SCC Best Practices
This chapter describes the best practices for configuring SCC features. It includes these sections:
Best Practices for Configuring Hybrid Networking
Hybrid networks combine private assets such as MPLS-based WAN networks with public services such as the Internet. RiOS provides application-level Quality of Service (QoS) and WAN path selection to control network consumption and prioritize critical and latency sensitive applications, while minimizing use by noncritical applications.
RiOS 9.0 and later provides the ability to configure a network topology and define application policies based on business requirements. These features provide the reusable building blocks that form the basis for configuring the features in a hybrid network: QoS, path selection, secure transport, application statistics, and web proxy.
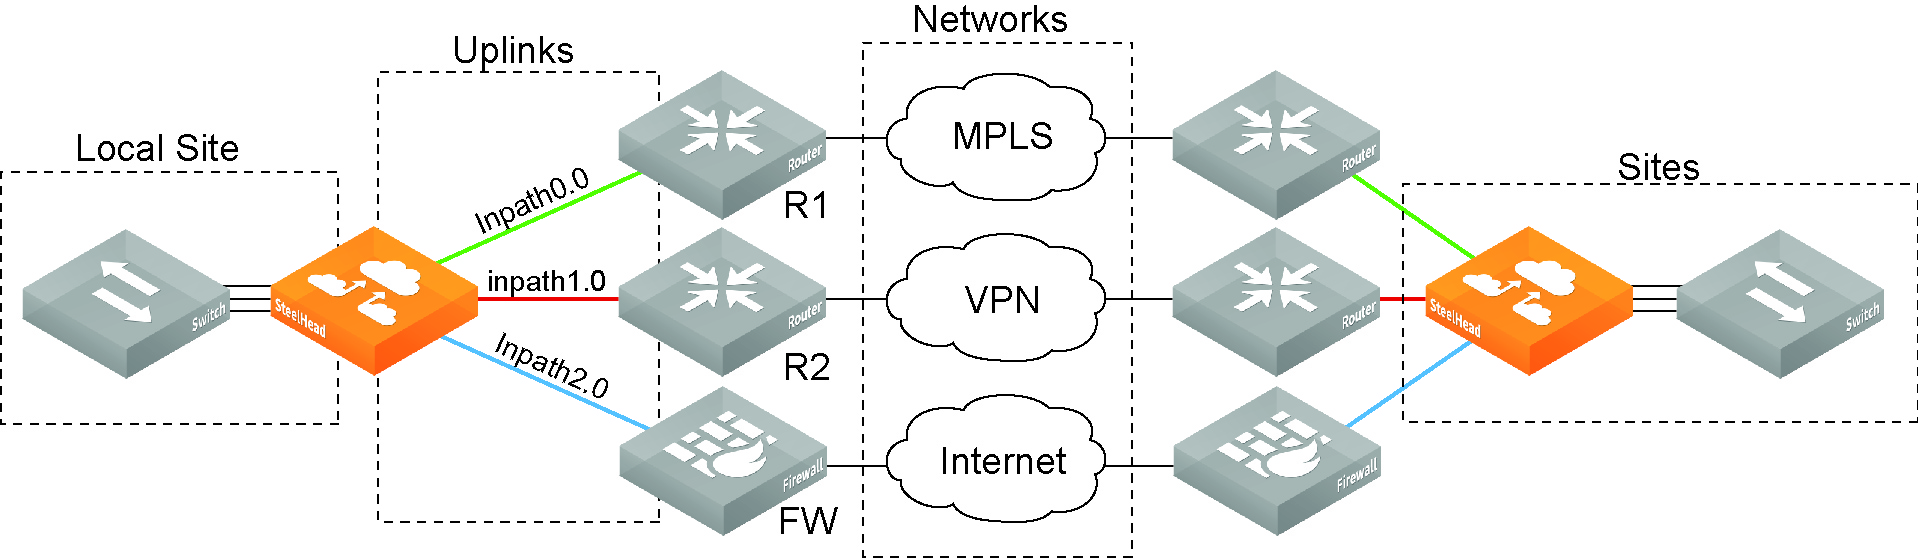
Network Topology
You define your network topology and application policies once and then reuse them as needed. The topology provides the network point-of-view to all possible sites, including the network of the remote site and a remotely pingable IP address.
A network topology includes these WAN topology properties:
• Networks - Networks represent the WAN clouds that sites and site types use to communicate to each other using Primary MPLS, VSAT, or the Internet. Basically, a network connects two uplinks between two sites. The SCC creates two nonsecure networks: MPLS and Internet. You can create additional secure and nonsecured networks or rename the precreated networks based on your topology requirements. You can also configure the Max Backoff Interval for a network to improve path selection performance. If there is no traffic at a site, the Max Backoff Interval default value of 1800 seconds determines how often that uplink is probed. Networks are important for path selection and secure transport. For details, see
Defining Networks.
• Sites - Define the discrete physical locations of Riverbed devices such as SteelHeads in the network (for example, a branch office or data center) so that you can more easily configure and manage your network. A site is a logical grouping of subnets and represents the physical and logical topology of a site type. You classify traffic for each site using IP addresses. Sites are linked to one or more networks. The local sites use the WAN in the network definition to connect to the other sites. The default site is a catch-all site that is the only site needed to backhaul traffic. Sites are used with the path selection, QoS, and secure transport features. For details, see
Defining Sites.
• Site Types - Groups one or more sites based on common attributes, such as business function and size. Riverbed automatically creates the basic site types: Data Center, Branch, and Headquarters. Site types are the building blocks for QoS profiles and pushing 9.0 and later features to SteelHeads. For details, see
Defining Site Types.
• Uplinks - Define the last network segment connecting the local site to a network. You define carrier-assigned characteristics to an uplink: for example, the upload and download bandwidth and latency. An uplink must be directly (L2) reachable by at least one SteelHead or Interceptor in the local network. An uplink does not need to be a physical in-path connection. Path selection uses only local uplinks. SteelHeads deployed in hybrid networks send ICMP probes on uplinks to establish contact with the appliances in the network. This uplink probing frequency can affect the scaling and performance of hybrid networks. Path selection rule-aware probing improves deployment scalability of hybrid networking. For details, see
Hybrid Network Path Selection Probing Techniques and
Defining Uplinks.
• Uplink Types - An uplink type is a name for similar functioning uplinks. On the SCC, uplink types can be used across multiple sites and path selection rules can be created using these names. The name must be unique at a site (but it can be same across different sites) so that the system can detect which path selection rule uses which uplinks. Because path selection rules are global on the SCC, you are restricted to 8 uplink types. Uplink types are the building blocks for path selection. You select the path preference order using the uplink types created, and it is used in various sites. Riverbed recommends that you reuse the same uplink types at different sites in order to label uplinks based on the preference for path selection. For example, you can label uplink types as primary, secondary, and tertiary based on the path selection preference. The uplink type can be based on the type of interface or network resource, such as Verizon or global resource of uplink abstraction that is tied to a network. On the SteelHead, this field is called the
Uplink Name, on the SCC it is the
Uplink Type. For details, see
Defining Uplink Types.
• Regions - Groups of sites based on a geographic location, such as North America, Europe, and so on. Regions are particularly important in reporting. Regions help you to troubleshoot network issues. For details, see
Defining Site Regions.
The Sites & Networks page is central to defining networks and sites, to viewing sites with which a network is associated, changing or deleting sites, and assigning uplinks to a site.
Figure: Network Topology
Application Performance
The SCC provides visibility into how applications are performing and reporting metrics such as traffic levels, application throughput performance, and TCP session flow characteristics. These performance metrics provide visibility to help diagnose problems and maintain control over your application infrastructure.
Using the SCC, you can define application policies based on business requirements, enabling you to easily leverage and control hybrid networks for accelerated application delivery. The SCC is prepopulated with known applications, and provides application groups to easily enable business-intent policy definition. You can also add custom applications. Based on your defined application groups, the SCC quickly derives all possible paths based on path availability and enables you to prioritize, secure, and deliver critical applications over the faster networks and less-critical, recreational applications and bulk backups over the Internet.
Application policies simplify application and path management, ensure service-level delivery for business-critical applications, and increase end-user productivity. The SCC manages hundreds of applications, including policy configuration, reporting, and troubleshooting.
For detailed information, see
Managing Application Policies.
Hybrid Network Path Selection Probing Techniques
SteelHead in-path interfaces, with path selection enabled, send ICMP probes to other SteelHead in-path interface peers to determine path availability. The frequency and coverage of these probes can directly affect the responsiveness and accuracy of path selection in determining path failures to enact policy-based actions. RiOS 9.2 and SCC 9.2 balance path selection responsiveness and accuracy with probe frequency and coverage, ensuring optimal performance with minimal network impact and high scale. Some of the probing techniques have user configurable options to address a varying deployment scenarios. You can view the state of the individual probing techniques by running this CLI command on the SteelHead:
show path-selection settings internal probe status
Traffic Aware Backoff Status: Enabled
Rate Limit Status: Enabled
Subset Probing Status: Enabled
Traffic Aware Backoff Probing
SteelHeads gradually reduce probing frequency to remote sites that have no traffic, from the default Timeout rate of every 2 seconds down to the default Max Backoff interval of every 1800 seconds. You configure the Max Backoff Interval when you define a network on the SCC.
When path selection is enabled, SteelHeads probe automatically at the configured Max Backoff Interval. When the first connection is seen by the SteelHead, the probing interval changes to the default configured value.
You can change the Max Backoff Interval and Timeout values on the SCC to whatever values are best suited for your hybrid network. On the SteelHead, you can view the back-off probe setting using the show path-selection debug networks CLI command.
For details about configuring the Max Backoff Interval in a network, see
Defining Networks. For details about configuring the uplink’s Timeout interval in sites, see
Defining Sites.
Subset Probing on SteelHeads
RiOS 9.2 avoids probe redundancy by probing only a subset of peers instead of probing all peers. For example, if there are four peers on a path that is up and actively seeing traffic, the probe monitors two peers instead of four. On the SteelHead Path Selection page, peers that are not probed due to subset probing appear as Unknown. On the SteelHead, you can view your settings using the show path-selection debug paths CLI command.
Rate Limited Bandwidth Probing
You can increase the efficiency of probing by limiting the number of probes that occur per second on an uplink. In the SCC, when you create an uplink you can enforce a bandwidth rate limit on all probes in the Probe Settings: Bandwidth field. The default bandwidth is 128 kbps. On the SteelHead, you can view your settings using the show path-selection debug uplinks CLI command.
Riverbed recommends that if you have a data center that is loaded, that is receiving traffic from all peers 100 per cent of the time, you should increase the Probing bandwidth on all SteelHeads to 512 kbps. This setting results in a path failover time of approximately 6 seconds.
Path Selection Rule Aware Probing
Another technique used by SteelHead path selection to reduce and manage probing overhead is rule-aware probing. If there are uplinks that are not referenced in any path selection rule, they are not probed. This feature is useful when secure transport is enabled where you have secure uplinks and nonsecure uplinks, but the nonsecure uplinks are not referenced in a path selection rule. On the SteelHead Path Selection page, the uplink status displays Healthy and the peers appear as Unknown.
Hybrid Networking Workflow
This table summarizes a typical workflow for configuring hybrid networking features
Task | Notes | For Detailed Instructions |
1. Configure applications based on application groups. | Check if the applications are defined in the Application Flow Engine (AFE). If they aren’t already defined, you must configure them and assign them to an application. Application policies enable you to prioritize traffic with QoS and steer traffic down a particular path with path selection. | |
2. Configure Sites and Networks. | Define the network and set up the local and remote sites for QoS. Configure the bandwidth to and from the sites. | |
3. Configure QoS Profiles. | Configure QoS profiles that contain the QoS classes and rules for traffic going to a site. You can assign a single QoS profile to many sites. Make sure you associate the QoS profile with a site. | |
4. Configure path selection. | You create path selection rules based on application groups. To improve performance for path selection deployments, make sure that you configure uplink probe scaling features on the SCC and SteelHead. For details, see Hybrid Network Path Selection Probing Techniques. | |
5. Configure secure transport. | Specify a secure network when you define a network on the Sites & Networks page. | |
Best Practices for SCC Features
This section describes best practices for the SCC features. It includes these features in alphabetical order:
Autonegotiation of Multi-stream ICA
Autonegotiation of multi-stream ICA enables Citrix Multi-stream ICA without the need to configure it on the Citrix server. This feature provides application class hints to QoS for the four priority connections when Citrix Multi-stream ICA is negotiated. This feature also provides the ability to apply path selection to the individual Citrix priority groups.
Autonegotiation of multi-stream ICA allows you to configure of true network-based QoS policies to the individual priority groups for the virtual channel traffic that they carry. The SteelHead identifies the priority of each connection, allowing for finer-grained QoS shaping or marking of Citrix traffic. You enable autonegotiation of multi-stream ICA on the client-side SteelHead. The client-side SteelHead automatically verifies if the client and server support autonegotiation of multi-stream ICA, and then autonegotiates with the client to use it.
When disabled, Citrix clients use one TCP connection per Citrix session unless XenApp/Desktop server is used in conjunction with Outbound and Inbound QoS, on both the client-side and server-side SteelHead.
Autonegotiation of multi-stream ICA can also be used in conjunction with the path selection feature.
Both the client-side and server-side SteelHead must be running RiOS 9.1. The Citrix deployment must support multi-stream ICA.
You enable autonegotiation of multi-stream ICA for SteelHeads when you configure a Citrix policy on the SCC.
For detailed information, see
Citrix.
To configure autonegotiation of multi-stream ICA
1. Choose Manage > Policies to display the Policies page.
2. Click the policy name that you want to modify in the policies list to expand the page.
3. Click + Add/Remove Pages to display the Add/Remove Policy pages pop-up window.
4. Under Optimization, select Citrix and click Apply to add Citrix to the policy pages list.
5. Select Citrix in the table to edit the Citrix policy page.
6. Under Settings, select Enable Auto-Negotiation of Multi-stream ICA and click Apply.
HTTPS Communication Channel
In SCC 9.1 and later, if the HTTPS channel is not established, the Management Console displays:
Disconnected: No HTTPS Connection
You can also view the status of these channels on the SteelHead using this CLI command:
amnesiac > show scc
Auto-registration: Enabled
HTTPS connection (to the CMC):
Status: Connected
Hostname: 10.0.0.7
SSH connection (from the CMC):
Status: Connected
Hostname: bravo-321 (10.0.0.7)
When the host for the HTTPS and SSH connections are different or both the channels do not have Connected status, the appliance cannot be fully managed by the SCC:
amnesiac > show scc
Auto-registration: Enabled
HTTPS connection (to the CMC):
Status: Auth_Failed <<Must be “Connected” to push hybrid features>>
Hostname: riverbedcmc
SSH connection (from the CMC):
Status: Connected
Hostname: bravo-321 (10.0.0.7)
To connect and establish connections between a SteelHead to the SCC, run this command while in configuration mode:
scc hostname <hostname> <<The hostname must be same as when you run the "show scc" command>>
If both connections show Connected to two different SCCs, remove the appliance from the Manage > Topology > Appliances page on the SCC that is incorrect and update the appliance username and password on the correct SCC.
If the SCC hostname was never configured on the appliance, the appliance will try to connect to the host riverbedcmc. Make sure to update your DNS to point the hostname riverbedcmc to the correct SCC that is managing the appliance.
If the HTTPS connection has not been established on the SCC, contact Riverbed Support at
https://support.riverbed.com.
MAPI over HTTP Optimization
SCC 9.1 and later provide bandwidth optimization for the MAPI over HTTP transport protocol. Microsoft implements the MAPI over HTTP transport protocol in Outlook 2010 update, Outlook 2013 SP1, and Exchange Server 2013 SP1.
You enable MAPI over HTTP optimization using the SCC when you configure a MAPI policy on the client-side SteelHead. You must also create an in-path rule using the Exchange Autodetect latency optimization policy to differentiate and optimize MAPI over HTTP traffic.
SSL optimization must be enabled and the server certificate must be installed on the server-side SteelHead.
Only Scalable Data Referencing (SDR) is supported. Both the client-side and server-side SteelHeads must be running RiOS 9.1 or later.
For detailed information, see
MAPI.
To configure MAPI over HTTP optimization
1. Choose Manage > Policies to display the Policies page.
2. Click the policy name that you want to modify to expand the page.
3. Click + Add/Remove Pages to display the Add/Remove Policy Pages pop-up window.
4. Under Optimization, select MAPI and click Apply to add MAPI to the policy pages list.
5. Select MAPI in the list to edit the MAPI policy page.
6. Scroll down and select Enable MAPI over HTTP optimization and click Apply.
To enable Exchange Autodetect for latency optimization in an in-path rule
1. Choose Manage > Policies to display the Policies page.
2. Click the policy name that you want to modify to expand the page.
3. Click + Add/Remove Pages to display the Add/Remove Policy Pages pop-up window.
4. Under Optimization, select In-Path Rules and click Apply to add In-Path rules to the policy pages list.
5. Select In-Path Rules in the table to edit the In-Path Rules policy page.
6. Click the in-path rule you want to modify to expand the page or click + Add an New In-Path Rule if you are creating one for the first time.
7. Under Latency Optimization Policy select Exchange Autodetect and click Add.
Migrating Appliances to Sites
SCC 9.0 introduced the concept of sites, networks, and uplinks to organize appliances into a network topology. For detailed information about sites, see
Managing Sites and Networks.
With defined sites, you can easily track user issues based on the location of the appliance and troubleshoot problems. Sites are required for path selection, QoS, and secure transport. The SCC includes a migration wizard with comma-separated values (CSV) import and export so that you can easily migrate appliances and appliance groups to sites. For detailed information for migrating appliances to sites, see
Migrating Appliances to Sites.
You migrate the existing appliances or group of appliances to sites for hybrid networking features, such as path selection, QoS, or secure transport. There are two types of migrations provided for sites:
• Bulk Migration - Bulk migration allows you to migrate groups of appliances to more than one site in a single operation. It is a useful tool when you want to create many sites at once. The bulk migration wizard provides a custom CSV template with the list of appliances that are not part of any site and the format in which the sites must be entered in the CSV template. You edit the downloaded CSV template to specify the sites and other site-related information, and then upload the CSV. Upon uploading the CSV file, the SCC creates the sites according to the configuration in the CSV file. For details, see
Migrating Appliances to Sites.
• Create Sites Individually - Alternatively, you can create individual sites manually using the basic site creation form in the Appliances page or the detailed form (for features such as secure transport) on the Sites & Networks page. Creating sites allows you to map your unassigned appliances to sites. For details, see
Managing Sites and Networks.
Order of Migration to 9.0 and Later
If you are running SCC 8.6 and earlier, you must perform a multistep upgrade; for example:
5.5.4c > (6.0.1 or 6.1.x) > 6.5.x > (7.0.x or 8.0.x) > 8.5.x > 8.6.0 > (9.0.x or 9.1.0 or 9.2) > 9.2.0
You can upgrade from SCC 8.6 > 9.2, but a multistep upgrade ensures that automigration of statistics occurs correctly. Contact Riverbed Support at https://support.riverbed.com for detailed information about upgrade paths.
If you are upgrading managed SteelHeads to 9.0 and later to use path selection, QoS, and secure transport, you must follow a particular migration order. These steps assume that you have upgraded your SteelHeads to RiOS 9.0 or later and that the HTTPS-based communication channel is running. These steps outline the order in which the migration of path selection, QoS, and secure transport should be performed.
To configure path selection only
2. Create any custom-defined applications that you needed in your network. For details, see
Defining Applications.
3. Create the new set of path selection rules using application groups and applications that are needed for your SteelHeads running RiOS 9.0 and later. For details, see
Configuring Path Selection Rules.
To configure QoS only
3. Run the QoS migration wizard to migrate existing basic and advanced QoS policies to global QoS profile. For details, see
Migrating Legacy QoS Policies.
Alternatively, if you do not want to run the migration wizard, you can create a new or copy an existing QoS profile using the newly migrated sites or site types.
4. For the first push, push the entire topology (that is, push all features including sites and networks to the desired sites or site types.) For details, see
Adding Classes and Rules to QoS Profiles.
To configure secure transport only
1. Make sure your SteelHeads have an SSL license. Due to export control of encryption, each SteelHead is required to have an SSL license before it can join the secure transport group. For detailed information about verifying SteelHead licenses, see the SteelHead Management Console User’s Guide. If you do not have a valid enhanced cryptography license key file, go to https://sslcert.riverbed.com and follow the procedures documented there.
On the SteelHead create a secure transport controller using the CLI. For details, see
Configuring the Secure Transport Controller on the SteelHead.
3. Create networks with secure uplinks. All appliances in the sites containing an uplink with a secure network will be a part of the secure transport group and are listed as secure transport peers. For details, see
Defining Networks.
4. Migrate your existing appliances managed by the SCC to one or more sites containing one or more uplinks with the secure network. For details, see
Migrating Appliances to Sites.
6. Configure the path selection rules to use secure uplinks for required applications. Traffic will not be secured if path selection rules do not use the secure uplinks.
If you want configure all of these features, you must create sites with uplinks containing secure networks; then you can do the migration in any order. If you are performing a QoS migration, the legacy policies that need to be migrated must be included in the push and assigned to an appliance or group.
Pushing Hybrid Networking Features
For a push to function correctly, the HTTPS-based communication channel must be set up and connected. Riverbed recommends that you select site types over sites if pushing to numerous sites in a single push operation.
After you configure hybrid networking you push the configuration to the appliances in your network. For the initial configuration the SCC pushes the entire configuration. For SteelHeads and an SCC running 9.2, any changes made after the initial push, the SCC pushes only the modified settings to ensure adequate response times and improved throughput performance.
Note: When you perform a policy push, the SCC is the master configuration; any local changes made on SteelHeads are overwritten.
In SCC 9.0 and later, the new REST API-based push can be used from the path selection, QoS, and application statistic collection pages. In order to push the configuration, you can either select Sites or Site Types but not both. This restriction prevents overlapping push jobs. There are two types of pushes to choose from:
• Pushing all features (that is, the entire topology) - This pushes all the hybrid network features currently, including the sites topology and applications. Because the new features use legacy host labels and port labels that are assigned to Global group, Riverbed recommends doing a legacy push as well. Riverbed recommends using this option when you are pushing these features for the first time or if there is a change in sites or applications.
• Pushing individual features - This pushes either path selection rules, QoS profiles, application statistic collection settings (9.1), and web proxy settings (9.1). Riverbed recommends using this option when you have only modified these individual features.
After selecting Site or Site Types and any of the above push options, you push the configuration. The push job status can be viewed in the Operations table on the Operations History page. It displays detailed push status and any issues occurred during the push.
For detailed information about pushing path selection rules, QoS profiles, and application statistic settings, see
Pushing Your Settings and Viewing Push Status.
QoS Migration
SCC 9.0 and later enable you to migrate your legacy QoS policies (basic and advanced) to QoS profiles using a migration wizard. You must perform these prerequisite steps before beginning the migration wizard:
• Include the basic and advanced legacy policies in the push.
The migration wizard uses the existing assigned QoS rules and they are included in the legacy policy pushes to provide you with the choices for QoS profiles. You might need to wait for approximately five minutes before starting the migration if there are any changes made to the legacy policy. The migration is a bulk migration—migrating a legacy policy can result in the creation of more than one QoS profiles. The migration does not affect the existing legacy QoS policy. These legacy policies continue to be applied to SteelHeads running RiOS earlier than 9.0.
A QoS profile in SCC 9.0 or later defines endpoints to which this profile will apply. Specifically it defines the source and destination sites or site types. A QoS profile is a container for QoS rules and QoS classes. When pushing QoS profiles, only the selected sites or site types in the push will be applied to the QoS profiles.
Since a QoS profile applies to source and destination sites, site types, or any site, the migration wizard gives you the choice to select these settings. Specifically, during the migration, you are asked to specify the source and destination sites for sites or site types or any site. Riverbed recommends you select site types rather than sites. Selecting site types applies all sites in that type in the QoS profile and makes QoS profiles more manageable. Only select sites when you want the QoS profile to apply to that site. Also selecting sites as a source or destination choice for a QoS profile overrides the QoS profile containing the site type to which this site belongs.
QoS migration can result in QoS profiles that might already exist. The migration wizard does not override these profiles. If you want to override these profiles, you must delete the QoS profiles and rerun the wizard. SCC 9.0 or later does not allow overriding or deleting the Any Site to Any Site QoS profile during migration.
The source site selection is determined by the subnets in the legacy QoS policy that are now part of the site. Subnets in the legacy policy must map to sites. Destination site selection is determined by the service policies in the basic QoS policy or the class hierarchies in the advanced QoS policy. For advanced QoS policies, Riverbed does not recommend that you select the All QoS Class Hierarchies option as this might cause the creation of many QoS profiles containing destination sites instead of site types. Selecting this option results in QoS profiles becoming unmanageable.
In QoS, you define uplinks for a QoS rule and DSCP values for a site. The DSCP values steer traffic based on policy-based routing (PBR) to an upstream router.
After migration has completed, you cannot revert your QoS settings in a legacy-basic outbound QoS policy to a basic outbound QoS mode. You are encouraged to create a copy of the legacy policy before you migrate to advanced outbound QoS.
SteelCentral AppResponse Support
You can use the SCC 9.0 or later to configure the communication between SteelHeads running RiOS 9.0 or later and the SteelCentral AppResponse running 9.0 or later.
The SCC collects SteelFlow WTA data that can be sent (via REST API) to a SteelCentral AppResponse appliance. SteelFlow web transaction analysis (WTA) data includes the HTTP time stamp and payload data for web objects optimized by the SteelHead. SteelCentral AppResponse combines this data into page views and calculates detailed metrics for server and network busy times, HTTP request and response delays, slow pages, view rates, HTTP response codes, and so on.
You enable REST API access and add an authorization code on the SCC as part of a SteelHead policy. After you push the policy to the SteelHeads that you want SteelCentral AppResponse to monitor, you run a CLI command to email a CSV file that contains the configured SteelHeads and the authorization codes. You then import this CSV file onto the SteelCentral AppResponse appliance. After the SteelCentral AppResponse has the authorization codes, you can view data for the SteelHeads in the group.
For detailed information about configuring SteelCentral AppResponse support in as part of a SteelHead policy, see
HTTP.
Web Proxy
A single-ended web proxy transparently intercepts all traffic bound to the Internet. The web proxy improves performance by providing optimization services such as web object caching and SSL decryption to enable content caching and logging services. The efficient caching algorithm provides a significant advantage for video traffic. The benefit comes in the form of multiple users viewing the same video content, thereby saving significant WAN bandwidth and providing efficient network use. YouTube caching is handled as a special case given its growing popularity in the enterprise.
Web proxy improves HTTP performance and reduces congestion on Internet traffic. It also provides performance benefits when you access HTTP(S) servers on the Internet directly from a branch office. It provides visibility to all Internet activity at any given branch as long as that destined traffic passes through the web proxy.
The HTTP web proxy has these characteristics:
• The cache sizes range from 50 GB to 500 GB on SteelHeads.
• The cache content is persistent after reboots and service restarts.
• There is not individual object size limitation.
• The cache storage space has been expanded on SteelHeads. The xx55 models have 50 GB of cache space for Web Proxy storage.
• The request logging format has been expanded to improve visibility, debugging, and diagnostics.
• You can use the Web proxy with virtual in-path deployments such as WCCP and PBR.
For detailed information about web proxy, see
Managing Web Proxies.
You can view web proxy connections in the SteelHead in the Current Connections report as a new connection type: web proxy.
You can also view the cache hits for all SteelHeads configured with web proxy in the SCC on the Web Proxy page, Cache Hits Ratio report.
Configuring Web Proxy on the Client-Side SteelHead
Before you begin configuring web proxy on the SCC, you must perform these steps on the client-side SteelHead. Web proxy does not require a server-side SteelHead to function.
The client-side SteelHead must have the ability to access Internet traffic from the in-path interface.
To configure web proxy on the client-side SteelHead
1. On the client-side SteelHead choose Networking > In-path Interfaces: In-Path Interface Settings, for the interface that is configured to access the Internet.
2. Add the In-Path Gateway IP address and click Apply.
Configuring the Certificate Authority on the SCC
You must configure the Certificate Authority (CA) on the SCC to generate server certificates for decrypting white-listed domains. A white-list is a list of domains for which you want to decrypt traffic for HTTPS caching.
To configure the CAAS on the SCC
1. Choose Administration > Security: Certificate Authority to display the Certificate Authority page.
2. Select Enable/disable the certificate authority and click Apply.
3. Click Replace to display the controls for adding a CA.
4. If you have an existing private key and CA-Signed Public Certificate, select Import Existing Private Key and CA-Signed Public Certificate, and import an existing key and certificate pair.
or
If you do not have a private key and CA-signed Public Certificate, select Generate New Private Key and Self-Signed Public Certificate, specify the self-explanatory Self-Signed Certificate fields, and click Generate Key and Certificate.
If HTTPS is enabled, the CA certificate must be trusted by the client browsers that are accessing the web proxy. Those domains defined in the domain white-list will display a pop-up window stating that the certificate is not trusted. Make sure that all domains defined in the web proxy white-list have the CA configured on the client browser.
To trust web clients with the SCC CA
1. Copy and paste the CA certificate in PEM format into a text file.
2. Install the certificate on the system as Trusted Root Certificates.
3. To installing CA certificate on Mac OS X, see
https://www.digicert.com/ssl-certificate-installation-mac-osx.htm
or
4. To install CA certificate on Windows, see
https://technet.microsoft.com/en-us/library/cc754431.aspx
or
5. Double-click CA certificate (that is, the .crt extension) to install it.
Configuring Web Proxy on the SCC
You perform these steps to enable HTTP and HTTPS web proxy on the SCC.
To configure web proxy for HTTP and HTTPS
1. Choose Manage > Optimization: Web Proxy to display the Web Proxy page.
2. To perform HTTP caching, under Global Configuration, select Enable Web Proxy.
3. If you want to decrypt and cache HTTPS traffic, select Enable HTTPS Optimization.
4. Click Save to save your settings.
5. Under Global HTTP Whitelist, click + Add Exception to display the pop-up window.
6. Add a domain, either a hostname (for example, www.riverbed.com) or a wildcard domain (for example, *.riverbed.com) that you wish to decrypt in web proxy. The server certificate is generated against the specified hostname or wildcard domain. Repeat this process for any other domain names.
Important: For HTTPS web proxy, before adding domains, make sure that the SCC CA is trusted by all clients/browsers defined in the domain white-list.
7. Click Add Domain to save your settings.
8. On the right-side of the page, under Policy Push Control, click Include in Push.
9. Under Push to Appliances, select Sites or Site Types that contain the client-side SteelHead to which this configuration should be pushed.
10. Click Push and wait for the Push Status to display Success.
In-Path Rules Requirements for HTTP Caching
The in-path rule table includes a default web proxy rule set to Auto. By default, all traffic not specified in user-configured rules is web proxied for Internet-bound traffic. This includes all traffic destined to public IP addresses not included in Request for Comments (RFC) 1918 on port 80 and 443. Only IPv4 is supported for web proxy.
If you need a more fine-grained rule for public IP addresses, then you must add a new in-path rule with these options:
• Type: Auto Discover
• Web Proxy: Auto
• Source Subnet: IPv4 address or subnet
• Destination Subnet: IPv4 address or subnet
• Port: No matter what port is specified, only port 80 and 443 traffic is directed to the web proxy
If you need an in-path rule for private or intranet IP addresses, specify these options:
• Type: Pass Through
• Web Proxy: Force
• Port: Any port or port-label specified is proxied. This value results in plain TCP proxying without optimizations if the traffic is not detected to be HTTP or HTTPS.
There is a default pass-through rule for all secure ports traffic above the default in-path rule that prevents all traffic to port 443 from being intercepted. If HTTPS proxying is required, then the pass-through rule (as described above) must be added above the secure ports rule, to direct SSL traffic to the web proxy.
After you configure your web proxy in-path rules policies in the SCC, you push the policy to the SteelHeads in the Appliance Operations page.
Configuring In-Path Rules on the SCC
You configure in-path rules on client-side SteelHeads when you create a policy. For detailed information about creating policies, see
Managing Path Selection.
To configure in-path rules policies on the SCC
1. Choose Manage > Policies to display the Policies page.
2. Click + Add Policy to expand the page.
3. In the Policy Name text box, type web proxy.
4. Click Add to add a new policy.
5. Under Edit Policy Web Proxy, click + Add/Remove Pages to display the pop-up window.
6. Scroll down to Optimization and select In-Path Rules, and click Apply.
7. Under Optimization, click In-Path Rules in the policies pages list to display the In-Path Rules page.
8. Click + Add a New In-Path Rule to expand the page.
9. Add the required in-path rules and click Add to save your settings.
10. Choose Manage > Appliances and select the SteelHead with web proxy.
11. Click Appliance Operations at the top of the Appliances page to display the Appliance Operations page.
12. From the drop-down list select Push Policies and click Push to push your policy to the appliance.