Figure: Displaying QoS Profile Details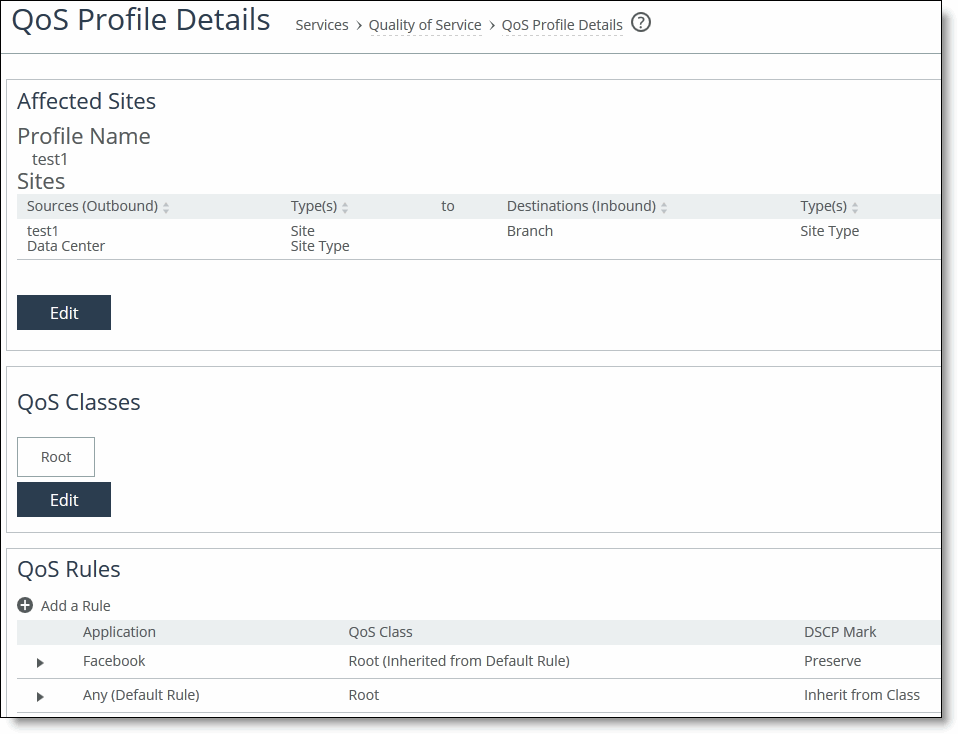
Control | Description |
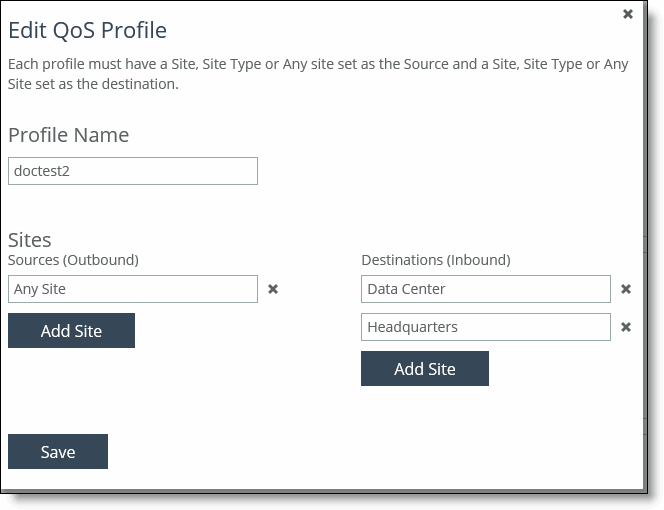
Name | Specify a name that describes this profile. Click the text box to display a drop-down list of sites or site types from which to choose. The option Any Site does not display choices as it includes all sites. When you create QoS profiles, Riverbed recommends selecting site types rather sites to make QoS more manageable. Sites should only be selected when creating exceptions for QoS profiles containing the site types. When you push QoS profiles, only the selected site types or sites in the push are applied to the QoS profiles. Each profile can have multiple source and destinations defined. With multiple source and destination sites, you can reuse an existing QoS profile at a site or quickly change a single site to a QoS profile. |
Classes and Rules | Select Create Blank Profile with No Classes or Rules to create an empty profile. Select Copy Classes and Rules from Existing Profile to copy an existing profile. Click the text box to display a drop-down list that displays the default and custom profiles. The autocomplete shows existing QoS profile names. These default profiles are available: • Any Site to Any Site - Creates a profile that applies to all sites. If you select this option, you cannot create another profile of this type. • Branch to Data Center - Creates a profile that is applicable only to branch and data center sites. • Any Site to Branch - Creates a profile that is applicable to all sites connecting to the branch. • Headquarters to Any Site - Creates a profile that is applicable to all sites connecting to the headquarters. |
Sites | Select Any Site, Data Center, Headquarters, or Branch as the Source (outbound) and Destination (inbound) sites for this profile. Click Add Site to configure multiple source and destinations sites. With multiple source and destination sites, you can reuse an existing QoS profile at a site or quickly change a single site to a QoS profile. |
Create Profile | Saves your profile settings. |
Control | Description |
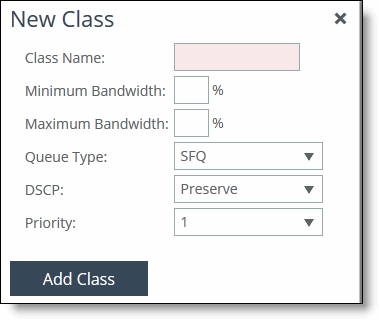
Class Name | Specify a name for the QoS class. |
Minimum Bandwidth | Specify the minimum amount of bandwidth (as a percentage) to guarantee to a traffic class when there is bandwidth contention. All of the classes combined cannot exceed 100 percent. During contention for bandwidth, the class is guaranteed the amount of bandwidth specified. The class receives more bandwidth if there is unused bandwidth remaining. Excess bandwidth is allocated based on the relative ratios of minimum bandwidth. The total minimum guaranteed bandwidth of all QoS classes must be less than or equal to 100 percent of the parent class. A default class is automatically created with minimum bandwidth of 10 percent. Traffic that does not match any of the rules is put into the default class. Riverbed recommends that you change the minimum bandwidth of the default class to the appropriate value. You can adjust the value as low as 0 percent. The system rounds decimal numbers to 5 points. |
Maximum Bandwidth | Specify the maximum allowed bandwidth (as a percentage) a class receives as a percentage of the parent class maximum bandwidth. The limit is applied even if there is excess bandwidth available. The system rounds decimal numbers to 5 points. |
Queue | Optionally, select one of these queue methods for the leaf class from the drop-down list (the queue does not apply to the inner class): • SFQ - Shared Fair Queueing (SFQ) is the default queue for all classes. Determines SteelHead behavior when the number of packets in a QoS class outbound queue exceeds the configured queue length. When SFQ is used, packets are dropped from within the queue in a round-robin fashion, among the present traffic flows. SFQ ensures that each flow within the QoS class receives a fair share of output bandwidth relative to each other, preventing bursty flows from starving other flows within the QoS class. • FIFO - Transmits all flows in the order that they are received (first in, first out). Bursty sources can cause long delays in delivering time-sensitive application traffic and potentially to network control and signaling messages. • MX-TCP - Has very different use cases than the other queue parameters. MX-TCP also has secondary effects that you must understand before configuring: – When optimized traffic is mapped into a QoS class with the MX-TCP queueing parameter, the TCP congestion-control mechanism for that traffic is altered on the SteelHead. The normal TCP behavior of reducing the outbound sending rate when detecting congestion or packet loss is disabled, and the outbound rate is made to match the guaranteed bandwidth configured on the QoS class. – You can use MX-TCP to achieve high-throughput rates even when the physical medium carrying the traffic has high-loss rates. For example, MX-TCP is commonly used for ensuring high throughput on satellite connections where a lower-layer-loss recovery technique is not in use. RiOS 8.5 and later introduce rate pacing for satellite deployments, which combines MX-TCP with a congestion-control method. – Another use of MX-TCP is to achieve high throughput over high-bandwidth, high-latency links, especially when intermediate routers do not have properly tuned interface buffers. Improperly tuned router buffers cause TCP to perceive congestion in the network, resulting in unnecessarily dropped packets, even when the network can support high-throughput rates. MX-TCP is incompatible with AFE identification. A traffic flow cannot be classified as MX-TCP and then subsequently classified in a different queue. This reclassification can occur if there is a more exact match of the traffic using AFE identification. You must ensure these best practices when you enable MX-TCP: • The QoS rule for MX-TCP is at the top of QoS rules list. • The rule does not use AFE identification. • You only use MX-TCP for optimized traffic. MX-TCP does not work for unoptimized traffic. Use caution when specifying MX-TCP. The outbound rate for the optimized traffic in the configured QoS class immediately increases to the specified bandwidth, but it does not decrease in the presence of network congestion. The SteelHead always tries to transmit traffic at the specified rate. If no QoS mechanism (either parent classes on the SteelHead, or another QoS mechanism in the WAN or WAN infrastructure) is in use to protect other traffic, that other traffic might be impacted by MX-TCP not backing off to fairly share bandwidth. • There is a maximum bandwidth setting for MX-TCP that allows traffic in the MX class to burst to the maximum level if the bandwidth is available. For detailed information about MX-TCP Queue Policies, see the SteelHead Management Console User’s Guide for SteelHead CX. |
DSCP | Selects the default DSCP mark for the class. QoS rules can then specify Inherit from Class for outbound DSCP to use the class default. Select Preserve or a DSCP value from the drop-down list. This value is required when you enable QoS marking. The default setting is Preserve, which specifies that the DSCP level or IP ToS value found on pass-through and optimized traffic is unchanged when it passes through the SteelHead. The DSCP marking values fall into these classes: • Expedited forwarding (EF) class - In this class, packets are forwarded regardless of link share of other traffic. The class is suitable for preferential services requiring low delay, low packet loss, low jitter, and high bandwidth. • Assured forwarding (AF) class - This class is divided into four subclasses, each containing three drop priorities for more granular classification. The QoS level of the AF class is lower than that of the EF class. 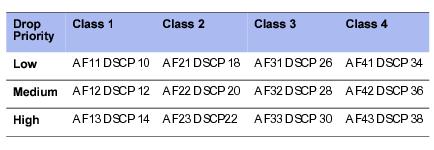 • Class selector (CS) class - This class is derived from the IP ToS field. |
Priority | Select a latency priority from 1 through 6, where 1 is the highest and 6 is the lowest. |
Save/Revert | Saves your settings; Click Revert to clear the controls. |
x | Click to remove the class. To remove a parent class, delete all rules for the corresponding child classes first. When a parent class has rules or children, the x for the parent class is unavailable. |
Control | Description |
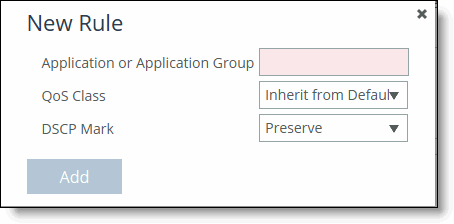
Application or Application Group | Specify the application or application group. Riverbed recommends using application groups for the easiest profile configuration and maintenance. Type the first few letters of the application or application group in the text box. As you type the name, a drop-down list appears that lists available applications or groups that match your entry. Select an application or group from the list. |
QoS Class | The QoS class indicates how delay-sensitive a traffic class is to the QoS scheduler. Select a service class for the application from the drop-down list (highest priority to lowest): • Inherit from Default Rule - Uses whichever class is currently set for the default rule. By default, this is Low Priority. • Real-Time - Specifies real-time traffic class. Give this value to your highest priority traffic: for example, VoIP, or video conferencing. • Interactive - Specifies an interactive traffic class: for example, Citrix, RDP, telnet, and SSH. • Business Critical - Specifies the high priority traffic class: for example, Thick Client Applications, ERPs, and CRMs. • Normal Priority - Specifies a normal priority traffic class: for example, Internet browsing, file sharing, and email. • Low Priority - Specifies a low priority traffic class: for example, FTP, backup, replication, other high-throughput data transfers, and recreational applications such as audio file sharing. • Best Effort - Specifies the lowest priority. These are minimum service class guarantees; if better service is available, it is provided. For example, if a class is specified as low priority and the higher priority classes are not active, then the low priority class receives the highest possible available priority for the current traffic conditions. This parameter controls the priority of the class relative to the other classes. Note: The service class describes only the delay sensitivity of a class, not how much bandwidth it is allocated, nor how important the traffic is compared to other classes. Typically you configure low priority for high-throughput, nonpacket delay sensitive applications like FTP, backup, and replication. |
DSCP Mark | Select Inherit from Class, Preserve, or a DSCP value from the drop-down list. This value is required when you enable QoS marking. The default setting is Inherit from Class. Preserve specifies that the DSCP level or IP ToS value found on pass-through and optimized traffic is unchanged when it passes through the SteelHead. When you specify a DSCP marking value in a rule, it either takes precedence over or inherits the value in a class. |
Add/Revert | Click Add to add your changes; click Revert to clear your settings. |
Control | Description |
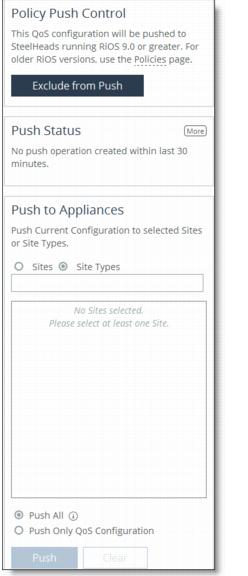
Push to Appliances | Select to push your path selection rules: • Site Types - Click the text box to display site types to choose from. Select the site types one at a time to add them to the text box. After you select the site type, it is displayed in the text box. To remove a site type, click the X. To view what sites make up the site type, click See More. Riverbed recommends that you choose site types rather than sites to organize your rules as site types make the management of rules easier. • Sites - Click the text box to display sites to choose from. Select the sites one at a time to add them to the text box. After you select the site, it is displayed in the text box. To remove a site, click the X. To view site details, click See Details. |
Push All | Pushes all related configurations, such as applications, sites, and networks. |
Push Only QoS Configuration | Pushes only QoS configuration settings to remote appliances. |
Push | Pushes configuration settings to the selected sites or site types. Click Clear to clear your settings. |