Managing QoS
You enable QoS and configure QoS profiles in the Quality of Service page. This section contains these topics:
QoS Overview
QoS is a reservation system for network traffic. In its most basic form, QoS allows organizations to allocate scarce network resources across multiple traffic types of varying importance. Advanced QoS implementations allow organizations to accurately control their applications by the amount of bandwidth they have access to and by their sensitivity to delay.
QoS configuration identifies business applications and classifies traffic according to priorities. The SteelHead uses this information to control the amount of WAN resources that each application can use. QoS ensures that your important applications are prioritized and removes the guesswork from protecting performance of key applications. In addition, QoS can prevent recreational applications from interfering with business applications. Before configuring QoS, Riverbed recommends that you define any custom applications for use in QoS profiles. For details, see
Defining Applications.
Riverbed strongly recommends that you configure and push QoS policies from SCC to the SteelHeads, particularly with large scale deployments. With an SCC and SteelHeads running 9.2.0, if you have path selection disabled and QoS enabled, the SCC pushes settings to only those remote sites which are applicable to the local site. If you are running SCC 9.2.0 and you push QoS settings to SteelHeads running RiOS 9.1 and 9.0, the push might fail.
For detailed information about configuring QoS for SteelHeads, including legacy QoS configuration features and requirements, see the SteelHead Management Console User’s Guide for SteelHead CX.
For detailed information about deploying QoS in your network, see the SteelCentral Controller for SteelHead Deployment Guide.
Note: When you configure QoS and path selection for RiOS 9.0 or later, SteelHeads using host or port labels must be assigned to the Global group. For detailed information about assigning policies to groups, see
Assigning Policies to Appliances and Groups.
Enabling and Disabling QoS
You can enable global QoS for your network deployment or you can disable QoS at certain sites in the Quality of Service page.
To enable global QoS
1. Choose Manage > Services: Quality of Service to display the Quality of Service page.
Figure: Enabling QoS
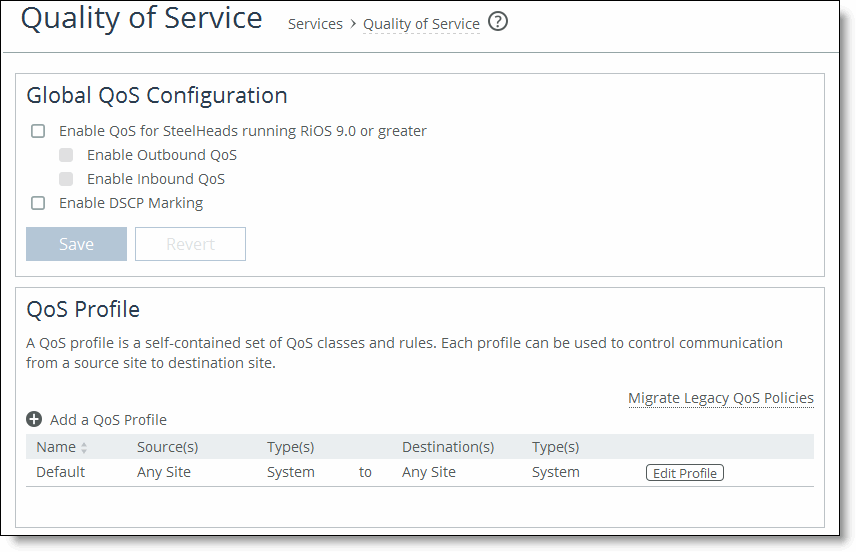
2. Complete the configuration as described in this table.
Control | Description |
Enable QoS for SteelHeads running RiOS 9.0 or greater | Select to enable QoS on SteelHeads running RiOS 9.0 or later. |
Enable Outbound QoS | Enables QoS classification to control the prioritization of different types of network traffic and to ensure that the SteelHead gives certain network traffic (for example, Voice over IP) higher priority than other network traffic. Traffic is not classified until at least one WAN interface is enabled. The system enables inbound and outbound QoS on all in-path interfaces by default. For detailed information about outbound QoS, see the SteelHead Management Console User’s Guide for SteelHead CX. |
Enable Inbound QoS | Enables QoS classification to allocate bandwidth and prioritize traffic flowing into the LAN network behind the SteelHead. Inbound QoS provides the benefits of QoS for environments that cannot meet their QoS requirements with outbound QoS. Enabling inbound QoS focuses on prioritizing types of traffic using rules and classes just like outbound QoS. The inbound configuration is separate from the outbound configuration. You define the applications on the local network and then create their corresponding shaping policies. For detailed information about inbound QoS, see the SteelHead Management Console User’s Guide for SteelHead CX. |
Enable DSCP Marking | Select to enable DSCP marking. You must select DSCP values if the service providers are applying QoS metrics based on DSCP marking and each provider is using a different type of metric. |
Save | Click Save to save and apply your settings; click Revert to undo your changes. |
To disable QoS at sites
3. Choose Manage > Services: Quality of Service to display the Quality of Service page.
4. Click Disable QoS at Certain Sites to expand the page.
5. Click + Add an override to display the New QoS Override pop-up window.
Figure: Disabling QoS
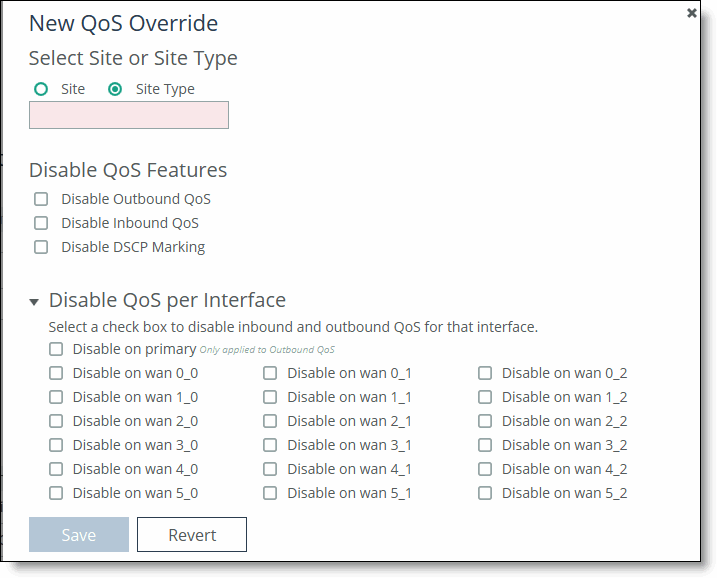
6. Complete the configuration as described in this table.
Control | Description |
Select Site or Site Type | Select Site or Site Type on which to disable QoS. Click the text box to display a drop-down list with the sites or site types from which to choose. |
Disable Outbound QoS | Select to disable outbound QoS on the site or site type. |
Disable Inbound QoS | Select to disable inbound QoS on the site or site type. |
Disable DSCP Marking | Select to disable DSCP marking on the site or site type. |
Disable QoS per Interface | Click the > to display the inbound and outbound QoS interfaces. Select the interfaces to disable QoS on the interface. |
Save/Revert | Saves your settings; click Revert to undo your changes. |
Adding a QoS Profile
In SCC 9.0 or later, QoS profiles replace QoS policies. To use QoS, you must create sites and site types before using QoS. For details, see
Migrating Appliances to Sites.
A QoS profile is a container for QoS rules and QoS classes that apply to a source and destination site, or site type, or any site. When you push QoS profiles, only the selected sites or site types in the push are assigned to the applied QoS profiles. You can have multiple source and destination sites in a QoS profile.
A QoS profile defines the endpoints to which the QoS profile will apply. Specifically, it defines the source and destination sites or site types or any site that this QoS profile applies to. When you create QoS profiles, Riverbed strongly recommends you select site types rather sites to make QoS rules more manageable. You should only select sites when you create exceptions in QoS profiles containing the site types. You can create a blank profile and copy settings from existing profiles. Riverbed recommends you copy from existing QoS profiles when most of the QoS profile configuration is the same and you only need to change a few settings. For details, see
Adding Classes and Rules to QoS Profiles.
You can create up to three levels of a class hierarchy in a QoS profile. For any additional class levels, you must use the CLI on the SteelHead. For detailed information about the CLI command, see the Riverbed Command-Line Interface Reference Manual.
When you build the QoS profile on the SCC, assigning a QoS profile name enables you to identify which profile goes to which SteelHead. It also enables you to reuse the QoS profile as a template by renaming it. You can also define which sites or interfaces to be excluded from a QoS profile.
The default QoS profile (that is, Any Site to Any Site) has a class structure and a default QoS rule. By default, all in-path interfaces are enabled for inbound and outbound QoS with the same link rate. The default profile is important because it is the profile that takes the bulk of the traffic. Use the default profile to capture traffic from any site to any site. You can edit the default QoS profile but you cannot delete it.
QoS rules should also use application groups rather than individual applications. Application groups enable you to manage QoS rules in a simpler way. You should only use individual applications in QoS rules to create exceptions for QoS rules. For detailed information about configuring application groups, see
Configuring Application Groups Using the Path Selection Wizard.
In SCC 9.0 and later, support for inbound and outbound QoS reports for SteelHeads running RiOS 9.0 and later has been dropped. To view these reports, you must connect to the individual SteelHead.
To add a QoS profile
1. Choose Managing > Services: Quality of Service display the Quality of Service page.
2. Click + Add a QoS Profile to display the New QoS Profile pop-up window.
Figure: Adding a New QoS Profile
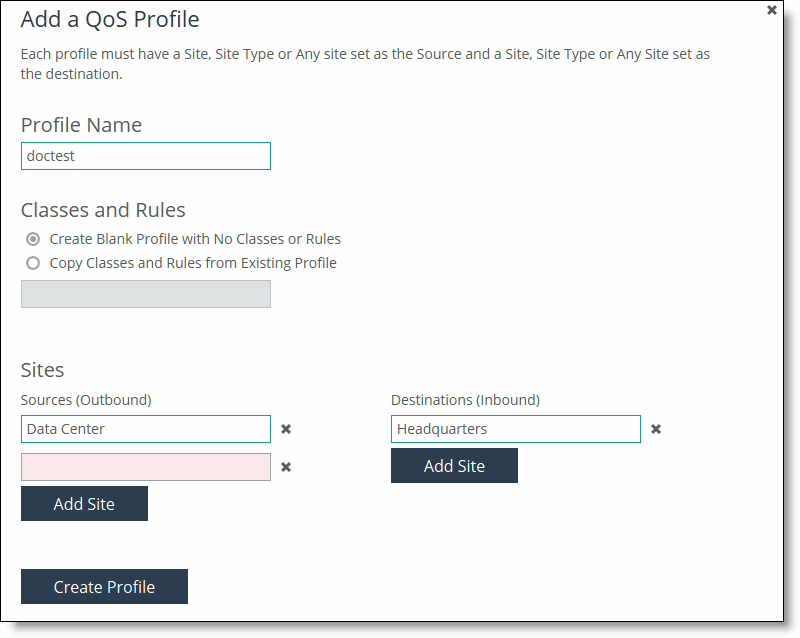
3. Complete the configuration as described in this table.
Control | Description |
Name | Specify a name that describes this profile. Click the text box to display a drop-down list of sites or site types from which to choose. The option Any Site does not display choices as it includes all sites. When you create QoS profiles, Riverbed recommends selecting site types rather sites to make QoS more manageable. Sites should only be selected when creating exceptions for QoS profiles containing the site types. When you push QoS profiles, only the selected site types or sites in the push are applied to the QoS profiles. Each profile can have multiple source and destinations defined. With multiple source and destination sites, you can reuse an existing QoS profile at a site or quickly change a single site to a QoS profile. |
Classes and Rules | Select one of these options: • Create Blank Profile with No Classes or Rules to create an empty profile. • Copy Classes and Rules from Existing Profile to copy an existing profile. Click the text box to display a drop-down list that displays the default and custom profiles. The autocomplete shows existing QoS profile names. The Any Site to Any Site profile is the default profile and applies to all sites. If you select this option, you cannot create another profile of this type. For example, you could create these types of profiles: • Branch to Data Center - Creates a profile that is applicable only to branch and data center sites. • Any Site to Branch - Creates a profile that is applicable to all sites connecting to the branch. • Headquarters to Any Site - Creates a profile that is applicable to all sites connecting to the headquarters. |
Sites | Select a site or site type (for example, Any Site, Data Center, Headquarters, or Branch) as the Source (outbound) and Destination (inbound) sites for this profile. Click Add Site to configure multiple source and destinations sites. With multiple source and destination sites, you can reuse an existing QoS profile at a site or quickly change a single site to a QoS profile. |
Create Profile | Saves your profile settings. |
To view a profile
1. Choose Managing > Services: Quality of Service display the Quality of Service page.
2. Under QoS Profiles, click Edit QoS Profile next to the name of the profile you want to view and display the QoS Profile Details page.
Figure: Displaying the QoS Profile
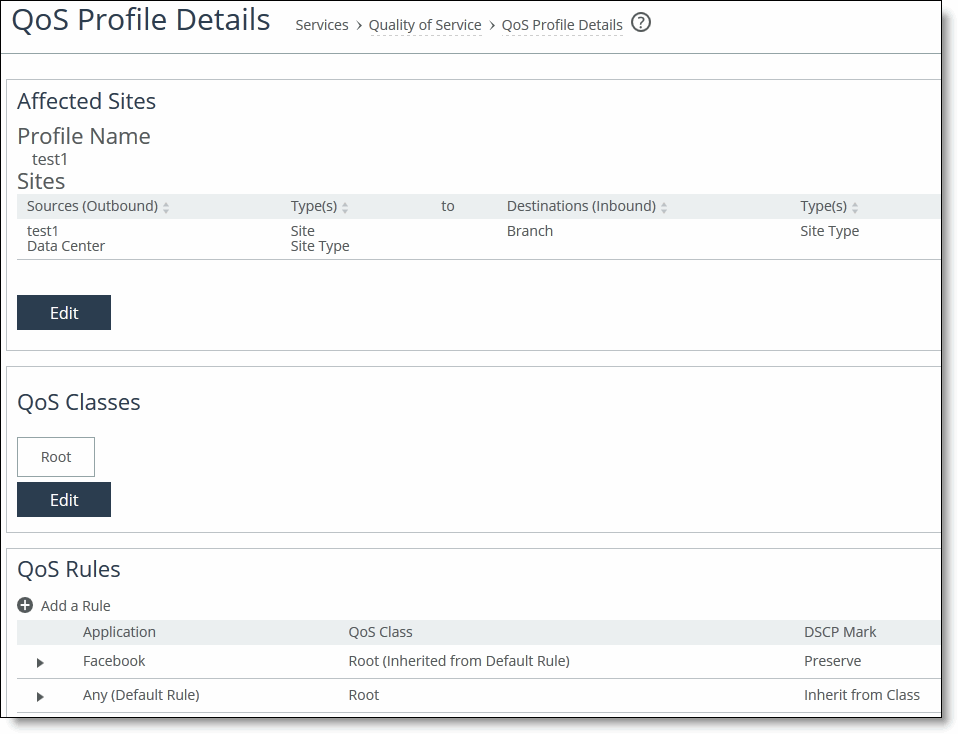
The profile name, rules, and classes appear. The classes model the network requirements for applications that exhibit similar characteristics and have similar requirements: minimum bandwidth, maximum bandwidth, and latency priority. For example, the Realtime class contains voice and video traffic.
A QoS profile contains one or more classes. Classes within a profile are typically organized in a hierarchical tree structure.