Managing Path Selection
You configure path selection in the Path Selection page. This section includes these topics:
Note: With RiOS 9.0 and SCC 9.0 or later, existing path selection rules are not migrated to SteelHeads. You must create new path selection rules in the SCC 9.0 or later. These new path selection rules apply only to RiOS 9.0 and later. Legacy path selection rules apply only to SteelHeads running RiOS earlier than 9.0.
Path selection ensures that the right traffic travels to the right path by choosing a predefined WAN gateway for traffic flows in real-time, based on availability. In path selection, you define a path, called an uplink, by specifying a WAN egress point and providing a direction for the egressing packets to take. This granular path manipulation enables you to better use and more accurately control traffic flow across multiple WAN circuits.
Enabling Internet paths makes efficient use of existing resources by taking advantage of both private and public links. Path selection provides the right performance levels for your applications and saves on bandwidth costs by optimizing the use of available bandwidth.
Path Selection probing must be able to distinguish between true path availability versus false positives or inaccurate assumptions of service availability. For detailed information about path selection probing best practices, see
Hybrid Network Path Selection Probing Techniques.
Using the SCC, you can define application policies based on business requirements, enabling you to easily leverage and control hybrid networks for accelerated application delivery. Application policies enable you to configure and reuse a single path selection or QoS rule for multiple applications. Using an application policy in path selection or QoS rules reduces the number rules significantly. The SCC manages hundreds of applications, including policy configuration, reporting, and troubleshooting.
To simplify SCC configuration, you define application policies based on application groups using the widget in the Path Selection page. For details, see
Managing Path Selection.
After you define the application policy, you use it to configure path selection rules. An application group is a logical grouping of similar applications matched by the type of network traffic. A separate application group allows for the configuration of multiple path selection rules, using the same application without having to repeat the application definition for each rule. For each application, you also specify uplinks to monitor path availability; you configure the latency of the path (timeout) and the loss observed (threshold).
If the SCC and SteelHeads are both running 9.2.0 or later, for the initial configuration the SCC pushes the entire configuration. For SteelHeads and an SCC running 9.2, any changes made after the initial push, the SCC pushes only the modified settings to ensure improved response times and throughput performance. If the SCC and SteelHeads are both running 9.0 and 9.1, when you push configuration changes, whether the initial push or after, the SCC deletes the entire configuration and replaces it with the new configuration settings, which can slow response times and performance.
Important: You cannot migrate your previously defined path selection rules to SCC 9.0 or later.
Note: When you configure QoS and path selection for RiOS 9.0 or later, SteelHeads using host or port labels must be assigned to the Global group. For detailed information about assigning policies to groups, see
Assigning Policies to Appliances and Groups.
For detailed information about path selection common use cases and how to configure them, see the SteelHead Deployment Guide and the SteelHead Management Console User’s Guide for SteelHead CX.\
Configuring Application Groups Using the Path Selection Wizard
SCC includes a wizard that enables you to define path selection rules for application groups. The wizard describes each application group, some sample applications in that group, and provides a recommendations for uplink preferences. Using the wizard you create path selection rules and create the uplink preference order for each application group.
The application group determines the global performance for an application, including latency priority. Application groups provide a powerful way to group traffic profiles and to specify policies based on the profile.
When you prioritize the application group, you select the uplink type for uplinks and the default action for each: for example, Relay and Drop.
To configure application groups and path selection rules
2. Choose Manage > Services: Path Selection to display the Path Selection page.
3. Under Getting Started with Path Selection, click Begin Setup to display the getting started widget.
Figure: Path Selection
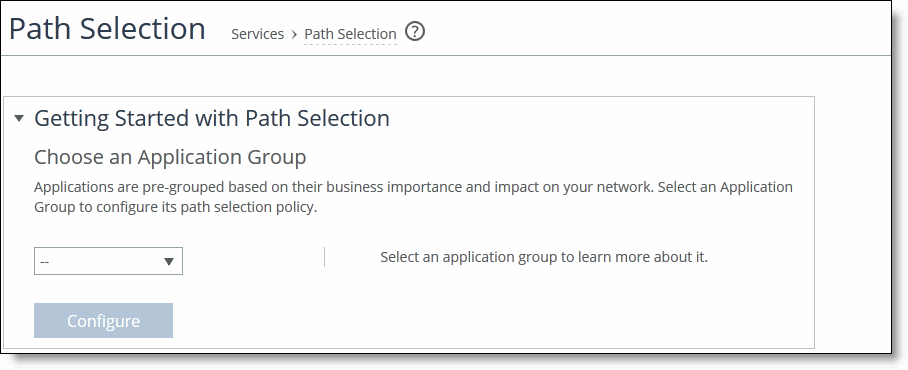
Widget
4. Complete the configuration as described in this table.
Control | Description |
Application Group | Select an application group from the drop-down list (highest priority to lowest): • Business Bulk - Captures business-level file transfer applications and protocols, such as CIFS, SCCM, anti-virus updates, and over-the-network backup protocols. • Business Critical - Captures business-level, low-latency transactional applications and protocols, such as SQL, SAP, Oracle and other database protocols, DHCP, LDAP, RADIUS, and routing and other network communication protocols. • Business Productivity - Captures general business-level productivity applications and protocols, such as email, messaging, streaming and broadcast audio/video, collaboration, Intranet HTTP traffic, and business cloud services O365, Google applications, SFDC, and others through a whitelist. • Business Standard - Captures all intra-network traffic going within local subnets as defined by the uplinks on the SteelHead. Use this class to define the default path for traffic not classified by other application groups. • Business VDI - Captures real-time interactive business-level virtual desktop interface (VDI) protocols, such as Citrix CGP/ICA, Remote Desktop Protocol (RDP), and Virtual Network Computing (VNC). • Business Video - Captures business-level video conferencing applications and protocols, such as Microsoft Lync and RTP video. • Business Voice - Captures business-level Voice over IP (VoIP) applications and protocols (signaling and bearer), such as Microsoft Lync, RTP, H.323 and SIP. • Recreational - Captures all Internet-bound traffic that has not already been classified and processed by other application groups. • Standard Bulk - Captures general file transfer protocols, such as FTP, torrents, NNTP/usenet, NFS, and online file hosting services Dropbox, Box.net, iCloud, MegaUpload, Rapidshare, and others. • Custom Applications - Captures user-defined applications that have not been classified into another application group. |
5. Click Configure to expand the page.
Figure: Configuring Path Selection Rules for Application Groups
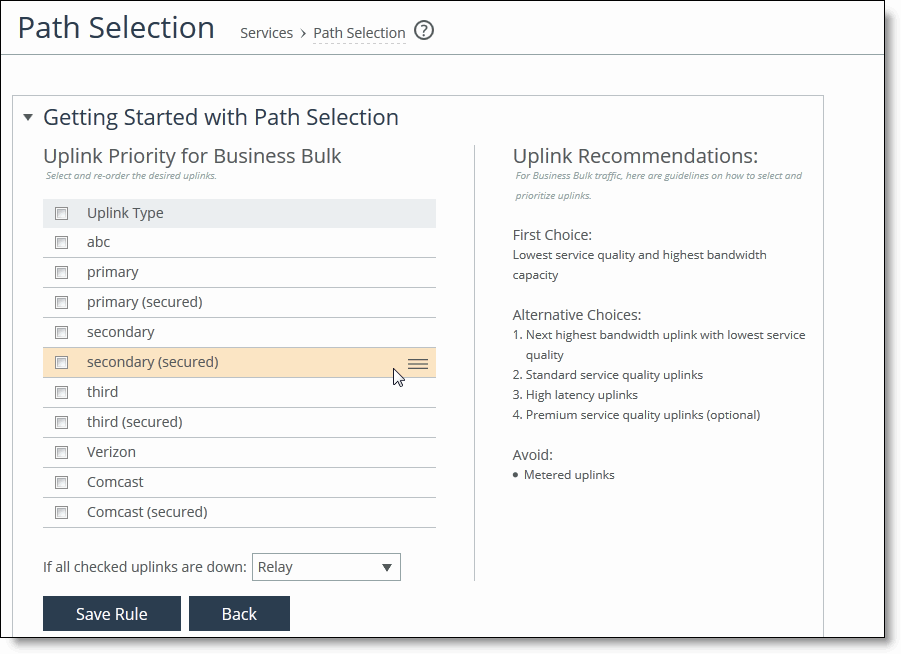
6. Complete the configuration as described in this table.
Control | Description |
Uplink Type | Select and reorder the uplinks. • To confirm that you have chosen the correct application group for your path selection rule, read the uplink recommendations for the application group on the right side of the pane. These recommendations change based on the application group you have selected. • To move the uplink type up or down in the priority list, hover over the uplink type you want to move, click and hold the cursor over the three bars on the right and move the link up or down the priority list. An uplink type is a label that describes the type of traffic for the uplink. For details about creating uplinks and defining the uplink type, see Defining Uplink Types. |
If all checked uplinks are down | Select what happens if all the uplinks specified in the rule are down. These settings are available even when no uplinks are selected. • Relay - Sends the traffic unmodified out of the WAN side on whichever in-path it came in on. This is the default setting. • Drop - Drops the packets in case of failure of all three (primary, secondary, tertiary) paths. Select this option when you do not want the traffic to pass on any of the uplinks specified in the rule, not just the primary. Dropping traffic is useful if you prefer not to use bandwidth on the secondary (or tertiary) uplinks in case of failure on the primary path. |
Save Rule | Saves your path selection rule. |
Back | Returns to the previous screen. |
Configuring Path Selection Rules
To configure path selection, you define path selection rules to direct traffic to any site.
Path Selection rules direct matching traffic onto specific uplinks. Traffic is matched by a combination of application and destination site.
You can create multiple rules for a site. When multiple rules are created for a site, the rules are followed in the order in which they are shown in the Path Selection page and only the first matching rule is applied to the site.
The network topology definition includes direct uplinks on a SteelHead. A SteelHead uses a direct uplink to steer packets to a specific gateway. The SteelHead can reach the gateway over Layer 2, so it can send packets directly to that gateway.
You configure a direct uplink using a network and gateway IP address. For details, see
Defining Sites. When you define path selection rules, you specify the uplink preferences for certain traffic.
Path selection uses only local uplinks. You can create site connectivity templates with one or more uplinks for use with multiple sites that share the same uplink structure, such as dual uplink sites or branch sites. When the site connectivity template is applied to a site, the uplinks defined in the template uplinks are cloned. For details about creating site templates, see
Defining Site Connectivity Templates.
The default path selection rule is Any, that is, any application or application group. The Any rule combines identifications of all known configured sites, including the Default-Site. Rather than configuring a separate identical path selection rule for every known site, select the Any rule to match the destination address of every configured site. The Any default rule steers the configured application and any matching configured site, or the default-site, onto the selected uplink. Using the Any default rule reduces the configuration steps required, yet provides a common application steering design.
To configure path selection
2. Choose Manage > Services: Path Selection to display the Path Selection page.
Figure: Enabling Path Selection
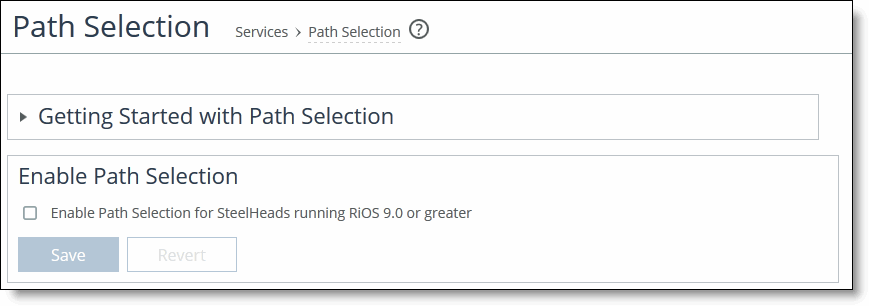
3. Select the check box. Path Selection is disabled by default. After you enable path selection, it processes new flows; it does not process preexisting flows.
4. Click Save to save your settings; click Revert to disable path selection.
5. Under Path Selection Rules, click + Add a Rule to display the pop-up window.
Figure: Adding a Rule
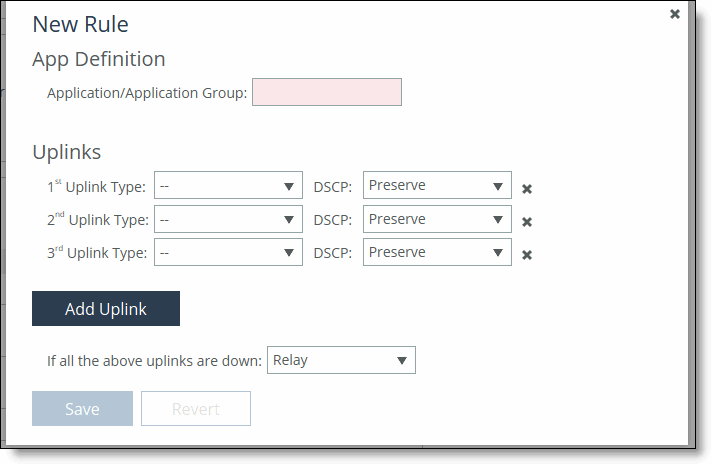
6. Complete the configuration as described in this table.
Control | Description |
Application/Application Group | Identify the traffic flow by selecting an application or application group for the Riverbed Application Flow Engine (AFE). Type the first few letters of the application in the Application/Application Group field. As you type the name of an application, a menu appears and lists available applications and groups that match your typing. Select an application from the list. The default setting is any application or application group. The Any setting combines identifications of all known configured sites, including the Default-Site. Rather than configuring a separate identical path selection rule for every known site, select the Any setting to match the destination address of every configured site. When you select Any, path selection steers the configured application and any matching configured site, or the default-site, onto the selected uplink. Using the Any setting reduces the configuration steps required, yet provides a common application steering design. |
Uplinks | Specify the uplink and DSCP. The uplinks you select cascade from one to the next, based on availability. • Uplink Type - Define the type of traffic flow in order of priority and whether the network is secured: – primary – primary (secured) – secondary – secondary (secured) – tertiary – tertiary (secured) If the primary uplink assigned to a connection becomes unavailable, the SCC directs traffic through another available uplink and triggers an alarm. When the original uplink comes back up, the SCC redirects the traffic back to it. • DSCP - Select Preserve or the DSCP level from the drop-down list. DSCP marks the uplink for a given flow to allow an upstream router to steer packets based on the observed marking. The default marking is Preserve. Preserve specifies that the DSCP level or IP ToS value found on pass-through and optimized traffic is unchanged when it passes through the appliances. |
Add Uplink | Adds your uplink settings. |
If all the above uplinks are down: | Select how the system handles packets if the default uplinks go down from the drop-down list: • Relay - Sends the traffic unmodified out of the WAN side on whichever in-path it came in on. This is the default setting. • Drop - Drops the packets in case of failure of all three (primary, secondary, tertiary) paths. Select this option when you do not want the traffic to pass on any of the uplinks specified in the rule, not just the primary. Dropping traffic is useful if you prefer not to use bandwidth on the secondary (or tertiary) uplinks in case of failure on the primary path. |
Save | Saves your settings. |
Pushing Your Settings and Viewing Push Status
You can push your path selection settings from the Policy Push Control on the right side of the page. You can also view push status from the Push Status panel on the right side of the page.
If the SCC and SteelHeads are both running 9.2.0 or later, for the initial configuration the SCC pushes the entire configuration. For SteelHeads and an SCC running 9.2, any changes made after the initial push, the SCC pushes only the modified settings to ensure improved response times and throughput performance. If the SCC and SteelHeads are both running 9.0 and 9.1, when you push configuration changes, whether the initial push or after, the SCC deletes the entire configuration and replaces it with the new configuration settings, which can slow response times and performance.
When you perform a policy push, the SCC is the master configuration; any local changes made on SteelHeads are overwritten.
To push settings
1. Under Policy Push Control on the right side of the page, click Include in Push to expand the page and display the Push to Appliances panel.
Figure: Pushing Settings
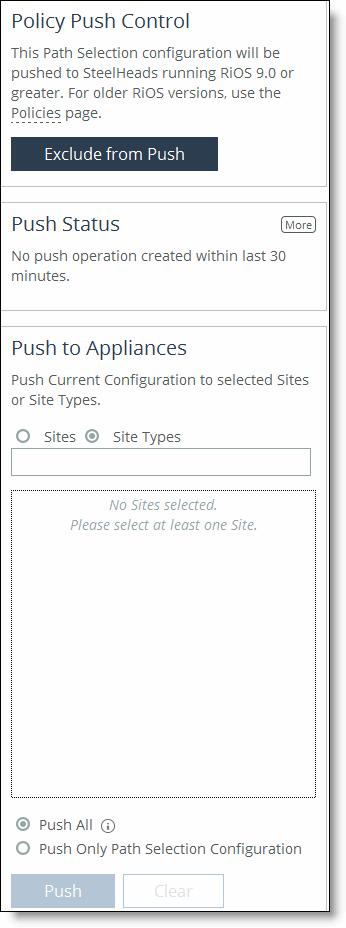
Note: To exclude appliances from the push, under Push Control on the right side of the page, click Exclude from Push. (This option only appears if you have clicked Include in Push.)
2. Complete the configuration as described in this table.
Control | Description |
Push to Appliances | Select to push your path selection rules: • Site Types - Click the text box to display site types to choose from. Select the site types one at a time to add them to the text box. After you select the site type, it is displayed in the text box. To remove a site type, click the X. To view what sites make up the site type, click See More. Riverbed recommends that you choose site types rather than sites to organize your rules as site types make the management of rules easier. • Sites - Click the text box to display sites to choose from. Select the sites one at a time to add them to the text box. After you select the site, it is displayed in the text box. To remove a site, click the X. To view site details, click See Details. |
Push All | Pushes all related configurations, such as applications, sites, and networks. |
Push Only Path Selection Configuration | Pushes only path selection configuration settings to remote appliances. |
Push | Pushes configuration settings to the selected sites or site types. Click Clear to clear your settings. |
Viewing Push Status
You can view the current status of your pushes on the right side of the page in the Push Status panel.
To view current status of configuration pushes
• Under Push Status on the right side of the page, click More to be directed to the Operation History page.
Figure: Displaying Push Status

The current operations (that is, pushes) and status are displayed in the Operations table.
 Widget
 Widget
 Widget


