Managing Policies
You manage SteelHead configurations by creating policies in the Policies page. Policies are sets of configuration settings that are shared among different SteelHeads independently or via group membership. This section contains these topics:
Note: SCC 9.0 or later introduces the concept of sites, networks, and uplinks to create a topology for deployments of Riverbed appliances. Sites, networks, and uplinks are required for path selection, simplified QoS, and secure transport features. For detailed information about configuring sites, networks, and uplinks, see
Managing Interceptor Clusters.
The SCC uses appliance groups and appliance policies to facilitate centralized configuration and reporting of remote SteelHeads:
• Policies are made up of particular RiOS features that are applied to individual SteelHeads or a group of SteelHeads. For example, system settings policies contain feature sets for common system administration settings such as alarms, announcements, email notifications, while security policies contain feature sets for encryption, authentication methods, and user permissions. The configuration settings are inherited by all members of the group.
• Groups are comprised of SteelHeads or groups of SteelHeads; all groups and SteelHeads are contained in the root default Global group. As a result, all policy configurations from the Global group are inherited by all child groups and SteelHeads. Each group or SteelHead can be assigned one of each type of policy. Because the Global group serves as the root group, or parent, to all subsequent groups and appliances, any policies assigned to the Global group provide the default values for all groups and SteelHeads.
Policy Types
These policy types are available:
• Networking policy - Use networking policies to manage networking features such as simplified routing, host settings, and legacy QoS settings. For details about networking policies, see
Networking Policy Settings. • Optimization policy - Use optimization policies to manage optimization features such as the HTTP, in-path rules, and secure peering settings. For details about optimization policies, see
Optimization Policy Settings. • Branch services policy - Use branch services policies to manage caching DNS and branch storage settings. For details about branch services policies, see
Branch Services Settings. • System settings policy - Use system settings policies to organize and manage system setting features such as alarms, announcements, email notifications, and logging. For details about system settings policies, see
System Settings Policies. • Security policy - Use security policies to manage security settings such as RADIUS, TACACS+, passwords, and management ACL. For details about security policies, see
Security Policy Settings. For detail information about the configuration settings for the feature sets that comprise policies, see the SteelHead Management Console User’s Guide for SteelHead CX and EX.
Basic Steps to Create and Push a Policy
This table lists the basic steps needed to create and configure a policy, followed by detailed procedures.
Task | Reference |
1. Add an appliance to an appliance group. | |
2. Add a policy. | |
3. Configure policy pages. Policy pages represent the feature sets for networking, optimization, branch services, system settings, and security settings for appliances. | |
4. Assign a policy to an appliance or appliance group. | |
5. Push a configuration to an appliance or appliance group. | To push global policies for path selection, QoS, web proxy, and application statistics collection, and Riverbed Global Policy, see Performing Global Policy Pushes. |
Adding Policies
You can add policies in the Policies page.
After you create a policy you configure the settings for the policy using policy pages. Policy pages represent the feature sets for networking, optimization, branch services, system settings, and security settings for appliances. For detailed information about policy page configuration settings, see
Policy Pages Reference. To add a policy
1. Choose Manage > Services: Policies to display the Policies page.
2. Click + Add Policy to expand the page.
Figure: Adding Policies
3. Select + Add a Policy, and complete the configuration as described in this table.
Control | Description |
Policy Name | Specify the policy name. |
Description | Optionally, type a description of the policy so that you can easily distinguish it from other policies. |
CLI Commands | Optionally, you can specify a set of CLI commands for configuring your policy. |
Rename Policy | Specify a new policy name in the text box. |
4. Click Apply to save your settings to the running configuration.
Configuring Policy Pages
You configure policy pages in the Policies page. Policy pages are feature sets for SteelHeads. You modify or configure SteelHead features in the policy pages.
For detailed information about policy page configuration settings, see
Policy Pages Reference. To configure policy pages
1. Choose Manage > Services: Policies to display the Policies page.
Figure: Viewing Policies Page
2. Select the name of the policy you want to configure to expand the page.
Figure: Editing Policy Panel
3. Click + Add/Remove Pages to display the Add/Remove pop-up window.
Figure: Add/Remove Policy Pages
4. Select the policy pages you want to add. To select all, select the check box next to the policy page type. For example, click Networking to select all the networking policy pages.
5. Click Apply to display the policy pages in the policy table.
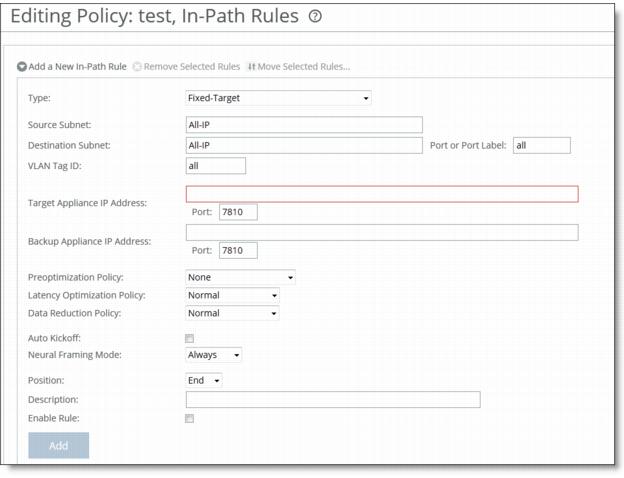
6. Click the name of the policy page to display the Editing <policy name> <feature set> page.
Figure: Editing a Policy Page
7. Modify the policy page settings. For detailed information about policy page configuration settings, see
Policy Pages Reference. 8. To navigate to other policies feature sets, at the top of the page select the policy page name from the Page drop-down list.
9. When you have finished configuring all the policy pages, in the policy table select the Include in Policy Push check box to push the policy settings to the appliance or appliance group.
If the check box is not selected, the page is not pushed to the appliance. Policy pages or CLI commands are required for the policy to be pushed.
10. Click Apply to apply the settings to the running configuration.
Copying an Existing Policy
You can copy an existing policy in the Policies page.
To copy an existing policy
1. Choose Manage > Services: Policies to display the Policies page.
2. Click + Add Policy to expand the page.
3. Select Add a copy of an existing policy to display the controls for copying an existing policy.
Figure: Copying an Existing Policy
4. Complete the configuration as described in this table.
Data Series | Description |
Policy Name | Specify a new policy name for the copy of the existing policy. |
Description | Optionally, type a description of the policy so that you can easily distinguish it from other policies. |
Copy Policy from: | Select the policy you want to copy from the drop down list. |
Add | Adds the new policy in the policy table. |
6. Click Apply to apply your settings.
Importing Polices from Appliance Configurations
You can import a policy from an appliance configuration in the Policies page.
To import a policy from an appliance configuration
1. Choose Manage > Services: Policies to display the Policies page.
2. Click + Add Policy to expand the page.
3. Select Import policy from an appliance configuration to display the controls for importing an existing policy.
Figure: Importing an Existing Policy
4. Complete the configuration as described in this table.
Data Series | Description |
Policy Name | Specify a new policy name for the imported policy. |
Appliance | Select the appliance from which you want to import the policy from the drop down list. |
Add | Adds the new policy in the policy table. |
6. Click Apply to apply your settings.
Merging Policies
You can merge a policy from an existing appliance configuration in the Polices page.
To merge a policy from an appliance configuration
1. Choose Manage > Services: Policies to display the Policies page.
2. Click + Add Policy to expand the page.
3. Select Merge existing policies to display the controls for merging an existing policy.
Figure: Merging an Existing Policy
4. Complete the configuration as described in this table.
Control | Description |
Policy Name | Specify a new policy name for the policy merge. |
Description | Optionally, type a description of the policy so that you can easily distinguish it from other policies. |
Policies | Select the policy that you want to merge from the drop-down list. |
Add | Adds the new policy in the policy table. |
6. Click Apply to apply your settings.
Editing Policies
You can edit existing policies in the Policies page.
If you delete or rename a policy, you cannot create another policy with the same name until you save the configuration changes.
To edit an existing policy
1. Choose Manage > Services: Policies to display the Policies page.
2. In the policy table, select the check box next to the policy name to expand the page and display the controls for editing a policy.
Figure: Editing an Existing Policy
3. Complete the configuration as described in this table.
Control | Description |
Description | Optionally, type a description of the policy so that you can easily distinguish it from other policies. |
CLI Commands | Optionally, specify the CLI commands to configure features. |
Rename Policy | Select to rename the policy. |
New Name | Specify the new name for the policy. |
Add/Remove Pages | Click to add or remove policy pages. |
Include in Policy Push | Select the Include in Policy Push check box next to the policy page that you want to include on the policy push. If no pages are checked and if no CLI commands are specified, the policy is not pushed. |
4. Click Apply to apply your settings.
Note: To remove a policy, in the policy table select the check box of the policy you want to remove and click Remove Policy at the top of the table.
Overriding Policy Settings from a Parent Group
Policies are comprised of feature sets whose values can be inherited from the parent group. By default, no policies are assigned to the Global group, but any policies assigned to the Global group can be inherited by all groups and appliances. Similarly, specific feature sets in individual policies can be enabled, in that case they override the values that would otherwise be inherited from a parent group.
You can also assign different policies directly to groups and appliances. For flexibility, the policy you apply can also be configured to inherit or override specific feature-set values from the nearest parent group.
For example, in the Policies page:
• a group uses optimization policy accG, whose in-path rules feature set specifies four in-path rules.
• an appliance in that group uses optimization policy accA, whose in-path rules feature set specifies only three rules.
• Unselect the Enable Rule option for in-path rules in the accA policy definition to ensure that the appliance uses the accG in-path rules settings.
Figure: Enable Rule Option
Policy Page Conflicts
A page conflict error message displays when you cannot enable or push a policy page due to a conflict. The error message summarizers which policy pages are in conflict with each other. In addition, it tells you if more than one policy is assigned to an appliance or appliance group.
The conflicting pages cannot be pushed to an appliance or an appliance group until the conflict is resolved.
Assigning Policies to Appliances and Groups
You assign policies to groups and appliances in the Appliances page. Policies are optional for groups and appliances.
To assign a policy to a an appliance or group
1. Choose Manage > Topology: Appliances to display the Appliances page.
2. Click the name of the group that you want to assign the policy to expand the page, and display the Policies tab.
Figure: Adding a Policy to a Group
3. Click Add/Remove Policies to display the Add/Remove Polices pop-up window.
Figure: Adding/Removing Policies
4. Complete the configuration as described in this table.
Setting | Description |
Add/Remove Policies | Select the policy you want to add. A message is displayed stating the policy has been added. The SCC redisplays the table and applies your changes to the running configuration, that is stored in memory. |
Done/Revert | Click Done to add the policy; click Revert to remove the policy. |