Controlling Direct Collection
This section explains how to control direct collection and includes the following topics:
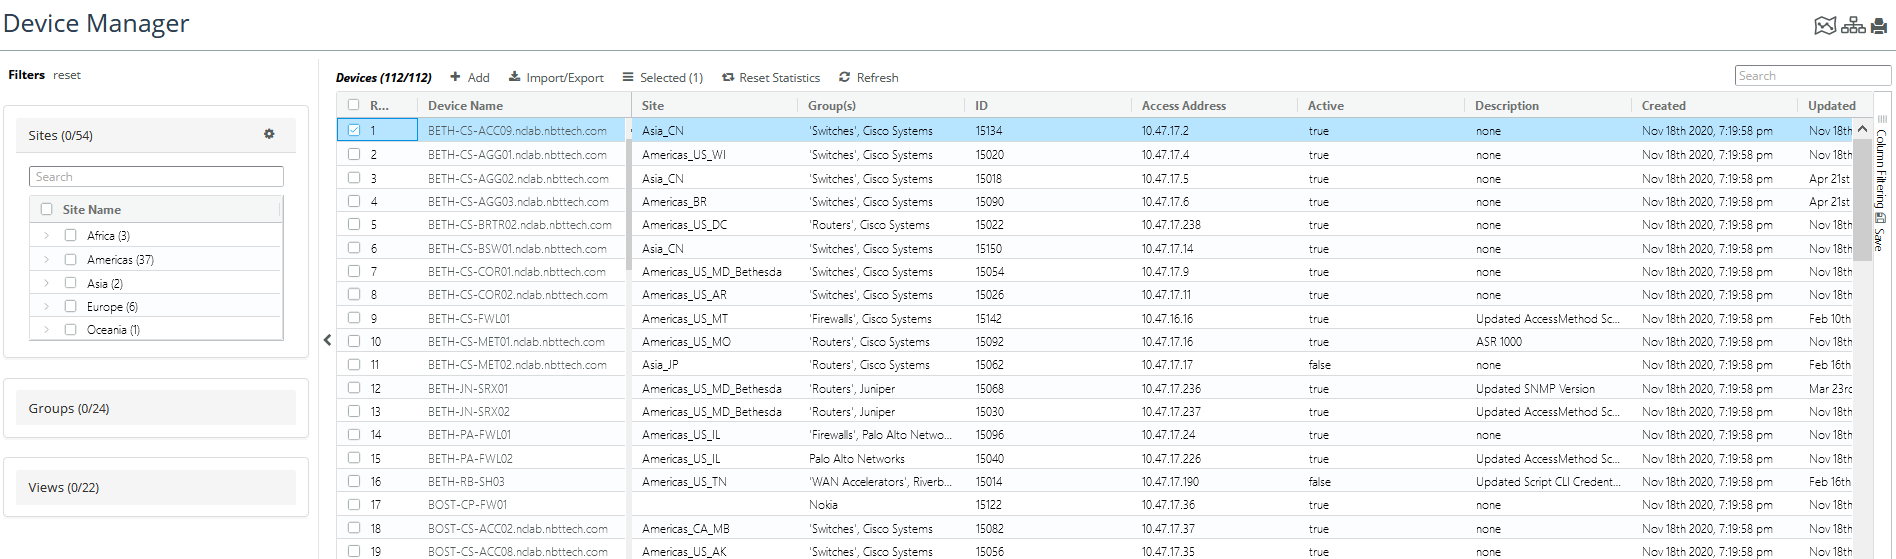
Accessing the Device Manager
To access the Device Manager, follow theses steps.
1. Login to the UI as admin.
2. Navigate to CONFIGURE >Device Manager.
The Device Manager screen appears, as shown in the following screen:
The maximum number of groups and sites that can be displayed in the left navigation panel of the Device Manager has been increased to 1000 (previously a maximum of 500). Additionally, Device Manager’s right-click menu has been enhanced to include new options to Clear Collected Data, Collect from Device(s), and Collect from Device(s) and Update Model.
Working with Device Entries
You must have administrative privileges to create and/or modify device entries.
This section includes the following topics:
What Is a Device Entry?
NetIM requires certain information to access a device using SNMP and/or WMI. This access information—plus additional fields that support NetIM functionality—is organized into a device entry.
Device entries are automatically created and populated with needed information when you run the Add/Discover Devices wizard.
Device entries can also be created by importing a device info file or manually created through the user interface. (See
“Creating, Modifying, and Deleting Device Entries".)
Each separately managed network element must have its own device entry. Because of this, some devices require multiple device entries. For example, a switch may consist of a switching core running CatOS and one or more routing modules running IOS. In this case, each separately managed addressable module must have its own device entry. Interface and port modules do not need to be handled in this fashion.
Device entries are stored in the NetIM database. When a project is removed or the database cleaned, device entries are exported to a device info file before they are removed. Connection statistics, however, are not preserved.
Related Topics
Viewing Device Entries
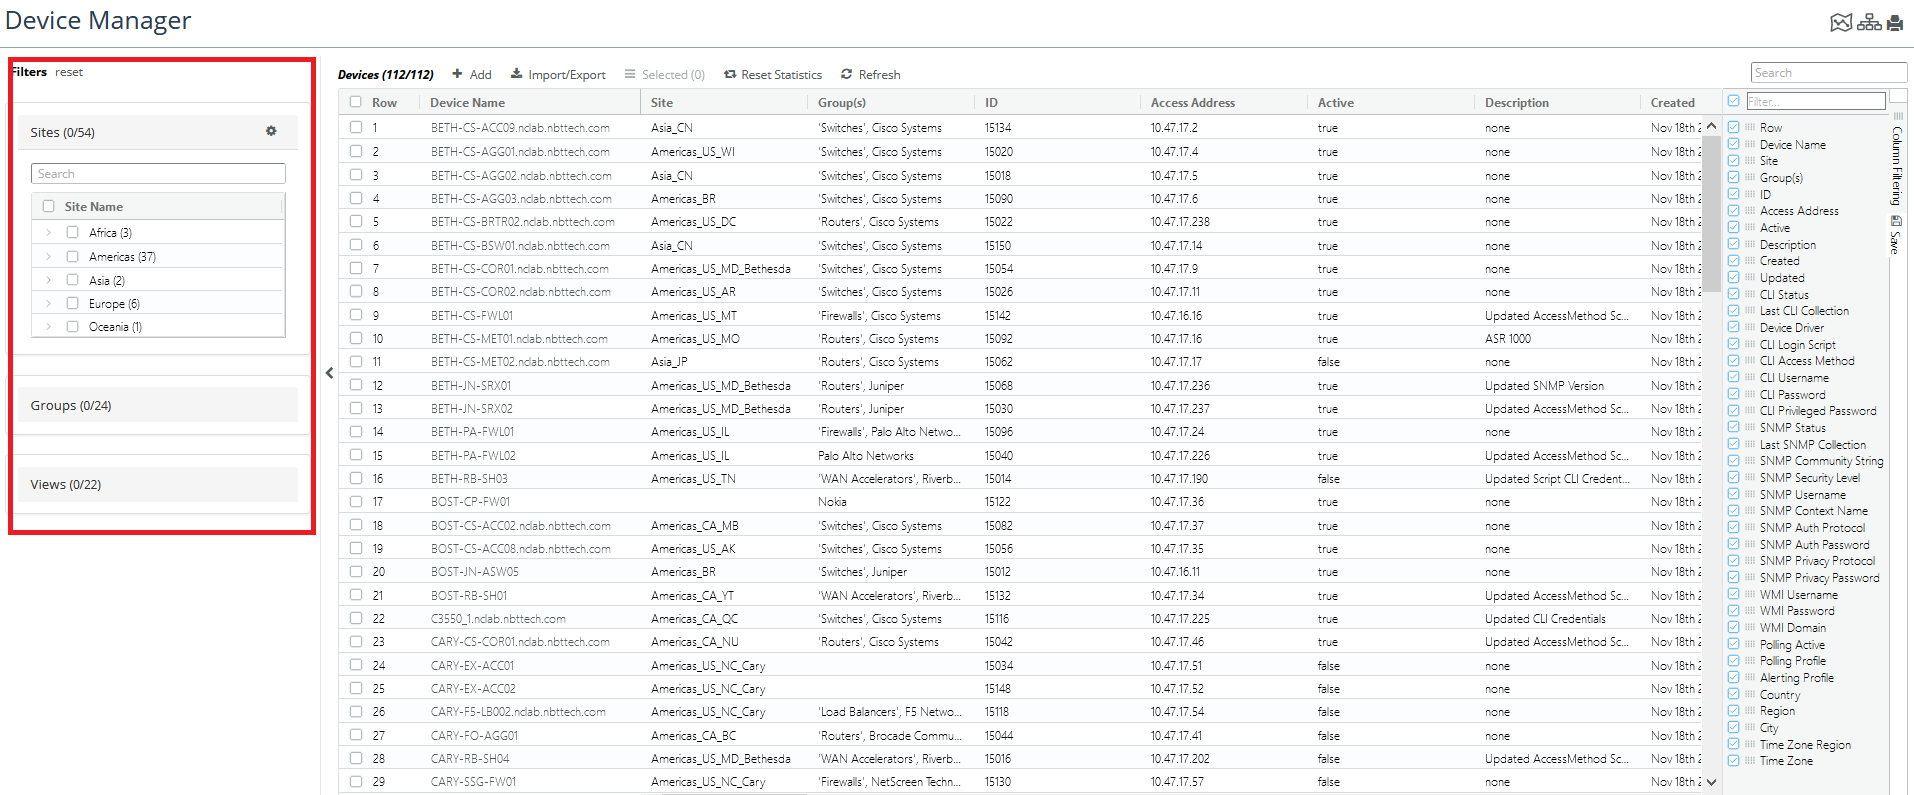
The Device Manager lists device entries, as shown in the following screen.
Device Entries
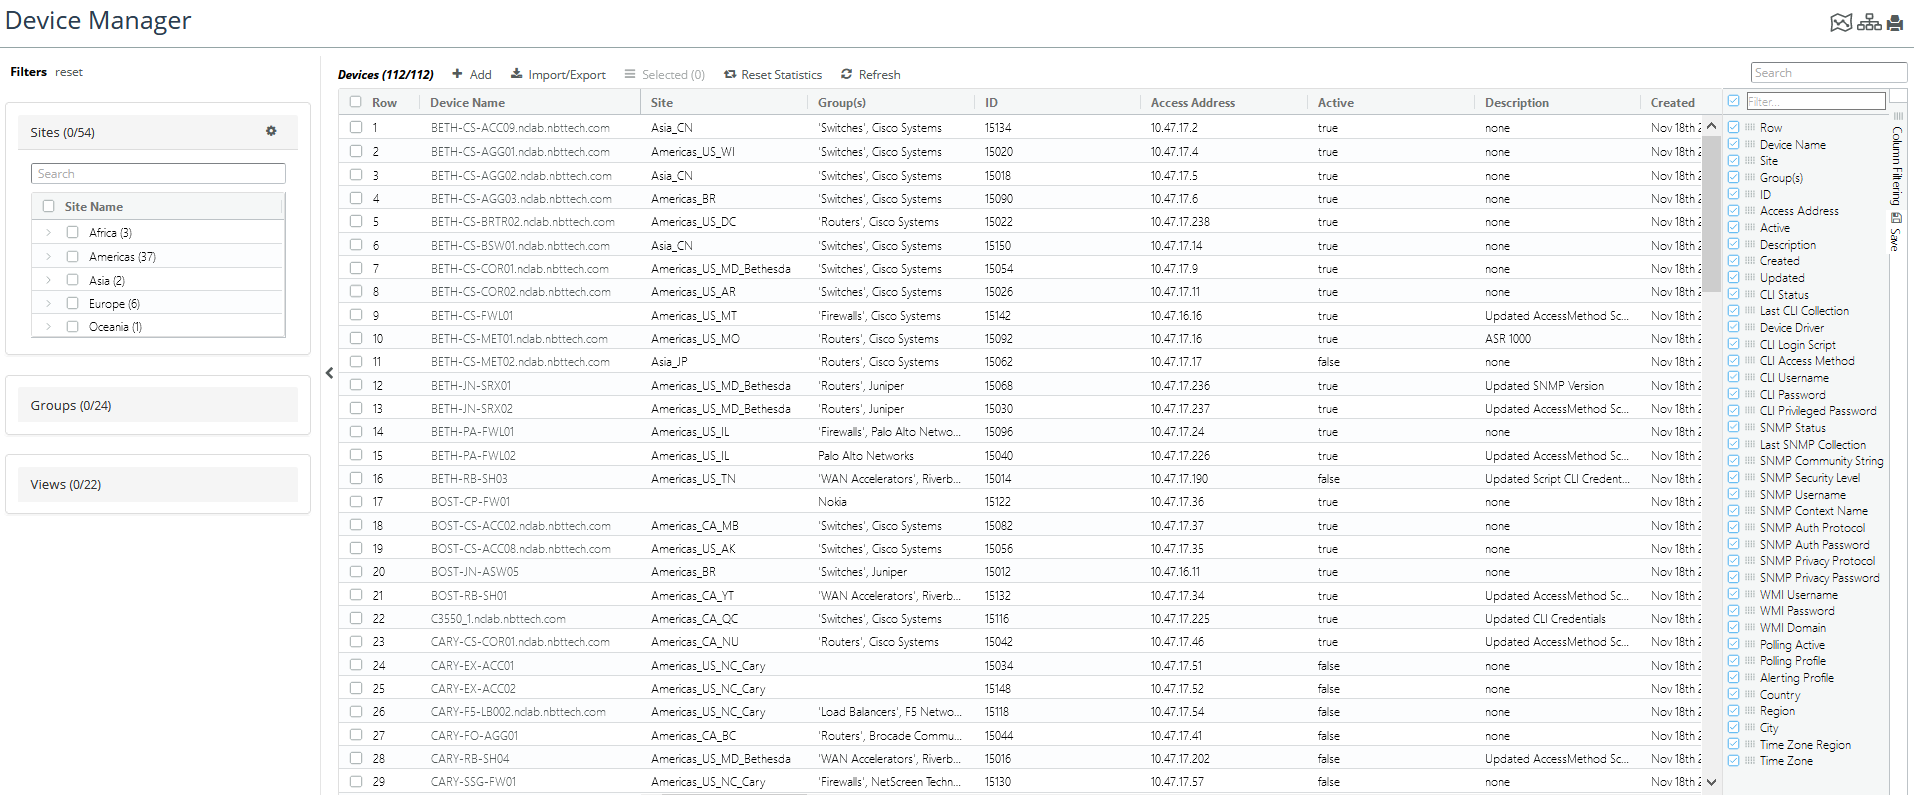
Not all components of a device entry are displayed in the Device Manager. The password, privileged password, and community string fields are encrypted and stored in the NetIM database as part of the device entry but are not included in the display.
.The Device Driver and Login Script fields define scripts internal to NetIM that are used to connect to a device using the CLI. These fields are required for AppNetwork Path Analysis. These are automatically determined by the Add/Discover Devices wizard. Do not modify unless directed to do so by technical support.
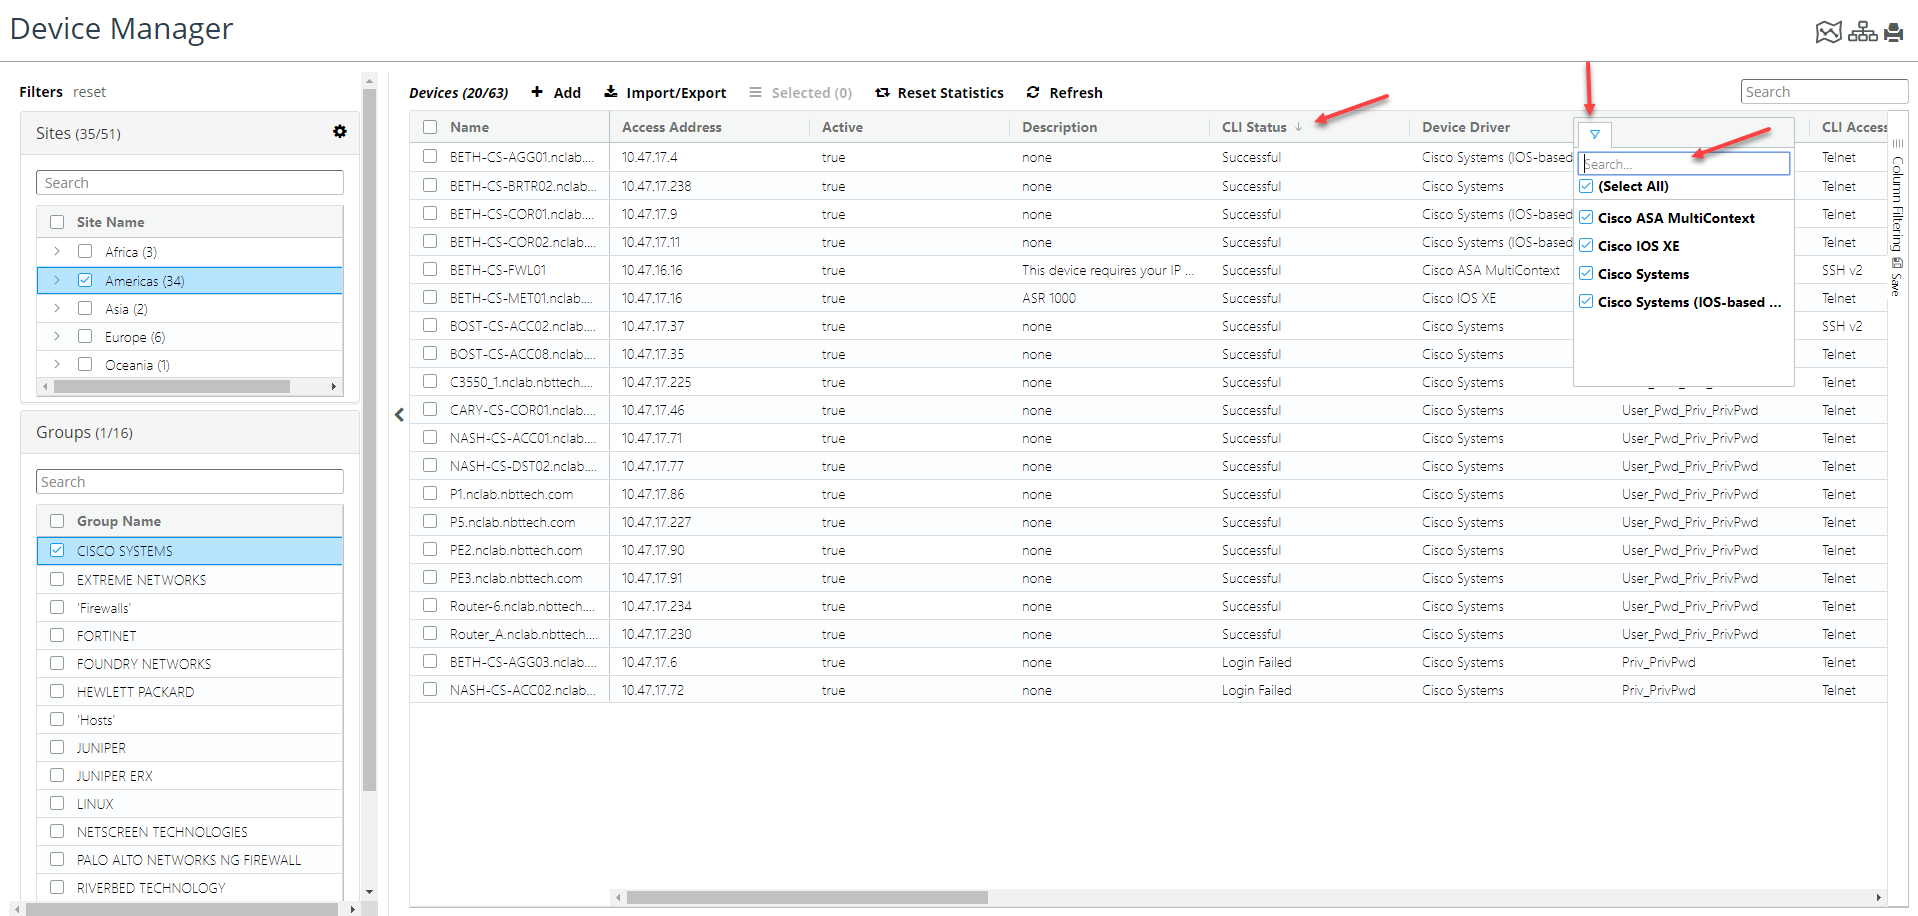
Filtering Device Entries
The Device Manger supports robust filtering.
You can add entries in the Device table based on Sites, Groups, and Views, using the left side navigation and selection expander, as follows:
You can also add and remove columns in the main device listing panel by expanding the Column Filtering on the right side of the page, and selecting the columns you want to display, as shown in the following screen:
You can, for example, choose to view the devices primarily by their sysName or hostname instead of device name and access address or hide columns you are not interested in seeing.
Each column in Device Manager supports sorting, searching, and filtering:
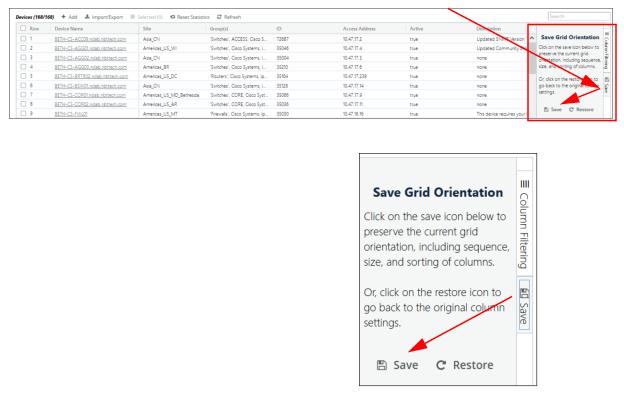
Saving Column Layout
After you have determined the column layout that best suits your purposes, you can save the layout so that it persists between sessions by clicking on the Save icon on the far right of the Device Manager page, which brings up the Save Grid Orientation window, as shown in the following screen:
Every user can make their own column layout and save it.
Click on the Save button to save your layout.
Related Topics
Components of a Device Entry
The components of device entry are listed in the following table.
Device Management View
The following table lists the components of each device entry.
Field | Description |
Active | Determines whether a device is a candidate for metric polling and/or AppNetwork Path Analysis. • When a device entry is inactive it will be skipped. • When active, the appropriate Collect flag (
Collect CLI, Collect WMIor
Collect Metrics) determines the function that NetIM attempts to perform for that device |
Device Name | Indicates the hostname of the device. |
Access Address | Specifies the network address used to access the device. |
Polling Profile | Shows the name of the polling profile (configured in the
“Using the Polling Wizard to Create, Clone, Edit or Delete Polling Profiles") to use for the device. |
Alerts | Shows the alerts (configured in the
“Configuring an Alert") associated with the device. |
Managed By | Local indicates that polling of the device is managed by the local system. |
Polling Profile | Specifies the polling profile assigned to the device. A device may have only one polling profile. See
“Configuring Metric Polling". |
Alerts | Specifies alerts assigned to the device. A device may have multiple alerts. See
“Configuring Metric Alerts". |
SNMP Version | Indicates version of SNMP used to contact the device. |
Device Driver | Specifies the device console “show” commands that will be executed to collect data. The device driver can be imported from a file or NetIM can automatically determine the appropriate device driver when discovering devices. Device drivers are managed using the
“Enabling Collection of CLI Data for a Device Driver". |
Login Script | Specifies the initial device prompt and a sequence of commands and expected responses for successful command line interface (CLI) login to this device. This is automatically determined by the
“Add/Discover Devices Wizard". |
Access Method | Specifies the protocol used for CLI access. (TELNET, SSHv1, SSHv2, or Unknown). |
CLI Username | Specifies the username for CLI login. |
WMI Username | Specifies the username for WMI access. |
WMI Domain | Specifies the domain for WMI access. |
Password | Specifies the password for CLI login. This field does not display in the Device Manager. |
Privileged Password | Specifies the password (if needed) to enter the privileged exec mode during a CLI session. This field does not display in the Device Manager. |
System Name | Specifies the device name. Supports NetIM’s archiving function. Do not modify unless directed to do so by technical support. |
Collect CLI | Do not modify unless directed to do so by technical support. Checked to indicate CLI metrics are being collected. |
Collect WMI | Do not modify unless directed to do so by technical support. Checked to indicate WMI metrics are being collected. |
Collect Metrics | When the
Active flag is enabled for a device, the status of the Collect Metrics flag determines whether the Poller will attempt to collect metrics from the device.To enable/disable polling, adjust the
Active flag for the device. You should not disable the Collect Metrics flag. See
“Manually Enabling or Disabling Metric Polling" to learn more. |
Description | Free-text description. |
Country | Specifies the country, region, and city in which a device is located. See
“Setting Geographic Location". |
Region |
City |
Time Zone | Specifies the time zone associated with a device. This value overrides the default time zone setting from Basic Setup. See
“Setting Time Zones and Business Hours". |
Business Hours | Identifies the Business Hour profile associated with the device. See
“Setting Time Zones and Business Hours" for further information on how to use this wizard. |
Required Credentials for CLI (AppNetwork Path Analysis) and SNMP and/or WMI (Metric Polling)
Credentials are required to connect to a device using the CLI or SNMP and/or WMI.
The following table lists required device entry fields for each.
Display Name | CLI | SNMP | WMI |
Device Name | X | X | X |
Access Address | X | X | X |
Username | X | | X |
Password | Xb | | X |
Privileged Password | Xb | | X |
Device Driver | X | | X |
Login Scriptc | X | | X |
Access Methodc | X | | X |
Read Community String | | X | X |
SNMP v3 Credentials | | Xd | X |
1 CLI access is required for AppNetwork Path Analysis.
2 Required fields depend on device login.
3 The Add/Discover Devices wizard automatically determines the appropriate values and sets them in the device entry when you choose an entry mode that uses SNMP discovery.
4 Read community string is required for SNMPv2c and below. SNMP v3 credentials are required for SNMP v3. The following require SNMP access: Device MIB Configuration Import, Device MIB MPLS TE Import, SNMP MIB Poller, and IP Detection Service.
Related Topics
Creating, Modifying, and Deleting Device Entries
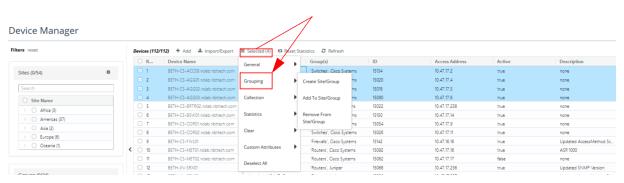
Group/Site Creation, Member Editing, and Member Deletion
The Device Manager supports group/site creation, group/site member editing, and group/site member deletion.
To perform these tasks, follow these steps:
1. Navigate to CONFIGURE->Device Manager.
The Device Manager appears, as shown in the following screen:
2. Select the device entries of interest, then click on the Selected hamburger menu.
A pop-up menu appears, as follows:
3. Select Grouping, which displays options to:
– Create Site/Group
– Add to Site/Group
– Remove From Site/Group.
4. Click on the operation you want to perform.
Note the following:
• Group and Site names and descriptions can also be edited from the group and site pages hamburger menus, as shown in the following screens:
• You can bulk delete all groups or all sites from the CONFIGURE->All Settings->Customize->.General Settings page, as follows:
Controlling Collection Using the Active Flag and Collection Settings
Each device in the Device Manager has several flags that control whether NetIM will contact that device for various purposes. For example:
• Active - specifies whether that device will be contacted for any purpose. If not checked, none of the following will be performed, regardless of their setting.
• Collect SNMP - specifies whether NetIM will include this device in Direct Collection (the effort to build a network model) by contacting its SNMP interface.
• Collect WMI - specifies whether NetIM will include this device in Direct Collection (the effort to build a network model) by contacting its WMI interface.
• Collect Metrics - specifies whether NetIM will collect performance metrics from this device’s SNMP interface.
For information on modifying these settings for a device, see
“Adding Devices to Device Manager“