11.10. Plugins
A plugin is some collection of one or more of the following:
- core - low-level classes and functions, may involve interacting with remote systems
- devices - abstraction for managing new device types
- data sources
- new table types for collecting data from devices
- analysis tables for manipulating data from other data sources
- reports - defined based on new tables and or tables from other plugins
Each plugin is fundamentally a Python Package, and thus yields all the benefits that such packaging provides:
- setup.py - single script for building a distribution for sharing
- versioning - major.minor.patch version numbers to facilitate tracking and upgrade
- simple installation both from source as well as from a single distribution file
11.10.1. Managing plugins
SteelScript Application Framework provides a page allowing easy management of reports within each of your installed Application Framework plugins. To open the page, choose the “Edit Plugins” option from the upper-right drop-down menu in the browser. Then a table with all installed Application Framework plugins will show up.
The first column of each plugin shows the status of the plugin. By checking the box of each row, the reports belonging to the plugin will be accessible in the Reports drop-down upper-left in the browser. For instance, by enabling the NetShark Datasource Plugin, a total of 5 reports are available, shown as below.

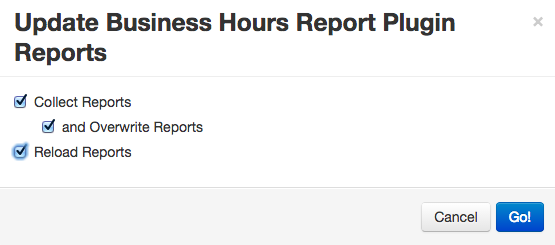
The Action column provides an interface to update the reports with source files in your plugin directory. By clicking “Update Reports” link, a pop-up window will appear with options. Checking off the “Collect Reports” option will copy the reports over to the project directory, and reports with same names will be overwritten if the “and Overwrite Reports” option is checked, as described in Collecting Reports. Checking the “Reload Reports” option will reload all the reports of the installed plugins after they have been collected, as described in reload reports. The pop-up window is shown as below.
11.10.2. Creating a new plugin
New Application Framework plugins can be created at any time using
steel appfwk mkplugin:
$ steel appfwk mkplugin -h
Usage: steel appfwk mkplugin [options]

Create a new SteelScript Application Framwork plugin

Options:
  --version             show program's version number and exit
  -h, --help            show this help message and exit
  -n NAME, --name=NAME  Simple name for the plugin
  -t TITLE, --title=TITLE
                        Title for the plugin
  -D DESCRIPTION, --description=DESCRIPTION
                        Short description
  -a AUTHOR, --author=AUTHOR
                        Author's name
  -e AUTHOR_EMAIL, --author-email=AUTHOR_EMAIL
                        Author's email
  --non-interactive     Accept defaults for all options not specified
  -d DIR, --dir=DIR     Location to create the new package
  -w, --wave            Create the sample wave plugin rather than empty
  --nogit               Do not initialize project as new git repo
Note
You can create a fully functional sample “Wave Generator” plugin
using the command steel appfwk mkplugin -w. This will populate
steelscript-wave in the current directory with all the files
associated with this plugin. The source files are well documented.
Once created, cd steelscript-wave followed by pip install -e .
will install the plugin and make it available in your current
application project.
You will need to give your new plugin a short name – this should be
all lowercase and very simple and short. A directory will be named
steelscript-{name} and all your code will be available via
import steelscript.{name}.*.
Use the title for a one-liner and description for even more detail.
You can change the title and description later by editing setup.py
and plugin.py (see below).
The new plugin will have skeleton code in most files with comments
to describe the functionality that is to be placed in each file.
See the wave plugin for an example of a fully functional plugin
that demonstrates many aspects of a plugin from core to
AnalysisTables.
By default the new source tree is initialized as a local git
repository if git is available. Specify --nogit to disable
this.
Note
The rest of this page will use name wave as an example.
11.10.3. Directory layout
Once a new plugin has been created, the following items will be present:
| File/directory | Description |
|---|---|
| gitpy_versioning | Source files to manage versioning |
| LICENSE | MIT License text |
| MANIFEST.in | List of files/directories to include/exclude for packaging |
| README.rst | Description of the project |
| RELEASE-VERSION | Version file |
| setup.py | Python script for creating distributions and installing |
| steelscript/ | Root directory for all source code |
| steelscript/wave/appfwk/ | Sub-directory of all Application Framework related sources |
| steelscript/wave/appfwk/datasources/ | Directory for defining new data source |
| steelscript/wave/appfwk/devices/ | Directory for defining new device types |
| steelscript/wave/appfwk/libs/ | Miscellaneous helper functions / class for appfwk |
| steelscript/wave/appfwk/models.py | Database models specific to this plugin |
| steelscript/wave/appfwk/plugin.py | Settings for the appfwk plugin |
| steelscript/wave/appfwk/reports/ | Custom reports |
| steelscript/wave/commands/ | Sub-commands for steel |
| steelscript/wave/core/ | Low-level functions and classes |
11.10.4. Installing from source
Once you have created the source tree for you new plugin, you will need to install it in order for your application framework project to find it.
The preferred installation method during development is as follows (from within a virtualenv, as necessary):
$ cd steelscript-wave
$ pip install -e .
The -e argument indicates that the package should be installed in
editable mode. That means you can make changes to the code in the
local directory and they will take effect in the environment where you
are installing the package. Without this flag, source files will
instead be copied into the site-packages directory.
Once your package is installed, it should show up in the output of
steel about:
$ steel about

Installed SteelScript Packages
Core packages:
  steelscript                               0.6.0.post43
  steelscript.netprofiler                   0.6.0.post23
  steelscript.netshark                      0.6.0.post21
  steelscript.wave                          0.0.1              <== new plugin
  steelscript.wireshark                     0.9.0rc2.post3
This means that in any of your scripts you can now import your code
via the module path steelscript.wave.
11.10.5. Plugin Reports
A typical first step is to write a test report or two as part of your plugin.
Note that while report source files are in your plugin directory, they
must be copied to your project using the collectreports command as
described in Collecting Reports (probably with the
--overwrite flag). Then you must reload reports. This must be executed each time you make a change to the
reports.
11.10.6. Creating a Distribution
Once you have successfully created a plugin and are ready to share it, you need to make a distribution. This is a fairly simple process that requires only setting a version number and building the package.
11.10.6.1. Setting a version
If your new project was set up with git, then versioning is based on git annotated tags. At creation a tag of 0.0.1 was added to the very first commit.
Tag a new version using git tag:
$ git commit -a -m "Checking in all outstanding changes"
$ git tag -a 0.0.2 -m 0.0.2
This will commit all outstanding changes since the last commit (to the
local repository only). Then a tag of 0.0.2 is added. Ideally
we recommend following Semantic Versioning
which uses the model of <major>.<minor>.<patch>. In any event
you should use increasing version numbers using this pattern to
ensure that upgrades happen properly.
If you are not using git, simple edit the RELEASE-VERSION file in
the root of the project to designate the desired version.
11.10.6.2. Packaging
Once you have set a version, a tar-file is created with one command:
$ cd steelscript-wave
$ python setup.py sdist
running sdist
running egg_info
writing dependency_links to steelscript.wave.egg-info/dependency_links.txt
writing requirements to steelscript.wave.egg-info/requires.txt
writing steelscript.wave.egg-info/PKG-INFO
writing top-level names to steelscript.wave.egg-info/top_level.txt
writing namespace_packages to steelscript.wave.egg-info/namespace_packages.txt
writing entry points to steelscript.wave.egg-info/entry_points.txt
reading manifest file 'steelscript.wave.egg-info/SOURCES.txt'
reading manifest template 'MANIFEST.in'
writing manifest file 'steelscript.wave.egg-info/SOURCES.txt'
running check
warning: check: missing required meta-data: url

creating steelscript.wave-0.0.2
creating steelscript.wave-0.0.2/gitpy_versioning
creating steelscript.wave-0.0.2/steelscript

...
...

Writing steelscript.wave-0.0.2/setup.cfg
creating dist
Creating tar archive
removing 'steelscript.wave-0.0.2' (and everything under it)
When this is complete you should see a file in the dist directory:
$ ls dist
total 20K
20K steelscript.wave-0.0.2.tar.gz
This is your new package!
11.10.6.3. Sharing and Installing
This new package can be installed on any other steelscript installation. Simply upload to the new machine, start up the virtualenv and run:
$ pip install steelscript.wave-0.0.2.tar.gz
Thats about it! When you’re ready, you can post your entire tree up on github or even share it via PyPI, the Python Package Index.
11.10.7. Custom Data sources and Analysis Tables
The real power in plugins is the ability to write fully custom code to extract data from remote devices or perform complex analysis on data retrieved from other tables. See the Wave plugin for an example of what’s possible.
Move on to Analysis Tables for a detailed guide to writing custom analysis classes.