11.5. Configuration
Once a project has been created (see Projects), a local_settings.py
file will be in the directory with default settings available for customization.
11.5.1. Setting up the database
By default, local_settings.py uses a simple sqlite database to store
configurations, reports, and other data. This is fine for single-user
and basic development, but sqlite has concurrency and performance limitations
which make it unsuitable for more dedicated use.
DATABASES = {
    'default': {
        # Optionally change 'sqlite3' to 'postgresql_psycopg2', 'mysql' or 'oracle'.
        # for connection to other database engines
        'ENGINE': 'django.db.backends.sqlite3',

        # Path to database file if using sqlite3.
        # Database name for others
        'NAME': os.path.join(DATAHOME, 'data', 'project.db'),

        'USER': '',     # Not used with sqlite3.
        'PASSWORD': '', # Not used with sqlite3.
        'HOST': '',     # Set to empty string for localhost. Not used with sqlite3.
        'PORT': '',     # Set to empty string for default. Not used with sqlite3.
    }
}
More detailed discussion of these parameters can be found in the django documentation. If help is needed configuring a MySql or PostgreSQL database, many resources are available online.
After changes are made to this entry, you will need to initialize the new database tables from App Framework by running the reset_appfwk command.
11.5.2. Devices
Logging in to the server will bring up the “Edit Devices” page, except for the first time after initializing the server, in which case the the User Preference page will be brought up instead.
This page is only accessible to admin users, and provides a means to add devices for use throughout the site.
Click on “Add New Device” and fill out the requested information for each device you’d like to be able to use as a datasource.
11.5.3. User Preferences
With a freshly initialized server, the first login to the server will bring up the “User Preferences” page. Besides, you can navigate to the upper-right button and choose “Preferences”. This will bring up a simple dialog allowing updates to the admin user password, email address, and timezone. It is required to update the timezone to be the same as the local system. Further discussion of user management is described in the section below, Managing users.
Note that each user will be able to change their own timezone and email address.
11.5.4. System Settings
Navigating to the upper-right button and choosing “System Settings” bring up the admin-only list of system configuration items.
Ignore cache- every report will be re-run directly from the source device, ignoring any locally stored cacheDeveloper mode- enables an option under Report Run widgets called “Debug this report”, which will rollover the server logs, run the report, collect logs, then prompt the user to download a zipfile of the collected information. Due to the potentially sensitive nature of the log files, this should be turned off except for explicit debugging purposes.Enable Map Widgets- provides the option to enable/disable all map widgets, and if enabled, to choose between OpenStreetMap sources and Google Maps sources. In order to use Google Maps, anAPI Keyor aClient IDis required. See Map Widgets for more information.Enable Weather Map Overlay- provides the option to enable/disable weather overlays for map widgets. In order to use weather overlays, aWeather Tile URLis required. See Weather Overlays for more information.
11.5.4.1. Map Widgets
Two options are available for Map Widgets in App Framework, OpenStreetMap and Google Maps. Use of either service is subject to their license terms. Additionally, use of Google Maps requires one of two types of api keys, please check with your IT administrator which one is appropriate for your use, and see the following links for more information:
11.5.4.2. Weather Overlays
To add weather overlays to map widgets, you will need a weather tile URL. This URL can be generated from any number of weather tile providers. The only requirement is that the URL contains {x}, {y}, and {z}. These are special values which will be used to calculate the x, y, and z positions of the tiles that will be used to display over the map.
Generating a URL using Open Weather Map:
- Visit OpenWeatherMap and sign up
- Once signed up, visit https://home.openweathermap.org/ and click Map Editor
- Click + New Project and name your new map overlay project
- Begin adding layers, choosing what weather data to display until you are satisfied with your overlay.
- Click the globe icon to view the overlay’s URL. It should look something like this:
http://maps.owm.io:8091/56e64a322ee3260100f4a254/{z}/{x}/{y}?hash={your_app_id}
- Replace
{your_app_id}with an identifier for your application. For example:?hash=my_app. - Copy and paste the URL into the Appfwk Weather Tile URL box.
11.5.5. Locations
The Geolocation functionality of App Framework relies on internally stored set of locations and IP address mappings in order to accurately plot data points. Included in the example-configs directory are two locations files you can modify to meet your internal network layout. To install these files (or your own similarly created ones):
$ cd appfwk_project
$ python manage.py locations --import-locations example-configs/sample_locations.txt
Imported 13 locations
$ python manage.py locations --import-location-ip example-configs/sample_location_ip.txt
Imported 13 locations/ip entries
11.5.6. Managing users
As a default, a single user is enabled on the system with the username /
password combination: admin / admin. This account has full administrative
rights and should only be used by trusted users.
The password for this default account can be changed at any time via the “Change User Password” link under admin->Preferences.
To add additional user accounts or manage existing ones, choose the “Admin Panel” option from the dropdown menu. This will lead to page similar to the following:
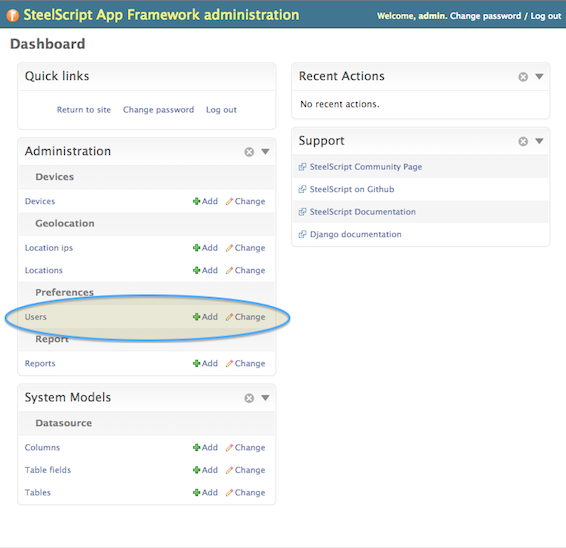
You can use the Add button directly from this page or click on Users to
manage all locally stored user accounts.
11.5.7. Using LDAP for Authentication
A file named ldap_example.py can be found in the directory
example-configs within the app framework project that gets created for you.
This file includes several example settings that can be incorporated into your
local_settings.py file to enabled authentication against an internal LDAP
or Active Directory service.
As noted at the top of the file, two additional python packages are required:
- ldap
- django-auth-ldap
With those installed, further information can be found at the django-auth-ldap documentation site.
Note that under the AUTHENTICATION_BACKENDS setting, including both
LDAPBackend and ModelBackend will still allow locally created user
accounts to access the site.