Managing Appliances
This topic describes how to manage the gateways, switches, and access points. It includes these sections:
Viewing SteelConnect appliances
SteelConnect appliances are SDI gateways, SteelHead SD appliances, switches, and access points that connect to SCM.
The appliances overview lists the SteelConnect hardware configuration within an organization. It includes the hardware, software, and shadow appliances.
In SteelConnect 2.10 and later, SCM works with XMS-Cloud to plan, deploy, and manage access points. For details, see
Wi-Fi Manager.
To view the appliances within an organization
•Choose Appliances > Overview.
Viewing the appliances within an organization
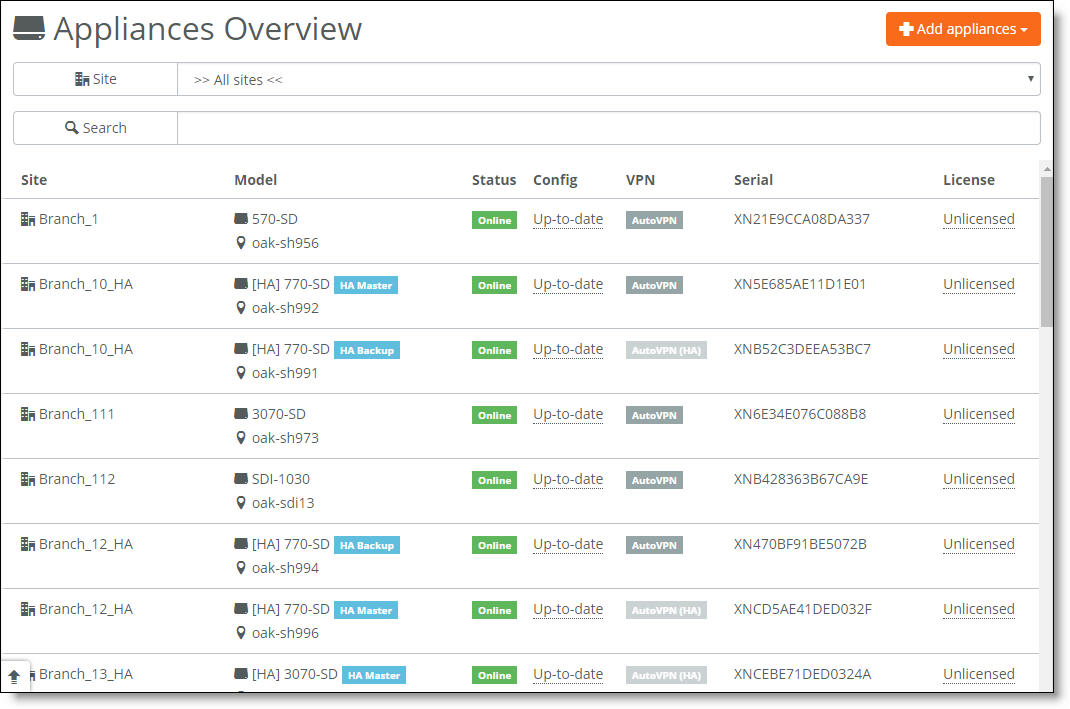
The display includes the appliance status and if its configuration is up-to-date. It also shows if a firmware upgrade is pending or up to date and whether the appliance is set up as an automatic VPN gateway for a site.
For details on SteelHead SD 570-SD, 770-SD, and 3070-SD appliances, see the SteelHead SD Installation Guide and the SteelHead SD User Guide.
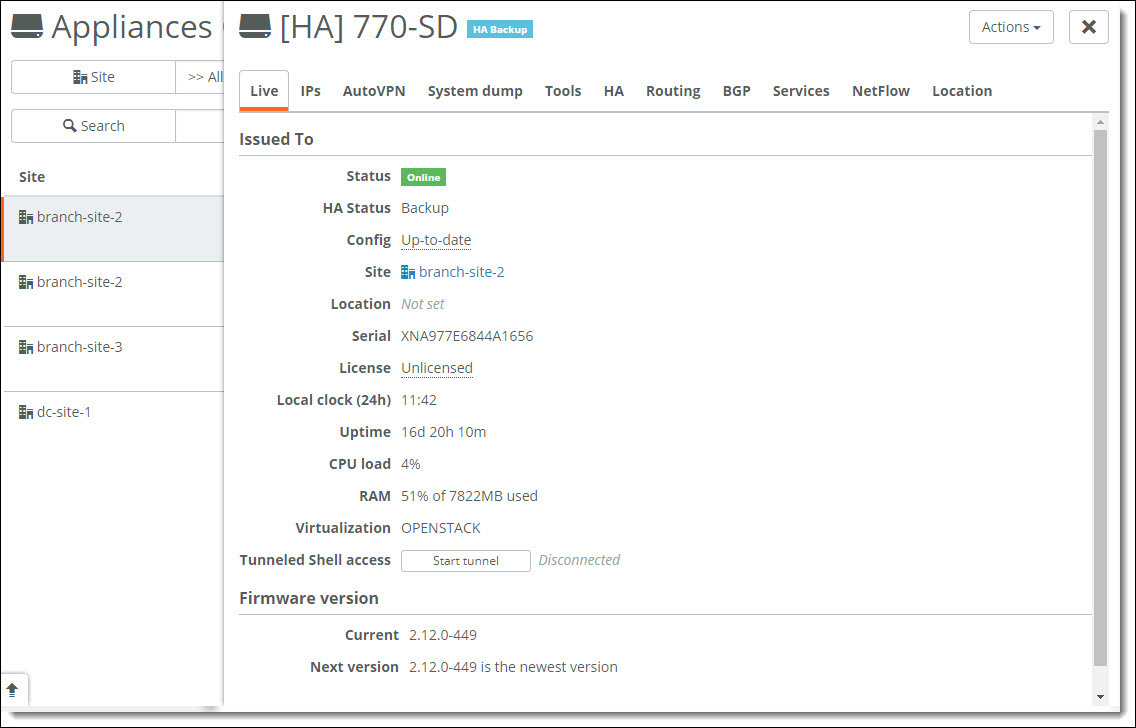
Viewing appliance details
Click an individual appliance to view its properties, such as serial number and firmware version. You can also generate a support package to send to Riverbed support for troubleshooting and ping another appliance. For details, see
Support package.
We recommend that you always specify a detailed location for the appliance using the Location field under the Location tab in the appliance page. Setting the location associates an appliance with its location wherever an appliance is referenced on various SCM pages. The location is especially important when adding access points.
Appliance date and time
In DHCP client mode, the appliances use the DHCP-provided Network Time Protocol (NTP) server for synchronizing their internal clock. If the DHCP-provided NTP server is not reachable, the appliance connects to known NTP servers on the internet.
Viewing gateways
To view the gateways within an organization
•Choose Appliances.
Viewing the gateways for all sites
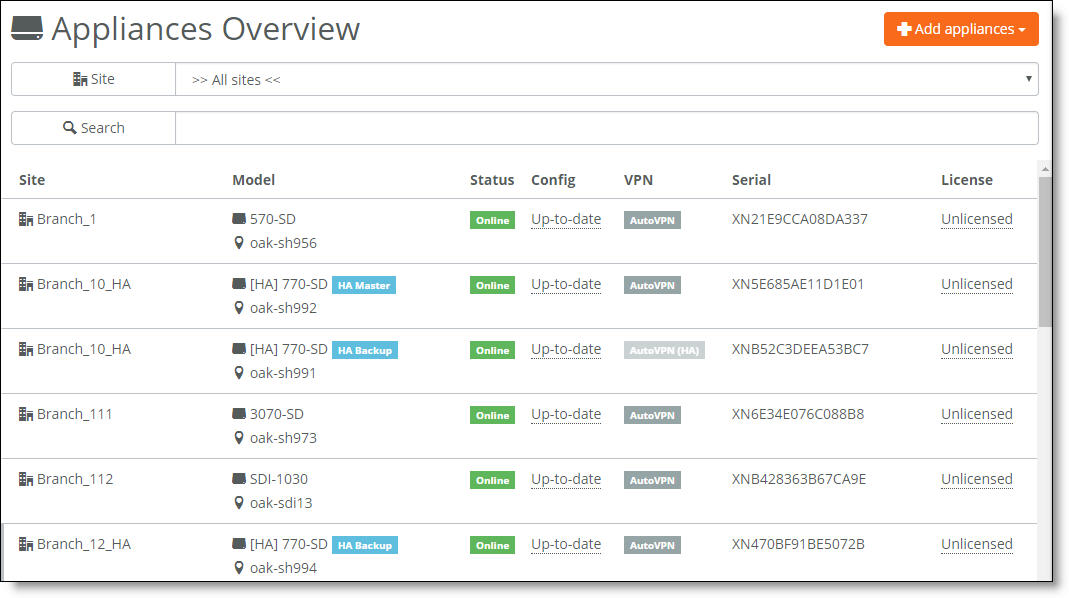
The display includes the gateways for all sites. You can filter the display by selecting a site from the drop-down list. You can also search for a specific gateway.
To view gateway details
•Select a gateway.
SCM displays details on the gateway. You can change settings associated with a gateway using the tabs on the gateway details page. Use the Actions menu to reboot or delete the gateway (and more).
Gateway details page
Wi-Fi
The Wi-Fi tab shows all active client sessions on the radios of the appliance.
STP
The Spanning Tree Protocol (STP) prevents network malfunction by blocking ports that can cause loops in redundant network paths.
SteelConnect gateways and switches implement the Multiple Spanning Tree (MST) protocol defined in the IEEE 802.1s specification.
By default, STP is activated on all LAN ports of SteelConnect gateways and switches. We strongly recommend leaving STP enabled; however, you can use the STP tab to disable it. When you disable STP on an appliance, it’s deactivated for all ports.
Do not disable STP without a valid reason, as disabling it can cause network loops.
Setting the STP root bridge priority
To work with an existing STP root bridge configuration on non-Riverbed equipment, and to configure Riverbed appliances to be compatible with an existing configuration, you can set the STP root bridge priority at the appliance level. You can also configure a Riverbed gateway or switch as the STP root bridge. The appliance with the highest priority (assigned the lowest number as its priority value) in the site assumes the role as the root bridge. By default, SCM assigns the root bridge priority levels shown in
STP tab to all STP-enabled appliances.
STP tab
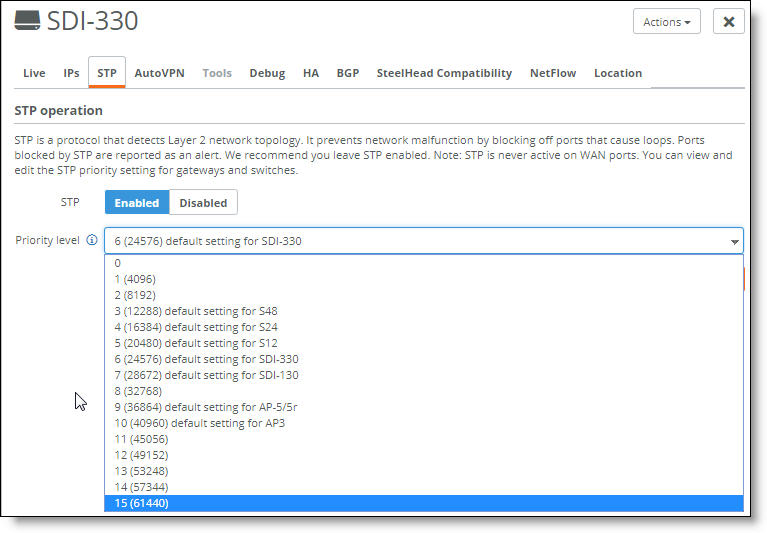
The number in parentheses following the priority level references the legacy Cisco method of assigning a priority in increments of 4096.
To set the STP root bridge priority on an appliance
1. Select the STP tab.
2. Verify that STP is enabled.
3. Select a priority level from the drop-down list.
4. Click Submit.
STP is never active on WAN ports, and STP is not supported on gateways configured for high availability.
The SteelHead SD 570-SD, 770-SD, and 3070-SD appliances, the SDI-VGW virtual gateway, and the SDI-1030 and SDI-2030 gateways do not support STP.
SCM displays an alert when STP is blocking ports on an appliance. Blocked ports do not allow traffic to be sent or received through the port. A port blocked by STP isn’t disabled, and the switch on the other end of the link still sees the link as active, but frames sent over that link are blocked.
For details, see the SD-WAN Deployment Guide.
AutoVPN
For sites with more than one gateway, enabling AutoVPN on a gateway makes it the hub concentrator for AutoVPN connections (including RouteVPN and SwitchVPN). The ideal placement for the hub gateway is inline with all traffic entering and exiting the site.
Alternatively, if you’re using Classic VPN, you might need to turn AutoVPN off. For details, see
AutoVPN modes.
Adding shadow appliances
SCM stores all configurations, including your existing and future network plans. This means you can either add an appliance when you physically have it or you can preplan and configure an appliance by adding a shadow appliance and later drop the physical appliance into the topology with no further configuration. Shadow appliances are basically cardboard cutouts that you can use to represent what will be a physical appliance after registering it with a serial number.
To add shadow appliances
1. Choose Appliances.
2. Click Add appliances and select Create Shadow Appliance.
3. Select a gateway from the model drop-down list.
For details on the SteelHead SD 570-SD, 770-SD, and 3070-SD appliances, see the SteelHead SD User Guide.
4. Select the site where you want to deploy the shadow appliance from the site drop-down list.
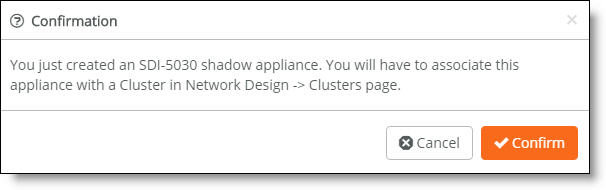
When you deploy an SDI-5030 gateway into a site, a dialog box lets you know that you must associate the appliance with a cluster.
Adding an SDI-5030 gateway
5. Click Submit.
6. Repeat these steps for each of your appliances.
After adding the shadow appliances, SCM automatically connects them using AutoVPN to create secure VPN tunnels. Next, you’ll register the gateways to transform them from shadow appliances to physical appliances.
7. Choose Network Design > Uplinks to see that SCM has automatically assigned uplinks to the new gateways.
Before deploying the hardware, you can configure other SteelConnect features now or wait until later.
Registering appliances
When you add an appliance for future deployment, it’s called a shadow appliance. Shadow appliances are basically cardboard cutouts that you can use to represent what will be a physical appliance after registering it with a serial number. For example, you can deploy a shadow SDI-130 gateway into the headquarters site and work with it as though it were a real, physical gateway before deploying the physical SDI-130 gateway in your network.
You can create and register an appliance on the Appliances Overview page.
To register a shadow appliance
1. Choose Appliances.
2. Click the shadow appliance description.
3. Click Register hardware.
4. Type the serial number.
To help you identify an appliance without unmounting it, unregistered appliances with an OLED display (SDI-330 gateway, Switch S24, and Switch S48) display their serial number in the screen until you register the appliance with SCM.
5. Click Submit.
6. Plug the network cables into the configured ports.
The provisioning server hands off the appliance when it connects into the particular organization and the particular site, and it gives the appliance its configuration, brings it online, performs all the firmware upgrades, and realizes your design on the appliance in the real world. This provisioning process also makes the appliances easily replaceable.
After AutoVPN establishes the tunnels, you can click a site marker on the dashboard map to see a representation of the network. You can see on the map that the locations are completely connected with a full mesh VPN, and these lines will change if problems arise or if there is downtime at any of the sites.
Gateway provisioning
By default, when you register a gateway, SCM automatically creates a DHCP-client uplink and attaches it to the gateway WAN1 port. In addition, it preconfigures all switched LAN ports with the site-local zone.
You can add more networks in Network Design > Zones later. You can then assign these zones to a gateway port.
When gateway selection is set to automatic (the default setting), the SteelConnect gateway always uses the default gateway IP from the IP configuration of the zone.
Additionally you can enable gateway services like IPv4 DHCP server and IPv6 RA per zone.
Make sure that internet connectivity and a DHCP server are available on the WAN port of the gateway to allow the first provisioning to succeed. While booting up, one green LED of the gateway will glow as long as a connection to SteelConnect Manager was established successfully. Glowing will stop in normal operation mode.
For networks with no DHCP server available, or when you want to use a static IP or DSL uplink for the gateway, you can use offline provisioning.
How do I provision a gateway offline?
Adding a new gateway to your network requires the appliance to contact the SteelConnect Manager, which provides the initial configuration. In a scenario where no DHCP server is available in the existing network, or where a static IP address should be assigned to the new gateway, you can use offline provisioning.
You can set up the configuration on SCM, even if the hardware is currently not present at the related site.
You’ll need the serial number of the new gateway to create an offline provisioning configuration file.
This procedure supports all SteelConnect SDI gateways only. You can’t provision an access point or switch offline using a USB stick.
This procedure doesn’t apply to SteelHead SD appliances. For SteelHead SD models, see
https://supportps://supportkb.riverbed.com/support/index?page=content&id=S30215.
To provision an appliance without DHCP
1. Log in to SteelConnect Manager.
2. Choose Network Design > Sites > Add Site(s).
3. Specify at least the site tag, name, and city.
4. Click Submit.
5. Choose Network Design > Uplinks.
An uplink is the last network segment connecting the local site to a WAN network.
6. Select the uplink for the new site and define an uplink type: for example, static IPv4 or DSL.
7. Fill out the required IP address or user account information and click Submit.
8. Choose Appliances, click Add appliances, and select Register Hardware Appliance.
9. Enter the serial number of the SteelConnect Gateway and select the site you want to deploy the appliance.
10. Select the new hardware appliance, click Actions, and select Download config.
The system downloads a configuration file named with the gateway serial number.
11. Apply the file on a FAT32 formatted USB stick. The SDI-130, SDI-330, SDI-1030, and SDI-5030 gateways do not support other file system types like Linux ext2, ext3, ext4, NTFS, and so on. The SDI-2030 gateway supports FAT32, ext3, and ext4.
12. Deploy the gateway on the site and power on the appliance.
Wait at least 30 seconds until the new appliance powers up correctly before plugging in the USB stick.
Because the gateway doesn’t mount the stick during boot up, it won’t import the configuration automatically.
13. Plug in the USB stick to restore the configuration.
The gateway connects to SCM with the previous set up configuration.
Exporting NetFlow data
NetFlow export is typically enabled at the realm or organization level and you don't need to configure individual appliances. It can be useful to analyze NetFlow data for an appliance when you want to temporarily narrow the flows for troubleshooting.
NetFlow export is enabled at the appliance level by default, and becomes active when NetFlow is enabled at the realm or organization level. SteelConnect supports NetFlow exporting on the SDI-130, SDI-330, SDI-1030, SDI-2030, and SDI-5030 gateways; the SDI-VGW virtual gateway; and SteelHead SD appliances. Collectors can be configured using an IPv4 address or a fully qualified domain name.
The appliance includes NetFlow traffic destined to its LAN zone in its NetFlow reporting. When the NetFlow collectors are placed in sites behind appliances that are reporting NetFlow themselves, the appliance will include NetFlow reports destined to a collector in its NetFlow reporting.
For more NetFlow details and information on configuring NetFlow at the realm level, see
Exporting NetFlow data.
To enable NetFlow export
1. Choose Appliances.
2. Select the appliance.
3. Select the NetFlow tab.
4. Under NetFlow export, click On.
The appliance monitors the interfaces configured at the realm or organization level. You cannot configure the monitored interfaces at the appliance level.
To configure collectors for an appliance
1. Under NetFlow collectors, click Add Collector.
Adding a NetFlow collector

2. In the Collector address field, specify the collector IPv4 address or fully qualified domain name (FQDN). If you specify a FQDN, the appliance will perform the DNS resolution at the time of export. Make sure that the DNS server can resolve the collector hostname.
3. In the Port field, specify the UDP port number the flow collector is listening on.
The exporter will iterate through the list of collectors when sending packets to the UDP destination.
You cannot change the default export protocol IPFIX. IPFIX is the only supported export protocol in SteelConnect 2.12.
4. Click Submit.
Monitoring the appliance CPU temperature
SteelConnect monitors the CPU temperature on the SteelHead SD appliances and the SDI-2030 and SDI-5030 gateways.
The thresholds for CPU temperature for the 570-SD and 770-SD appliances are:
•Upper critical: 97.000° C
•Upper noncritical: 90.000° C
The temperature is shown on the Health Check page, under Appliance Resources. For details, see
Appliance Health page details. The Health Check resources display for a SteelHead SD 3070-SD, a SDI-2030 gateway, and an SDI-5030 gateway shows the CPU temperature as the number of degrees lower than the upper limit.
A display of 0 means that the appliance is in an upper nonrecoverable state. The appliance temperature for a SteelHead SD 3070-SD appliance, a SteelConnect SDI-2030 gateway, and a SteelConnect SDI-5030 gateway might report a negative Celsius temperature as a green check mark because the Intelligent Platform Management Interface (IPMI) tool does not report the actual temperature, but instead reports the thermal margin, which is the processor's thermal specification minus its current temperature.
For example, -60° C means that it is 60 degrees lower than the temperature upper limit. Thus, if the temperature is 0° C, it means the system is in an upper nonrecoverable state and will be displayed as a red check mark.
To view the appliance temperature
1. Choose Health Check > Appliance Health.
2. Click anywhere in the row for the appliance you want to view.
The temperature appears under Resources.
3. Click the plus sign (+) for more information.