Administering a Realm
This topic describes tasks and settings that can be enabled by a realm administrator. Each SCM has a realm that hosts one or more organizations. It includes these sections:
Realm overview
SCM is a hierarchical multitenant management portal with a deployed instance of SCM running in Amazon AWS, called a realm, at the top. The realm can host one or more organizations.
An organization represents an end customer. It contains the customer details, sites, devices, and zones associated with the devices, the uplinks, and so on.
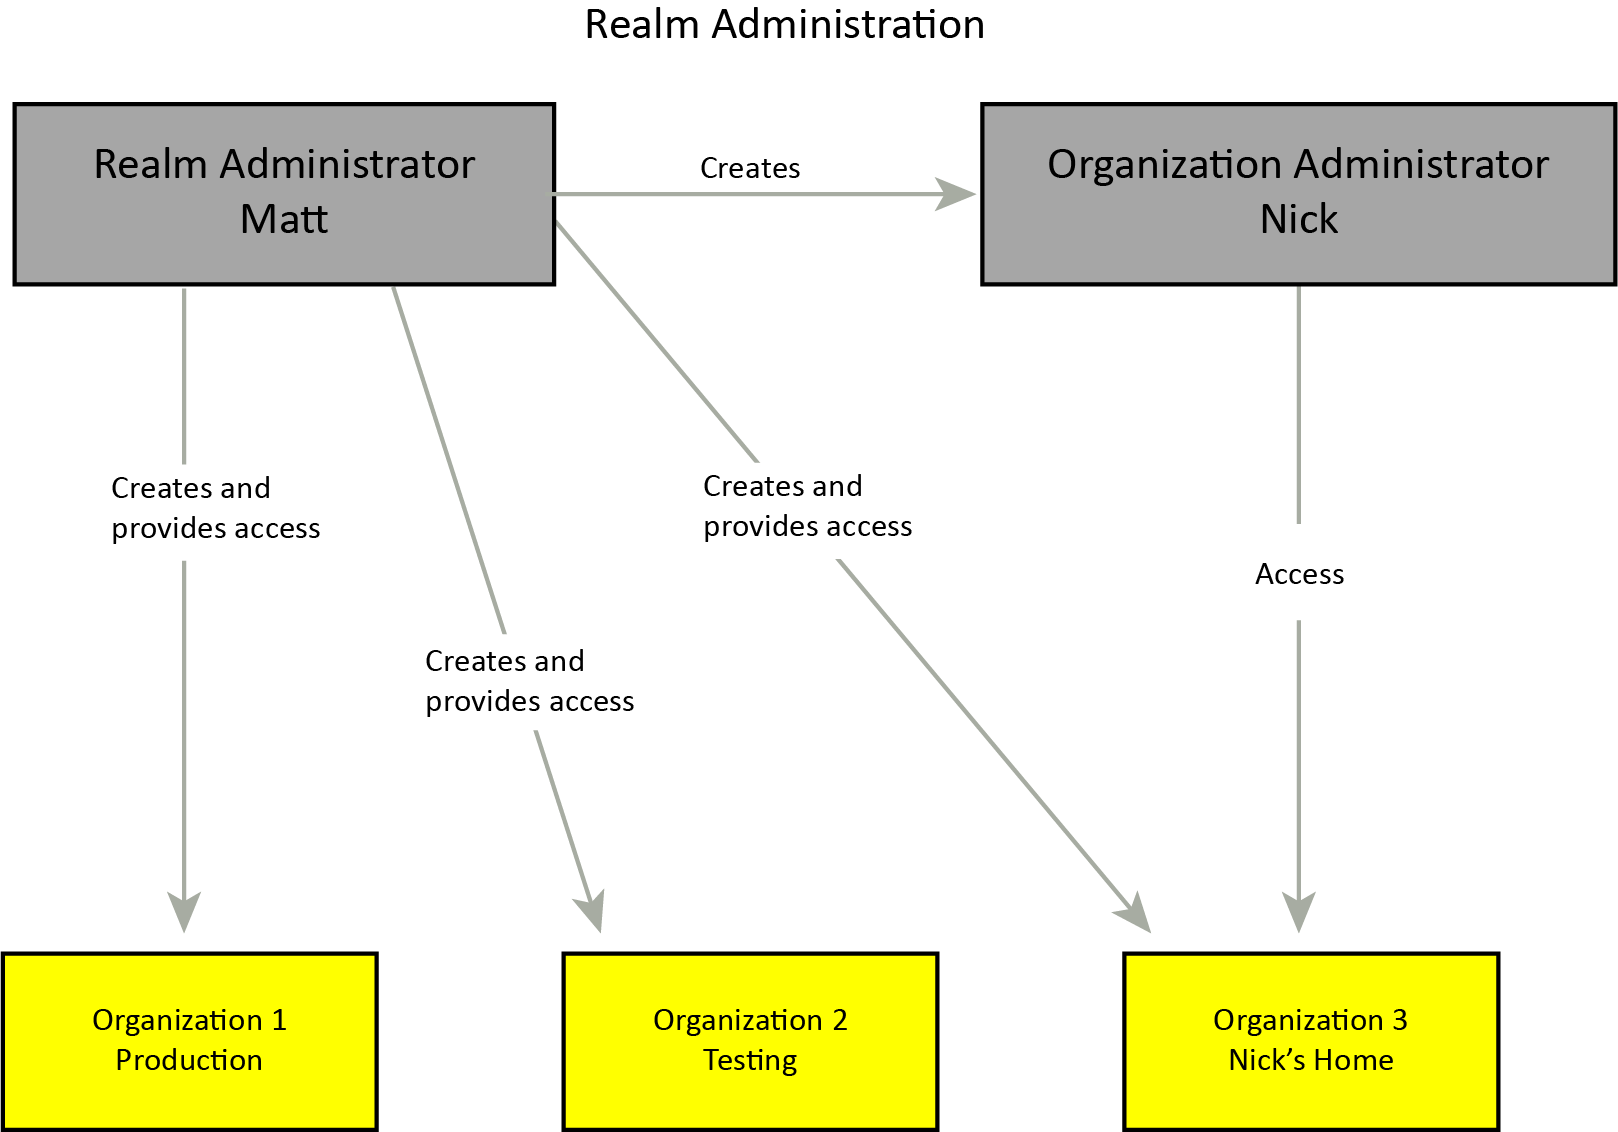
Each realm has realm administrators and organization administrators.
•Realm administrators - Super users that view and manage the entire instance.
•Organization administrators - Users that manage an organization within a realm.
A single Amazon instance could host 50 small organizations in production, whereas a larger organization might have one dedicated Amazon instance.
You can change settings associated with a realm after logging in to SCM with realm administrator credentials and using the tabs on the realm map. The procedures described in this topic require realm administrator credentials.
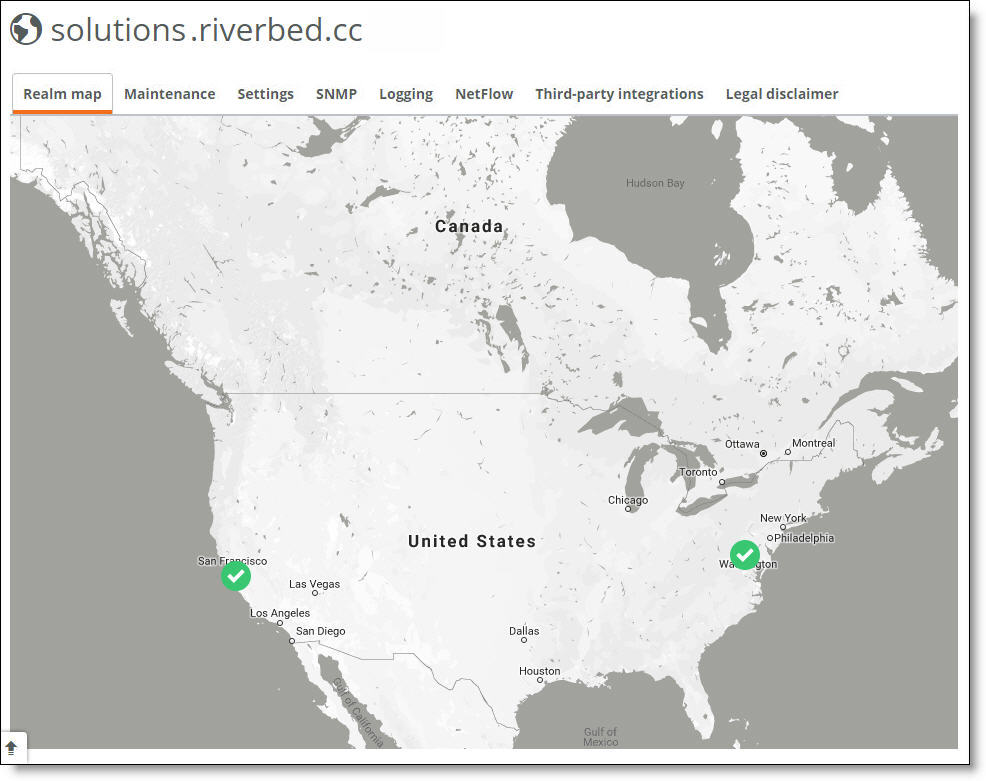
Realm map
Managing the firmware upgrade process
The Maintenance tab controls the centrally managed firmware upgrade process. A Riverbed appliance simply needs to be connected and registered, and the upgrade happens automatically when a new version of the firmware is available (unless you reschedule the upgrade or an upgrade schedule is customized for an organization within the realm). For details, see
Upgrade overview.
An organization’s maintenance policy overrides the realm’s maintenance policy.
Setting security and enabling the REST API
The Settings tab is where you enable two-factor loopback authentication, allow access to the Riverbed Support team, enable APIs, add passwords to logins to improve security, and allow an organization administrator to reset their own password.
Password policy
Realm administrators can set a password policy for all users, including organization administrators. The first time you enable a password policy, passwords for all users expire immediately and all users will need to create new passwords to log in to SCM. By default, password policy is disabled.
To enable a password policy
1. At the realm level, select the Settings tab.
2. Under Password Policy, click On.
A dialog warns that all user passwords will expire immediately.
3. Click Expire All Passwords.
4. Customize the following settings or click Submit to accept the default settings.
•Password expiration time (in days) - Specify the number of days the current password remains in effect. The default is 30. The maximum is 60. The minimum is 1.
A password expiration warning will appear for every login when seven or fewer days remain in the expiration period.
When a user fails to reset a password within the given expiration time, the administrator must reset the password for the next login.
•Number of failed logins allowed - Restrict the number of failed login attempts by specifying the maximum number of unsuccessful login attempts before blocking user access to the realm. The user is prevented from further login attempts when the number is exceeded. The default is 3.
An error message appears on the login page after each failed login attempt. The error message shows the number of remaining login attempts remaining before access to the realm is locked.
When the login attempts exceed the number of failed logins allowed, the account is locked. An administrator can click the Forgot Password link on the login page to unlock a locked account. Optionally, the user can ask the realm administrator to reset the password. Resetting a password requires a registered email address or mobile phone number for the user.
When a user doesn’t have a registered email address or mobile phone number, the realm administrator can specify a temporary password. A temporary password has no password characteristic requirements because it’s only used once. After the user has correctly entered the temporary password, they must immediately create a new password that complies with the password policy criteria.
•Minimum length of password - Specify the minimum number of characters for the password length. The default is 8.
•Session expiration time (in minutes) - Specify the number of minutes the session remains active after inactivity. The default setting is 30. When the expiration time elapses, the session becomes inactive. The Disable long-term session caching setting on the administrator’s Authentication tab must also be set to
On. By default, long-term session caching is disabled. For details, see
Enabling long-term session caching for a realm.
Password characteristic requirements
•By default, the minimum password length is eight characters. You can change the minimum length.
•The password must contain one uppercase character (A-Z).
•The password must contain one lowercase character (a-z).
•The password must contain one digit (0-9).
•The password must contain at least one special character (~`!@#$%^&*()-_+={}[]|\;:"<>,./?).
•You cannot reuse any of the past five passwords.
•The password cannot contain personal details such as a name or a phone number.
Password characteristic requirements
When password policy is enabled, a realm administrator can enter a temporary password in the Change password field that will allow a user to access SCM and reset their password. This is a one-time, temporary password that does not need to comply with the password policy criteria. The next time the user logs in, they must enter this temporary password. After they have correctly entered the temporary password, they must immediately create a new password that complies with the password policy criteria.
Automatic expiration of active user sessions
In SteelConnect 2.12, active user sessions will expire and require reauthentication when these account settings change:
•The user will be automatically logged out after the realm administrator changes their password or username.
•The user will be automatically logged out after they change their password.
•The user will be automatically logged out after the realm administrator changes the user's two-factor authentication setting. When two-factor authentication is enabled, the user will be logged off when the their mobile phone number changes. For details, see
Enabling two-factor authentication.
When a realm administrator changes two-factor authentication at the realm level, all active sessions of those users who have two-factor authentication set to use realm settings will be logged out.
•All of the users assigned to a role will be automatically logged out after the realm administrator changes the role’s properties.
•The user will be automatically logged out after a session is inactive for 30 minutes, by default, or when a session exceeds the active session timeout period set by the realm administrator.
The realm administrator can override the realm setting to keep a user logged in using the Disable long-term caching setting on the administrator’s Authentication tab. For details, see
Enabling long-term session caching for a realm.
•A user can’t log in to more than one active session. The second login that creates a new session for a user that already has an active session invalidates the first active session. The user is logged out of the first session.
•When the realm administrator changes the user's superuser privileges, that user will be logged out.
Enabling support access
A realm administrator can allow Riverbed Support to directly view and troubleshoot issues for an SCM instance.
To enable support access to your SCM
1. At the realm level, select the Settings tab.
2. Under Riverbed support access, click On.
Enabling REST API
SteelConnect features a powerful REST API for northbound traffic. When you enable REST API, it is enabled for all organizations within the realm. You can use the API to access many features that are also available through the SteelConnect Manager (SCM) graphical user interface (GUI). For details, see
Accessing the API.
To enable REST API
1. At the realm level, select the Settings tab.
2. Under REST API, click On.
Enabling two-factor authentication
When two-factor authentication is enabled for the realm, all access to the realm GUI must be authenticated with a second authentication mechanism. The value of this setting is also the default setting for two-factor authentication when accessing individual organizations. You can override this default setting per organization.
You must specify a mobile phone number for every administrator before enabling loopback authentication through mobile messaging.
To enable two-factor authentication
1. At the realm level, select the Settings tab.
2. Under Two-factor authentication, click On.
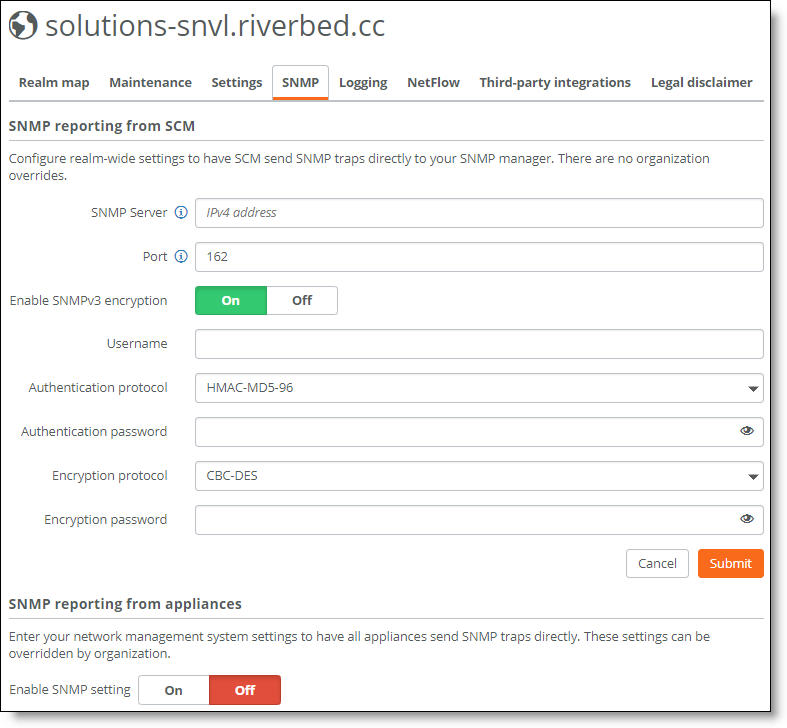
Enabling SNMP reporting and logging
The SNMP tab is where you enable SNMP operations (such as SNMP GET and SNMP WALK) as well as event reporting (in the form of traps) to the SNMP server.
SteelConnect provides support for these SNMP versions:
•SNMPv1 and v2c polling and event logging are supported on the SDI-130, SDI-330, SDI-1030, and SDI-5030 gateways. They are also supported on VGWs. SNMPv2 is the default setting.
•SNMP v1, v2c, and v3 are supported in SteelConnect Manager (and only visible by a realm administrator).
Exporting SNMP events
SteelConnect 2.10 and later support the standard device IF-MIB to monitor appliance interface statistics and SNMPv2 MIBs. IF-MIB statistics fetch information related to interfaces and monitor packet counters over these interfaces. For a list of SNMP events, see
SNMP traps.
You can enable an on-premises network management system (NMS) to poll SteelConnect gateways for MIB objects related to IF-MIB and SNMPv2 MIB. Also, gateways will generate v1 and v2 traps asynchronously in case of some events: for example, interface down or up, authentication failure, and SNMP agent restart.
NetFlow collectors allow SNMP queries. For details, see
Exporting NetFlow data.
When SNMP and NetFlow are enabled and NetFlow collectors are configured:
•The appliance will reconfigure the SNMP agent to allow polling by NetFlow collectors.
•You might need to add or modify inbound (NAT) rules to accept SNMP requests from the collector hosts. For details, see
Policy controls.
•If SNMP is disabled and you are enabling NetFlow, you must explicitly enable SNMP to allow polling by NetFlow collectors.
To enable SNMPv1/v2
1. At the realm level, select the SNMP tab.
SNMP reporting
2. Type the SNMP server’s IPv4 address.
3. Type the SNMP port number used by the SNMP agent to send SNMP traps to server.
To enable SNMPv3
1. Click On next to Enable SNMPv3 encryption.
2. Type the username.
3. Select an authentication method from the drop-down list.
–HMAC-MD5-96 - Use the Message Digest 5 algorithm, a widely used cryptographic hash function with a 128-bit hash value. This is the default value.
–HMAC-SHA1-96 - Use the Secure Hash Algorithm, a set of related cryptographic hash functions. SHA is considered to be the successor to MD5.
4. Specify an authentication password. Click the eye icon to see the password as you type. The password remains visible until you click the eye icon again.
5. Select an encryption method from the drop-down list:
–CBC-DES - Use the cyber block chaining (CBC) data encryption standard (DES). This is the default value.
–CBS-3DES-EDE - Use the triple data encryption standard, which is similar to the CBC-DES method, but it applies the DES operation three times.
–CFB128-AES-128 - Use the advanced encryption standard (AES).
6. Specify an encryption password. Click the eye icon to see the password as you type. The password remains visible until you click the eye icon again.
7. Click Submit.
Sending SNMP data directly to your network management system
When direct SNMP reporting is enabled, your network management system (NMS) initiates the SNMP poll to all individual gateways in a realm. The gateways send SNMP data directly to the NMS. You can override this setting to limit the SNMP data to all gateways within an organization. To override the realm settings, see
SNMP.
The direct SNMP reporting feature doesn’t support SNMPv3.
To enable direct SNMP reporting
1. At the realm level, select the SNMP tab.
2. Under SNMP reporting from appliances, click On. Clicking On enables all direct SNMP configuration fields.
3. Type your NMS IPv4 address.
4. Type the NMS server port number. The default is 162.
5. Type a string to authenticate and identify the read-only community: for example, public. The maximum is 30 characters.
6. Click Submit.
SCM forwards the configuration to the SteelConnect gateways, and the gateways use this configuration to set up the SNMP agent daemon. The SNMP agent services the GET and WALK requests from the NMS and also generates traps and sends them to the NMS.
Configuring the NMS
To enable SNMP operations (such as SNMP GET and SNMP WALK or asynchronous traps from a SteelConnect appliance) you need to provide the NMS interface IP address through which the appliance is reachable.
The IP address of the appliance is required. For an SDI-2030 or SDI-5030 gateway, use the management IP address. For the SDI-130, SDI-330, and SDI-1030 gateways, use the local zone IP address.
The port number to query the appliance is the standard SNMP port 161. You need to specify this port if the NMS does not use it by default.
Exporting syslog messages
For midsize to large enterprises that require log exporting to a central server, an SCM appliance provides remote logging. With remote logging, all system logs (syslogs) from different appliances can be exported, aggregated, and stored in a single remote server located within the same enterprise network. Remote logging is configured for on-premise SteelConnect appliances sending logs to an on-premise syslog server to keep security, compliance, and audit requirements intact.
You can also export syslog messages to a local enterprise collector.
For details on the configuring a remote syslog server, the syslog message format, and a list of syslog messages, see
Syslog overview.
Exporting NetFlow data
NetFlow is a network protocol for the collection and monitoring of network traffic flow data generated by NetFlow-enabled appliances. Appliances running SteelConnect 2.12 can be enabled as flow exporters to export network flow information to a flow collector. In the flow exporter role, the appliances aggregate packet information into flows, and then export the flow records to one or more flow collectors using the IP Flow Information Export (IPFIX) protocol. For IPFIX details, see
RFC5101.
The flow collector receives, stores, and preprocesses the flow data from the exporter.
NetFlow monitors all traffic flows that enter and exit the appliances, including flows on the underlay, overlay, and local flows. These flow records provide a central monitor with the SteelConnect view of the network.
Configuring NetFlow for SteelConnect
You can enable NetFlow data export to a flow collector at the SCM realm, organization, or appliance level. When NetFlow is enabled for an organization, the organization settings take precedence over the realm settings.
SteelConnect supports NetFlow exporting on the SDI-130, SDI-330, SDI-1030, SDI-VGW, SDI-2030, and SDI-5030 gateways, and SteelHead SD appliances. NetFlow export is disabled by default at the realm and organization levels. NetFlow is enabled by default on appliances, and becomes active only when NetFlow is also enabled at the realm or organization level.
Configuration levels
The NetFlow configuration levels are:
Realm level | Organization level | Appliance level |
Enable and disable exporting for all organizations within the realm. | Enable and disable exporting for all appliances running 2.12 within the organization. Organization level configuration overrides all NetFlow export or collector settings at the realm level. | Enable and disable additional NetFlow exporting per appliance. This configuration is additive to the realm or organization configurations and doesn’t override them. Typically configured for temporarily debugging a single appliance. |
Add up to three collectors. All monitored flows are sent to all collectors. | Add up to three collectors. All monitored flows are sent to all collectors. | Add one collector. The appliance must be running SteelConnect 2.12. |
You can configure which interfaces are monitored. | You can configure which interfaces are monitored. | The appliance monitors the interfaces configured at the realm or organization level. You cannot configure the monitored interfaces at the appliance level. |
NetFlow export is typically enabled at the realm or organization level and you don't need to configure individual appliances. It can be useful to analyze NetFlow data for an appliance when you want to temporarily narrow the flows for troubleshooting..
If NetFlow monitoring is disabled on an appliance, or if an appliance is running SteelConnect 2.11.x or earlier, it will not export NetFlow data.
For details on configuring NetFlow at the organization level, see
NetFlow.
Collectors
NetProfiler or third-party collectors can be configured using an IPv4 address or fully qualified domain name (FQDN). You can configure a maximum of four NetFlow collectors (three collectors from either a realm or an organization and one from an appliance).
A collector is reachable over the overlay, the underlay, or the LAN.
Notes
•An SDI-5030 gateway cannot reach collectors through the overlay or underlay across the WAN.
•When NetFlow is enabled on an appliance pair configured for high availability, the active appliance in the pair will export the flows.
•When SNMP is enabled and NetFlow collectors are configured:
–the appliance will reconfigure the SNMP agent to allow polling by NetFlow collectors.
–you might need to add or modify inbound (NAT) rules to accept SNMP requests from the collector hosts. For details, see
Policy controls.
To enable NetFlow export
1. At the realm level, select the NetFlow tab.
2. Under NetFlow export, click On.
The next step is to customize the monitoring to balance the level of visibility versus the amount of CPU load the appliances can handle.
3. Next to Monitored interfaces, select an observation point from the drop-down list.
–No interfaces - Do not monitor any interfaces. Monitoring is turned off.
–All LAN interfaces - Monitor all of the traffic that flows in or out of the appliance through the LAN. This option includes all internal LAN traffic that is routed across VLANs. This option will not include the internal VLAN traffic routed by the hardware.
The advantage to selecting All LAN interfaces is that it lessens the CPU load because there are limited physical ports.
–All WAN interfaces - Monitor all the underlay and overlay flows from an uplink perspective.
–All interfaces - Monitor all LAN and WAN traffic. This option provides the most visibility, but increases the overall CPU load. VPN WAN monitoring excludes dedicated internet access (DIA) traffic.
On an SDI-5030 gateway, all interfaces are monitored and the other monitoring options do not apply.
4. Click Submit.
SteelConnect pushes the NetFlow configuration to all of the organizations in the realm. When NetFlow monitoring is disabled on an appliance in the realm, or when an appliance is running SteelConnect 2.11.x or earlier, that appliance will not export NetFlow data.
To configure collectors for all organizations in the realm
1. Under NetFlow collectors, click Add Collector.
Adding a NetFlow collector

2. In the Collector address field, enter the collector IPv4 address or FQDN. If you specify an FQDN, the appliance will perform the DNS resolution at the time of export. Make sure that the DNS server can resolve the collector hostname.
3. In the Port field, enter the UDP port number the flow collector is listening on.
The exporter will iterate through the list of collectors when sending packets to the UDP destination.
The default protocol for exporting metrics for IP traffic flows is IPFIX. IPFIX is the only supported export protocol in SteelConnect 2.12. IPFIX flow records exported by the appliance are unencrypted.
4. Click Submit.
5. To configure additional collectors, repeat
Step 1 through
Step 4.
To view a list of NetFlow collectors
•From the realm level, select the NetFlow tab.
SCM displays the configured NetFlow collectors, the port the collector is listening on, and the protocol IPFIX.
To delete a NetFlow collector
1. From the realm level, select the NetFlow tab.
2. Click Delete next to the collector.
3. Click Confirm.
To change a NetFlow collector host or port
1. From the realm level, select the NetFlow tab.
2. Click Edit next to the collector.
3. Change the settings and click Submit.
Integrating third-party services or SMS providers
The third-party integrations tab is where you integrate a third-party email service or alternative SMS provider with the realm.
By default, a SteelConnect realm uses the Riverbed hosted Amazon Simple Queue Service (SQS) email server and short message service (SMS) provider. A realm administrator can integrate a third-party email service or SMS relay into a realm for use in place of the Riverbed hosted services. While the Riverbed hosted services are reliable, integrating a third-party provider has the added benefits of easier tracking and improved security because the email addresses and phone numbers never leave the service provider domain, geography, country, or governing region (such as the European Union).
To integrate a third-party email service
1. At the realm level, select the Third-party integrations tab.
2. Under Email Server Settings, select Custom Setup from the drop-down list.
3. Enter the third-party email server.
4. Enter the port number for the third-party email server.
5. Enter the username.
6. Enter the password. Click the eye icon to see the password as you type. The password remains visible until you click the eye icon again.
7. Click Submit.
To enable a third-party SMS
1. At the realm level, select the Third-party integrations tab.
2. Under SMS Service Settings, select the alternative service provider MessageBird from the drop-down list.
3. Enter the authorization access key such as AccessKey test_gshuPaZoeEG6ovbc8M79w0QyM.
To enter a Google map API key
1. At the realm level, select the Third-party integrations tab.
2. Under SMS Service Settings, select the alternative service provider MessageBird from the drop-down list.
3. Enter the authorization access key such as AccessKey test_gshuPaZoeEG6ovbc8M79w0QyM.
Adding a legal disclaimer
The Legal disclaimer tab provides a place to add a predefined legal disclaimer that appears each time a user logs in to SCM. For example, “This computer system is the private property of its owner, whether individual, corporate, or government. It is for authorized use only.”
Using realm menus
The left menu provides realm administrators with ways to view organizations and administrators for the organizations. In addition, it provides a way to view a list of all appliances in every organization belonging to the realm.
Realm menus

Organizations
Select this menu item to view a list of all organizations belonging to the realm, add an organization to a realm, edit an organization name, or select an organization to manage.
To change the organization name or long name
1. At the realm level, choose Organizations.
2. Select the organization.
3. Select the Name/Location tab.
4. Change the name or long name.
5. Click Submit.
Admins
Select this menu item to assign administrative rights to individual administrator accounts per organization. You can also update the administrator’s contact information and change authentication settings.
Admin roles and permissions
SteelConnect uses role-based access control (RBAC) to enforce decisions regarding which administrators are authorized to access resources or perform actions. RBAC provides protection from unauthorized access and modification using fine-grained access controls. Permission to perform specific operations are assigned to specific roles, and admins are granted permission to perform specific operations only through their assigned roles. This simplifies system administration because you don’t need to assign admin permissions directly. The admins acquire them through their assigned roles.
You can create RBAC permissions that apply to an entire realm or by organization. When creating organization administrators, you can assign them a role that determines how much access they have to an organization and what tasks they can perform within an organization. Creating a role is easy because you select an existing role to use its permissions as the starting point for your new role. You can edit the rights after creating the role to fine-tune the permissions.
Role administration offers different types of SD-WAN by providing the ability to hide or expose different SteelConnect features, depending on permissions. For example, an organization admin might not have access to or be able to view the routing, AWS, Azure, and API features.
We recommend that you keep the number of realm administrators to a necessary minimum and create organization administrators to manage organizations. An administrator can be assigned to any number of organizations. An administrator can only be assigned one role per organization.
Realm and organization administration
Creating an administrator
To create a realm or an organization administrator
1. At the realm level, choose Admins.
2. Click New admin.
Creating an administrator for a realm or an organization
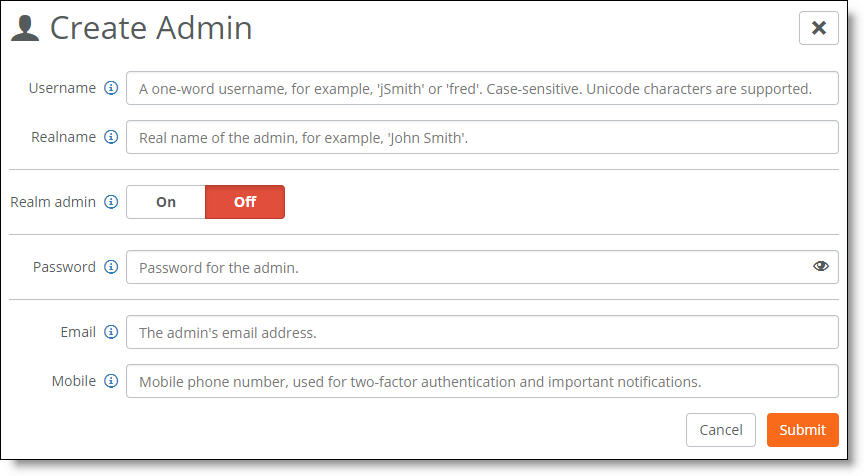
3. Specify a one-word, case-sensitive username for the administrator. You can use Unicode characters.
4. Specify the administrator’s real name.
5. To make the administrator a super user who can view and manage the entire instance, click On next to Realm admin. We recommend that you keep the number of realm administrators to a minimum and create organization administrators to manage organizations.
To make an organization administrator, click Off next to Realm Admin. This is the default setting.
6. Specify an administrator password. Click the eye icon to see the password as you type. The password remains visible until you click the eye icon again.
7. Specify the administrator’s email address.
8. Specify a mobile phone number for the administrator to use loopback authentication through mobile messaging. The administrator will also receive important text notifications using this number.
9. Click Submit.
If the new administrator will be managing an organization, you need to associate the name with the organization.
To assign a new role to an admin
1. Choose Admins.
A list of all admins for the realm appear. Filter the list by searching for an admin’s username, real name, organization, site tags, role, or email address.
2. Select an admin. You can’t select a realm admin because they are assigned to all roles.
3. Click Assign Role.
4. Select an organization. Click the search selector for a list of organizations and select an organization from the list.
5. Click the search selector for a list of roles and select a role from the list. An administrator can only be assigned to one role per organization.
6. Click Submit.
To change an admin’s role assignment
1. Choose Admins.
A list of all admins for the realm appear. Filter the list by searching for a username, real name, organization, role, or email address.
2. Select an admin.
A list of all roles assigned to the admin appears. If there are no roles assigned to the admin, None appears under the Organization and Role columns.
3. Click Edit next to the organization and role to change.
4. Select another organization to assign to the admin. Click the search selector for a list of organizations and select an organization from the list.
5. Select another role to assign to the admin. Click the search selector for a list of roles and select a role from the list.
6. Click Submit.
To view an administrator’s role
•Choose Admins.
A list of all admins for the realm appear. The list includes the admin’s organization, role, and email. Filter the list by searching for a admin’s username, real name, organization, role, or email address.
To remove a role assignment from an admin
1. Choose Admins.
A list of all admins for the realm appear. Filter the list by searching for a username, realname, organization, role, or email address.
2. Select an admin.
3. Click Remove next to the organization and role to delete.
4. Click Yes, Remove Role to confirm that you want to remove the role assignment from the admin.
Overriding organization settings
A realm administrator can provide authentication from the realm level, overriding organization settings.
Enabling two-factor authentication
When two-factor authentication is enabled for the realm, all access to the realm GUI must be authenticated with a second authentication mechanism, such as mobile messaging. The value of the realm setting is also the default setting for two-factor authentication when accessing individual organizations. This procedure overrides this default setting per organization.
To override two-factor authentication for organization access
1. At the realm level, choose Admins.
2. Select an admin.
3. Select the Authentication tab.
4. Select a setting from the drop-down list.
You must specify a mobile phone number for every administrator before enabling loopback authentication through mobile messaging.
Enabling long-term session caching for a realm
Long-term session caching keeps an active session open indefinitely. To close an inactive session after 30 minutes, disable long-term session caching. By default, long-term session caching is disabled. This procedure overrides this default setting per organization. For details, see session expiration time under
Password policy.
Keeping SCM open in a browser counts as activity, even when it’s open in a background tab.
To disable long-term session caching
1. At the realm level, choose Admins.
2. Select an admin.
3. Select the Authentication tab.
4. Under disable long-term session caching, click On.
Changing the realm administrator password
To change the realm administrator password
1. At the realm level, choose Admins.
2. Select an admin.
3. Select the Authentication tab.
4. Under Change password, type the new password.
5. Click Submit.
Assigning roles to an administrator
Choose Roles to assign a role to an administrator. A role is a set of permissions, or rights, that allow access to the ability to perform certain functions such as adding traffic rules. You can assign an administrator various roles across various organizations, but only one role can be assigned to an administrator per organization.
A role assignment includes selecting both a role and an organization for which an administrator will have that role. This is what determines:
–an administrator’s access to an organization
–what functions they can perform within that organization.
–which sites they can manage within that organization.
Predefined roles
These roles and permissions are predefined by default.
Role | Permissions granted |
Network admin | Administrators with this permission can design networks, including permission to create, modify, and delete sites, data center clusters, WANs, and uplinks. You must set network components individually by category. Some network components, such as uplinks, have individual settings for more granularity. Administrators with this permission cannot create a new organization; delete an existing organization; or create, modify, and delete inbound and outbound traffic rules. |
Policy admin | Administrators with this permission can create, modify, and delete inbound and outbound traffic rules. |
Org admin | Administrators with this permission can perform all combined functions of a network admin and a policy admin. They can create and edit networking defaults, maintenance, and data retention settings. They can also deny editing rights to other users and hide these settings from unauthorized users. This admin can prevent logins to SCM and perform debugging using a USB port. |
ReadOnly | Administrators with this permission have read-only access and cannot make any changes to the system. |
Creating and editing a new role
If the predefined roles don’t provide exact realm security requirements, a realm admin can create a custom role. Custom roles can be based on the permissions granted by one of the default roles and then fine-tuned. Or, the custom role can be empty with zero permissions and permissions can be added later.
If you would like to base the new role on a preexisting role, decide what type of role you are creating:
•A role with permission to edit top-level areas of an organization. For example, the permission to define traffic rules. See
Other rights.
•A role with permission to create and edit specific sites within an organization.
Organization permissions
To create a role with permission to create and edit organizations
1. Choose Roles.
2. Click Add role.
3. Type a unique name for the role, using a minimum of 2 and a maximum of 1024 characters.
4. Choose Org Admin as the initial role permissions to base the new role on, or select None to create a role with no rights. You can add more granularity later. For example, if you select a rights level that allows the admin to edit, you can then deny editing of specific areas of the user interface.
5. Click Submit.
To edit an organization admin role
When you edit a role in SteelConnect 2.12, all users in the role will be logged out. A role change can only be done by a realm administrator.
1. Select an organization admin role.
2. Select the Organization rights tab.
Fine-tuning organization rights
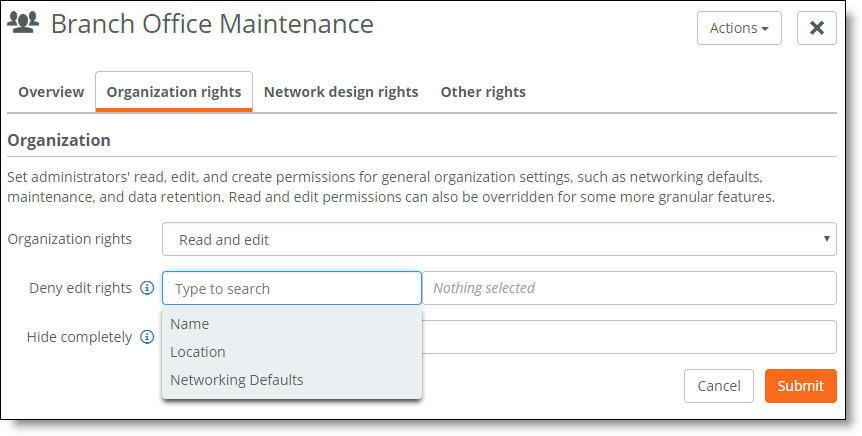
3. After Deny edit rights, select specific rights to deny even when the permission is set to read and edit. For example, an admin can be assigned overall read and edit permission; however, editing of the organization name, location, and network defaults can be denied individually. Start typing or click the search selector for a list of rights and select a right from the list.
Click the trash can icon next to the denied right to restore it.
4. After Hide completely, select specific rights to hide from the SCM user interface, even when read permission is granted. Start typing or click the search selector for a list of rights and select a right from the list.
Click the trash can icon next to the hidden function to restore it.
5. Click Submit.
6. To add other permissions, select another tab. For example, to add permission to create uplinks, select the Network design rights tab.
Organization permissions by site
In SteelConnect 2.12, realm administrators can assign specific sites within an organization to an administrator to manage. Assigning a list of site tags to an administrator creates a Role-Based Access Control (RBAC) administrator. An RBAC administrator is an SCM administrator that has permission to manage specific sites within an organization, instead of all sites within an organization. An RBAC administrator cannot edit any entity not included in an assigned site. All entities that are outside of an assigned site are read-only, including the site tags.
An RBAC administrator cannot delete a site or change the site’s properties, even if they are given permission to manage the site.
Site-level permission always overrides the RBAC administrator permission in the event of a conflict. For example, for an administrator with site-level permission, the organization settings will always be read-only, irrespective of the role definition.
To create a role with permission to create and edit specific sites within an organization
1. Select an organization admin role.
2. Click Assign Permissions.
By default, an organization administrator has permission to manage all sites with the organization, so only the role and organization selections are displayed.
3. Assign a role to the RBAC administrator, if necessary. Note that some of the sections in a role definition are not applicable to an RBAC administrator.
Manage all sites button
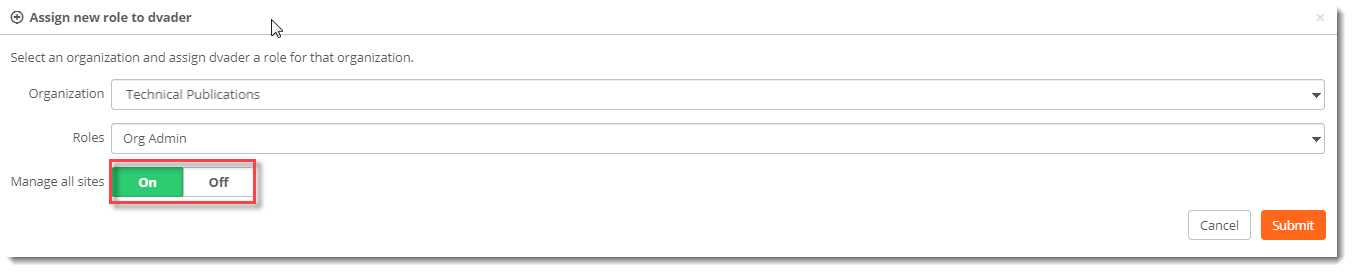
4. Next to Manage all sites, click Off.
Manage all sites button disabled
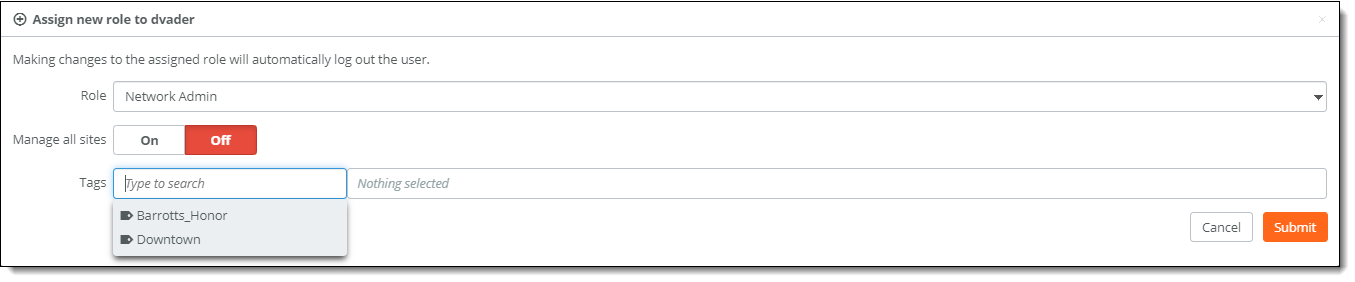
Click the Tags search selector to see the site tags for the organization. The tag list is automatically populated based on the tags assigned from the site’s Location tab. When there is no organization selected, the tag list is empty.
5. Select one or more tags from the drop-down list.
6. Click Submit.
The role assignment table displays the site tags (if any) and the role for certain organizations.
Network Design Permissions
To create a new role with permission to do network design
1. Choose Roles.
2. Click Add Role.
3. Type a unique name for the role.
4. Select Network Admin to set the initial role permissions to base the new role on, or select None to create a role with no rights. You can add more granularity later. For example, if you select a rights level that allows the admin to read and edit uplinks, you can then hide the functionality to configure QoS from the user interface.
5. Click Submit.
To fine-tune network admin permissions or hide functionality from the GUI
1. Select a network design role.
2. Select the Network design rights tab.
Fine-tuning network design rights
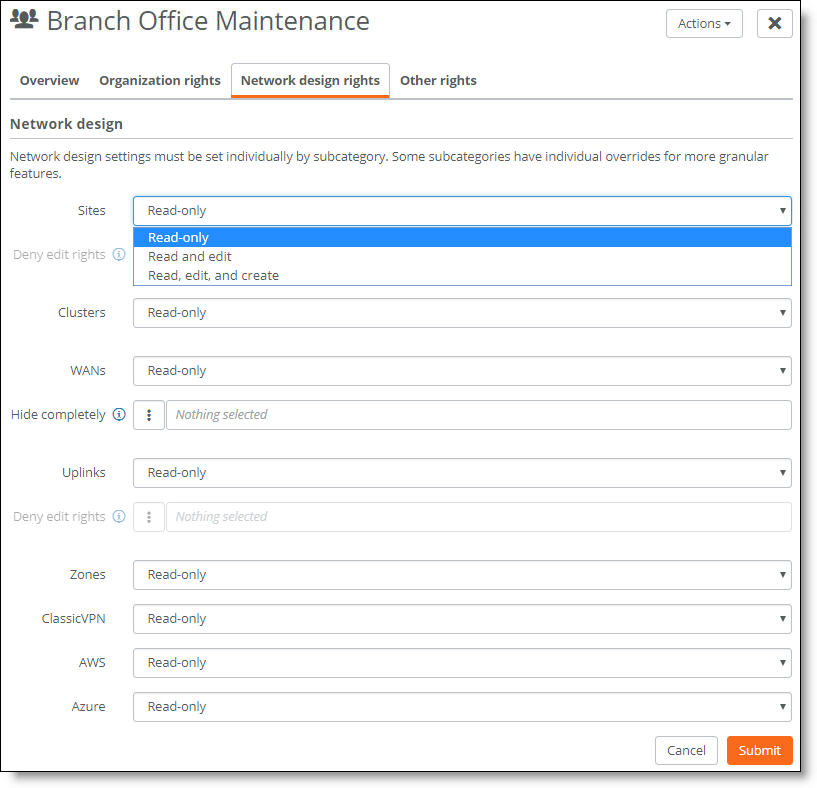
3. Select the permissions (such as read, edit and create) for each subcategory from the drop-down lists. You can add more granularity for some of the network design permissions. For example, you can give an admin permission to edit all uplink settings except for QoS.
When you select a rights level that allows editing, you can then deny editing rights to specific areas of the user interface and also hide specific areas of the user interface.
4. Click Submit.
5. To add other permissions, select another tab. For example, to add permission to create appliances, select the Other rights tab.
Other rights
This role provides access to top-level features not covered in the organization admin or network admin roles.
To create a new role with “other” permissions
1. Choose Roles.
2. Click Add Role.
3. Type a unique name for the role.
4. Select a preexisting role as the set of the initial permissions to base the new role on, or select None for no rights. You can add more granularity later.
5. Click Submit.
By default, all top-level menu items appear for admins with “other” rights. You can hide menu items and high-level access to services such as Riverbed support access.
To fine-tune the role permissions or hide functionality from the GUI
1. Select the new role.
2. Select the Other rights tab.
Fine-tuning organization rights
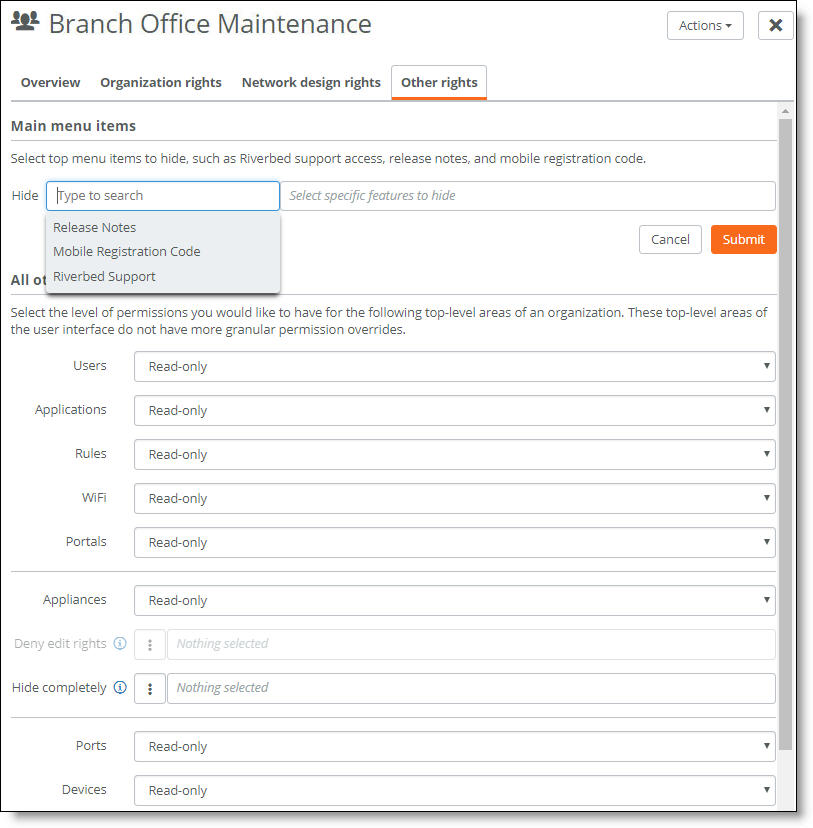
3. Select any top-level menu items to hide from the role. For example, select Release Notes to remove the release notes from the GUI.
4. Select the permissions (such as read, edit and create) for other top-level organization configuration. You can’t fine-tune these configuration settings, except for appliance configuration.
5. Click Submit.
To assign a role to an admin, see
To assign a new role to an admin.
Deleting a role
To delete a role
1. Choose Roles.
2. Select the role.
3. From the Actions menu, choose Delete.
4. Click Confirm.
Viewing a list of appliances in organizations
Choose Hardware to view a list of all appliances in every organization belonging to the realm. Select an appliance to view details about the appliance. Select the Organization tab to assign the appliance to another organization.