Managing Configuration Files
You can save, activate, and import configurations in the Configurations page.
Each SCC has an active, running configuration and a written, saved configuration.
When you apply your settings in the SCC, the values are applied to the active running configuration, but the values are not written to disk and saved permanently.
When you save your configuration settings, the values are written to disk and saved permanently. They take effect after you restart the RiOS services to which the configuration was pushed.
Each time you save your configuration settings, they are written to the current running configuration, and a backup is created. For example, if the running configuration is myconfig and you save it, myconfig is backed up to myconfig.bak and myconfig is overwritten with the current configuration settings.
The Configuration Manager is a utility that enables you to save configurations as backups or to activate configuration backups. For detailed information, see the SteelHead Management Console User’s Guide for SteelHead CX.
Important: Some configuration settings require that you to restart the SCC service for the settings to take effect. For details about restarting the appliance service, see
Rebooting and Shutting Down the SCC.
To manage configurations
1. Choose Administration > System Settings: Configurations to display the Configurations page.
Figure: Configurations Page
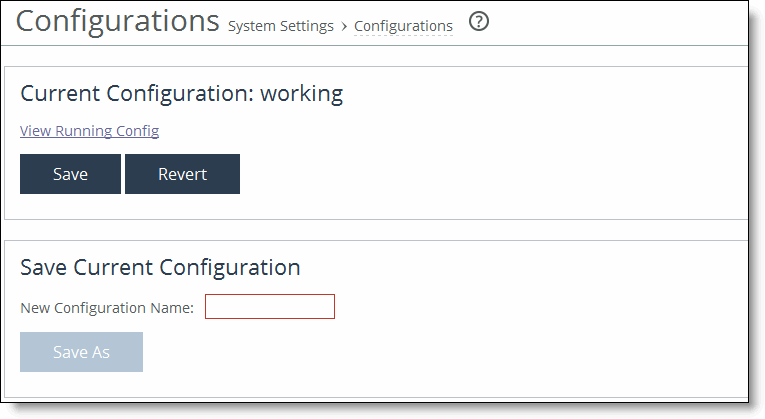
2. Complete the configuration as described in this table.
Control | Description |
Current Configuration: <configuration name> | View Running Config - Displays the running configuration settings in a new browser window. |
Save - Saves settings that have been applied to the running configuration. |
Revert - Reverts your settings to the running configuration. |
Save Current Configuration | Specify a new filename to save settings that have been applied to the running configuration as a new file, and then click Save As. |
To import a configuration
1. Choose Administration > System Settings: Configurations to display the Configurations page.
Figure: Importing a Configuration
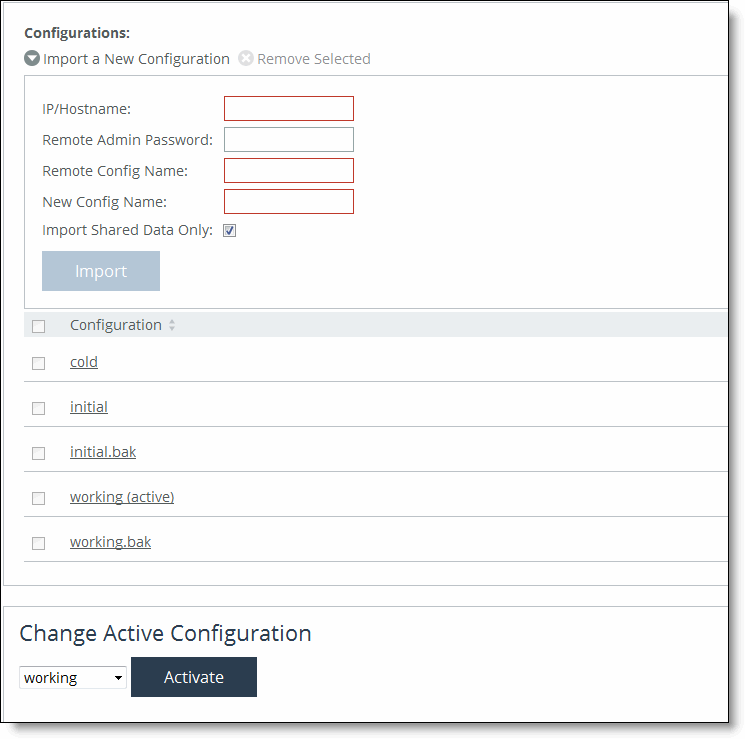
2. Complete the configuration as described in this table.
Control | Description |
Import a New Configuration | Displays the controls for importing a new configuration. |
IP/Hostname | Specify the IP address or hostname of the SteelHead from which you want to import the configuration. |
Remote Admin Password | Specify the administrator password for the remote SteelHead. |
Remote Config Name | Specify the name of the configuration you want to import from the remote SteelHead. |
New Config Name | Specify a new, local configuration name. |
Import Shared Data Only | Takes a subset of the configuration settings from the imported configuration and combines them with the current configuration to create a new configuration. Import shared data is enabled by default. |
Import | When the Import Shared Data Only check box is selected, activates the imported configuration and makes it the current configuration. This is the default. When the Import Shared Data Only check box is not selected, adds the imported configuration to the Configuration list. It does not become the active configuration until you select it from the list and click Activate. |
Remove Selected | Select the check box next to the name and click Remove Selected. |
To Change Active Configuration | Under Change Active Configuration, select the configuration to activate from the drop-down list and click Activate. |
3. Click Save to Disk to save your settings permanently.
Tip: Click the configuration name to display the configuration settings in a new browser window.
To change the active configuration
1. Choose Administration > System Settings: Configurations to display the Configurations page.
2. Under Change Active Configuration, select the configuration from the drop-down list and click Activate.
Configuring Security Settings
This section describes how to configure security settings in the SCC. This section includes these topics: