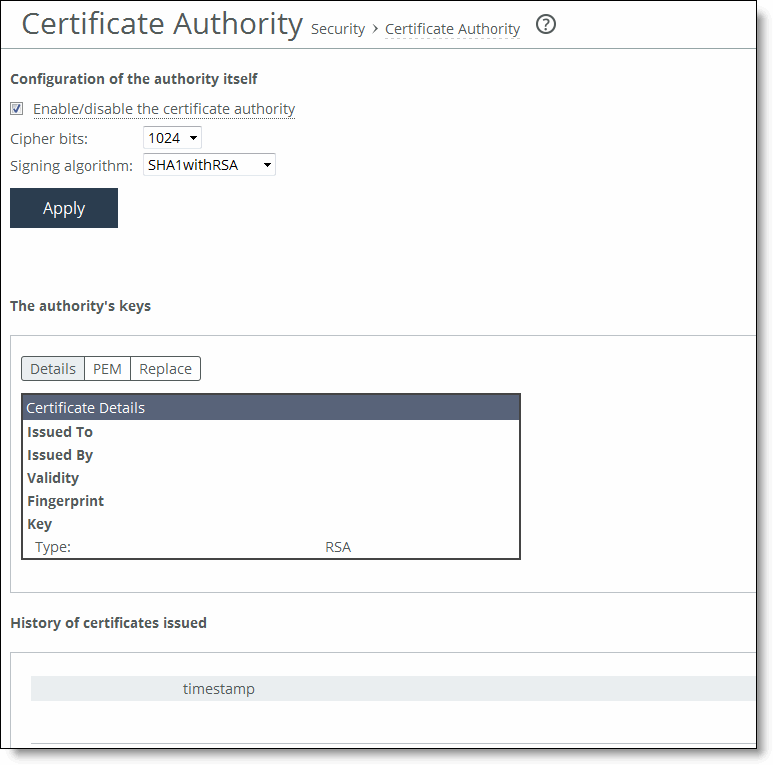
Figure: Certificate Authority Page


Control | Description |
Enable/disable the certificate authority | Select the check box to enable certificate authority. - or - Clear the check box to disable certificate authority. |
Cipher bits | Select the key length from the drop-down list. The default value is 1024. |
Signing algorithm | Select the signing algorithm from the drop-down list. The default value is SHA1withRSA. |
Apply | Applies the settings to the running configuration. After you click Apply, the Certificate Authority tabs are displayed for viewing or replacing the certificate. |
Control | Description |
Details | Displays the certificate details. |
PEM | Displays the certificate in PEM format. |
Replace | Displays the controls for replace or generating a CA-Signed certificate. |
Import Existing Private Key and CA-Signed Public Certificate (One File in PEM format) | Select this option if the existing private key and CA-signed certificate are located in one file. The page expands displaying Private Key and CA-Signed Public Certificate controls for browsing to the key and certificate files or a text box for copying and pasting the key and certificate. The private key is required regardless of whether you are adding or updating. |
Local File - Browse to the local file. | |
Text - Paste the content of the file. | |
Decryption Password - Specify the password used to decrypt, if necessary. | |
Change - Changes the settings. | |
Import Existing Private Keys and CA-Signed Public Certificate (One File in PEM format) Private Key CA-Signed Public Certificate | Select this option if the existing private key and CA-signed certificate are located in two files. The page expands displaying Private Key and CA-Signed Public Certificate controls for browsing to the key and certificate files or text boxes for copying and pasting the keys and certificates. A private key is optional for existing server configurations. |
Private Key Local File - Browse to the local file containing the private key. | |
Private Key Text - Paste the private key text. | |
Local File - Browse to the local file. | |
Cert Text - Paste the content of the certificate text file. | |
Decryption Password - Specify the password used to decrypt, if necessary. | |
Change - Changes the settings. | |
Generate New Private Key and Self-Signed Public Certificate | Select this option to generate a new private key and self-signed public certificate. |
Cipher Bits - Select the key length from the drop-down list. The default value is 1024. | |
Common Name - Specify the domain name of the server. | |
Organization Name - Specify the organization name (for example, the company). | |
Organization Unit Name - Specify the organization unit name (for example, the section or department). | |
Locality - Specify the city. | |
State (no abbreviations) - Specify the state. | |
Country (2-letter code) - Specify the country (2-letter code only). | |
Email Address - Specify the email address of the contact person. | |
Validity Period (Days) - Specify how many days the certificate is valid. | |
Change - Changes the settings. | |
Generate New Private Key and Certificate - Generates new private key and certificate. |