Administering NetIM
This section describes the following system administration tasks.
You must have an administrator login to perform these tasks.
Running Virus Scans on NetIM
You must exclude NetIM directories (the directory where the NetIM software is installed, the NetIM temporary directory, and the database data directory) from being scanned, if on-access virus scanning is enabled on NetIM.)
On-access virus scanning of the NetIM directories (including the DSS data directory) severely impacts performance, may cause data corruption, and can interfere with correct operation of the NetIM software. If the database is on a remote host, you must also make sure that the database data directory is excluded from on-access scanning on that host.
Virus scanning of NetIM directories may be performed on a regular basis, however scanning of directories where NetIM software writes and manipulates files should not be performed during normal NetIM operation. Instead, conduct virus scanning of NetIM software and database data directories at a time when NetIM services are stopped.
When you update your virus scanning software, ensure that the latest definitions do not register a false positive for NetIM or Data Storage Server files. After each update, run a virus scan and verify that none of the NetIM files have been quarantined or deleted.
Running Backup Services on NetIM
Backup services running on NetIM that lock files in the database directory and/or other directories to which NetIM reads and writes (for example, the temporary directory and log directory) interfere with NetIM operation.
Do not run backup services on NetIM during normal NetIM operation as this can interfere with the operation of NetIM and produce unpredictable results.
Using the NetIM SAVE_RESTORE Utility
The SAVE_RESTORE utility allows you to perform an on-line backup of most primary settings, as well as the NetIM Core model from a NetIM 2.0.2 or later version installation. You can use the SAVE_RESTORE utility as part of your normal disaster recovery backup process; however, VM snapshots may be preferred in your setting as a more complete solution.
SAVE_RESTORE should be used only for saving and restoring to the identical release version of NetIM 2.x. for example, save from a NetIM 2.1.0 installation and restore to a NetIM 2.1.0 installation. Using SAVE_RESTORE to back up one version of NetIM and restore to another version of NetIM is not supported.
SAVE_RESTORE allows you to backup and restore the following:
• Device and Platform Information
• Global Discovery Settings
• Trap Receiver Credentials
• Groups and Sites
• Auto Grouping Rules
• Device Drivers
• IP Detection Service Settings
• Polling Profiles
• Interface filters
• Business Hours Settings
• Alerts and Notification Settings
• User-Defined Metrics Settings
• Synthetic Tests
• NetProfiler Settings
• Custom Attributes
For a list of
SAVE_RESTORE limitations, including data and configurations that are not backed up and restored, see
SAVE_RESTORE Limitations.
Using SAVE_RESTORE export
Usage: app.sh SAVE_RESTORE export <path to directory for exporting zip file>
SAVE_RESTORE export does not require stopping NetIM Core services and, therefore, requires no downtime to the NetIM system you are backing up. However, we recommend that you perform the export after the completion of any network discovery process or network model refresh process. Additionally, you should refrain from making configuration and settings changes to the NetIM while you are executing a SAVE_RESTORE export operation.
SAVE_RESTORE export creates a zip file in the directory you specify when you execute the command (by default, SAVE_RESTORE will write the backup file to /opt/riverbed/NetIM/op_admin/tmp/vne/configExport). The backup file is named with the date and time of the export, for example, Jan-31-2020@09-45-29.zip.
Using SAVE_RESTORE import to Restore from Backup
Usage: app.sh SAVE_RESTORE import <path and file name of zip file to import>
SAVE_RESTORE import requires an existing NetIM 2.0.2 or later version deployment in order to import the settings and database you previously exported. SAVE_RESTORE import takes, as input, a zip file created by the SAVE_RESTORE export command.
Note the following before executing this command:
• NetIM Core services are stopped during the SAVE_RESTORE import process.
• After the import is complete, the SAVE_RESTORE import script will restart all NetIM Core services. SAVE_RESTORE will not start/re-start swarm services. NetIM swarm services are assumed to be up.
• Any existing NetIM Core network model database will be erased and replaced with the network model database contained in the zip file you are importing.
SAVE_RESTORE should be used only for saving and restoring to the identical release version of NetIM 2.x. for example, save from a NetIM 2.1.0 installation and restore to a NetIM 2.1.0 installation. Using SAVE_RESTORE to back up one version of NetIM and restore to another version of NetIM is not supported.
Using SAVE_RESTORE import to Create a Near-Replica of Your Primary NetIM
You can use SAVE_RESTORE to create a near-replica of your primary NetIM. Once this procedure is completed the first time, you can then use SAVE_RESTORE export on your primary NetIM and SAVE_RESTORE import on your backup NetIM to keep the primary and backup in sync on a continuing basis.
Before you begin, note the following:
• SAVE_RESTORE import requires that you plan for some minimal downtime of the NetIM while the import process takes place. NetIM Core services are stopped during the SAVE_RESTORE import process.
• During the down time, the NetIM WebUI will be inaccessible as will all Core services, including REST APIs. Additionally, all NetIM product integrations (like the Portal) will also be impacted.
• Polling and all swarm services will continue uninterrupted during the import process.
• Alerting and notification will also continue during the SAVE_RESTORE import process, but will be affected when the Core model resyncs with the swarm.
To use SAVE_RESTORE to create a near-replica operating backup from your primary NetIM, follow theses steps:
1. Deploy and configure your primary NetIM.
3. Deploy your backup NetIM deployment and setup and start your swarm and Core services.
5. After the import is complete, use the NetIM wizards and configuration pages to configure remaining settings that are not migrated (this final step only needs to be performed the first time you perform the migration). For more information, see the next section,
“SAVE_RESTORE Limitations".
SAVE_RESTORE Limitations
The following are known limitations of SAVE_RESTORE:
• SAVE_RESTORE backs up and restores most of your primary NetIM configuration settings and model data. However, SAVE_RESTORE does not backup and restore the following:
– Archived configuration files
– Identity Provider (SAML) settings and local users
– User Management - Local users
– Roll-up settings
– SNMP Default Port
– SSH Default Port
– Delay between SSH Session Retries (sec)
– Source Data Difference Detection setting
– Number of Consecutive Failures Required to Indicate a Device is Down
– IP Detection Service’s Resolve IP address using DNS setting
– Scheduled Jobs
– IP Forwarding Tables collection settings
– Report Export Settings
• Test Engines must be re-configured to integrate with the restored NetIM if the NetIM’s IP address or hostname is changed
• Notification sender will be the sender configured in the primary NetIM
For example, sender name: hostname-primary@riverbed.com would remain the same when settings are restored on a different host system such as hostname-backup
• Any external links configured on the primary system may stop working if the links pointed to the original system and the system is down
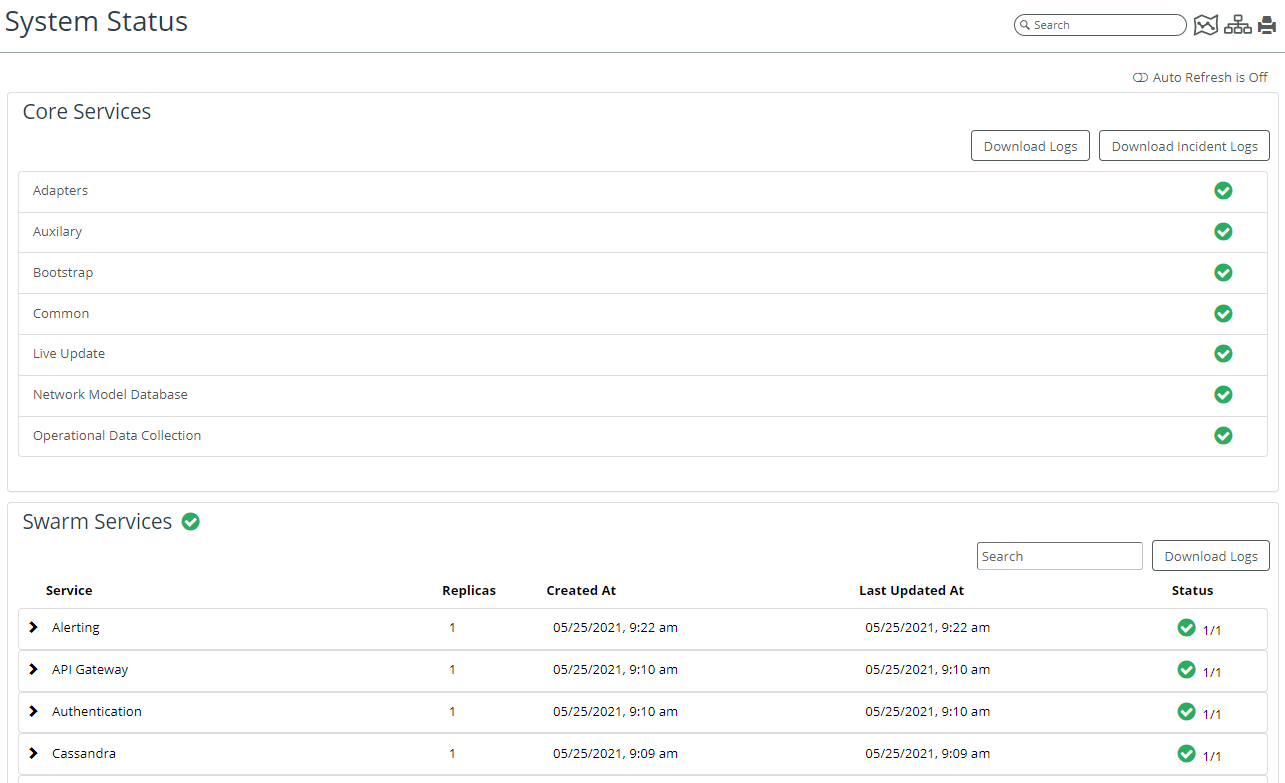
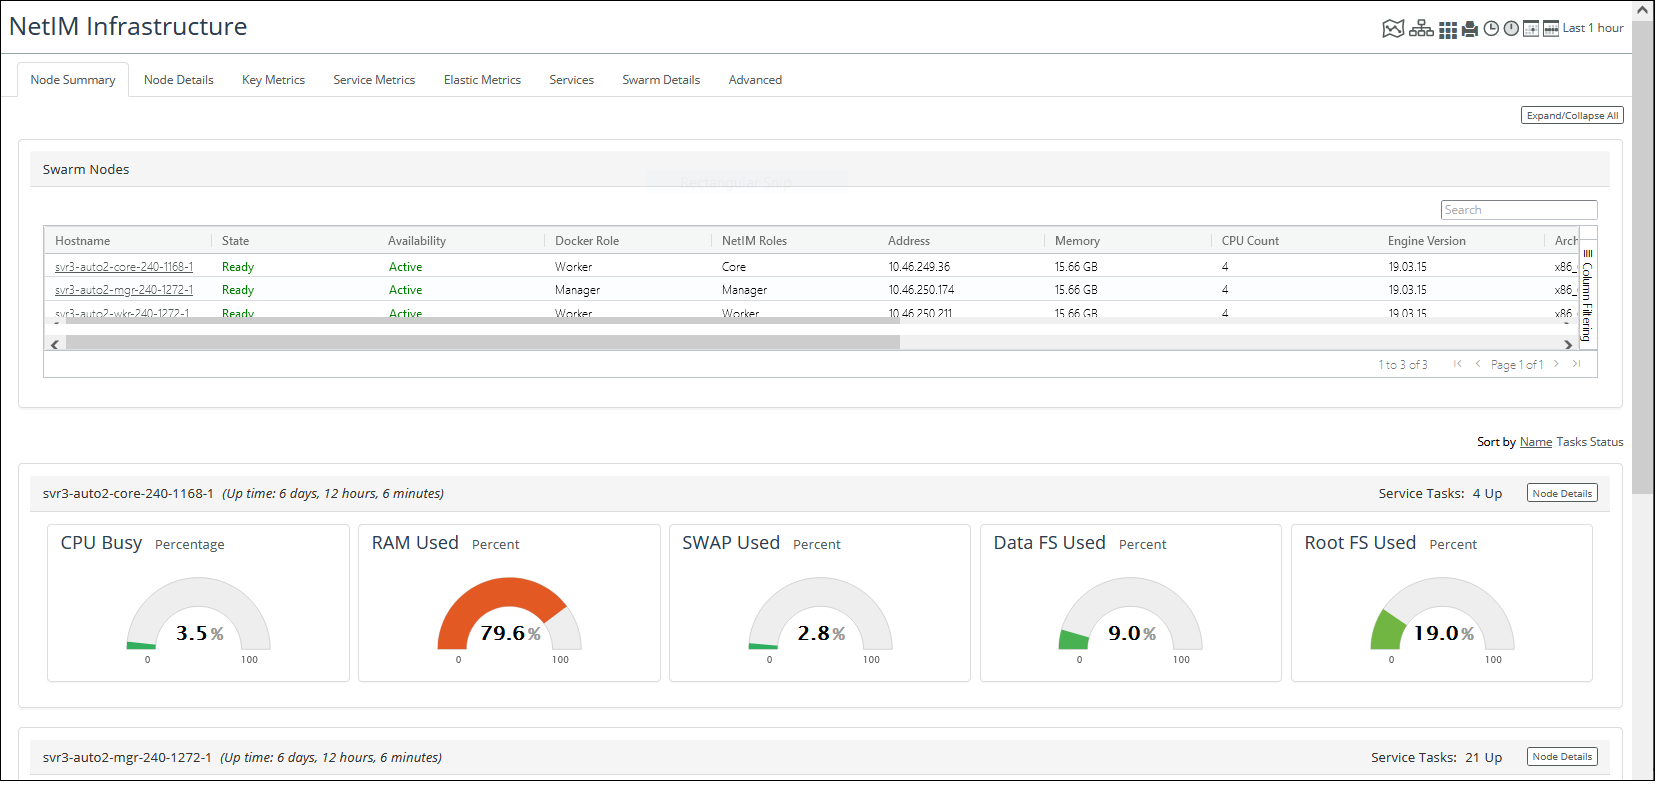
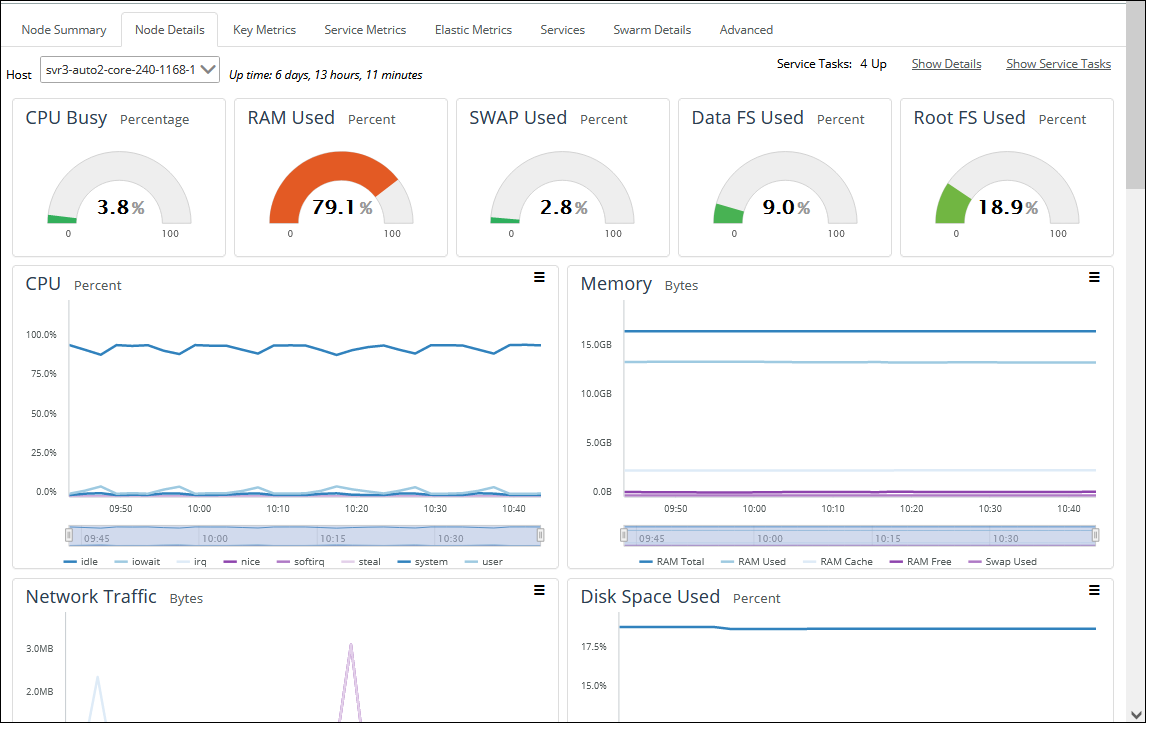
Starting and Stopping Core NetIM Services
This section discusses the NetIM Services and consists of the following topics:
The NetIM software is a set of services that run on the Docker swarm where NetIM is installed. For more information on the NetIM architecture, see
Overview..
The Bootstrap Service, Common Services, Live Update Server, and Web Service all start when NetIM starts. These services remain running to support product functionality unless you stop them from either the UI or the CLI.
When you start NetIM services (
“Starting and Stopping Core NetIM Services from the UI") from the user interface, the Bootstrap Service, Common Services, and Live Update Server restart, then the remaining services start. When you stop NetIM services from the Server Status page of the user interface, only the following services are stopped:
• Adapter Service
• Auxiliary Services
• Network Model Database Server
• Operational Data Collection
The remaining services continue to run. The following table lists the state of the underlying services when NetIM services are in a started or stopped state.
NetIM Services | when NetIM Processes are Stopped | when NetIM Processes are Started |
Riverbed NetIM Adapter Service | | started |
Riverbed NetIM Auxiliary Service | | started |
Riverbed NetIM Bootstrap Service | started | started |
Riverbed NetIM Common Service | started | started |
Riverbed NetIM Live Update Service | started | started |
Riverbed NetIM Network Model Database Server | | started |
Riverbed NetIM Operational Data Collection Service | | started |
Riverbed NetIM Web Service | started | started |
Starting and Stopping Core NetIM Services from the UI
Perform the following procedure to stop or start services.
1. Login to the UI as a user with administrative privilege.
2. Stop or start services as appropriate.
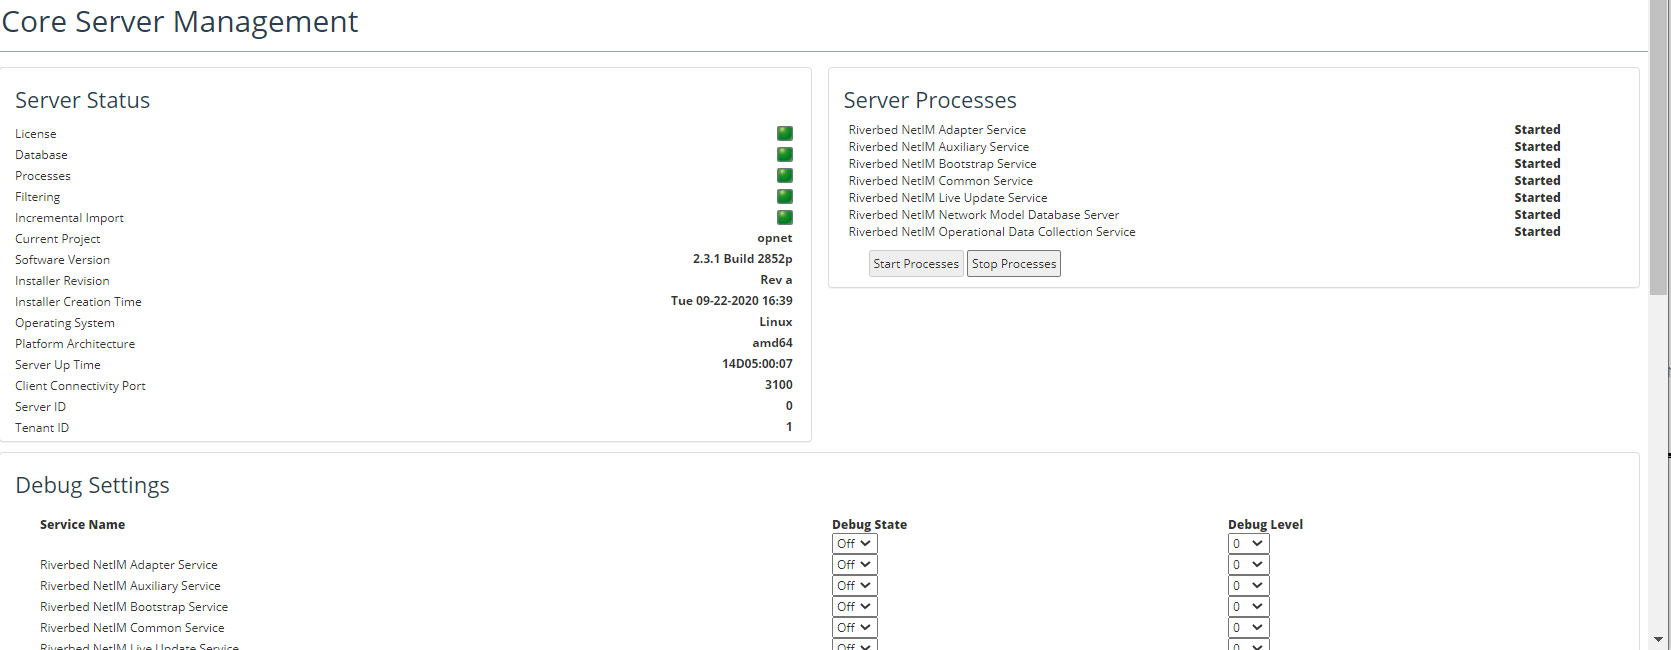
3. Navigate to CONFIGURE->All Settings->Administer->Core Server Management
The Core Server Management screen appears, as follows.
4. Under Server Processes, do one of the following:
– Click the Stop Processes button to stop the services
– Click the Start Processes button to start the services
Within a few minutes, services stop/stop.
If services fail to start or error dialog boxes appear, there is a problem with the installation.
“Contact Technical Support" for assistance if problems persist.
Starting the Core NetIM Web Service from the Command Line
Perform the following procedure to start the Riverbed SteelCentral NetIM Web Service. This will give you access to the UI. You will be unable to access the UI if the Riverbed SteelCentral NetIM Web Service service is not running.
1. Log in to NetIM core as netimadmin.
2. Navigate to the NetIM installation directory, by entering a command like the following:
cd /data1/riverbed/NetIM/<install_dir>
3. Enter the following commands:
bash
./app.sh -c start WS
Starting All CoreNetIM Services from the Command Line
Perform the following procedure to start all NetIM services from the command line:
1. Log in to NetIM core as netimadmin.
2. Navigate to the NetIM installation directory, by entering a command like the following:
cd /data1/riverbed/NetIM/<install_dir>.
3. Enter the following commands:
bash
./app.sh -c start ALL
Stopping All CoreNetIM Services from the Command Line
Perform the following procedure to stop all NetIM services from the command line:
1. Log in to NetIM core as netimadmin.
2. Navigate to the NetIM installation directory, by entering a command like the following:
cd /data1/riverbed/NetIM/<install_dir>.
3. Enter the following commands:
bash
./app.sh -c stop ALL
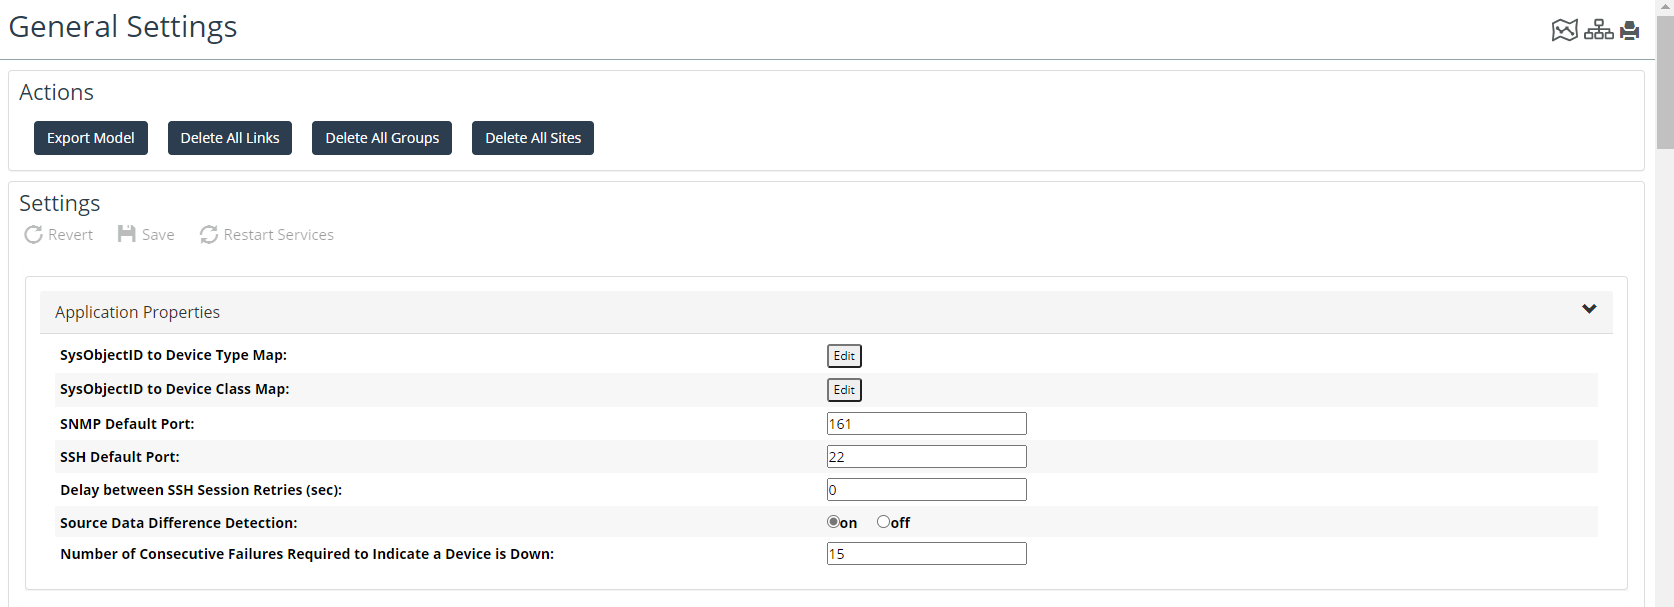
Working with General NetIM Settings
You can configure general NetIM settings for such things as IP Detection, Application Properties, and Device Discovery Global Settings by navigating to CONFIGURE > All Settings->Customize->General Settings.
The following screen appears.
On the General Settings page, you can configure settings related to the following.
• Application Properties
• Device Discovery Global Settings
• IP Detection
• Polling and Metrics Collection (now including Generic Metrics Import)
• SNMP Poller
• NetAuditor integration
• External Data Collection
• Device CLI Collection
• Device MIB Configuration Import
• Link and Connection Inference
Help for each field is displayed when you click the mouse-over Information icon.
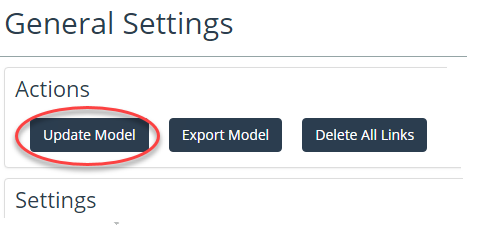
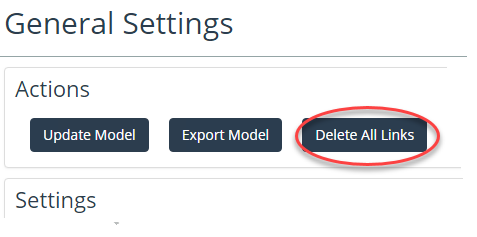
Update Model
The General Settings page contains a button to perform a full update of the NetIM network model. Selecting the Update Model button will execute the same network model update that you schedule during the Basic Setup wizard, as shown in the following screen:
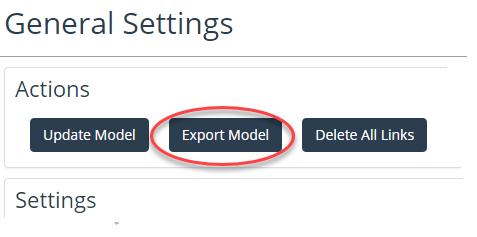
Export Model
The General Settings page contains a button to perform a full export of the NetIM network model. The model will be exported to file in XML format. You may be instructed by Technical Support to execute this function and provide the resulting file to Technical Support.
Delete All Links
The General Settings page contains a button to perform the deletion of all links from the NetIM network model. This function should be performed when you want to have link inference perform a recalculation of all inferred connectivity. You may be instructed by Technical Support to execute this function.
Automatic Update of Device Configuration Data
NetIM performs an automatic update of device configuration data for all devices that are being polled based upon the schedule you set in the Basic Setup wizard (for example, frequency and time of day). Device configuration data can be collected using CLI, SNMP, WMI, or a combination of these, depending upon the supported technologies on the device.
During SNMP-based metric polling, if NetIM detects that the device has rebooted or the interface number on the device changed between polls, then an immediate update is triggered for the changed device(s) only.
User Management of Stale Network Data
During collection on device configuration data for all active sources (CLI/SNMP/WMI) if the connection fails 15 consecutive times for a device, that device is considered stale and its device entry is made inactive. No further collection or polling attempts are made for inactive devices.
If the device still present in your network is an SNMP device, you may need to update the SNMP community string in the device entry. After you supply the correct community string, enable polling for the device (
Creating, Modifying, and Deleting Device Entries.).
Stale devices remain in NetIM until you manually remove them. To remove a device (and all metrics data for that device) from NetIM, do the following:
Metrics data for a deleted device cannot be recovered. Use care when deleting devices.
Important Core NetIM Files and Directories
The installation directory on NetIM core is NetIM/<version_build>.
For example, the full path to the install directory on NetIM core is: /data1/riverbed/NetIM/2.3.0_2778
The NetIM installation directory has the following main subdirectories:
• doc—Contains NetIM documentation
• input—Contains device access information and ASCII data files
• lib—Contains XML control files, MIBs, ASCII data templates
• log—Contains product log files
The NetIM startup scripts, database scripts, and libraries are located in the installation directory.
The following table lists important files within the NetIM environment.
Description | Files |
Console event log file | <install dir>/log/eventLog/vne.log |
Adapter Statistics log file | <install dir>/log/adapterStats/adapterStats_<project_name>.txt |
Product startup script | <install dir>/app.sh |
Product definition files | <install dir>/lib/xml/dtd |
Product resource files | <install dir>/lib/xml/res |
Database setup scripts | <install dir>/setup_accounts.sql
<install dir>/drop_accounts.sql |
Installation log files | <install dir>/InstallLogs/ |
The NetIM temporary directory, also referred to as the temp dir in this document, is the working directory where adapter data files are collected and processed.
By default, this directory is /data1/riverbed/NetIM/op_admin/tmp/vne and contains subdirectories that are organized by adapter. The XML files produced by each adapter are also staged in the temp dir before they are imported into the network database. Adapters rename their temporary files after they are processed, so the Maintenance Service can identify and remove old files.
You specify the location of the temp dir during NetIM installation and cannot change it after installation is complete.
The following table lists the organization of the NetIM temp dir environment.
Directory | Contents |
temp dir root /data1/riverbed/NetIM/op_admin/tmp/vne | Contains subdirectories and XML import files. |
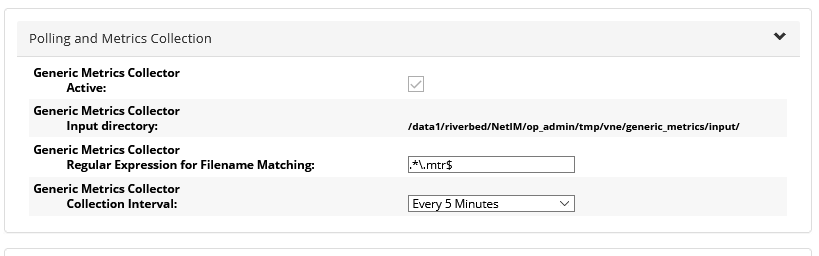
Generic Metrics Import
The Generic Metrics Collector imports locally stored text files containing metric data. It can also be used to import metrics data from a third-party source if the metric data is converted to input files that meet file format requirements.
To configure generic metrics import, follow these steps:
1. Log into the UI as admin.
2. Navigate to CONFIGURE->All Settings-> Customize->General Settings.
The General Settings screen appears. The Polling and Metrics Collection section of the page is highlighted, as follows:
If set to Active, the Generic Metrics Collector scans an input directory for formatted text files containing metric data. The frequency with which the input directory is scanned is determined by the user-configurable collection interval. When valid input files are found, metrics data is imported into NetIM and associated with interfaces or devices in the topology.
Do not use the SNMP MIB Poller and Generic Metrics Collector to collect the same metric data for the same device or interface.
3. To use the Generic Metrics Collector feature, enable the Active flag by doing the following:
– Determine a naming convention for the input files. All input files must have the same file extension. By default, the Generic Metrics Collector recognizes a file extension of mtr. If you use a different file extension you must configure the Generic Metrics Collector to recognize your file extension by setting the appropriate regular expression for filename matching.
– Set the collection interval.
– Convert metrics data to the required file format. Repeat as necessary.
– Copy the properly named and formatted files to the input directory shown in the Polling and Metrics Collection settings. Repeat as necessary.
Generic Metrics Collector Best Practices and File Formatting Requirements
The following sections describe the best practices for file naming and working with metric files, and consist of the following topics:
Rules for the Naming and Handling of Generic Metric Files
• At every time interval that an external mechanism generates metric data, such as every five minutes, the mechanism should copy one or more.mtr files to the Generic Metrics Collector’s input directory. There might be several files per interval, each containing data from a different network device or set of devices. The Generic Metrics Collector processes the.mtr files in the input directory at a configured interval and then appends “.imported” to each file name to prevent the file from being imported again.
• Each.mtr file must be named uniquely with a timestamp or increasing sequence number.
– On the first interval, the files might be named:
DeviceOne001.mtr
DeviceTwo001.mtr
DeviceGroupA001.mtr
DeviceGroupB001.mtr
– On the next interval, the files might be named:
DeviceOne002.mtr
DeviceTwo002.mtr
DeviceGroupA002.mtr
DeviceGroupB002.mtr
• Do not duplicate data within a file, or in more than one file.
• Do not move the same file to the input directory more than once.
Rules for Correct Formatting of Generic Metric Files
Each.mtr file must be divided into the three logical sections listed in the following table.
Section | Required Number |
Metric Sample Data Headers | One or more |
Target Info Header | One |
Metric Samples | Zero or more |
Metric Sample Data Headers
Metric sample data headers define the metric class and the metric fields that will be provided for each sample.
Note the following:
• One or more such metric headers can be defined so samples for one or more metric classes can be present in a single file.
• Each metric sample header is defined on a separate line.
• A line that defines a metric sample data header is identified using the start marker [SampleDataHeader]
• This marker is immediately followed by the name (identifier) of the header, in the format [name=X]. This is then followed by name of the metric class which it defines, in the format [metricClass=Y]. See Metric Classes.
• The field names of the header fields are then listed following the metric class name.
• The order in which the field names are listed on this line is the order in which the sample data fields in each sample are output.
• The field names should exactly match the field names defined in the respective.hdr file for that metric class in NetIM but can be listed in any order. The.hdr files are in the NetIM installation directory in the following location: <install dir>/lib/xml/res/metrics.
• Header files for user-defined metrics are in the NetIM installation directory in the following location: <install dir>/lib/xml/res/custommetrics.
• A subset of the field names defined in the.hdr file is also allowed. For example, if the.hdr file for a particular metric class contains five fields, only three may be used/listed in the sample header for the metric class in the metric data file.
Metric Classes
Commonly used metric classes include the following:
• COS_DROPS
• COS_UTIL
• CPU_UTIL
• DEV_STATUS
• IFC_UTIL
• INTERFACE_AVAILABILITY
• INTERFACE_ERRORS
• INTERFACE_STATUS
• SERVER_DISK_USAGE
• SERVER_SW_RUN_PERF
You can find additional metric classes by looking at the Header Name property in each of the.hdr files in the <install_dir> dir>/lib/xml/res/metrics directory.
Target Info Header
The target info header is a single line in the file that lists the names of the target fields that will be output for each metric sample and the order in which they will be output.
Note the following:
• The target header line is identified using the start marker [TargetInfoHeader].
• The order in which the field names are listed on this line is the order in which the target information fields in each sample are output.
• Several target fields are supported so that metrics can be accurately associated with the parent that contains them, as shown in the following table:
Target Field Name | Required? | Description |
SYSNAME | Yes | The sysname of the device the metric pertains to. |
IFINDEX | Yes* | The ifIndex of the interface the metric pertains to. |
IFDESCR | Yes* | The ifDescr of the interface the metric pertains to. |
IFNAME | Yes* | The ifName of the interface the metric pertains to. |
HEADERNAME | Yes | Name of the header for this sample. This is used to identify the header that describes the sample data. |
(*) If importing an interface level metric, at least one of the following is required: IFINDEX, IFDESCR, or IFNAME.
Metric Samples
Each metric sample must be on a separate line in the following format:
[TI]<target information data>[SI][SD]<sample data>
Note the following:
• The Target Information section consists of comma separated values that indicate the entity to which the sample belongs. This section starts with [TI] delimiter. The values are interpreted using the target header defined in the metric data file with the [TargetInfoHeader] marker.
• An [SI] delimiter needs to be present between the Target Information section and the Sample Data section.
• The Sample Data section consists of the actual sample data, containing a list of comma separated values. The sample values are interpreted using the sample header defined in the metric data file with the [SampleDataHeader] marker for the metric class of the sample. This section starts with [SD] delimiter.
Example Metric File
This following is an example of a valid input file for the Generic Metrics Collector:
[SampleDataHeader][name=H1][metricClass=CPU_UTIL]timestamp,cpuIndex,cpuName,cpuUtilType,cpuUtil
[TargetInfoHeader]HEADERNAME,SYSNAME
[TI]H1,P1.lab.rvbd.com[SI][SD]1329235965717,2,,cpmCPUTotal1minRev,73.52
[TI]H1,P1.lab.rvbd.com[SI][SD]1329235965717,2,,cpmCPUTotal5minRev,73.52
leDataHeader] marker for the metric class of the sample. This section starts with [SD] delimiter.
Exporting Metric Data
NetIM supports exporting metric data using REST APIs. For more information, see
Supported APIs.
Backing Up and Restoring Network Data
Most database applications require periodic backup of the database. Due to the nature of the NetIM product, database backup is not essential. Using a restored database with NetIM may present the following problems.
• If the database was backed up under an older version of NetIM, data schema changes may have occurred in the current release such that the recovered database is no longer usable.
• The other problem relates to the age of the backup. If the network configuration has changed significantly since the backup was created, NetIM will take as much time to update the database to the current state of the network as it would take to populate a fresh database. For most networks, NetIM can completely populate a network database in a matter of hours.
NetIM provides scripts that can be used to backup and restore the NetIM database in the event that you decide to keep backups of your network database or are asked to provide your database as part of a Technical Support case. This section contains the following topics.
Exporting the NetIM Core Database
This section contains the following topics.
Exporting the NetIM Core Database
Use the following procedure to export the NetIM database, including all metric data.
1. Log into NetIM core as netimadmin.
2. Navigate to the <install_dir> by entering a command like the following:
cd /data1/riverbed/NetIM/<install_dir>
3. Stop the NetIM services by entering the following commands:
bash
./app.sh -c stop ALL
4. Enter the following command:
./app.sh DB_UTIL export
Numerous progress messages appear that contain backup details.
When complete, the following files are created in <install_dir>/database:
– <dbname>_db.dmp—Backup file of the NetIM database
– <dbname>_db_export.log—Log file of the export session
5. Restart the NetIM services by entering the following command:
./app.sh -c start ALL
Exporting the NetIM Core Database without Metric Data
Doing a full database export from NetIM, as described in
“Exporting the NetIM Core Database", can be time-consuming and can produce very large output files. In some cases, the exported metric data may be unrelated to your export goals. To export the NetIM database, excluding metric data, use the following procedure.
1. Log into NetIM core as netimadmin.
2. Navigate to the <install_dir> by entering a command like the following:
cd /data1/riverbed/NetIM/<install_dir>
3. Stop the NetIM services by entering the following commands:
bash
./app.sh -c stop ALL
4. Enter the following command:
./app.sh DB_UTIL exportNoMetrics
Numerous progress messages appear that contain backup details.
When complete, the following files are created in <install dir>/database:
– <dbname>_db.dmp—Backup file of the NetIM database
– <dbname>_db_export.log—Log file of the export session
5. Restart the NetIM services by entering the following command:
./app.sh -c start ALL
Customizing a Core Database Export
Using additional parameters, you can exclude additional data from your Core database export or include only the particular information you want. This section provides the parameters you can use to do so.
To see all supported commands for DB_UTIL, enter the following at the command line:
bash
./app.sh DB_UTIL help
Verifying Core Database Table Patterns
For the Core database export commands discussed in this section, you will specify table patterns to match with include or exclude parameters. To verify your table patterns, use the following procedure.
Verifying Core Database Table Patterns
1. Login to NetIM core as netimadmin.
2. Navigate to the install directory, by entering a command like the following:
cd /data1/riverbed/NetIM/<install_dir>
3. Stop all services by entering the following commands:
bash
./app.sh -c stop ALL
4. Navigate to the PostgreSQL bin directory by entering the following command:
cd /data1/riverbed/DSS/PostgreSQL/9.5/bin.
5. Enter the following command:
./psql -U dssuser -p 5495 -d vnes
6. You will be prompted for your
dssuser password, which you get from
Riverbed support.
7. Enter the following command to see a list of tables matching a string:
\dt <table_pattern>
Example: To see all tables starting with “chng” enter \dt chng*.
8. Navigate to the install directory, by entering a command like the following:
cd /data1/riverbed/NetIM/<install_dir>
9. Start all services by entering the following command:
./app.sh -c start ALL
Exporting the Core Database without Metrics and with Additional Exclusions
Use the -exclude parameter to specify tables you do not want to export with the Core database. In the following example, we are excluding tables that start with “chng” or with “install_detail”. You can use the asterisk (*) as a wild card.
bash
./app.sh DB_UTIL exportNoMetrics -exclude chng* -exclude install_detail*
You can specify as many exclusion patterns as you want by using the -exclude parameter before each.
Exporting the Core Database with Selected Tables Included
To export the Core database in NetIM with only selected tables, use the following command.
bash
./app.sh DB_UTIL export -include <table_pattern>
For example, in the following command we are exporting the database and including tables that start with “chng” or equal “oe”:
bash
./app.sh DB_UTIL export -include chng* -include oe
You can specify as many inclusion patterns as you want by using the -include parameter before each.
Exporting the Core Database without Metrics Except Some Metric Classes
If you want to export your Core database without metrics except those you specify, you will need to create separate database dump files for the metric classes you want to export. Use the following procedure to export the files.
Export the Core Database without Metric Data Except Some Metric Classes
1. Export your Core database without metrics by using the following command:
bash
./app.sh DB_UTIL exportNoMetrics
2. Use the following command to export the required metric classes to another database dump file.
./app.sh DB_UTIL export -dumpFile <filename> -include <table_pattern>
For example, the following command exports all raw, hourly, daily, and weekly interface utilization (ifc_util) data:
./app.sh DB_UTIL export -dumpFile /data1/riverbed/DSS/ifc_util.dmp -include ifc_util_[rhdw]_[0-9]+_[0-9]+__*
You can include all required metric classes by specifying additional inclusion table patterns with the -include option in the export command above.
Can I specify both exclusions and inclusions of tables in the same export command?
Yes. However any table specified by the exclusion pattern will override the same table specified in any inclusion pattern. Here is an easy way to remember this rule:
Tables included in database export =
Tables specified by inclusion patterns (all tables by default) — Tables specified by exclusion patterns.
Importing the NetIM Core Database
Perform the following procedure to import a NetIM Core database. To successfully import a NetIM Core database, the schema of the exported data must match the schema of the current database.
To import the NetIM Core database, follow these steps:
The data saved in an exported database can only be imported into the same NetIM release from which it was exported.
1. Login to NetIM core as netimadmin.
2. Navigate to the NetIM installation directory, by entering a command like the following:
cd /data1/riverbed/NetIM/<install_dir>
3. Stop all services by entering the following commands:
bash
./app.sh -c stop ALL
4. Copy the <dbname>_db.dmp file that contains the exported database to the <install_dir>/database directory. If you have renamed the file to something more descriptive (that is something with a timestamp), rename it to <dbname>_db.dmp.
5. Enter the following command:
./app.sh DB_UTIL import
– Numerous progress messages appear that contain restore details.
– A message appears when the import is complete.
./app.sh DB_UTIL import -dumpFile <filename>
7. Start NetIM services by entering the following command:
./app.sh -c start ALL
Saving and Restoring NetIM Settings
NetIM includes scripts that permit you to save and restore a limited set of configuration settings. This is useful for recovery in the event of failure on NetIM, and when moving the NetIM software to a new VM.
A limited set of NetIM settings can be exported and imported, including:
• Device and Platform Information
• User Authentication Settings
• Global Discovery Settings
• Trap Receiver Credentials
• Groups and Device Sets
• Auto Grouping Rules
• Workflow Settings (chosen during basic setup)
• Default Time Zone
• Business Hours Settings
• Device Drivers
• IP Detection Service Settings
• Rollup Settings
• Polling Profiles
• Alerts and Notification Settings
• User-Defined Metrics Settings (definitions, not stored metrics)
• Synthetic Testing Settings
• Network Intelligence Settings
• Dashboard Events
• Locked Links
When you export settings, NetIM creates a zip file that can be imported at a later time to restore those settings.
Exported settings are specific to the NetIM release and build and operating system and cannot be imported into a NetIM that is configured differently. To use the save/restore settings feature the following must be the identical for the NetIM exporting the settings and the NetIM importing the settings:
• Operating system (Windows to Windows)
• Database schema
• NetIM version
• Server ID
• “dssuser” database password
Perform one of the following procedures to export NetIM settings.
Exporting NetIM Configuration Settings (User Interface Method)
1. Login to NetIM core as netimadmin.
2. Navigate to the NetIM installation directory, by entering a command like the following:
cd /data1/riverbed/NetIM/<install_dir>
3. Open the export settings user interface by entering the following commands:
This is a UI-based utility. You must use X or an xrdp session.
bash
./app.sh SETTINGS_MIG_GUI export
The interface similar to the following figure appears.
4. Choose an alternate output directory, if desired.
5. Click Export. You are reminded not to modify settings during this export process, and you are asked to confirm to continue.
6. Click Yes to export settings.
– In the specified output directory, NetIM creates a time-stamped subdirectory containing a zip file named configExport.zip.
– A notification appears when the export of settings is complete.
7. Click OK to close the notification.
To view the progress log, open <install dir>/migrationLog/configExport.log (for example, /data1/riverbed/NetIM/2.3.0_2778/migrationLog/configExport.log) in a text editor.
8. Click Exit to close the setting export window.
9. Save a copy of the zip file on a different host so you can restore settings in the event of a catastrophic failure on this host.
Exporting NetIM Configuration Settings (Command Line Method)
1. Login to NetIM core as netimadmin.
2. Navigate to the NetIM installation directory, by entering a command like the following:
cd /data1/riverbed/NetIM/<install_dir>
3. Enter the following commands:
bash
./app.sh SETTINGS_MIG export <output_dir>
where <output_dir> is the full path to the output directory where the configExport.zip file is written.
For example:
./app.sh SETTINGS_MIG export /data1/riverbed/NetIM/op_admin/tmp/vne/configExport
Progress messages are written to the command window as NetIM stops services and exports settings. During export, NetIM creates a time-stamped subdirectory containing a zip file named configExport.zip in the specified output directory.
4. During export, do not modify settings. When export is complete, the command prompt returns.
To view the progress log, open /data1/riverbed/NetIM/2.3.0_2778/migrationLog/configExport.log in a text editor.
5. Save a copy of the zip file on a different host so you can restore settings in the event of a catastrophic failure on this host.
Perform one of the following procedures to restore the NetIM configuration from a backup settings file.
Importing NetIM Configuration Settings (User Interface Method)
A NetIM configuration backup (configExport.zip) is specific to the release and build that created the backup. DO NOT attempt to restore a configuration that was created using a different version or build of NetIM.
1. Login to NetIM core as netimadmin.
2. Navigate to the NetIM installation directory, by entering a command like the following:
cd /data1/riverbed/NetIM/<install_dir>
3. Open the import settings user interface by entering the following commands:
This is a UI-based utility. You must use X or an xrdp session.
bash
./app.sh SETTINGS_MIG_GUI import
You are warned that services will be stopped and asked to confirm to continue.
4. Click the Browse button and select the zip file that you want to import. After you select the zip file, the interface displays the data to be imported.
5. Click Import to restore settings from the specified backup settings file.
Before importing settings, NetIM shuts down (all services stop). The web UI is inaccessible during this time. In addition, the database is cleaned before settings are imported.
A confirmation dialog appears.
6. If you want save the database before it is cleaned, select the Save database before cleaning checkbox in the confirmation dialog.
7. Click Yes in the confirmation dialog when you are ready to continue with the import.
NetIM notifies you when the import is complete by displaying a notification dialog.
8. Click OK to close the notification.
To view the progress log, choose File > View Process Log in the settings import window, or open <install_dir>/log/ConfigImport.log in a text editor.
9. Click Exit to close the settings import window.
10. Start the NetIM services by entering the following command:
./app.sh -c start ALL
Importing NetIM Configuration Settings (Command Line Method)
A NetIM configuration backup (configExport.zip) is specific to the release and build that created the backup. DO NOT attempt to import a configuration that was created using a different version or build of NetIM.
1. Login to NetIM core as netimadmin.
2. Navigate to the NetIM installation directory, by entering a command like the following:
cd /data1/riverbed/NetIM/<install_dir>
3. Using a utility like putty or WINscp, copy the configExport.zip settings file you want to import to the <install> directory.
4. Enter the following commands:
bash
./app.sh SETTINGS_MIG import <input_dir>/<filename>.zip
where <input_dir>/<filename>.zip is the full path and name of the settings file to be imported. (When multiple files are detected, the most recent one is imported.)
For example:
./app.sh SETTINGS_MIG IMPORT /data1/riverbed/Netim/2.3.0_2778/configExport.zip
Before importing settings, NetIM shuts down (all services stop). The web UI is inaccessible during this time. In addition, the database is cleaned before settings are imported.
5. When import is complete, the command prompt returns.
To view the progress log, open /data1/riverbed/NetIM/2.3.0_2778/migrationLog/configImport.log in a text editor.
6. Start all NetIM services by entering the following command:
./app.sh -c start ALL
Securing the Communication Between NetIM and Other SteelCentral Solutions
The mechanism for securing communication between NetIM and external applications is Encryption by HTTPS. This mechanism encrypts the data communication between the following:
• NetIM and the browsers that access it
• 488NetIM and the external applications that consume NetIM data, including but not limited to Portal
HTTPS mode requires an initial setup to obtain, install, and use a signed SSL Certificate for NetIM. Obtaining and installing a signed certificate for HTTPS is a one-time setup operation. (If NetIM is moved to a host with a different name or the host is renamed, you may need to obtain a new signed certificate.)
This section includes the following topics:
Configuring NetIM for Encryption by HTTPS
Perform this procedure only after NetIM installation is complete and verified.
Configuring NetIM for HTTPS
1. Login to NetIM core as netimadmin.
2. Navigate to the NetIM installation directory, by entering a command like the following:
cd /data1/riverbed/NetIM/<install_dir>
3. Stop all services by entering the following commands:
bash
./app.sh -c stop ALL
4. Enter the following command:
./https_setup.sh /secure true
You are prompted for the fully qualified name of the host machine.
5. Enter the fully qualified host name (for example, myhost.myco.com) or the IP address.
Enter the hostname exactly as you will enter it in the URL to connect to the web server using a web browser.
6. Specify whether you will use an existing certificate or generate a new certificate. Your response will depend on whether you have already obtained and imported a CA signed certificate for NetIM or if this is the first time you are configuring NetIM for HTTPS.
Generation of a new certificate will remove the existing server certificate from the keystore. If a CA signed certificate is already present in the NetIM keystore, do not generate a certificate.
– If you have a CA signed certificate in the NetIM keystore, enter
R to reuse the existing certificate and go to
step 17 – If this is the first time this NetIM is being configured for HTTPS, proceed to
step 7 7. Enter G to generate a new certificate.
The default key size is 2048 bits. Enter Y to use the default key size or enter N then specify the key size that is appropriate for your organization.
When prompted to set domain attribute, enter Y.
Provide each of the following values are you are prompted. Enter valid information as these values will be used when generating the server certificate.
– name of your organizational unit
– name of your organization
– name of your city or locality
– name of your state or province
– two letter country code of your unit (for example, US)
After you have entered country code, the script shows a summary of the domain information that you have entered. Review each value to make sure it is correct.
8. Enter N to reenter information. Enter Y when these values are correctly entered.
A CSR file is created in NetIM's security directory. The file will be named <host>.csr where <host> is the fully qualified host name that you entered in
step 5The location of the security directory is configured during installation. The default location is /data1/riverbed/security.
9. Obtain a signed certificate.
This is a process that is external to the NetIM application. Follow your organization’s procedures for obtaining a signed certificate from a CA. The CSR may be sent by an e-mail communication between the user and the CA. The validity of the server certificate must be negotiated between the user and the CA.
10. Locate the CSR file in the security directory and provide it to a Certificate Authority (CA) for signing.
11. Proceed to the next step when you receive the signed certificate reply from the CA.
If the CA is known to Java, (for example, VeriSign, Thawte, and so on.), you will only need a signed server certificate from the CA. If you use a private CA, you will also need the CA root certificate and any intermediate CA certificates.
12. Import the signed server certificate and CA certificates (when needed).
In this step you will import the signed certificate into the keystore. Import the CA root certificate and all intermediate CA certificates as appropriate.
13. Log into NetIM core as netimadmin.
14. Navigate to the NetIM installation directory, by entering a command like the following:
cd /data1/riverbed/NetIM/2.3.0_2778
15. Enter the following commands:
bash
./https_setup.sh /server_cert <signed_cert> [/ca_cert <ca_root_cert>]
Where <signed_cert> is the full path to the signed server certificate and <ca_root_cert> is the full path to a CA root certificate. The CA root certificate (specified by the /ca_cert option) is required only for a private CA root certificate.
As an example, if you have a private CA and the certificate files are stored in /data1/riverbed/security enter:
./https_setup.sh /server_cert /data1/riverbed/security/host.der /ca_cert /data1/riverbed/security/cacert.der
You will be prompted to enter the path to all intermediate CA certificates or “N” if you do not have any intermediate CA certificates.
16. Your response will depend on whether you have intermediate CA certificates in the signed server certificate chain.
– Enter N if you do not have intermediate CA certificates.
– Enter the full path to the intermediate CA certificate. If you have more than one intermediate CA certificate, enter them one at a time in the order they appear in the certificate chain. The certificate chain can be seen by opening the signed certificate reply file in Internet Explorer and clicking on the Certification Path tab.
The CA root certificate will be at the top and the server certificate will be at the bottom of the chain. The order in which the intermediate CA certificates are listed between the CA root certificate and the server certificate while going down the chain is the order that needs to be followed while specifying the full path to each of the intermediate CA certificate files.
The details of each certificate can be seen by clicking on the View Certificate button. When you have finished specifying all intermediate CA certificates files, enter N at the prompt.
The script imports the server certificate and CA certificates for use by NetIM.
17. Start all services by entering the following command:
./app.sh -c start ALL
18. Verify communication with the NetIM Web Server using HTTPS.
Open a web browser and enter the URL for the NetIM web UI using the following format:
<protocol>://<host>:<port>/vnes
Enter <host> exactly as it appears in the signed certificate.
For example, if the NetIM host is myhost.myco.com and the https port is 8543 enter:
https://myhost.myco.com:8543/vnes
If the web UI does not open, verify that you have specified the hostname exactly as it appears in the server certificate and that you have imported all CA certificates in the order in which they appear in the certificate chain.
After you configure NetIM for encryption by HTTPS, it may be necessary to enable weak ciphers to communicate with older client software.
Enabling Weak Ciphers
1. On NetIM core, navigate to the <install_dir>, such as:
cd /data1/riverbed/NetIM/<install_dir>
2. Stop all services by entering the following commands:
bash
./app.sh -c stop ALL
3. Enter the following command to enable weak ciphers:
./https_setup.sh /ciphers weak
If needed, you can disable weak ciphers with the following command:
./https_setup.sh /ciphers strong
4. Display and verify the set of enabled ciphers. Use the following command to display the set of enabled ciphers:
./https_setup.sh /ciphers print
5. Start all services by entering the following command:
./app.sh -c start ALL
Switching from HTTPS Back to HTTP Mode
Perform the following procedure if you have configured NetIM for HTTPS and you want to switch back to HTTP.
1. On NetIM core, navigate to the <install_dir>, such as:
cd /data1/riverbed/NetIM/<install_dir>
2. Stop all services by entering the following commands:
bash
./app.sh -c stop ALL
3. Enter the following command:
./https_setup.sh /secure false
The script writes output to the screen indicating the web protocol has been changed to HTTP.
4. Start all services by entering the following command:
./app.sh -c start ALL
5. Verify communication with the NetIM Web Server using HTTP.
Open a web browser and enter the URL for the NetIM UI using the following format:
<protocol>://<host>:<port>/vnes
Where <host> is the fully qualified name of the NetIM host.
For example, if the NetIM host is myhost.myco.com and the http port is 8543, enter:
http://myhost.myco.com:8543/vnes
Designating the Security Directory (for the Keystore and Certificates)
The security directory is a folder where the keystore file and all related certificate files reside. This is used for the HTTPS mode of operation since it contains the keystore that is used by the SSL communication. The security directory is configured when NetIM is installed, but can be changed after installation by performing the following procedure.
Change the NetIM Security Directory (keystore)
1. On NetIM core, navigate to <install_dir>, by entering a command like the following:
cd /data1/riverbed/NetIM/<install_dir>
2. Stop all services by entering the following commands:
bash
./app.sh -c stop ALL
3. Enter the following command:
./app.sh /security_dir <security_dir>
where <security_dir> is the full path to the security directory.
For example, to change the security directory /mysecurity enter:
./app.sh /security_dir /data1/riverbed/mysecurity
4. Start all services by entering the following command:
./app.sh -c start ALL
Requiring Username and Password Authentication
To require external applications to supply a username and password to NetIM, perform the following procedure.
Adding an Application’s Host to the Trusted Clients List
1. On NetIM core, navigate to the <install_dir>, by entering a command like the following:
cd /data1/riverbed/NetIM/<install_dir>
2. Stop all services by entering the following commands:
bash
./app.sh -c stop ALL
3. Activate authentication by entering the following command:
./app.sh AUTH_STATUS enable
4. Restart all NetIM services:
./app.sh -c start ALL
Exempting External Applications from the Authentication Requirement
Many external applications (like SteelCentral NetPlanner and SteelCentral Portal) have the ability to answer NetIM’s requests for username and password, but some do not. If authentication is enabled but communication must still be allowed with applications that cannot authenticate, those applications’ hosts can be added to the “trusted clients” list.
Adding an Application’s Host to the Trusted Clients List
1. On NetIM core, navigate to the <install_dir>, by entering a command like the following:
cd /data1/riverbed/NetIM/<install_dir>
2. Stop all services by entering the following commands:
bash
./app.sh -c stop ALL
3. Navigate to the /data1/riverbed/NetIM/<install_dir>/input/trustedClients directory, such as:
cd /data1/riverbed/NetIM/<install_dir>/input/trustedClients
4. Use any text editor to open trustedClients.txt.
5. At the bottom of the file, add the hostname or IP address of the host of each application that must be exempt from authentication, such as:
trustedClients.txt
# A list of IP addresses that are considered 'trusted' clients.
# Requests from these IP addresses will not require user
# credentials in order for their requests to be authorized.
# Add one trusted hostname or IP address per line.
121.232.343.10
NC-AREA51-BOX2
6. Navigate back to the installation directory as in
step 1, and restart all NetIM services by entering the following command:
./app.sh -c start ALL
Launching NetIM from an External Application
Using a model or metrics query, you can search NetIM and launch to results from an external application. The root NetIM search URL used for this call is:
/vnes/Home.html#/vnes/search
You can further parameterize the search URL to do a model or top-N metrics query as described in the sections below.
The default ports are 9190 and 8543 for HTTP and HTTPS, respectively. NetIM is configured to use HTTPS by default.
Model Query
To do a model query, use the parameters shown in the following table. The syntax for a model query is as follows.
http://<netim_server>:8543/vnes/Home.html#/vnes/search?query=<string>
Parameters for a model query are described in the following table.
Name | Required? | Description | Values | Default Value |
query | Yes | Query string | <query string> | None |
type | No | Limits the search to the specified object type(s). | Comma-separated list of object types: device, site, group, interface, host, archive. | All object types |
autoForward | No | Specifies whether to go to the search result’s object view, if the query returns a single result. | true | false | false |
Model Query Example
The following query returns results for device and interface objects containing the string “beth”:
http://MyNetIMserver.any.com:8543/vnes/Home.html#/vnes/search?type=DEVICE,INTERFACE&query=beth
Top-N Metrics Query
To do a top-N metrics query, use the parameters shown in the following table. The syntax for a top-N metrics query is as follows.
http://<netim_server>:8543/vnes/Home.html#/vnes/search?searchType=topbottomn&type=DEVICE&top=true&n=10&metricClass=IFC_UTIL&metric=throughputIn&timeWindowAlgo=avg&filterOperator=%3E&filterValue=5&rollupAlgo=aggregateAvgRollup&startTime=148727 3666050&endTime=1487277266050
Parameters for a top-N metrics query are described in the following tables.
Name | Required? | Description | Values | Default Value |
Search type | Yes | Indicates that this is a top/bottom-n metrics query | topbottomn | None |
type | Yes | Limits the search to the specified object type(s) | device | group | interface | device |
top | Yes | Specifies a top/bottom-n search | true | false | true |
n | Yes | Defines the variant for number of results | <number> | 10 |
metricClass | Yes | Queried metric class | See | None |
timeWindowAlgo | Yes | The operation applied when rolling up the metric sample data to larger time windows | avg | min | max | sum | None |
startTime | Yes | Start timestamp | <number> | Current timestamp |
endTime | Yes | End timestamp | <number> | Current timestamp |
filterOperator | No | Operator used to evaluate metric values | > (%3E), >=(%3E=), =, !=, < (%3C), <= (%3C=) | None |
filterValue | No | Use in conjunction with filterOperator | <number> | None |
rollupAlgo | No | The algorithm applied when rolling up metric sample data to larger time windows | See | None |
autoForward | No | Specifies whether to forward the search result’s object view if the query returns a single result. | true | false | false |
Metric Classes | Object |
SERVER_SYSTEM_STATS | Device |
SERVER_SW_RUN_PERF | Device |
DOM_CTL | Device |
SHAREPOINT_ASP_NET | Device |
SQL_SERVER | Device |
MGTSYS_SERVER | Device |
MSMQ_QUEUE | Device |
SP_SQL_DATABASES | Device |
DEV_STATUS | Device |
CPU_UTIL | Device |
SERVER_DEVICE_STAT | Device |
SP_SQL_STATISTICS | Device |
SERVER_DISK_USAGE | Device |
TCP_CONN | Device |
WIN_SERVICE | Device |
IIS_WEB | Device |
SP_SEARCH_INDEXER | Device |
SP_SEARCH | Device |
LSP_UTIL | Device |
SP_SQL_LATCHES | Device |
SYS_STATS | Device |
LSN_PRTS | Device |
DEV_AVL | Device |
MEMORY_USAGE | Device |
SP_SQL_PLAN_CACHE | Device |
WIN_SYS | Device |
DEV_EVENT_COUNT | Device |
EVENTS_DETAIL | Device |
DEV_CHANGES | Device |
SP_SQL_LOCKS | Device |
COS_UTIL | Interface |
IFC_UTIL | Interface |
IFC_ERRORS | Interface |
UTILS | Interface |
IFC_AVAILABILITY | Interface |
IFC_MEDIA_CALLS | Interface |
ATM_UTIL | Interface |
COS_DROPS | Interface |
ETHER_STATS | Interface |
IFC_STATUS | Interface |
FR_UTIL | Interface |
IFC_EVENT_COUNT | Interface |
GRP_STATUS | Group |
GRP_EVENT_COUNT | Group |
Rollup Algorithm |
aggregateMinRollup |
aggregateMaxRollup |
aggregateAvgRollup |
aggregateSumRollup |
durationWeightedRollup |
aggregatePercentileRollup |
aggregatePctl95RateRollup |
aggregatePctl98RateRollup |
Working With User Accounts and Authentication
Authentication is the verification that a given password matches a given username. Authorization is the granting of an access level based on a username.
NetIM supports local accounts, as well as the following authentication/authorization services:
• Security Assertion Markup Language (SAML)
• Terminal Access Controller Access-Control System Plus (TACACS+)
User Roles
NetIM supports the following user roles:
• Administrator: The Administrator role is the NetIM super-user and as such has full and complete access to NetIM data and configuration
• Privileged: The Privileged role has some ability to perform configuration (like create/edit/turn on/off alerts and create maintenance windows) but not full administrator rights. A user with privileged access has some, but limited wizard access.
• User: The User role lacks the ability to modify collection, monitoring, and alerting behavior but does have access to grouping operations, custom attribute operations, custom view operations, and monitored path creation (without scheduling)
. The User role has no wizard access.
• Restricted: The Restricted role has read-only or view-only access. A user with the restricted role does not have the ability to modify any configuration option or setting that controls system operations. The restricted user is also prevented from viewing sensitive information.
Adding, Modifying, Deleting, and Logging Out Users
To add, modify, or delete a user account or log off a user, follow these steps:
1. Log into the NetIM UI as admin.
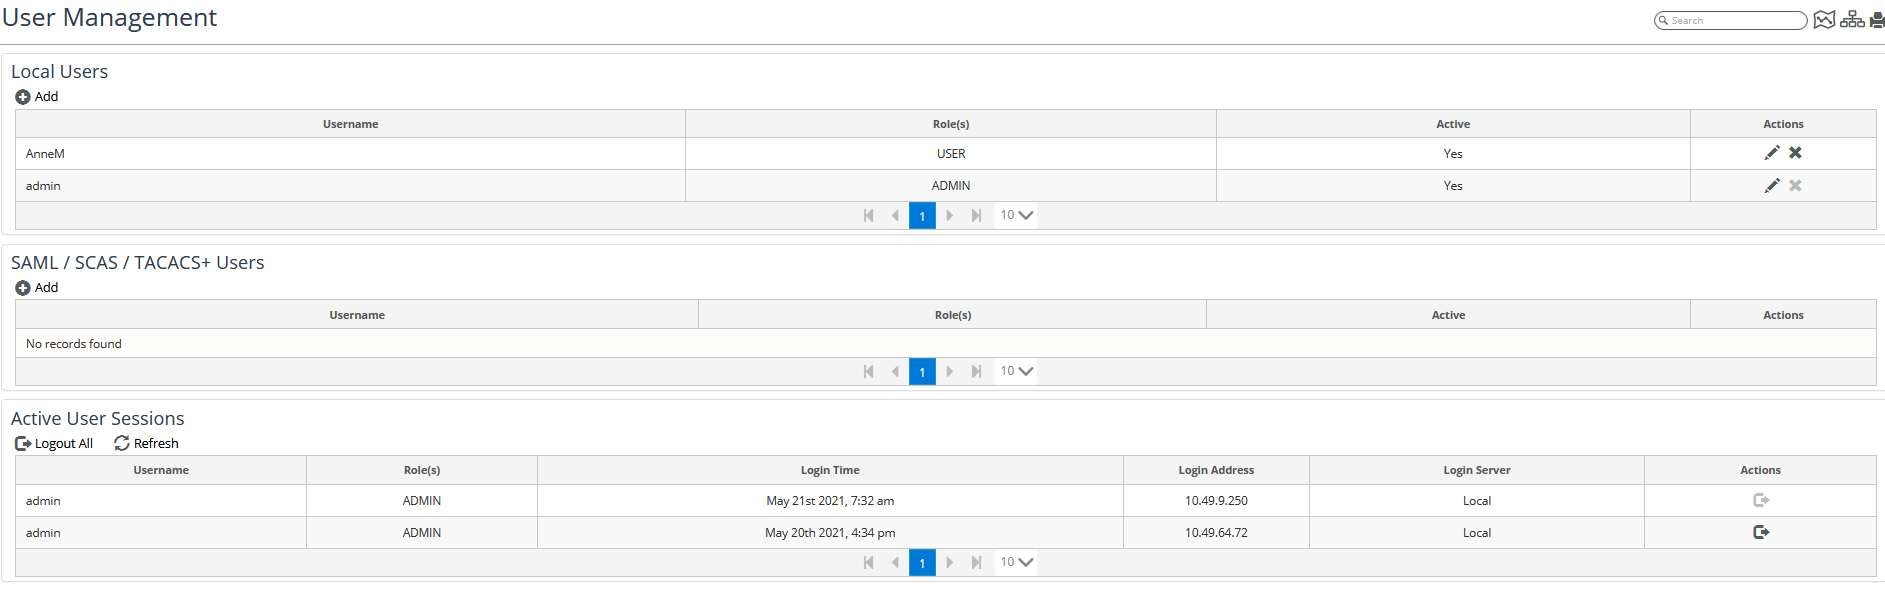
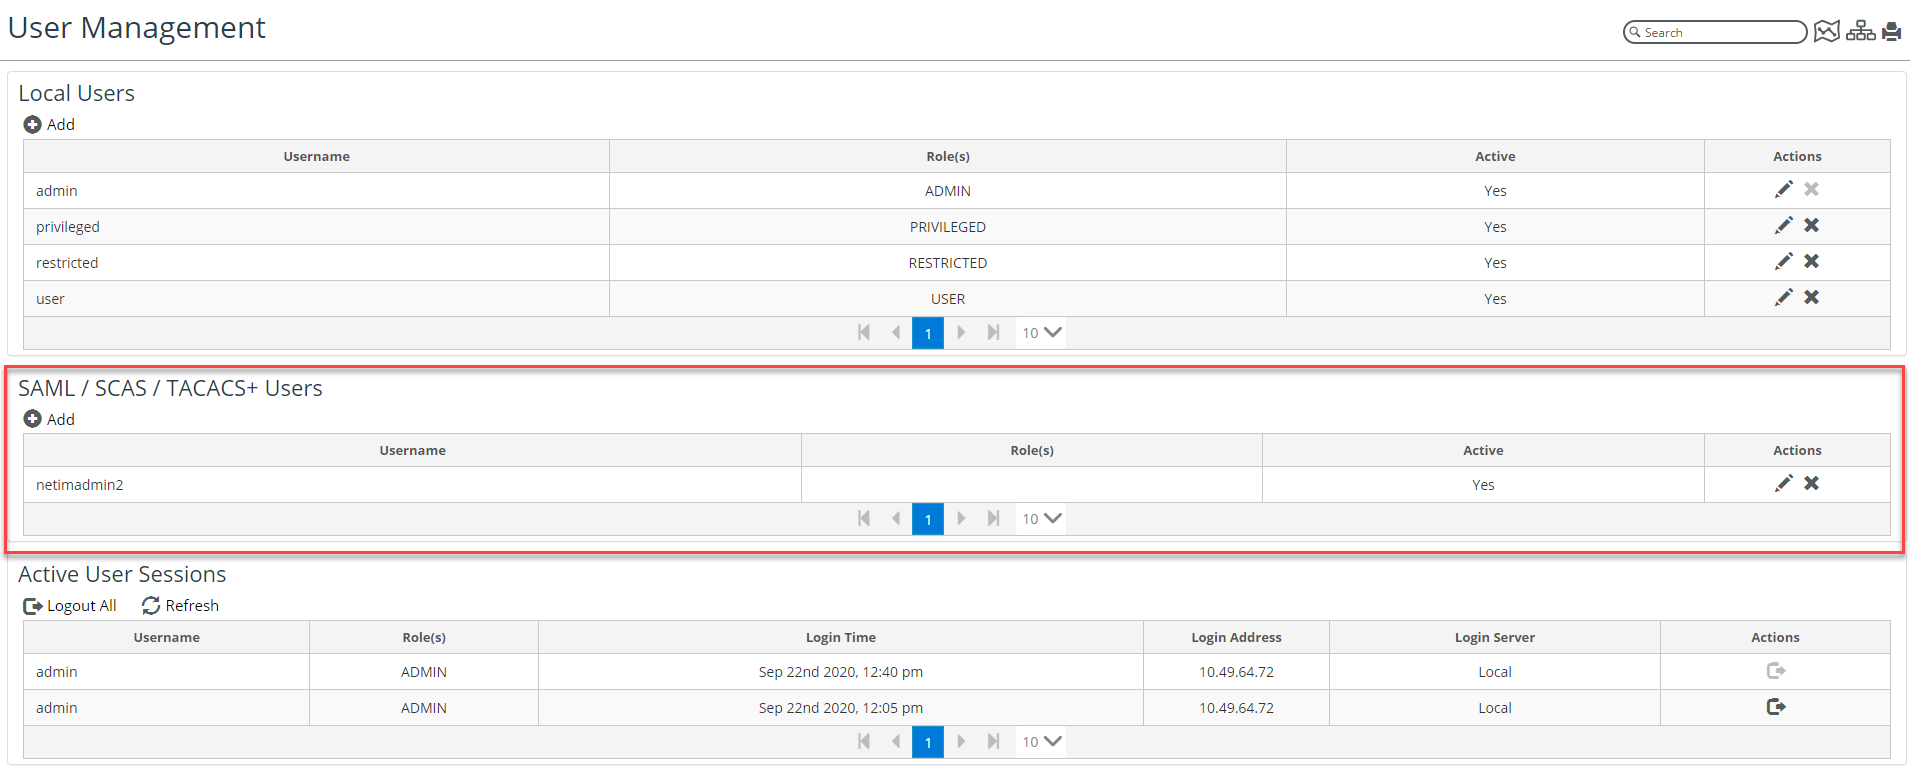
2. Navigate to CONFIGURE->All Settings->Administer->User Management.
The User Management page appears, as follows:
Adding a User
1. To add a local user, click on the Add icon (

} beneath the Local User frame.
The following pop-up appears:
– Determine if the user should be active (default) or inactive.
– Enter a username, assign a role and password. then click the Save button.
2. To add a SAML or TACACS+ user, click on the (
} icon beneath that frame.
The following dialog appears:
– Determine if the user should be active (default) or inactive.
Enter the user’s Username (exactly as they would enter it to login to the SAML identity provider) and Role.
Role assignment is not necessarily required for SAML users if SAML attribute-to-NetIM-role mapping is set up. NetIM uses the assigned roles provided by SAML if you do not assign the user a role using NetIM’s
User Management page. For more information on configuring SAM, see
Configuring SAML Authentication.
– Select a valid SAML or TACACS+ username, assign a role. then click the Save button.
Deleting a User Account
To delete a user, click on the X icon in the Actions column at the end of that user’s entry, as shown in the following screen:
Modifying a User Account
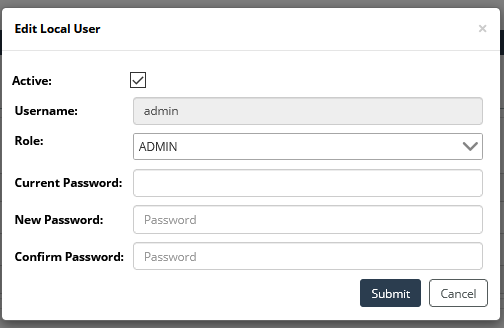
To modify a user account, click on the pencil icon in the Actions column at the end of that user’s entry, as shown in the following screen:
An Edit User pop-up appears, as follows:
Logging Out a User
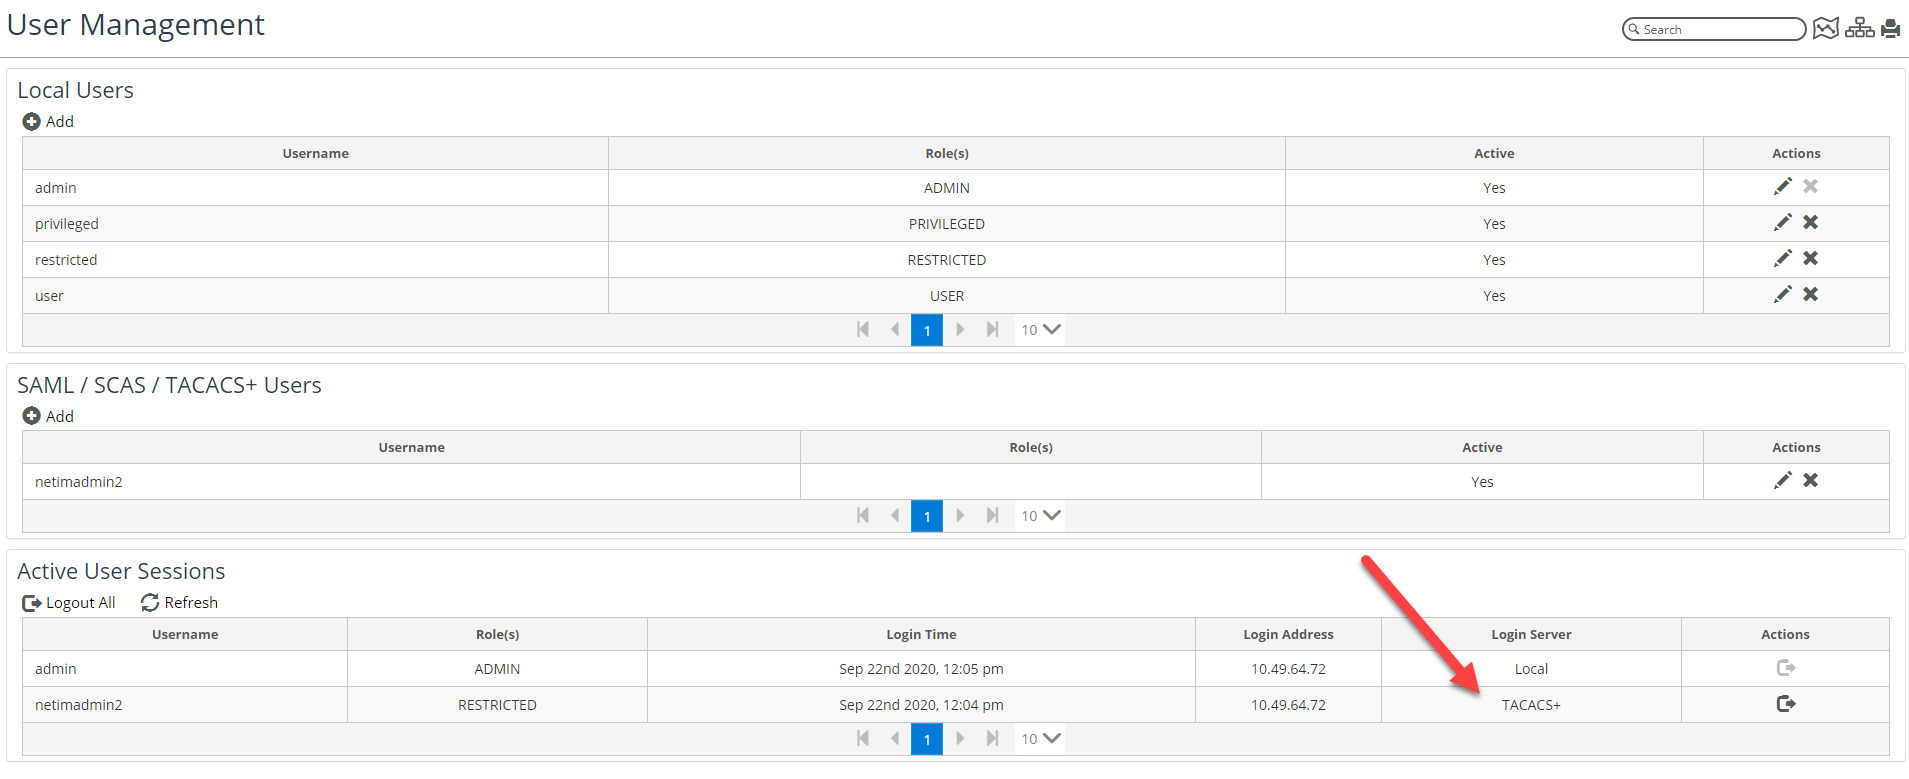
To log out a user, click on the logout icon under the Action column at the end of that user’s entry in the Active User Sessions frame, as shown in the following screens:
You can also log out all users simultaneously, by clicking on the Logout All icon above the Username column of the Active User Sessions frame, as shown in the following screen:
Tracking User Logins
User login and logout activity is tracked in the following log file on NetIM core:
<install_dir>/log/vnes_analytics_logins_logouts
The following information is written to the log:
• Username
• Timestamp
• Machine name or IP address
• Browser type and version
• Login/logout success or failure
Example:
2021/08/23 07:09:45 INFO - [OPNETVnesWebService] Successful log in from 10.49.9.250. -- User: admin. Method: Local. SessionId: eK5Xu0pE/1XpO+nx0WDgyw==.
2021/08/23 07:10:07 INFO - There are currently 1 users logged in to the system.
2021/08/23 07:10:07 INFO - 1 users with role ADMIN.
2021/08/23 11:40:39 INFO - Forced to log out. -- User: admin. Method: Local. SessionId: java.util.HashMap$KeyIterator@4fcf3a2e.
2021/08/23 11:41:29 INFO - [OPNETVnesWebService] Successful log in from 10.49.9.250. -- User: admin. Method: Local. SessionId: tXJj8g0tMXJ3WZ7LvN9P5A==.
Configuring SAML Authentication
NetIM supports integration with SAML 2.0-compliant identity providers. There are many SAML 2.0-compliant identity providers available on the market that may be configured differently in different environments. This section does not attempt to provide detailed instructions about integration with specific identity providers. Instead, we outline the basic steps for adding an identity provider.
To add a SAML 2.0-compliant identity provider, follow these steps, after gathering the requisite information from the SAML administrator for your site:
1. Log into the UI as admin.
2. Navigate to Configure > All Settings->Integrate->Identity Providers.
The Identity Providers page appears, as follows:
3. (Optional) If your SAML administrator needs the NetIM metadata, click the

button, which saves the NetIM metadata to a file.
4. To add an identity provider, click the
Add icon (
).
The following screen appears:
Add the following information, and when you are satisfied with your choices click the Submit button:
Your SAML administrator should provide you with the necessary information to fill out the screen.
– Activate - Whether or not the Identity Provider configuration should be set to Active. The default is inactive.
– Provider Name - Supply the name of the SAML provider.
– Attribute Mapping - The attribute provided in the SAML response that should be used by NetIM for role assignment.
– Username Attribute -The username attribute is usually a string such as UserID, EmailAddress, DisplayName, NameID, Email, and so on.
If you leave this field blank, NetIM will use NameID from the SAML identity provider’s response.
– Roles Attribute: The attribute provided in the SAML response that should be used by NetIM for role assignment.
– Global Lockout - Specify whether or not IdP should log out globally, that is log out of NetIM and the SAML server, or log out of NetIM only.
– Metadata: Supply the necessary metadata using a URL or an XML text file. Choose the appropriate metadata Source and then enter the URL or copy and paste the XML file source into the field.
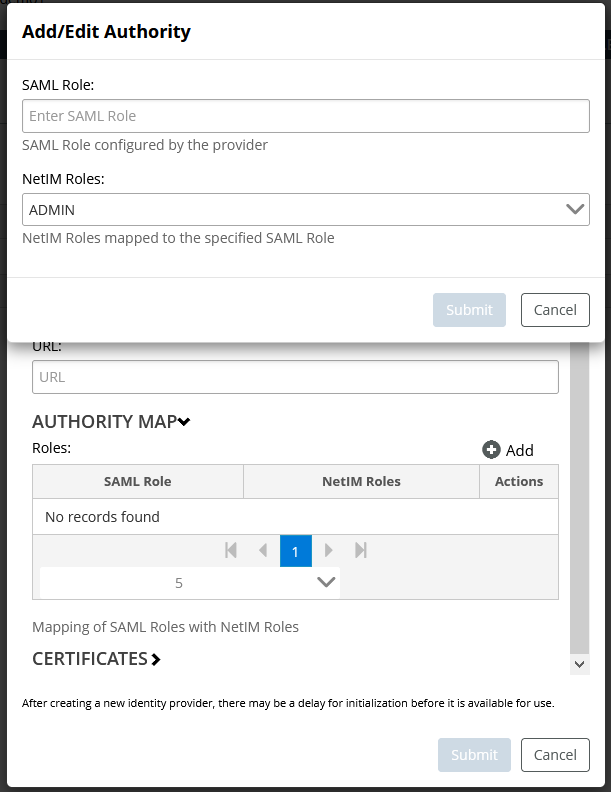
– Authority Map - Map the SAML attribute values provided in the roles attribute to a NetIM role. You can add multiple attribute-to-role mappings using the authority map Add/Edit Authority dialog, as shown in the following screen:
– Certificates - Specify how you want to import the provider’s certificate. You can provide it manually using an upload or have it automatically imported when the server is contacted during setup. Additionally, you will need to indicate whether you want to allow the import of any certificate (including self-signed certificates).
In some cases, your SAML administrator may want you to import the server’s certificate before adding the identity provider. Should that be the case, see
Step 4.
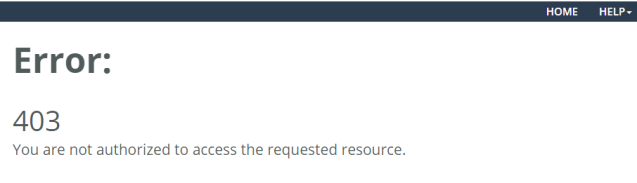
5. After successfully adding a SAML 2.0-compliant identity provider, all users will be able to authenticate but if they do not have an assigned role, they will not be authorized to use NetIM. Authenticated users without an assigned role will be presented with the following when they attempt to login and use NetIM:
To remedy this problem, either use the
Authority Map section of the
Create Identity Provider screen as described in
Step 4 or the
CONFIGURE> All Settings->Administer->User Management page as described in
Step 2.Enabling and Disabling SAML Using the CLI
Enable SAML in your installation by performing the following step.
All app.sh commands must be run at the root of the installation directory.
1. Login to NetIM core as netimadmin.
2. Change your working directory to the installation directory, by entering a command like the following
cd /data1/riverbed/NetIM/2.3.0_2778
3. Invoke the bash shell by typing “bash” at the netimsh command prompt.
4. Use the CLI to enable SAML as follows:
– Stop Services by entering the following command
./app.sh -c stop ALL
– Enable SAML by entering the following command:
./app.sh -saml_state enabled
– Import Certificate by entering the following command:
./app.sh CHECK_SAML_CERTIFICATE /importCertificate true <Metadata URL>
– Start Services by entering the following command:
./app.sh -c start ALL
5. Use the CLI to disable SAML by performing the following steps:
– Stop Services by entering the following command:
./app.sh -c stop ALL
– Disable SAML by entering the following command:
./app.sh /saml_state disabled
– Start Services by entering the following command:
./app.sh -c start ALL
Configuring TACACS+ Authentication
NetIM supports integration with TACACS+ servers for authentication and authorization (AAA). To enable TACACS+ integration, you must log into NetIM Core VM as netadmin and then enable TACACS+ integration using the app.sh target, by entering the following command:
app.sh /TACACS_STATE enabled
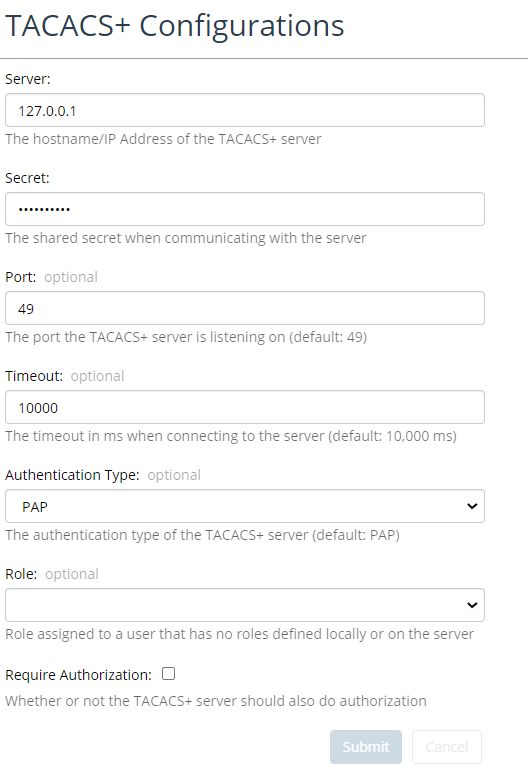
After enabling TACACS+ integration, navigate to Configure,->All Settings->Integrate->TACACS+ to access the TACACS+ Configurations page, as shown in the following screen:
Before setting up TACACS+ authentication and/or authorization, ensure that you have the following required TACACS+ configuration data from your TACACS+ administrator:
• Hostname
• Shared Secret Port
• Timeout
• Authentication Type: ASCII, PAP, CHAP, MSCHAP, ARAP
You and TACACS+ administrator must decide whether you want TACACS+ to provide just user authentication or both user authentication and user authorization. If you choose just user authentication, you can set a default NetIM role for all TACACS+ users in the NetIM TACACS+ configuration page, as follows:
You can also assign a specific role to any user in the NetIM
User Management page (
CONFIGURE->All Settings->Administer->User Management) as shown in the following screen. For more information, see
Appendix: Tracking User Logins,Specific user roles set in the User Management page takes priority over any default roles or roles provided by TACACS+.
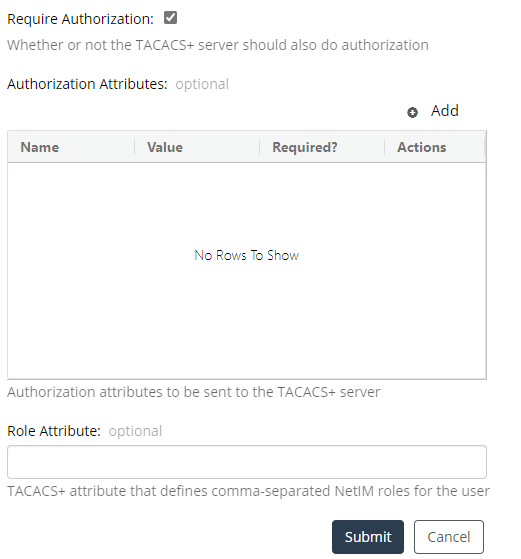
If you want TACACS+ to provide authorization as well as authentication, select the check box for “Require Authorization” and provide the authorization attributes and role attributes, as shown in the following screen:
The following settings demonstrate one way of configuring authorization on the NetIM TACACS+ authorization-screen:
• Name = Service
• Value = Shell
• Required = Yes
• Role Attribute = netim-role
On the TACACS+ server, you must define the roles as shown. (The roles should be in all CAPs as shown.)
• netim-role=ADMIN
• netim-role=PRIVILEGED
• netim-role=USER
• netim-role=RESTRICTED
In the preceding example, the name used for role attribute is netim-role. However, the role attribute can be named anything you want. It does not need to be called netim-role. The only requirement is that the role attribute entered in NetIM must match the name on the TACACS+ server.
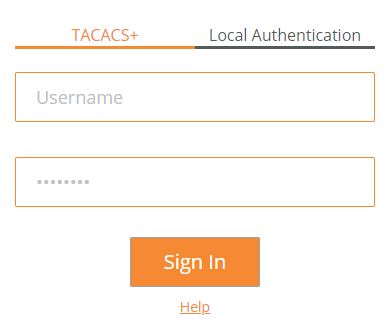
After enabling and configuring TACACS+ integration, the NetIM login screen presents an option to use TACACS, as follows:
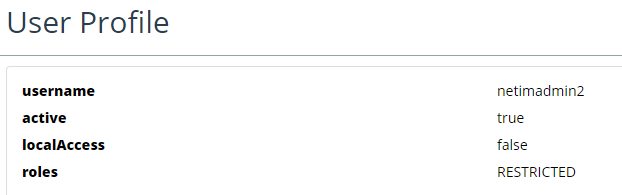
Any errors encountered will be displayed in the login screen. If you successfully log in using TACACS+, you can click the username in the upper right side. and view your user profile, as follows:
If you have admin rights, then you can go to the NetIM User Management page (CONFIGURE->All Settings->Administer->User Management) and view the Active User Sessions, as follows:
There are numerous vendors of TACACS+ servers with many different deployment options, so your TACACS+ configuration may be unique to your enterprise and require different Authorization Attributes and Role Attribute settings. You should work with your TACACS+ administrator to design an integration that works for both ends of the integration.
TACACS+ integration may require some debugging on both ends, including Wireshark packet captures. To turn on debugging in NetIM, go to the Core Server Management page and turn the Debug State of the NetIM Web Service to On.
To view debug output, look in the Catalina.out log file in: <install_dir>/webServer/jakarta-tomcat/logs on NetIM core.
Alternatively, you can turn on debug in the <install-dir>/webServer/jakarta-tomcat/webapps/vnes/WEB-INF/classes/logback.xml file and restart the web service.
1. Login to NetIM core as netimadmin.
2. Change your working directory to <install-dir>/webServer/jakarta-tomcat/webapps/vnes/WEB-INF/classes
3. Open the logback.xml file for editing.
4. To turn on debugging, change:
<!-- SLF4J logging to vnes_webapp. -->
<root level="info">
to:
<!-- SLF4J logging to vnes_webapp. -->
<root level="debug">
5. To restart the Web Service, enter the following command from the netimsh shell:
start WS
Working With Interface Speed Overrides
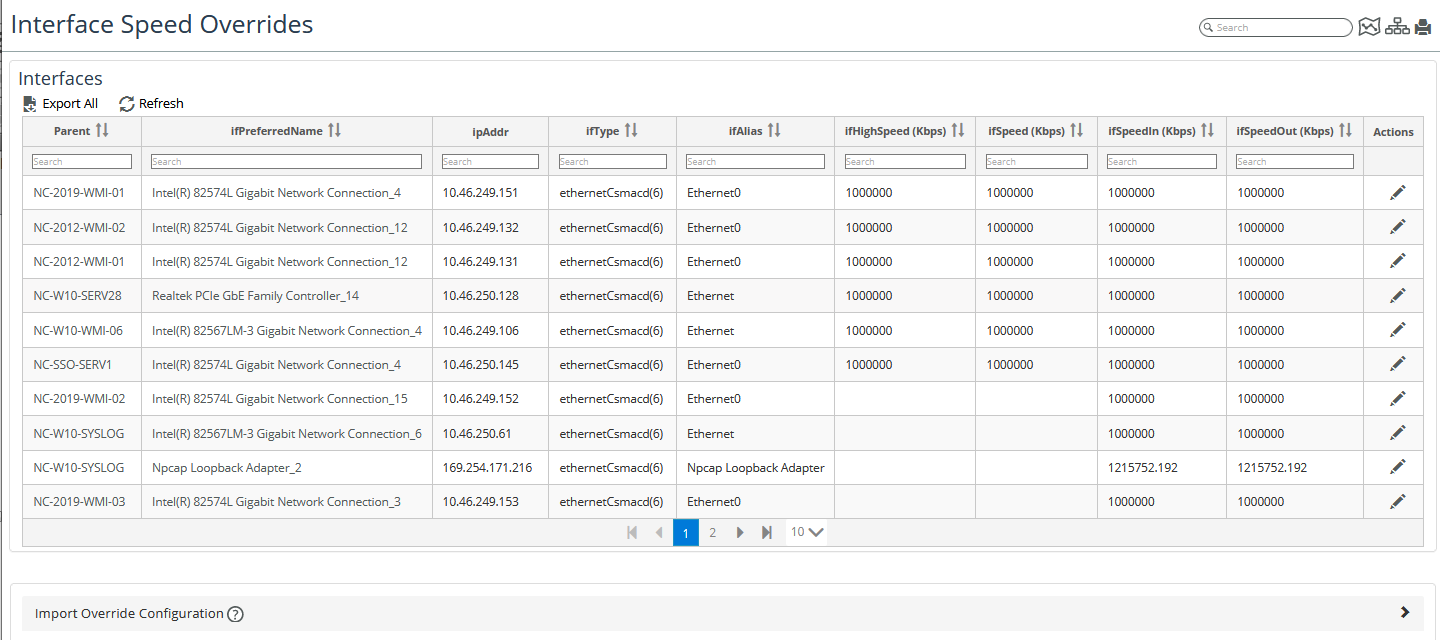
To access the Interface Speed Overrides Page, navigate to CONFIGURE->All Settings->Customize->Interface Speed Overrides. The following screen appears:
The Interface Speed Overrides Page allows you to do the following:
• View all your interface speed overrides,
• Change the interface inbound and outbound speeds (click the pencil icon under Actions).
• Export to CSV (click the Export All link)
• Import from CSV to (click the Import Overrides Configuration link).
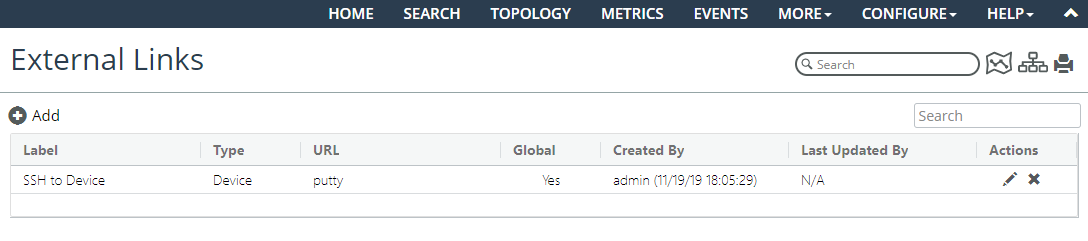
Launching to Custom External Links
NetIM supports adding custom external launches from devices and interfaces. Navigate to CONFIGURE> All Settings->Customize->External Link. The following page appears:
From this page you can do the following:
• Edit or delete existing external links using the  controls on the right side of each listing under the Actions column.
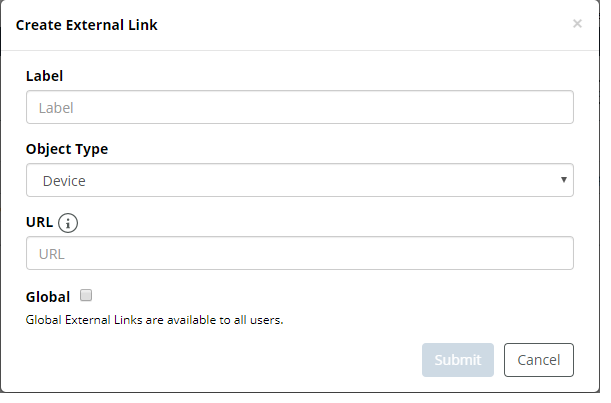
 • Create a new external link by clicking on the plus icon

. The following screen appears:
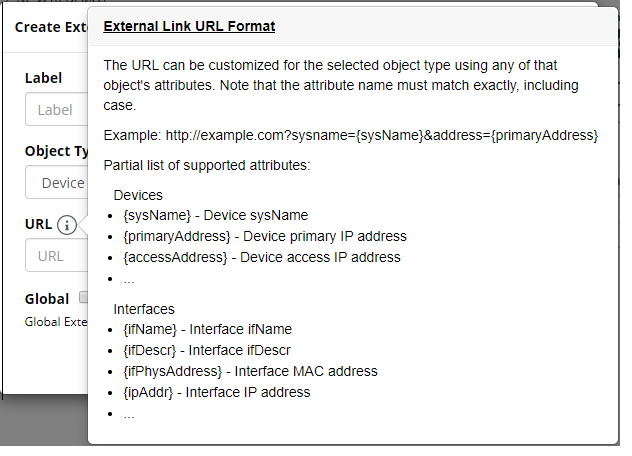
The syntax for creating external link URL appears when you mouse over the

:icon, as follows:
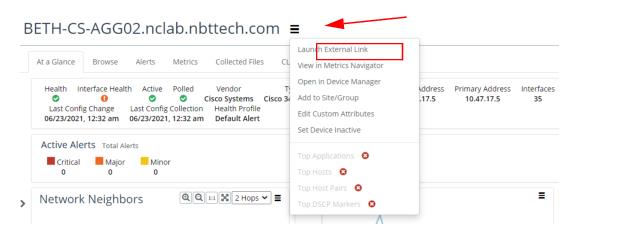
You can access the links you create in various area of the UI, including the
Device page,
Interface page, and
Topology page by clicking on the Hamburger menu

and selecting “Launch External Link”, as follows:
Overriding Element Names
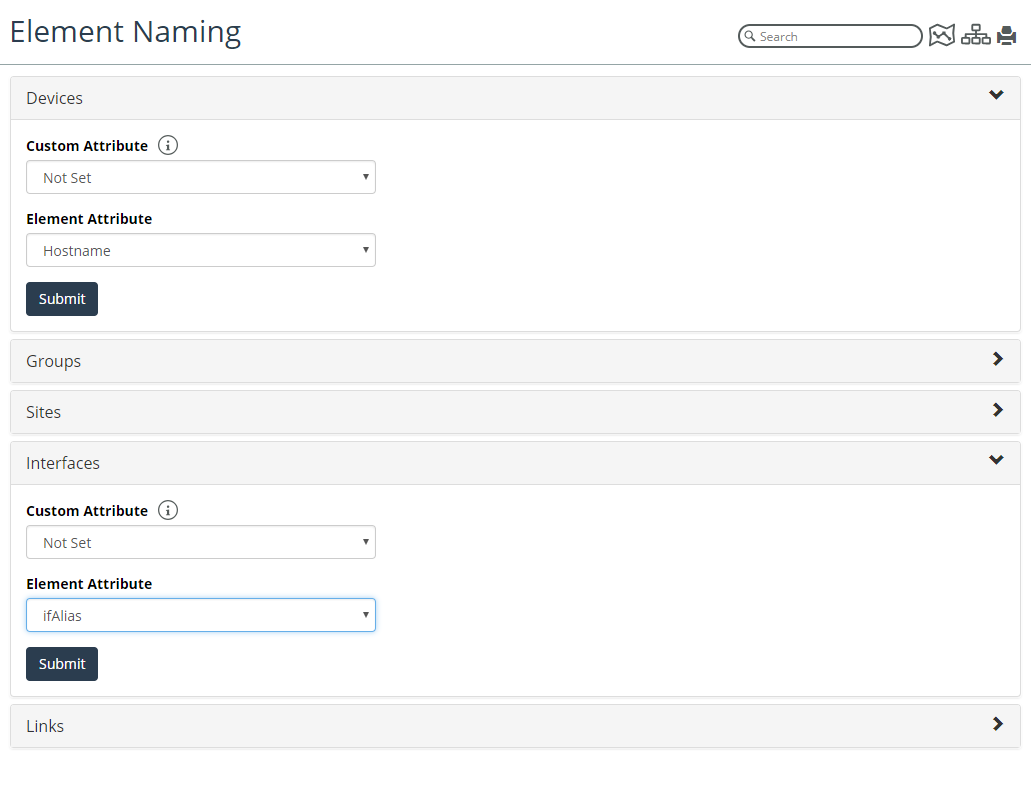
NetIM supports the ability to override default naming for devices, interfaces, groups, sites, and links. To configure custom display names, navigate to CONFIGUE->All Settings-> Organize->Element Naming, as shown in the following screen:
The Element Naming feature allows you to specify a system-provided object attribute or a user-defined custom attribute to be used for displaying the object’s name in most views. From the Element Naming page, you can override the default naming and chose you own naming. As shown in the following screen. Note that we have chosen to display devices by their hostname and interfaces by their ifAlias value, as opposed to the defaults of sysName and ifName or ifDescription, respectively:
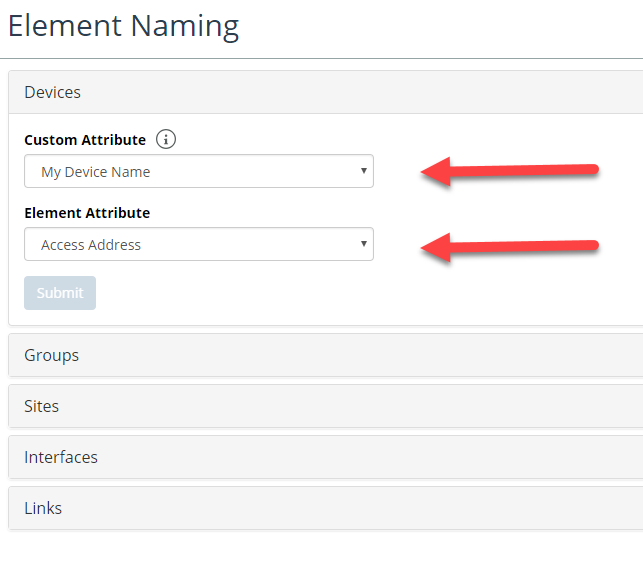
You can also select both a user-defined custom attribute and a system-defined attribute as follows:
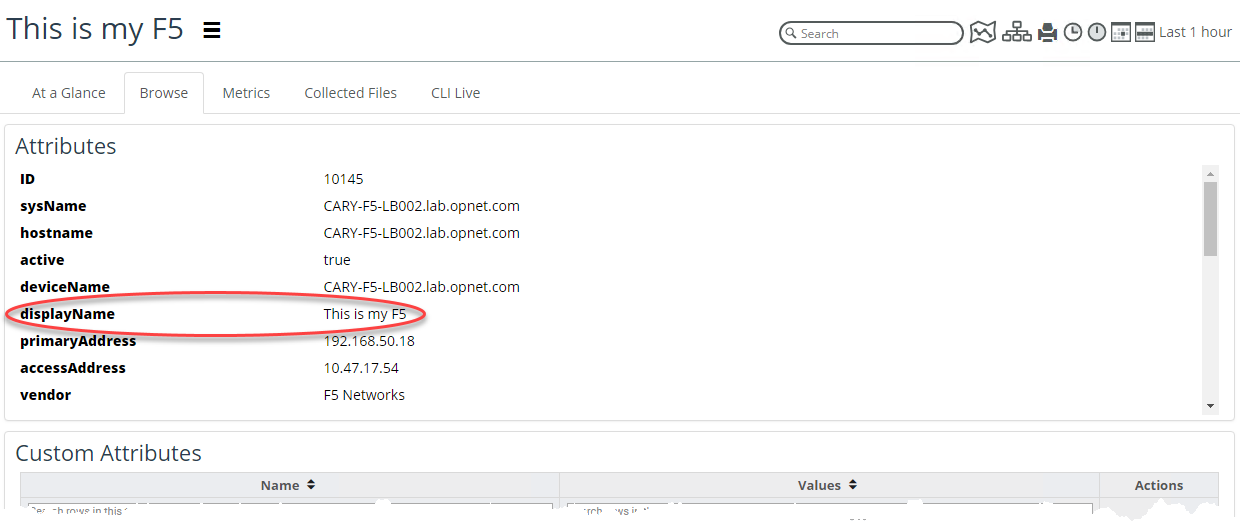
In the example above, the custom attribute “My Device Name” is used as a device’s display name. If the value of “My Device Name” is empty or null, then the system-defined custom attribute “Access Address” is used as the device’s display name.
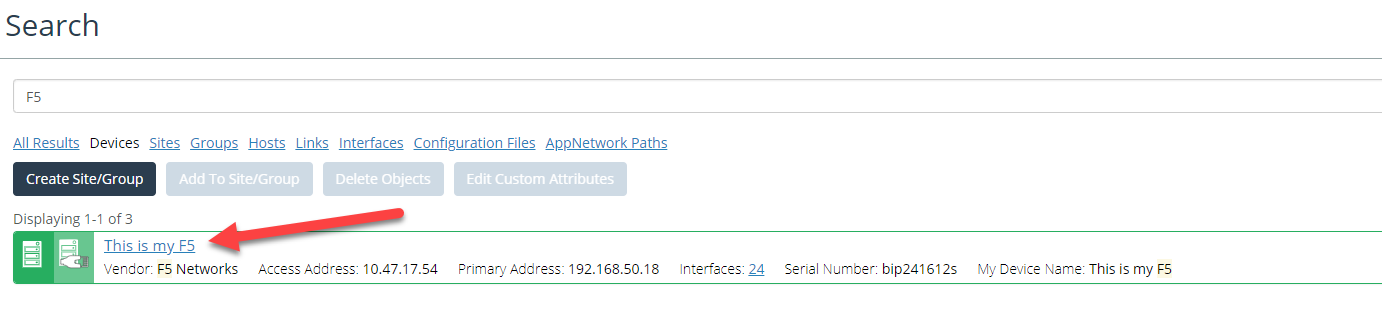
For example, if you provided the value “This is My F5” for the custom attribute “My Device Name” then your search results would be displayed as follows:
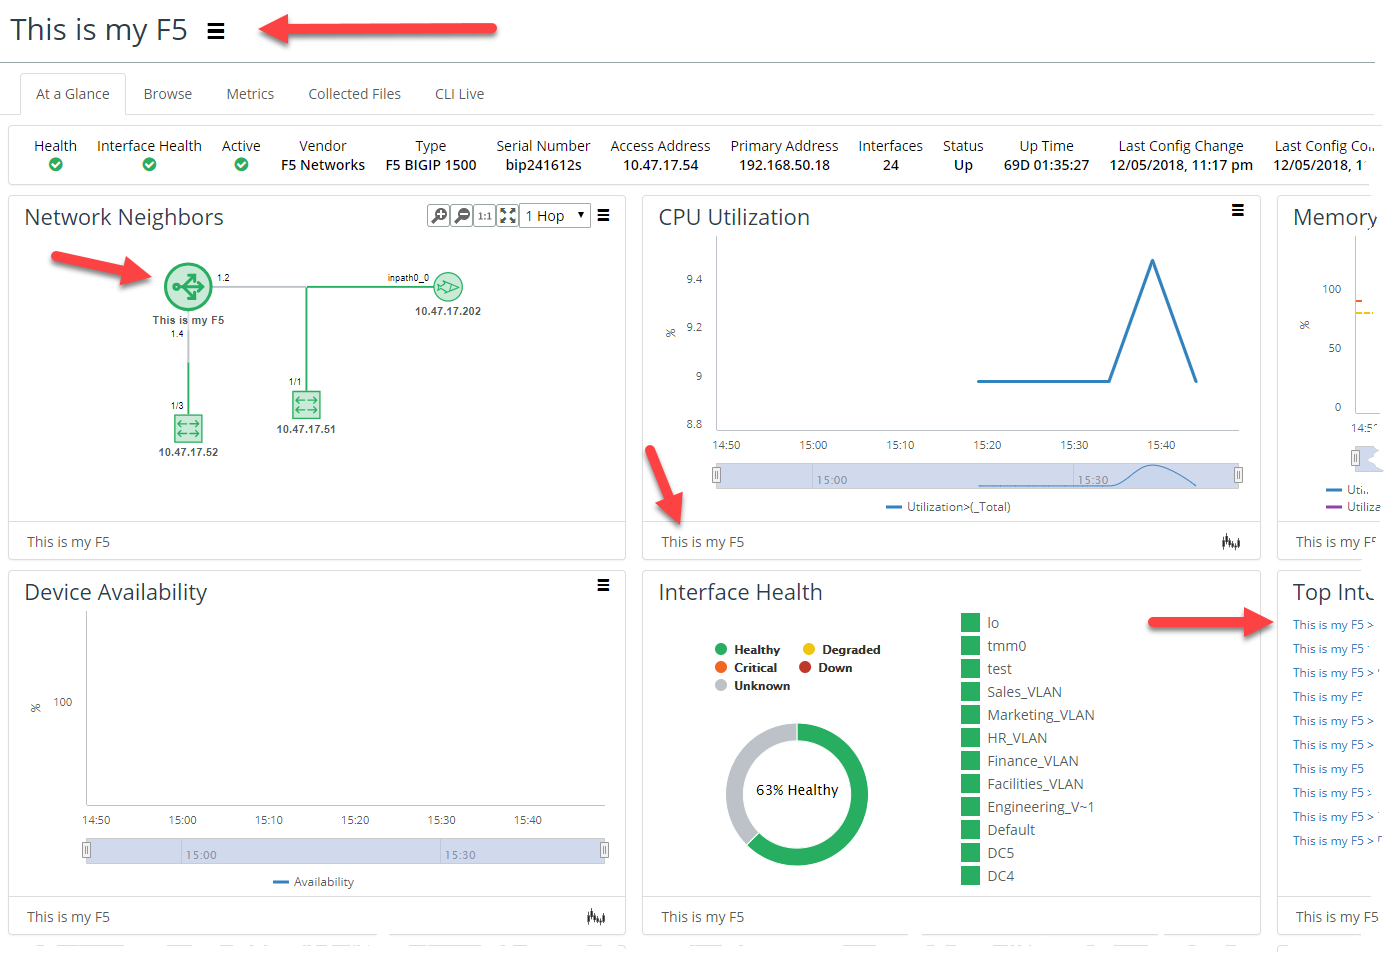
The At-a-Glance tab will be displayed as follows:
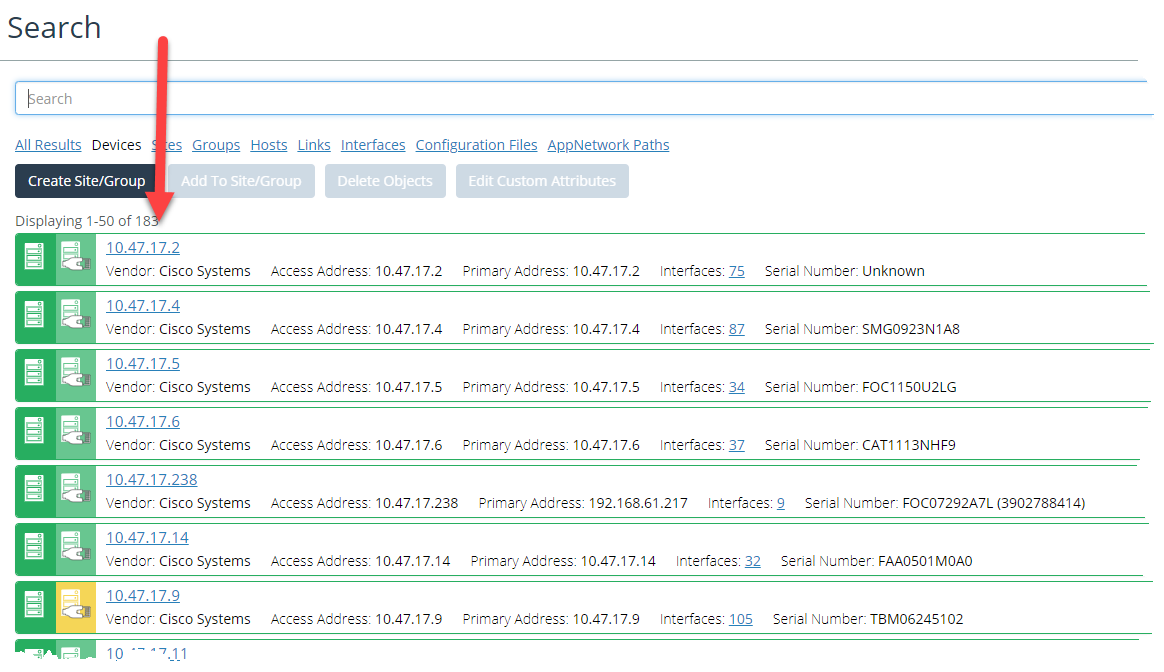
Devices that do not have the user-defined custom attribute “My Device Name” set will be displayed by their access address in the Search page, similar to the following:
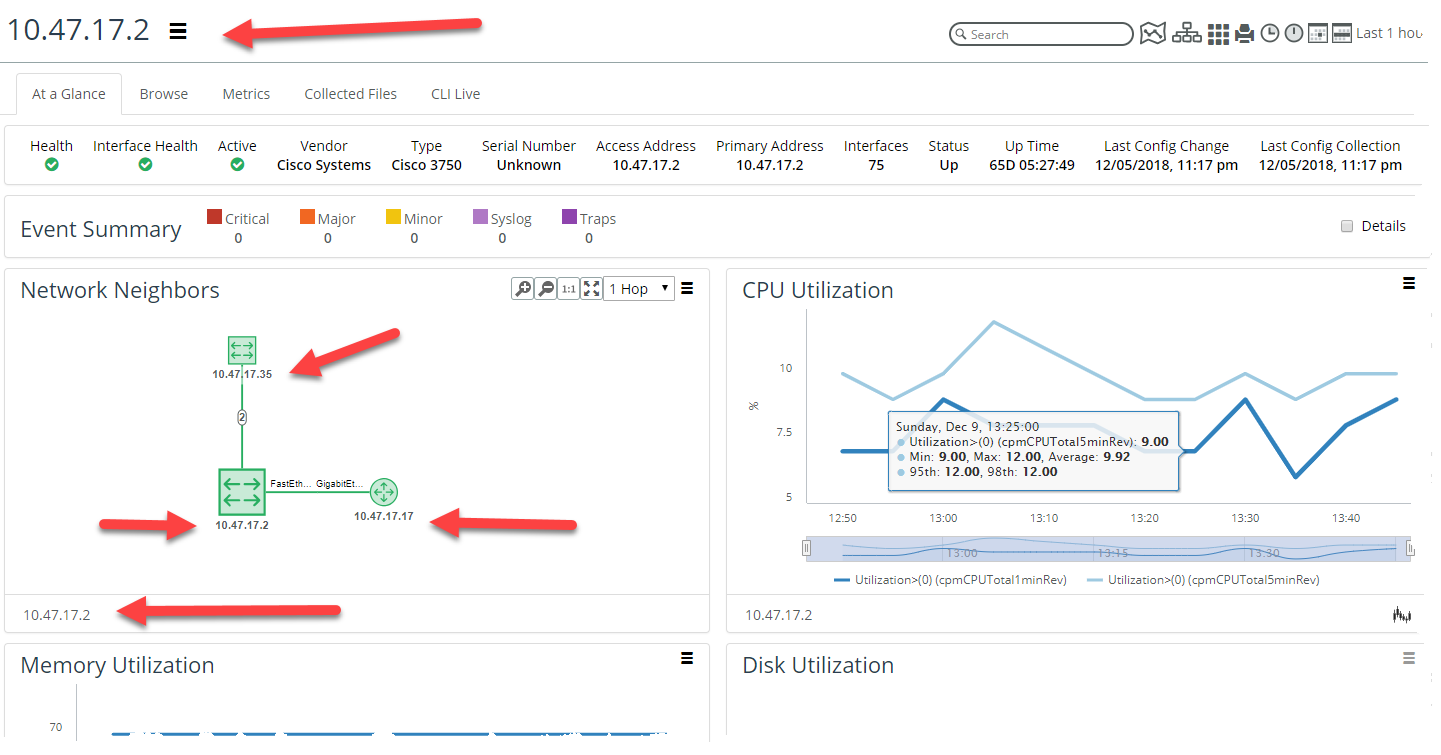
The At-a-Glance pages appear similar to the following, with devices displayed by their access addresses:
If the user-defined custom attribute and system-defined attribute you have chosen in the Element Naming page are both blank, then the default naming attribute will be used instead.
The Element Naming attributes you chose will be resolved and you will see a new object attribute in every object’s Browse tab, as shown in the following screen:
The displayName attribute is also used to identify the object when NetIM sends alerts. Additionally, this new attribute, displayName, is provided to SteelCentral Portal as a new property that can be used by Portal for displaying objects provided by NetIM.
Working with Scheduled Jobs
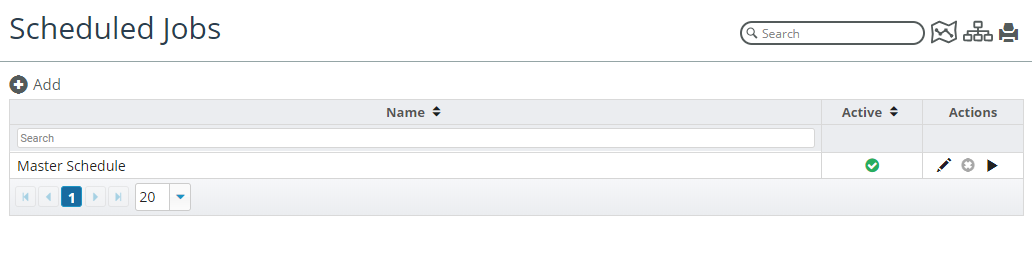
NetIM supports the concept of multiple, configurable, scheduled jobs for performing tasks such as discovery and collection. To configure Scheduled Jobs, choose CONFIGURE > All Settings->Customize->Scheduled Jobs as shown in the following screen:
NetIM also provides a system-defined schedule named the “Master Schedule” that cannot be edited or deleted from the Scheduled Jobs page, as shown in the following screen:
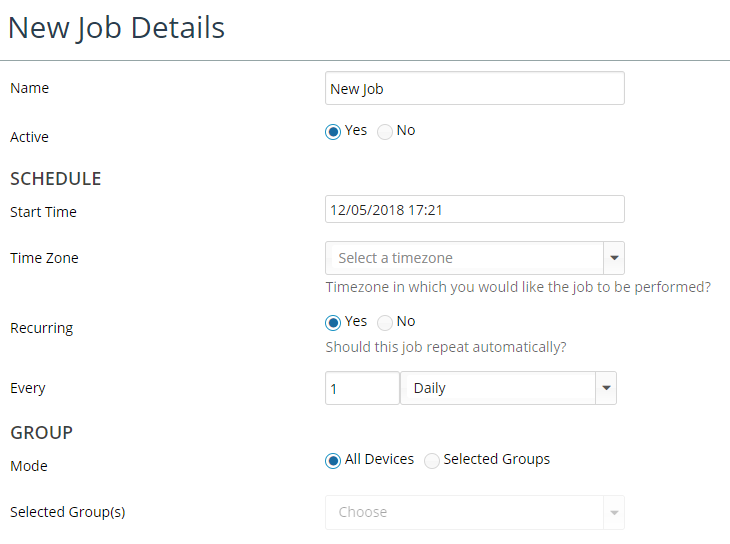
You can cause the Master Schedule to be triggered manually from the Scheduled Jobs page by clicking the Run Now

button or create newjobs by clicking the Add

button to launch the New Job Details page, as shown in the following screen:
To set up a new job, do the following:
1. Provide the job with a name, schedule, and whether it should be group-based or apply to all devices.
2. Select the tasks and subtasks you want the job to perform by enabling or disabling the available tasks.
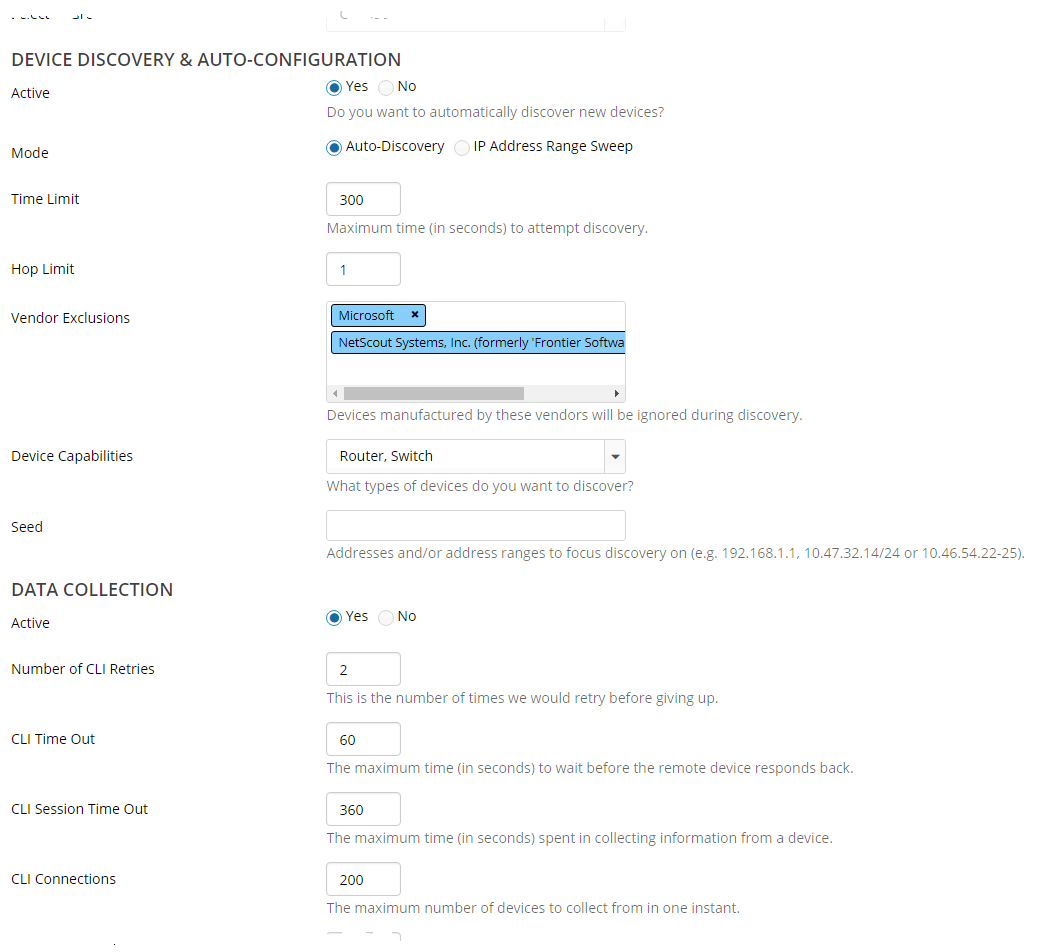
The following screen shows how a new job is defined:
Tasks and Subtasks that are available in a scheduled job include:
• Discovery & Autoconfiguration,
• CLI and SNMP Data Collection & Parsing.
• Pre-Collected File Collection & Parsing
• Data Import
• Auto Grouping and Topology Inference
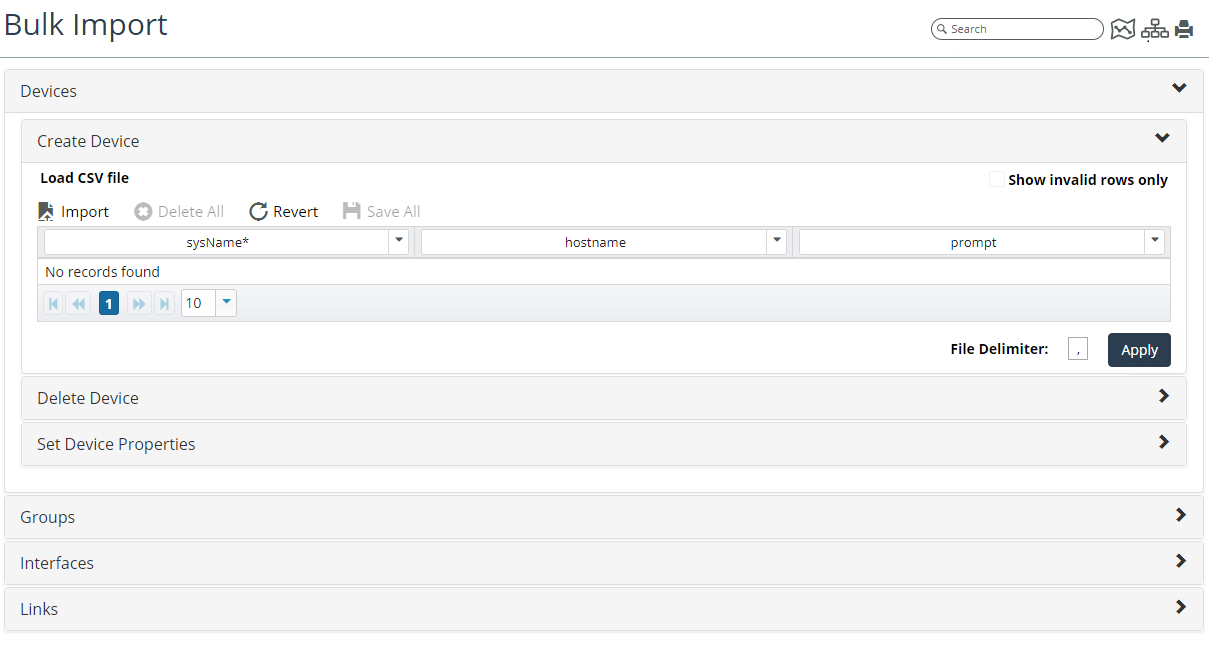
Using Bulk Import
NetIM supports bulk operations using properly formatted CSV files on devices, interfaces, links, and groups/sites.
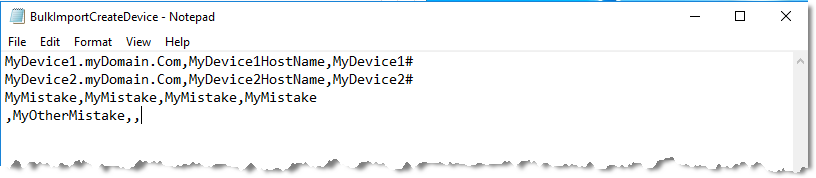
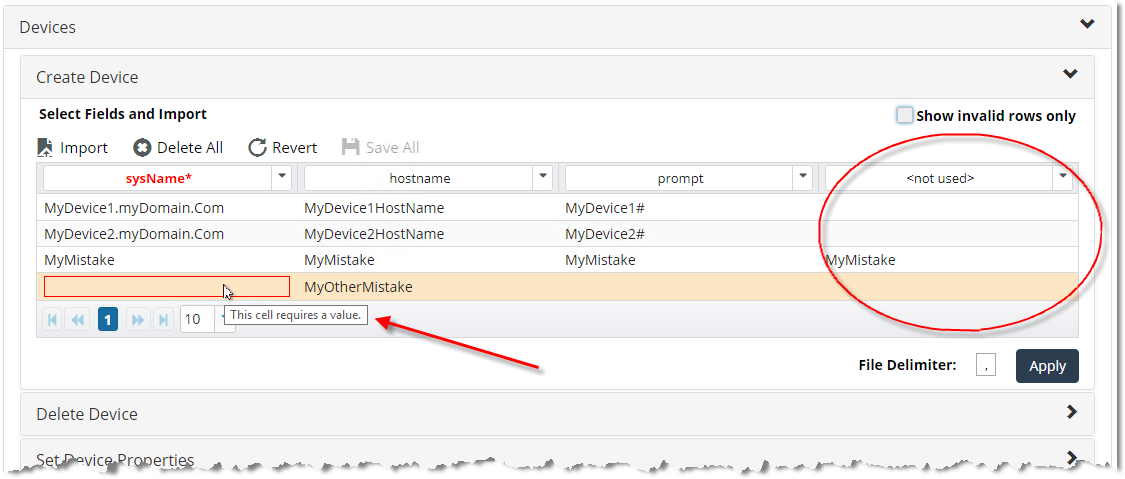
Bulk import provides a simple, easy-to-use means of manually augmenting your NetIM model. For example, NetIM’s Bulk Import can be used to create a few devices from a simple CSV file, as shown in the following screen:
The CSV file contains deliberate errors (an extra field and a missing required cell value) to illustrate how the Bulk Import webUI detects errors and allows you to repair the errors before import, as shown in the following screen:
Bulk Import Limitations
Bulk import has the following limitations:
• Bulk Import delete operations must reference existing objects for proper operation. Failing to do so may result in the creation of an object.
• Bulk import does not support wrapping of import fields in quotes or double quotes
Instead, you must use a delimiter other than the default comma to import data such as sysUptime. For example, to import a sysUptime of 1 days, 1 hours, 1 minutes, 1 seconds you should use a delimiter other than the default comma and leave the sysUptime string as-is.
• Bulk Import does not support the inclusion of a header in the text file to import.
All lines are treated as data to import. Including a header in the input file will result in an error or erroneous data from the header being imported into the database.
• Bulk Import requires that ifAdminStatus and ifOperStatus values be supplied in their numeric, integer value, not string value.
.Supplying string values will result in a failure to import the values. See RFC2863 or the IF-MIB for a definition of the supported integer values.
Working with Bulk Import
To perform a bulk import, follow these steps
1. Log into the UI as admin.
2. Navigate to CONFIGURE->All Settings->Customize->Bulk Import.
The following screen appears:
3. Work with Bulk Import – Devices
The following operations are supported for bulk devices:
– Create Device
– Delete Device
– Set Device Properties
4. Work with Bulk Import – Interfaces
The following bulk operations supported for interfaces:
– Create Interface
– Create Subinterface
– Delete Interface
– Delete Subinterface
– Set Interface Address
– Set Interface/Subinterface Address Properties
– Set Subinterface Address
5. Work with Bulk Import – Groups
The following bulk operations are supported for groups:
– Add Device to Group
– Create Group
– Create Subgroup
– Delete Group
– Delete Subgroup
– Remove Device from Group
6. Work with Bulk Import – Links
The following bulk operation are supported for links:
– Create Link (by interface preferred name)
– Create Link (by interface index)
– Create Link (by interface name)
IP Forwarding Table Collection
NetIM supports collecting IP Forwarding Tables for use in NetPlanner studies. For configuring IP Forwarding Table Collection. IP Forwarding Table Collection supports the scheduled or on-demand CLI collection of IP forwarding tables from devices. The collection can be set up to be performed on a specific site or group or set of sites and groups, as shown in the following screen:
By default, IP Forwarding Table Collection is inactive and should be started only if you own NetPlanner and require forwarding tables for your NetPlanner studies.
To access the IP Forwarding Table Collection navigate to CONFIGURE> All Settings->Customize->IP Forwarding Table Collection.
The following screen appears:
From the IP Forwarding Table Collection page you can do the following:
• Active - set to Yes or No (default)
• SCHEDULE - set to Now, Later, or After Model Refresh is complete (default)
• GROUP - set to All Elements or Selected Group (default). If the default is chosen, choose the Selected groups from the pull-down list.
Collecting the IP forwarding tables can create significant load on both NetIM and the devices on which you are collecting the forwarding tables. You should use extreme caution before enabling IP forwarding table collection.
Start with a small group and monitor for CPU spikes on the devices. You should avoid all Internet-facing routers as their routing tables will be extremely large and impractical for performing NetPlanner studies. Plan and limit your scope of collection by using group-based collection and editing each device driver’s “IP Route (.iproute)” command to collect only a specific routing protocol or specific VRFs. Consider contracting with Riverbed Professional Services for guidance on best practices.
Working with Custom Scripts
The Custom Scripts feature supports adding custom processing during the NetIM model update process. Some use cases are as follows:
• Copy reports exported from NetIM to an archive environment.
• Move config files or data files collected by other tools to the import directory.
• Run scripts and tools to manage NetIM processing.
The Custom Scripts page provides contextual help to describe the various steps available for script injection. Additionally, contextual help is provided for each attribute associated with a custom script’s configuration.
To configure custom scripts, follow these steps:
1. Log into the UI as admin.
2. Navigate to CONFIGURE->All Settings->Customize->Custom Scripts.
The Custom Scripts page appears, as shown in the following screen:
You can configure scripts to run:
– Before the discovery and network model update starts.
– After SNMP and CLI data collection has completed, but before the data is parsed and loaded into the database.
– After the user-supplied network data files have been collected, but before data is parsed and loaded into the database.
– After Report Export has completed.
– After all functions performed as part of network model update have completed.
The custom scripts page provides default scripts which you can enable if they are relevant to your purposes.
3. When you determine when you want a script to run, define the following fields in the appropriate frame. The following is an example of how to define a perl script: For examples of how to define an executable, see the OOTB scripts on the Custom Scripts page.
– Enabled - check to enable the script, the default is disabled.
– Command Name - provide a name of the program you want invoked, for example Save_Reports.
– Command - enter the name of the program you want to run, for example perl.
– Working Directory - enter the absolute path to the directory where the program defined in Command resides, for example /usr/bin/perl.
– Arguments - the script you want to run and the file or directory to run against, for example
<install_dir>/scripts/saveReports.pl /data1/riverbed/NetIM/op-admin/tmp/vne/Reports
– Environment Variables - enter any environment variables that need to be set.
– Timeout - set a timeout value in seconds for the command to exit if unsuccessful, for example 5000.
Checking System Status
NetIM supports a System Status page and a NetIM Infrastructure page that provide detailed status on the NetIM deployment on Docker swarm.
The System Status Page
To work with the System Status page, follow these steps:
1. Log into the UI.
2. Do one of the following:
– Click the LED in the upper left of the title bar:
– Navigate to Help->System Status
The following screen appears:
3. From this page you can check on the status of Core Services and Swarm Services, download logs, download incident logs if they exist, and drill-down on Swarm Services of interest for additional information, as shown in the following screen:
Users who do not have admin privileges can only view status; other operations like downloading logs are grayed out.
Each service regardless of Core and Swarm is shown with an LED indicating it’s current health status. A mouse-over on the LED can give additional status. In addition to service health status another important function of the System Status page is the ability to perform log aggregation and download.
Core Service logs and Core incident directories can be harvested and downloaded directly from the WebUI. For Core Service Logs, there are essentially 2 options, as shown in the following screen:
– Basic: just the Core service logs
– Include supporting files: includes the Core service logs and everything under the log directory, except the incident directories
For Core Incident Directories, you are given the choice of which incident directories (if any exist) to download from a list of the most recent 10 detected Core incidents, as shown in the following screen:
When you click the Submit button he logs are streamed over to your browser and you are provided with progress using an indication of the amount of data downloaded, as shown in the following screen:
Swarm Service logs can be aggregated and downloaded or specific service logs can be harvested and downloaded. Generally, you will likely use per-service log download because an issue is almost always confined to a single microservice.
When downloading a swarm service log you will be asked the time-frame from which you want to harvest the logs (defaults to current time) and the number of lines you want to download (defaults to the last 100 lines). This allows you to pinpoint a time in history where you wish to download and view logs as opposed to downloading all logs, as shown in the following screen:
In addition to downloading and viewing swarm logs, you can also drill-down to Service Metrics directly from the service as well as view service and task details Service and Task Details are generally used only by advanced Support personnel, as shown in the following screen:
NetIM Infrastructure Page
The the NetIM Infrastructure page allows the admin user to monitor and troubleshoot the NetIM Docker swarm or virtual deployment, and incorporates the System Status page in the Services tab.
The NetIM Infrastructure page provides visibility into the internals of NetIM and the platform on which you are hosting NetIM. The NetIM Infrastructure page provides curated views into metrics related to the underlying infrastructure as well as NetIM internals. By default, NetIM stores 15 days of 30-second metrics for viewing current and past metric state. You control the time-range as you would any other NetIM page using the time-selector in the upper right-hand side of the page.
The NetIM Infrastructure page and related tabs provide a wealth of information for monitoring your NetIM deployment. The tabs are arranged in order of increasing detail and complexity. In general, these pages assist with monitoring the health of the underlying infrastructure supporting your NetIM implementation and provide a high-level view into some of the key internals of the NetIM application.
You can view a concise table of the NetIM swarm nodes including their names, roles, IP address, availability, and configuration. You can also view the uptime for each of the nodes in your NetIM deployment.
Some rules-of-thumb to consider when viewing NetIM Infrastructure tabs include:
• Node Summary:
– NetIM’s Manager should consistently be the most heavily used component of your NetIM implementation. High utilization of memory and CPU on the Manager is expected. If your internal policies require lower utilization of memory and CPU, consider increasing the CPU and memory available to NetIM Manager.
• Node Details:
– “Holes” or gaps in system-level metric data in the Node Details tab are a likely indicator of snapshots and/or insufficient resources available to harvest metrics. Using the metric graphs, you can pinpoint the time it occurred and raise it to your VM team.
– “Docker Daemon Container Actions” should generally be a flat-line unless you are actively starting/stopping services.
– “System Load” should ideally trend to be close to the number of cores/CPUs allocated to the VM. Given NetIM Manager is uniquely loaded, you may want to provide more CPU resources to NetIM Manager.
• Key Metrics:
– Kafka “Messages In” and “Messages Consumed” should generally be equal and the graphs look roughly identical.
– Kafka Lag may go up and down and even report as negative at times. Lag should never be consistently monotonically increasing; it should trend towards zero.
– “Tasks dropped” should generally be zero. Significant tasks being dropped indicate a need to scale the pollers by increasing workers.
– Log Events (Error/Warning Count) metric can be an indicator of where to look and when to review logs.
To work with the NetIM Infrastructure page follow these steps:
1. Log into the UI as admin.
2. Navigate to CONFIGURE->All Settings->Administer->NetIM Infrastructure or click on the LED in the upper left of the Home page, as shown in the following screen:
The NetIM Infrastructure page appears, as shown in the following screen:
3. From the NetIM Infrastructure page you can view the following information for every NetIM infrastructure node:
Node Summary Tab (default)
The Node Summary tab provides a high-level semi-circle chart display of the following, with drill-down to the Node Details view for a specific node:
– CPU Busy
– RAM Used
– SWAP Used
– Data File System Used
– Root File System Used
Node Details Tab
The Node Details tab displays the same semi-circle charts as the Node Summary Tab, as well as the a Node Details link for each node in the swarm that takes you to the Node Details tab which displays more detailed line charts with mouse-over information, filters in the footers, and show/hide options in the hamburger menus, providing system-level summary and detailed metric charts per node in your NetIM implementation:
– CPU
– Memory
– Network Traffic
– Disk Space Used
– CPU Usage by Container
– Memory Usage by Container
– Received Network Traffic by Container
– Transmitted Network Traffic by Container
– File System Reads by Container
– File System Writes by Container
– Disk IOs
– Docker Daemon Container Actions
– Processes Status
– System Load
You can also display the Service Tasks by clicking on the Show/Hide Service Task link in the upper right of the page and then drill down further on the Service Task of interest, as shown in the following screens:
Key Metrics Tab
The Key Metrics tab displays high-level metrics related to the key NetIM operations including kafka, polling jobs, and indications if any services are generating error or warning messages in logs. The charts tracking the following key metrics, with mouse-over information, filters in the footers, show/hide options in the hamburger menus:
– Kafka Lag
– Messages In
– Messages Consumed
– Log Events
– Tasks Dropped
Service Metrics Tab
The Service Metrics tab displays detailed metrics that can be filtered to a specific NetIM Service for specific service monitoring. The chart track the following service metrics, with mouse-over information, filters in the footers, and show/hide options in the hamburger menus:
– I/O Rate
– I/O Errors
– I/O Duration
– CPU Usage
– I/O Thread Utilization
– JVM Heap
– JVM Non-Heap
– Threads
– Thread States
– Log Events
– File Descriptors
– Garbage Collections
– Garbage Collection Pause Duration
Elastic Metrics Tab
The Elastic Metrics tab displays charts tracking the following elastic metrics, with mouse-over information, filters in the footers, and show/hide options in the hamburger menus:
– Cluster Stats
– CPU Usage
– JVM Heap Used
– JVM Heap Committed
– Search Latencies
– Indexing Latencies
– Documents
– Index Data Size
– Open Files
– Disk Free
Services Tab
The Services tab is provided as a convenience so that you can remain within the NetIM infrastructure page for access to the service status and log downloads. You can view if any of the swarm services have encountered incidents. You will find a column indicating whether out-of-memory incidents were detected, and you can download the HPROF file to provide to Riverbed Support for analysis.
This tab provides the same view and features as NetIM’s
System Status page.displays. For more information, see
The System Status Page.
Swarm Details Tab
The Swarm Details tab provides Riverbed Support with a direct way to view and inspect the NetIM docker swarm images, docker volumes, and docker networks associated with your deployment, and when troubleshooting issues stay within the UI rather than rely on external troubleshooting tools like Portainer.
Advanced Tab
The Advanced tab supports troubleshooting problems and consists of the following three tools:
– Model Mapping Troubleshooter - allows you to drill down on issues and review suggested remediations.
– Prometheus PromQL Query - allows you to the use PromQL (Prometheus Query Language) to selects and aggregate time series data in real time. For more information, see the
Prometheus documentation.
– Swarm API Request and Response - allows you to create a variety of API calls to test the swarm.
Adding a Message to the Login Screen
NetIM allows the administrator to add a message of any kind to the login screen. To add a message to the login screen, follow these steps:
1. Login to the UI as admin.
2. Navigate to CONFIGURE->All Settings->Administer->Login Settings.
The following screen appears:
3. From the Login Settings page you can do the following:
– Create a banner message.
– Enable or disable the display of the banner message.
– Require users to acknowledge the banner message in order to log in.
4. When you are satisfied with your selections. click the Submit button.
The NetIM Administrative Shell
The NetIM administrative shell, netimsh, is a convenience shell on NetIM core and NetIM manager in the Docker swarm.
You can invoke the bash shell by typing bash from the netimsh prompt as follows:
netimadmin@netim-core-230 [netimsh]: bash
In NetIM 2.*, the netimsh shell has been enhanced to allow the netimadmin user to reset all or a subset of configuration options in order to reconfigure NetIM for a move or re-adjustment in the deployed implementation.
For more information about the reset options, enter “reset --help” from within the netimsh shell on the NetIM manager or NetIM core in the Docker swarm, as follows:
netimadmin@netim-core-230[netimsh]:~$reset --help
Reset system configuration
Commands:
? Help
all Reset all"
core Reset core
network Reset network configuration
ntp Reset ntp configuration
ssh Reset ssh configuration
swarm Reset swarm
timezone Reset time zone
Run 'reset COMMAND ?' for more information on a command.
After using a reset option to reset configuration on your NetIM implementation, you should then follow the standard setup steps on Manager and Core by entering setup in the netimsh shell on Manager and Core and provide the required information at the prompts.
Configuring NetIM 2.x with a Certificate Authority Signed Certificate
By default, NetIM is installed with a self-signed certificate. To install a CA-signed certificate follow these steps:
1. Login to NetIM Core as netimadmin. The default password is netimadmin.
2. Stop all NetIM Core services by entering the following command within the netimsh shell:
stop ALL
3. Exit to the bash shell, navigate to the NetIM install directory, and execute the https_setup script with appropriate commands as shown below:
bash
cd <NetIM-core-install-dir> (for example: cd /data1/riverbed/NetIM/2.0.1_295)
./https_setup.sh /secure true
You are prompted for several inputs.
4. Enter the fully qualified host name (for example, myhost.myco.com) or IP address.
Enter the hostname exactly as you will enter it in the URL to connect to the web server using a web browser.
5. Specify whether you will use the existing certificate or generate a new certificate. Your response will depend on whether you have already obtained and imported a CA signed certificate for NetIM previously or if this is the first time you are configuring NetIM with a CA signed certificate.
Note: Generation of a new certificate will remove the existing server certificate from the keystore. If a CA signed certificate is already present in the NetIM keystore, do not generate a new certificate.
– If you have a CA signed certificate in the NetIM keystore, enter
R to reuse the existing certificate and go to
Step 9.
– If this is the first time this NetIM is being configured with a CA signed certificate, proceed to step 5.
6. Enter G to generate a new certificate.
– The default key size is 2048 bits. Enter either Y to use the default key size or enter N and then specify the key size that is appropriate for your organization.
– When prompted to set domain attribute, enter Y.
– Provide each of the following values as you are prompted. Enter valid information as these values will be used when generating the server certificate.
• Name of your organization unit
• Name of your organization
• Name of your city or locality
• Name of your state or province
• Two letter country code of your unit (for example, US)
Note: After you have entered country code, the script echoes a summary of the domain information that you have entered. Review each value to make sure it is correct.
– Enter
N to re-enter information. Enter
Y when these values are correctly entered. A Certificate Signing Request (CSR) file is created in NetIM's security directory (for example,.
/opt/riverbed/security or
/data1/riverbed/security). The file will be named
<host>.csr where
<host> is the fully qualified host name that you entered in
Step 4.
7. Obtain a signed certificate.
The certificate signing process is external to the NetIM application. Follow your organization’s procedures for obtaining a signed certificate from a CA. The CSR file may be sent via e-mail communication between the user and the CA. The validity of the server certificate must be negotiated between the user and the CA.
– Locate the CSR file in the security directory (for example, /data1/riverbed/security) and provide it to a Certificate Authority (CA) for signing.
– Proceed to the next step when you receive the signed certificate reply from your CA.
Note: If the CA is known to Java, (for example, VeriSign, DigiCert, Thawte, etc.), you will only need a signed server certificate from the CA. If you use a private CA, you will also need the CA root certificate and any intermediate CA certificates.
8. Import the signed server certificate and CA certificates (when needed). In this step you will import the signed certificate into the keystore. Import the CA root certificate and all intermediate CA certificates as appropriate.
– Exit to the bash shell and navigate to the NetIM installation directory (for example /data1/riverbed/NetIM/<version_number>).
– Enter the following command, where <signed_cert> is the full path to the signed server certificate and <ca_root_cert> is the full path to a CA root certificate:
./https_setup.sh /server_cert <signed_cert> [/ca_cert <ca_root_cert>]=
• X.509 certificates encoded in the DER, PEM, and PKCS#7 formats are supported.
• The CA root certificate (specified by the /ca_cert option) is required only for a private CA root certificate.
• You will be prompted to enter the path to all intermediate CA certificates or N if you do not have any intermediate CA certificates.
– Your responses will depend on whether you have intermediate CA certificates in the signed server certificate chain.
• Enter N if you do not have intermediate CA certificates.
• If you have intermediate CA certificates, enter the full path to the intermediate CA certificate. If you have more than one intermediate CA certificate, enter them one at a time in the order they appear in the certificate chain.
Note: The certificate chain can be seen by opening the signed certificate reply file in a supported browser (i.e., Internet Explorer) and viewing the Certification Path tab. The CA root certificate will be at the top and the server certificate will be at the bottom of the chain. The order in which the intermediate CA certificates are listed between the CA root certificate and the server certificate while going down the chain is the order that needs to be followed while specifying the full path to each of the intermediate CA certificate files. The details of each certificate can be seen by clicking on the View Certificate button.
• When you have finished specifying all intermediate CA certificates files, enter N at the prompt.
The script imports the server certificate and CA certificates for use by NetIM.
9. Enter the netimsh shell and start all services by entering the following commands:
netimsh
start ALL
10. Verify communication with the NetIM Web Server via HTTPS by opening a web browser and entering the URL for the NetIM web console. For example, if the NetIM host is myhost.myco.com and the https port is 8543 enter the following:
https://myhost.myco.com:8543
If the web console does not open, verify that you have specified the hostname exactly as it appears in the server certificate and that you have imported all CA certificates in the order in which they appear in the certificate chain.