NetIM Best Practices and Troubleshooting
This section includes best practices for using NetIM and preparing to collect data using NetIM. It also describes troubleshooting steps you can take to investigate and solve problems that can occur during NetIM operation.
With any problem you encounter, verify that the product setup is correct. If the problem involves a data collection failure, verify access to the problem device, as well. If the suggested troubleshooting steps do not solve the problem, collect all the requested information before you contact technical support.
This section includes the following topics:
NetIM Best Practices
The following sections describe best practices for working with NetIM:
Data Import
Hostname Changes
If a device hostname or system name is changed by a network administrator, it may affect NetIM. This section describes how to manage these changes.
Device Duplication
By default the NetIM adapter priority used for the sysName model attribute is set to an equal value for all adapters. If you have changed the sysName adapter priority settings, and a hostname is changed, you may see duplicate representations of the same physical device in the network model.
When hostnames are changed in your network, NetIM may produce the same device or portions of the device under both names, especially if you are using third-party network management products as data sources. You can recover from this scenario by using the Device Manager to delete the duplicate devices from your model.
As a last resort, you can block import of the device from the adapter that is a source for the device and delete the obsolete device from the database. Use the Device Manager for both operations.
Impact on Device Groups
When device names change, any device groups that reference the device by the old name will no longer include the device. The old name will still appear in the device group, but the device no longer shows up in a model when its device group is imported into an analysis software client. If the device is a member of any blocked import groups, data import from the blocked source will resume for the device.
Naming Conventions
NetIM imposes few restrictions on the names given to devices in your network. Device names may contain spaces, slashes, backslashes, and punctuation marks. Some unusual combinations that are not currently supported are listed below.
Hostname and System Name Restrictions
Note the following restrictions:
• If the hostname of a device comprises a series of dots (one or more), no splitting is performed on the name to separate it into host.domain. If the hostname is “....foo.com”, the device is imported to NetIM as “...”; the domain is ignored.
• Cisco devices with hostnames longer than 29 characters are imported as 2 devices.
• Devices with a hostname ending in a “\” character are imported into the network model with “\” missing from the name.
• Devices with hostnames that contain XML special character elements either fail to be imported or are imported incorrectly. Character strings such as “>” and “<” will be converted to “>” and “<” respectively. Other XML elements may cause data import problems.
Interface Description Restrictions
Interface descriptions that contain XML special character elements fail to be imported or are imported incorrectly. Character strings such as “>” and “<” will be converted to “>” and “<” respectively. Other XML elements may cause data import problems.
Duplicate IP Addresses
Duplication of IP addresses in network data may interfere with NetIM’s ability to correctly merge objects and infer connections.There may be a valid reason why IP addresses are duplicated in your network. There may also be instances in which duplicate IP addresses are being reported by the device operating system either as intended behavior for a particular configuration or as a result of a software problem.
• For the purposes of link inference, if an interface is administratively down, the interface will not be considered as a link endpoint. However, if there are duplicate IP addresses for interfaces, and these interfaces are not administratively down, connections may not be inferred correctly. Consult the Duplicate IP Address report to determine if this may be problem.
Juniper ERX devices report the same IP address on interfaces that are configured on different virtual routers. For example:
virtual-router FOO
interface FastEthernet 1/0.1
ip address 10.1.1.1 255.255.255.0
!
virtual-router BAR
interface FastEthernet 1/0.2
ip address 10.1.1.1 255.255.255.0
!
This has implications for both interface merging and link inference. An IP Address Merge exclusions file can be used to prevent merging based on the duplicate IP address; however link inference will still infer links using this address.
Duplicate MAC Addresses
Some vendor devices report duplicate MAC addresses on interfaces. This may interfere with NetIM’s ability to correctly merge objects and infer connections.
When the CAM engine is enabled in Link and Connection Inference, MAC address forwarding tables are used to infer connections between Layer-2 devices. Duplicated MAC Addresses may lead to inference of extra links. Consult the Duplicate MAC Address report to determine if this may be a problem.
Report Export Service
Report Export Service can experience an out of memory exception when attempting to export certain reports for a very large database (in terms of number of nodes and/or number of interfaces).
Database Access
When NetIM detects problems with database access, the service framework is automatically shut down, and Emergency level messages are displayed in the SYstem Event Viewer. This can happen if the database is down, unreachable, or in a bad state. The service framework will also shut down if data that violates the underlying table schema is imported into the database. Some examples of this are type mismatches between data and table schema or a field overflow situation. Data problems may arise when receiving invalid or unexpected data from a third-party product or directly from a device polled by NetIM. In either case, services will shut down when the invalid data item is encountered.
“Contact Technical Support" for assistance when you encounter this situation.
Common Problem Scenarios
For each problem scenario, verify the correct configuration of NetIM, verify access to the target network, and perform any indicated troubleshooting steps. If the problem persists, collect the specified information for technical support before initiating a support case.
This section includes the following topics:
Installation and Product Startup Problems
For troubleshooting issues with the installation of NetIM, see the installation guide on the
support site.
Licensing Problems
The problem scenarios in this section involve problems that can arise with respect to product licensing.
Rebooting the NetIM Host
There may be circumstances where NetIM may not be able to successfully launch and start services following a restart. See
“Cannot Obtain a License When Starting NetIM".
Cannot Obtain a License When Starting NetIM
Scenario:
Services fail to start. An Emergency level event appears in the UI System Event Dashboard about a failure to obtain a license.
Recovery:
If this problem occurs, perform the following steps to recover.
1. Login to the UI as admin.
2. Verify that a valid license is available for NetIM. To do this, navigate to
CONFIGURE->All Settings->Administer->Licensing and verify that your licenses have a status of Active.
3. Check the NetIM installation directory for an opmonlock directory. If the directory exists, delete it.
Work through these steps to correct any problems found. After completing them, you should be able to start services and obtain a license.
Collect Debug Information:
If the recovery steps do not correct your licensing problems,
“Contact Technical Support".
Services Shut Down Due to License Problems
Scenario:
NetIM has been operating for an extended period of time (hours, days, weeks) when services stop, and an Emergency level event appears in the System Event Dashboard about a failure to keep a license.
Recovery:
If this problem occurs, do the following:
1. Login to NetIM core as netimadmin.
2. Navigate to the <install_dir> by entering a command like the following:
cd /data1/riverbed/NetIM/2.3.0_2778
3. Restart the services by entering the following commands:
bash
./app.sh start ALL
The services should start up. If they do not, execute the recovery steps in
“Cannot Obtain a License When Starting NetIM".
Collect Debug Information:
If the recovery steps do not correct your licensing problems,
“Contact Technical Support".
Configuration Problems
The problem scenarios in this section involve problems that can arise during product configuration.
Cannot Communicate with the Target Network
Scenario:
CLI-based and SNMP-based device data collection fails for all the network devices immediately after data collection starts. The Events page shows numerous events of Error severity that describe device access problems.
Possible Causes:
There may be an error in your NetIM setup, or the target devices may be inaccessible.
Verify Setup:
Verify configuration of the VM, NetIM, and the target network, by checking the following items:
1. Verify that device entries exists in your project. Go to the Device Manager and verify that there are device entries. Add device entries as needed.
2. Check the NetIM device access information for the target network to ensure that device IP addresses, login information, and community strings are correct. Correct any problems.
3. Verify that devices in the target network have telnet or SSH enabled. Enable telnet or SSH as needed.
Verify Access:
Verify access to the target network.
1. Ping the gateway that provides access into the target network. Ping interfaces on several devices in the target network. Run tracert to inaccessible addresses.
2. If you can ping device interfaces in the target network, verify that you can use telnet or SSH to access several different devices.
If access to the target network is the problem, fix any configuration or network problems.
Collect Debug Information:
If the problem persists after you have verified NetIM setup and access to the target network,
“Contact Technical Support".
Configuration Files are Not Collected for a Specific Device
Scenario:
Configuration files are not collected for a device. The Device Manager and reports do not show information for the device.
Verify Setup:
View the device access entry in the Device Manager. Verify that the device login information is correct. Correct any problems.
Verify Access:
Ping the target device to verify access. Telnet to the target device to verify that it is accessible. Verify access to Privileged Exec mode. Correct any problems.
Retest the Device:
From the Device Manager, right-click the device and select Collect from Device(s). This will attempt to collect new CLI data from the device, but will not import the data. You can monitor progress from the System Event Dashboard. When the collection is complete, check to see if the data has been successfully collected by right-clicking the device in the Device Manager and selecting Inspect Files or View CLI History.
Autoconfigure the Device:
Use this only if the device is SNMP capable. From the Device Manager, right-click the device and select Autoconfigure Device(s). This will clear all of the access information for the device and then attempt to find new credentials for the device using the global credential lists. Verify the problem has been resolved by repeating the “Retest the Device” step above.
Collect Debug Information:
MIB Data is Not Collected for a Specific Device
Scenario:
The reports do not show any data obtained from MIBs for a specific device. The Event Dashboard shows events of Error severity that describe access problems with the problem device.
Verify Setup:
View the device access entry in the Device Manager. Verify that the SNMP community string is correct. Correct any problems.
Verify Access:
If you have access to other products that can do SNMP queries (HP OpenView, AdventNet, and so on.), collect System group information from the target device to verify both access and the community string.
Verify SNMP:
Verify that the device’s SNMP agent is running.
Autoconfigure the Device:
Use this method only if other methods are unsuccessful. From the Device Manager, right-click the device and select Autoconfigure Device(s). This will clear all of the access information (including CLI login credentials) for the device and then attempt to find new credentials for the device using the global credential lists.
Collect Debug Information:
Operation Problems
The problem scenarios in this section involve problems that can arise during continuous operation.
Services Halt and Database Error Events Appear in the Event Dashboard
Scenario:
The NetIM System Event Dashboard shows events of Emergency and Critical severity that describe database problems. The service shuts down.
Causes:
Any kind of a database access error can cause this problem. If there is no free tablespace for the database, this problem will also occur. This problem may also occur if data written to the database does not match the underlying schema.
Recovery:
1. Login to NetIM core as netimadmin.
2. Navigate to the <install_dir> by entering a command like the following:
cd /data1/riverbed/NetIM/2.3.0_2778
3. Restart the services by entering the following commands:
bash
./app.sh start ALL
The services should start up. If they do not,
“Contact Technical Support".
Collect Debug Information:
Forward the services logs and event logs to technical support. If possible, zip the temp dir and forward that to technical support, as well. If you cannot provide this data, for security reasons, save the temp dir in a location accessible to you for joint troubleshooting with technical support.
Unexpected Devices are Present in the Network Database
Scenario:
The reports and the UI show devices that are not expected to be in the target network.
Verify Setup:
View the device access information in the Device Manager. Verify that the device access information only includes devices in the target network. Correct any problems.
Collect Debug Information:
Device Asset Information is Not Collected for a Device
Scenario:
The Asset Inventory report does not show device hardware configuration information for a device. Other MIB data, such as the System Description, is present in reports.
Possible Causes:
The device may not support the ENTITY-MIB. NetIM collects hardware configuration information from this MIB.
Collect Debug Information:
If the device supports the ENTITY-MIB,
“Contact Technical Support".
Troubleshooting Operations
This section describes how to find information commonly required during troubleshooting and how to access troubleshooting utilities provided with the NetIM software.
This section includes the following topics:
Locating NetIM Release Information
When contacting technical support, always provide the NetIM software release information (software version and build number). Perform the following procedure to locate NetIM release information.
Locating NetIM Release Information
1. Choose Help > About.
The software version is listed in the About dialog box.
For example:
Version: 1.0.0 Build 123
Database Schema Version 123
Generating Snapshot of NetIM Configuration
You may be asked to provide a configuration description or “snapshot” of your NetIM configuration to Technical Support. NetIM software includes a utility that you can use to generate this configuration snapshot. Perform the following procedure to generate a snapshot log file.
Generate NetIM Snapshot
1. Log into NetIM core as netimadmin.
2. Navigate to the NetIM installation directory, as follows:
cd /data1/riverbed/NetIM/<install_dir>
Example: cd /data1/riverbed/NetIM/2.3.0_2778
3. Run the appsnapshot utility, by entering the following commands:
bash
./app.sh VNESNAPSHOT
Status messages are written to the command window. When the utility has completed, you will see a message indicating it is done. The results are written to: <install dir>/log/vnesnapshot.log.
Each time you run the vnesnapshot utility, the results are overwritten.
Testing NetIM Database Configuration
Perform the following procedure to test the configuration of the NetIM database.
Verify the Database Configuration
1. Log into NetIM core as netimadmin.
2. Invoke the bash shell by entering the following command:
bash
3. Navigate to the NetIM installation directory, with a command like the following:
cd /data1/riverbed/NetIM/2.3.0_2778
4. Enter the following command:
./app.sh DBAUTOTEST
– Tests run to verify that the NetIM account can perform needed operations in the database.
– Output is written to the command window and a separate Java window opens to display a summary of results.
5. Review DBAUTOTEST results.
If any of the database tests fail, visit the Knowledge Base on
support.riverbed.com for troubleshooting information.
Copy the test results from the command window and paste into a text document. Provide this file to Technical Support.
Testing Connection to a Database
NetIM provides a utility, named testdbconnection, for testing database connections. This utility can be used to test the connection to a database from which a NetIM adapter is attempting to collect data. This utility can also be used to test connection to the database that NetIM is attempting to write data. This utility will test connections to databases including PostgreSQL, Sybase, Informix, and MYSQL.
The testdbconnection utility provides options that permit you to manually enter information needed to test connection to a database (such as the hostname/IP address, username, password, port, and so on.). This utility also provides options to test connection to a database using the database settings for the NetIM installation.
Perform the following procedure to test connection to a database using the testdbconnection utility.
Access testdbconnection utility
1. Log into NetIM core as netimadmin.
2. Navigate to the NetIM installation directory, with a command like the following:
cd /data1/riverbed/NetIM/2.3.0_2778
3. Enter the following commands:
bash
./app.sh TESTDBCONNECTION
The testdbconnection utility provides several options.
4. Select the option that is appropriate for the database to which you want to test connection.
Options that include “default settings” in the description do no require user input, product configuration is read from files. You can use these options to test information configured in adapter settings. If the “default settings” option fails, use another selection to manually enter values until you find the correct values that you need for adapter configuration.
Creating Compressed File of NetIM Logs for Technical Support
You may be asked to provide NetIM logs to Technical Support. NetIM software includes a utility that you can use to assemble and compress log files. Perform the following procedure to assemble and compress NetIM log files, adapter statistics, resource files, vnesnapshot (if present), and so on.
Assemble and Compress NetIM Logs
1. Log into NetIM core as netimadmin.
2. Navigate to the NetIM installation directory, with a command like the following:
cd /data1/riverbed/NetIM/2.3.0_2778
3. Enter the command to run the
logpacker utility. Specify the appropriate command options to include all needed files. See
“Usage of Logpacker Utility“.
You do not need to specify any command options if you accept the default set of files (all files in <install dir>/log that end with.log and adapter statistics). For the default files, enter the following command: ./app.sh LOGPACKER
Status messages are written to the command window. When the utility has completed, you will see a message indicating the location of the compressed file (<install dir>/logPack_<timestamp>.zip, as in:
The packed log file is located at: /data1/riverbed/NetIM/2.3.0_2778/logPack_2021-08-18_14-59.zip
Usage of Logpacker Utility
The command syntax for the logpacker utility is:
app.sh LOGPACKER <option>
Command options for the logpacker utility are listed in the following table
Option | Description |
help | Prints command usage and options. |
current | This is the default mode that runs when no command options are specified. Assembles and compresses: • Files in <install dir>/log directory that end with “.log” • Adapter statistics files (from <install dir>/log/adapterStats) |
all_log | Assembles and compresses: • All files in the <install dir>/log directory and subdirectories • Web logs (stored in <install dir>/<release>/webServer/jakarta-tomcat-5.0.28/logs) |
resource | Assembles and compresses resource files (stored in <install dir>/<release>/lib/xml/res). Does not include any log files. |
log_res | Assembles and compresses: • Files in <install dir>/<release>/log directory that end with “.log” • Adapter statistics files (from <install dir>/log/adapterStats) • Aesource files (stored in <install dir>/<release>/lib/xml/res |
all | Assembles and compresses: • All files in the <install dir>/log directory and subdirectories • Web logs (stored in <install dir>/webServer/jakarta-tomcat-5.0.28/ogs) • Resource files (stored in <install dir>/lib/xml/res |
Troubleshooting WMI
This section explains how to address common issues with WMI, and consists of the following topics.
Before troubleshooting issues with WMI, ensure that you are familiar with the requirements for WMI system attribute collection and metrics polling, specifically that PowerShell remoting has to be configured on the target Windows systems, since the NetIM WMI workflow is based on the PowerShell. For more information, see
WMI Prerequisite Checklist.
Which WMI Namespaces and Classes Does NetIM Access for Polling?
The minimal required Namespaces for model collection are defined on Core in /data1/riverbed/NetIM/<version>/lib/xml/res/WmiWmiClasses_dev.res, while the required metric polling Namespaces are defined in
/data1/riverbed/NetIM/<version>/lib/xml/res/DynamicPollingWmiClasses_dev.res.
In NetIM version 2.4.0, users have to give complete access both to the ROOT namespace and the following sub-namespaces by adding these entries to WmiWmiClasses_dev.res and DynamicPollingWmiClasses_dev.res:
• ROOT\CIMV2
• ROOT\StandardCimv2
• ROOT\directory\LDAP
Depending on what metric classes you are trying to collect, you may also need to give permission to the following:
• ROOT\citrix
• ROOT\citrixLicensing
How Do I Run PowerShell Commands to Confirm That ROOT Namespace Access Is Enabled on Devices Targeted For Netim V2.x WMI Polling?
For WMI polling to work in NetIM, the polled devices need to have ROOT namespace access enabled.
To confirm that ROOT namespace access is enabled on the target devices, follow these steps:
1. Log into a Worker node on the Docker swarm as netimadmin. The default password is netimadmin,
2. Enter the PowerShell mode on the Worker node by entering the following commands:
netimadmin@serv18-230-wkr[netimsh]:~$bash
netimadmin@serv18-230-wkr:~$ pwsh
PS /home/netimadmin>
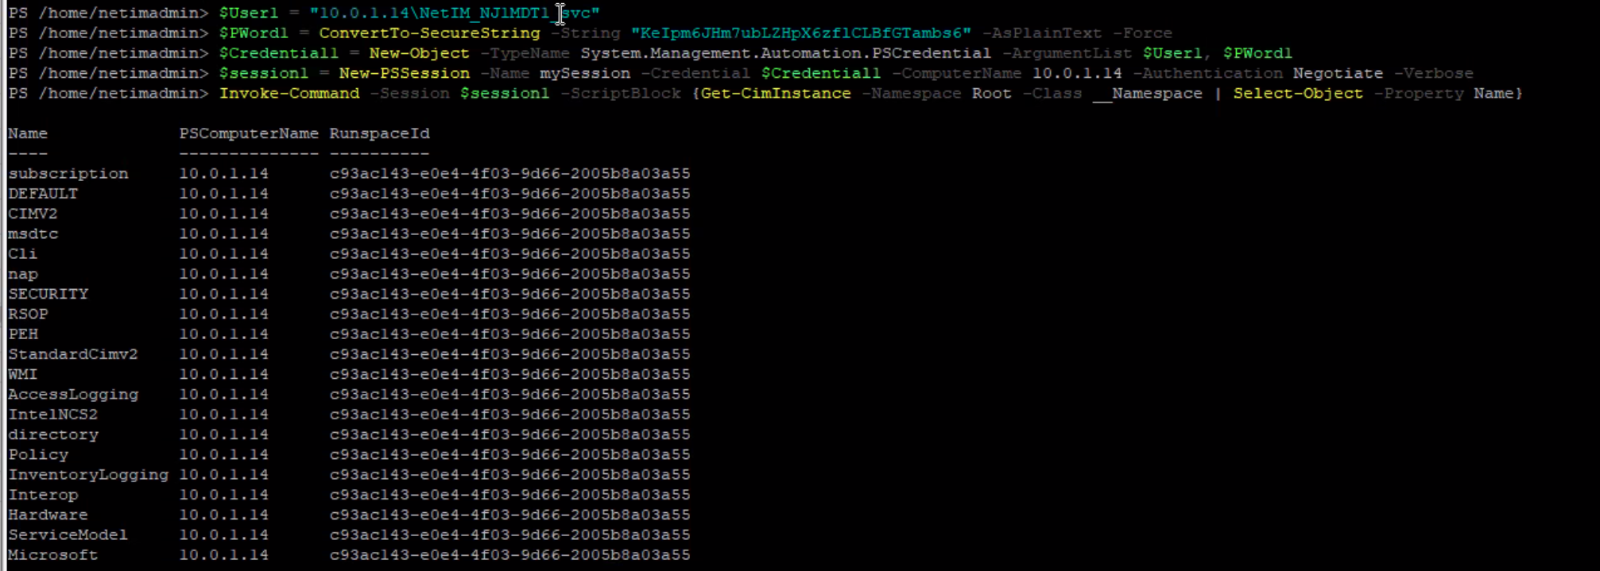
3. Set the following variables, replacing the host_ip_address, wmiuser and wmiuser_pwd with your respective values:
– PS /home/netimadmin> $User1 = "<host_ip_address>\<wmiuser>"
– PS /home/netimadmin> $PWord1 = ConvertTo-SecureString -String "<wmiuser_pwd>" -AsPlainText -Force
– PS /home/netimadmin> $Credential1 = New-Object -TypeName System.Management.Automation.PSCredential -ArgumentList $User1, $PWord1
– PS /home/netimadmin> $session1 = New-PSSession -Name mySession -Credential $Credential1 -ComputerName <host_ip_address> -Authentication Negotiate -Verbose
4. Run the following command, replacing Namespace with the appropriate value:
PS /home/netimadmin> Invoke-Command -Session $session1 -ScriptBlock {Get-CimInstance
-Namespace -Class_Namespace | Select-Object -Property Name}
The following screen shows Namespaces returned by the PowerShell Invoke-Command. If this table is empty, then ROOT namespace access is not enabled on the target devices.
Resolving Issues with PowerShell Remoting and WMI
For information on resolving issues with PowerShell remoting and WMI, see .
How Do I Run the WMITEST Utility on NetIM 2.x Core?
The WMItest utility is used to find the device interface that NetIM is receiving metrics from and provide details about the device interface.
To launch the WMItest utility follow these steps:
1. Login to NetIM Core. The UI and default PW are netimadmin/netimadmin.
2. At the netimsh prompt enter the following command:
start xrdp 1h
3. From a command prompt on your local system, login to NetIM Core using RDP.
4. In the RDP terminal enter the following commands to invoke the WMI Test Utility:
bash
cd /data1/riverbed/NetIM/<VERSION>
./app.sh WMITEST
5. When the WMI Test Utility appears, select or add devices, then click on the Run Test button in the lower right corner, as shown in the following screen:
The following screen shows sample output with data. The drill down into interface information shows two interfaces with the same 'name':
Metrics Data Not Visible in WMI Polling Even After Successful Poller/Collection Status
While performing WMI polling in NetIM 2.3.0/2.3.1, no metric data is visible with a "No data to display" error under every metric class along with the following conditions:
• WMI Polling is successful in Poller Status, Collection Status, and in the Device Manager: Statistics > View WMI History for the target device.
• The WMITEST utility from Core or Worker xrdp is successfully returning data.
In NetIM 2.3.0/2.3.1 PowerShell Remoting is used to poll the Windows devices by creating a winRM session and then invoking the required metrics data.
• NetIM has collected the basic device attributes like Vendor, Serial Number, Interfaces (greyed out) and is showing the overall device status as Healthy with Interface Healthy status as Unknown.
This issue can occur due to multiple reasons. The two most common are the following:
• While using a 'local' user, the 'domain' field in the NetIM WMI configuration should have the 'Device name' and cannot be left empty.
Note the following:
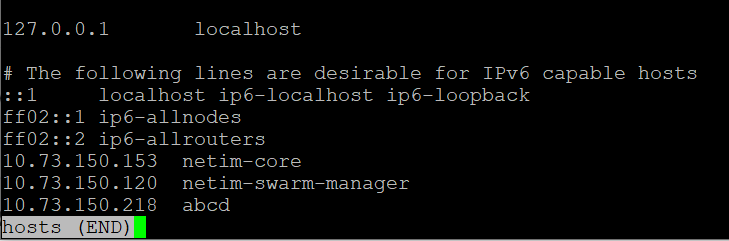
– This 'Device name' should be resolvable to the access IP address of the device itself via DNS.
– NetIM should be connected to the DNS server that has the A record for the Windows device to be polled.
– If both of the above cannot be implemented, edit the /etc/hosts file on the Core and Worker nodes and add an entry for DNS. The following screens shows a DNS host entry with a random name abcd that resolves the WMI polling problem:
– In the WMI tab for the device, add the Domain name in the Domain text box, as shown in the following screen:
WMI information is then collected and displayed for the target device, as shown in the following screen:
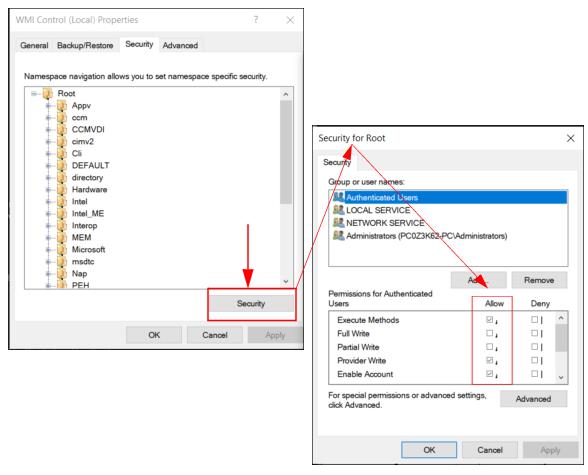
• The WMI user does not have adequate privileges to access the ROOT Namespace.
– Open wmimgmt.msc in the Windows device and navigate to: WMI Control > Properties > Security > Root and click the Security button in the lower right of the screen, which brings up the Security for Root page, as shown in the following screens:
– Make sure the following options are ticked for Authenticated Users: Execute Methods, Provider Write, Enable Account, and Remote Enable.
– All options should be ticked for Administrators.
These privileges must be given to the ROOT Namespace first to create the data model for the device in NetIM. Once the data model is created, the privileges listed above are only required for the CIMV2 namespace.
WMI Login Fails On NetIM 2.3 If a User Password Contains a Special Character
After adding a Windows server to NetIM using the Device Manager and trying to collect WMI data from this device, the connection/login fails.
To address this problem, follow these steps:
1. Ensure that PowerShell version is 5.1.x or higher, PowerShell remoting is supported, and the user is in the correct groups on the remote windows server and verify the WMI connection to the Windows server from the NetIM
Core/Worker CLI. For more information, see
Resolving Issues with PowerShell Remoting and WMI. 2. If the Windows user password has a special character in it or a back tic (‘), this will prevent a WMI login on NetIM.
To determine if the user password contains a special character or back tic, enter the following command. If the password contains a back tic or a special character, the command will fail:
$PWord1 = ConvertTo-SecureString -String "<Password>" -AsPlainText -Force
3. If the command fails, replace the double quotes with single quotes around the password, as follows:
$PWord1 = ConvertTo-SecureString -String '<Password>' -AsPlainText -Force
Troubleshooting Issues with Adding WMI-Enabled Devices
For information on how to troubleshoot issues with adding WMI-enabled devices, see
Troubleshooting Issues with Adding WMI-Enabled Devices.Troubleshooting winrm Firewall Exception
If an interface is on a public network, winrm quickconfig will fail (intended security feature), as shown in the following screen:
To determine if interfaces are public or private, execute Get-NetConnectionProfile from the PowerShell, as shown in the following screen:
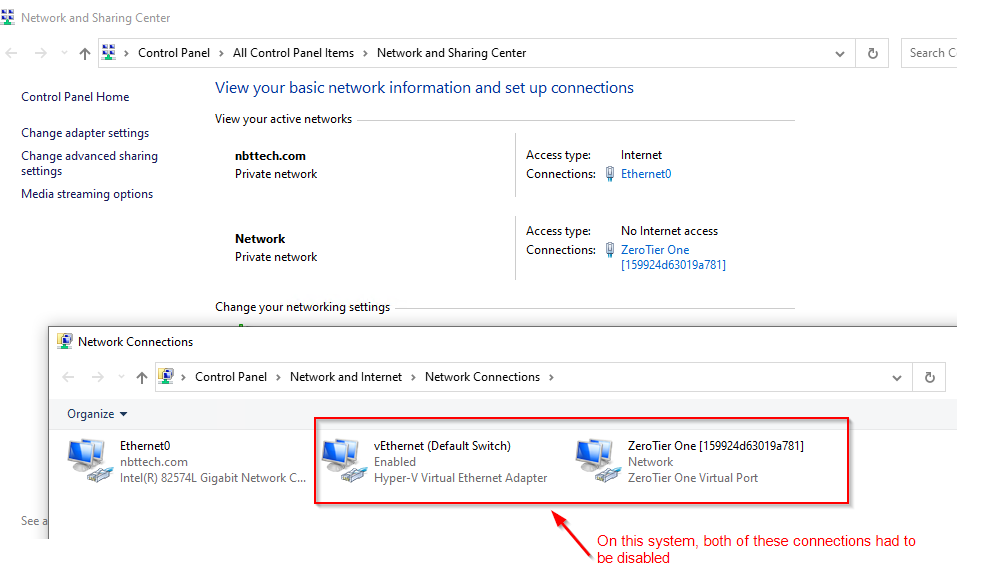
• If the interface is public, change the network connection type to Domain or private.
• If no interface is on a public network, go to Control Panel > All Control Panel Items > Network Connections, and try disabling all but the required ethernet adapter, as shown in the following screen:
WMI and NetSensor Troubleshooting
NetSensor collects the WMI Configuration for a Windows device that is read into the WMI Class Definition Container. Based on the device configuration (system configuration, hardware details, and interfaces) and polling profile it determines what metrics it can collect. A list of WMI classes is then sent to the Poller.
The Poller uses the credentials to establish a WMI Session to the device using the WMI API.
The WMI Classes are collected and sent to the Data Collector over the WMI session and stored. The results of the collection (Success, Incomplete, etc) are sent back to the Poller and the session is closed.
Once the session closes the Poller sends back a confirmation. The Data Transformer normalizes the WMI class data as XML for it to be parsed and persisted into the database or forwarded to the alerting framework or streamed to clients such as Portal using the Live Update/DCL Proxy services.
All WMI classes, class instance and properties used for metrics polling are registered in file DynamicPollingWmiClasses_dev.res under <netsenoristalldir>\lib\xml\res.
All WMI classes, class instance and properties used for device modeling are registered in file
WmicWmiClasses_dev.res under <netsensorinstalldir>\lib\xml\res.
Common Issues and Solutions
There are no interfaces present on the device in NetSensor but I do see system level information.
The Windows account being used by NetSensor does not have sufficient access. Ensure that the WMI access requirements are met. For more information, see
Metrics Data Not Visible in WMI Polling Even After Successful Poller/Collection Status.
The Windows device is encountering high CPU when WMI metrics are polled. *
The remote Windows system may be under heavy load from other install applications and services. Disable polling and check the system load to establish a baseline load. Reduce the number of polled metric classes or reduce polling frequency.
Additionally, the remote Windows systems WMI repository may be large. When NetSensor polls it may trigger a repository verification which can consume CPU resources on the remote system. Identify which WMI classes are taking up the space in the repository and remove them. For more information, see
WMI/Objects.Data bloating.All WMI metrics are not getting polled even though they are enabled for polling.
The remote Windows system may not be responding to the request for the specific WMI class that provide the metric data. Use a WMI testing tool to check the device to see if the class is available on the remote system.
The following may also be the source of the problem:
• The account used to access WMI on the remote system may not have access to this WMI class. Please make sure that the account meets the requirement for establishing WMI access in NetSensor.
• The remote Windows system may not be able to respond for a specific metric at the desire polling frequency. As a result the metric may be getting dropped from polling. Reducing the polling frequency for these long running metric classes may resolve the issue.
I have another product that's polling WMI on the devices just fine. Why isn't NetSensor able to poll these devices?
A major difference between NetSensor and other products that perform metric polling is the necessity of a device model. NetSensor has to create a model of a device that contains system and interface data information before metrics polling is performed. If for some reason the account used by NetSensor does not have sufficient access to the WMI classes under the root\cimv2 namespace to gather the information necessary to model the device then polling will not start. Ensure that the account meets the requirements for establishing WMI access in NetSensor.
Additionally, the other product may be using a fallback method that relies on another API accessing performance data on remote Windows systems.
WMI uses a range of source ports when communicating How do I restrict this to specific TCP ports in order to allow WMI polling/collecting for devices accessible only through a firewall?
For information for configuring WMI to use static ports, see
Setting Up a Fixed Port for WMI.
What are the key logs and reports I should check if issues are encountered.
• Check the Event Dashboard for any an WMI polling Events.
• Check the Auxiliary Services logs located in <netsensorinstalldir>\log
• Check the WMI poller report file located on Core in the following directory:
\OPNET\ASnX\op_admin\tmp\vne\reportFiles\WMI Poller
– Logs reportFiles \WMI Poller\WMI Poller\stats\summary\perSchedulePerTriggerSummaryStatsdatetime.txt
+ Number of devices dropped per cycle
+ Number of devices discarded per cycle
+ Number of devices removed per cycle
– Logs reportFiles\WMI Poller\stats\perSchedulePerTriggerStatsdatetime.txt
+ Number of devices dropped per cycle
+ Number of devices discarded per cycle
+ Number of devices removed per cycle
+ Per device details about each poller metric (successful, unresponsive or incomplete polling attempts)
– Logs reportFiles\WMI Poller\provision\Running.log
+ Is data polled for the device?
+ Are their polling exclusions for certain metric classes?
WMI Logging
WMI logging is useful if you want to confirm that WMI queries are actually being processed on the remote system being polled.
For information on how to enable WMI logging, see
Logging WMI Activity.WMI Troubleshooting Tools
The following tools are helpful for WMI troubleshooting.
WMITest Tool
The WMITest Tool and a diagnostic utility included with the NetSensor installation.The tool allows you to test WMI Collection (device modeling) and Metrics Polling. The tool displays WMI-enabled devices already configured in the NetSensor, and allows you to add new devices and their credentials.
WMI Error Codes
.The following WMI error codes are commonly encountered when troubleshooting WMI connections.
Code | Connection Type | Message |
80041064 | Login | Local Credentials Must Be Used |
80041003 | Login | Access Denied |
80041062 | Login | Privilege not held |
80041068 | Login | Null security descriptor |
80042003 | Login | Authorization not privileged |
8004100 | Polling | Invalid Namespace |
For a complete list of WMI error codes, see
WMI Error Constants.WMI Explorer
WMI Explorer is a program that allows you to browse and view WMI namespaces, classes, instances, and properly from a single window. For more information, see
WMI Exploder on github.
PowerShell
PowerShell can be used to validate WMI access.
On a Windows system search for PowerShell in the Start search box. When located right-click and choose the RunAs Administrator option. A screen like the following appears:
In the PowerShell window you can enter commands like the following to query WMI classes on the remote device:
Get-WmiObject -Namespace "root\cimv2" -Class <wmiclass> -Impersonation 3 -Credentials <domain>\\<username> -ComputerName <remotehost>
• wmi_class = whatever WMI class you want to query
• domain = the domain for the account on the remote system you wish to query
• username = the login id for the account on the remote system
• remote_host = the host name or IP address of the remote system
For example:
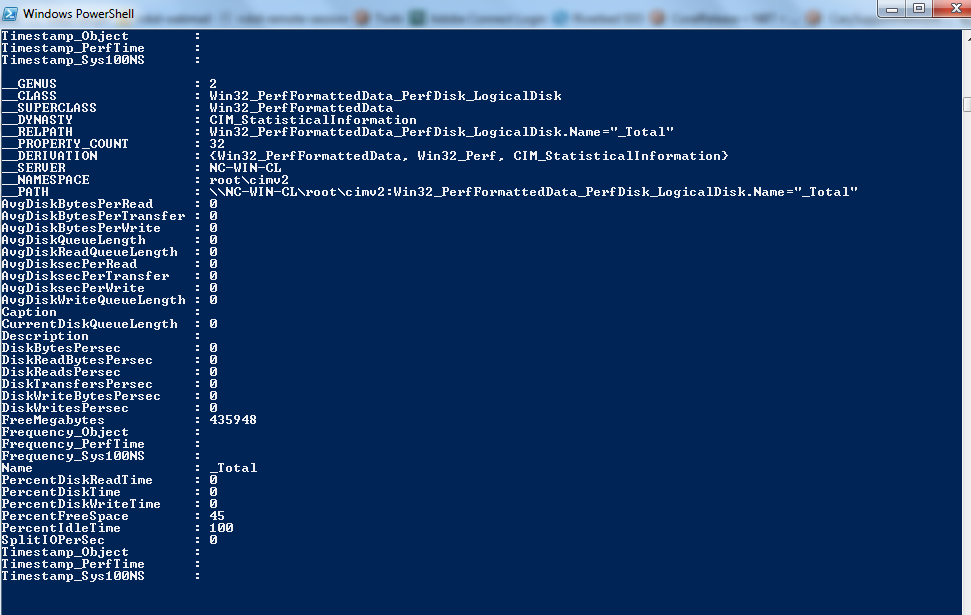
Get-WmiObject -Namespace "root\cimv2" -Class Win32PerfFormattedDataPerfDisk_LogicalDisk -Impersonation 3 -Credential opnet\clesane -ComputerName nc-win-cl
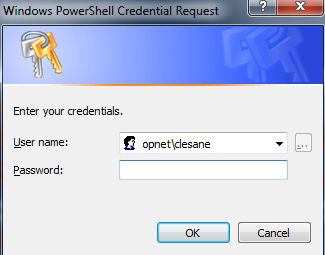
When you enter the command in the PowerShell you are prompted to enter a password, as shown in the following screen:
Click OK and the query of the name class runs against the remote system, displaying the results in the PowerShell console, as shown in the following screen:
If you want to measure the time taken to run the remote command you can use the PowerShell measure-command cmdlet with query, as follows:
measure-command {Get-WmiObject -Namespace "root\cimv2" -Class Win32PerfFormattedDataPerfDisk_LogicalDisk -Impersonation 3 -Credential opnet\clesane -ComputerName nc-win-cl}
Instead of the entire command output being displayed, only the measure time is displayed, as shown in the following screen:
To display both the measure time and the output, add Export-Csv <path>\test.txt to the query, as follows:
measure-command {Get-WmiObject -Namespace "root\cimv2" -Class Win32PerfFormattedDataPerfDisk_LogicalDis Impersonation 3 -Credential opnet\clesane -ComputerName nc-win-cl | Export-Csv C:\test.txt}
Contact Technical Support
If you cannot solve the problem, gather logs and additional troubleshooting information before you contact technical support.
1. Enter a technical support request.
– Document the problem scenario.
– Include a description of the adapters and services included in the schedule chain, the order in which they run, and the components that are active in each. Do not use shorthand names or abbreviations to refer to adapters and services.
2. Send relevant log files, resource files, and test results to Technical Support.
– If the NetIM Event Viewer shows events relevant to the problem, use File > Save to save these events to a log file.
– In some cases, it will be helpful for you to test database configuration. See
“Testing NetIM Database Configuration“. If you copy/paste the test results from the command window to a text file that you save in the <install dir>/<release>/log directory.
The process log files are located in the <install dir>/log directory. The event log files are located in <install dir>/log/eventlog directory.