Configuring Secure Peers
You configure secure peers in the Optimization > SSL: Secure Peering (SSL) page. Secure, encrypted peering extends beyond traditional SSL traffic encryption. In addition to SSL-based traffic like HTTPS that always needs a secure connection between the client-side and the server-side SteelHead, you can also secure other types of traffic such as:
• MAPI-encrypted, SMB1, and SMB2-signed traffic.
• Citrix traffic.
• all other traffic that inherently doesn’t require a secure connection.
In RiOS 9.0 and later, SSL secure peering and secure transport traffic can co-exist.
Secure Inner Channel Overview
Each SteelHead is manufactured with its own self-signed certificate and private key, which uniquely identify that SteelHead. The secure inner channel setup process begins with the peer SteelHeads authenticating each other by exchanging certificates and negotiating a separate encryption key for each intercepted connection. Next, the SteelHeads create corresponding inner connections for all outer connections between the client and the client-side SteelHead and between the server and the server-side SteelHead.
Peers are detected the first time a client-side SteelHead attempts to connect to the server. The optimization service bypasses this initial connection and doesn’t perform data reduction, but rather uses it to detect peers and populate the peer entry tables. On both SteelHeads, an entry appears in a peering list with the certificate of the other peer and identifying information such as IP address and hostname. You can then accept or decline the trust relationship with each SteelHead requesting a secure inner channel.
After the appliances trust each other, they send encrypted data between themselves over secure inner connections matching the outer connections of the selected traffic types. The trust relationship between the SteelHead is bidirectional; the client-side SteelHead trusts the server-side SteelHead, and vice versa.
We recommend using the secure inner channel in place of IPSec encryption to secure traffic.
Enabling Secure Peers
This section describes how to secure traffic between client-side and server-side SteelHeads.
Note: You rarely need to replace a self-signed certificate on a SteelHead; however, if you do, add the CA’s certificate to the peering trust section so each SteelHead can verify the peer certificate for its peers. For details, see
Configuring Peer Trust.
To enable secure peering
1. If you are securing encrypted MAPI traffic or Citrix traffic, enable one of these on both the server-side and client-side SteelHeads:
• Choose Optimization > Protocols: MAPI and select Enable Encrypted Optimization.
—or—
• Choose Optimization > Protocols: Citrix and select Enable SecureICA Encryption. Both SteelHeads must be running RiOS 7.0 or later.
If you are securing SMB-signed traffic, choose Optimization > Protocols: CIFS and select Enable SMB Signing on the server-side SteelHead.
2. We recommend using NTP time synchronization or manually synchronizing the clocks on both the server-side and client-side SteelHeads. It is critical that the peer SteelHead time is the same for the trust relationship to work.
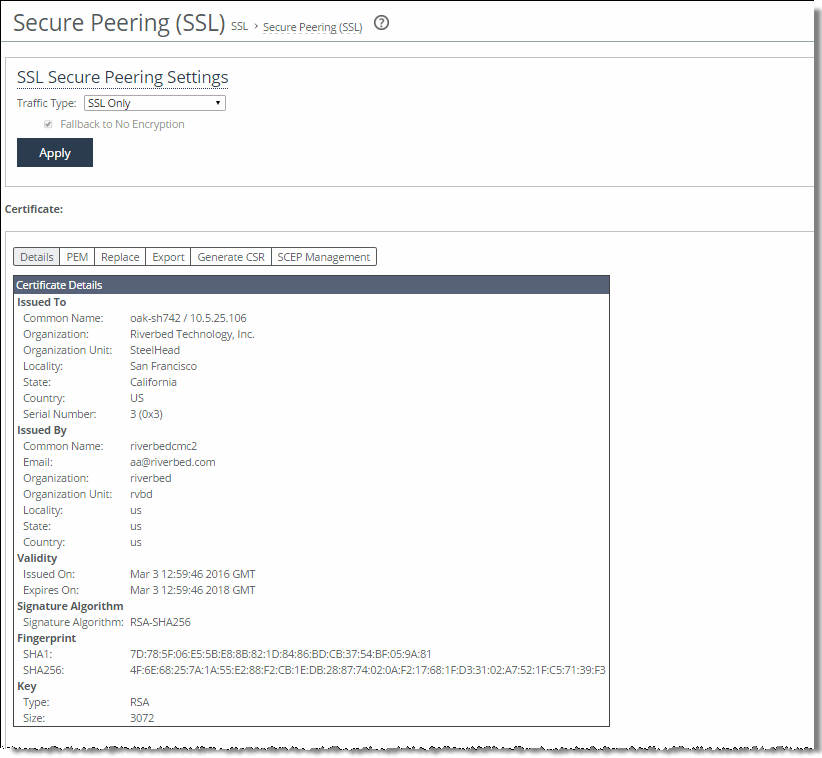
3. On both the server-side and client-side SteelHeads, choose Optimization > SSL: Secure Peering (SSL) to display the Secure Peering (SSL) page.
Figure: Secure Peering (SSL) Page
4. Under SSL Secure Peering Settings, complete the configuration as described in this table.
Control | Description |
Traffic Type | Select one of these traffic types from the drop-down list: • SSL Only - The peer client-side SteelHead and the server-side SteelHead authenticate each other and then encrypt and optimize all SSL traffic: for example, HTTPS traffic on port 443. This is the default setting. • SSL and Secure Protocols - The peer client-side SteelHead and the server-side SteelHead authenticate each other and then encrypt and optimize all traffic traveling over these secure protocols: Citrix, SSL, SMB-signed, and encrypted MAPI. MAPI encryption or Secure ICA encryption must be enabled on both the client-side and server-side SteelHeads when securing encrypted MAPI traffic, or encrypted Citrix ICA traffic (RiOS 7.0 and later). Enabling this option requires an optimization service restart. • All - The peer client-side SteelHead and the server-side SteelHead authenticate each other and then encrypt and optimize all traffic. Only the optimized traffic is secure; pass-through traffic is not. Enabling this option requires an optimization service restart. Selecting All can cause up to a 10 percent performance decline in higher-capacity SteelHeads. Take this performance metric into account when sizing a complete secure SteelHead peering environment. |
Fallback to No Encryption | Specifies that the SteelHead optimizes but doesn’t encrypt the connection when it’s unable to negotiate a secure, encrypted inner channel connection with the peer. This is the default setting. Enabling this option requires an optimization service restart. Note: We strongly recommend enabling this setting on both the client-side and the server-side SteelHeads, especially in mixed deployments where one SteelHead is running RiOS 7.0 or later and the other SteelHead is running an earlier RiOS version. This option applies only to non-SSL traffic and is unavailable when you select SSL Only as the traffic type. Clear the check box to pass through connections that don’t have a secure encrypted inner channel connection with the peer. Use caution when disabling this setting, as doing so specifies that you strictly don’t want traffic optimized between nonsecure SteelHeads. Consequently, when this setting is disabled connections might be dropped. For example, consider a configuration with a client-side SteelHead running RiOS 5.5 and a server-side SteelHead running RiOS 6.0. When this setting is disabled on the server-side SteelHead and All is selected as the traffic type, it will not optimize the connection when a secure channel is unavailable, and might drop it. |
5. Click Apply to save your settings to the running configuration.
6. Click Save to Disk to save your settings permanently.
Note: The SteelHead supports RSA private keys for peers and SSL servers.
Configuring Peer Trust
The first time a client-side SteelHead attempts to connect to the server, the optimization service detects peers and populates the peer entry tables. On both SteelHeads, an entry appears in a peering list with the information and certificate of the other peer. A peer list provides you with the option of accepting or declining the trust relationship with each SteelHead requesting a secure inner channel. The self-signed peer lists are designated by these color categories:
• White - Lists all trusted SteelHeads. When you select Trust for a peer in a black or gray list, the public key of the SteelHead peer is copied into the white list of the local SteelHead trusted host. The list includes the peer expiration date, IP address, and hostname.
• Black - Lists all untrusted SteelHeads. When you select Do Not Trust for a peer in a white or gray list, the public key of the SteelHead peer is copied into the black list of the local SteelHead untrusted host. The list includes the peer expiration date, IP address, and hostname.
• Gray - Lists all SteelHeads of unknown status. This list serves as a temporary holding place for all discovered peer SteelHeads that are attempting to establish a secure inner channel. The list includes the peer expiration date, IP address, and hostname. You can select one of these actions to change the status of the peer and move it to the white or black lists: Trust, Do Not Trust, or Remove.
Note: When a self-signed peer has already been added to a peering trust list manually, the SSL server recognizes it upon the first connection from that peer and automatically places it in the white list (without action by the administrator). The certificate that was previously copied and pasted (or imported) into the trusted list isn’t removed.
The Optimization > SSL: Secure Peering (SSL) page also provides you with these options for configuring peer certificates and Mobile Controller trust:
• Peering Trust - Add and view these types of entities:
– Certificates of trusted peers.
– Certificates of trusted Certificate Authorities (CAs) that may sign certificates for peers.
• SCEP Peering Trust - Add and view trusted SCEP entities.
• Mobile Trust - Add and view trusted SteelCentral Controller for SteelHead Mobile entities that may sign certificates for SteelHead Mobiles.
To configure SSL peers
1. Choose Optimization > SSL: Secure Peering (SSL) to display the Secure Peering (SSL) page.
Figure: Secure Peering (SSL) Page
The SteelHead identity certificate details appear, as described in this table.
Control | Description |
Issued To/Issued By | Common Name - Specifies the common name of the certificate authority. Organization - Specifies the organization name (for example, the company). Locality - Specifies the city. State - Specifies the state. Country - Specifies the country. Serial Number - Specifies the serial number (Issued To, only). |
Validity | Issued On - Specifies the date the certificate was issued. Expires On - Specifies the date the certificate expires. |
Signature Algorithmn | Specifies the signature secure hash algorithm (SHA) in use by certification authorities to sign certificates and the certificates revocation list (CRL). |
Fingerprint | Specifies the SHA and SHA2 SSL fingerprints. |
Key | Type - Specifies the key type. Size - Specifies the size in bytes. |
2. To replace an existing certificate, under Certificate, select the Replace tab and complete the configuration as described in this table.
Control | Description |
Import Certificate and Private Key | Imports the certificate and key. The page displays controls for browsing to and uploading the certificate and key files. Or, you can use the text box to copy and paste a PEM file. The private key is required regardless of whether you are adding or updating the certificate. |
Certificate | Upload - Browse to the local file in PKCS-12, PEM, or DER formats. Paste it here (PEM) - Copy and then paste the contents of a PEM file. |
Private Key | Select the private key origin. • The Private Key is in a separate file (see below) - you can either upload it or copy and paste it. • This file includes the Certificate and Private Key • The Private Key for this Certificate was created with a CSR generated on this appliance. |
Separate Private Key | Upload (PEM or DER formats) - Browse to the local file in PEM or DER formats. Paste it here (PEM only) - Paste the contents of a PEM file. Decryption Password - Specify the decryption password, if necessary. Passwords are required for PKCS-12 files, optional for PEM files, and never needed for DER files. |
Generate Self-Signed Certificate and New Private Key | Select to generate a new private key and self-signed public certificate. Common Name (required) - Specify the hostname of the peer. Organization Name - Specify the organization name (for example, the company). Organization Unit Name - Specify the organization unit name (for example, the section or department). Locality - Specify the city. State (no abbreviations) - Specify the state. Country (2-letter code) - Specify the country (2-letter code only). Email Address - Specify the email address of the contact person. Validity Period (Days) - Specify how many days the certificate is valid. The default value is 730. |
Private Key | Cipher Bits - Select the key length from the drop-down list. The default value is 2048. |
Update Certificate Through SCEP Enrollment | Select to generate a private key and CSR using a Simple Certificate Enrollment Protocol (SCEP) responder. Select the SCEP Management tab to configure the SCEP responder. |
3. To export an existing certificate, under Certificate, select the Export tab and complete the configuration as described in this table.
Control | Description |
Password/Password Confirm | Specify and confirm the encrypted password if you are including the private key (required if including key). The password must be at least four characters long. |
Include Private Key | Includes the private key in the export. |
Export | Exports the SteelHead peering certificate and key. |
4. To generate a CSR, under Certificate, select the Generate CSR tab and complete the configuration as described in this table.
Control | Description |
Common Name (required) | Specify the common name (hostname) of the peer. |
Organization Name | Specify the organization name (for example, the company). |
Organization Unit Name | Specify the organization unit name (for example, the section or department). |
Locality | Specify the city. |
State | Specify the state. Do not abbreviate. |
Country (2-letter code) | Specify the country (2-letter code only). |
Email Address | Specify the email address of the contact person. |
Generate CSR | Generates the Certificate Signing Request. |
5. To use SCEP to manage the certificate, under Certificate, select the SCEP Management tab and complete the configuration as described in this table.
Control | Description |
URL | Specify the URL of the SCEP responder. Use this format: http://<host><[:port]>/<pathtoservice> Example: http://<IP Address>/certsrv/mscep/mscep.dll RiOS 8.5 and later supports single-tier, two-tier, and three-tier hierarchies to validate the chain certificates it receives. |
Maximum Number of Polls | Specify the maximum number of polls before the SteelHead cancels the enrollment. The peering certificate is not modified. The default value is 5. A poll is a request to the server for an enrolled certificate by the SteelHead. The SteelHead polls only if the server responds with pending. If the server responds with fail then the SteelHead doesn’t poll. |
Poll Period | Specify the poll frequency in minutes. The default value is 5. |
Change Challenge Passphrase | Specify the challenge password phrase. |
Enable Auto Enrollment | Enables automatic reenrollment of a certificate to be signed by a CA using SCEP. • Expiration Threshold - Specify the amount of time (in days) to schedule reenrollment before the certificate expires. The range is from 1 to 60 days. The default value is 30 days. |
Update SCEP Settings | Updates the SCEP settings. |
6. To add or remove a Trusted entity, under Peering Trust, complete the configuration as described in this table.
Control | Description |
Add a New Trusted Entity | Displays the controls for adding trusted entities. |
Trust Existing CA | Select an existing CA from the drop-down list. |
Trust New Certificate | Adds a new CA or peer certificate. The SteelHead supports RSA and DSA for peering trust entities. |
Optional Local Name | Optionally, specify a local name for the entity (for example, the fully qualified domain name). |
Local File | Browse to the local file. |
Cert Text | Paste the content of the certificate text file into the text box. |
Add | Adds the trusted entity (or peer) to the trusted peers list. |
Remove Selected | Select the check box next to the name and click Remove Selected. |
7. To add or remove a SCEP Trusted entity, under SCEP Peering Trust, complete the configuration as described in this table.
Control | Description |
Add a New SCEP Entity | Displays the controls for adding a trusted SCEP entity. |
Peering Trust | Select a peering trust from the drop-down list. |
Add | Adds the trusted entity (or peer) to the trusted peers list. |
Remove Selected | Select the check box next to the name and click Remove Selected. |
8. To add or remove a SteelCentral Controller for SteelHead Mobile trusted entity, under Mobile Trust, complete the configuration as described in this table.
Control | Description |
Add a New Mobile Entity | Displays the controls for adding a trusted SteelCentral Controller for SteelHead Mobile entity. |
Optional Local Name | Optionally, specify a local name for the entity (for example, the fully qualified domain name). |
Local File | Browse to the local file. |
Cert Text | Paste the content of the certificate text file into the text box. |
Add | Adds the trusted entity (or peer) to the trusted peers list. |
Remove Selected | Select the check box next to the name and click Remove Selected. |
9. To change the trust status of a self-signed peer and move it to another list, or to remove a peer from a list, click the down arrow in the Actions drop-down list and complete the configuration as described in this table.
The white, gray, and black peering lists sort the peers by IP address.
Note: Before moving a peer from the gray list to the trusted peers white list, it is critical to verify that the certificate fingerprint does indeed belong to a peer SteelHead, particularly to avoid the potential risk of a man-in-the-middle attack.
Control | Description |
Trust | Changes the peer SteelHead to a trusted entity. The SteelHead automatically finds all SteelHeads in your deployment and lists them in the gray list. When a self-signed peer becomes a trusted entity it moves to the white list. |
Do Not Trust | Changes the self-signed peer from a trusted entity to an untrusted entity. The SteelHead automatically finds all SteelHeads in your deployment and lists them by IP address in the gray list. When a self-signed peer becomes an untrusted entity it moves to the black list. |
Remove Selected | Select the check box next to the name and click Remove Selected. |
Note: When the same certificate appears in both the trusted entity and a self-signed peer list, deleting the certificate from one list automatically deletes it from the other.
10. Click Apply to save your settings to the running configuration.
11. Click Save to Disk to save your settings permanently.
Verifying the Secure Inner Channel Connections
This section describes what happens when a secure inner channel can’t be established for traffic between SteelHeads and how to verify whether connections are using a secure inner channel.
When the SteelHeads are configured to use secure inner channels for SSL traffic only or All optimized traffic:
• The first connection that runs into a failure is passed through without optimization. This connection appears as established in the Current Connections report, but it is flagged with a red protocol error.
• For up to five minutes all follow-on or subsequent connections are passed through. These follow-on connections appear as pass-through in the Current Connections report. You can click the magnifying glass for details about the pass-through reason.
When the SteelHeads are configured to use secure inner channels for SSL and Secure Protocols:
• The first secure protocol connection (either encrypted MAPI, SMB Signed, or Citrix) that runs into a failure is passed through without optimization if Fallback to No Encryption is disabled. See
Enabling Secure Peers.
• The first SSL connection that runs into a failure is passed through without optimization. This connection appears as established in the Current Connections report, but it is flagged with a red protocol error.
• For up to five minutes all follow-on or subsequent connections are passed through.
To verify that the secure inner channel is encrypting and optimizing traffic, choose Reports > Networking: Current Connections. Look for the
Lock icon and three yellow arrows, which indicate the connection is encrypted and optimized. If the
Lock icon isn’t visible, or is dimmed, click the connection to view a failure reason that explains why the SteelHead isn’t encrypting the connection. If there’s a red protocol error, click the connection to view the reason for the error. For details, see
Viewing Current Connection Reports and
Verifying SSL and Secure Inner Channel Optimization.
Related Topics