Configuring Zscaler
This topic describes how to integrate Zscaler with SteelConnect. It includes these sections:
Zscaler overview
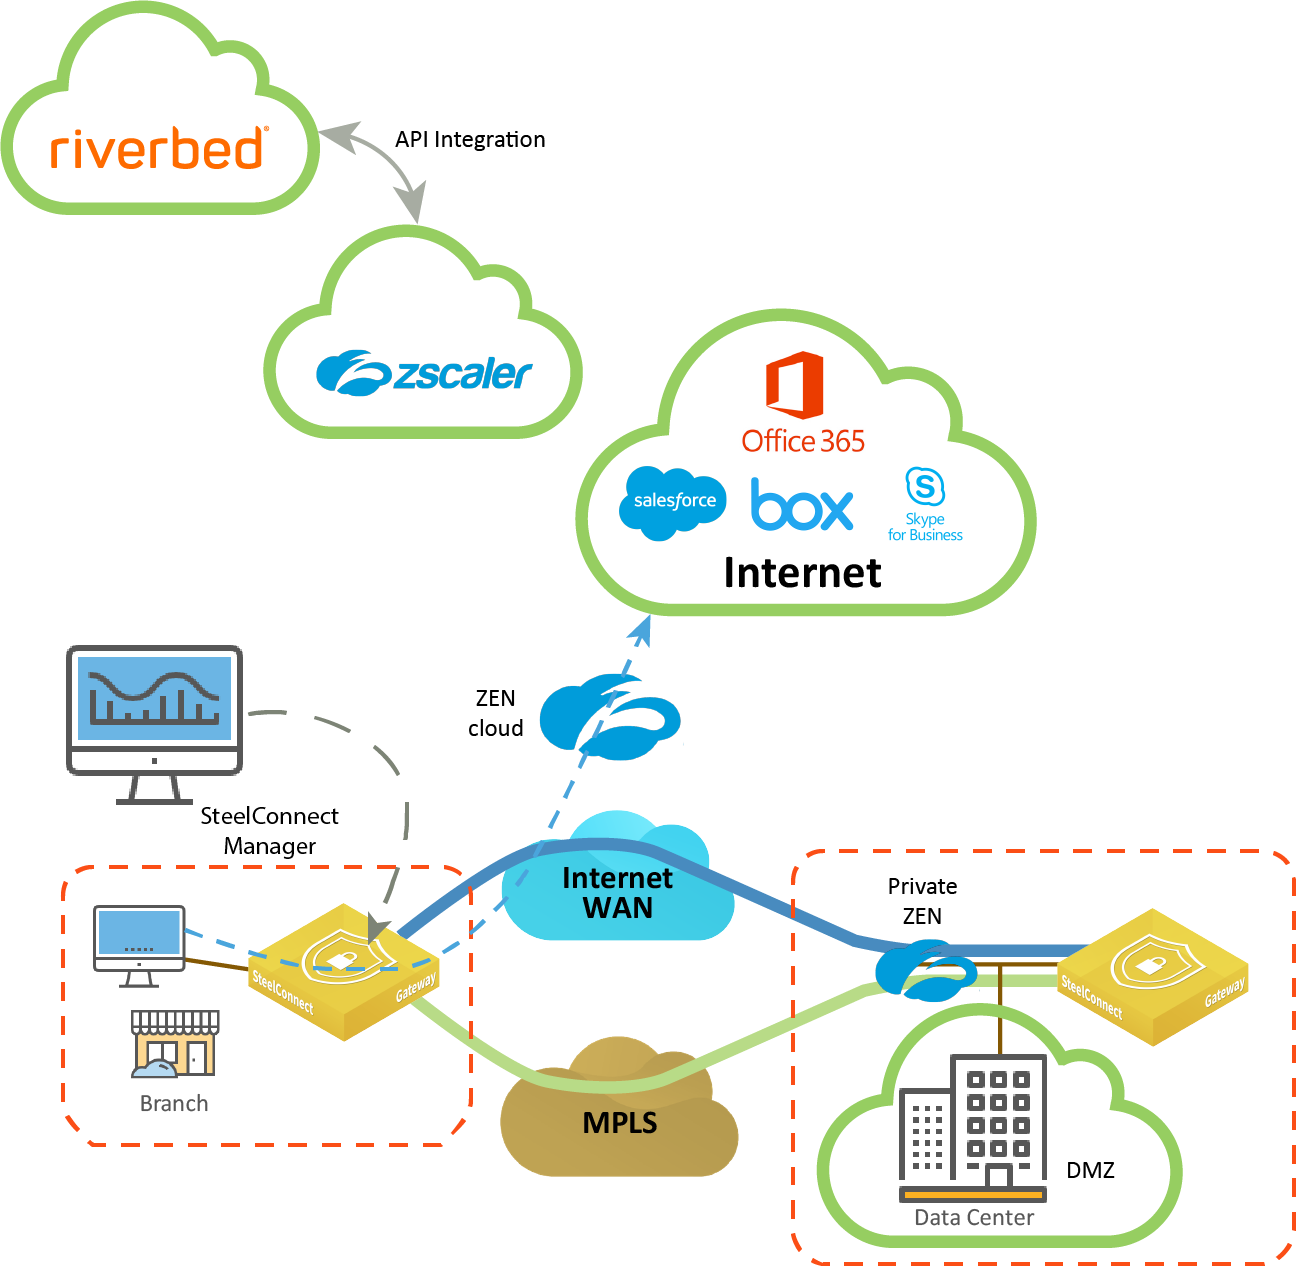
Zscaler is a cloud-based security provider that distributes components of a standard proxy to create a giant global network that acts as a single virtual proxy. The native integration of Zscaler with SteelConnect provides these benefits:
•Easy configuration - Organizations with mobile users and numerous branch offices can use Zscaler instead of deploying an advanced firewall at each branch office. SteelConnect reduces the complexity of connecting to the cloud security service to a few simple clicks.
A SteelConnect gateway automatically connects with a Zscaler Enforcement Node (ZEN), creating a secure IPsec VPN tunnel between the Zscaler cloud and the SteelConnect gateways at sites. VPN tunnels are established with IKEv2.
•Flexibility - After establishing a secure IPsec tunnel between the Zscaler cloud and SteelConnect gateways, you have the flexibility to configure Zscaler as an internet breakout preference at the organization, site, or zone level or as a breakout preference in traffic rules.
•Robustness - If the primary IPsec VPN tunnel or an intermediate connection goes down, all traffic is rerouted through the backup IPsec tunnel to a secondary ZEN in approximately 15-60 seconds, depending on the configuration and cause of failure.
•Visibility - The Health Check > Proxy Tunnels page provides visibility into Zscaler tunnel status. The Zscaler tunnel status messages are also reported to syslog.
•Automatic tunnel optimization - SteelConnect automatically optimizes tunnel latency by choosing the best ZEN for each site.
Zscaler and Riverbed partner API integration
Before you begin
Before configuring Zscaler, make sure you:
•have a Zscaler Security as a Service platform subscription. The SteelConnect integration with Zscaler supports Zscaler Internet Access (ZIA).
•plan the level at which to configure internet breakout. For example, you might want to fall back to direct breakout if Zscaler is unavailable, or you might want to break out traffic at the organization or site level using a traffic rule.
•decide in which order the breakout should occur: Zscaler, Zscaler and then internet, or internet and then Zscaler. Are there sites that require special routing such as guest zones? Do you need to break out the data center sites directly?
Zscaler is not supported for data center deployments using SDI-5030 gateway clusters. SteelConnect 2.11 and later support Zscaler on the SDI-2030 gateway and SteelHead SD 570-SD, 770-SD, and 3070-SD appliances in addition to SteelConnect SDI-130, SDI-330, and SDI-1030 gateways.
Integrating with Zscaler
SteelConnect automatically routes traffic destined for the internet to the nearest ZEN for minimum latency, and it enforces traffic policies configured on Zscaler. Here are some key Zscaler components:
•Each customer account is associated with one Zscaler cloud.
•Each cloud consists of ZENs in various geographic regions.
•ZENs act as proxy servers that perform traffic analysis and filtering.
Automatic ZEN assignment is the default, recommended method; however, you can manually choose a primary ZEN and a secondary ZEN for each site. For example, you might need to select ZENs located in a particular country for certain geographic requirements and regulations, or for users who need to see localized content. For details, see
To manually set the ZENs for the site.
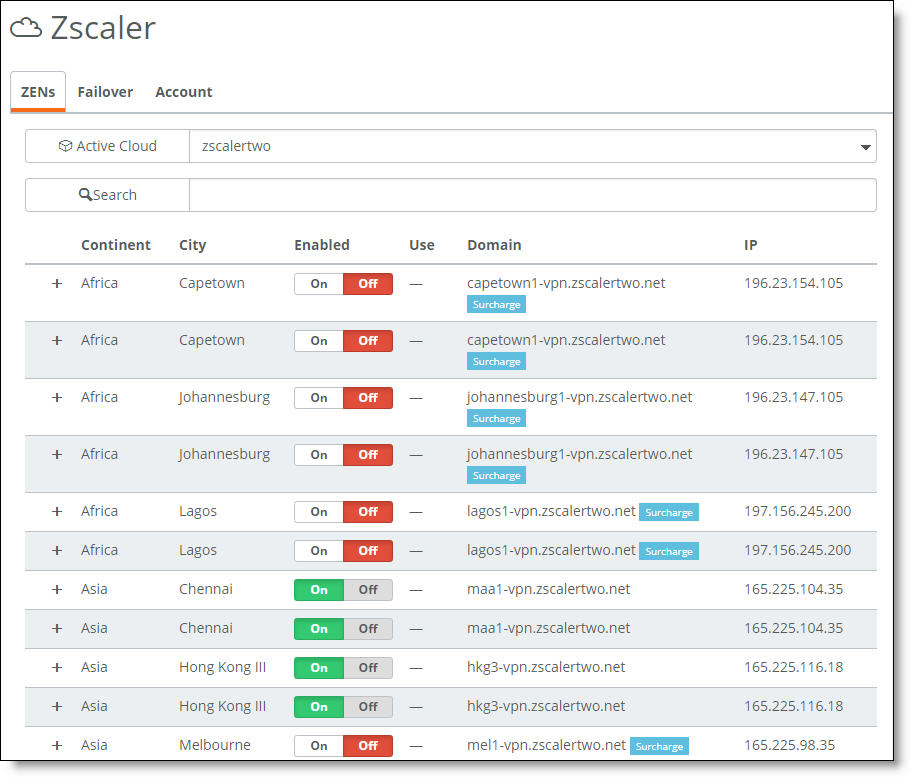
Some ZENs apply an additional regional surcharge for their use. SteelConnect 2.10 and later support ZENs requiring a surcharge. After enabling a ZEN with a surcharge, SCM asks you to confirm the selection.
SteelConnect 2.12 provides two methods to integrate with Zscaler:
•SD-WAN REST API access - provides fast Zscaler integration from SCM using the Zscaler partner APIs. We recommend using this method for its ease of use and automation. This method requires a Zscaler support ticket to whitelist the domain
•Manual configuration - requires a Zscaler support ticket to whitelist the domain and download site locations and VPN credentials. Then, you log in to the Zscaler portal, and upload the locations and credentials using a comma-separated values (CSV) file.
API partner integration (recommended)
Zscaler configuration
The tasks in this section describe the API partner configuration in the Zscaler portal.
To add a partner administrator role with SD-WAN partner access
1. Log in to your Zscaler account.
2. Go to Administration > Role Management.
3. Click Add Partner Administrator Role.
4. Enter a name for the partner admin role.
5. After Access Control, select Full, which allows partner admins to view and edit locations and VPN credentials that are managed through the cloud service API.
6. Under Partner Access, select SD-WAN Partner Access and select the Locations and VPN Credentials check boxes.
7. Click Save and then activate the change.
To create a partner administrator account
1. In the Zscaler Admin Portal, go to Administration > Administrator Management.
2. Click Add Partner Administrator.
3. Enter the login ID for the partner administrator and select the appropriate domain name from the drop-down list.
4. Enter an email address for the partner administrator and select the appropriate domain name from the drop-down list.
5. Enter a name for the partner administrator.
6. Select the partner role from the drop-down list.
7. Optionally, add comments to help manage the account.
8. Enter a password for the partner administrator.
9. Re-enter the password to confirm.
10. Click Save and then activate the change.
Zscaler assigns each API partner a unique key used to access and activate the administrator account.
To get the integration key
1. In the Zscaler Admin Portal, go to Administration > Partner Integrations.
2. Select the SD-WAN tab.
The key appears after Riverbed SteelConnect.
3. Copy and paste the key in a convenient location for use in SCM later.
The next task is to activate the Zscaler API partner account in SCM. The partner account changes the domain name and updates all VPN credentials and locations. Before you activate the partner account, delete any existing VPN credentials and locations from the Zscaler portal. To remove existing entries, import locations and the VPN credentials in the Zscaler portal manually as described in
To delete locations and VPN credentials.
About VPN credentials
In an IPsec VPN tunnel, two peers use a negotiation process called Internet Key Exchange (IKE) to define the security mechanisms they will use to protect their communications. IKE has two phases. In the first negotiation phase, the peers define the security parameters they will use to communicate in the second phase. In order to identify each other and authenticate, the peers exchange VPN credentials.
SteelConnect 2.12 has two different CSV files: one is used to create VPN credentials and one is used to delete VPN credentials manually.
About locations
Locations identify the various networks from which your organization sends its internet traffic. SCM uses a domain that includes the organization’s long name, organization ID, the site’s long name, and SCM domain name with whitelisted VPN credentials,
When you have been using Zscaler using the manual method, and you want to switch to the partner API method, you need to delete the records created using the manual method first. If this is the first time you are configuring Zscaler, you do not need to delete locations and VPN credentials.
To download the CSVs
1. Choose Network Design > Zscaler.
2. Select the Account tab
3. Download the CSVs to delete (not create) the old records.
To delete locations and VPN credentials
1. In the Zscaler portal, choose Administration > Resources > Locations and click Import Locations.
You need to import the locations first before importing the VPN credentials.
2. Choose Administration > Resources > VPN Credentials and click Import VPN Credentials.
3. In the Activation menu, click Activate.
To import locations and VPN credentials, see
To add the VPN credentials to the Admin Portal.
To view the whitelisted domains
1. Log in to Zscaler.
2. Go to Administration > Settings > Company Profile.
A list of whitelisted domains appears.
SCM configuration
The tasks in this section describe API Partner configuration in SCM.
To add the Zscaler partner account
1. In SCM, choose Organization and select the organization.
2. Choose Network Design > Zscaler.
3. Select the Account tab.
4. Under Zscaler account, click Add Zscaler account.
SD-WAN partner integration
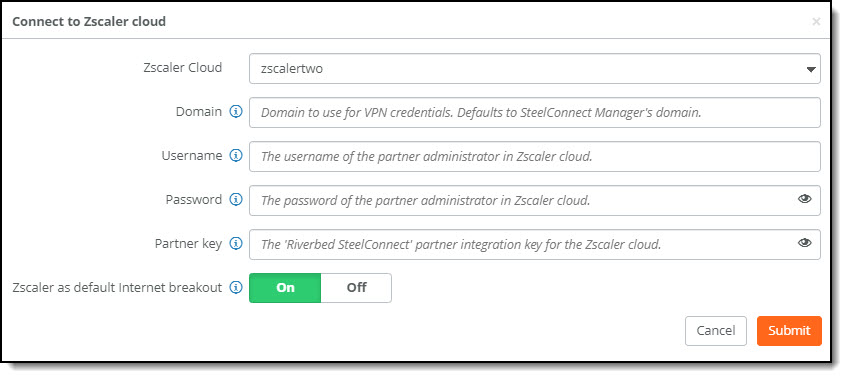
To configure the Zscaler partner account
1. Select the Zscaler cloud with the partner integration account.
2. Specify the domain to use for VPN credentials.
The domain must be whitelisted to establish a tunnel with the Zscaler cloud. If you already have a whitelisted domain, you don’t need to ask Zscaler support to whitelist the domain. You can use the existing one.
When you change a domain name in SCM, all VPN credentials and locations are updated.
3. Specify the username and password for the partner administrator in Zscaler cloud.
4. Paste the partner integration key copied in
Step 3 from the procedure to get the integration key.
5. Click On to enable Zscaler as the internet breakout preference for the organization. This is the default setting.
6. Click Submit.
When the VPN credentials are cleared and the account creation is successful, SCM shows the status as “Account linked” in green.
Partner account
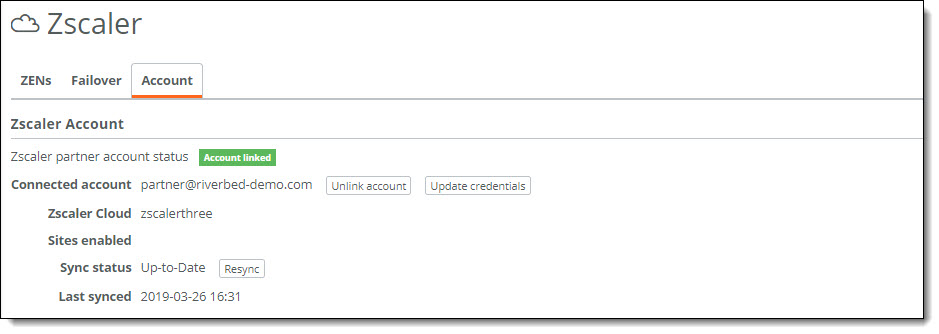
After an account is linked to Zscaler, a job scheduler compares the credentials data from the Zscaler portal to the data in SCM every 15 minutes and synchronizes any updates in the background.
By default, SteelConnect performs automatic ZEN selection. After you select a cloud:
•SteelConnect automatically enables Zscaler and sends the list of available ZENs to all gateways.
•The ZENs belonging to the selected cloud appear.
•SteelConnect creates a Zscaler WAN for the organization.
•The gateway measures latency to all of the ZENs. SteelConnect selects the two ZENs with the lowest latency.
•SteelConnect pairs the ZENs with the sites in the organization.
•Each gateway establishes IPsec VPN tunnels to its primary and secondary ZENs through an internet connection to the assigned ZEN pairs for the sites. Automatic ZEN selection and tunnel creation finish in approximately two minutes. Click the ZEN row to view which sites are using this ZEN as a primary or secondary ZEN.
•If the primary IPsec VPN tunnel or an intermediate connection goes down, all traffic is rerouted through the backup IPsec tunnel to the secondary ZEN in approximately 60 seconds. It can take up to 120 seconds.
Because changing ZENs can briefly impact connectivity and change exit IP addresses, SteelConnect assigns the ZENs once and doesn’t update them after the initial assignment. This means that you must trigger automatic ZEN selection after you move a site to another location, change an ISP, and so on.
To trigger automatic ZEN selection
1. Choose Network Design > Sites.
2. Select a site.
3. Select the Zscaler tab.
4. Click Automatic node selection.
5. Click Confirm.
Viewing the ZEN selections
You can view the IPsec VPN tunnel ZEN selections in SCM.
To view the ZEN selections for the site
1. In SCM, choose Network Design > Zscaler.
2. Select the site.
3. Select the Zscaler tab.
If the automatic ZEN selections are correct, skip ahead to
Setting traffic policies.
If the automatic ZEN selections are incorrect, you can reset them manually. For details, see
Setting the ZENs manually.
For more troubleshooting, see
Troubleshooting Zscaler tunnels.
Synchronizing the partner account with the Zscaler cloud manually
SCM automatically synchronizes the partner account with the Zscaler cloud whenever a site name or location changes. There are two synchronization methods:
1. A sync operation updates the incremental changes to a site immediately and doesn’t update any other values.
2. A full sync updates all information for every site in the organization.
The sync status displays one of these states:
•Syncing - A sync update or full sync operation is currently in progress.
•Up-to-Date - The last sync or full sync operation was successful.
•Failure - The last sync or full sync operation has failed.
Last synced displays the date and time of the previous sync or full sync.
Resynchronizing performs an immediate full sync that updates all existing locations and VPN credentials in Zscaler cloud. It also creates any missing locations or VPN credentials it finds.
Sync status
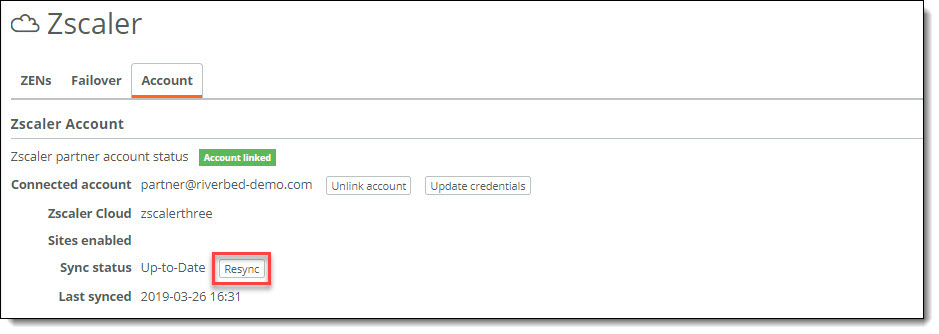
To resynchronize Zscaler and SCM
1. Click Resync.
A confirmation message appears.
2. Click Confirm.
The resynchronization begins immediately updating all locations and VPN credentials.
To unlink a Zscaler partner account
•Click Unlink account.
Manual Integration
This section describes how to set up a Zscaler account manually. This method is not recommended for new users. Instead, use the partner integration method as described in
API partner integration (recommended).
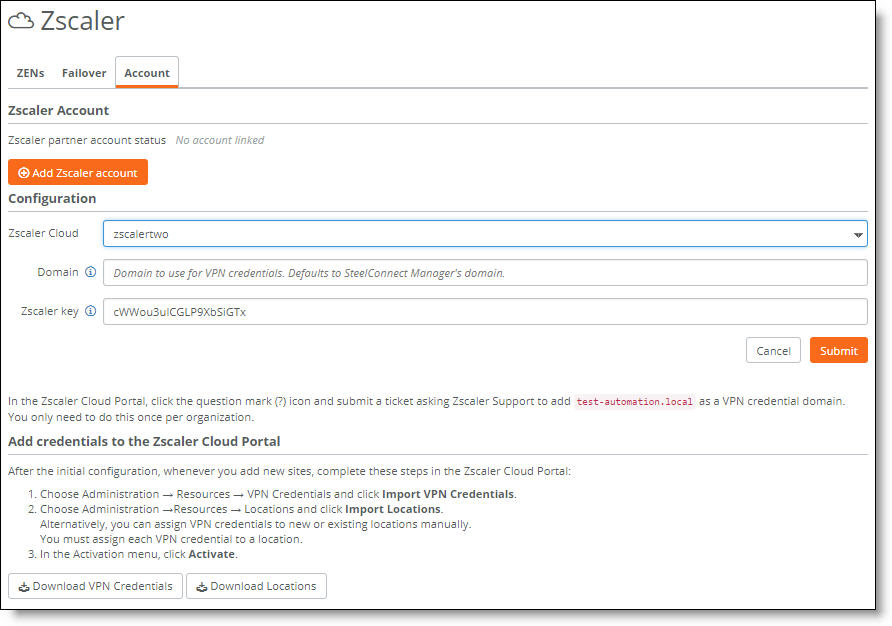
Selecting a cloud
The first task is to select an active cloud.
To select a cloud
1. In SCM, choose Network Design > Zscaler.
2. Select the Account tab.
3. Select a cloud.
You cannot select the same cloud for Cloudi-Fi and Zscaler. For details on Cloudi-Fi, see
Configuring Cloudi-Fi.
4. Specify a new domain name.
5. Specify the preshared key for the domain.
6. Click Submit.
Zscaler active cloud
By default, SteelConnect performs automatic ZEN selection. After you select a cloud:
•SteelConnect automatically enables Zscaler and sends the list of available ZENs to all gateways.
•The ZENs belonging to the selected cloud appear.
•SteelConnect creates a Zscaler WAN for the organization.
•The gateway measures latency to all of the ZENs. SteelConnect selects the two ZENs with the lowest latency.
•SteelConnect pairs the ZENs with the sites in the organization.
•Each gateway establishes IPsec VPN tunnels to its primary and secondary ZENs through an internet connection to the assigned ZEN pairs for the sites. Automatic ZEN selection and tunnel creation finish in approximately two minutes. Click the ZEN row to view which sites are using this ZEN as a primary or secondary ZEN.
•If the primary IPsec VPN tunnel or an intermediate connection goes down, all traffic is rerouted through the backup IPsec tunnel to the secondary ZEN in approximately 60 seconds. It can take up to 120 seconds.
Because changing ZENs can briefly impact connectivity and change exit IP addresses, SteelConnect assigns the ZENs once and doesn’t update them after the initial assignment. This means that you must trigger automatic ZEN selection after you move a site to another location, change an ISP, and so on.
To trigger automatic ZEN selection
1. In SCM, choose Network Design > Sites.
2. Select a site.
3. Select the Zscaler tab.
4. Click Automatic node selection.
5. Click Confirm.
Viewing the ZEN selections
You can view the IPsec VPN tunnel ZEN selections in SCM.
To view the ZEN selections for the site
1. In SCM, choose Network Design > Zscaler.
2. Select the site.
3. Select the Zscaler tab.
If the automatic ZEN selections are correct, skip ahead to
Configuring VPN credentials (manual configuration only).
Setting the ZENs manually
Automatic ZEN assignment is the default and the recommended method; however, you can manually choose a primary ZEN and a secondary ZEN for each site.
You can use any ZEN in the same cloud. All ZENs in a cloud share the same configuration.
ZENs that apply a regional surcharge are disabled by default and aren’t selected during automatic ZEN assignment. After enabling a ZEN with a regional surcharge, you can select the nodes automatically and manually using the same methods as nodes that don’t require a regional surcharge.
When a ZEN that has been assigned to an SCM site manually is removed from the active cloud by Zscaler, SCM changes that site to use automatic selection mode.
ZEN selection for a site
To manually set the ZENs for the site
1. In SCM, choose Network Design > Sites.
2. Select a site.
3. Select the Zscaler tab.
4. After ZEN Selection, select Manual from the drop-down list.
The current primary and secondary ZEN settings appear.
5. Click the search selector and select a primary and secondary ZEN.
6. Click Submit.
SCM shows all VPN configuration details under ZEN status as soon as the system creates the third-party VPN connection. The status also reports any tunnel latency.
You can disable Zscaler on a per-site basis.
To enable or disable a ZEN from the active cloud
•Next to the ZEN, click On or Off.
Configuring VPN credentials (manual configuration only)
The next task is to ask Zscaler support to whitelist your VPN credential domain for successful authentication. After your credentials are whitelisted, you need to add the credentials to the Zscaler Admin Portal and then link the credentials to a location.
To whitelist the VPN credential domain
1. In SCM, choose Network Design > Zscaler.
2. Select the Account tab.
SCM displays your VPN credential domain.
Zscaler VPN credential domain
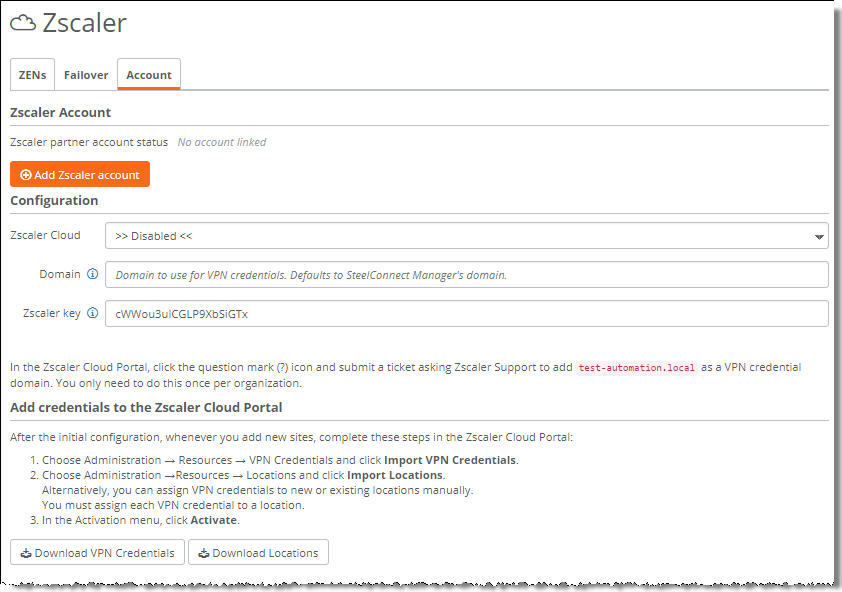
You’ll need this VPN credential domain for the Zscaler support representative. Don’t click Download VPN credentials or Download Locations yet. You’ll do that in
Step 4.
3. In Zscaler, submit a support ticket to whitelist the VPN domain credential for the organization. You only need to add the domain once for the organization.
4. After receiving a response from Zscaler support, return to the SCM Zscaler Configuration dialog and click Download VPN Credentials.
The configuration file downloads.
To add the VPN credentials to the Admin Portal
1. In Zscaler, choose Administration > Resources > VPN Credentials.
2. Click Import VPN Credentials.
3. Mouse over the Activation menu and click Activate.
After adding the VPN credentials to the Zscaler Admin Portal, the next task is to link the credentials to a location. Linking the VPN credentials to a location is required. Zscaler ignores VPN credentials that are not linked to a location.
You can link multiple credentials to one location to speed up configuration of multiple sites. For details, see
To link the VPN credentials to multiple locations.
To link the VPN credentials to a location
1. In Zscaler, choose Administration > VPN Credentials > Locations.
2. Click Add VPN Credentials.
3. Enter the name, state/province, country, and time zone for the branch office location.
4. In the Addressing section, enter the public IP address for SteelConnect.
5. Click the down arrow beside VPN Credentials and select the credentials you created to associate with this branch location.
6. Click Save to store the changes locally.
7. Mouse over the Activation menu and click Activate.
This action pushes the configuration changes to the Central Authority (CA) immediately. The CA serves as the central repository for policies and configuration settings. The ZENs retrieve the policies from the CA and apply them to your organization’s internet traffic. Because all policies are centrally stored on the CA, the latest policies are always applied, no matter which ZEN your users connect to.
To link the VPN credentials to multiple locations
1. In SCM, choose Network Design > Zscaler.
2. Select the Account tab.
3. Click Download Locations.
4. In Zscaler, choose Administration > VPN Credentials > Locations.
5. Click Import.
6. Click Apply Changes to store the changes locally.
7. Mouse over the Activation menu and click Activate.
This action pushes the configuration changes to the Central Authority (CA) immediately. The CA serves as the central repository for policies and configuration settings. The ZENs retrieve the policies from the CA and apply them to your organization’s internet traffic. Because all policies are centrally stored on the CA, the latest policies are always applied, no matter which ZEN your users connect to.
Customizing the VPN domain name
For test environments or troubleshooting, you can customize the whitelisted VPN domain name with another name without submitting a request to Zscaler support to whitelist the domain name manually.
In SteelConnect 2.10 and later, the default domain name is the name of the SCM domain. This is a change from previous SteelConnect versions, which used the organization ID. This new default domain name doesn’t impact previous configurations. If you have already configured Zscaler for an organization using SteelConnect 2.9.x, your configuration will continue to work with no further changes.
To change the VPN domain name
1. In SCM, choose Network Design > Zscaler.
2. Select the Account tab.
Change the VPN credentials
3. Specify a new domain name.
4. Specify the preshared key for the domain.
5. Click Submit.
6. Repeat
Step 1 through
Step 5 if you’d like to return the VPN domain name to its original setting after you’re finished testing or troubleshooting.
Customizing the failover settings for an organization
SteelConnect creates IPsec VPN tunnels to the primary and secondary ZENs. The backup tunnel to the secondary ZEN is on hot-standby. Both tunnels are monitored constantly, but user traffic is only routed through one active tunnel.
SteelConnect 2.12 makes tunnel monitoring and failover faster and more reliable by using a combination of ICMP and HTTP-based monitoring by default.
You can optionally customize failover settings to adjust the methods used to monitor the primary and secondary ZEN nodes, detect failures, and switch over from primary to secondary tunnels when necessary.
The default SteelConnect Zscaler failover settings are very low-level values that work in most environments, and most values do not need fine tuning. However, if you want to adjust the settings, this section describes how. The optimal settings are balanced according to the latency and reliability of the uplinks.
Lower values shorten the failover time, but if they are too low they can create false positives. High latency sites can benefit from increasing the values, but the failover time will increase, and the failover reporting will take even longer. When in doubt, slower failover is preferred.
You can customize the failover settings for an organization, or you can customize the settings for a site.
To specify site-specific Zscaler failover settings, choose Network Design > Sites, select a site, and select the Zscaler tab. Turn off the organization settings and specify the settings for the site.
To change the default failover settings for an organization
1. In SCM, choose Network Design > Zscaler.
2. Select the Failover tab.
Change the failover settings
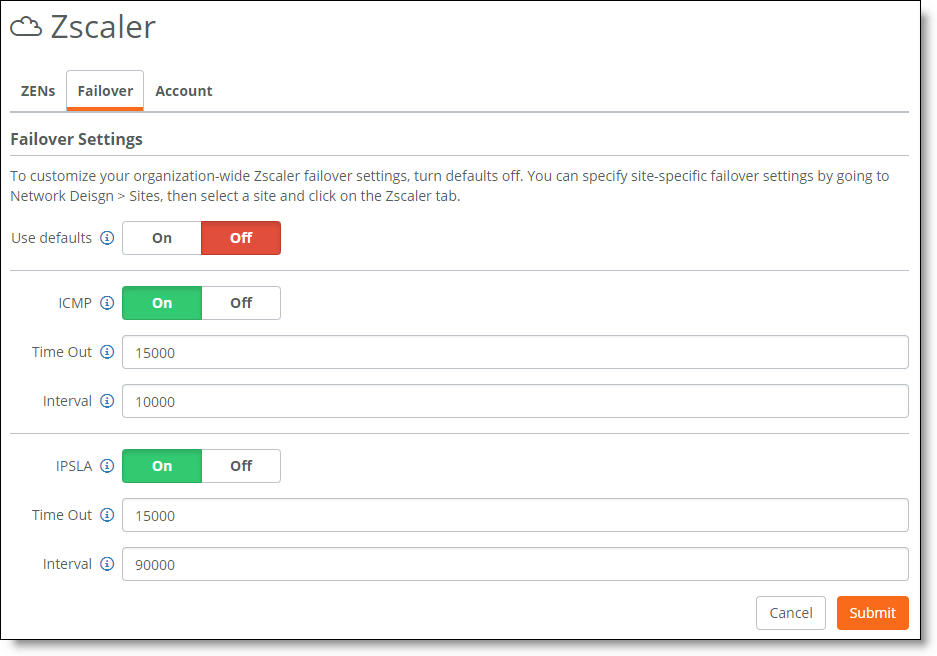
3. Click Off to disable the default settings. The values that were previously in use are shown as editable values.
4. Click On to enable ICMP as the method for to perform tunnel monitoring. Internet Control Message Protocol (ICMP) uses echo requests (pings) to measure round-trip packet travel times. ICMP is a low to medium overhead protocol that allows for shorter intervals and faster detection of failures (10 seconds or less). ICMP detects these failures:
–Unreachability of the Zscaler data center due to a local uplink failure.
–Something in the middle.
–The DC actually being down.
To detect other failures, enable both HTTP and ICMP.
The outbound ICMP probes travel the underlay to reach the ZENs. The uplink must allow SteelConnect to use ICMP. If you are directly connected to the internet with no firewall in the middle, your configuration already allows ICMP. If your firewall or security policy does not allow outbound ICMP, you can disable ICMP and use HTTP monitoring instead. HTTP monitoring has a high overhead and the ZEN failover time will be slower than ICMP. We strongly recommend that you allow outbound ICMP on the underlay.
5. Specify how often ICMP sends new pings, in milliseconds. If a ping fails or times out, a retry is sent immediately on the timeout irrespective of the interval. Over the period of one timeout, SteelConnect pings five times. We recommend an ICMP time-out setting of 15 seconds (15000 ms).
6. Specify how long to wait, in milliseconds, for a response before the ping and all of its retries are considered failed. We recommend an ICMP interval setting of 10 seconds (10000 ms).
7. Click On to enable the HTTP operation as an additional method with ICMP to perform tunnel monitoring, evaluation, and trending. HTTP is a medium to high overhead protocol that detects failure in 60 seconds or less. HTTP detects most failures, including:
–Unreachability of the Zscaler data center due to a local uplink failure.
–Something in the middle.
–The DC actually being down.
–A tunnel that isn’t carrying traffic.
–ZEN node failure (Layer 7, even though IPsec tunnel to the load-balance [LB] VPN might be established),
8. Specify how often HTTP sends pings, in milliseconds. If a ping fails or times out, a retry is sent immediately on the time-out irrespective of the interval.
9. Specify how long to wait, in milliseconds, for a response before the ping and all of its retries are considered failed.
10. Click Submit.
Setting traffic policies
The final task is to steer traffic through Zscaler using internet breakout preferences, traffic rules, or both.
Configuring the Zscaler WAN as the internet breakout
When Zscaler is enabled, SCM creates a Zscaler WAN. You can configure the Zscaler WAN as the default internet breakout (as the organization’s default, as the site’s default, or for specific zones). For details, see
Setting the internet breakout preference and
Setting an internet breakout point for a zone.
Do not set Zscaler as the internet breakout for a zone if the organization or site to which that zone belongs has Zscaler disabled. This configuration can cause a loss of connectivity to the internet and Zscaler will be ignored. Also, if there are no other breakout options configured:
•At the organization level, traffic will be dropped.
•At the site level, SCM will fall back to the organization’s internet breakout preferences.
•At the zone level, SCM will fall back to the site’s internet breakout preferences.
When you select the organization's Networking Defaults tab, the site’s WAN/AutoVPN tab, or the zone’s WAN tab and Zscaler is not currently enabled, but has been selected previously as an internet breakout preference, a red x appears next to Zscaler in the internet breakout preference list to indicate that it is disabled.
Defining traffic rules
Zscaler can also be used as a breakout path preference in traffic rules. Traffic rules determine which traffic is sent to the internet breakout or other VPNs. For example, you could send all Facebook traffic to the Zscaler WAN and the rest of the traffic to the internet or backhaul it. For details, see
Directing traffic using traffic rules.
Only traffic rules performing application detection based on the first packet can be used.
Do not set Zscaler as the path preference in a traffic rule for a zone if the organization or site to which that zone belongs has Zscaler disabled. This configuration can cause loss of connectivity to the internet and Zscaler will be ignored.
Viewing Zscaler tunnels
You can check the status of Zscaler tunnels in SCM.
The SCM dashboard shows the Zscaler VPN tunnels between sites; it doesn’t show the tunnel endpoints for Zscaler.
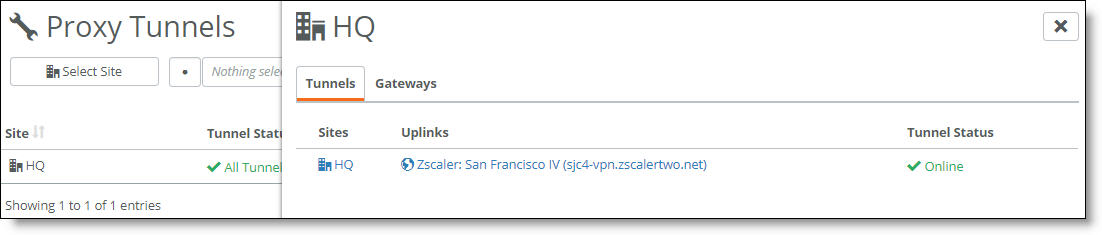
To view Zscaler tunnels
1. In SCM, choose Health Check > Proxy Tunnels.
2. Select a site or select all sites.
The Proxy Tunnels page shows the tunnel status for each site.
3. Click the uplink to view the ZENs on the Zscaler page.
Zscaler tunnel status
in Health Check
You can also view Zscaler Analytics dashboards for reporting and analysis.
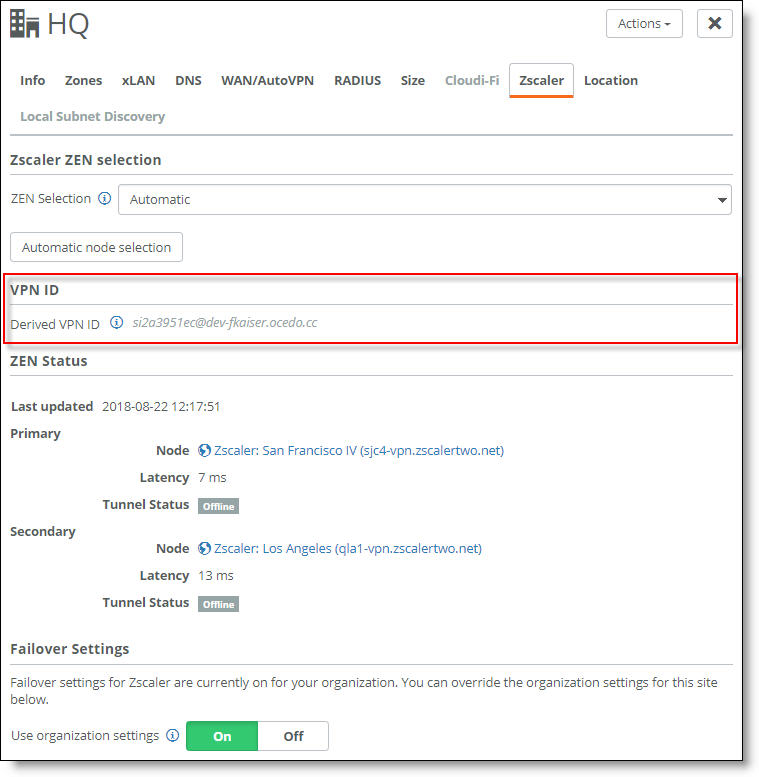
Viewing the VPN ID
You can view the VPN ID credential used for tunnel authentication in SCM. This can be useful for determining whether a site has a configured VPN credential.
To view the VPN ID
1. In SCM, choose Network Design > Sites.
2. Select a site.
3. Select the Zscaler tab.
The ID derived from Zscaler appears under VPN ID.
Zscaler VPN credential for a site
Troubleshooting Zscaler tunnels
To diagnose and fix Zscaler configuration and network problems, refer to this table.
Condition | Possible causes | Solution |
A Zscaler tunnel is offline. | Is the Zscaler configuration up to date? | Reimport the configuration file into Zscaler. Ensure that the VPN credentials are linked to locations. Click Activate changes. |
Could the ZEN be down? Has it moved to another location? The current list of ZENs is updated during SCM startup and reflects ZENs that were added, updated, or deleted according to their availability. Check the current node list: for example, https://ips.zscaler.net/cenr (this link varies for each cloud). | Choose Network Design > Zscaler, and click Off to disable the problematic node in the ZEN list. For sites with manually configured ZENs, choose a different ZEN manually. |
The Zscaler tunnels are up, but traffic is not going through Zscaler. | Are you testing a recent change? | Make sure that the browser is using a new connection. Changes only apply to new connections. Be aware that browsers usually attempt to reuse existing connections. |
Have you configured an internet breakout preference either at the organization, site, or zone level using a traffic rule? | Check the internet breakout configuration in the organization, site, zone, or traffic rule. Make sure that an organization preference isn’t being overridden by a site or zone-level preference. Check that the client is using the SteelConnect gateway as the DNS server. This only applies to some types of traffic rules and doesn’t apply to organization, site, or zone breakout preferences. Choose Rules > Traffic Rules and verify the traffic rules are configured correctly. Make sure that the traffic rules use the first packet to detect the application. Check http://ip.zscaler.com for an ineffective rule. Continue with normal forwarding path troubleshooting. For details, see Troubleshooting tools and Using the CLI on SteelHead SD appliances. |
After attempting to import the VPN configuration file into Zscaler, you see this error: "Firewall Basic subscription is required to enable firewall...." | Could the VPN credentials configuration be causing the problem? | Either license the cloud firewall feature in Zscaler or remove "Firewall-Enable" from the Locations CSV file to make the column empty and reimport the file. |
There aren’t any established Zscaler tunnels on an appliance. | Are ZENs selected for the site? | The automatic ZEN selection might still be in progress. Wait two minutes and then refresh the page. If there are still no ZEN assignments after refreshing the page, check that the ZEN selection is set to automatic (or you can select the ZENs manually). To trigger automatic ZEN selection 1. Choose Network Design > Sites. 2. Select a site. 3. Select the Zscaler tab. 4. Click the Automatic zone selection button. 5. Click Confirm. |
Is at least one of the appliance’s ports marked as an uplink? | Verify that an appliance port is listed as an uplink under the Mode column of the display. If there are no appliance ports configured as uplinks, configure a port as an uplink. To set the port to uplink 1. Select a port. 2. Select the Info/Mode tab. 3. Next to Port mode, select Uplink. 4. Select the uplink. 5. Click Submit. |
Do any of the appliance’s uplinks allow AutoVPN? The appliance must have at least one uplink that allows AutoVPN. | To allow AutoVPN on an uplink 1. Choose Network Design > Uplinks. 2. Select an uplink. 3. Select the AutoVPN tab. 4. Under AutoVPN priority, select any option from the drop-down list except this option: Don’t use this uplink for AutoVPN. |
| Is AutoVPN enabled on the gateway? | To enable AutoVPN on a gateway 1. Choose Appliances. 2. Select the gateway. 3. Select the AutoVPN tab. 4. Click On. |
Are you trying to enable Zscaler on an SDI-5030 gateway? Zscaler is not supported on SteelConnect SDI-5030 gateways. | Zscaler is supported on SteelHead SD 570-SD, 770-SD, 3070-SD appliances, and SteelConnect SDI-130, SDI-330, SDI-1030, and SDI-2030 gateways. |
The Zscaler tunnels are defined on the appliance but the Health Check > Proxy Tunnels page shows their status as down. | Is the wrong Zscaler cloud selected? | Select the correct Zscaler active cloud as determined by the domain name on the Zscaler admin console. To select an active cloud 1. Choose Network Design > Zscaler. 2. Select the Account tab. |
Are the VPN credentials defined? Has the VPN credential configuration file been imported into Zscaler? Did the configuration file become outdated after a new site was added to an organization? | Download the credential configuration file from SCM and reimport it into Zscaler. For details, see Configuring VPN credentials (manual configuration only). |
Did the VPN credential import fail? | Download the credential configuration file from SCM and reimport it into Zscaler. For details, see Configuring VPN credentials (manual configuration only). |
Do some of the records that are being imported in the CSV file already exist? | Delete existing records manually or remove the records from the CSV and reimport the CSV. |
Has the VPN credential been whitelisted? | If the VPN credential hasn’t been whitelisted, create a Zscaler support ticket. For details, see Configuring VPN credentials (manual configuration only). |
Is the VPN credential assigned to a location? A VPN credential can be unassigned when: •The credential configuration file hasn’t been imported into Zscaler yet. •The location configuration file is outdated because a new site was added after the configuration file was originally imported. | The solution for both issues is to download the credential configuration file from SCM and reimport it into Zscaler. For details, see Configuring VPN credentials (manual configuration only). |
| Does the preshared key (PSK) match the PSK shown in the Zscaler console? Choose Network Design > Zscaler and select the Account tab. Verify that the PSK matches the PSK shown in the Zscaler console. | Fix the PSK in SCM or reimport the VPN credentials CSV file into Zscaler You can also manually set the key in Zscaler. |
Is the ZEN selected from the wrong cloud? | To verify the ZEN 1. Choose Network Design > Sites. 2. Select the site. 3. Select the Zscaler tab. If the ZEN selection is set to manual, select new primary and secondary ZENs. If the ZEN selection is set to automatic, click Automatic node selection to reset the ZENs. |
The appliance reports a Zscaler tunnel as up, but SCM reports the same tunnel as missing or down. | Does the Health Check > Proxy Tunnels page show the tunnel as missing or down? | SteelConnect might not have finished uploading the tunnel statistics. Wait one minute and refresh the page. If the appliance has just been booted, allow about five minutes. |
VPN credentials aren’t up to date. Deleted credentials are still appearing. | Is more time needed to complete the changes? | A Zscaler API partner configuration might need more time to complete background tasks such as creating, updating, or deleting VPN credentials (or locations). Wait for at least 15 minutes for the partners to finish updating. |