Configuring Optimization Settings
This chapter describes the following configuration settings related to optimization and load balancing:
Note: The load-balancing service requires a configured IP address on the in-path interface (displayed when running the show steelhead communication and show interceptor communication commands). If you are in VLAN segregation mode and you remove the IP address on an in-path interface, when you switch to VLAN segregation the load-balancing service will be inactive. In this case, reconfigure the IP addresses on the in-path interface and restart the service.
Overview of Configuring Traffic Redirection
This section describes how the SteelHead Interceptor redirects traffic to local SteelHeads based on in-path rules, load-balancing rules, and other parameters, such hardware-assist pass-through rules and Fair Peering:
• In-path rules - Control whether locally initiated connections are redirected. In-path rules define the action (redirect, pass, deny, or discard) that the SteelHead Interceptor takes when a TCP SYN packet arrives through the LAN interface. In-path rules are an ordered list of matching parameters and an action field. The matching parameters can be any of the following:
– IP source or destination subnets
– IP source or destination host
– Destination TCP port
– VLAN ID
• Load-balancing rules - Control which traffic is redirected for WAN-optimization and how it is distributed to the SteelHead clusters. Load-balancing rules define the action (pass-through or redirect) that the SteelHead Interceptor takes upon receiving a TCP SYN packet for a connection. Load-balancing redirection rules must also specify at least one SteelHead. For details, see
Configuring Load-Balancing Rules.
• Service rules - Service rules are used with the path selection feature. Service rules are manually configured and they are used to redirect pass-through traffic to the appropriate SteelHead in a cluster. The rules control which traffic flows are redirected for path selection and how the traffic flows are distributed to the SteelHead clusters. The SteelHead chosen then matches its path selection rules to direct traffic to the appropriate uplink. For details, see
To add a new service rule on a SteelHead Interceptor.
• Hardware assist pass-through rules - Control which traffic is passed through in the hardware on supported network bypass cards.
SteelHead Interceptor software release 2.0.4 or later supports hardware-assist pass-through traffic forwarding when used with certain bypass cards, specifically the Two-Port LR Single Mode Fiber 10 GigE PCI-E and Two-Port SR Multimode Fiber 10 GigE PCI-E bypass cards. This allows the administrator to statically configure all UDP traffic and selected TCP traffic (identified by subnet pairs or VLANs) to be passed through the SteelHead Interceptor at close to line-rate speeds.
Note: For details about applying these rules, see the SteelHead Deployment Guide.
The types of redirection control rules control which traffic is redirected and potentially optimized by a SteelHead.
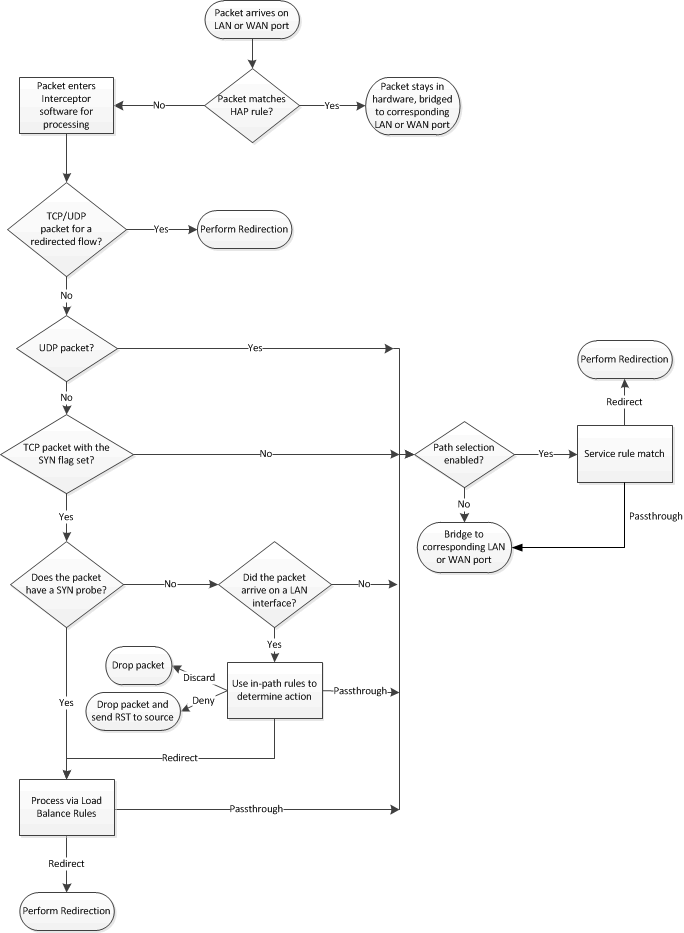
Figure: Overview of Redirection Packet Process shows how the control rules are used when a packet arrives on the LAN or WAN interfaces of the SteelHead Interceptor.
The SteelHead Interceptor first checks whether the packets arriving on a LAN or WAN port match a hardware-assist rule. If they match, the SteelHead Interceptor bridges the packet in the hardware corresponding to the port. If not, the SteelHead Interceptor checks whether the packet belongs to a flow being redirected. This could be because the flow is going through autodiscovery, or because the flow previously went through the autodiscovery process and started optimization.
If the packet does not correspond to a redirected flow, the in-path and load-balance rules are used to determine the next action. TCP SYN packets from a LAN interface are processed with the in-path rules and either dropped or passed-through and then forwarded for further processing with the load-balance rules.
Figure: Overview of Redirection Packet Process
Configuring General Service Settings (Standard Mode Only)
You can set virtual in-path settings in the General Interceptor Settings page when the SteelHead Interceptor is running in standard mode.
Note: WCCP is not supported when the SteelHead Interceptor is running in VLAN segregation mode (or when path selection is enabled). For this reason, the General Service Settings page is not displayed in VLAN segregation mode.
To configure general service settings
1. Choose Optimization > Optimization: General Service Settings to display the General Service Settings page.
Figure: General Service Settings Page
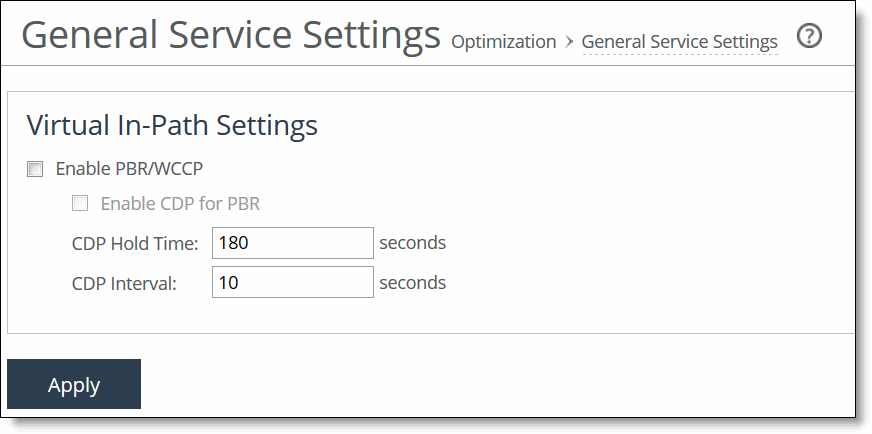
2. Under Virtual In-Path Settings, select the Enable PBR/WCCP check box.
This option enables virtual in-path support on all the interfaces for networks that use PBR or WCCP. External traffic redirection is supported on only the first in-path interface. The following redirection methods are available:
• Policy-based routing (PBR) - PBR allows you to define policies to route packets instead of relying on routing protocols. You enable PBR to redirect traffic that you want optimized by a SteelHead Interceptor that is not in the direct physical path between the client and server.
• Web Cache Communication Protocol (WCCP) - If your network design requires you to use WCCP, a packet redirection mechanism, it directs packets to RiOS appliances that are not in the direct physical path to ensure that they are optimized.
For details about configuring Layer-4 switch, PBR, and WCCP deployments, see the SteelHead Deployment Guide.
3. For a failover deployment that uses PBR rather than WCCP to redirect traffic to a backup SteelHead, select Enable CDP for PBR. You can also override the default CDP values:
• CDP Hold Time - Specifies the CDP message hold time, in seconds. The default value is 180 seconds.
• CDP Interval - Specifies the CDP message polling interval, in seconds. The default value is 10 seconds.
4. Click Apply to apply the change.
5. Click Save to save your changes to the running configuration.
Configuring In-Path Rules
You configure in-path rules in the In-Path Rules page.
The SteelHead Interceptor evaluates rules in numerical order, starting with Rule 1. If the conditions set in the rule match, then the rule is applied and the system moves on to the next packet. If the conditions set in the rule do not match, the system consults the next rule. For example, if the conditions of Rule 1 do not match, Rule 2 is consulted. If Rule 2 matches the conditions, it is applied, and no further rules are consulted.
When the SteelHead Interceptor intercepts a SYN request to a server, the in-path rules you configure determine the subnets and ports for traffic to be optimized. You can specify in-path rules to pass through, discard, or deny traffic; or to redirect and optimize it.
In the case of a data center, the SteelHead Interceptor intercepts SYN requests when a data center server establishes a connection with a client that resides outside the data center.
To configure in-path rules
1. Display the In-Path Rules page in either standard mode or VLAN segregation mode.
The location of the In-Path Rules page depends on whether the SteelHead Interceptor is running in standard mode or VLAN segregation mode:
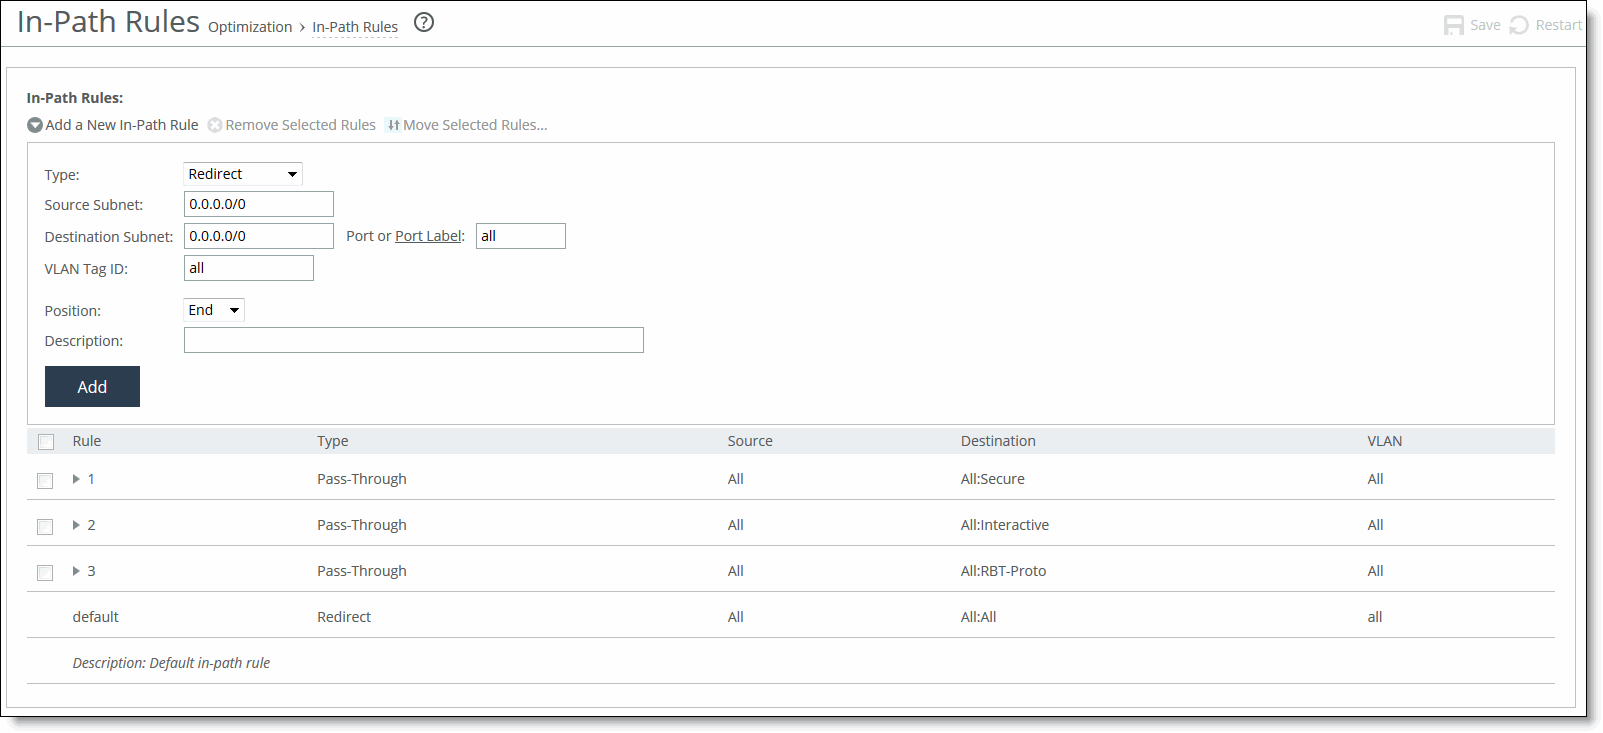
• Standard mode - Choose Optimization > Optimization: In-Path Rules to display the In-Path Rules page.
Figure: In-Path Rules Page (Standard Mode)
• VLAN segregation mode - In-path rules are configured on a per-instance basis. From the instance dashboard for a given instance, choose In-Path Rules in the Optimization section of the navigation bar.
Figure: In-Path Rules Page (VLAN Segregation Mode)
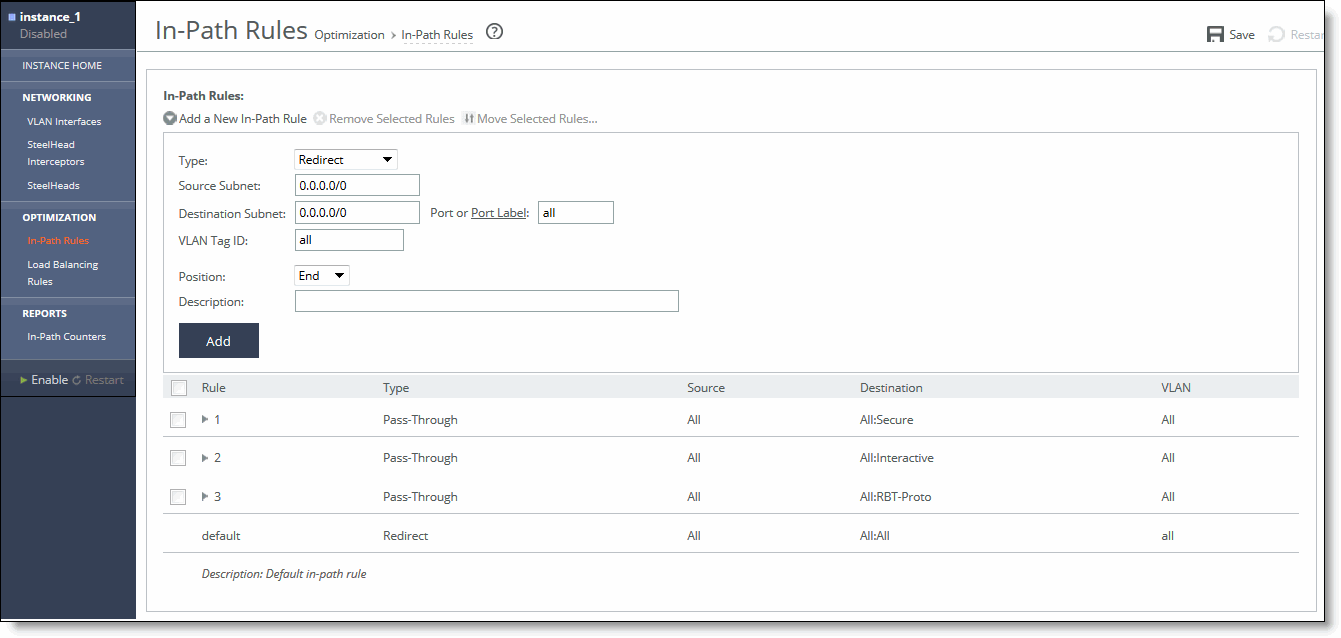
2. Complete the configuration as described in this table.
Control | Description |
Add a New In-Path Rule | Displays the controls for adding a new rule. |
Type | Select one of the following rule types: • Redirect - Redirect rules select traffic that might be redirected. Typically, you configure a redirect rule for source and destination addresses and ports you want to optimize with the Riverbed system. A separate set of load-balancing rules determines the SteelHead to which the connection is to be redirected. • Pass Through - Pass-through rules identify traffic that is passed through the network unoptimized. For example, you might choose to pass through traffic on interactive or secure ports. Note: When traffic matches the pass-through rules, the traffic will also be matched to service rules if path selection is enabled. • Discard - Packets for connections that match the rule are dropped silently. Essentially, the SteelHead Interceptor filters out traffic that matches the discard rules. For example, you might choose to drop connections from an unauthorized source or to an unauthorized target subnet. • Deny - If packets for connections match the deny rule, the SteelHead Interceptor actively tries to reset the connection. For example, you might choose to deny connections from an unauthorized source or to an unauthorized target subnet. |
Source Subnet | Specify the IP address for the source subnet. Use the following format:
XXX.XXX.XXX.XXX/XX To configure a rule to apply to all source subnets, specify all. |
Destination Subnet | Specify the IP address for the destination subnet. Use the following format:
XXX.XXX.XXX.XXX/XX To configure a rule to apply to all destination subnets, specify all. |
Port or Port Label | Specify the destination port number, port label, or All. Click Port Label to go to the Networking > Network Services: Port Labels page for reference. For details about managing port labels, see Setting Port Labels. Note: If you order rules so that traffic that is passed through, discarded, or denied is filtered first, All represents all remaining ports. |
VLAN Tag ID | Specify a VLAN identification number from 0 to 4094, enter all to apply the rule to all VLANs, or enter untagged to apply the rule to nontagged connections. Pass-through traffic maintains any preexisting VLAN tagging between the LAN and WAN interfaces. To complete the implementation of VLAN tagging, you must set the VLAN tag IDs for the in-path interfaces that the SteelHead Interceptor uses to communicate with other SteelHead Interceptors. |
Position | Select Start, End, or a rule number from the drop-down list. SteelHead Interceptors evaluate rules in numerical order starting with rule 1. If the conditions set in the rule match, then the rule is applied, and the system moves on to the next packet. If the conditions set in the rule do not match, the system consults the next rule: for example, if the conditions of rule 1 do not match, rule 2 is consulted. If rule 2 matches the conditions, it is applied, and no further rules are consulted. In general, list rules in this order: 1. Deny 2. Discard 3. Pass-through 4. Fixed-target 5. Auto-Discover Note: The default rule, Auto-Discover, which optimizes all remaining traffic that has not been selected by another rule, cannot be removed and is always listed last. |
Description | Describe the rule to facilitate administration. |
Add | Adds the newly defined rule to the list and applies the settings to the running configuration. |
Remove Selected Rules | Select the check box next to the name and click Remove Selected Rules. This action applies the settings to the running configuration. Note: The default rule cannot be removed and is always listed last. |
Move Selected Rules | Click the arrow next to the desired rule position; the rule moves to the new position. Note: The default rule cannot be reordered and is always listed last. |
3. Click Save to save your changes to the running configuration.
Configuring Load-Balancing Rules
You can add or remove load-balancing rules in the Load Balancing Rules page.
Load-balancing rules define the characteristics by which traffic is selected for load balancing and the availability of a local SteelHead for such traffic.
This section includes the following topics:
Overview of Load-Balancing Rules
Your load-balancing rules must account for the following conditions:
• Traffic over all subnets and ports that have been selected for redirection.
• All SteelHeads you have configured as targets of redirect rules or reserved for the automatic load-balancing rule:
• If a cluster SteelHead is specified as a target for a rule, it is reserved for traffic that matches that rule and is not available to the pool used for automatic load balancing.
• If a cluster SteelHead is not specified as a target for a rule, it is available for automatic load balancing.
• Second-preference cases in which you would rather pass through traffic than tax the automatic load-balancing pool.
The following table describes how the SteelHead Interceptor processes load-balancing rules.
Event | Interceptor Process |
Redirect rule matches and target SteelHeads are available. | Redirects traffic to a SteelHead in the target list. The SteelHead Interceptor chooses a SteelHead from the list based on a connection distribution algorithm that considers: • Peer Affinity - The SteelHead Interceptor has chosen the target SteelHead before. When the target list includes more than one SteelHead with peer affinity, the SteelHead Interceptor chooses the SteelHead with the most affinity—that is, the appliance to which the Interceptor has forwarded the most connections. • Round-Robin - Instead of checking the SteelHeads in order of most to least affinity, the SteelHeads are checked for availability in round-robin order, starting with the one after the SteelHead that received the last connection from that rule. |
Redirect rule matches but none of the target SteelHeads for the rule are available. | Consults the next rule in the target list. |
Pass-through rule matches. | Passes through traffic, traversing bypass routes without optimization. Note: Processed by service rules if path selection is enabled. |
Redirect rule matches but none of the target appliances are available; does not match a pass-through rule. No rules match. No rules specified. | The SteelHead Interceptor chooses a SteelHead from the pool of SteelHeads that you have added as part of the cluster but have not assigned as targets in other load-balancing rules. The SteelHead Interceptor chooses a SteelHead based on the connection distribution algorithm described above. |
Enabling Fair Peering and Pressure Monitoring
When the SteelHead Interceptor is running in standard mode, you can enable the Fair Peering feature for each load-balancing rule, including the default rule.
Caution: In VLAN segregation mode, Fair Peering v2 is enabled by default, and it cannot be disabled.
When the Fair Peering feature is enabled for a load-balancing rule, the target SteelHead cannot exceed a dynamically determined maximum number of remote SteelHeads. When that maximum is reached, peer connections are reassigned. For example, when the maximum limit for one local SteelHead is reached, the load shifts to another local SteelHead.
If a new remote SteelHead comes online, a new maximum value is dynamically computed. As a result, the Fair Peering feature ensures that all remote SteelHeads are always covered. This feature is an alternative to the default load-balancing algorithm which, when a new remote SteelHead is assigned to a local cluster, determines the appropriate local SteelHead to which the new connection should be directed.
Prior to using Fair Peering, be aware of the following limitations:
• If a load-balancing rule is configured with Fair Peering enabled, the target SteelHead cannot be targeted in any other load-balancing rule.
• Load balancing can only occur among SteelHeads that are targeted by load-balancing rules with the same Fair Peering configuration.
For details about configuring Fair Peering, see
Configuring Load-Balancing Rules.
Enabling Pressure Monitoring
Pressure monitoring provides details about the health of the local SteelHeads, so that the Interceptor can better manage and balance traffic. Pressure parameters that are measured include available memory, CPU utilization, and disk load. All three pressures are treated equally, and the Interceptor sends a consolidated message to indicate one of the following states: normal, high, or severe.
The value is determined as follows:
• Normal - A value of normal is assigned if all three pressures measure normal.
• High - A value of high is assigned if one or more pressures measure high but none measure severe.
• Severe - A value of severe is assigned if one or more pressures measure severe.
Pressure values are displayed in the SteelHeads report. For more information, see
Configuring SteelHead-to-Interceptor Communication.
When the pressure monitoring feature is enabled, pressures are reported but do not necessarily affect the load-balancing functionality of the SteelHead Interceptor. However, when this feature is enabled together with the Fair Peering v2 (“capacity adjustment”) option, the SteelHead Interceptor implements the pressure measurements into load balancing based on the credits available in each SteelHead.
Note: Each SteelHead is assigned credits based on its model number. The credit is equivalent to the SteelHead size used in Fair Peering. The credits determine the percentage of total load a SteelHead can handle in the cluster.
When Fair Peering v2, pressure monitoring, and capacity adjustment are enabled, the pressure data from a SteelHead determines the credits assigned to it and, as a result, the percentage of connections assigned to that SteelHead. For example, if two SteelHeads (LSH1 and LSH2) have credits 250 and 750, respectively, then the SteelHead Interceptor sends 25 percent of the load to LSH1 and 75 percent to LSH2.
Specifically, when pressure data changes, SteelHead credits are affected as follows:
• Normal changing to High - SteelHead credits are reduced by 10 percent.
• Normal changing to Severe - SteelHead credits are reduced by 20 to 30 percent.
• Severe changing to Normal - SteelHead credits are restored accordingly.
Note: Pressure readings are not polled. Rather, SteelHeads report only changes to pressure states.
Pressure Monitoring and Path Selection
When the path selection feature is enabled, service rules specify one or more SteelHeads to which unoptimized traffic is redirected.
The SteelHead Interceptor uses a hashing mechanism to select the SteelHead. The hashing mechanism takes into account the weight of the SteelHead as derived from the connection capacity of the SteelHead. This method allows a SteelHead with a larger connection capacity to receive more redirected traffic than a SteelHead with a smaller connection capacity, assuming both SteelHeads were configured in the same service rule. The hash used to pick a SteelHead from the service rule that matches the traffic flow is derived from the SRC IP address, the DST IP address, the SRC Port, and the DST Port settings of the traffic flow.
When pressure monitoring is enabled, the weight of the SteelHead is adjusted as follows:
– Normal pressure - Weight assigned is proportional to the connection capacity of the SteelHead.
– High pressure - Weight assigned is half the normal weight.
– Severe pressure - No new connections are redirected.
Note: The weight of the SteelHead controls the number new connections and flows that will be redirected to the SteelHead. The weight does not change the connections that are already being redirected to the SteelHead.
Configuring Load-Balancing Rules
You configure load-balancing settings and rules in the Load Balancing Rules page.
To configure a load-balancing rule
1. Display the Load Balancing Rules page in either standard mode or VLAN segregation mode.
The location of the Load Balancing Rules page depends on whether the SteelHead Interceptor is running in standard mode or VLAN segregation mode:
• Standard mode - Choose Optimization > Optimization: Load Balancing Rules to display the Load Balancing Rules page.
Figure: Load Balancing Rules Page (Standard Mode)
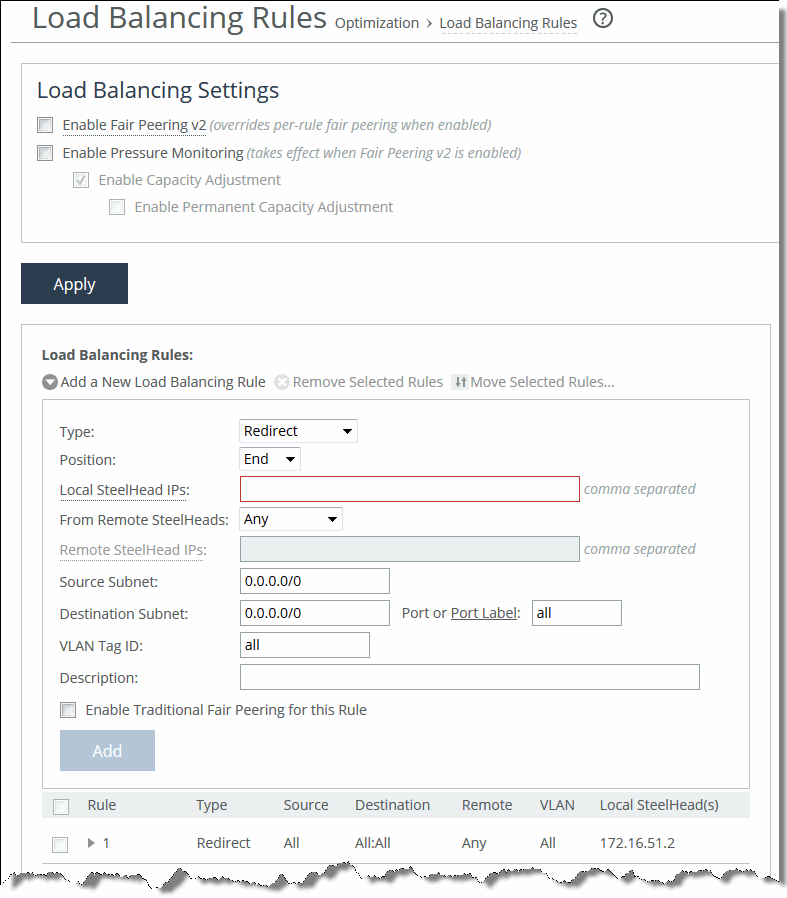
Note: In VLAN segregation mode, Fair Peering v2 is enabled by default, and it cannot be disabled. For this reason, the check box control for enabling Fair Peering v2 is not displayed on the Load Balancing Rules page when the SteelHead Interceptor is running in VLAN segregation mode.
• VLAN segregation mode - Load-balancing rules are configured on a per-instance basis. From the instance dashboard for a given instance, choose Load Balancing Rules under the Optimization section of the navigation bar.
Figure: Load Balancing Rules Page (VLAN Segregation Mode)
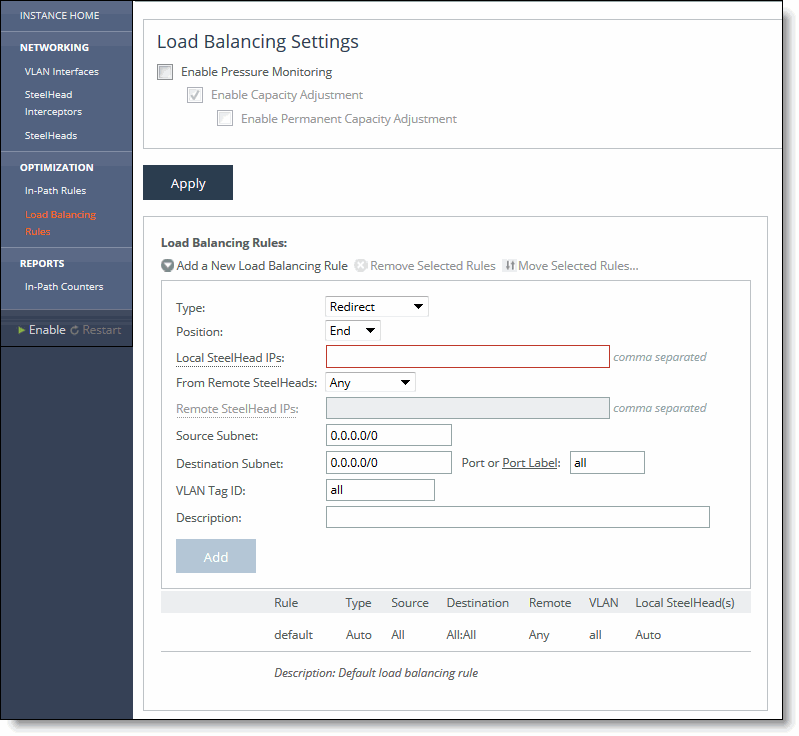
2. Optionally, under Load Balance Settings, configure Fair Peering as described in this table.
Control | Description |
Enable Fair Peering v2 | Select this option to enable the Fair Peering v2 feature across all load-balancing rules. The Fair Peering v2 feature ensures that no local SteelHead exceeds a dynamically determined maximum number of remote peers. By default, the SteelHead Interceptor selects the target SteelHead on the basis of peer affinity (based on which candidate SteelHead has been used to optimize connections to or from the remote site in the past). Note: If you enable Fair Peering v2, this global setting overrides any traditional Fair Peering enabled on a per-rule basis. Note: Fair Peering v2 is supported with Interceptor version 3.0 and later and local SteelHeads running RiOS 6.1.3 or later. |
Enable Pressure Monitoring | Select this option to enable the pressure monitoring feature. When enabled, this feature provides more detailed information about the health of the local SteelHeads, to enable the Interceptor to better manage and balance traffic. For details, see Enabling Pressure Monitoring. Note: Riverbed recommends that you enable pressure monitoring only in conjunction with Fair Peering v2. |
Enable Capacity Adjustment | If pressure monitoring is enabled, select this option to enable the capacity adjustment feature. When enabled, this feature reduces the number of new connections sent to local SteelHeads for which the Interceptor determines an unacceptable pressure value. For a local SteelHead with an unacceptable pressure value, this feature artificially and temporarily reduces the capacity of the SteelHead for Interceptor load-balancing calculations. As a result of using a downward-adjusted capacity for a particular SteelHead, the SteelHead Interceptor moves existing paired peers from that SteelHead to less-used SteelHeads. The SteelHead Interceptor uses the artificially reduced capacity value for that SteelHead Interceptor in load-balancing calculations until the SteelHead returns to a Normal pressure value. |
Enable Permanent Capacity Adjustment | If capacity adjustment is enabled, select this option to cause capacity reduction—once triggered for a local SteelHead that reaches an unacceptably high pressure value—to be permanent. Note: To disable permanent capacity adjustment of a SteelHead, you must issue a service restart on the SteelHead Interceptor. |
3. Under Load Balancing Rules, configure load-balancing rules as described in this table.
Control | Description |
Add a New Load Balancing Rule | Displays the controls for adding a new rule. |
Type | Select any of the following options from the drop-down list: • Redirect - Configure rules of this type for traffic you want to optimize. • Pass Through - Configure rules of this type as a second-preference rule for cases in which you want to optimize when connections are available on specified targets but, in the event that targets have reached admission control capacity, you would rather pass through traffic than tax the autobalance pool. For example, you might use pass-through rules to handle HTTP traffic on port 80. Note: When path selection is enabled, if traffic matches pass-through rule, the traffic will be further evaluated by service rule table. |
Position | Select any of the following options from the drop-down list: • Select Start to insert the rule at the start of the list. • Select End to inserts the rule at end of the list. • Select a rule number. In general, list rules in this order: 1. Deny 2. Discard 3. Pass-through 4. Fixed-target 5. Auto-Discover The rule type of a matching rule determines which action the SteelHead Interceptor takes on the connection. |
Local SteelHead IPs | Specify a comma-separated list of SteelHead IP addresses to which traffic can be redirected. If a rule matches, connections are redirected to the first SteelHead in the list that has capacity for new connections. If no rule matches, peer affinity applies. If there is no existing peer affinity, the connection is redirected to the SteelHead with the least number of current connections. |
From Remote SteelHeads | Select one of the following options from the drop-down list: • Any - Rule applies only when matching any SYN or SYN+ (behavior of load-balancing rule before peering was added). • Probe-only - Match any packet with a probe SYN+. • Non-probe - Match only SYN entering from the LAN side. • IP Address - Match the given IP address when a SYN+ comes from that SteelHead. |
Remote SteelHead IPs | If you specify IP Address for the From Remote SteelHeads setting, use this field to specify a comma-separated list of SteelHead IP addresses. |
Source Subnet | Specify the IP address for the source network. Use the following format: XXX.XXX.XXX.XXX/XX To configure a rule to apply to all source subnets, specify all. |
Destination Subnet | Specify the IP address for the destination network. Use the following format: XXX.XXX.XXX.XXX/XX To configure a rule to apply to all destination subnets, specify all. |
Port or Port Label | Specify the destination port number, port label, or All. Click Port Label to go to the Networking > Network Services: Port Labels page for reference. For details about managing port labels, see Setting Port Labels. If you order rules so that traffic that is passed through, discarded, or denied is filtered first, All represents all remaining ports. |
VLAN Tag ID | Specify a VLAN identification number from 0 to 4094, enter all to apply the rule to all VLANs, or enter untagged to apply the rule to nontagged connections. Pass-through traffic maintains any preexisting VLAN tagging between the LAN and WAN interfaces. To complete the implementation of VLAN tagging, you must set the VLAN tag IDs for the in-path interfaces that the SteelHead Interceptor uses to communicate with other SteelHead Interceptors. Note: To complete the implementation of VLAN tagging, you must set the VLAN tag IDs for the in-path interfaces that the SteelHead Interceptor uses to communicate with other SteelHead Interceptors. For details about configuring the in-path interface for the SteelHead Interceptor, see Configuring In-Path Rules. |
Description | Describe the rule to facilitate administration. |
Enable Traditional Fair Peering for this Rule | Select the check box to enable the traditional (v1) Fair Peering feature for the custom load-balancing rule. For details, see Enabling Fair Peering and Pressure Monitoring. Note: If you enable traditional Fair Peering for this rule, this per-rule setting is overridden if Fair Peering v2 is enabled for load balancing. |
Add | Adds the new rule to the configuration. The new rule displays in the list at the top of the page. |
Remove Selected Rules | Select the check box next to the name and click Remove Selected Rules. Note: The default rule cannot be removed and is always listed last. |
Move Selected Rules | Moves the selected rules. Click the arrow next to the desired rule position; the rule moves to the new position. Note: The default rule cannot be reordered and is always listed last. |
4. Click Save to save your changes to the running configuration.
Configuring Connection Tracing Rules
You can add or remove connection tracing rules in the Connection Tracing Rules page.
Connection tracing rules enable you to determine to which SteelHeads the SteelHead Interceptor has redirected specific connections. Connection traces can be used as a debugging tool for troubleshooting issues with failing or unoptimized connections or connections requiring path selection.
To configure connection tracing rules
1. Choose Optimization > Optimization: Connection Tracing Rules to display the Connection Tracing Rules page.
Figure: Connection Tracing Rules Page
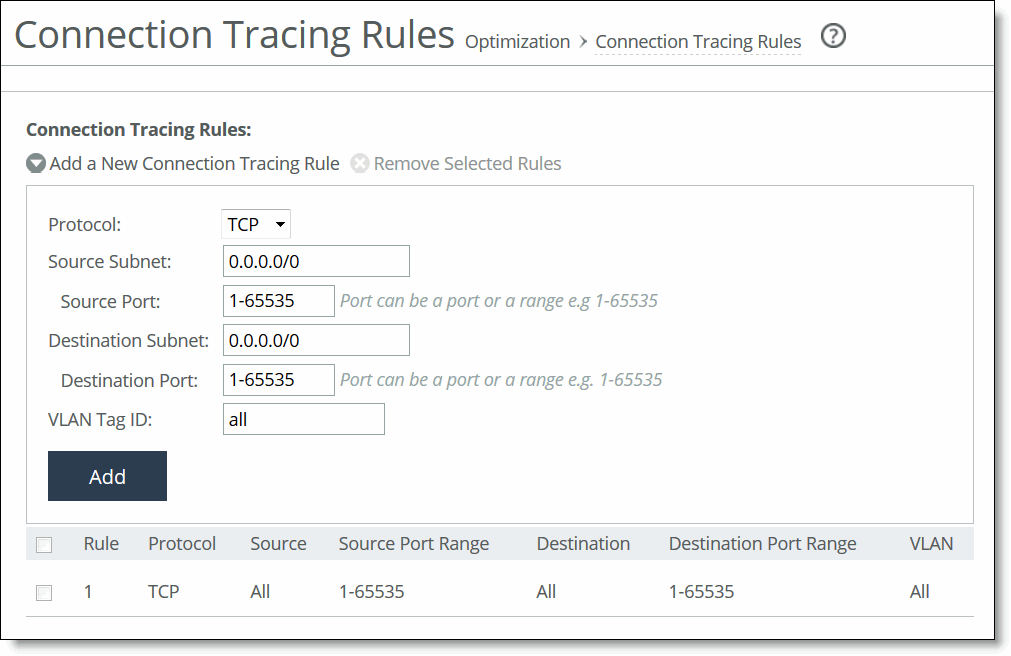
2. Under Connection Tracing Rules, complete the configuration as described in this table.
Control | Description |
Add a New Connection Tracing Rule | Displays the controls for adding a new rule. |
Protocol | Specify a protocol. Choices are TCP, UDP (if path selection is enabled), or Any. |
Source Subnet | Specify an IP address and mask for the traffic source. Use the following format: XXX.XXX.XXX.XXX/XX Note: You can specify all or 0.0.0.0/0 as the wildcard for all traffic. |
Source Port | Specify the source port. |
Destination Subnet | Specify an IP address and mask for the traffic destination. Use the following format: XXX.XXX.XXX.XXX/XX Note: You can specify all or 0.0.0.0/0 as the wildcard for all traffic. |
Destination Port | Specify the destination port. |
VLAN Tag ID | Specify the VLAN ID, if applicable, or All to trace all connections. Note: If the SteelHead Interceptor is running in VLAN segregation mode, you can also click Trace By Instance, and select an instance from the drop-down list. |
Trace by VLAN (VLAN segregation mode) | Specify the VLAN ID, if applicable, or All to trace all connections. Note: If the SteelHead Interceptor is running in VLAN segregation mode, you can also click Trace By Instance, and select an instance from the drop-down list. |
Trace by Instance (VLAN segregation mode) | Select the instance for the connections to be traced. For details about VLAN segregation and instances, see Configuring VLAN Segregation. |
Add | Adds the new connection tracing rule to the list. The SteelHead Interceptor refreshes the Connection Tracing Rules table and applies your modifications to the running configuration, which is stored in memory. |
Remove Selected Rules | To remove a rule, select the check box next to the name and click Remove Selected Rules. Note: When you remove a rule, you also remove all traces from the list that resulted from the rule. |
3. Click Save to save your changes to the running configuration.
Configuring Hardware Assist Rules (Standard Mode Only)
You configure hardware assist rules in the Hardware Assist Rules page.
On SteelHead Interceptors equipped with one or more Two-Port SR Multimode Fiber 10 Gigabit-Ethernet PCI-E or Two-Port LR Single Mode Fiber 10 Gigabit-Ethernet PCI-E cards, you can configure the SteelHead Interceptor to automatically bypass all User Datagram Protocol (UDP) connections. You can also configure rules for bypassing specific Transmission Control Protocol (TCP) connections. By automatically bypassing these connections, you can decrease the workload on the local SteelHeads.
Note: For a hardware assist rule to be applied to a specific Two-Port LR Single Mode Fiber 10 GigE PCI-E or Two-Port SR Multimode Fiber 10 GigE PCI-E bypass card, the corresponding in-path interface must be enabled and have an IP address.
To configure hardware assist rules
1. Choose Optimization > Optimization: Hardware Assist Rules to display the Hardware Assist Rules page.
Figure: Hardware Assist Rules Page
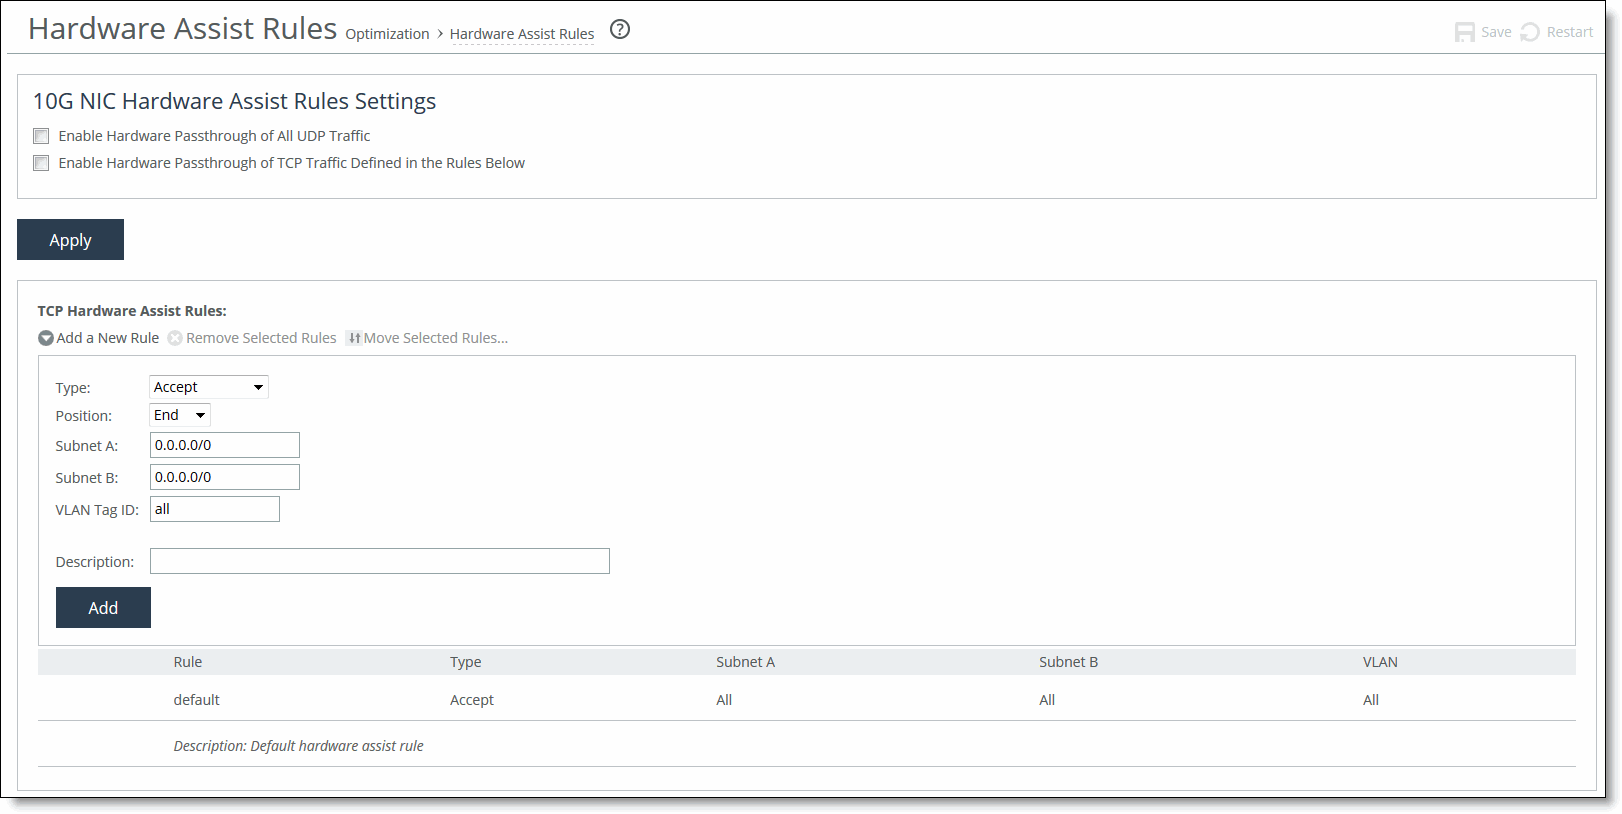
2. Under 10G NIC Hardware Assist Rules Settings, enable pass-through traffic as follows:
• To automatically pass through all UDP traffic, select the Enable Hardware Passthrough of All UDP Traffic check box.
• To pass through TCP traffic based on the configured rules, select the Hardware Passthrough TCP Traffic check box.
TCP pass-through traffic is controlled by rules. The next step describes how to set up hardware assist rules.
Note: All hardware assist rules are ignored unless this check box is selected. No TCP traffic will be passed through.
3. Click Apply to apply the settings to the current configuration.
4. Under TCP Hardware Assist Rules, complete the configuration as described in this table.
Control | Description |
Add a New Rule | Displays the controls to add a new rule. |
Type | Select one of the following rule types: • Accept - Accept rules identify traffic that is optimized. • Pass-Through - Pass-through rules identify traffic that is passed through the network unoptimized. |
Position | Select Start, End, or a rule number: In general, filter traffic that is to be unoptimized, discarded, or denied before processing rules for traffic that is to be optimized. |
Subnet A | Specify an IP address and mask for the subnet that can be both source and destination together with Subnet B. Use the following format: XXX.XXX.XXX.XXX/XX Note: You can specify all or 0.0.0.0/0 as the wildcard for all traffic. |
Subnet B | Specify an IP address and mask for the subnet that can be both source and destination together with Subnet A. Use the following format: XXX.XXX.XXX.XXX/XX Note: You can specify all or 0.0.0.0/0 as the wildcard for all traffic. |
VLAN Tag ID | Optionally, specify the VLAN identification number to set the VLAN tag ID. • Specify all to specify the rule applies to all VLANs. • Specify Untagged to specify the rule applies to nontagged connections. Note: Pass-through traffic maintains any preexisting VLAN tagging between the LAN and WAN interfaces. Note: To complete the implementation of VLAN tagging, you must set the VLAN tag IDs for the in-path interfaces that the SteelHead Interceptor uses to communicate with other SteelHead Interceptors. For details about configuring the in-path interface for the SteelHead Interceptor, see Configuring In-Path Rules. |
Description | Optionally, include a description of the rule. |
Add | Adds the new hardware assist tracing rule to the list. The SteelHead Interceptor refreshes the Hardware Assist Rules table and applies your modifications to the running configuration, which is stored in memory. |
Move Selected Rules | Moves the selected rules. Click the arrow next to the desired rule position; the rule moves to the new position. Note: The default rule cannot be reordered and is always listed last. |
Remove Selected Rules | Select the check box next to the name and click Remove Selected Rules. Note: The default rule cannot be removed and is always listed last. |
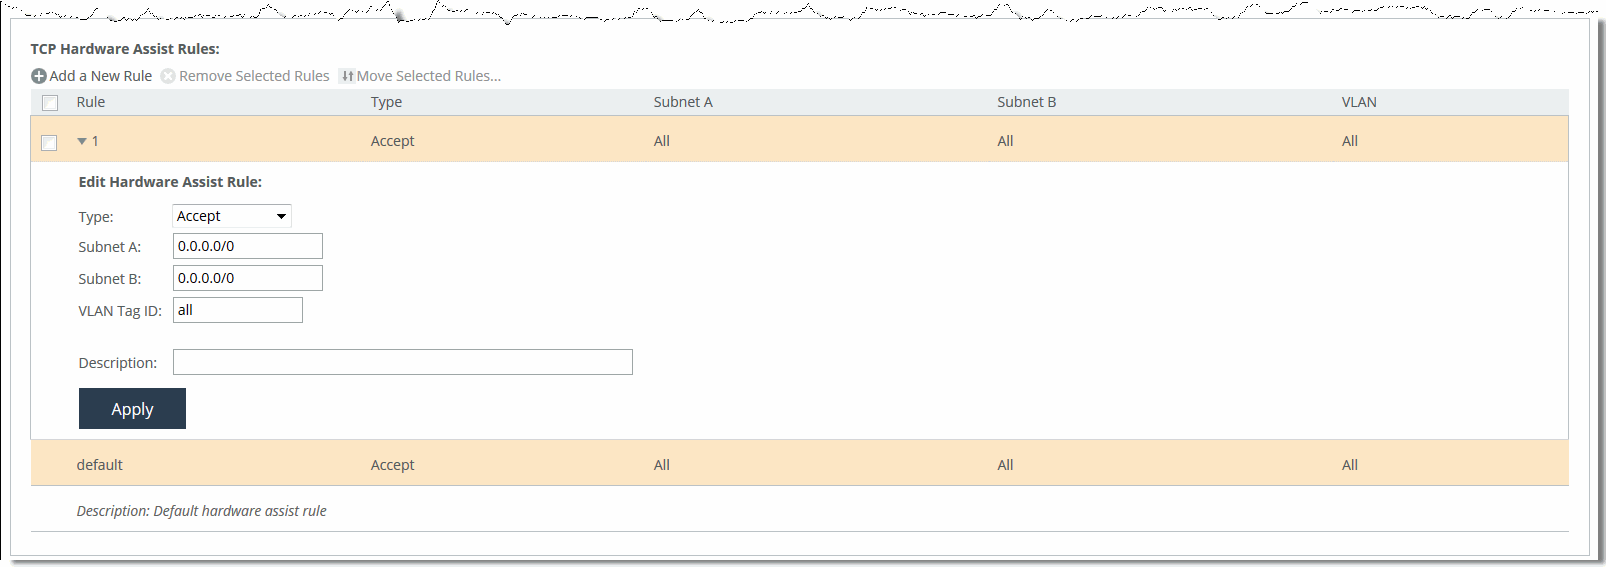
5. To modify an existing rule:
• Click on the value in the Rule column to expand a panel that contains the settings for that rule.
• Modify as necessary and click Apply.
Figure: Hardware Assist Rules Page
6. Click Save to save your changes to the running configuration.
7. Click Reset to restore the previous values.


