Configuring Optimization Features
This chapter describes how to enable and configure optimization features. It includes these topics:
Configuring general service settings
You configure general optimization service settings in the Optimization > Network Services: General Service Settings page.
Enabling basic deployment options
General Service Settings include controls to enable or disable in-path, out-of-path, failover support, and to set connection limits and the maximum connection pooling size.
If you have a SteelHead that contains multiple bypass cards, the Management Console displays options to enable in-path support for these ports. The number of these interface options depends on the number of pairs of LAN and WAN ports that you have enabled in your SteelHead.
The properties and values you set in this page depend on your deployment. For example, these deployment types would require different choices:
•Physical in-path - The SteelHead is physically in the direct path between the client and the server. The clients and servers continue to see client and server IP addresses. Physical in-path configurations are suitable for any location where the total bandwidth is within the limits of the installed SteelHead.
•Virtual in-path - The SteelHead is virtually in the path between the client and the server. This deployment differs from a physical in-path in that a packet redirection mechanism is used to direct packets to SteelHeads that aren’t in the physical path. Redirection mechanisms include SteelHead Interceptor, WCCP, Layer-4 switches, and PBR. In this configuration, clients and servers continue to see client and server IP addresses.
•Out-of-path - The SteelHead isn’t in the direct path between the client and the server. Servers see the IP address of the server-side SteelHead rather than the client IP address, which might impact security policies. An out-of-path configuration is suitable for data center locations where physically in-path or virtually in-path configurations aren’t possible.
For an overview of in-path and out-of-path deployment options, see the SteelHead Deployment Guide.
Enabling failover
In the event of appliance failure, the SteelHead enters bypass mode to avoid becoming a single point of failure in your network. If you want optimization to continue in the event of appliance failure, you can deploy redundant appliances as failover buddies.
For details about failover redundancy, see the SteelHead Deployment Guide.
Physical in-path failover deployment
For a physical in-path failover deployment, you configure a pair of SteelHeads: one as a master and the other as a backup. The master SteelHead in the pair (usually the SteelHead closest to the LAN) is active and the backup SteelHead is passive. The master SteelHead is active unless it fails for some reason. The backup is passive while the master is active and becomes active if either the master fails or the master reaches its connection limit and enters admission control status. A backup SteelHead doesn’t intercept traffic while the master appliance is active. It pings the master SteelHead to make sure that it is alive and processing data. If the master SteelHead fails, the backup takes over and starts processing all of the connections. When the master SteelHead comes back up, it sends a message to the backup that it has recovered. The backup SteelHead stops processing new connections (but continues to serve old ones until they end).
Out-of-path failover deployment
For an out-of-path failover deployment, you deploy two server-side SteelHeads and add a fixed-target rule to the client-side SteelHead to define the master and backup target appliances. When both the master and backup SteelHeads are functioning properly, the connections traverse the master appliance. If the master SteelHead fails, subsequent connections traverse the backup SteelHead.
The master SteelHead uses an Out-of-Band (OOB) connection. The OOB connection is a single, unique TCP connection that communicates internal information only; it doesn’t contain optimized data. If the master SteelHead becomes unavailable, it loses this OOB connection and the OOB connection times out in approximately 40 to 45 seconds. After the OOB connection times out, the client-side SteelHead declares the master SteelHead unavailable and connects to the backup SteelHead.
During the 40 to 45 second delay before the client-side SteelHead declares a peer unavailable, it passes through any incoming new connections; they’re not blackholed.
While the client-side SteelHead is using the backup SteelHead for optimization, it attempts to connect to the master SteelHead every 30 seconds. If the connection succeeds, the client-side SteelHead reconnects to the master SteelHead for any new connections. Existing connections remain on the backup SteelHead for their duration. This is the only time (immediately after a recovery from a master failure) that connections are optimized by both the master SteelHead and the backup.
If both the master and backup SteelHeads become unreachable, the client-side SteelHead tries to connect to both appliances every 30 seconds. Any new connections are passed through the network unoptimized.
Synchronizing master and backup failover pairs
In addition to enabling failover and configuring buddy peering, you must synchronize the RiOS data stores for the master-backup pairs to ensure optimal use of SDR for
warm data transfer. With warm transfers, only new or modified data is sent, dramatically increasing the rate of data transfer over the WAN. For information on synchronizing RiOS data stores for master-backup pairs, see
Synchronizing peer RiOS data stores.
Configuring general service settings
In the General Service Settings page, you can also modify default settings for the maximum half-opened connections from a single source IP address and the connection pool size. For details, pay careful attention to the configuration descriptions included in the following procedure.
To configure general optimization service settings
1. Choose Optimization > Network Services: General Service Settings to display the General Service Settings page.
2. Under In-Path Settings, complete the configuration as described in this table.
Control | Description |
Enable In-Path Support | Enables optimization on traffic that is in the direct path of the client, server, and SteelHead. |
Reset Existing Client Connections on Start Up | Enables kickoff globally. If you enable kickoff, connections that exist when the optimization service is started and restarted are disconnected. When the connections are retried they’re optimized. Generally, connections are short-lived and kickoff is not necessary. It is suitable for very challenging remote environments. In a remote branch-office with a T1 and 35-ms round-trip time, you would want connections to migrate to optimization gracefully, rather than risk interruption with kickoff. RiOS provides a way to reset preexisting connections that match an in-path rule and the rule has kickoff enabled. You can also reset a single pass-through or optimized connection in the Current Connections report, one connection at a time. Do not enable kickoff for in-path SteelHeads that use autodiscover or if you don’t have a SteelHead on the remote side of the network. If you don’t set any in-path rules the default behavior is to autodiscover all connections. If kickoff is enabled, all connections that existed before the SteelHead started are reset. |
Enable L4/PBR/WCCP Interceptor Support | Enables optional, virtual in-path support on all the interfaces for networks that use Layer-4 switches, PBR, WCCP, and SteelHead Interceptor. External traffic redirection is supported only on the first in-path interface. These redirection methods are available: •Layer-4 Switch - You enable Layer-4 switch support when you have multiple SteelHeads in your network, so that you can manage large bandwidth requirements. •Policy-Based Routing (PBR) - PBR allows you to define policies to route packets instead of relying on routing protocols. You enable PBR to redirect traffic that you want optimized by a SteelHead that is not in the direct physical path between the client and server. •Web Cache Communication Protocol (WCCP) - If your network design requires you to use WCCP, a packet redirection mechanism directs packets to RiOS appliances that aren’t in the direct physical path to ensure that they’re optimized. For details about configuring Layer-4 switch, PBR, and WCCP deployments, see the SteelHead Deployment Guide.  The AWS SteelHead-c doesn’t support L4/PBR/WCCP and Interceptor, but the ESX SteelHead-c supports it. |
Enable Agent-Intercept This feature is only supported by the SteelHead-c. | Enables configuration of the transparency mode in the SteelHead-c and transmits it to the Discovery Agent. The Discovery Agent in the server provides these transparency modes for client connections: •Restricted transparent - All client connections are transparent with these restrictions: –If the client connection is from a NATted network, the application server sees the private IP address of the client. –You can use this mode only if there’s no conflict between the private IP address ranges (there are no duplicate IP addresses) and ports. This is the default mode. •Safe transparent - If the client is behind a NAT device, the client connection to the application server is nontransparent—the application server sees the connection as a connection from the SteelHead-c IP address and not the client IP address. All connections from a client that is not behind a NAT device are transparent and the server sees the connections from the client IP address instead of the SteelHead-c IP address. •Non-transparent - All client connections are nontransparent—the application server sees the connections from the server-side SteelHead IP address and not the client IP address. We recommend that you use this mode as the last option. |
Enable Optimizations on Interface <interface_name> | Enables in-path support for additional bypass cards. If you have an appliance that contains multiple two-port, four-port, or six-port bypass cards, the Management Console displays options to enable in-path support for these ports. The number of these interface options depends on the number of pairs of LAN and WAN ports that you have enabled in your SteelHead. The interface names for the bypass cards are a combination of the slot number and the port pairs (inpath<slot>_<pair>, inpath<slot>_<pair>): for example, if a four-port bypass card is located in slot 0 of your appliance, the interface names are inpath0_0 and inpath0_1. Alternatively, if the bypass card is located in slot 1 of your appliance, the interface names are inpath1_0 and inpath1_1. For details about installing additional bypass cards, see the Network and Storage Card Installation Guide. |
3. Under Out-of-Path Settings, complete the configuration as described in this table.
Control | Description |
Enable Out-of-Path Support | Enables out-of-path support on a server-side SteelHead, where only a SteelHead primary interface connects to the network. The SteelHead can be connected anywhere in the LAN. There is no redirecting device in an out-of-path SteelHead deployment. You configure fixed-target in-path rules for the client-side SteelHead. The fixed-target in-path rules point to the primary IP address of the out-of-path SteelHead. The out-of-path SteelHead uses its primary IP address when communicating to the server. The remote SteelHead must be deployed either in a physical or virtual in-path mode. If you set up an out-of-path configuration with failover support, you must set fixed-target rules that specify the master and backup SteelHeads. |
4. Under Connection Settings, complete the configuration as described in this table.
Control | Description |
Half-Open Connection Limit per Source IP | Restricts half-opened connections on a source IP address initiating connections (that is, the client machine). Set this feature to block a source IP address that is opening multiple connections to invalid hosts or ports simultaneously (for example, a virus or a port scanner). This feature doesn’t prevent a source IP address from connecting to valid hosts at a normal rate. Thus, a source IP address could have more established connections than the limit. The default value is 4096. The appliance counts the number of half-opened connections for a source IP address (connections that check if a server connection can be established before accepting the client connection). If the count is above the limit, new connections from the source IP address are passed through unoptimized. Note: If you have a client connecting to valid hosts or ports at a very high rate, some of its connections might be passed through even though all of the connections are valid. |
Maximum Connection Pool Size | Specify the maximum number of TCP connections in a connection pool. Connection pooling enhances network performance by reusing active connections instead of creating a new connection for every request. Connection pooling is useful for protocols that create a large number of short-lived TCP connections, such as HTTP. To optimize such protocols, a connection pool manager maintains a pool of idle TCP connections, up to the maximum pool size. When a client requests a new connection to a previously visited server, the pool manager checks the pool for unused connections and returns one if available. Thus, the client and the SteelHead don’t have to wait for a three-way TCP handshake to finish across the WAN. If all connections currently in the pool are busy and the maximum pool size has not been reached, the new connection is created and added to the pool. When the pool reaches its maximum size, all new connection requests are queued until a connection in the pool becomes available or the connection attempt times out. The default value is 20. A value of 0 specifies no connection pool. Note: You must restart the SteelHead after changing this setting. Note: Viewing the Connection Pooling report can help determine whether to modify the default setting. If the report indicates an unacceptably low ratio of pool hits per total connection requests, increase the pool size. |
5. Under Failover Settings, complete the configuration as described in this table.
Control | Description |
Enable Failover Support | Configures a failover deployment on either a master or backup SteelHead. In the event of a failure in the master appliance, the backup appliance takes its place with a warm RiOS data store and can begin delivering fully optimized performance immediately. The master and backup SteelHeads must be the same hardware model. |
Current Appliance is | Select Master or Backup from the drop-down list. A master SteelHead is the primary appliance; the backup SteelHead is the appliance that automatically optimizes traffic if the master appliance fails. |
IP Address (peer in-path interface) | Specify the IP address for the master or backup SteelHead. You must specify the in-path IP address (inpath0_0) for the SteelHead, not the primary interface IP address. Note: You must specify the inpath0_0 interface as the other appliance’s in-path IP address. |
Control | Description |
Enable Packet Mode Optimization | Performs packet-by-packet SDR bandwidth optimization on TCP or UDP (over IPv4 or IPv6) flows. This feature uses fixed-target packet mode optimization in-path rules to optimize bandwidth for applications over these transport protocols. TCPv6 or UDPv4 flows are supported. TCPv4 and UDPv6 flows require a minimum RiOS version of 8.5. By default, packet-mode optimization is disabled. Enabling this feature requires an optimization service restart. |
7. Click Apply to apply your settings.
8. Click Save to Disk to save your settings permanently.
After applying the settings, you can verify whether changes have had the desired effect by reviewing related reports. When you have verified appropriate changes, you can write the active configuration that is stored in memory to the active configuration file (or you can save it as any filename you choose). For details about saving configurations, see
Managing configuration files.
Related topics
Enabling peering and configuring peering rules
This section describes how to enable peering and configure peering rules. It includes these topics:
About regular and enhanced automatic discovery
With enhanced automatic discovery, the SteelHead automatically finds the furthest SteelHead peer in a network and optimization occurs there. By default, enhanced autodiscovery is enabled. When enhanced autodiscovery is disabled, the SteelHead uses regular autodiscovery. With regular autodiscovery, the SteelHead finds the next appliance in the group and optimization occurs there.
In some deployments, enhanced autodiscovery can simplify configuration and make your deployments more scalable. When enhanced autodiscovery is enabled, the SteelHead automatically finds the furthest SteelHead in a network and optimization occurs there. For example, if you had a deployment with four SteelHeads (A, B, C, D), where D represents the appliance that is furthest from A, the SteelHead automatically finds D. This feature simplifies configuration and makes your deployment more scalable.
The SteelHead (in the cloud) doesn’t use automatic peering. When you run a server in the cloud, you deploy the SteelHead (in the cloud) to be the furthest SteelHead in the network because the Discovery Client on the server is configured to use the SteelHead (in the cloud) automatically. When you run a client in the cloud, and there are multiple SteelHeads in the path to the server, the SteelHead (in the cloud) is selected for optimization first. You can enable automatic peering on the remote SteelHeads to make the SteelHead (in the cloud) peer with the furthest SteelHead in the network.
We recommend enhanced autodiscovery for the deployments described in this table.
Deployment type | Description |
Serial Cascade Deployments | Cascade configurations enable optimal multisite deployments where connections between the client and the server might pass through intermediate SteelHeads to reach their final destination. Enhanced autodiscovery for cascading SteelHeads detects when more than two SteelHeads are present between the client and the server and automatically chooses the two outside SteelHeads, optimizing all traffic in between. |
Serial Cluster Deployments | You can provide increased optimization by deploying two or more SteelHeads back-to-back in an in-path configuration to create a serial cluster. Appliances in a serial cluster process the peering rules you specify in a spill-over fashion. When the maximum number of TCP connections for a SteelHead is reached, that appliance stops intercepting new connections. This behavior allows the next SteelHead in the cluster the opportunity to intercept the new connection, if it has not reached its maximum number of connections. The in-path peering rules and in-path rules tell the SteelHead in a cluster not to intercept connections between themselves. You configure peering rules that define what to do when a SteelHead receives an autodiscovery probe from another SteelHead. You can deploy serial clusters on the client-side or server-side of the network. Supported models Two-appliance serial clusters are supported for all SteelHead and xx55 models, except the 255 models. The SteelHeads must be the same model. The CX570 through GX10000 SteelHead models support serial clusters. These models can reach their specifications even while potentially passing through the LAN-side traffic for optimized connections for the other SteelHead in the cluster. Note: For environments that want to optimize MAPI or FTP traffic which require all connections from a client to be optimized by one SteelHead, we strongly recommend using the master and backup redundancy configuration instead of a serial cluster. For larger environments that require multiappliance scalability and high availability, we recommend using the Interceptor to build multiappliance clusters. For details, see the SteelHead Interceptor Deployment Guide and the SteelHead Interceptor User Guide. Note: A serial cluster has the same bandwidth specification as the SteelHead model deployed in the cluster. The bandwidth capability doesn’t increase because the cluster contains multiple SteelHeads. For example, a serial cluster that is made up of two SteelHead 570M models with a bandwidth specification of 20 Mbps has a bandwidth specification of 20 Mbps Note: If the active SteelHead in the cluster enters a degraded state because the CPU load is too high, it continues to accept new connections. |
For details about these deployment types, see the SteelHead Deployment Guide.
Extending the number of peers
RiOS supports a large number of peers (up to 20,000) per SteelHead. This feature is available only on the SteelHead CX5070, CX7070, CX5080, CX7080, and GX10000. We recommend enabling the extended peer table if you have more than 4,000 peers. After enabling extended peer table support, you must clear the RiOS data store and stop and restart the service. See
Configuring peering.
Configuring peering
You display, add, and modify autodiscovery peering settings in the Optimization > Network Services: Peering Rules page. You can also enable extended peer table support.
To enable enhanced autodiscovery
1. Choose Optimization > Network Services: Peering Rules to display the Peering Rules page.
2. Under Settings, complete the configuration as described in this table.
Control | Description |
Enable Enhanced IPv4 Auto-Discovery | Enables enhanced autodiscovery for IPv4 and mixed (dual-stack) IPv4 and IPv6 networks. With enhanced autodiscovery, the SteelHead automatically finds the furthest SteelHead along the connection path of the TCP connection, and optimization occurs there: for example, in a deployment with four SteelHeads (A, B, C, D), where D represents the appliance that is furthest from A, the SteelHead automatically finds D. This feature simplifies configuration and makes your deployment more scalable. By default, enhanced autodiscovery peering is enabled. Without enhanced autodiscovery, the SteelHead uses regular autodiscovery. With regular auto-discovery, the SteelHead finds the first remote SteelHead along the connection path of the TCP connection, and optimization occurs there: for example, if you had a deployment with four SteelHeads (A, B, C, D), where D represents the appliance that is furthest from A, the SteelHead automatically finds B, then C, and finally D, and optimization takes place in each. Note: This option uses an IPv4 channel to the peer SteelHead over a TCP connection, and your network connection must support IPv4 for the inner channels between the SteelHead and the SteelCentral Controller for SteelHead Mobile. If you have an all-IPv6 (single-stack IPv6) network, select the Enable Enhanced IPv6 Auto-Discovery option. For detailed information about deployments that require enhanced autodiscovery peering, see the SteelHead Deployment Guide. |
Enable Enhanced IPv6 Auto-Discovery | Enables enhanced autodiscovery for single-stack IPv6 networks. |
Enable Extended Peer Table | Enables support for up to 20,000 peers on high-end server-side SteelHeads (and CX models 5055 and 7055) to accommodate large SteelHead client deployments. The RiOS data store maintains the peers in groups of 1,024 in the global peer table. We recommend enabling the extended peer table if you have more than 4,000 peers. By default, this option is disabled and it’s unavailable on SteelHead models that don’t support it. Note: Before enabling this feature, you must have a thorough understanding of performance and scaling issues. When deciding whether to use extended peer table support, you should compare it with a serial cluster deployment. For details on serial clusters, see the SteelHead Deployment Guide. After enabling this option, you must clear the RiOS data store and stop and restart the service. |
Enable Latency Detection | Enables peer appliances to pass through traffic without optimizing it when the latency between the peers is below the configured threshold. The latency threshold is in milliseconds and the default is 10 ms. The client-side SteelHead calculates the latency. When latency between peers is low enough, simply passing through unoptimized traffic can be faster than transmitting optimized traffic. When enabled, you can specify the Ignore Latency Detection flag in peer in-path rules, as needed. |
3. Click Apply to apply your settings. If you have enabled Extended Peer Table Support, a message tells you to clear the RiOS data store and restart the service.
4. Click Save to Disk to save your settings permanently.
Peering rules
Peering rules control SteelHead behavior when it sees probe queries.
Peering rules are an ordered list of fields a SteelHead uses to match with incoming SYN packet fields (for example, source or destination subnet, IP address, VLAN, or TCP port) as well as the IP address of the probing SteelHead. This feature is especially useful in complex networks.
Peering rules list
The Peering Rules page displays a list of peering rules. The list contains the default peering rules and any peering rules you add.
The system evaluates the rules in numerical order starting with rule 1. If the conditions set in the rule match, then the rule is applied. If the conditions set in the rule don’t match, then the rule isn’t applied and the system moves on to the next rule. For example, if the conditions of rule 1 don’t match, rule 2 is consulted. If rule 2 matches the conditions, it is applied, and no further rules are consulted.
The Rule Type of a matching rule determines which action the SteelHead takes on the connection.
About the default peering rules
The default peering rules are adequate for typical network configurations, such as in-path configurations. However, you might need to add peering rules for complex network configurations. For details about deployment cases requiring peering rules, see the SteelHead Deployment Guide.
We recommend using in-path rules to optimize SSL connections on destination ports other than the default port 443. For details, see
Configuring in-path rules.
•The default peering rule number 1 with the SSL incapable flag matches any SSL connection whose IP address and destination port appear in the list of bypassed clients and servers in the Networking > SSL: SSL Main Settings page. The bypassed list includes the IP addresses and port numbers of SSL servers that the SteelHead is bypassing because it couldn’t match the common name of the server’s certificate with one in its certificate pool. The list also includes servers and clients whose IP address and port combination have experienced an SSL handshake failure. For example, a handshake failure occurs when the SteelHead can’t find the issuer of a server certificate on its list of trusted certificate authorities.
After a server or client appears in the bypassed servers list, follow-on connections to the same destination IP and port number always match rule number 1.
•The default peering rule number 2 with the SSL capable flag matches connections on port 443 that did not match default peering rule number 1. The SteelHead attempts to automatically discover certificate matches for servers answering on port 443. For all connections that match, the SteelHead performs both enhanced autodiscovery (finding the nearest and farthest SteelHead pair) and SSL optimization.
To configure a peering rule
1. To add, move, or remove a peering rule, complete the configuration as described in this table.
Control | Description |
Add a New Peering Rule | Displays the controls for adding a new peering rule. |
Rule Type | Determines which action the SteelHead takes on the connection. Select one of these rule types from the drop-down list: •Auto - Allows built-in functionality to determine the response for peering requests (performs the best peering possible). If the receiving SteelHead is not using automatic autodiscovery, this has the same effect as the Accept peering rule action. If automatic autodiscovery is enabled, the SteelHead only becomes the optimization peer if it’s the last SteelHead in the path to the server. •Accept - Accepts peering requests that match the source-destination-port pattern. The receiving SteelHead responds to the probing SteelHead and becomes the remote-side SteelHead (that is, the peer SteelHead) for the optimized connection. •Passthrough - Allows pass-through peering requests that match the source and destination port pattern. The receiving SteelHead doesn’t respond to the probing SteelHead, and allows the SYN+probe packet to continue through the network. |
Insert Rule At | Determines the order in which the system evaluates the rule. Select Start, End, or a rule number from the drop-down list. The system evaluates rules in numerical order starting with rule 1. If the conditions set in the rule match, then the rule is applied and the system moves on to the next rule: for example, if the conditions of rule 1 don’t match, rule 2 is consulted. If rule 2 matches the conditions, it’s applied, and no further rules are consulted. The Rule Type of a matching rule determines which action the SteelHead takes on the connection. |
Source Subnet | Specify an IP address and mask for the traffic source. You can also specify wildcards: •All-IPv4 is the wildcard for single-stack IPv4 networks. •All-IPv6 is the wildcard for single-stack IPv6 networks. •All-IP is the wildcard for all IPv4 and IPv6 networks. Use these formats: xxx.xxx.xxx.xxx/xx (IPv4) x:x:x::x/xxx (IPv6) |
Destination Subnet | Specify an IP address and mask pattern for the traffic destination. You can also specify wildcards: •All-IPv4 is the wildcard for single-stack IPv4 networks. •All-IPv6 is the wildcard for single-stack IPv6 networks. •All-IP is the wildcard for all IPv4 and IPv6 networks. Use these formats: xxx.xxx.xxx.xxx/xx (IPv4) x:x:x::x/xxx (IPv6) Port - Specify the destination port number, port label, or all. |
Peer IP Address | Specify the in-path IP address of the probing SteelHead. If more than one in-path interface is present on the probing SteelHead, apply multiple peering rules, one for each in-path interface. You can also specify wildcards: •All-IPv4 is the wildcard for single-stack IPv4 networks. •All-IPv6 is the wildcard for single-stack IPv6 networks. •All-IP is the wildcard for all IPv4 and IPv6 networks. |
SSL Capability | Enables an SSL capability flag, which specifies criteria for matching an incoming connection with one of the rules in the peering rules table. This flag is typically set on a server-side SteelHead. Select one of these options from the drop-down list to determine how to process attempts to create secure SSL connections: •No Check - The peering rule doesn’t determine whether the server SteelHead is present for the particular destination IP address and port combination. •Capable - The peering rule determines that the connection is SSL-capable if the destination port is 443 (irrespective of the destination port value on the rule), and the destination IP and port don’t appear on the bypassed servers list. The SteelHead accepts the condition and, assuming all other proper configurations and that the peering rule is the best match for the incoming connection, optimizes SSL. •Incapable - The peering rule determines that the connection is SSL-incapable if the destination IP and port appear in the bypassed servers list. The service adds a server to the bypassed servers list when there’s no SSL certificate for the server or for any other SSL handshake failure. The SteelHead passes the connection through unoptimized without affecting connection counts. We recommend that you use in-path rules to optimize SSL connections on non-443 destination port configurations. |
Cloud Acceleration | Use cloud acceleration in peering rules on a server-side SteelHead in a back-hauled deployment to configure which connections coming from a client-side SteelHead (with the SteelHead SaaS enabled but with redirect disabled) should be optimized with the SteelHead SaaS. Select one of these rule types from the drop-down list: •Auto - The server-side SteelHead redirects to the cloud connections when the client-side SteelHead tries to optimize with the SteelHead SaaS. •Pass Through - The server-side SteelHead doesn’t redirect to the cloud connections when the client-side SteelHead tries to optimize with the SteelHead SaaS. If the client-side SteelHead doesn’t have the SteelHead SaaS enabled, or if it’s not trying to optimize the SteelHead SaaS connection, the value of this field is irrelevant on the server-side SteelHead. |
Description | Specify a description to help you identify the peering relationship. |
Add | Adds a peering rule to the list. The Management Console redisplays the Peering Rules table and applies your modifications to the running configuration, which is stored in memory. |
Remove Selected Rules | Select the check box next to the name and click Remove Selected Rules. |
Move Selected Rules | Select the check box next to the rule and click Move Selected Rules. Click the arrow next to the desired rule position; the rule moves to the new position. |
2. Click Save to Disk to save your settings permanently.
Preventing an unknown (or unwanted) SteelHead from peering
Enhanced autodiscovery greatly reduces the complexities and time it takes to deploy SteelHeads. It works so seamlessly that occasionally it has the undesirable effect of peering with SteelHeads on the Internet that aren’t in your organization's management domain or your corporate business unit. When an unknown (or unwanted) SteelHead appears connected to your network, you can create a peering rule to prevent it from peering and remove it from your list of peers. The peering rule defines what to do when a SteelHead receives an autodiscovery probe from the unknown SteelHead.
To prevent an unknown SteelHead from peering
1. Choose Optimization > Network Services: Peering Rules.
2. Click Add a New Peering Rule.
3. Select Passthrough as the rule type.
4. Specify the source and destination subnets. The source subnet is the remote location network subnet (in the format xxx.xxx.xxx.xxx/xx). The destination subnet is your local network subnet (in the format xxx.xxx.xxx.xxx/xx).
5. Click Add.
The peering rule passes through traffic from the unknown SteelHead in the remote location.
When you use this method and add a new remote location in the future, you must create a new peering rule that accepts traffic from the remote location. Place this new Accept rule before the Pass-through rule.
If you don’t know the network subnet for the remote location, there’s another option: you can create a peering rule that allows peering from your corporate network subnet and denies it otherwise. For example, create a peering rule that accepts peering from your corporate network subnet and place it as the first rule in the list.
6. Create a second peering rule to pass through all other traffic.
When the local SteelHead receives an autodiscovery probe, it checks the peering rules first (from top to bottom). If it matches the first Accept rule, the local SteelHead peers with the other SteelHead. If it doesn’t match the first Accept rule, the local SteelHead checks the next peering rule, which is the pass-through rule for all other traffic. In this case, the local SteelHead just passes through the traffic, but it doesn’t peer with the other SteelHead.
After you add the peering rule, the unknown SteelHead appears in the Current Connections report as a Connected Appliance until the connection times out. After the connection becomes inactive, it appears dimmed. To remove the unknown appliance completely, restart the optimization service.
Related topics
Configuring NAT IP address mapping
This feature is supported by only the SteelHead (in the cloud).
You configure NAT IP address mapping for the SteelHead (in the cloud) in the Optimization > Cloud: NAT IP Address Mapping page.
To configure NAT IP address mapping
1. Choose Optimization > Cloud: NAT IP Address Mapping to display the NAT IP Address Mapping page.
2. Under Public/Private IP Address Mapping Settings, select the Enable Address Mapping Support check box to enable the SteelHead (in the cloud) to support public or private IP address mapping.
3. Click Apply to apply your settings to the running configuration.
4. Complete the configuration as described in this table.
Control | Description |
Add a New Map | Displays the controls to add a new IP address map. |
Remove Selected | Select the check box next to the IP address and click Remove Selected to delete it from the system. |
Public IP | Type the current public IP address of the appliance. |
Private IP | Type the private IP address (cloud vendor-assigned) of the appliance. |
Add | Adds the public IP address and private IP address of the appliance to the system. |
Configuring discovery service

This feature is supported by the SteelHead (in the cloud) and the SteelHead (virtual edition) appliances.
You configure the discovery service in the Optimization > Cloud: Discovery Service page. The discovery service enables the SteelHead (in the cloud) or SteelHead (virtual edition) appliance to find and propagate the public and private IP address of the SteelHead (in the cloud) or SteelHead (virtual edition) appliance.
To configure the discovery service
1. Choose Optimization > Cloud: Discovery Service to display the Discovery Service page.
2. Under Discovery Service Settings, select the Enable Discovery Service check box to enable discovery service. This option is selected by default.
The system displays the following discovery service information: node ID, node key, discovery type, polling interval, and portal URL.
The Optimization Groups table displays the group name and the load balancing policy of the optimization groups that you configured in the Riverbed Cloud Portal. Click the group name to display more information about the list of nodes in each group. Click the node to display more information about the node, such as the load balancing policy, node ID, public interfaces, and local interfaces.
Configuring the RiOS data store
This section describes how to configure RiOS data store settings. It includes these topics:
You display and modify RiOS data store settings in the Optimization > Data Replication: Data Store page. This page is typically used to enable RiOS data store encryption and synchronization.
SteelHeads transparently intercept and analyze all of your WAN traffic. TCP traffic is segmented, indexed, and stored as segments of data, and the references representing that data are stored on the RiOS data store within SteelHeads on both sides of your WAN. After the data has been indexed, it is compared to data already on the disk. Segments of data that have been seen before aren’t transferred across the WAN again; instead a reference is sent in its place that can index arbitrarily large amounts of data, thereby massively reducing the amount of data that needs to be transmitted. One small reference can refer to megabytes of existing data that has been transferred over the WAN before.
Encrypting the RiOS data store
You enable RiOS data store encryption in the Optimization > Data Replication: Data Store page.
Encrypting the RiOS data store significantly limits the exposure of sensitive data in the event an appliance is compromised by loss, theft, or a security violation. The secure data is difficult for a third party to retrieve.
Before you encrypt the RiOS data store, you must unlock the secure vault. The secure vault stores the encryption key. For details, see
Unlocking the secure vault.
RiOS doesn’t encrypt data store synchronization traffic.
Encryption strengths
Encrypting the RiOS data store can have performance implications; generally, higher security means less performance. Several encryption strengths are available to provide the right amount of security while maintaining the desired performance level. When selecting an encryption type, you must evaluate the network structure, the type of data that travels over it, and how much of a performance trade-off is worth the extra security.
Encrypted RiOS data store downgrade limitations
The SteelHead can’t use an encrypted RiOS data store with an earlier RiOS software version, unless the version is an update (8.0.x). For example, an encrypted RiOS data store created in 8.0.2 would work with 8.0.3, but not with 8.5.
Before downgrading to an earlier version, you must select none as the encryption type, clear the RiOS data store, and restart the service. After you clear the RiOS data store, the data is removed from persistent storage and can’t be recovered.
If you return to a previous software version and there’s a mismatch with the encrypted RiOS data store, the status bar indicates that the RiOS data store is corrupt. You can either:
•Use the backup software version after clearing the RiOS data store and rebooting the service.
—or—
•Return to the software version in use when the RiOS data store was encrypted, and continue using it.
To encrypt the RiOS data store
1. Choose Optimization > Data Replication: Data Store to display the Data Store page.
2. Under General Settings, complete the configuration as described in this table.
Control | Description |
Data Store Encryption Type | Select one of these encryption types from the drop-down list. The encryption types are listed from the least to the most secure. •None - Disables data encryption. •AES_128 - Encrypts data using the AES cryptographic key length of 128 bits. •AES_192 - Encrypts data using the AES cryptographic key length of 192 bits. •AES_256 - Encrypts data using the AES cryptographic key length of 256 bits. |
3. Click Apply to apply your settings.
4. Click Save to Disk to save your settings permanently.
You must clear the RiOS data store and reboot the optimization service on the SteelHead after enabling, changing, or disabling the encryption type. After you clear the RiOS data store, the data can’t be recovered. If you don’t want to clear the RiOS data store, reselect your previous encryption type and reboot the service. The SteelHead uses the previous encryption type and encrypted RiOS data store. For details, see
Rebooting and shutting down the SteelHead.
Synchronizing peer RiOS data stores
For deployments requiring the highest levels of redundancy and performance, RiOS supports warm standby between designated master and backup devices. RiOS data store synchronization enables pairs of local SteelHeads to synchronize their data stores with each other, even while they’re optimizing connections. RiOS data store synchronization is typically used to ensure that if a SteelHead fails, no loss of potential bandwidth savings occurs, because the data segments and references are on the other SteelHead.
You can use RiOS data store synchronization for physical in-path, virtual in-path, or out-of-path deployments. You enable synchronization on two SteelHeads, one as the synchronization master, and the other as the synchronization backup.
The traffic for RiOS data store synchronization is transferred through either the SteelHead primary or auxiliary network interfaces, not the in-path interfaces.
RiOS data store synchronization is a bidirectional operation between two SteelHeads, regardless of which deployment model you use. The SteelHead master and backup designation is only relevant in the initial configuration, when the master SteelHead RiOS data store essentially overwrites the backup SteelHead RiOS data store.
RiOS data store synchronization requirements
The synchronization master and its backup:
•must have the same hardware model.
•must be running the same software version of RiOS.
•don’t have to be in the same physical location. If they’re in different physical locations, they must be connected via a fast, reliable LAN connection with minimal latency.
When you have configured the master and backup appliances, you must restart the optimization service on the backup SteelHead. The master restarts automatically.
After you have enabled and configured synchronization, the RiOS data stores are actively kept synchronized. For details about how synchronized appliances replicate data and how RiOS data store synchronization is commonly used in high-availability designs, see the SteelHead Deployment Guide.
If one of the synchronized SteelHeads is under high load, some data might not be copied. For details, see the SteelHead Deployment Guide.
If RiOS data store synchronization is interrupted for any reason (such as a network interruption or if one of the SteelHeads is taken out of service), the SteelHeads continue other operations without disruption. When the interruption is resolved, RiOS data store synchronization resumes without risk of data corruption.
To synchronize the RiOS data store
1. Choose one SteelHead to be the master and one to be the backup. The backup has its RiOS data store overwritten by the master RiOS data store.
2. Make sure there’s a network connection between the two SteelHeads.
3. Connect to the Management Console on the SteelHead you have chosen to be the master appliance.
4. Choose Optimization > Data Replication: Data Store to display the Data Store page.
5. Under General Settings, complete the configuration as described in this table.
Control | Description |
Enable Automated Data Store Synchronization | Enables automated RiOS data store synchronization. Data store synchronization ensures that each RiOS data store in your network has warm data for maximum optimization. All operations occur in the background and don’t disrupt operations on any of the systems. |
Current Appliance | Select Master or Backup from the drop-down list. |
Peer IP Address | Specify the IP address for the peer appliance. You must specify either the IP address for the primary or auxiliary interface (if you use the auxiliary interface in place of the primary). |
Synchronization Port | Specify the destination TCP port number used when establishing a connection to synchronize data. The default value is 7744. |
Reconnection Interval | Specify the number of seconds to wait for reconnection attempts. The default value is 30. |
6. Click Apply to apply your settings.
7. Click Save to Disk to save your settings permanently.
8. Choose Administration > Maintenance: Services to display the Services page.
9. Select Clear the Data Store and click Restart Services to restart the service on the SteelHead.
Clearing the RiOS data store
The appliance continues to write data references to the RiOS data store until it reaches capacity. In certain situations, you must clear the RiOS data store. For example, you must clear the RiOS data store:
•after enabling or disabling encryption or changing the encryption type.
•before downgrading to an earlier software version.
•to redeploy an active-active synchronization pair.
•after testing or evaluating the appliance.
•after receiving a “data store corruption” or “data store clean required” alarm message.
For details about clearing the RiOS data store, see
Rebooting and shutting down the SteelHead.
After clearing the RiOS data store and restarting the optimization service or rebooting the appliance, the data transfers are cold. Performance improves with subsequent warm data transfers over the WAN.
Improving SteelHead Mobile performance
You enable branch warming for SteelHead Mobiles in the Optimization > Data Replication: Data Store page. By default, branch warming is enabled.
Branch warming keeps track of data segments created while a SteelCentral Controller for SteelHead Mobile user is in a SteelHead-enabled branch office and sends the new data back to the SteelCentral Controller for SteelHead Mobile user’s laptop. When the user leaves the branch office, the SteelCentral Controller for SteelHead Mobile client provides warm performance.
Branch warming cooperates with and optimizes transfers for a server-side SteelHead. New data transfers between the client and server are populated in the SteelCentral Controller for SteelHead Mobile RiOS data store, the branch SteelHead RiOS data store, and the server-side SteelHead RiOS data store.
When the server downloads data, the server-side SteelHead checks if either the SteelHead Mobile or the branch SteelHead has the data in their RiOS data store. If either device already has the data segments, the server-side SteelHead sends only references to the data. The SteelHead Mobile and the branch SteelHead communicate with each other to resolve the references.
Other clients at a branch office benefit from branch warming as well, because data transferred by one client at a branch also populates the branch SteelHead RiOS data store. Performance improves with all clients at the branch because they receive warm performance for that data. For details, see the SteelHead Deployment Guide.
Requirements
These requirements must be met for branch warming to work:
•Enable latency-based location awareness and branch warming on the SteelCentral Controller for SteelHead Mobile.
•Enable branch warming on both the client-side and server-side SteelHeads.
•Both the client-side and server-side SteelHeads must be deployed in-path.
•Enable enhanced autodiscovery on both the client-side and server-side SteelHeads.
•The Mobile Controller appliance must be running RiOS 3.0 or later.
•The SteelHead Mobile must be running RiOS 3.0 or later.
Branch warming doesn’t improve performance for configurations using:
•SSL connections
•Out-of-path with fixed-target rules
•SteelHead Mobiles that communicate with multiple server-side appliances in different scenarios. For example, if a SteelHead Mobile home user peers with one server-side SteelHead after logging in through a VPN network and peers with a different server-side SteelHead after logging in from the branch office, branch warming doesn’t improve performance.
To enable branch warming
1. On both the client-side and the server-side SteelHeads, choose Optimization > Data Replication: Data Store to display the Data Store page.
2. Under General Settings, select Enable Branch Warming for SteelHead Mobile Clients.
3. Click Apply to apply your settings.
4. Click Save to Disk to save your settings permanently.
Receiving a notification when the RiOS data store wraps
You enable RiOS data store wrap notifications in the Optimization > Data Replication: Data Store page. By default, data store wrap notifications are enabled.
This feature triggers an SNMP trap and sends an email when data in the RiOS data store is replaced with new data before the time period specified.
To receive a notification when the data store wraps
1. Choose Optimization > Data Replication: Data Store to display the Data Store page.
2. Under General Settings, select Enable Data Store Wrap Notifications. Optionally, specify the number of days before the data in the data store is replaced. The default value is 1 day.
3. Click Apply to apply your settings.
4. Click Save to Disk to save your settings permanently.
Related topics
Improving performance
You enable settings to improve network and RiOS data store performance in the Optimization > Data Replication: Performance page. This section describes the default settings and the cases in which you might consider changing the default values.
Selecting a RiOS data store segment replacement policy
The RiOS data store segment replacement policy selects the technique used to replace the data in the RiOS data store. While the default setting works best for most SteelHeads, occasionally we recommend changing the policy to improve performance.
We recommend that the segment replacement policy matches on both the client-side and server-side SteelHeads.
To select a RiOS data store segment replacement policy
1. Choose Optimization > Data Replication: Performance to display the Performance page.
2. Under Data Store, select one of these replacement algorithms from the drop-down list.
Control | Description |
Segment Replacement Policy | •Riverbed LRU - Replaces the least recently used data in the RiOS data store, which improves hit rates when the data in the RiOS data store aren’t equally used. This is the default setting. •FIFO - Replaces data in the order received (first in, first out). |
3. Click Apply to apply your settings.
4. Click Save to Disk to save your settings permanently.
Optimizing the RiOS data store for high-throughput environments
You optimize the RiOS data store for high-throughput Data Replication (DR) or data center workloads in the Optimization > Data Replication: Performance page.
You might benefit from changing the performance settings if your environment uses a high-bandwidth WAN. DR and Storage Area Network (SAN) replication workloads at these high throughputs might benefit from the settings that enhance RiOS data store performance while still receiving data reduction benefits from SDR.
To maintain consistent levels of performance, we recommend using separate SteelHeads for DR workloads than for optimization of other application traffic.
Setting an adaptive streamlining mode
The adaptive data streamlining mode monitors and controls the different resources available on the SteelHead and adapts the utilization of these system resources to optimize LAN throughput. Changing the default setting is optional; we recommend you select another setting only with guidance from Riverbed Support or the Riverbed Sales Team.
Generally, the default setting provides the most data reduction. When choosing an adaptive streamlining mode for your network, contact Riverbed Support to help you evaluate the setting based on:
•the amount of data replication your SteelHead is processing.
•the type of data being processed and its effects on disk throughput on the SteelHeads.
•your primary goal for the project, which could be maximum data reduction or maximum throughput. Even when your primary goal is maximum throughput you can still achieve high data reduction.
To select an adaptive data streamlining mode
1. Choose Optimization > Data Replication: Performance to display the Performance page.
2. Under Adaptive Data Streamlining Modes, select one of these settings.
Setting | Description |
Default | This setting is enabled by default and works for most implementations. The default setting: •provides the most data reduction. •reduces random disk seeks and improves disk throughput by discarding very small data margin segments that are no longer necessary. This margin segment elimination (MSE) process provides network-based disk defragmentation. •writes large page clusters. •monitors the disk write I/O response time to provide more throughput. |
SDR-Adaptive | Legacy - Includes the default settings and also: •balances writes and reads. •monitors both read and write disk I/O response, and CPU load. Based on statistical trends, can employ a blend of disk-based and non-disk-based data reduction techniques to enable sustained throughput during periods of disk/CPU-intensive workloads. Use caution with the SDR-Adaptive Legacy setting, particularly when you are optimizing CIFS or NFS with prepopulation. Contact Riverbed Support for more information. Advanced - Maximizes LAN-side throughput dynamically under different data workloads. This switching mechanism is governed with a throughput and bandwidth reduction goal using the available WAN bandwidth. |
SDR-M | Performs data reduction entirely in memory, which prevents the SteelHead from reading and writing to and from the disk. Enabling this option can yield high LAN-side throughput because it eliminates all disk latency. This is typically the preferred configuration mode for SAN replication environments. SDR-M is most efficient when used between two identical high-end SteelHead models: for example, 7055 - 7055. When used between two different SteelHead models, the smaller model limits the performance. After enabling SDR-M on both the client-side and the server-side SteelHeads, restart both SteelHeads to avoid performance degradation. Note: You can’t use peer RiOS data store synchronization with SDR-M. |
3. Click Apply to apply your settings.
4. Click Save to Disk to save your settings permanently.
If you select SDR-M as the adaptive data streamlining mode, the Clear the Data Store option isn’t available when you restart the optimization service because the SDR-M mode has no effect on the RiOS data store disk.
After changing the RiOS data store adaptive streamlining setting, you can verify whether changes have had the desired effect by reviewing the Optimized Throughput report. From the menu bar, choose Reports > Optimization: Optimized Throughput.
Configuring CPU settings
Use the CPU settings to balance throughput with the amount of data reduction and balance the connection load. The CPU settings are useful with high-traffic loads to scale back compression, increase throughput, and maximize Long Fat Network (LFN) utilization.
To configure the CPU settings
1. Choose Optimization > Data Replication: Performance to display the Performance page.
2. Under CPU Settings, complete the configuration as described in this table.
Setting | Description |
Compression Level | Specifies the relative trade-off of data compression for LAN throughput speed. Generally, a lower number provides faster throughput and slightly less data reduction. From the drop-down list, select a RiOS data store compression level from 1 to 9. Level 1 sets minimum compression and uses less CPU; level 9 sets maximum compression and uses more CPU. The default value is 6. We recommend setting the compression level to 1 in high-throughput environments such as data center-to-data center replication. |
Adaptive Compression | Detects LZ data compression performance for a connection dynamically and disables it (sets the compression level to 0) momentarily if it’s not achieving optimal results. Improves end-to-end throughput over the LAN by maximizing the WAN throughput. By default, this setting is disabled. |
Multi-Core Balancing | Enables multicore balancing, which ensures better distribution of workload across all CPUs, thereby maximizing throughput by keeping all CPUs busy. Core balancing is useful when handling a small number of high-throughput connections (approximately 25 or fewer). By default, this setting is disabled and should be enabled only after careful consideration and consulting with Sales Engineering or Riverbed Support. |
3. Click Apply to apply your settings.
4. Click Save to Disk to save your settings permanently.
Related topics
Configuring the SaaS Accelerator
You can accelerate SaaS application traffic by registering a SteelHead with a SteelConnect Manager (SCM) that is set up for SaaS acceleration.
When you set up SaaS acceleration on SCM, SCM deploys and manages a SaaS service cluster in the cloud. Once registered, SteelHeads (and SteelHead Mobile clients) peer with the SaaS service cluster to accelerate the SaaS traffic.
The SaaS Accelerator feature also includes proxy certificate management to simplify the deployment process.
SaaS Accelerator through SteelConnect is a Riverbed end-to-end solution and simplifies deployment and certificate management. It is intended as a replacement for SteelHead Cloud Accelerator with Akamai, which has been renamed to Legacy Cloud Accelerator.
Prerequisites
Before you can set up the SteelHead and accelerate SaaS traffic, you need to perform these steps on the SteelConnect Manager:
1. Ensure you have a license for SaaS Accelerator.
SaaS Accelerator requires an additional license, but the license is not installed on the SteelHead; it is installed on the SteelConnect Manager. In addition, SteelHead models CX580, CX780, and CX3080 require the Standard license tier or higher to accelerate SaaS traffic. Without a license, SaaS traffic is passed through.
2. Enable automatic signing and certificate management capabilities. On the SteelConnect Manager, choose Optimization > SSL Optimization.
3. Configure SaaS applications for acceleration. On the SteelConnect Manager, choose Optimization > SaaS Accelerator.
See the SteelConnect Manager User Guide and the SaaS Accelerator User Guide for detailed configuration information.
Configuring SaaS acceleration on a SteelHead
When you have configured SteelConnect Manager for SaaS acceleration, you can configure SteelHead as a client.
We strongly recommend that you configure and push SaaS acceleration policies from a SteelCentral Controller for SteelHead to the SteelHeads, particularly with large scale deployments and production networks with multiple SteelHeads. For details, see
“Configuring SaaS acceleration on multiple SteelHeads using SCC” on page 91.To configure a SteelHead for SaaS acceleration
1. On the SteelConnect Manager, choose Optimization > SaaS Client Appliances and copy the registration token.
2. On the SteelHead, choose Optimization > SaaS: SaaS Accelerator and add these values:
–SteelConnect Manager Hostname.
–SteelConnect Manager Port. The client-side SteelHead uses port 3900 on the primary interface to communicate with SCM, and the port needs to be open on the branch firewall. You cannot change this value.
–Registration Token. Paste the registration token you copied in Step 1 to this field.
3. Click Register.
When the registration process completes, the registration details and a helpful list of remaining configuration tasks appear on the page. Completed tasks are prefaced by a check mark.
A new SaaS Acceleration section also appears on the page where you can view the current status and monitor acceleration status.
4. Enable SSL optimization on the SteelHead appliance.
Choose Optimization > SSL: SSL Main Settings, and in the General SSL Settings area select Enable SSL Optimization and click Apply.
5. On the SteelConnect Manager, move this SteelHead appliance to the whitelist.
Newly added appliances always appear on the graylist in the Access List column. You need to change their status to the whitelist to allow acceleration.
Choose Optimization > SaaS Client Appliances and click the appliance serial number to display the details panel.
Under Access List and Notes, select Whitelist from the Access List drop-down menu and click Submit.
6. Enable SaaS acceleration on this appliance. Choose Optimization > SaaS: SaaS Accelerator, select Enable Acceleration, and click Apply.
When you click Apply, be patient. It can take several minutes to start acceleration.
7. Add an in-path rule to accelerate SaaS applications.
The in-path rule lets the SteelConnect Manager associate the IP address of the SaaS service cluster in the cloud with the SteelHead and associates the SaaS service cluster with the accelerated application.
Choose Optimization > Network Services: In-Path Rules and click Add a New In-Path Rule. For the Destination Subnet, choose SaaS Application. A second menu appears to the right. In the second menu, choose a SaaS application (such as SharePoint for Business) or an application group (such as Microsoft Office 365) for acceleration. Only applications set up for SaaS acceleration on the SteelConnect Manager appear in the list. Click Add.
Note: At the initial release of SteelHead 9.9.2, you need to configure a unique in-path rule for each Microsoft Office 365 application, such as SharePoint and Exchange Online. An upcoming release of SteelConnect Manager will let you define a single in-path rule for all Office 365 traffic. When available, Microsoft Office 365 will automatically appear as an option for a SaaS application in-path rule.
8. Click Save to Disk to save your settings permanently.
Configuring SaaS acceleration on multiple SteelHeads using SCC
In SCC 9.9.1 and later, you can configure SaaS acceleration on managed SteelHeads. SaaS Accelerator requires an additional license, but the license is not installed on the SCC and SteelHeads; it is installed on SCM.
To accelerate SaaS application traffic using your managed SteelHeads, register your SCC with an SCM that is set up for SaaS acceleration. After registering the SCC with SCM, register selected SteelHeads or a group of SteelHeads with SCM. Once registered, SteelHeads peer with the SaaS service cluster to accelerate the SaaS traffic. Make sure you move the registered SCC and SteelHead appliances to the whitelist on SCM.
On the SCC policies that include SaaS acceleration, make sure you perform these configurations:
•Enable SSL optimization.
•Enable SaaS acceleration.
•Add an in-path rule to accelerate traffic for a selected SaaS application.
For more details about configuring SaaS acceleration on managed SteelHeads, see the SteelCentral Controller for SteelHead User Guide.
Monitoring SaaS acceleration
Once configured, you can use the SaaS Acceleration Status panel to monitor activity. This panel shows all SaaS applications configured for acceleration and shows the status of their in-path rules.
The SteelHead gets data from the SteelConnect Manager every five minutes and shows the time for the displayed data. Click Refresh Data to get the latest information.
Canceling SaaS acceleration
To cancel the acceleration, click Deregister. This action also removes all related in-path rules.
Configuring the Legacy Cloud Accelerator
The name for this feature has changed from SteelHead Cloud Accelerator to Legacy Cloud Accelerator. The SaaS Accelerator through SteelConnect replaces the Legacy Cloud Accelerator and provides a Riverbed end-to-end solution with simplified deployment and certificate management. See
Configuring the SaaS Accelerator for more information.
Configure the cloud acceleration service for Software as a Service (SaaS) applications such as Office 365 and Salesforce.com in the Optimization > SaaS: Legacy Cloud Accelerator page. The SteelHead Legacy Cloud Accelerator combines RiOS with the Akamai internet route optimization technology to accelerate SaaS application performance.
To enable SaaS applications for use with SteelHeads, follow the steps in
Activating SaaS applications.
Legacy Cloud Accelerator requires an additional license, but the license is not installed on the SteelHead; it is installed on the Riverbed Cloud Portal. In addition, SteelHead models CX580, CX780, and CX3080 require the Standard license tier or higher to accelerate SaaS traffic. Without a license, SaaS traffic is passed through.
Prerequisites
Before you configure the SteelHead Cloud Accelerator on the SteelHead, be sure to configure the following:
•DNS (Domain Name System) - Configure and enable DNS. Ensure that the SteelHead can access the configured name server(s).
•NTP (Network Time Protocol) - Configure and enable NTP, and ensure that the NTP server(s) is accessible.
To register a SteelHead to the SteelHead Cloud Accelerator
1. Log in to the Riverbed Cloud Portal. For more information about the Riverbed Cloud Portal, see the SteelHead SaaS User Guide (for Legacy Cloud Accelerator).
2. Select Cloud Accelerator.
3. Copy the Appliance Registration Key.
4. Log in to the SteelHead.
5. Choose Optimization > SaaS: Legacy Cloud Accelerator to display the Legacy Cloud Accelerator page.
6. Paste the registration key into the Appliance Registration Key text field under Registration Control and click Register.
When a SteelHead is registered for the first time, you might see the text initialized. After you refresh the page by choosing Optimization > SaaS: Legacy Cloud Accelerator, the following text appears:
This appliance is pending service.
7. Grant the service for the SteelHead on the Riverbed Cloud Portal. For information about granting service, see the section about Enabling and Disabling Optimization Services on Registered Appliances in the SteelHead SaaS User Guide (for Legacy Cloud Accelerator).
Registration is successful when you receive the following text. You can click Refresh Service to refresh the service status, or wait for the page to refresh:
This appliance is currently registered with the Cloud Portal.
8. Under Cloud Accelerator Control, select the Enable Cloud Acceleration check box to activate the cloud acceleration service on the SteelHead.
9. Select the Enable Cloud Accelerator Redirection check box to activate traffic redirection from the SteelHead to the Akamai network (direct mode). This control is enabled by default. There are two options for proxy redirection:
–Direct mode - The SteelHead redirects traffic to the Akamai network. Leave the Enable Cloud Accelerator Redirection check box selected to use the direct mode.
–Back-hauled mode - The SteelHead in the data center redirects traffic to the Akamai network for all the branch SteelHeads. If you choose this option, you must disable proxy redirection in the SteelHead appliance and leave it enabled on the data center appliance.
Clear the Enable Cloud Accelerator Redirection check box to use the back-hauled mode.
10. In the Redirection Tunnel Port text field, leave the default value (9545) of the port number for the configurable outbound port for UDP connections to the Akamai network as it is. The SteelHead connected to the Akamai network uses this configurable UDP port over a wide range of IP addresses.
It is necessary to configure the UDP port 9545 only for outbound connectivity from the in-path IP address of the SteelHead. If there are multiple in-path addresses, then the firewall must allow access for each in-path IP address.
11. Under Cloud Accelerator Status, click Refresh Service for the SteelHead to get the latest service details from the Riverbed Cloud Portal.
12. Click Apply to apply your configuration.
To unregister an appliance from the SteelHead Cloud Accelerator
1. Log in to the Riverbed Cloud Portal and deregister the SteelHead. For more information, see “Registering and Unregistering Appliances on the Portal” in the SteelHead SaaS User Guide (for Legacy Cloud Accelerator).
2. Log in to the SteelHead appliance.
3. Click De-register to deregister the SteelHead.
The system displays a confirmation dialog box.
4. Click De-register in the dialog box.
Activating SaaS applications
Enabling optimization for SaaS applications on SteelHead appliances requires configuration on both the Riverbed Cloud Portal and the SteelHead. Enabling a SaaS application on the Riverbed Cloud Portal makes that application available to all registered SteelHeads, while enabling a SaaS application on the SteelHead activates optimization for that application on that SteelHead.
After you enable optimization, you can run reports to view optimization statistics.
Prerequisites
•An SSL license is required.
To activate SaaS applications
1. Ensure that your SteelHead is registered with the Riverbed Cloud Portal, that it is granted Cloud Accelerator service, and that the SaaS applications you want the SteelHead to optimize are enabled in the Riverbed Cloud Portal. See
Configuring the Legacy Cloud Accelerator and the
SteelHead SaaS User Guide (for Legacy Cloud Accelerator) for details.
2. Enable the applications on the SteelHead by scrolling down in the Optimization > SaaS: Legacy Cloud Accelerator page and changing the value in the Local Optimization column from Disabled to Enabled.
You can also enable the application with the service cloud-accel application command. See the Riverbed Command-Line Interface Reference Manual for more information.
Related topics
Configuring CIFS prepopulation
You enable prepopulation and add, modify, and delete prepopulation shares in the Optimization > Protocols: CIFS Prepopulation page.
The prepopulation operation effectively performs the first SteelHead read of the data on the prepopulation share. Later, the SteelHead handles read and write requests as effectively as with a warm data store. With a warm data store, RiOS sends data references along with new or modified data, dramatically increasing the rate of data transfer over the WAN.
The first synchronization, or the initial copy, retrieves data from the origin file server and copies it to the RiOS data store on the SteelHead. Subsequent synchronizations are based on the synchronization interval.
The RiOS 8.5 and later Management Consoles include policies and rules to provide more control over which files the system transfers to warm the RiOS data store. A policy is a group of rules that select particular files to prepopulate. For example, you can create a policy that selects all PDF files larger than 300 MB created since January 1, 2017.
CIFS Prepopulation is disabled by default.
The AWS SteelHead (in the cloud) doesn’t support CIFS Prepopulation. The ESX SteelHead-c supports CIFS Prepopulation if it is deployed with WCCP or PBR (not with the Discovery Agent).
To enable CIFS prepopulation and add, modify, or delete a prepopulation share
1. Choose Optimization > Protocols: CIFS Prepopulation to display the CIFS Prepopulation page.
2. Under Settings, complete the configuration as described in this table.
Control | Description |
Enable CIFS Prepopulation | Prewarms the RiOS data store. In this setup, the primary interface of the SteelHead acts as a client and prerequests data from the share you want to use to warm the data store. This request goes through the LAN interface to the WAN interface out to the server-side SteelHead, causing the in-path interface to see the data as a normal client request. When data is requested again by a client on the local LAN, RiOS sends only new or modified data over the WAN, dramatically increasing the rate of data transfers. |
Enable Transparent Prepopulation Support using RCU | Opens port 8777 to allow manual warming of the RiOS data store using the Riverbed Copy Utility (RCU) to prepopulate your shares. Most environments don’t need to enable RCU. |
3. Click Apply to apply your settings.
4. When prepopulation is enabled, you can add shares and schedule automatic unattended synchronization as described in this table.
Control | Description |
Add a Prepopulation Share | Displays the controls for adding a new prepopulation share. |
Remote Path | Specify the path to the data on the origin server or the Universal Naming Convention (UNC) path of a share to which you want to make available for prepopulation. Set up the prepopulation share on the remote box pointing to the actual share in the headend data center server. For example: \\<origin file server>\<local name> Note: The share and the origin-server share names can’t contain any of these characters: < > * ? | / + = ; : " , & [] |
Username | Specify the username of the local administrator account used to access the origin server. The Windows account needs read-only permissions to the share location you specify in the Remote Path field. |
Password | Specify the password for the local administrator account. |
Comment | Optionally, include a comment to help you administer the share in the future. Comments can’t contain an ampersand (&). |
Sync Time Limit | Specify a time limit that the synchronization job shouldn’t exceed. Use this time format: H:M:S Examples: 1 = 1 second 1:2 = 1 minute and 2 seconds 1:2:3 = 1 hour, 2 minutes, and 3 seconds |
Sync Size Limit | Specify a limit on the amount of data in the synchronization job and select either MB or GB from the drop-down list. The default is MB. |
Sync Using | Select either current files for syncing or use the latest share snapshot (if no snapshots are available, the system uses the current files). |
Enable Scheduled Synchronization | Enables subsequent synchronization jobs after the initial synchronization. Select the type of synchronization the system performs after the initial synchronization. •Incremental Sync - The origin-file server retrieves only new data that was modified or created after the previous synchronization and sends it to the SteelHead. •Full Sync - The origin-file server retrieves all data and sends it to the SteelHead. Full synchronization is useful on SteelHeads that are frequently evicting the prepopulated data from the RiOS data store because of limited memory. If the schedule for a full synchronization and an incremental synchronization coincide, the system performs a full synchronization. •Start Date/Time - Specify a base start date and time from which to schedule synchronizations. •Recurring Every - Specify how frequently scheduled synchronizations should occur relative to the start date and time. Leave blank to run the synchronization once. |
Add Prepopulation Share | Adds the share to the Prepopulation Share list. |
5. Click Save to Disk to save your settings permanently.
After you add a share, the CIFS prepopulation page includes the share in the Share table. The Share table provides an editable list of shares along with each share’s remote pathname, the date and time the next synchronizations will occur, the status, and any comments about the share.
When the status reports that the share has an error, mouse over the error to reveal details about the error.
Editing a prepopulation share
After adding a CIFS prepopulation share, you can edit it from the Configuration tab. You can create a policy (group of rules) to apply to the share, and you can schedule a date and time for share synchronization.
To edit a CIFS prepopulation share
1. Choose Optimization > Protocols: CIFS Prepopulation to display the CIFS Prepopulation page.
2. Select the remote path for the share.
3. Select the Configuration tab.
4. Under Settings, complete the configuration as described in this table.
Control | Description |
Remote Path | Specifies the path to the data on the origin server or the UNC path of a share available for prepopulation. This control is not editable under the share Configuration tab. |
Username | Specify the username of the local administrator account used to access the origin server. |
Change Password | Select the check box and then specify the password for the local administrator account. |
Comment | Optionally, include a comment to help you administer the share in the future. Comments can’t contain an ampersand (&). |
Sync Time Limit | Specify a time limit that the synchronization job shouldn’t exceed. Use this time format: H:M:S Examples: 1 = 1 second 1:2 = 1 minute and 2 seconds 1:2:3 = 1 hour, 2 minutes, and 3 seconds |
Sync Size Limit | Specify a limit on the amount of data in the synchronization job. |
Sync Using | Select to synchronize the current files or select the latest share snapshot (if no snapshots are available, the system uses the current files). |
5. Click Apply to apply your configuration.
6. Click Save to Disk to save your settings permanently.
To add a CIFS prepopulation policy
1. Choose Optimization > Protocols: CIFS Prepopulation to display the CIFS Prepopulation page.
2. Select the remote path for the share.
3. Select the Configuration tab.
4. Click Add a Policy.
5. Complete the configuration as described in this table.
Control | Description |
Add a Policy | Displays the controls to add a policy. A policy is a group of rules applied to a share. There are no limits on the number of policies or the number of rules within a policy. A file needs to pass every rule in only one policy to be selected for synchronization. An empty policy with no rules selects everything. RiOS doesn’t validate rules or policies; use caution to avoid including or excluding everything. |
Policy Name | Specify a name for the policy. |
Description | Describe the policy. |
Add Rule | Click to add a new rule to a policy. You can add rules that prepopulate the RiOS data store according to filename, file size, or the time of the last file access, creation, or modification. |
Synchronize files that match all of the following rules | Select a filter from the drop-down list and type or select a value for the rule from the drop-down list. The control changes dynamically according to the rule type. Examples: Select all TXT and PDF files: •File extension or name matches *.txt; *.PDF Select all files that have been modified within the last two hours: •Modify time is within, when syncing 02:00:00 Select all TXT files larger than 300 MB and created since Jan 1st, 2013: •File size is greater than 300 MB •File extension/name matches *.txt •Creation Time is newer than 2013/01/01 00:00:00 Use the mouse to hover over the information icon for a tool tip about the filter. To delete a rule, click the red x. |
Add Policy | Adds the policy to the policy list. |
6. Click Apply to apply your configuration.
7. Click Save to Disk to save your settings permanently.
To schedule a synchronization
1. Choose Optimization > Protocols: CIFS Prepopulation to display the CIFS Prepopulation page.
2. Select the remote path for the share.
3. Select the Configuration tab.
4. Complete the configuration as described in this table.
Control | Description |
Enable Scheduled Synchronization | Enables subsequent synchronization jobs after the initial synchronization. Select the type of synchronization the system performs after the initial synchronization. •Incremental Sync - The origin file server retrieves only new data that was modified or created after the previous synchronization and sends it to the SteelHead. •Full Sync - The origin file server retrieves all data and sends it to the SteelHead. Full synchronization is useful on SteelHeads that are frequently evicting the prepopulated data from the RiOS data store because of limited memory. If the schedule for a full synchronization and an incremental synchronization coincide, the system performs a full synchronization. •Start Date/Time - Specify a base start date and time from which to schedule synchronizations. •Recurring Every - Specify how frequently scheduled synchronizations should occur relative to the start date and time. Leave blank to synchronize once. |
5. Click Apply to apply your configuration.
6. Click Save to Disk to save your settings permanently.
Performing CIFS prepopulation share operations
After adding a CIFS prepopulation share, you can synchronize the share or perform a dry run of what would be synchronized.
To perform an operation on a CIFS prepopulation share
1. Choose Optimization > Protocols: CIFS Prepopulation to display the CIFS Prepopulation page.
2. Select the remote path for the share.
3. Select the Operations tab.
4. Click a button to perform an operation on a share as described in this table. You can perform only one operation at a time.
Operation | Description |
Sync Now | Synchronizes the share using the current settings. |
Perform Dry Run | Creates a log of what would be synchronized using the current settings, without actually synchronizing anything. |
Cancel Operation | Cancels the operation. |
Viewing CIFS prepopulation share logs
After adding a CIFS prepopulation share, you can view CIFS prepopulation share logs to see more detail regarding recent synchronizations, the initial copy of the share, or the last share synchronization.
To view CIFS prepopulation share logs
1. Choose Optimization > Protocols: CIFS Prepopulation to display the CIFS Prepopulation page.
2. Select the remote path for the share.
3. Select the Operations tab.
4. Click one of these links to view a log file.
Log File | Description |
Recent syncs | Contains logs for the last few share synchronizations. The log includes how many directories, files, and bytes were received and how long it took to receive them. The log also lists any errors or deletions. |
Initial sync | Includes how many directories, files, and bytes were received initially and how long it took to receive them. The log also lists any errors or deletions. |
Last dry run | Includes a log of what would have been synchronized with the current share configuration, without actually synchronizing anything. |
To print the report, choose File > Print in your web browser to open the Print dialog box.
Related topics
Configuring TCP, satellite optimization, and high-speed TCP
This section describes how to configure TCP, satellite optimization, and high-speed TCP settings. It includes these topics:
You configure TCP, high-speed TCP, and satellite optimization settings in the Optimization > Network Services: Transport Settings page.
Optimizing TCP and satellite WANs
Riverbed provides satellite WAN optimization to overcome the common sources of performance loss associated with space networking. Satellite optimization allows for more effective use of satellite channels, while providing improved user experiences and increased productivity.
SkipWare, an exclusive technology in the Riverbed product family, senses increases and decreases in bandwidth allocation and automatically adjusts its transmission window in response, without requiring user intervention.
Optimizing SCPS with SkipWare
RiOS includes compatibility settings for the Space Communications Protocol Standards (SCPS) protocol suite. SCPS is designed to allow communication over challenging environments. Originally, it was developed jointly by NASA and DOD’s USSPACECOM to meet their various needs and requirements. Through a collaborative, multiyear R&D effort, the partnership created the Space Communications Protocol Standards-Transport Protocol (SCPS-TP, commonly referred to as “skips”). This protocol now meets the needs of the satellite and wireless communities.
Unlike TCP, the SCPS protocol was designed to operate in an environment of high latency and limited bandwidth. The first commercial implementation of the SCPS protocol was released under the brand name SkipWare.
To use the SkipWare discovery mechanisms, you must have a SCPS license.
•For CX580, CX780, and CX3080 appliances, the SCPS license is part of the Enterprise tier.
•For CX5080 and CX7080 appliances, the SCPS license is included with the standard license package (license group 1).
•For x70 and xx70 appliances, the SCPS license is a separate license. You receive a SCPS license when you purchase the SCPS option. If you did not receive your SCPS license, contact your Riverbed Sales Representative.
•For Next Generation SteelHead-v (models VCX10-110), the SCPS license is included. For all other SteelHead-v models, the SCPS license is a separate purchase.
SkipWare is enabled automatically when the license is installed, regardless of which transport optimization method is selected (for example, standard TCP, high-speed TCP, or bandwidth estimation). After installing the SkipWare license, you must restart the optimization service.
The basic RiOS license includes non-SkipWare options such as bandwidth estimation and standard TCP.
To change SkipWare settings, you must have role-based permission to use the Optimization Service role. For details, see
Managing user permissions.
For details and example satellite deployments, see the SteelHead Deployment Guide.
SCPS connection types
You configure satellite optimization settings depending on the connection type. This section describes the connection types. For details about the SCPS discovery process used in various device scenarios, see the SteelHead Deployment Guide.
RiOS and SCPS connection
A RiOS and SCPS connection is established between two SteelHeads. Because both SteelHeads are SCPS compatible, this is a double-ended connection that benefits from traditional RiOS optimization (SDR and LZ). A RiOS and SCPS connection works with all RiOS features.
RiOS and SCPS Connection
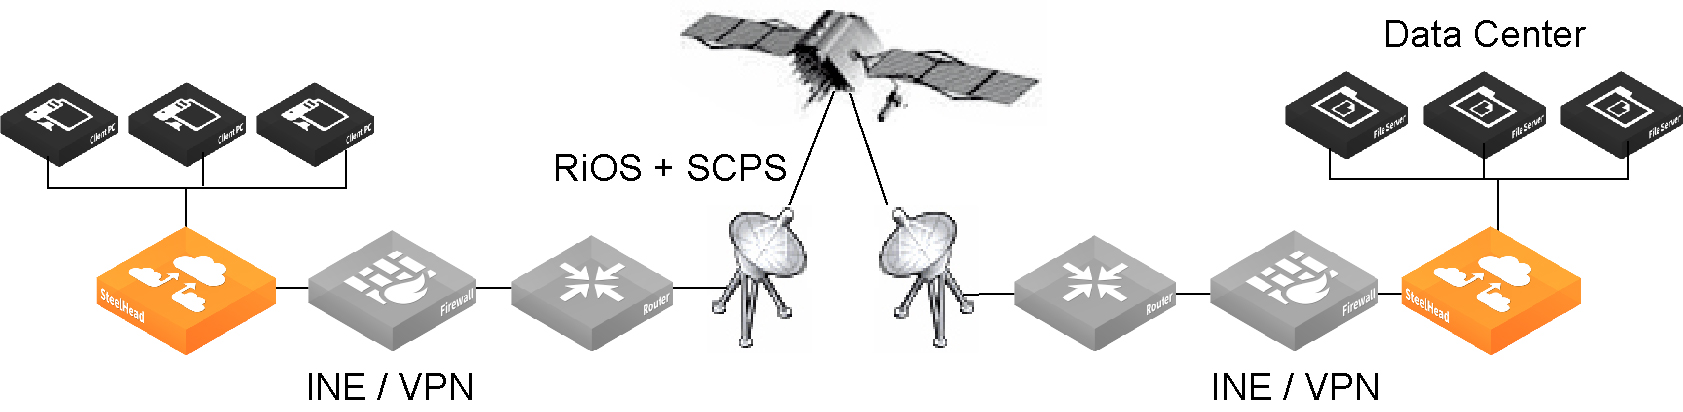
SEI connection
A single-ended interception (SEI) connection is established between a single SteelHead paired with a third-party device running TCP-PEP (Performance Enhancing Proxy). Both the SteelHead and the TCP-PEP device are using the SCPS protocol to speed up the data transfer on a satellite link or other high-latency links. In the following figure, the SteelHead replaces a third-party device running TCP-PEP in the data center, but the SteelHead can also reside in the branch office. Because there’s only one SteelHead that intercepts the connection, this is called a single-ended interception.
Single-Ended Interception Connection
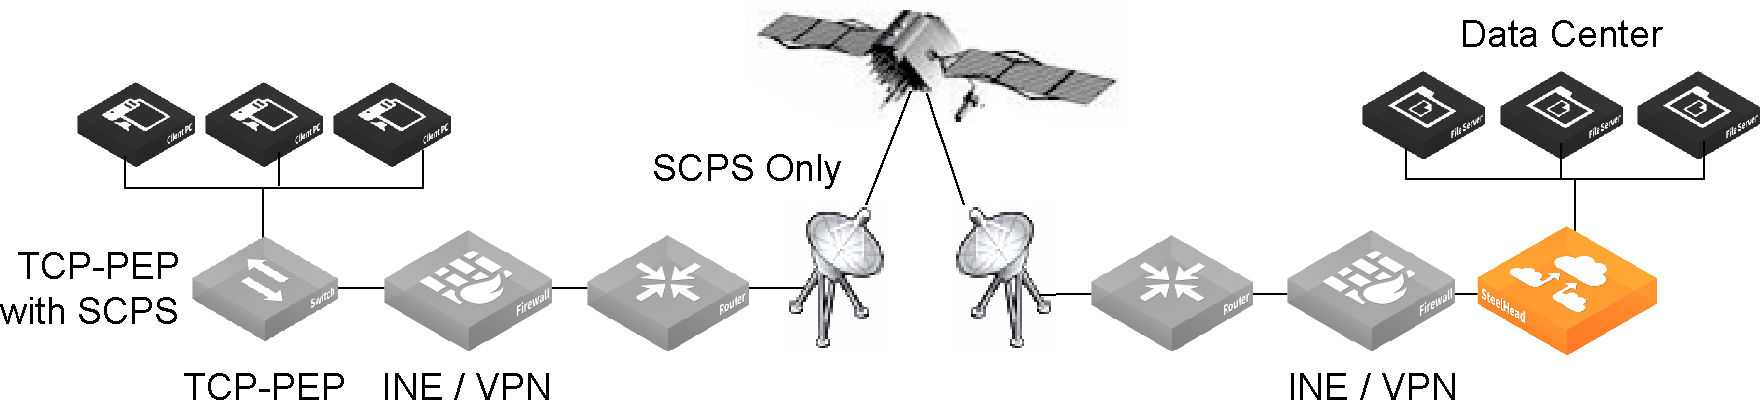
Because a single-ended interception connection communicates with only one SteelHead, it:
•performs only sender-side TCP optimization.
•supports virtual in-path deployments such as WCCP and PBR.
•can’t initiate a SCPS connection on a server-side out-of-path SteelHead.
•supports kickoff.
•supports autodiscovery failover (failover is compatible with IPv6).
•coexists with high-speed TCP.
•doesn’t work with connection forwarding.
Even without a license, you can configure a rule in the SCPS rule table for SEI connections and the SCPS option is added to the SYN packet allowing you to achieve SCPS optimization.
To configure satellite optimization for an SEI, you define SEI connection rules. The SteelHead uses SEI connection rules to determine whether to enable or pass-through SCPS connections.
We recommend that for SEI configurations in which the SteelHead initiates the SCPS connection on the WAN, you add an in-path pass-through rule from the client to the server. While the pass-through rule is optional, without it the SteelHead probes for another SteelHead, and when it doesn’t locate one, will failover. Adding the in-path pass-through rule speeds up setup by eliminating the autodiscovery probe and subsequent failover.
The in-path pass-through rule isn’t necessary on SEI configurations in which the SteelHead terminates the SCPS connection on the WAN, because in this configuration the SteelHead evaluates only the SEI connection rules table and ignores the in-path rules table.
SEI connections count toward the connection count limit on the SteelHead.
When server-side network asymmetry occurs in an SEI configuration, the server-side SteelHead creates a bad RST log entry in the asymmetric routing table. This log entry differs from other configurations (non-SCPS) in that the client-side SteelHead typically detects asymmetry because of the bad RST and creates an entry in the asymmetric routing table. In SEI configurations, the SteelHead detects asymmetry and creates asymmetric routing table entries independent of other SteelHeads. This results in a TCP proxy only connection between the client-side SteelHead and the server when autodiscovery is disabled. For details about the asymmetric routing table, see
Configuring asymmetric routing features.
To configure TCP and SkipWare SCPS optimization
To properly configure transport settings for your environment, you must understand its characteristics. For information on gathering performance characteristics for your environment, see the SteelHead Deployment Guide.
1. Choose Optimization > Network Services: Transport Settings to display the Transport Settings page.
2. Under TCP Optimization, complete the configuration as described in this table.
Control | Description |
Auto-Detect | Automatically detects the optimal TCP configuration by using the same mode as the peer SteelHead for inner connections, SkipWare when negotiated, or standard TCP for all other cases. This is the default setting. If you have a mixed environment where several different types of networks terminate into a hub or server-side SteelHead, enable this setting on your hub SteelHead so it can reflect the various transport optimization mechanisms of your remote site SteelHeads. Otherwise, you can hard code your hub SteelHead to the desired setting. RiOS advertises automatic detection of TCP optimization to a peer SteelHead through the OOB connection between the appliances. For single-ended interception connections, use SkipWare per-connection TCP optimization when possible; use standard TCP otherwise. |
Standard (RFC-Compliant) | Optimizes non-SCPS TCP connections by applying data and transport streamlining for TCP traffic over the WAN. This control forces peers to use standard TCP as well. For details on data and transport streamlining, see the SteelHead Deployment Guide. This option clears any advanced bandwidth congestion control that was previously set. |
HighSpeed | Enables high-speed TCP optimization for more complete use of long fat pipes (high-bandwidth, high-delay networks). Do not enable for satellite networks. We recommend that you enable high-speed TCP optimization only after you have carefully evaluated whether it will benefit your network environment. For details about the trade-offs of enabling high-speed TCP, see tcp highspeed enable in the Riverbed Command-Line Interface Reference Manual. |
Bandwidth Estimation | Uses an intelligent bandwidth estimation algorithm along with a modified slow-start algorithm to optimize performance in long lossy networks. These networks typically include satellite and other wireless environments, such as cellular networks, longer microwave, or Wi-Max networks. Bandwidth estimation is a sender-side modification of TCP and is compatible with the other TCP stacks in the RiOS system. The intelligent bandwidth estimation is based on analysis of both ACKs and latency measurements. The modified slow-start mechanism enables a flow to ramp up faster in high-latency environments than traditional TCP. The intelligent bandwidth estimation algorithm allows it to learn effective rates for use during modified slow start, and also to differentiate BER loss from congestion-derived loss and manage them accordingly. Bandwidth estimation has good fairness and friendliness qualities toward other traffic along the path. The default setting is off. |
SkipWare Per-Connection | Applies TCP congestion control to each SCPS-capable connection. The congestion control uses: •a pipe algorithm that gates when a packet should be sent after receipt of an ACK. •the NewReno algorithm, which includes the sender's congestion window, slow start, and congestion avoidance. •time stamps, window scaling, appropriate byte counting, and loss detection. This transport setting uses a modified slow-start algorithm and a modified congestion-avoidance approach. This method enables SCPS per-connection to ramp up flows faster in high-latency environments, and handle lossy scenarios, while remaining reasonably fair and friendly to other traffic. SCPS per-connection does a very good job of efficiently filling up satellite links of all sizes. SCPS per-connection is a high-performance option for satellite networks. We recommend enabling per-connection if the error rate in the link is less than approximately 1 percent. The Management Console dims this setting until you install a SkipWare license. |
SkipWare Error-Tolerant | Enables SkipWare optimization with the error-rate detection and recovery mechanism on the SteelHead. This setting allows the per-connection congestion control to tolerate some loss due to corrupted packets (bit errors), without reducing the throughput, using a modified slow-start algorithm and a modified congestion-avoidance approach. It requires significantly more retransmitted packets to trigger this congestion-avoidance algorithm than the SkipWare per-connection setting. Error-tolerant TCP optimization assumes that the environment has a high BER and that most retransmissions are due to poor signal quality instead of congestion. This method maximizes performance in high-loss environments, without incurring the additional per-packet overhead of a FEC algorithm at the transport layer. SCPS error tolerance is a high-performance option for lossy satellite networks. Use caution when enabling error-tolerant TCP optimization, particularly in channels with coexisting TCP traffic, because it can be quite aggressive and adversely affect channel congestion with competing TCP flows. We recommend enabling error tolerance if the error rate in the link is more than approximately 1 percent. The Management Console dims this setting until you install a SkipWare license. |
Cubic | Enables the Cubic congestion control alogorithm. Cubic is the local default congestion control alogorithm when two peer SteelHeads are both configured to auto-detect. Cubic offers better performance and faster recovery after congestion events than NewReno, the previous local default. |
Enable Rate Pacing | Imposes a global data-transmit limit on the link rate for all SCPS connections between peer SteelHeads, or on the link rate for a SteelHead paired with a third-party device running TCP-PEP (Performance Enhancing Proxy). Rate pacing combines MX-TCP and a congestion-control method of your choice for connections between peer SteelHeads and SEI connections (on a per-rule basis). The congestion-control method runs as an overlay on top of MX-TCP and probes for the actual link rate. It then communicates the available bandwidth to MX-TCP. Enable rate pacing to prevent these problems: •Congestion loss while exiting the slow-start phase. The slow-start phase is an important part of the TCP congestion-control mechanisms that starts slowly increasing its window size as it gains confidence about the network throughput. •Congestion collapse •Packet bursts Rate pacing is disabled by default. With no congestion, the slow-start phase ramps up to the MX-TCP rate and settles there. When RiOS detects congestion (either due to other sources of traffic, a bottleneck other than the satellite modem, or because of a variable modem rate), the congestion-control method kicks in to avoid congestion loss and exit the slow-start phase faster. Enable rate pacing on the client-side SteelHead along with a congestion-control method. The client-side SteelHead communicates to the server-side SteelHead that rate pacing is in effect. You must also: •Enable Auto-Detect TCP Optimization on the server-side SteelHead to negotiate the configuration with the client-side SteelHead. •Configure an MX-TCP QoS rule to set the appropriate rate cap. If an MX-TCP QoS rule is not in place, the system doesn’t apply rate pacing and the congestion-control method takes effect. You can’t delete the MX-TCP QoS rule when rate pacing is enabled. The Management Console dims this feature until you install a SkipWare license. Rate pacing doesn’t support IPv6. You can also enable rate pacing for SEI connections by defining an SEI rule for each connection. |
Enable Single-Ended Connection Rules Table | Enables transport optimization for single-ended interception connections with no SteelHead peer. These connections appear in the rules table. In RiOS 8.5 or later, you can impose rate pacing for single-ended interception connections with no peer SteelHead. By defining an SEI connection rule, you can enforce rate pacing even when the SteelHead is not peered with a SCPS device and SCPS is not negotiated. To enforce rate pacing for a single-ended interception connection, create an SEI connection rule for use as a transport-optimization proxy, select a congestion method for the rule, and then configure a QoS rule (with the same client/server subnet) to use MX-TCP. RiOS 8.5 and later accelerate the WAN-originated or LAN-originated proxied connection using MX-TCP. By default, the SEI connection rules table is disabled. When enabled, two default rules appear in the rules table. The first default rule matches all traffic with the destination port set to the interactive port label and bypasses the connection for SCPS optimization. The second default rule matches all traffic with the destination port set to the RBT-Proto port label and bypasses the connection for SCPS optimization. This option doesn’t affect the optimization of SCPS connections between SteelHeads. When you disable the table, you can still add, move, or remove rules, but the changes don’t take effect until you reenable the table. The Management Console dims the SEI rules table until you install a SkipWare license. Enable SkipWare Legacy Compression - Enables negotiation of SCPS-TP TCP header and data compression with a remote SCPS-TP device. This feature enables interoperation with RSP SkipWare packages and TurboIP devices that have also been configured to negotiate TCP header and data compression. Legacy compression is disabled by default. After enabling or disabling legacy compression, you must restart the optimization service. The Management Console dims legacy compression until you install a SkipWare license and enable the SEI rules table. Legacy compression also works with non-SCPS TCP algorithms. These limits apply to legacy compression: •This feature is not compatible with IPv6. •Packets with a compressed TCP header use IP protocol 105 in the encapsulating IP header; this might require changes to intervening firewalls to permit protocol 105 packets to pass. •This feature supports a maximum of 255 connections between any pair of end-host IP addresses. The connection limit for legacy SkipWare connections is the same as the appliance-connection limit. •QoS limits for the SteelHead apply to the legacy SkipWare connections. |
3. Click Apply to save your settings to the running configuration.
4. Click Save to Disk to save your settings permanently.
5. Click Restart Services to restart the optimization service.
Configuring buffer settings
The buffer settings in the Transport Settings page support high-speed TCP and are also used in data protection scenarios to improve performance. For details about data protection deployments, see the SteelHead Deployment Guide.
To properly configure buffer settings for a satellite environment, you must understand its characteristics. For information on gathering performance characteristics for your environment, see the SteelHead Deployment Guide.
To configure buffer settings
1. Choose Optimization > Network Services: Transport Settings to display the Transport Settings page.
2. Under Buffer Settings, complete the configuration as described in this table.
Control | Description |
LAN Send Buffer Size | Specify the send buffer size used to send data out of the LAN. The default value is 81920. |
LAN Receive Buffer Size | Specify the receive buffer size used to receive data from the LAN. The default value is 32768. |
WAN Default Send Buffer Size | Specify the send buffer size used to send data out of the WAN. The default value is 262140. |
WAN Default Receive Buffer Size | Specify the receive buffer size used to receive data from the WAN. The default value is 262140. |
3. Click Apply to save your settings to the running configuration.
4. Click Save to Disk to save your settings permanently.
Adding single-ended connection rules
You can optionally add rules to control single-ended SCPS connections. The SteelHead uses these rules to determine whether to enable or pass through SCPS connections.
A SteelHead receiving a SCPS connection on the WAN evaluates only the single-ended connection rules table.
To pass through a SCPS connection, we recommend setting both an in-path rule and a single-ended connection rule.
To add a single-ended connection rule
1. Choose Optimization > Network Services: Transport Settings to display the Transport Settings page.
2. Under Single-Ended Connection Rules, complete the configuration as described in this table.
Control | Description |
Add New Rule | Displays the controls for adding a new rule. |
Position | Select Start, End, or a rule number from the drop-down list. SteelHeads evaluate rules in numerical order starting with rule 1. If the conditions set in the rule match, then the rule is applied, and the system moves on to the next packet. If the conditions set in the rule don’t match, the system consults the next rule. As an example, if the conditions of rule 1 don’t match, rule 2 is consulted. If rule 2 matches the conditions, it’s applied, and no further rules are consulted. |
Source Subnet | Specify an IPv4 or IPv6 address and mask for the traffic source. You can also specify wildcards: •All-IPv4 is the wildcard for single-stack IPv4 networks. •All-IPv6 is the wildcard for single-stack IPv6 networks. •All-IP is the wildcard for all IPv4 and IPv6 networks. Use these formats: xxx.xxx.xxx.xxx/xx (IPv4) x:x:x::x/xxxx (IPv6) |
Destination Subnet | Specify an IPv4 or IPv6 address and mask for the traffic destination. You can also specify wildcards: •All-IPv4 is the wildcard for single-stack IPv4 networks. •All-IPv6 is the wildcard for single-stack IPv6 networks. •All-IP is the wildcard for all IPv4 and IPv6 networks. Use these formats: xxx.xxx.xxx.xxx/xx (IPv4) x:x:x::x/xxxx (IPv6) |
Port or Port Label | Specify the destination port number, port label, or all. Click Port Label to go to the Networking > App Definitions: Port Labels page for reference. |
VLAN Tag ID | Specify one of the following: a VLAN identification number from 1 to 4094; all to specify that the rule applies to all VLANs; or untagged to specify the rule applies to untagged connections. RiOS supports VLAN v802.1Q. To configure VLAN tagging, configure SCPS rules to apply to all VLANs or to a specific VLAN. By default, rules apply to all VLAN values unless you specify a particular VLAN ID. Pass-through traffic maintains any preexisting VLAN tagging between the LAN and WAN interfaces. |
Traffic | Specifies the action that the rule takes on a SCPS connection. To allow single-ended interception SCPS connections to pass through the SteelHead unoptimized, disable SCPS Discover and TCP Proxy. Select one of these options: – SCPS Discover - Enables SCPS and disables TCP proxy. – TCP Proxy - Disables SCPS and enables TCP proxy. |
Congestion Control Algorithm | Select a method for congestion control from the drop-down list. •Standard (RFC-Compliant) - Optimizes non-SCPS TCP connections by applying data and transport streamlining for TCP traffic over the WAN. This control forces peers to use standard TCP as well. For details on data and transport streamlining, see the SteelHead Deployment Guide. This option clears any advanced bandwidth congestion control that was previously set. •HighSpeed - Enables high-speed TCP optimization for more complete use of long fat pipes (high-bandwidth, high-delay networks). Do not enable for satellite networks. We recommend that you enable high-speed TCP optimization only after you have carefully evaluated whether it will benefit your network environment. For details about the trade-offs of enabling high-speed TCP, see tcp highspeed enable in the Riverbed Command-Line Interface Reference Manual. •Bandwidth Estimation - Uses an intelligent bandwidth estimation algorithm along with a modified slow-start algorithm to optimize performance in long lossy networks. These networks typically include satellite and other wireless environments, such as cellular networks, longer microwave, or Wi-Max networks. Bandwidth estimation is a sender-side modification of TCP and is compatible with the other TCP stacks in the RiOS system. The intelligent bandwidth estimation is based on analysis of both ACKs and latency measurements. The modified slow-start mechanism enables a flow to ramp up faster in high latency environments than traditional TCP. The intelligent bandwidth estimation algorithm allows it to learn effective rates for use during modified slow start, and also to differentiate BER loss from congestion-derived loss and deal with them accordingly. Bandwidth estimation has good fairness and friendliness qualities toward other traffic along the path. •SkipWare Per-Connection - Applies TCP congestion control to each SCPS-capable connection. This method is compatible with IPv6. The congestion control uses: –a pipe algorithm that gates when a packet should be sent after receipt of an ACK. –the NewReno algorithm, which includes the sender's congestion window, slow start, and congestion avoidance. –time stamps, window scaling, appropriate byte counting, and loss detection. This transport setting uses a modified slow-start algorithm and a modified congestion-avoidance approach. This method enables SCPS per connection to ramp up flows faster in high-latency environments, and handle lossy scenarios, while remaining reasonably fair and friendly to other traffic. SCPS per-connection does a very good job of efficiently filling up satellite links of all sizes. SkipWare per-connection is a high-performance option for satellite networks. The Management Console dims this setting until you install a SkipWare license. |
| •SkipWare Error-Tolerant - Enables SkipWare optimization with the error-rate detection and recovery mechanism on the SteelHead. This method is compatible with IPv6. This method tolerates some loss due to corrupted packets (bit errors), without reducing the throughput, using a modified slow-start algorithm and a modified congestion avoidance approach. It requires significantly more retransmitted packets to trigger this congestion-avoidance algorithm than the SkipWare per-connection setting. Error-tolerant TCP optimization assumes that the environment has a high BER and most retransmissions are due to poor signal quality instead of congestion. This method maximizes performance in high-loss environments, without incurring the additional per-packet overhead of a FEC algorithm at the transport layer. Use caution when enabling error-tolerant TCP optimization, particularly in channels with coexisting TCP traffic, because it can be quite aggressive and adversely affect channel congestion with competing TCP flows. The Management Console dims this setting until you install a SkipWare license. |
Enable Rate Pacing | Imposes a global data transmit limit on the link rate for all SCPS connections between peer SteelHeads or on the link rate for a SteelHead paired with a third-party device running TCP-PEP (Performance Enhancing Proxy). Rate pacing combines MX-TCP and a congestion-control method of your choice for connections between peer SteelHeads and SEI connections (on a per-rule basis). The congestion-control method runs as an overlay on top of MX-TCP and probes for the actual link rate. It then communicates the available bandwidth to MX-TCP. Enable rate pacing to prevent these problems: •Congestion loss while exiting the slow start phase. The slow-start phase is an important part of the TCP congestion-control mechanisms that starts slowly increasing its window size as it gains confidence about the network throughput. •Congestion collapse. •Packet bursts. Rate pacing is disabled by default. With no congestion, the slow start ramps up to the MX-TCP rate and settles there. When RiOS detects congestion (either due to other sources of traffic, a bottleneck other than the satellite modem, or because of a variable modem rate), the congestion-control method kicks in to avoid congestion loss and exit the slow start phase faster. Enable rate pacing on the client-side SteelHead along with a congestion-control method. The client-side SteelHead communicates to the server-side SteelHead that rate pacing is in effect. You must also: •Enable Auto-Detect TCP Optimization on the server-side SteelHead to negotiate the configuration with the client-side SteelHead. •Configure an MX-TCP QoS rule to set the appropriate rate cap. If an MX-TCP QoS rule is not in place, rate pacing is not applied and the congestion-control method takes effect. You can’t delete the MX-TCP QoS rule when rate pacing is enabled. The Management Console dims this setting until you install a SkipWare license. Rate pacing doesn’t support IPv6. You can also enable rate pacing for SEI connections by defining an SEI rule for each connection. |
Add | Adds the rule to the list. The Management Console redisplays the SCPS Rules table and applies your modifications to the running configuration, which is stored in memory. |
Remove Selected Rules | Select the check box next to the name and click Remove Selected. |
Move Selected Rules | Moves the selected rules. Click the arrow next to the desired rule position; the rule moves to the new position. |
3. Click Apply to save your settings to the running configuration.
4. Click Save to Disk to save your settings permanently.
After you apply your settings, you can verify whether changes have had the desired effect by viewing the Current Connections report. The report summarizes the optimized established connections for SCPS. SCPS connections appear as typical established, optimized or established, or single-ended optimized connections. Click the connection to view details. SCPS connection detail reports display SCPS Initiate or SCPS Terminate under Connection Information. Under Congestion Control, the report displays the congestion control method that the connection is using.
High-speed TCP optimization
The high-speed TCP (HS-TCP) feature provides acceleration and high throughput for high-bandwidth links (also known as long fat networks, or LFNs) for which the WAN pipe is large but latency is high. HS-TCP is activated for all connections that have a BDP larger than 100 packets.
For details about using HS-TCP in data protection scenarios, see the SteelHead Deployment Guide.
HS-TCP basic steps
This table describes the basic steps needed to configure high-speed TCP.
Task | Reference |
1. Enable high-speed TCP support. | |
2. Increase the WAN buffers to 2 * Bandwidth Delay Product (BDP). You can calculate the BDP WAN buffer size: Buffer size in bytes = 2 * bandwidth (in bits per sec) * delay (in sec) / 8 (bits per byte) Example: For a link of 155 Mbps and 100 ms round-trip delay. Bandwidth = 155 Mbps = 155000000 bps Delay = 100 ms = 0.1 sec BDP = 155 000 000 * 0.1 / 8 = 1937500 bytes Buffer size in bytes = 2 * BDP = 2 * 1937500 = 3 875 000 bytes. If this number is greater than the default (256 KB), enable HS-TCP with the correct buffer size. | |
3. Increase the LAN buffers to 1 MB. | |
4. Enable in-path support. | |
Configuring service ports
You configure service port settings in the Optimization > Network Services: Service Ports page.
Service ports are the ports used for inner connections between SteelHeads.
You can configure multiple service ports on the server-side of the network for multiple QoS mappings. You define a new service port and then map destination ports to that port, so that QoS configuration settings on the router are applied to that service port.
Configuring service port settings is optional.
To set a service port
1. Choose Optimization > Network Services: Service Ports to display the Service Ports page.
2. Under Service Port Settings, complete the configuration as described in this table.
Control | Description |
Service Ports | Specify ports in a comma-separated list. The default service ports are 7800 and 7810. |
Default Port | Select the default service port from the drop-down list. The default service ports are 7800 and 7810. |
3. Click Apply to apply your settings.
To add a service port
1. Under Service Ports, complete the configuration as described in this table.
Control | Description |
Add a New Service Port Mapping | Displays the controls to add a new mapping. |
Destination Port | Specify a destination port number. |
Service Port | Specify a port number. |
Add | Adds the port numbers. |
Remove Selected | Select the check box next to the name and click Remove Selected. |
2. Click Save to Disk to save your settings permanently.
Related topic
Configuring domain labels
You create domain labels in the Networking > App Definitions: Domain Labels page.
Domain labels are names given to a group of domains to streamline configuration. You can specify an internet domain with wildcards to define a wider group. For example, you can create a domain label called Office365 and add *.microsoftonline.com, *.office365.com, or *.office.com.
Domain labels provide flexible domain and hostname-based interception through a dynamic IP address to accommodate network environments that are changing from static to dynamic IP addresses.
Domain labels are optional.
When to use
Use domain labels to:
•create a logical set of domain names—apply an in-path rule to the entire set instead of creating individual rules for each domain name. One rule replaces many rules. For example, you can define a set of services in a domain label, use that domain label in an in-path rule, and apply an optimization policy based on the application or service being accessed.
•match a specific set of services—domain labels can be especially useful when an IP address and subnet hosts many services and you don’t need your in-path rule to match them all.
•replace a fixed IP address for a server—Some SaaS providers and the O365 VNext architecture that serve multiple O365 applications such as SharePoint, Lync, and Exchange no longer provide a fixed IP address for the server. With many IP addresses on the same server, a single address is no longer enough to match with an in-path rule. Let’s suppose you need to select and optimize a specific SaaS service. Create a domain label and then use it with a host label and an in-path rule to intercept and optimize the traffic.
Dependencies
Domain labels have these dependencies:
•They are compatible with autodiscover, passthrough, and fixed-target (not packet mode) in-path rules.
•They don’t replace the destination IP address. The in-path rule still sets the destination using IP/subnet (or uses a host label or port). The in-path rule matches the IP addresses and ports first, and then matches the domain label second. The rule must match both the destination and the domain label.
•They aren’t compatible with IPv6.
Because domain labels are compatible with IPv4 only, you must set the source and destination to All IPv4 or a specific IPv4 address when adding a domain label to an in-path rule.
•The client-side and server-side SteelHeads must be running RiOS 9.2 or later.
•Domain labels apply only to HTTP and HTTPS traffic. Therefore, when you add a domain label to an in-path rule and set the destination port to All, the in-path rule defaults to ports HTTP (80) and HTTPS (443) for optimization. To specify another port or port range, use the Specific Port option instead of All Ports.
•A fixed-target rule with a domain label match followed by an auto-discover rule will not use autodiscovery but will instead pass through the traffic. This happens because the matching SYN packet for a fixed-target rule with a domain-label isn’t sent with a probe.
•When you add a domain label to an in-path rule that has cloud acceleration enabled, the system automatically sets cloud acceleration to Pass Through, and connections to the subscribed SaaS platform are no longer optimized by the Akamai network. However, you could add in-path rules so that other SteelHeads in the network optimize SaaS connections.
To allow the Akamai network to optimize SaaS connections, complete one of the following tasks:
–Create an in-path rule with Cloud Acceleration set to Auto and specify the
_cloud-accel-saas_ host label. This label detects the IP addresses being used by SaaS applications automatically. See
Using the _cloud-accel-saas_ host label for details.
–Place domain label rules lower than cloud acceleration rules in your rule list so the cloud rules match before the domain label rules.
•We recommend adding domain label rules last in the list, so RiOS matches all previous rules before matching the domain label rule.
•They aren’t compatible with connection forwarding.
•You can’t use domain labels with QoS rules.
Creating a domain label
To create a domain label
1. On the client-side SteelHead, choose Networking > App Definitions: Domain Labels.
2. To add a domain label, complete the configuration as described in this table.
Control | Description |
Add a New Domain Label | Displays the controls to add a new domain label. |
Name | Specify the label name. These rules apply: •A domain label name can be up to 64 characters long. •Domain label names are case sensitive and can be any string consisting of letters, numbers, the underscore ( _ ), or the hyphen ( - ). There can’t be spaces in domain label names. •We suggest starting the name with a letter or underscore, although the first character can be a number. •To avoid confusion, don’t use a number for a domain label. |
Domains | Specify a comma-separated list of domains. Keep in mind that the URL might use other domains. For example, www.box.com might also use srv1.box.net and other domains. Determine all of the domains whose traffic you want to optimize, and make an entry in the domain label for each one. Domain labels are most useful when they specify a narrow destination IP range, so use the smallest destination IP/range you can. Using a host label can help to narrow the destination IP range. These rules apply to domain label entries: •Matching is not case sensitive. •You must include a top-level domain: for example, .com. You cannot include a wildcard in a top-level domain. •You must specify second-level domains: for example, *.outlook.com, but not *.com. •You can also separate domains with spaces or new lines. •A domain name can be up to 64 characters long. •Characters must be alphanumeric (0-9, a-z, A-Z), periods, underscores, wildcards, and hyphens. •Do not use consecutive periods. •Do not use consecutive wildcards. •Do not use IP addresses. A domain can appear in multiple domain labels. You can create up to 63 unique domain labels. |
Remove Selected | Select the check box next to the name and click Remove Selected. You can’t delete domain labels that an in-path rule is using. |
Add New Domain Label | Adds the domain label. The page updates the domain label table with the new domain label. |
Modifying domains in a domain label
You add or delete domains in the Domain Labels page.
To modify the domains in a domain label
1. Choose Networking > App Definitions: Domain Labels to display the Domain Labels page.
2. Select the domain label name in the Domain Label table.
3. Make changes to the list of domains in the Domains text box.
4. Click Apply to save your settings to the running configuration. RiOS immediately applies domain label changes to in-path rules, changing the traffic processing for all rules using the label.
Related topics
Configuring host labels
You create host labels in the Networking > App Definitions: Host Labels page.
Host labels are names given to sets of hostnames and subnets to streamline configuration. Host labels provide flexibility because you can create a logical set of hostnames to use in place of a destination IP/subnet and then apply a rule, such as a QoS rule or an in-path rule, to the entire set instead of creating individual rules for each hostname or IP subnet.
When you define hostnames in host labels (as opposed to subnets), RiOS performs a DNS query and retrieves a set of IP addresses that correspond to that fully qualified domain name (hostname). It uses these IP addresses to match the destination IP addresses for a rule using the host label. You can also specify a set of IP subnets in a host label to use as the destination IP addresses for a rule using the host label.
Host labels are compatible with autodiscover, passthrough, and fixed-target (not packet mode) in-path rules. Host labels aren’t compatible with IPv6.
Host labels are optional.
Using the _cloud-accel-saas_ host label
RiOS includes a predefined host label, _cloud-accel-saas_, that detects any IP addresses that carry Legacy Cloud Accelerator-enabled SaaS traffic automatically. As SaaS applications are added or deleted, the host label is automatically updated with the list of associated IP addresses. This host label removes the requirement that domain rules and Cloud Acceleration be mutually exclusive.
Use the _cloud-accel-saas_ host label with an Auto Discover in-path rule, and set Cloud Acceleration to Auto.
You can also use the _cloud-accel-saas_ host label with the in-path rule auto-discover CLI command, specifying cloud-accel as auto and including the dst-host _cloud-accel-saas_ parameter. See the Riverbed Command-Line Interface Reference Manual for details.
When to use
You can define a set of file servers in a host label, use that host label in a single QoS or in-path rule, and apply a policy limiting all IP traffic to and from the servers (independent of what protocol or application is in use).
Other ways to use host labels:
•List multiple dedicated application servers by hostname in a single rule and apply a policy
•List multiple business websites and servers to protect
•List recreational websites to restrict
Configuring a host label
To create a host label
1. Choose Networking > App Definitions: Host Labels to display the Host Labels page.
2. To add a host label, complete the configuration as described in this table.
Control | Description |
Add a New Host Label | Displays the controls to add a new host label. |
Name | Specify the label name: for example, YouTube. These rules apply: •Host label names are case sensitive and can be any string consisting of letters, numbers, the underscore ( _ ), or the hyphen ( - ). There can’t be spaces in host labels. •Riverbed suggests starting the name with a letter or underscore. •To avoid confusion, don’t use a number for a host label. •You can’t delete host labels that a QoS or in-path rule is using. |
Hostnames/Subnets | Specify a comma-separated list of hostnames and subnets. Hostnames aren’t case sensitive. You can also separate hostname and subnet names with spaces or new lines. Use this format: xxx.xxx.xxx.xxx/xx where /xx is a subnet mask value between 0 and 32. A host label can be a fully qualified domain name. A hostname can appear in multiple host labels. You can use up to 100 unique hostnames. A host label can contain up to 64 subnets and hostnames. |
Remove Selected | Select the check box next to the name and click Remove Selected. You can’t delete host labels that a QoS or in-path rule is using. |
Add New Host Label | Adds the host label. The page updates the host label table with the new host label. Because the system resolves new hostnames through the DNS, wait a few seconds and then refresh your browser. |
Resolving hostnames
RiOS resolves hostnames through a DNS server immediately after you add a new host label or after you edit an existing host label. RiOS also automatically re-resolves hostnames once daily. If any problems arise during the automatic or manual hostname resolution, the summary section of the host labels page alerts you quickly that there’s a problem.
RiOS relays any changes in IP addresses to QoS or in-path rules after resolving them; you don’t need to update the host label in QoS or in-path rules.
When you know that the IP addresses associated with a hostname have been updated in the DNS server, and you don’t want to wait until the next scheduled resolution, you can resolve the hostnames manually. After you resolve the hostname cache manually, RiOS schedules the next resolve time to be 24 hours in the future.
To resolve hostnames through the DNS immediately
•Click Resolve Hostnames.
To show or hide the resolved IP addresses of the hostnames
•Select or clear the Show resolved IPs for the hostnames in the table below check box.
When the system resolves a hostname, the elapsed time appears next to the Resolved label.
Viewing the hostname resolution summary
The summary section displays this information:
•Unique Hostnames - The total number of unique hostnames, because a hostname can appear in multiple host labels. You can configure a maximum of 100 unique hostnames.
•Checking DNS - The number of unique hostnames that are actively being resolved.
•Unresolvable - The number of unique hostnames that can’t be resolved through the DNS because the DNS server isn’t configured, the DNS server isn’t reachable due to network connectivity issues, there’s a typo in the hostname, and so on.
On rare occasions, if the DNS server goes down after resolving a hostname once, the system keeps the information, even though it might be stale. When this occurs, the following message appears:
Note: This hostname was resolved successfully at least once in the past but the last attempt failed.
Modifying hostnames or subnets in a host label
You add or delete hostnames or subnets associated with a host label in the Host Labels page.
To modify hostnames or subnets in a host label
1. Choose Networking > App Definitions: Host Labels to display the Host Labels page.
2. Select the host label name in the Host Label table.
3. Add or delete hostnames or subnets in the Hostnames/Subnets text box.
4. Click Apply to save your settings to the running configuration. RiOS immediately applies host label changes to QoS and in-path rules, changing the traffic processing for all rules using the label.
5. Verify that any new hostnames resolve successfully to the expected IP addresses.
Related topics
Configuring port labels
You create port labels in the Networking > App Definitions: Port Labels page.
Port labels are names given to sets of port numbers. You use port labels when configuring in-path rules in place of individual port numbers. For example, you can use port labels to define a set of ports for which the same in-path, peering, QoS classification, and QoS marking rules apply.
This table summarizes the port labels that are provided by default.
Port Type | Description and ports |
SteelFusion | Use this port label to automatically pass-through traffic on Riverbed SteelFusion ports 7950 - 7954 (data transfers), and 7970 (management). SteelFusion delivers block-storage optimization that accelerates access to storage area networks (SANs) across the WAN, decoupling storage from servers and allowing data to reside in one location. |
Interactive | Use this port label to automatically pass-through traffic on interactive ports (for example, Telnet, TCP ECHO, remote logging, and shell). |
RBT-Proto | Use this port label to automatically pass-through traffic on ports used by the system: 7744 (RiOS data store synchronization), 7800-7801 (in-path), 7810 (out-of-path), 7820 (failover), 7850 (connection forwarding), 7860 (Interceptor appliance), 7870 (SteelCentral Controller for SteelHead Mobile). |
Secure | Use this port label to automatically pass-through traffic on commonly secure ports (for example, SSH, HTTPS, and SMTPS). |
FTP | Use this port label to automatically pass-through traffic on FTP ports 20 and 21. |
If you don’t want to automatically forward traffic on interactive, RBT-Proto, secure ports or FTP, you must delete the Interactive, RBT-Proto, Secure, and FTP in-path rules. For details, see
In-path rules overview.
For information on common port assignments, see
SteelHead Ports.
This feature is optional.
Creating a port label
To create a port label
1. Choose Networking > App Definitions: Port Labels to display the Port Labels page.
2. To add a port label, complete the configuration as described in this table.
Control | Description |
Add a New Port Label | Displays the controls to add a new port label. |
Name | Specify the label name. These rules apply: •Port labels aren’t case sensitive and can be any string consisting of letters, the underscore ( _ ), or the hyphen ( - ). There can’t be spaces in port labels. •The fields in the various rule pages of the Management Console that take a physical port number also take a port label. •To avoid confusion, don’t use a number for a port label. •Port labels that are used in in-path and other rules, such as QoS and peering rules, can’t be deleted. •Port label changes (that is, adding and removing ports inside a label) are applied immediately by the rules that use the port labels that you have modified. |
Ports | Specify a comma-separated list of ports. |
Remove Selected | Select the check box next to the name and click Remove Selected. |
Add | Adds the port label. |
3. Click Save to Disk to save your settings permanently.
Modifying ports in a port label
You add or delete ports associated with a port label in the Port Label: <Port Label Name> page.
To modify ports in a port label
1. Choose Networking > App Definitions: Port Labels to display the Port Labels page.
2. Select the port label name in the Port Labels list to display the Editing Port Labels Interactive group.
3. Under Editing Port Label <port label name>, add or delete ports in the Ports text box.
4. Click Apply to save your settings to the running configuration; click Cancel to cancel your changes.
5. Click Save to Disk to save your settings permanently.
Related topics
Configuring CIFS optimization
This section describes how to optimize CIFS. It includes these topics:
You display and modify CIFS optimization and SMB signing settings in the Optimization > Protocols: CIFS (SMB1) page and the Optimization > Protocols: SMB2/3 pages.
CIFS enhancements by version
This section lists and describes new CIFS and SMB features and enhancements by RiOS version.
•RiOS 9.10 added support for Mac OS version 10.13 and version 10.14 for SMB2/3.
•RiOS 9.5 added the following support:
–Ability to optimize Distributed File System (DFS) shares over SMB2/3.
–Ability to make SMB2 files, directories, and shares case insensitive by entering the protocol smb2 caseless enable command.
•RiOS 9.2 provides support for SMB 3.1.1 latency and bandwidth optimization. It also provides support for SMB file sharing as well as Windows domain integration for Windows 10 and Windows Server 2016 Technical Preview 2.
•RiOS 9.0 and later provide support for SMB 3.02 latency and bandwidth optimization.
•RiOS 8.5 and later support Active Directory integration with Windows 2012 domain function level.
•RiOS 8.5 and later provide support for SMB3 latency and bandwidth optimization.
•RiOS 8.0 and later provide support for SMB1 signing settings for macOS Lion (10.7) and Mountain Lion (10.8). RiOS 8.0 doesn’t support SMB2 signing settings for macOS Lion (10.7) and Mountain Lion (10.8).
For all SteelHead models except CX580, CX780, and CX3080, CIFS latency optimization doesn’t require a separate license. The CX580, CX780, and CX3080 models require the Standard licensing tier or better.
SMB1 is enabled by default. Typically, you disable CIFS optimizations only to troubleshoot the system.
SMB dialects by Windows version
OS | Windows 10 WS* 2016 Technical Preview 2 | Windows 8.1 WS 2012 R2 | Windows 8 WS 2012 | Windows 7 WS 2008 R2 | Windows Vista WS 2008 | Previous versions |
Windows 10 WS 2016 TP2 | SMB 3.1.1 | SMB 3.0.2 | SMB 3.0 | SMB 2.1 | SMB 2.0.2 | SMB 1.x |
Windows 8.1 WS 2012 R2 | SMB 3.0.2 | SMB 3.0.2 | SMB 3.0 | SMB 2.1 | SMB 2.0.2 | SMB 1.x |
Window 8 WS 2012 | SMB 3.0 | SMB 3.0 | SMB 3.0 | SMB 2.1 | SMB 2.0.2 | SMB 1.x |
Windows 7 WS 2008 R2 | SMB 2.1 | SMB 2.1 | SMB 2.1 | SMB 2.1 | SMB 2.0.2 | SMB 1.x |
Windows Vista WS 2008 | SMB 2.0.2 | SMB 2.0.2 | SMB 2.0.2 | SMB 2.0.2 | SMB 2.0.2 | SMB 1.x |
Previous Versions | SMB 1.x | SMB 1.x | SMB 1.x | SMB 1.x | SMB 1.x | SMB 1.x |
* WS = Windows Server
Optimizing CIFS SMB1
CIFS SMB1 optimization performs latency and SDR optimizations on SMB1 traffic. Without this feature, SteelHeads perform only SDR optimization without improving CIFS latency.
You must restart the client SteelHead optimization service after enabling SMB1 latency optimization.
For appliances with feature-tier licensing, you can configure and enable CIFS SMB1 optimization even if the feature is not licensed; however, the feature needs to be both enabled and licensed to work. If the feature is not licensed, the interface displays an alert. For more information, see
“Feature-tier licensing” on page 341.To display CIFS optimization settings for SMB1
1. Choose Optimization > Protocols: CIFS (SMB1) to display the CIFS (SMB1) page.
2. Under Settings, complete the configuration as described in this table.
Control | Description |
Enable Latency Optimization | Enables SMB1 optimized connections for file opens and reads. Latency optimization is the fundamental component of the CIFS module and is required for base optimized connections for file opens and reads. Although latency optimization incorporates several hundred individual optimized connection types, the most frequent type of file opens is where exclusive opportunistic locks have been granted, and read-ahead operations are initiated on the file data. RiOS optimizes the bandwidth used to transfer the read-ahead data from the server side to the client side. This is the default setting. Only clear this check box if you want to disable latency optimization. Typically, you disable latency optimization to troubleshoot problems with the system. Note: Latency optimization must be enabled (or disabled) on both SteelHeads. You must restart the optimization service on the client-side SteelHead after enabling latency optimization. |
Disable Write Optimization | Prevents write optimization. If you disable write optimization, the SteelHead still provides optimization for CIFS reads and for other protocols, but you might experience a slight decrease in overall optimization. Select this control only if you have applications that assume and require write-through in the network. Most applications operate safely with write optimization because CIFS allows you to explicitly specify write-through on each write operation. However, if you have an application that doesn’t support explicit write-through operations, you must disable it in the SteelHead. If you don’t disable write-through, the SteelHead acknowledges writes before they’re fully committed to disk, to speed up the write operation. The SteelHead doesn’t acknowledge the file close until the file is safely written. |
Optimize Connections with Security Signatures (that do not require signing) | Prevents Windows SMB signing. This is the default setting. This feature automatically stops Windows SMB signing. SMB signing prevents the SteelHead from applying full optimization on CIFS connections and significantly reduces the performance gain from a SteelHead deployment. Because many enterprises already take additional security precautions (such as firewalls, internal-only reachable servers, and so on), SMB signing adds minimal additional security at a significant performance cost (even without SteelHeads). Before you enable this control, consider these factors: •If the client-side machine has Required signing, enabling this feature prevents the client from connecting to the server. •If the server-side machine has Required signing, the client and the server connect but you can’t perform full latency optimization with the SteelHead. Domain Controllers default to Required. Note: If your deployment requires SMB signing, you can optimize signed CIFS messages using the Enable SMB Signing feature. For details about SMB signing and the performance cost associated with it, see the SteelHead Deployment Guide - Protocols. |
Enable Dynamic Write Throttling | Enables the CIFS dynamic throttling mechanism that replaces the current static buffer scheme. When there’s congestion on the server side of the optimized connection, dynamic write throttling provides feedback to the client side, allowing the write buffers to be used more dynamically to smooth out any traffic bursts. We recommend that you enable dynamic write throttling because it prevents clients from buffering too much file-write data. This is the default setting. If you enable CIFS dynamic throttling, it’s activated only when there are suboptimal conditions on the server-side causing a backlog of write messages; it doesn’t have a negative effect under normal network conditions. |
Enable Applock Optimization | Enables CIFS latency optimizations to improve read and write performance for Microsoft Word (.doc) and Excel (.xls) documents when multiple users have the file open. This control enhances the Enable Overlapping Open Optimization feature by identifying and obtaining locks on read write access at the application level. The overlapping open optimization feature handles locks at the file level. Enable the applock optimization feature on the client-side SteelHead. |
Enable Print Optimization | Improves centralized print traffic performance. For example, when the print server is located in the data center and the printer is located in the branch office, enabling this option speeds the transfer of a print job spooled across the WAN to the server and back again to the printer. By default, this setting is disabled. Enable this control on the client-side SteelHead. Enabling this control requires an optimization service restart. This option supports Windows XP (client), Vista (client), Windows 2003 (server), and Windows 2008 (server). This feature doesn’t improve optimization for a Windows Vista client printing over a Windows 2008 server, because this client and server pair uses a different print protocol. |
3. Click Apply to apply your settings to the current configuration.
4. Click Save to Disk to save your settings permanently.
To enable Overlapping Open Optimization
1. On the client-side SteelHead, under Overlapping Open Optimization (Advanced), complete the configuration as described in this table.
Control | Description |
Enable Overlapping Open Optimization | Enables overlapping opens to obtain better performance with applications that perform multiple opens on the same file (for example, CAD applications). By default, this setting is disabled. Enable this setting on the client-side SteelHead. With overlapping opens enabled the SteelHead optimizes data where exclusive access is available (in other words, when locks are granted). When an oplock is not available, the SteelHead doesn’t perform application-level latency optimizations but still performs SDR and compression on the data as well as TCP optimizations. Note: If a remote user opens a file that is optimized using the overlapping opens feature and a second user opens the same file, they might receive an error if the file fails to go through a SteelHead (for example, certain applications that are sent over the LAN). If this occurs, disable overlapping opens for those applications. Use the radio buttons to set either an include list or exclude list of file types subject to overlapping open optimization. |
Optimize only the following extensions | Specify a list of extensions you want to include in overlapping open optimization. |
Optimize all except the following extensions | Specify a list of extensions you don’t want to include. For example, specify any file extensions that Enable Applock Optimization is being used for. |
2. Click Apply to apply your settings to the current configuration.
3. Click Save to Disk to save your settings permanently.
After you apply your settings, you can verify whether changes have had the desired effect by reviewing related reports. When you have verified appropriate changes, you can write the active configuration that is stored in memory to the active configuration file (or you can save it as any filename you choose). For details about saving configurations, see
Managing configuration files.
Optimizing SMB2/3
This section describes the SMB support changes with recent versions of RiOS.
SMB3 support
Enabling SMB3 on a SteelHead also enables support for SMB 3.1.1 to accelerate file sharing among Windows 10 clients to Windows Server 16 or Windows VNext (server). RiOS supports latency and bandwidth optimization for SMB 3.1.1 when SMB2/3 and SMB2 signing is enabled and configured. SMB 3.1.1 adds these encryption and security improvements:
•Encryption - The SMB 3.1.1 encryption ciphers are negotiated per-connection through the negotiate context. Windows 10 now supports the AES-128-CCM cipher in addition to AES-128-GCM for encryption. SMB 3.1.1 can negotiate to AES-128-CCM to support older configurations.
Encryption requires that SMB2 signing is enabled on the server-side SteelHead in NTLM-transparent (preferred) or NTLM-delegation mode, and/or end-to-end Kerberos mode. Domain authentication service accounts must be configured for delegation or replication as needed.
•Preauthentication Integrity - Provides integrity checks for negotiate and session setup phases. The client and server maintain a running hash on all of the messages received until there’s a final session setup response. The hash is used as input to the key derivation function (KDF) for deriving the session secret keys.
•Extensible Negotiation - Detects man-in-the-middle attempts to downgrade the SMB2/3 protocol dialect or capabilities that the SMB client and server negotiate. SMB 3.1.1 dialect extends negotiate request/response through negotiate context to negotiate complex connection capabilities such as the preauthentication hash algorithms and the encryption algorithm.
The server-side SteelHeads must be joined to the domain in Active Directory Integrated Windows 2008 or later.
With the exception of service accounts configuration, you can complete all of the above settings on the server-side SteelHead by using the Configure Domain Auth widget. See
Easy domain authentication configuration.
In RiOS 9.0 and later, enabling SMB3 on a SteelHead also enables support for the SMB 3.02 dialect introduced by Microsoft in Windows 8.1 and Windows Server 2012 R2. SMB 3.02 is only negotiated when systems of these operating system versions are directly connected. SMB 3.02 is qualified with SMB3.02 signed and unsigned traffic over IPv4 and IPv6, and encrypted connections over IPv4 and IPv6. Authenticated connections between a server-side SteelHead and a domain controller are only supported over IPv4.
RiOS 8.5 and later include support for SMB3 traffic latency and bandwidth optimization for native SMB3 clients and servers.
Windows 8 clients and Windows 2012 servers feature SMB3, an upgrade to the CIFS communication protocol. SMB3 adds features for greater resiliency, scalability, and improved security. SMB3 supports these features:
•Encryption - If the server and client negotiate SMB3 and the server is configured for encryption, all SMB3 packets following the session setup are encrypted on the wire, except for when share-level encryption is configured. Share-level encryption marks a specific share on the server as being encrypted; if a client opens a connection to the server and tries to access the share, the system encrypts the data that goes to that share. The system doesn’t encrypt the data that goes to other shares on the same server.
Encryption requires that you enable SMB signing.
•New Signing Algorithm - SMB3 uses the AES-CMAC algorithm instead of the HMAC-SHA256 algorithm used by SMB2 and enables signing by default.
•Secure Dialect Negotiation - Detects man-in-the-middle attempts to downgrade the SMB2/3 protocol dialect or capabilities that the SMB client and server negotiate. Secure dialect negotiation is enabled by default in Windows 8 and Server 2012. You can use secure dialect negotiation with SMB2 when you are setting up a connection to a server running Server 2008-R2.
SMB 3.0 dialect introduces these enhancements:
–Allows an SMB client to retrieve hashes for a particular region of a file for use in branch cache retrieval, as specified in [MS-PCCRC] section 2.4.
–Allows an SMB client to obtain a lease on a directory.
–Encrypts traffic between the SMB client and server on a per-share basis.
–Uses remote direct memory access (RDMA) transports, when the appropriate hardware and network are available.
–Enhances failover between the SMB client and server, including optional handle persistence.
–Allows an SMB client to bind a session to multiple connections to the server. The system can send a request through any channel associated with the session, and sends the corresponding response through the same channel previously used by the request.
To optimize signed SMB3 traffic, you must run RiOS 8.5 or later and enable SMB3 optimization on the client-side and server-side SteelHeads.
For additional details on SMB 3.0 specifications, go to
SMB2 support
RiOS supports for SMB2 traffic latency optimization for native SMB2 clients and servers. SMB2 allows more efficient access across disparate networks. It is the default mode of communication between Windows Vista and Windows Server 2008. Microsoft modified SMB2 again (to SMB 2.1) for Windows 7 and Windows Server 2008 R2.
SMB2 brought a number of improvements, including but not limited to:
•a vastly reduced set of opcodes (a total of only 18); in contrast, SMB1 has over 70 separate opcodes. Note that use of SMB2 doesn’t result in lost functionality (most of the SMB1 opcodes were redundant).
•general mechanisms for data pipelining and lease-based flow control.
•request compounding, which allows multiple SMB requests to be sent as a single network request.
•larger reads and writes, which provide for more efficient use of networks with high latency.
•caching of folder and file properties, where clients keep local copies of folders and files.
•improved scalability for file sharing (number of users, shares, and open files per server greatly increased).
To display optimization settings for SMB2 and SMB3
1. Choose Optimization > Protocols: SMB2/3 to display the SMB2/3 page.
2. Under Optimization, complete the configuration on both the client-side and server-side SteelHeads as described in this table.
Control | Description |
None | Disables SMB2 and SMB3 optimization. |
Enable SMB2 Optimization | Performs SMB2 latency optimization in addition to the existing bandwidth optimization features. These optimizations include cross-connection caching, read-ahead, write-behind, and batch prediction among several other techniques to ensure low-latency transfers. RiOS maintains the data integrity, and the client always receives data directly from the servers. By default, SMB2 optimization is disabled. You must enable (or disable) SMB2 latency optimization on both the client-side and server-side SteelHeads. After enabling SMB2 optimization, you must restart the optimization service. |
Enable SMB3 Optimization | Performs SMB3 latency optimization in addition to the existing bandwidth optimization features. This optimization includes cross-connection caching, read-ahead, write-behind, and batch prediction among several other techniques to ensure low-latency transfers. RiOS maintains the data integrity and the client always receives data directly from the servers. By default, SMB3 optimization is disabled. You must enable (or disable) SMB3 latency optimization on both the client-side and server-side SteelHeads. You must enable SMB2 optimization to optimize SMB3. To enable SMB3, both SteelHeads must be running RiOS 8.5 or later. After enabling SMB3 optimization, you must restart the optimization service. |
Enable DFS Optimization | Enables optimization for Distributed File System (DFS) file shares. You must upgrade both your server-side and client-side SteelHeads to RiOS 9.5 or later to enable DFS optimization. However, this box only needs to be checked on the client-side SteelHead. |
3. Under Down Negotiation, complete the configuration on the client-side SteelHead as described in this table.
Control | Description |
None | Don’t attempt to negotiate the CIFS session down to SMB1. |
SMB2 and SMB3 to SMB1 | Enable this control on the client-side SteelHead. Optimizes connections that are successfully negotiated down to SMB1 according to the settings on the Optimization > Protocols: CIFS (SMB1) page. RiOS bypasses down-negotiation to SMB1 when the client or the server is configured to use only SMB2/3 or the client has already established an SMB2/3 connection with the server. If the client already has a connection with the server, you must restart the client. Down-negotiation can fail if the client only supports SMB2 or if it bypasses negotiation because the system determines that the server supports SMB2. When down-negotiation fails, bandwidth optimization is not affected. . |
4. Click Apply to apply your settings to the current configuration.
5. If you have enabled or disabled SMB1, SMB2, or SMB3 optimization, you must restart the optimization service.
For appliances with feature-tier licensing, you can configure and enable CIFS SMB2/3 optimization even if the feature is not licensed; however, the feature needs to be both enabled and licensed to work. If the feature is not licensed, the interface displays an alert. For more information, see
“Feature-tier licensing” on page 341.Related topics
Configuring SMB signing
You display and modify SMB signing settings in the Optimization > Protocols: CIFS (SMB1) and (SMB2/3) pages.
When sharing files, Windows provides the ability to sign CIFS messages to prevent man-in-the-middle attacks. Each CIFS message has a unique signature that prevents the message from being tampered with. This security feature is called SMB signing.
You can enable the RiOS SMB signing feature on a server-side SteelHead to alleviate latency in file access with CIFS acceleration while maintaining message security signatures. With SMB signing on, the SteelHead optimizes CIFS traffic by providing bandwidth optimizations (SDR and LZ), TCP optimizations, and CIFS latency optimizations—even when the CIFS messages are signed.
RiOS 8.5 and later include support for optimizing SMB3-signed traffic for native SMB3 clients and servers. You must enable SMB3 signing if the client or server uses any of these settings:
•SMB2/SMB3 signing set to required. SMB3 signing is enabled by default.
•SMB3 secure dialect negotiation (enabled by default on the Windows 8 client).
•SMB3 encryption.
SteelHeads include support for optimizing SMB2-signed traffic for native SMB2 clients and servers. SMB2 signing support includes:
•Windows domain integration, including domain join and domain-level support.
•Authentication using transparent mode and delegation mode. Starting with RiOS 9.6, transparent mode is the recommended mode for SMB2 and is the default. To use transparent mode with Windows 7 and above, you must join the server-side SteelHead as an Active Directory integrated (Windows 2008 and later). For details, see
Authentication.
Domain security
The RiOS SMB signing feature works with Windows domain security and is fully compliant with the Microsoft SMB signing version 1, version 2, and version 3 protocols. RiOS supports domain security in both native and mixed modes for:
•Windows 2000
•Windows 2003 R2
•Windows 2008
•Windows 2008 R2
The server-side SteelHead in the path of the signed CIFS traffic becomes part of the Windows trust domain. The Windows domain is either the same as the domain of the user or has a trust relationship with the domain of the user. The trust relationship can be either a parent-child relationship or an unrelated trust relationship.
RiOS optimizes signed CIFS traffic even when the logged-in user or client machine and the target server belong to different domains, provided these domains have a trust relationship with the domain the SteelHead has joined. RiOS supports delegation for users that are in domains trusted by the server's domain. The trust relationships include:
•a basic parent and child domain relationship. Users from the child domain access CIFS/MAPI servers in the parent domain. For example, users in ENG.RVBD.COM accessing servers in RVBD.COM.
•a grandparent and child domain relationship. Users from grandparent domain access resources from the child domain. For example, users from RVBD.COM accessing resources in DEV.ENG.RVBD.COM.
•a sibling domain relationship. For example, users from ENG.RVBD.COM access resources in MARKETING.RVBD.COM.
Authentication
The process RiOS uses to authenticate domain users depends upon its version.
RiOS features these authentication modes:
•NTLM transparent mode - Uses NTLM authentication end to end between the client-side and server-side SteelHeads and the server-side SteelHead and the server. This is the default mode for SMB1 and SMB2/3 signing starting with RiOS 9.6. Transparent mode supports all Windows clients and servers, including Windows 2008 R2, that have NTLM enabled. We recommend using this mode.
•NTLM delegation mode - Uses Kerberos delegation architecture to authenticate signed packets between the server-side SteelHead and any configured servers participating in the signed session. NTLM is used between the client-side and server-side SteelHead. SMB2 delegation mode supports Windows 7 and Samba 4 clients. Delegation mode requires additional configuration of Windows domain authentication.
•Kerberos authentication support mode - Uses Kerberos authentication end to end between the client-side and server-side SteelHead and the server-side SteelHead and the server. Kerberos authentication requires additional configuration of Windows domain authentication.
Transparent mode doesn’t support the following configurations; instead, use Kerberos authentication support mode:
•Windows 2008 R2 domains that have NTLM disabled.
•Windows servers that are in domains with NTLM disabled.
•Windows 7 clients that have NTLM disabled.
You can enable extra security using the secure inner channel. The peer SteelHeads using the secure channel encrypt signed CIFS traffic over the WAN. For details, see
Configuring secure peers.
SMB signing prerequisites and recommendations
This section describes prerequisites and recommendations for using SMB signing.
•With RiOS Server Message Block (SMB) signing enabled, SteelHeads sign the traffic between the client and the client-side SteelHead and between the server and the server-side SteelHead. The traffic isn’t signed between the SteelHeads, but the SteelHeads implement their own integrity mechanisms. Whether SteelHeads are used or not, SMB-signed traffic is only signed, not encrypted. For maximum security, we recommend that you configure the SteelHeads as SSL peers and use the secure inner channel to secure the traffic between them. For details, see
Configuring secure peers.
•If you already have a delegate user and are joined to a domain, enabling SMB2 signing will work when enabled with no additional configuration.
•SMB signing requires joining a Windows domain. It is vital to set the correct time zone for joining a domain. The most common reason for failing to join a domain is a significant difference in the system time on the Windows domain controller and the SteelHead. When the time on the domain controller and the SteelHead don’t match, this error message appears:
lt-kinit: krb5_get_init_creds: Clock skew too great
We recommend using Network Time Protocol (NTP) time synchronization to synchronize the client and server clocks. It is critical that the SteelHead time is the same as on the Active Directory controller. Sometimes an NTP server is down or inaccessible, in which case there can be a time difference. You can also disable NTP if it isn’t being used and manually set the time. You must also verify that the time zone is correct. For details, see
Configuring the date and time. For more troubleshooting, see
Troubleshooting a domain join failure.
•Both the client and the server must support SMB2 and SMB3 to use RiOS SMB2 and SMB3 signing.
Verifying the domain functional level and host settings
This section describes how to verify the domain and DNS settings before joining the Windows domain and enabling SMB signing.
To verify the domain functional level (delegation mode and replication users)
1. If you are using delegation mode or configuring replication users, verify that the Windows domain functionality is at the Windows 2003 level or higher. In Windows, open Active Directory Users and Computers on the domain controller, choose Domain Name, right-click, and select Raise Domain functionality level. If the domain isn’t already at the Windows 2003 level or higher, manually raise the domain functionality.
After you raise the domain level, you can’t lower it.
2. Identify the full domain name, which must be the same as DNS. You must specify this name when you join the server-side SteelHead to the domain.
3. Identify the short (NetBIOS) domain name by pressing Ctrl+Alt+Delete on any member server. You must explicitly specify the short domain name when the SteelHead joins the domain if it doesn’t match the far left portion of the fully qualified domain name.
4. Make sure that the primary or auxiliary interface for the server-side SteelHead is routable to the DNS and the domain controller.
5. Verify the DNS settings.
You must be able to ping the server-side SteelHead, by name, from a CIFS server joined to the same domain that the server-side SteelHead joins. If you can’t, you must manually create an entry in the DNS server for the server-side SteelHead and perform a DNS replication prior to joining the Windows domain. The SteelHead doesn’t automatically register the required DNS entry with the Windows domain controller.
You must be able to ping the domain controller, by name, whose domain the server-side SteelHead joins. If you can’t, choose Networking > Networking: Host Settings to configure the DNS settings.
The next step is to join a Windows domain.
To join a Windows domain
•Choose Optimization > Active Directory: Auto Config on the server-side SteelHead and join the domain.
Enabling SMB signing
After you have joined a Windows domain, you can enable SMB signing.
When SMB signing is set to Enabled for both the client-side and server-side SMB component (but not set to Required), and the RiOS Optimize Connections with Security Signatures feature is enabled, it takes priority and prevents SMB signing. You can resolve this by disabling the Optimize Connections with Security Signatures feature and restarting the SteelHead before enabling this feature.
The RiOS Optimize Connections with Security Signatures feature can lead to unintended consequences when SMB signing is required on the client but set to Enabled on the server. With this feature enabled, the client concludes that the server doesn’t support signing and might terminate the connection with the server as a result. You can prevent this condition by performing one of these actions before enabling this feature:
•Uncheck the Optimize Connections with Security Signatures check box in the Optimization > Protocols: CIFS (SMB1) page, then restart the SteelHead.
•Apply a Microsoft Service pack update to the clients (recommended). You can download the update from the Microsoft Download Center:
To enable SMB1 signing
1. On the server-side SteelHead, choose Optimization > Protocols: CIFS (SMB1) to display the CIFS (SMB1) page.
2. Under SMB Signing, complete the configuration as described in this table.
Control | Description |
Enable SMB Signing | Enables CIFS traffic optimization by providing bandwidth optimizations (SDR and LZ), TCP optimizations, and CIFS latency optimizations, even when the CIFS messages are signed. By default, this control is disabled. You must enable this control on the server-side SteelHead. Note: If you enable this control without first joining a Windows domain, a message tells you that the SteelHead must join a domain before it can support SMB signing. |
NTLM Transparent Mode | Provides SMB1 signing with transparent authentication. The server-side SteelHead uses NTLM to authenticate users. We recommend using this mode for the simplest configuration. Transparent mode is the default for RiOS 9.6 and later. For Windows 7 and later, we recommend that you also specify Active Directory integrated (Windows 2008 and later) in the Join Account Type drop-down list in the Optimization > Active Directory: Domain Join page. See To configure a Windows domain in Domain mode for more information. |
NTLM Delegation Mode | Re-signs SMB signed packets using the Kerberos delegation facility. We recommend using transparent mode instead of delegation mode because it is easier to configure and maintain. Delegation mode requires additional configuration. Choose Optimization > Active Directory: Service Accounts or click the link provided in the CIFS Optimization page. |
Enable Kerberos Authentication Support | Provides SMB signing with end-to-end authentication using Kerberos. The server-side SteelHead uses Kerberos to authenticate users. In addition to enabling this feature, you must also join the server-side SteelHead to a Windows domain and add replication users on the Optimization > Active Directory: Auto Config page. No configuration is needed on the client-side SteelHead. If you want to use password replication policy (PRP) with replication users, Kerberos authentication requires additional replication user configuration on the Windows 2008 Domain Controller. |
3. Click Apply to apply your settings to the running configuration.
4. Click Save to Disk to save your settings permanently.
To enable SMB2/3 signing
1. On the server-side SteelHead, choose Optimization > Protocols: SMB2/3 to display the SMB2/3 page.
2. Under Signing, complete the configuration as described in this table.
Control | Description |
Enable SMB2 and SMB3 Signing | Enables SMB2/3 traffic optimization by providing bandwidth optimizations (SDR and LZ), TCP optimizations, and SMB2/3 latency optimizations, even when the SMB2/3 messages are signed. By default, this control is disabled. You must enable this control on the server-side SteelHead. If you are upgrading and already have a delegate user, and the SteelHead is already joined to a domain, enabling SMB2/3 signing works when enabled with no additional configuration. Note: If you enable this control without first joining a Windows domain, a message tells you that the SteelHead must join a domain before it can support SMB2/3 signing. Note: You must enable SMB2/3 latency optimization before enabling SMB2/3 signing. To enable SMB2/3 latency optimization, choose Optimization > Protocols: SMB2/3. |
NTLM Transparent Mode | Provides SMB2/3 signing with transparent authentication. The server-side SteelHead uses NTLM to authenticate users. We recommend using this mode for the simplest configuration. Transparent mode is the default for RiOS 9.6 and later. For Windows 7 and later, we recommend that you also specify Active Directory integrated (Windows 2008 and later) in the Join Account Type drop-down list in the Optimization > Active Directory: Domain Join page. See To configure a Windows domain in Domain mode for more information. |
NTLM Delegation Mode | Re-signs SMB2/3 signed packets using the delegation facility. We recommend using transparent mode instead of delegation mode. Delegation mode requires additional configuration. Choose Optimization > Active Directory: Service Accounts or click the link in the CIFS Optimization page. |
Enable Kerberos Authentication Support | Provides SMB2/3 signing with end-to-end authentication using Kerberos. The server-side SteelHead uses Kerberos to authenticate users. In addition to enabling this feature, you must also join the server-side SteelHead to a Windows domain and add replication users: 1. Choose Optimization > Active Directory: Domain Join to join the server-side SteelHead to a Windows domain. 2. Choose Optimization > Active Directory: Auto Config. 3. Choose Configure Replication Account to add the replication users. For SMB3, the server-side SteelHead must be running RiOS 8.5 or later. No configuration is needed on the client-side SteelHead. If you want to use password replication policy (PRP) with replication users, Kerberos authentication requires additional replication user configuration on the Windows 2008 domain controller. |
3. Click Apply to apply your settings to the running configuration.
4. Click Save to Disk to save your settings permanently.
Related topics
Encrypting SMB3
If the SMB server and client negotiate SMB3 and the server is configured for encryption, you can configure share-level encryption. Share-level encryption marks a specific share on the server as encrypted so that if a client opens a connection to the server and tries to access the share, RiOS encrypts the data that goes to that share. RiOS doesn’t encrypt the data that goes to other shares on the same server.
RiOS 9.5 and later support the SMB 3.1.1 dialect when SMB3 is enabled. RiOS 9.0 and later support the SMB 3.0.2 dialect when SMB3 is enabled.
To encrypt SMB3 traffic
1. Choose Optimization > Active Directory: Domain Join on the server-side SteelHead and join the domain.
2. Choose Optimization > Protocols: SMB2/3 and enable SMB3 optimization on the client-side and server-side SteelHead.
3. Enable SMB2/3 signing on the server-side SteelHead.
4. Restart the optimization service.
Viewing SMB traffic on the Current Connections report
The Current Connections report displays the SMB traffic using these labels:
•SMB 2.0 and SMB 2.0.2 connections show as SMB20 or SMB21-SIGNED.
•SMB 2.1 connections show as SMB21 or SMB21-SIGNED.
•SMB 3.0 and SMB 3.0.2 connections show as SMB30 if there are protocol errors, or SMB30-ENCRYPTED or SMB30-SIGNED.
•SMB 3.1.1 connections show as SMB31 if there are protocol errors, or SMB31-ENCRYPTED or SMB31-SIGNED.
When some shares are marked for encryption and others aren’t, if a connection accesses both encrypted and nonencrypted shares, the report shows the connection as SMB30-ENCRYPTED or SMB31-ENCRYPTED.
•All unsupported SMB dialects show as SMB-UNSUPPORTED.
Configuring HTTP optimization
This section describes how to configure HTTP optimization features. HTTP optimization works for most HTTP and HTTPS applications, including SAP, customer relationship management, enterprise resource planning, financial, document management, and intranet portals.
It includes these topics:
About HTTP optimization
HTTP optimization has been tested on Internet Explorer 6.0 or later and Firefox 2.0 or later. HTTP optimization has been tested on Apache 1.3, Apache 2.2, Microsoft IIS 5.0, 6.0, 7.5, and 8; Microsoft SharePoint, ASP.net, and Microsoft Internet Security and Acceleration Server (ISA).
FPSE supports SharePoint Office clients 2007 and 2010, installed on Windows 7 (SP1) and Windows 8. SharePoint 2013 doesn’t support FPSE.
Basic steps
This table summarizes the basic steps for configuring HTTP optimization, followed by detailed procedures.
Task | Reference |
1. Enable HTTP optimization for prefetching web objects. This is the default setting. | |
2. Enable Store All Allowable Objects or specify object prefetch extensions that represent prefetched objects for URL Learning. By default, the SteelHead prefetches .jpg, .gif, .js, .png, and .css objects when Store All Allowable Objects is disabled. | |
3. Enable per-host auto configuration to create an optimization scheme automatically based on HTTP traffic statistics gathered for a host. | |
4. Optionally, specify which HTML tags to prefetch for Parse and Prefetch. By default, the SteelHead prefetches base/href, body/background, img/src, link/href, and script/src HTML tags. | |
5. Optionally, set a static HTTP optimization scheme for a host or server subnet. For example, an optimization scheme can include a combination of the URL Learning, Parse and Prefetch, or Object Prefetch features. The default options for subnets are URL Learning, Object Prefetch Table, and Strip Compression. RiOS supports authorization optimizations and basic tuning for server subnets. We recommend that you enable: –Strip compression - Removes the Accept-Encoding lines from the HTTP headers that contain gzip or deflate. These Accept-Encoding directives allow web browsers and servers to send and receive compressed content rather than raw HTML. –Insert cookie - Tracks repeat requests from the client. –Insert Keep Alive - Maintains persistent connections. While this feature is enabled by default, it’s often disabled, even though the web server can support it. This is especially true for Apache web servers that serve HTTPS to Microsoft Internet Explorer browsers. | |
6. If necessary, define in-path rules that specify when to apply HTTP optimization and whether to enable HTTP latency support for HTTPS. | |
7. If required, enable capturing of Office 365 User Identities to be part of the Current Connections report. | |
For the SteelHead to optimize HTTPS traffic (HTTP over SSL), you must configure a specific in-path rule that enables both SSL optimization and HTTP optimization.
Configuring HTTP optimization feature settings
You display and modify HTTP optimization feature settings in the Optimization > Protocols: HTTP page. For an overview of the HTTP optimization features and basic deployment considerations, see
Configuring HTTP optimization.
Configuring HTTP optimization can be a complex task. There are many different options and it isn’t always easy to determine what settings are required for a particular application without extensive testing. HTTP automatic configuration creates an ideal HTTP optimization scheme based on a collection of comprehensive statistics per host. The host statistics create an application profile, used to configure HTTP automatically and assist with any troubleshooting.
You can easily change an automatically configured server subnet to override settings.
All of the HTTP optimization features operate on the client-side SteelHead. You configure HTTP optimizations only on the client-side SteelHead.
For appliances with feature-tier licensing, you can configure and enable HTTP optimization even if the feature is not licensed; however, the feature needs to be both enabled and licensed to work. If the feature is not licensed, the interface displays an alert. For more information, see
“Feature-tier licensing” on page 341.To display or modify HTTP optimization settings
1. Choose Optimization > Protocols: HTTP to display the HTTP Configuration page.
2. Under Settings, complete the configuration as described in this table.
Control | Description |
Enable HTTP Optimization | Prefetches and stores objects embedded in web pages to improve HTTP traffic performance. By default, HTTP optimization is enabled. |
Enable SteelFlow WTA | Collects SteelFlow WTA data that can be sent (through REST API) to a SteelCentral AppResponse appliance. SteelFlow WTA data includes HTTP time stamp and payload data for web objects optimized by the SteelHead. The SteelCentral AppResponse appliance can combine this data into page views and calculate detailed metrics for server/network busy times, HTTP request/response delays, slow pages, view rates, HTTP response codes, and so on. Enable this control and HTTP optimization on the client-side and the server-side SteelHeads. You must enable REST API access on each client-side SteelHead. Each client-side SteelHead needs at least one access code defined in the REST API Access page. You must copy and paste this code into the SteelCentral AppResponse Web Console. To enable REST API access, choose Administration > Security: REST API Access. You must enable SSL optimization on the SteelHead if any of the monitored web applications are encrypted with SSL. To enable SSL, choose Optimization > SSL: SSL Main Settings. To configure the communication between a SteelHead and a SteelCentral AppResponse appliance, use SteelCentral Controller for SteelHead. The SteelCentral AppResponse appliance polls the SteelHead for WTA metrics through REST API on TCP port 443 (HTTPS). The SteelCentral AppResponse appliance must have access to the primary port IP of the client-side and the server-side SteelHead through TCP port 443. For details, see the SteelCentral Controller for SteelHead Deployment Guide and the SteelCentral AppResponse Integration with Other Riverbed Solutions document. |
Enable SaaS User Identity (Office 365) | Enables collection of statistics by user ID, which is viewable as an additional column in the Current Connections report. For more information, see Viewing Connection History reports. The SteelHead collects user IDs only from Office 365 users that are authenticated with single sign-on (SSO) using Active Directory Federation Services (ADFS). Additional configuration is required to enable this feature. See To enable the SaaS User Identity feature for details. This control is disabled by default. You only need to enable this control on one SteelHead in your network. We recommend enabling it on the client-side SteelHead for Office 365 traffic and the server-side SteelHead for SMB and MoH traffic. Starting with RiOS 9.7, user IDs for SMB encrypted, SMB signed, and MoH connections that are optimized are displayed in this field, and user IDs extracted on Office 365, SMB, and MoH connections are propagated to other connections originating from the same source IP. See Connections table for details. |
Store All Allowable Objects | Optimizes all objects in the object prefetch table. By default, Store All Allowable Objects is enabled. |
Store Objects With The Following Extensions | Examines the control header to determine which objects to store. When enabled, RiOS doesn’t limit the objects to those listed in Extensions to Prefetch but rather prefetches all objects that the control header indicates are storable. This control header examination is useful to store web objects encoded into names without an object extension. |
Disable the Object Prefetch Table | Stores nothing. |
Minimum Object Prefetch Table Time | Sets the minimum number of seconds the objects are stored in the local object prefetch table. The default is 60 seconds. This setting specifies the minimum lifetime of the stored object. During this lifetime, any qualified If-Modified-Since (IMS) request from the client receives an HTTP 304 response, indicating that the resource for the requested object has not changed since stored. |
Maximum Object Prefetch Table Time | Sets the maximum number of seconds the objects are stored in the local object prefetch table. The default is 86400 seconds. This setting specifies the maximum lifetime of the stored object. During this lifetime, any qualified If-Modified-Since (IMS) request from the client receives an HTTP 304 response, indicating that the resource for the requested object has not changed since stored. |
Extensions to Prefetch | Specifies object extensions to prefetch, separated by commas. By default the SteelHead prefetches .jpg, .gif, .js, .png, and .css object extensions. These extensions are only for URL Learning and Parse and Prefetch. |
Enable Per-Host Auto Configuration | Creates an HTTP optimization scheme automatically by evaluating HTTP traffic statistics gathered for the host or server subnet. RiOS derives the web server hostname or server subnet from the HTTP request header and collects HTTP traffic statistics for that host or subnet. RiOS evaluates hostnames and subnets that don’t match any other rules. Automatic configurations define the optimal combination of URL Learning, Parse and Prefetch, and Object Prefetch Table for the host or subnet. After RiOS evaluates the host or subnet, it appears on the Subnet or Host list at the bottom of the page as Auto Configured. HTTP traffic is optimized automatically. Automatic configuration is enabled by default. If you have automatically configured hostnames and then disabled Per-Host Auto Configuration, the automatically configured hosts are removed from the list when the page refreshes. They aren’t removed from the database. When you reenable Per- Host Auto Configuration, the hosts reappear in the list with the previous configuration settings. Enable this control on the client-side SteelHead. You can’t remove an automatically configured hostname or subnet from the list, but you can reconfigure them, save them as a static host, and then remove them. In RiOS 8.5 and later, the default configuration appears in the list only when automatic configuration is disabled. To allow a static host to be automatically configured, remove it from the list. |
Enable Kerberos Authentication Support | When enabled on the server-side SteelHead, optimizes HTTP connections using Kerberos authentication end-to-end between the client-side and server-side SteelHeads and the server-side SteelHead and the server. This method enables RiOS to prefetch resources when the web server employs per-request Kerberos. In addition to enabling this control on the server-side SteelHead, you must also join the server-side SteelHead to a Windows domain and add replication users: choose Optimization > Active Directory: Auto Config > Configure Replication Account. No additional configuration is needed on the client-side SteelHead. |
3. Click Apply to apply your settings to the running configuration.
4. Click Save to Disk to save your settings permanently.
To enable the SaaS User Identity feature
Use one of the following methods to enable SaaS identity. The second method requires the Riverbed Cloud Portal and the SteelHead SaaS service. If your network uses the SteelHead SaaS service, you can use either method.
Method 1
3. Add an in-path rule on the client-side SteelHead to optimize traffic from login.microsoftonline.com. See
Configuring in-path rules for information.
4. Choose Optimization > Protocols: HTTP, and select the Enable SaaS User Identity (Office 365) check box.
5. Optional: To use this feature with a SteelCentral AppResponse appliance, make the following configuration changes:
–From the SteelHead appliance, choose Optimization > Protocols: HTTP, and select the Enable SteelFlow WTA check box.
–Add an entry inside the user session tracking manager on the SteelCentral AppResponse appliance. See the SteelCentral AppResponse User Guide for details.
Method 2 (SteelHead SaaS service required)
2. Activate the O365 User Identity (SAASUID) application on both the Riverbed Cloud Portal and the SteelHead. See
Activating SaaS applications for more information.
3. Configure the associated proxy certificates on the Riverbed Cloud Portal. For more information, see the chapter about Configuring SaaS Proxy Certificates in the SteelHead SaaS User Guide (for Legacy Cloud Accelerator).
To prefetch HTML tags
1. Under HTML Tags to Prefetch, select which HTML tags to prefetch. By default, these tags are prefetched: base/href, body/background, img/src, link/href, and script/src.
These tags are for the Parse and Prefetch feature only and don’t affect other prefetch types, such as object extensions.
2. To add a new tag, complete the configuration as described in this table.
Control | Description |
Add a Prefetch Tag | Displays the controls to add an HTML tag. |
Tag Name | Specify the tag name. |
Attribute | Specify the tag attribute. |
Add | Adds the tag. |
Configuring a server subnet or host
Under Settings, you can enable URL Learning, Parse and Prefetch, and Object Prefetch Table in any combination for any host server or server subnet. You can also enable authorization optimization to tune a particular subnet dynamically, with no service restart required.
The default settings are URL Learning, Object Prefetch Table, and Strip Compression for all traffic with automatic configuration disabled. The default setting applies when HTTP optimization is enabled, regardless of whether there’s an entry in the Subnet or Host list. In the case of overlapping subnets, specific list entries override any default settings.
In RiOS 8.5 and later, the default rule is applied if any other rule (that is, the subnet rule or host-based rule) doesn’t match.
Suppose the majority of your web servers have dynamic content applications but you also have several static content application servers. You could configure your entire server subnet to disable URL Learning and enable Parse and Prefetch and Object Prefetch Table, optimizing HTTP for the majority of your web servers. Next, you could configure your static content servers to use URL Learning only, disabling Parse and Prefetch and Object Prefetch Table.
To configure an HTTP optimization scheme for a particular hostname or server subnet
1. Choose Optimization > Protocols: HTTP to display the HTTP page.
2. On the client-side SteelHead, under Server Subnet and Host Settings, complete the configuration as described in this table.
Control | Description |
Add a Subnet or Host | Displays the controls for adding a server subnet or host. The server must support keepalive. |
Server Subnet or Hostname | Specify an IP address and mask pattern for the server subnet, or a hostname, on which to set up the HTTP optimization scheme. Use this format for an individual subnet IP address and netmask: xxx.xxx.xxx.xxx/xx (IPv4) x:x:x::x/xxx (IPv6) You can also specify 0.0.0.0/0 (all IPv4) or ::/0 (all IPv6) as the wildcard for either IPv4 or IPv6 traffic. |
Row Filters | •Static - Displays only the static subnet or hostname configurations in the subnet and hostname list. You create a static configuration manually to fine-tune HTTP optimization for a particular host or server subnet. By default, RiOS displays both automatic and static configurations. •Auto - Displays only the automatic subnet or hostname configurations in the subnet and hostname list. RiOS creates automatic configurations when you select Enable Per-Host Auto Configuration, based on an application profile. Automatic configurations define the optimal combination of URL learning, Parse and Prefetch, and Object Prefetch Table for the host or subnet. By default, RiOS displays both automatic and static configurations. •Auto (Eval) - Displays the automatic hostname configurations currently under evaluation. By default, the evaluation period is 1000 transactions. |
Basic tuning | |
Strip Compression | Marks the accept-encoding lines from the HTTP compression header so they’re not returned in calls. An accept-encoding directive compresses content rather than using raw HTML. Enabling this option improves the performance of the SteelHead data reduction algorithms. By default, strip compression is enabled. |
Insert Cookie | Adds a cookie to HTTP applications that don’t already have one. HTTP applications frequently use cookies to keep track of sessions. The SteelHead uses cookies to distinguish one user session from another. If an HTTP application doesn’t use cookies, the client SteelHead inserts one so that it can track requests from the same client. By default, this setting is disabled. |
Insert Keep Alive | Uses the same TCP connection to send and receive multiple HTTP requests and responses, as opposed to opening a new one for every single request and response. Specify this option when using the URL Learning or Parse and Prefetch features with HTTP 1.0 or HTTP 1.1 applications using the Connection Close method. This setting is enabled by default. |
Caching | |
Object Prefetch Table | Enable this control on the client-side SteelHead to store HTTP object prefetches from HTTP GET requests for cascading style sheets, static images, and Java scripts in the Object Prefetch Table. When the browser performs If-Modified-Since (IMS) checks for stored content or sends regular HTTP requests, the client-side SteelHead responds to these IMS checks and HTTP requests, cutting back on round-trips across the WAN. |
Stream Splitting | Enable this control on the client-side SteelHead to split Silverlight smooth streaming, Adobe Flash HTTP dynamic streams, and Apple HTTP Live Streaming (HLS). This control includes support for Microsoft Silverlight video and Silverlight extensions support on Internet Information Server (IIS) version 7.5 installed on Windows Server 2008 R2. To split Adobe Flash streams, you must set up the video origin server before enabling this control. For details, see the SteelHead Deployment Guide. Apple HLS is an HTTP-based video delivery protocol for iOS and OSX that streams video to iPads, iPhones, and Macs. HLS is part of an upgrade to QuickTime. RiOS splits both live and on-demand video streams. Use this control to support multiple branch office users from a single real-time TCP stream. The SteelHead identifies live streaming video URL fragment requests and delays any request that is already in progress. When the client receives the response, it returns the same response to all clients requesting that URL. As an example, when employees in branch offices simultaneously start clients (through browser plugins) that all request the same video fragment, the client-side SteelHead delays requests for that fragment because it’s already outstanding. Since many identical requests typically are made before the first request is responded to, the result is many hits to the server and many bytes across the WAN. When you enable stream splitting on the client-side SteelHead, it identifies live streaming video URL fragment requests and holds subsequent requests for that fragment because the first request for that fragment is outstanding. When the response is received, it’s delivered to all clients that requested it. Thus, only one request and response pair for a video fragment transfers over the WAN. With stream splitting, the SteelHead replicates one TCP stream for each individual client. RiOS 9.1 and later increase the cache size by up to five times, depending on the SteelHead model, and stores the video fragments for 30 seconds to keep clients watching the same live video in sync. For details, see the SteelHead Deployment Guide - Protocols. Stream splitting optimization doesn’t change the number of sockets that are opened to the server, but it does reduce the number of requests made to the server. Without this optimization, each fragment is requested once per client. With this optimization, each fragment is requested once. Stream splitting is disabled by default. Enabling this control requires that HTTP optimization is enabled on the client-side and server-side SteelHeads. The client-side SteelHead doesn’t require an optimization service restart in RiOS 9.1 or later. No other changes are necessary on the server-side SteelHead. In addition to splitting the video stream, you can prepopulate video at branch office locations during off-peak periods and then retrieve them for later viewing. For information, see the protocol http prepop list url command in the Riverbed Command-Line Interface Reference Manual. To view a graph of the data reduction resulting from stream splitting, choose Reports > Optimization: Live Video Stream Splitting. |
Prefetch schemes | |
URL Learning | Enables URL Learning, which learns associations between a base URL request and a follow-on request. Stores information about which URLs have been requested and which URLs have generated a 200 OK response from the server. This option fetches the URLs embedded in style sheets or any JavaScript associated with the base page and located on the same host as the base URL. For example, if a web client requests /a.php?c=0 and then requests /b.php?c=0, and another client requests a.php?c=1 and then b.php?c=1, if somebody requests a.php?c=123, RiOS determines that it might request b.php?c=123 next and thus prefetches it for the client. URL Learning works best with nondynamic content that doesn’t contain session-specific information. URL Learning is enabled by default. Your system must support cookies and persistent connections to benefit from URL Learning. If your system has cookies disabled and depends on URL rewriting for HTTP state management, or is using HTTP 1.0 (with no keepalives), you can force the use of cookies using the Add Cookie option and force the use of persistent connections using the Insert Keep Alive option. |
Parse and Prefetch | Enables Parse and Prefetch, which parses the base HTML page received from the server and prefetches any embedded objects to the client-side SteelHead. This option complements URL Learning by handling dynamically generated pages and URLs that include state information. When the browser requests an embedded object, the SteelHead serves the request from the prefetched results, eliminating the round-trip delay to the server. The prefetched objects contained in the base HTML page can be images, style sheets, or any Java scripts associated with the base page and located on the same host as the base URL. Parse and Prefetch requires cookies. If the application doesn’t use cookies, you can insert one using the Insert Cookie option. |
Authentication tuning | |
Reuse Auth | Allows an unauthenticated connection to serve prefetched objects, as long as the connection belongs to a session whose base connection is already authenticated. This option is most effective when the web server is configured to use per-connection NTLM or Kerberos authentication. |
Force NTLM | In the case of negotiated Kerberos and NTLM authentication, forces NTLM. Kerberos is less efficient over the WAN because the client must contact the Domain Controller to answer the server authentication challenge and tends to be employed on a per-request basis. We recommend enabling Strip Auth Header along with this option. |
Strip Auth Header | Removes all credentials from the request on an already authenticated connection. This method works around Internet Explorer behavior that reauthorizes connections that have previously been authorized. This option is most effective when the web server is configured to use per-connection NTLM authentication. Note: If the web server is configured to use per-request NTLM authentication, enabling this option might cause authentication failure. |
Gratuitous 401 | Prevents a WAN round trip by issuing the first 401 containing the realm choices from the client-side SteelHead. We recommend enabling Strip Auth Header along with this option. This option is most effective when the web server is configured to use per-connection NTLM authentication or per-request Kerberos authentication. Note: If the web server is configured to use per-connection Kerberos authentication, enabling this option might cause additional delay. |
FPSE | Enables Microsoft Front Page Server Extensions (FPSE) protocol optimization. FPSE is one of the protocols in the Front Page protocol suite. FPSE compose a set of SharePoint server-side applications that let users simultaneously collaborate on the same website and web server to enable multiuser authoring. The protocol is used for displaying site content as a file system and allows file downloading, uploading, creation, listing, and locking. FPSE uses HTTP for transport. RiOS 8.5 and later cache and respond locally to some FPSE requests to save at least five round-trips per each request, resulting in performance improvements. SSL connections and files smaller than 5 MB can experience significant performance improvements. FPSE supports SharePoint Office 2007/2010 clients installed on Windows XP and Windows 7 and SharePoint Server 2007/2010. Note: SharePoint 2013 doesn’t use the FPSE protocol when users are editing files. It uses WebDAV when users map SharePoint drives to local machines and browse directories. FPSE is disabled by default. Choose Reports > Networking: Current Connections to view the HTTP-SharePoint connections. To display only HTTP-SharePoint connections, click add filter in the Query area, select for application from the drop-down menu, select HTTP-SharePoint, and click Update. |
WebDAV | Enables Microsoft Web Distributed Authoring and Versioning (WebDAV) protocol optimization. WebDAV is an open-standard extension to the HTTP 1.1 protocol that enables file management on remote web servers. Some of the many Microsoft components that use WebDAV include WebDAV redirector, Web Folders, and SMS/SCCM. RiOS predicts and prefetches WebDAV responses, which saves multiple round-trips and makes browsing the SharePoint file repository more responsive. WebDAV optimization is disabled by default. Choose Reports > Networking: Current Connections to view the HTTP-SharePoint connections. To display only HTTP-SharePoint connections, click add filter in the Query area, select for application from the drop-down menu, select HTTP-Sharepoint, and click Update. |
Add | Adds the subnet or hostname. |
Apply/Apply and Make Static | Click to save the configuration. Click Apply to save the configuration for static hostnames and subnets or Apply and Make Static to save an automatically configured host as a static host. |
3. Click Apply to apply your settings to the running configuration.
4. Click Save to Disk to save your settings permanently.
To modify subnet configuration properties, use the drop-down lists in the table row for the configuration.
To modify server properties, use the drop-down list in the table row for the server.
Configuring Oracle Forms optimization
You can display and modify Oracle Forms optimization settings in the Optimization > Protocols: Oracle Forms page.
Oracle Forms is a platform for developing user interface applications to interact with an Oracle database. It uses a Java applet to interact with the database in either native, HTTP, or HTTPS mode. The SteelHead decrypts, optimizes, and then reencrypts the Oracle Forms traffic.
You can configure Oracle Forms optimization in these modes:
•Native - The Java applet communicates with the backend server, typically over port 9000. Native mode is also known as socket mode.
•HTTP - The Java applet tunnels the traffic to the Oracle Forms server over HTTP, typically over port 8000.
•HTTPS - The Java applet tunnels the traffic to the Oracle Forms server over HTTPS, typically over port 443. HTTPS mode is also known as SSL mode.
Use Oracle Forms optimization to improve Oracle Forms traffic performance. RiOS supports 6i, which comes with Oracle Applications 11i, and 10gR2, which comes with Oracle E-Business Suite R12.
This feature doesn’t need a separate license and is enabled by default. However, you must also set an in-path rule to enable this feature.
Optionally, you can enable IPSec encryption to protect Oracle Forms traffic between two SteelHead appliances over the WAN or use the Secure Inner Channel on all traffic.
Determining the Deployment Mode
Before enabling Oracle Forms optimization, you must know the mode in which Oracle Forms is running at your organization.
To determine the Oracle Forms deployment mode
1. Start the Oracle application that uses Oracle Forms.
2. Click a link in the base HTML page to download the Java applet to your browser.
3. On the Windows taskbar, right-click the Java icon (a coffee cup) to access the Java console.
4. Choose Show Console (JInitiator) or Open <version> Console (Sun JRE).
5. Locate the “connectMode=” message in the Java Console window. This message indicates the Oracle Forms deployment mode at your organization. For example:
connectMode=HTTP, native
connectMode=Socket
connectMode=HTTPS, native
Enabling Oracle Forms optimization
This section describes how to enable Oracle Forms optimization for the deployment mode your organization uses.
For appliances with feature-tier licensing, you can configure and enable Oracle Forms optimization even if the feature is not licensed; however, the feature needs to be both enabled and licensed to work. If the feature is not licensed, the interface displays an alert. For more information, see
“Feature-tier licensing” on page 341.To enable the Oracle Forms optimization feature in native and HTTP modes
1. Choose Optimization > Protocols: Oracle Forms to display the Oracle Forms page.
2. On the client-side and server-side SteelHeads, under Settings, complete the configuration as described in this table.
Control | Description |
Enable Oracle Forms Optimization | Enables Oracle Forms optimization in native mode, also known as socket mode. Oracle Forms native-mode optimization is enabled by default. Disable this option only to disable Oracle Forms optimization. For example, if your network users don’t use Oracle applications. |
Enable HTTP Mode | Enables Oracle Forms optimization in HTTP mode. All internal messaging between the forms server and the Java client is encapsulated in HTTP packets. HTTP mode is enabled by default. You must also select the Enable Oracle Forms Optimization check box to enable HTTP mode. |
3. Click Apply to apply your settings to the running configuration.
4. Click Save to Disk to save your settings permanently.
6. If you have not already done so, choose Optimization > Network Services: In-path Rules and click Add a New In-path Rule. Add an in-path rule with these properties.
Property | Value |
Type | Auto-discover or Fixed-target. |
Destination Subnet/Port | Specify the server IP address (for example, 10.11.41.14/32), and a port number: •9000 - Native mode, using the default forms server. •8000 - HTTP mode. |
Preoptimization Policy | Oracle Forms. |
Data Reduction Policy | Normal. |
Latency Optimization Policy | HTTP - Select this policy to separate any non-Oracle Forms HTTP traffic from the standard Oracle Forms traffic. This policy applies HTTP latency optimization to the HTTP traffic to improve performance. |
Neural Framing Mode | Always. |
WAN Visibility | Correct Addressing. |
To enable the Oracle Forms optimization feature in HTTPS mode
2. Choose Optimization > Protocols: Oracle Forms to display the Oracle Forms page.
3. Under Settings, select both check boxes as described in this table.
Control | Description |
Enable Oracle Forms Optimization | Enables Oracle Forms optimization in native mode, also known as socket mode. Oracle Forms native-mode optimization is enabled by default. Disable this option only to disable Oracle Forms optimization. For example, if your network users don’t use Oracle applications. |
Enable HTTP Mode | Enables Oracle Forms optimization in HTTP mode. All internal messaging between the forms server and the Java client is encapsulated in HTTP packets. HTTP mode is enabled by default. You must also select the Enable Oracle Forms Optimization check box to enable HTTP mode. |
4. Click Apply to apply your settings to the running configuration.
5. Click Save to Disk to save your settings permanently.
7. Choose Optimization > Network Services: In-path Rules and click Add a New In-path Rule. Use these in-path rule settings.
Property | Value |
Type | Auto-discover or Fixed-target. |
Destination Subnet/Port | Specify the server IP address (for example, 10.11.41.14/32), and a port number (for example, 443). |
Preoptimization Policy | Oracle Forms over SSL. |
Data Reduction Policy | Normal. |
Latency Optimization Policy | HTTP - Select this policy to separate any non-Oracle Forms HTTP traffic from the standard Oracle Forms traffic. This policy applies HTTP latency optimization to the HTTP traffic to improve performance. |
Neural Framing Mode | Always. |
WAN Visibility | Correct Addressing. |
Related topics
Configuring MAPI optimization
You display and modify MAPI optimization settings in the Optimization > Protocols: MAPI page. This feature is enabled by default.
RiOS uses the SteelHead secure inner channel to ensure all MAPI traffic sent between the client-side and the server-side SteelHeads is secure. You must set the secure peering traffic type to All. For details, see
Enabling secure peers.
You must enable MAPI optimization on all SteelHeads optimizing MAPI in your network, not just the client-side SteelHead.
For appliances with feature-tier licensing, you can configure and enable MAPI optimization even if the feature is not licensed; however, the feature needs to be both enabled and licensed to work. If the feature is not licensed, the interface displays an alert. For more information, see
“Feature-tier licensing” on page 341.To configure MAPI optimization features
1. Set up secure peering between the client-side and server-side SteelHeads and enable inner channel SSL with secure protocols. For details, see
Configuring secure peers.
2. Choose Optimization > Protocols: MAPI to display the MAPI page.
3. Under Settings, complete the configuration as described in this table.
Control | Description |
Enable MAPI Exchange Optimization | Enables the fundamental component of the MAPI optimization module, which includes optimization for read, write (receive, send), and sync operations. By default, MAPI Exchange optimization is enabled. Only clear this check box to disable MAPI optimization. Typically, you disable MAPI optimization to troubleshoot problems with the system. For example, if you are experiencing problems with Outlook clients connecting with Exchange, you can disable MAPI latency acceleration (while continuing to optimize with SDR for MAPI). |
Exchange Port | Specify the MAPI Exchange port for optimization. Typically, you don’t need to modify the default value, 7830. |
Enable Outlook Anywhere Optimization | Enables Outlook Anywhere latency optimization. Outlook Anywhere is a feature of Microsoft Exchange Server 2003, 2007, and 2010 that allows Microsoft Office Outlook 2003, 2007, and 2010 clients to connect to their Exchange Servers over the Internet using the Microsoft RPC tunneling protocol. Outlook Anywhere allows for a VPN-less connection as the MAPI RPC protocol is tunneled over HTTP or HTTPS. RPC over HTTP can transport regular or encrypted MAPI. If you use encrypted MAPI, the server-side SteelHead must be a member of the Windows domain. Enable this feature on the client-side and server-side SteelHeads. By default, this feature is disabled. To use this feature, you must also enable HTTP Optimization on the client-side and server-side SteelHeads (HTTP optimization is enabled by default). If you are using Outlook Anywhere over HTTPS, you must enable SSL and the IIS certificate must be installed on the server-side SteelHead: •When using HTTP, Outlook can only use NTLM proxy authentication. •When using HTTPS, Outlook can use NTLM or Basic proxy authentication. •When using encrypted MAPI with HTTP or HTTPS, you must enable and configure encrypted MAPI in addition to this feature. Note: Outlook Anywhere optimized connections can’t start MAPI prepopulation. After you apply your settings, you can verify that the connections appear in the Current Connections report as a MAPI-OA or an eMAPI-OA (encrypted MAPI) application. The Outlook Anywhere connection entries appear in the system log with an RPCH prefix. Note: Outlook Anywhere creates twice as many connections on the SteelHead than regular MAPI. Enabling Outlook Anywhere latency optimization results in the SteelHead entering admission control twice as fast than with regular MAPI. For details, see Appendix A, “SteelHead MIB.” For details and troubleshooting information, see the SteelHead Deployment Guide - Protocols. |
Auto-Detect Outlook Anywhere Connections | Automatically detects the RPC over HTTPS protocol used by Outlook Anywhere. This feature is dimmed until you enable Outlook Anywhere optimization. By default, these options are enabled. You can enable automatic detection of RPC over HTTPS using this option or you can set in-path rules. Autodetect is best for simple SteelHead configurations with only a single SteelHead at each site and when the IIS server is also handling websites. If the IIS server is only used as RPC Proxy, and for configurations with asymmetric routing, connection forwarding or Interceptor installations, add in-path rules that identify the RPC Proxy server IP addresses and select the Outlook Anywhere latency optimization policy. After adding the in-path rule, disable the autodetect option. On an Interceptor, add load-balancing rules to direct traffic for RPC Proxy to the same SteelHead. In-path rules interact with autodetect as follows: •When autodetect is enabled and the in-path rule doesn’t match, RiOS optimizes Outlook Anywhere if it detects the RPC over HTTPS protocol. •When autodetect is not enabled and the in-path rule doesn’t match, RiOS doesn’t optimize Outlook Anywhere. •When autodetect is enabled and the in-path rule matches with HTTP only, RiOS doesn’t optimize Outlook Anywhere (even if it detects the RPC over HTTPS protocol). •When autodetect is not enabled and the in-path rule doesn’t match with HTTP only, RiOS doesn’t optimize Outlook Anywhere. •When autodetect is enabled and the in-path rule matches with an Outlook Anywhere latency optimization policy, RiOS optimizes Outlook Anywhere (even if it doesn’t detect the RPC over HTTPS protocol). •When autodetect is not enabled and the in-path rule matches with Outlook Anywhere, RiOS optimizes Outlook Anywhere. |
Enable Encrypted Optimization | Enables encrypted MAPI RPC traffic optimization between Outlook and Exchange. By default, this option is disabled. The basic steps to enable encrypted optimization are: 1. Choose Networking > Active Directory: Domain Join and join the server-side SteelHead to the same Windows Domain that the Exchange Server belongs to and operates as a member server. An adjacent domain can be used (through cross-domain support). It is not necessary to join the client-side SteelHead to the domain. 2. Verify that Outlook is encrypting traffic. 3. Enable this option on all SteelHeads involved in optimizing MAPI encrypted traffic. 4. RiOS supports both NTLM and Kerberos authentication. To use Kerberos authentication, select Enable Kerberos Authentication support on both the client-side and server-side SteelHeads. Kerberos authentication does not work with Windows 7 clients that are configured to use NTLM authentication only. Starting with RiOS 9.6, use Transparent mode for all other clients and for Windows 7 MAPI clients. The server-side SteelHeads must have a join account type of Active Directory Integrated (Windows 2008 and later). 5. Restart the service on all SteelHeads that have this option enabled. Note: When this option is enabled and Enable MAPI Exchange 2007 Acceleration is disabled on either SteelHead, MAPI Exchange 2007 acceleration remains in effect for unencrypted connections. |
NTLM Transparent Mode | Provides encrypted MAPI with transparent NTLM authentication. By default, this setting is enabled with encrypted MAPI optimization. Transparent mode supports all Windows servers, including Windows 2008 R2 (assuming they’re not in domains with NTLM disabled). Transparent mode includes support for trusted domains, wherein users are joined to a different domain from the Exchange Server being accessed. Transparent mode doesn’t support Windows 2008 R2 domains and Windows 7 clients that have NTLM disabled; instead, use Kerberos Authentication Support mode. |
NTLM Delegation Mode | Provides encrypted MAPI optimization using the Kerberos delegation facility. Note: CIFS SMB Signing and Encrypted MAPI optimization share the delegate user account. If you enable Delegation mode for both features, the delegate user account must have delegation privileges for both features as well. Delegation mode includes support for trusted domains, wherein users are joined to a different domain from the storage system being accessed. Delegation mode requires additional configuration. To configure Delegation mode, choose Optimization > Active Directory: Service Accounts. |
Enable Kerberos Authentication Support | Provides encrypted MAPI optimization with end-to-end authentication using Kerberos. The server-side SteelHead uses Kerberos to authenticate users. In addition to enabling this feature, you must also join the server-side SteelHead to a Windows Domain and add replication users on the Optimization > Active Directory: Service Accounts page. The server-side SteelHead must be joined to the same Windows Domain that the Exchange Server belongs to and operates as a member server. |
Enable Transparent Prepopulation | Enables a mechanism for sustaining Microsoft Exchange MAPI connections between the client and server even after the Outlook client has shut down. This method allows email data to be delivered between the Exchange Server and the client-side SteelHead while the Outlook client is offline or inactive. When a user logs into their Outlook client, the mail data is already prepopulated on the client-side SteelHead. This accelerates the first access of the client’s email, which is retrieved with LAN-like performance. Transparent prepopulation creates virtual MAPI connections to the Exchange Server for Outlook clients that are offline. When the remote SteelHead detects that an Outlook client has shut down, the virtual MAPI connections are triggered. The remote SteelHead uses these virtual connections to pull mail data from the Exchange Server over the WAN link. You must enable this control on the server-side and client-side SteelHeads. By default, MAPI transparent prepopulation is enabled. MAPI prepopulation doesn’t use any additional Client Access Licenses (CALs). The SteelHead holds open an existing authenticated MAPI connection after Outlook is shut down. No user credentials are used or saved by the SteelHead when performing prepopulation. The client-side SteelHead controls MAPI v2 prepopulation, which allows for a higher rate of prepopulated session, and enables the MAPI prepopulation to take advantage of the read-ahead feature in the MAPI optimization blade. If a user starts a new Outlook session, the MAPI prepopulation session terminates. If for some reason the MAPI prepopulation session doesn’t terminate (for example, the user starts a new session in a location that is different than the SteelHead that has the MAPI prepopulation session active), the MAPI prepopulation session eventually times-out per the configuration setting. Note: MAPI transparent prepopulation is not started with Outlook Anywhere connections. |
Max Connections | Specify the maximum number of virtual MAPI connections to the Exchange Server for Outlook clients that have shut down. Setting the maximum connections limits the aggregate load on all Exchange Servers through the configured SteelHead. The default value varies by model. For example, on a 5520 the default is 3750. You must configure the maximum connections on both the client-side and server-side of the network. The maximum connections setting is only used by the client-side SteelHead. |
Poll Interval (minutes) | Sets the number of minutes you want the appliance to check the Exchange Server for newly arrived email for each of its virtual connections. The default value is 20. |
Time Out (hours) | Specify the number of hours after which to time-out virtual MAPI connections. When this threshold is reached, the virtual MAPI connection is terminated. The time-out is enforced on a per-connection basis. Time-out prevents a buildup of stale or unused virtual connections over time. The default value is 96. |
Enable MAPI over HTTP Optimization | Select on a client-side SteelHead to enable bandwidth and latency optimization for the MAPI over HTTP transport protocol. You must also create an in-path rule using the Exchange Autodetect latency optimization policy to differentiate and optimize MAPI over HTTP traffic. Microsoft implemented the MAPI over HTTP transport protocol in Outlook 2010 update, Outlook 2013 SP1, and Exchange Server 2013 SP1. You must enable SSL optimization and install the server SSL certificate on the server-side SteelHead. Both the client-side and server-side SteelHeads must be running RiOS 9.2 or later to receive full bandwidth and latency optimization. If you have SteelHeads running both RiOS 9.1 and 9.2, you will receive bandwidth optimization only. To view the MAPI over HTTP optimized connections, choose Reports > Networking: Current Connections. A successful connection appears as MAPI-HTTP in the Application column. |
4. Click Apply to apply your settings to the running configuration.
5. Click Save to Disk to save your settings permanently.
When you have verified appropriate changes, you can write the active configuration that is stored in memory to the active configuration file (or you can save it as any filename you choose). For details about saving configurations, see
Managing configuration files.
Optimizing MAPI Exchange in out-of-path deployments
In out-of-path deployments, if you want to optimize MAPI Exchange by destination port, you must define a fixed-target in-path rule that specifies these ports on the client-side appliance:
•Port 135 - The Microsoft Endpoint Mapper port.
•Port 7830 - The SteelHead port used for Exchange traffic.
•Port 7840 - The SteelHead port used for Exchange Directory NSPI traffic.
For details about defining in-path rules, see
Configuring In-Path Rules.
Deploying SteelHeads with Exchange Servers behind load balancers
You can configure SteelHeads to operate with Exchange Server clusters that use load balancers (such as CAS) to provide dynamic MAPI port mappings for clients.
In these environments, you must configure one of the following transparency modes or disable port remapping on the client-side SteelHead:
•Enable port transparency for MAPI traffic. For details, see
Configuring in-path rules and the
SteelHead Deployment Guide - Protocols.
•Enable full transparency for MAPI traffic. For details, see
Configuring in-path rules and the
SteelHead Deployment Guide - Protocols.
•Disable MAPI port remapping using the CLI command no protocol mapi port-remap enable. After entering this command, restart the optimization service. For details, see the Riverbed Command-Line Interface Reference Manual.
Configuring NFS optimization
You display and modify NFS optimization settings in the Optimization > Protocols: NFS page.
NFS optimization provides latency optimization improvements for NFS operations by prefetching data, storing it on the client SteelHead for a short amount of time, and using it to respond to client requests. You enable NFS optimization in high-latency environments.
You can configure NFS settings globally for all servers and volumes or you can configure NFS settings that are specific to particular servers or volumes. When you configure NFS settings for a server, the settings are applied to all volumes on that server unless you override settings for specific volumes.
RiOS doesn’t support NFS optimization in an out-of-path deployment.
RiOS supports NFS optimization for NFSv3 only. When RiOS detects a transaction using NFS v2 or v4, it doesn’t optimize the traffic. Bandwidth optimization, SDR, and LZ compression still apply to the NFS v2 or NFS v4 traffic.
For appliances with feature-tier licensing, you can configure and enable NFS optimization even if the feature is not licensed; however, the feature needs to be both enabled and licensed to work. If the feature is not licensed, the interface displays an alert. For more information, see
“Feature-tier licensing” on page 341.To configure NFS optimization
1. Choose Optimization > NFS to display the NFS page.
2. Under Settings, complete the configuration as described in this table.
Control | Description |
Enable NFS Optimization | Enable this control on the client-side SteelHead to optimize NFS where NFS performance over the WAN is impacted by a high-latency environment. By default, this control is enabled. These controls are ignored on server-side SteelHeads. When you enable NFS optimization on a server-side SteelHead, RiOS uploads the NFS configuration information for a connection from the client-side SteelHead to the server-side SteelHead when it establishes the connection. |
NFS v2 and v4 Alarms | Enables an alarm when RiOS detects NFSv2 and NFSv4 traffic. When the alarm triggers, the SteelHead displays the Needs Attention health state. The alarm provides a link to this page and a button to reset the alarm. |
Default Server Policy | Select one of these server policies for NFS servers: •Custom - Specifies a custom policy for the NFS server. •Global Read-Write - Specifies a policy that provides data consistency rather than performance. All of the data can be accessed from any client, including LAN-based NFS clients (which don’t go through the SteelHeads) and clients using other file protocols such as CIFS. This option severely restricts the optimization that can be applied without introducing consistency problems. This is the default configuration. •Read-only - Specifies that the clients can read the data from the NFS server or volume but can’t make changes. The default server policy is used to configure any connection to a server that doesn’t have a policy. |
Default Volume Policy | Select one of these volume policies for NFS volumes: •Custom - Specifies a custom policy for the NFS volume. •Global Read-Write - Specifies a policy that provides data consistency rather than performance. All of the data can be accessed from any client, including LAN-based NFS clients (which don’t go through the SteelHeads) and clients using other file protocols such as CIFS. This option severely restricts the optimization that can be applied without introducing consistency problems. This is the default configuration. •Read-only - Specifies that the clients can read the data from the NFS server or volume but can’t make changes. The default volume policy is used to configure a volume that doesn’t have a policy. |
3. Click Apply to apply your settings to the running configuration.
4. Click Save to Disk to save your settings permanently.
You can add server configurations to override your default settings. You can also modify or remove these configuration overrides. If you don’t override settings for a server or volume, the SteelHead uses the global NFS settings.
To override NFS settings for a server or volume
1. Choose Optimization > Protocols: NFS to display the NFS page.
2. Under Override NFS Protocol Settings, complete the configuration as described in this table.
Control | Description |
Add a New NFS Server | Displays the controls to add an NFS server configuration. |
Server Name | Specify the name of the server. |
Server IP Addresses | Specify the IP addresses of the servers, separated by commas, and click Add. If you have configured IP aliasing (multiple IP addresses) for an NFS server, you must specify all of the server IP addresses. |
Add | Adds the configuration to the NFS Servers list. |
Remove Selected | Select the check box next to the name and click Remove Selected. |
To modify the properties for an NFS server
1. Choose Optimization > Protocols: NFS.
2. Select the NFS server name in the table and complete the configuration as described in this table.
Control | Description |
Server IP Addresses | Specify the server IP addresses, separated by commas. |
Server Policy | Select one of these server policies for this NFS server configuration from the drop-down list: •Custom - Create a custom policy for the NFS server. •Global Read-Write - Choose this policy when the data on the NFS server can be accessed from any client, including LAN clients and clients using other file protocols. This policy ensures data consistency but doesn’t allow for the most aggressive data optimization. This is the default value. •Read-only - Any client can read the data on the NFS server or volume but can’t make changes. |
Default Volume Policy | Select one of these default volume configurations for this server from the drop-down list: •Custom - Create a custom policy for the NFS server. •Global Read-Write - Choose this policy when the data on the NFS volume can be accessed from any client, including LAN clients and clients using other file protocols. This policy ensures data consistency but doesn’t allow for the most aggressive data optimization. This is the default value. •Read-only - Any client can read the data on the NFS server or volume but can’t make changes. |
Default Volume | Enables the default volume configuration for this server. |
Apply | Applies the changes. |
Remove Selected | Select the check box next to the name and click Remove Selected. |
3. Click Save to Disk to save your settings permanently.
After you add a server, the NFS page includes options to configure volume policies. The Available Volumes table provides an uneditable list of NFS volumes that are available for the current NFS server. You can use the NFS volume information listed in this table to facilitate adding new NFS volumes.
To add an NFS volume configuration for a server
1. Choose Optimization > Protocols: NFS.
2. Select the NFS server name in the table and complete the configuration as described in this table.
Control | Description |
Add a New Volume Configuration | Displays the controls to add a new volume. |
FSID | Specify the volume File System ID. An FSID is a number NFS uses to distinguish mount points on the same physical file system. Because two mount points on the same physical file system have the same FSID, more than one volume can have the same FSID. |
Policy | Optionally, choose one of these default volume configurations for this server from the drop-down list: •Custom - Create a custom policy for the NFS server. •Global Read-Write - Choose this policy when the data on the NFS volume can be accessed from any client, including LAN clients and clients using other file protocols. This policy ensures data consistency but doesn’t allow for the most aggressive data optimization. This is the default value. •Read-only - Any client can read the data on the NFS server or volume but can’t make changes. |
Root Squash | Enables the root squash feature for NFS volumes from this server, which turns off SteelHead optimizations for the root user on NFS clients. When the root user accesses an NFS share, its ID is squashed (mapped) to another user (most commonly “nobody”) on the server. Root squash improves security because it prevents clients from giving themselves access to the server file system. |
Permission Cache | Enables the permission cache, where the SteelHead stores file read data and uses it to respond to client requests. For example, if a user downloads data and another user tries to access that data, the SteelHead ensures that the second user has permission to read the data before releasing it. |
Default Volume | Enables the default volume configuration for this server. |
Add | Adds the volume. |
Remove Selected | Select the check box next to the volume FSID and click Remove Selected. |
3. Click Save to Disk to save your settings permanently.
To reset the NFS alarm
1. Choose Optimization > Protocols: NFS to display the NFS page. The option to reset the NFS alarm appears only after the service triggers the NFSv2 and v4 alarm. The alarm remains triggered until you manually reset it.
2. Under Reset NFS Alarm, click Reset NFS Alarm.
3. Click Save to Disk to save your settings permanently.
Related topic
Configuring Lotus Notes optimization
You can enable and modify Lotus Notes optimization settings in the Optimization > Protocols: Lotus Notes page.
Lotus Notes is a client/server collaborative application that provides email, instant messaging, calendar, resource, and file sharing. RiOS provides latency and bandwidth optimization for Lotus Notes 6.0 and later traffic across the WAN, accelerating email attachment transfers and server-to-server or client-to-server replications.
RiOS saves bandwidth by automatically disabling socket compression, which makes SDR more effective. It also saves bandwidth by decompressing Huffman-compressed attachments and LZ-compressed attachments when they’re sent or received and recompressing them on the other side. Lotus Notes optimization allows SDR to recognize attachments that have previously been sent in other ways (such as over CIFS, HTTP, or other protocols), and also allows SDR to optimize the sending and receiving of attachments that are slightly changed from previous sends and receives.
Enabling Lotus Notes provides latency optimization regardless of the compression type (Huffman, LZ, or none).
Before enabling Lotus Notes optimization, be aware that it automatically disables socket-level compression for connections going through SteelHeads that have this feature enabled.
For appliances with feature-tier licensing, you can configure and enable Lotus Notes optimization even if the feature is not licensed; however, the feature needs to be both enabled and licensed to work. If the feature is not licensed, the interface displays an alert. For more information, see
“Feature-tier licensing” on page 341.To configure Lotus Notes optimization
1. Choose Optimization > Protocols: Lotus Notes to display the Lotus Notes page.
2. Under Settings, complete the configuration as described in this table.
Control | Description |
Enable Lotus Notes Optimization | Enable this control on the client-side SteelHead to provide latency and bandwidth optimization for Lotus Notes 6.0 and later traffic across the WAN. This feature accelerates email attachment transfers and server-to-server or client-to-server replications. By default, Lotus Notes optimization is disabled. |
Lotus Notes Port | On the server-side SteelHead, specify the Lotus Notes port for optimization. Typically, you don’t need to modify the default value 1352. |
Optimize Encrypted Lotus Notes Connections | Enables Lotus Notes optimization for connections that are encrypted. By default, encrypted Lotus Notes optimization is disabled. Perform these steps: 1. Configure an alternate unencrypted port on the Domino server to accept unencrypted connections in addition to accepting connections on the standard TCP port 1352. For details, see Configuring an alternate port. If the standard port isn’t configured to require encryption, you can use it instead of configuring an alternate port. 2. Select the Optimize Encrypted Lotus Notes Connections check box on both the client-side and server-side SteelHeads. 3. Specify the alternate unencrypted port number on the server-side SteelHead. 4. Click Apply on both the client-side and server-side SteelHeads. 5. Import the ID files of the servers for which you want to optimize the connections on the server-side SteelHead. 6. Under Encryption Optimization Servers, choose Add Server. Either browse to a local file or specify the server ID filename to upload from a URL. Specify the password for the ID file in the password field. If the ID file has no password, leave this field blank. Click Add. The server ID file is usually located in C:\Program Files\IBM\Lotus\Domino\data on Windows servers. 7. (Optional, but recommended unless another WAN encryption mechanism is in use) Enable secure peering to create a secure inner channel between the client-side and server-side SteelHeads. 8. Click Save to Disk on both the client-side and server-side SteelHeads. 9. Restart the optimization service on both the client-side and server-side SteelHeads. After the connection is authenticated, the server-side SteelHead resets the connection of the Notes client, but maintains the unencrypted connection with the Domino server on the auxiliary port. The Notes client now tries to establish a new encrypted connection, which the server-side SteelHead intercepts and handles as if it were the Domino server. The server-side SteelHead (acting as the Domino server) generates the necessary information used to encrypt the connection to the Notes client. The result is an encrypted connection between the Notes client and server-side SteelHead. The connection is unencrypted between the server-side SteelHead and the Domino server. |
Unencrypted Server Port | Specify the alternate unencrypted port number on the server-side SteelHead. You must preconfigure this port on the Domino server. If the standard port (typically 1352) doesn’t require encryption, you can enter the standard port number. |
10. Click Apply to apply your settings to the running configuration.
11. Click Save to Disk to save your settings permanently.
Encryption Optimization Servers table
The Encryption Optimization Servers table displays all of the servers for which server ID files were imported and optimization of encrypted connections is occurring.
If the secure vault is locked, this table doesn’t appear. Instead, a dialog box asks you to unlock the secure vault. After you type the password to unlock the secure vault, the Encrypted Optimization Server table appears.
A successful connection appears as NOTES-ENCRYPT in the Current Connections report.
Unoptimized IP address table
New connections to or from an IP address on this list don’t receive Lotus Notes encryption optimization.
If RiOS encounters a problem during client authentication that prevents the SteelHead from optimizing the encrypted traffic, it must drop the connection, because in the partially authenticated session the client expects encryption but the server doesn’t. (Note that the client transparently tries to reconnect with the server after the connection drops.) Whenever there’s a risk that the problem might reoccur when the client reconnects, the client IP address or server IP address or both appear on the unoptimized IP address table on the server-side SteelHead. The system disables Lotus Notes encryption optimization in future connections to or from these IP addresses, which in turn prevents the SteelHead from repeatedly dropping connections, which could block the client from ever connecting to the server.
The Unoptimized IP Address table displays the reason that the client or server isn’t receiving Lotus Notes encrypted optimization.
Configuring an alternate port
This section explains how to configure a Domino server to accept unencrypted connections on an alternative TCP port in addition to accepting connections on the standard TCP port 1352.
To configure a Domino server to accept unencrypted connections on an alternative TCP port
1. Open Domino Administrator and connect to the Domino server that you want to configure.
2. Choose Configuration > Server > Setup Ports to display the Setup Ports dialog box.
3. Click New.
4. Type a port name: for example, TCPIP_RVBD. Then select TCP in the Driver drop-down box and click OK.
5. Select the new port in the Setup Ports dialog box.
6. Ensure that Port enabled is selected and that Encrypt network data is cleared, and click OK.
7. Locate and open the Domino server’s notes.ini file.
8. Add a line of the format <port_name>_TCPIPAddress=0,<IP_address>:<port>. Use the IP address 0.0.0.0 to have Domino listen on all server IP addresses.
9. To start the server listening on the new port, restart the port or restart the server.
Configuring Citrix optimization
You enable and modify Citrix optimization settings in the Optimization > Protocols: Citrix page.
Citrix optimization features
Citrix optimization has the following features:
•Classification and shaping of Citrix ICA traffic using Riverbed QoS to improve the end-user desktop experience
•Bandwidth reduction of compressed and encrypted Citrix ICA traffic using SteelHead Citrix optimization
•Latency optimization for client drive mapping in the Citrix ICA session
•Optimization of Citrix sessions over SSL using Citrix Access Gateway (CAG)
•SteelHead Citrix Optimization for Multi-Port ICA traffic
•Traffic optimization for enhanced data reduction for small Citrix packets.
Citrix enhancements by RiOS version
RiOS 9.0.x has enhancements to QoS that classify Citrix ICA traffic based on its ICA priority group using Multi-Stream with Multi-Port.
RiOS 9.1 and later include an autonegotiation of Multi-Stream ICA feature which classifies Citrix ICA traffic based on its ICA priority group.
Citrix version support
Support is provided for the following Citrix software components.
Citrix Receiver or ICA client versions:
•Online plug-in version 9.x
•Online plug-in version 10.x
•Online plug-in version 11.x
•Online plug-in version 12.x
•Online plug-in version13.x (Receiver version 3.x)
•Receiver for Windows version 4.x
Citrix XenDesktop:
•XenDesktop 4
•XenDesktop 5
•XenDesktop 5.5
•XenDesktop 5.6
•XenDesktop 7.x
Citrix XenApp:
•Presentation Server 4.5
•XenApp Server 5
•XenApp Server 6
•XenApp Server 6.5
•XenApp Server 7.x
In addition, RiOS supports encrypted and compressed Citrix ICA traffic optimization.
For more information about Citrix optimization, see the SteelHead Deployment Guide - Protocols, the Riverbed Command-Line Interface Reference Manual, and the white paper Optimizing Citrix ICA Traffic.
For appliances with feature-tier licensing, you can configure and enable Citrix optimization even if the feature is not licensed; however, the feature needs to be both enabled and licensed to work. If the feature is not licensed, the interface displays an alert. For more information, see
“Feature-tier licensing” on page 341.To configure Citrix optimization
1. Choose Networking > App Definitions: Ports Labels to display the Ports Labels page.
2. Select the Interactive port label in the Port Labels list to display the Editing Port Labels Interactive group.
3. Under Editing Port Label Interactive, remove Citrix ICA ports 1494 and 2598 from the Ports text box.
4. Click Apply to save your settings to the running configuration.
5. Choose Optimization > Protocols: Citrix to display the Citrix page.
6. Under Settings, complete the configuration on the client-side and server-side SteelHeads as described in this table.
Control | Description |
Enable Citrix Optimization | Optimizes the native Citrix traffic bandwidth. By default, Citrix optimization is disabled. Enabling Citrix optimization requires an optimization service restart. |
ICA Port | Specify the port on the Presentation Server for inbound traffic. The default port is 1494. |
Session Reliability (CGP) Port | Specify the port number for Common Gateway Protocol (CGP) connections. CGP uses the session reliability port to keep the session window open even if there’s an interruption on the network connection to the server. The default port is 2598. |
Enable SecureICA Encryption | Enables SDR and Citrix optimizations, while securing communication sent between a MetaFrame Presentation Server and a client. RiOS supports optimization of Citrix ICA sessions with SecureICA set to RC5 40-bit, 56-bit, and 128-bit encryption. By default, RiOS can optimize Citrix ICA traffic with SecureICA set to basic ICA protocol encryption. You must enable SecureICA encryption to allow RiOS to optimize ICA sessions with SecureICA encryption set to RC5 on the client-side SteelHeads. |
Enable Citrix CDM Optimization | Enable this control on the client-side and server-side SteelHeads to provide latency optimization for file transfers that use client drive mapping (CDM) between the Citrix client and server. CDM allows a remote application running on the server to access disk drives attached to the local client machine. The applications and system resources appear to the user at the client machine as if they’re running locally during the session. For example, in the remote session, C: is the C drive of the remote machine and the C drive of the local thin client appears as H:. Bidirectional file transfers between the local and remote drives use one of many virtual channels within the ICA protocol. The individual data streams that form the communication in each virtual channel are all multiplexed onto a single ICA data stream. This feature provides latency optimization for file transfers in both directions. You can use CDM optimization with or without secure ICA encryption. By default, CDM optimization is disabled. Enabling CDM optimization requires an optimization service restart. CDM optimization doesn’t include support for CGP (port 2598). |
Enable Auto-Negotiation of Multi-Stream ICA | Enable this control on the client-side SteelHead to automatically negotiate ICA to use Multi-Stream ICA and carry the ICA traffic over four TCP connections instead of one. The ICA traffic within a Citrix session comprises many categories of traffic called virtual channels. A virtual channel provides a specific function of Citrix ICA remote computing architecture, such as print, CDM, audio, video, and so on. The ICA traffic within a Citrix session is also categorized by priority, in which virtual channels carrying real-time traffic, such as audio and video, are flagged with higher priority than virtual channels carrying bulk transfer traffic such as print and CDM. When enabled, the SteelHead splits traffic on virtual channels into a separate TCP stream (by ICA priorities) so that QoS can be applied to each individual stream. This feature is applicable for both CGP and ICA connections. This allows finer QoS shaping and marking of Citrix traffic. You can also use this feature with path selection to select and prioritize four separate TCP connections. You can use this feature with both inbound and outbound QoS. Both SteelHeads must be running RiOS 9.1 or later. To view the multistream connections, choose Reports > Networking: Current Connections. When the connection is classified by QoS on the SteelHead, the Application column lists the connection as Citrix-Multi-Stream-ICA along with its priority. You can also choose Reports > Networking: Inbound QoS and Outbound QoS to view the connection classifications. Four applications are available by default under Networking > App Definitions: Applications > Business VDI for QoS classification: Citrix-Multi-Stream-ICA-Priority-0 Citrix-Multi-Stream-ICA-Priority-1 Citrix-Multi-Stream-ICA-Priority-2 Citrix-Multi-Stream-ICA-Priority-3 No configuration is required on the server-side SteelHead. The Citrix deployment must support Multi-Stream ICA: the clients must be running Citrix Receiver 3.0 or later. The servers must be running XenApp 6.5 or later or XenDesktop 5.5 or later. Enabling this feature doesn’t require an optimization service restart. |
Enable MultiPort ICA | Enable this control on the client-side SteelHead to provide multiport ICA support. For thin-client applications, Citrix has a protocol that segregates the network traffic between a client and a server. Typically, all of the traffic is routed through the same port on the server. Enabling multiport ICA lets you group the traffic into multiple CGP ports using priorities based on data type (mouse clicks, window updates, print traffic, and so on). After you enable multiport ICA, you can assign a port number to each of the configurable priorities. You can’t assign the same port number to more than one priority. You can also leave a priority port blank and route that traffic through some other means—which doesn’t have to be a SteelHead. Perform these steps: 1. From the Citrix server, enable and configure the multiport policy for the computer configuration policy in the Group Policy Editor or Citrix AppCenter. By default, port 2598 has high priority (value 1) and is not configurable. You can configure port values 0, 2, and 3. Use these application priorities for multiport ICA: Very high = 0, for audio High = 1, for ThinWire/DX command remoting, seamless, MSFT TS licensing, SmartCard redirection, control virtual channel, mouse events, window updates, end-user experience monitoring. Medium = 2, for MediaStream (Windows media and Flash), USB redirection, clipboard, and client drive mapping. Low = 3, for printing, client COM port mapping, LPT port mapping, and legacy OEM virtual channels. 2. Restart the Citrix server. You can then go to Reports > Networking: Current Connections to view the TCP connections in the ICA session. 3. On the client-side SteelHead, specify the same CGP ports configured on the Citrix server in the Priority Port fields. You can then return to Reports > Networking: Current Connections to view the four unique TCP connections in the ICA session. If you have a port label to represent all ICA traffic over ports 1494 and 2598, you must add the new CGP ports to support multiport ICA. Make sure that any ports you configure on the Citrix server don’t conflict with the ports used on the preconfigured port labels on the SteelHead. The port labels use default pass-through rules to automatically forward traffic. To view the default port labels, choose Networking > App Definitions: Port Labels. You can resolve a port conflict as follows: •To configure a standard port that is associated with the RBT-Proto, Secure, or Interactive port labels and can’t be removed, use a different port number on the Citrix server configuration. •Otherwise, remove the port from the port label. |
7. Click Apply to apply your settings to the running configuration.
8. Click Save to Disk to save your settings permanently.
Citrix traffic fallback behavior
This table describes how the SteelHeads handle Citrix traffic as a secure protocol after a secure inner channel setup failure.
Client-side SteelHead traffic type setting | Server-side SteelHead traffic type setting | Client-side SteelHead fallback setting | Server-side SteelHead fallback setting | Traffic-Flow type, if SSL secure inner channel setup fails |
SSL and secure protocols | SSL and secure protocols | Lenient. Fallback to No Encryption is enabled, allowing fallback. | Lenient. Fallback to No Encryption is enabled, allowing fallback. | Optimized without encryption |
SSL and secure protocols | SSL and secure protocols | Lenient. Fallback to No Encryption is enabled, allowing fallback. | Strict. Fallback to No Encryption is disabled. | Passed through |
SSL and secure protocols | SSL and secure protocols | Strict. Fallback to No Encryption is disabled. | Lenient. Fallback to No Encryption is enabled, allowing fallback. | Passed through |
SSL and secure protocols | SSL and secure protocols | Strict. Fallback to No Encryption is disabled. | Strict. Fallback to No Encryption is disabled. | Passed through |
SSL and secure protocols | All | Lenient. Fallback to No Encryption is enabled, allowing fallback. | Lenient. Fallback to No Encryption is enabled, allowing fallback. | Optimized without encryption |
SSL and secure protocols | All | Lenient. Fallback to No Encryption is enabled, allowing fallback. | Strict. Fallback to No Encryption is disabled. | Passed through |
SSL and secure protocols | All | Strict. Fallback to No Encryption is disabled. | Lenient. Fallback to No Encryption is enabled, allowing fallback. | Passed through |
SSL and secure protocols | All | Strict. Fallback to No Encryption is disabled. | Strict. Fallback to No Encryption is disabled. | Passed through |
Related topics
Configuring FCIP optimization
You can enable and modify Fibre Channel over TCP/IP (FCIP) storage optimization module settings in the Optimization > Data Replication: FCIP page.
FCIP is a transparent Fibre Channel (FC) tunneling protocol that transmits FC information between FC storage facilities over IP networks. FCIP is designed to overcome the distance limitations of FC.
FCIP storage optimization provides support for environments using storage technology that originates traffic as FC and then uses either a Cisco Multilayer Director Switch (MDS) or a Brocade 7500 FCIP gateway.
To increase the data reduction LAN-to-WAN ratio with either equal or greater data throughput in environments with FCIP traffic, RiOS separates the FCIP headers from the application data workload written to storage. The FCIP headers contain changing protocol state information, such as sequence numbers. These headers interrupt the network stream and reduce the ability of SDR to match large, contiguous data patterns. After isolating the header data, the SteelHead performs SDR network deduplication on the larger, uninterrupted storage data workload and LZ compression on the headers. RiOS then optimizes, reassembles, and delivers the data to the TCP consumer without compromising data integrity.
Environments with Symmetrix Remote Data Facility (SRDF) traffic originated through Symmetrix FC ports (RF ports) only require configuration of the RiOS FCIP storage optimization module. Traffic originated through Symmetrix GigE ports (RE ports) requires configuration of the RiOS SRDF storage optimization module. For details on storage technologies that originate traffic through FC, see the SteelHead Deployment Guide.
You configure the RiOS FCIP storage optimization module on the SteelHead closest to the FCIP gateway that opens the FCIP TCP connection by sending the initial SYN packet. The SteelHead location can vary by environment. If you are unsure which gateway initiates the SYN, enable FCIP on both the client-side and server-side SteelHeads.
By default, FCIP optimization is disabled.
For details about data replication deployments, see the SteelHead Deployment Guide.
To configure FCIP optimization
1. Choose Optimization > Data Replication: FCIP to display the FCIP page.
2. Under FCIP Settings, select Enable FCIP. By default, RiOS directs all traffic on the standard ports 3225, 3226, 3227, and 3228 through the FCIP optimization module. For most environments, the configuration is complete and you can skip to Step 4.
Environments with RF-originated SRDF traffic between VMAX arrays might need additional configuration to isolate and optimize the DIFs embedded within the headers of the FCIP data payload. For details, see
FCIP rules (VMAX-to-VMAX traffic only).
3. Optionally, you can add FCIP port numbers separated by commas or remove a port number. Do not specify a port range.
The FCIP ports field must always contain at least one FCIP port.
4. Click Apply to save your settings to the running configuration.
5. Click Save to Disk to save your settings permanently.
Viewing FCIP connections
After completing the FCIP configuration on both SteelHeads and restarting the optimization service, you can view the FCIP connections in the Current Connections report. Choose Reports > Networking: Current Connections. In the list of optimized connections, look for the FCIP connection in the Application column. Verify that the FCIP connection appears in the list without a red protocol error icon:
•If the report lists a connection as TCP instead of FCIP, the module isn’t optimizing the connection. You must verify the configuration.
•If the report lists a connection as FCIP but a red protocol error icon appears in the Notes column, click the connection to view the reason for the error.
You can view combined throughput and reduction statistics for two or more FCIP tunnel ports by entering this command from the command-line interface:
protocol fcip stat-port <port>
For details, see the Riverbed Command-Line Interface Reference Manual.
FCIP rules (VMAX-to-VMAX traffic only)
Environments with GigE-based (RF port) originated SRDF traffic between VMAX arrays must isolate DIF headers within the data stream. These DIF headers interrupt the data stream. When the R1 Symmetrix array is running Enginuity microcode version 5875 or newer, manual FCIP rules aren’t necessary. In 5875+ environments, RiOS automatically detects the presence of DIF headers and DIF blocksize for GigE-based (RF port) SRDF traffic. To manually isolate the DIF headers when the R1 Symmetrix array is running Enginuity microcode version 5874 or older, you add FCIP rules by defining a match for source or destination IP traffic.
Automatically detected FCIP settings in Enginuity 5875 and later environments override any manually configured FCIP rules.
FCIP default rule
The default rule optimizes all remaining traffic that has not been selected by another rule. It always appears as the last in the list. You can’t remove the default rule; however, you can change its DIF setting. The default rule uses 0.0.0.0 in the source and destination IP address fields, specifying all IP addresses. You can’t specify 0.0.0.0 as the source or destination IP address for any other rule.
To add an FCIP rule
1. Choose Optimization > Data Replication: FCIP to display the FCIP page.
2. Under Rules, complete the configuration as described in this table.
Control | Description |
Add a New Rule | Displays the controls for adding a new rule. Displays the controls for adding a manual rule. Use this control when the R1 Symmetrix array is running Enginuity microcode version 5874 or earlier. |
Source IP | Specify the connection source IP address of the FCIP gateway tunnel endpoints. Note: The source IP address can’t be the same as the destination IP address. |
Destination IP | Specify the connection destination IP address of the FCIP gateway tunnel endpoints. |
Enable DIF | Isolates and optimizes the DIFs embedded within the FCIP data workload. |
DIF Data Block Size | Specify the size of a standard block of storage data, in bytes, after which a DIF header begins. The valid range is from 1 to 2048 bytes. The default value is 512, which is a standard block size for Open System environments. When you enable DIF, RiOS FCIP optimization looks for a DIF header after every 512 bytes of storage data unless you change the default setting. Open System environments (such as Windows, UNIX, and Linux) inject the DIF header into the data stream after every 512 bytes of storage data. IBM iSeries AS/400 host environments inject the DIF header into the data stream after every 520 bytes. This field is required when you enable DIF. |
Add | Adds the manual rule to the list. The Management Console redisplays the Rules table and applies your modifications to the running configuration, which is stored in memory. |
Remove Selected | Select the check box next to the name and click Remove Selected. |
3. Click Apply to save your settings to the running configuration.
4. Click Save to Disk to save your settings permanently.
To edit an FCIP rule
1. Choose Optimization > Data Replication: FCIP to display the FCIP page.
2. Select the rule number in the rule list.
3. Edit the rule.
4. Click Save to Disk to save your settings permanently.
Example—Adding an FCIP rule to isolate DIF headers on the FCIP tunnel carrying the VMAX-to-VMAX SRDF traffic.
Suppose your environment consists mostly of regular FCIP traffic without DIF headers that has some RF-originated SRDF between a pair of VMAX arrays. A pair of FCIP gateways uses a tunnel to carry the traffic between these VMAX arrays. The source IP address of the tunnel is 10.0.0.1 and the destination IP is 10.5.5.1. The preexisting default rule doesn’t look for DIF headers on FCIP traffic. It handles all of the non-VMAX FCIP traffic. To isolate the DIF headers on the FCIP tunnel carrying the VMAX-to-VMAX SRDF traffic, add this rule.
1. Choose Optimization > Data Replication: FCIP to display the FCIP page.
2. Click Add a New Rule.
3. Specify these properties for the FCIP rule.
Control | Setting |
Source IP | 10.0.0.1. |
Destination IP | 10.5.5.1 |
Enable DIF | Select the check box. |
DIF Data Block Size | Leave the default setting 512. |
4. Click Add.
Related topic
Configuring SRDF optimization
You can enable and modify Symmetrix Remote Data Facility (SRDF) storage module optimization settings in the Optimization > Data Replication: SRDF page.
EMC’s Symmetrix Remote Data Facility/Asynchronous (SRDF/A) is a SAN replication product. It performs the data replication over GigE (instead of the Fibre Channel), using gateways that implement the SRDF protocol.
SRDF storage optimization provides support for environments using storage technology that originates traffic through Symmetrix GigE ports. For details on storage technologies that originate traffic through GigE RE ports, see the SteelHead Deployment Guide.
To increase the data reduction LAN-to-WAN ratio with either equal or greater data throughput in environments with SRDF traffic, RiOS separates the SRDF headers from the application data workload written to storage. The SRDF headers contain changing protocol state information, such as sequence numbers. These headers interrupt the network stream and reduce the ability of scalable data replication (SDR) to match large, contiguous data patterns. After isolating the header data, the SteelHead performs SDR network deduplication on the larger, uninterrupted storage data workload and LZ compression on the headers. RiOS then optimizes, reassembles, and delivers the data to the TCP consumer as originally presented to the SteelHead network.
Traffic originated through Symmetrix GigE ports (RE ports) requires configuration of the RiOS SRDF storage optimization module. Environments with SRDF traffic originated through Symmetrix FC ports (RF ports) require configuration of the RiOS FCIP storage optimization module.
You configure the SRDF storage optimization module on the SteelHead closest to the Symmetrix array that opens the SRDF TCP connection by sending the initial SYN packet. The SteelHead location can vary by environment. If you are unsure which array initiates the SYN, configure SRDF on both the client-side and server-side SteelHeads.
By default, SRDF optimization is disabled.
For details about data replication deployments, see the SteelHead Deployment Guide.
To configure SRDF optimization
1. Choose Optimization > Data Replication: SRDF to display the SRDF page.
2. Under SRDF Settings, select Enable SRDF. By default, RiOS directs all traffic on the standard port 1748 through the SRDF module for enhanced SRDF header isolation. For most environments, the configuration is complete and you can skip to Step 4.
3. Optionally, specify nonstandard individual SRDF port numbers separated by commas. Do not specify a port range.
The SRDF ports field must always contain at least one port.
4. Click Apply to save your settings to the running configuration.
5. Click Save to Disk to save your settings permanently.
Viewing SRDF connections
After completing the SRDF configuration on both SteelHeads and restarting the optimization service, you can view the SRDF connections in the Current Connections report.
•If the report lists a connection as TCP instead of SRDF, RiOS isn’t optimizing the connection. You must verify the configuration.
•If the report lists a connection as SRDF but a red protocol error icon appears in the Notes column, click the connection to view the reason for the error. A SRDF protocol error can occur when attempting to optimize traffic originating from the LAN side of the SteelHead. Check the LAN-side Symmetrix array for compatibility.
•If a protocol error doesn’t appear next to the SRDF connection on the client-side SteelHead, RiOS is optimizing the connection normally.
Setting a custom data reduction level for an RDF group
This section describes how to apply custom data reduction levels to remote data facility (RDF) groups.
You can base the data reduction level on the compression characteristics of the data associated with an RDF group to provide SRDF selective optimization. Selective optimization enables you to find the best optimization setting for each RDF group, maximizing the SteelHead use. Selective optimization depends on an R1 Symmetrix array running VMAX Enginuity microcode levels newer than 5874.
For example, you can customize the data reduction level for applications associated with an RDF group when excess WAN bandwidth is available and the application data associated with the group isn’t reducible. For applications with reducible data, getting maximum reduction might be more important, requiring a more aggressive data reduction level.
You can configure the optimization level from no compression to full scalable data replication (SDR). SDR optimization is the default, and includes LZ compression on the cold, first-pass of the data. You can also configure LZ-compression alone with no SDR.
Consider an example with these types of data:
•Oracle logs (RDF group 1)
•Encrypted check images (RDF group 2)
•Virtual machine images (RDF group 3)
In this example, you can assign LZ-only compression to the Oracle logs, no optimization to the encrypted check images, and default SDR to the virtual machine images. To assign these levels of optimization, you configure the SteelHead to associate specific RE port IP addresses with specific Symmetrix arrays, and then assign a group policy to specific RDF groups to apply different optimization policies.
The data reduction level within a group policy overrides the current default data reduction setting for the storage resources an RDF group represents. This override is distinct per Symmetrix ID.
To configure a custom data reduction group policy for a Symmetrix ID:
1. Choose Optimization > Data Replication: SRDF to display the SRDF page.
2. Under Symmetrix IDs and Group Override Policies, complete the configuration as described in this table.
Control | Description |
Add a Symm ID or Group Policy | Displays the tabs for adding a Symmetrix ID or group policy. |
Add a Symmetrix ID | Select to display the controls for adding a Symmetrix ID. |
Symm ID | Specify the Symmetrix ID. The Symmetrix ID is an alphanumeric string that can contain hyphens and underscores (for example, a standard Symmetrix serial number is 000194900363). Do not use spaces or special characters. Each Symmetrix ID can have 0 to 254 group override policies. |
Source IPs | Specify the connection source IP address of the Symmetrix DMX or VMAX GigE ports (RE ports) originating the replication. |
Add a Group Policy | Select to display the controls for adding a group policy. |
RDF Group | Specify the RDF group number. Symmetrix arrays that are serving Open Systems hosts and are using EMC Solutions Enabler report RDF group numbers in decimal, ranging from 1 to 255 (this is the RiOS default). Mainframe-attached Symmetrix arrays report RDF group numbers in hexadecimal, ranging from 0 to 254. You can’t add an RDF group until a Symmetrix ID exists. |
Symmetrix ID | Specify an IP address of the Symmetrix DMX or VMAX GigE ports (RE ports) originating the replication. |
Data Reduction Policy | By default, SDR uses the in-path rule data reduction policy. Select one of these data reduction policies from the drop-down list to override the in-path rule data reduction policy: •Default - Performs LZ compression and SDR. •LZ - Performs LZ compression; doesn’t perform SDR. •None - Disables SDR and LZ compression. |
Description | Describe the policy to facilitate administration: for example, Oracle 1 DB. |
Add | Adds the ID or policy to the list. The Management Console redisplays the list and applies your modifications to the running configuration, which is stored in memory. |
Remove Selected | Select the check box next to the name and click Remove Selected. |
Creating SRDF rules (VMAX-to-VMAX traffic only)
Environments with GigE-based (RE port) originated SRDF traffic between VMAX arrays must isolate data integrity field (DIF) headers within the data stream. These DIF headers interrupt the data stream. When the R1 Symmetrix array is running Enginuity microcode version 5875 or newer, manual SRDF rules aren’t necessary. In 5875+ environments, RiOS automatically detects the presence of DIF headers and DIF blocksize for GigE-based (RE port) SRDF traffic. To manually isolate the DIF headers when the R1 Symmetrix array is running Enginuity microcode version 5874 or older, you add SRDF rules by defining a match for source or destination IP traffic.
Automatically detected SRDF settings in Enginuity 5875 and later environments override any manually configured SRDF rules.
SRDF default rule
The default rule optimizes all remaining traffic that has not been selected by another rule. It always appears as the last in the list. You can’t remove the default rule; however, you can change the DIF setting of the default rule. The default rule uses 0.0.0.0 in the source and destination IP address fields, specifying all IP addresses. You can’t specify 0.0.0.0 as the source or destination IP address for any other rule.
To add an SRDF rule
1. Choose Optimization > Data Replication: SRDF to display the SRDF page.
2. Under Rules, complete the configuration as described in this table.
Control | Description |
Add a New Rule | Displays the controls for adding a manual rule. Use this control when the R1 Symmetrix array is running Enginuity microcode version 5874 or earlier. |
Source IP | Specify the connection source IP address of the Symmetrix DMX or VMAX GigE ports (RE ports) originating the replication. Note: The source IP address can’t be the same as the destination IP address. |
Destination IP | Specify the connection destination IP address of the Symmetrix DMX or VMAX GigE ports (RE ports) receiving the replication. |
Enable DIF | Isolates and optimizes the Data Integrity Fields embedded within the SRDF data workload. |
DIF Data Block Size | Specify the size of a standard block of storage data, in bytes, after which a DIF header begins. The valid range is from 1 to 2048 bytes. The default value is 512, which is a standard block size for Open System environments. When you enable DIF, RiOS SRDF optimization looks for a DIF header after every 512 bytes of storage data unless you change the default setting. Open System environments (such as Windows, UNIX, and Linux) inject the DIF header into the data stream after every 512 bytes of storage data. IBM iSeries (AS/400) host environments inject the DIF header into the data stream after every 520 bytes. Do not add a manual rule isolating DIF headers in mainframe environments, as SRDF environments that replicate mainframe traffic don’t currently include DIF headers. This field is required when you enable DIF. |
Add | Adds the manual rule to the list. The Management Console redisplays the Rules table and applies your modifications to the running configuration, which is stored in memory. |
Remove Selected | Select the check box next to the name and click Remove Selected. |
Move Selected | Moves the selected rules. Click the arrow next to the desired rule position; the rule moves to the new position. |
3. Click Apply to save your settings to the running configuration.
4. Click Save to Disk to save your settings permanently.
To edit an SRDF rule
1. Choose Optimization > Data Replication: SRDF to display the SRDF page.
2. Select the rule number in the rule list.
3. Edit the rule.
4. Click Save to Disk to save your settings permanently.
Related topics
Configuring SnapMirror optimization
You manage SnapMirror storage optimization settings in the Configure > Optimization: SnapMirror page.
SnapMirror is used mainly for disaster recovery and replication. To provide maximum protection and ease of management, many enterprises choose to perform SnapMirror operations across the wide-area network. However, WAN links are often costly, and the limited bandwidth and high-network latency they provide often severely degrade SnapMirror operations.
SteelHead improves the performance of the WAN for NetApp SnapMirror traffic by overcoming limited bandwidth restrictions, high latency, and poor network quality commonly associated with wide-area networks.
RiOS also improves WAN performance, visibility, and control of NetApp SnapMirror traffic with features that allow you to:
•present performance statistics and apply optimization policies based on source and destination volume and host pairs.
•define QoS policies for SnapMirror traffic.
•collect SnapMirror statistics, such as the total LAN/WAN bytes in and out and the active cycle time.
SteelHead supports SnapMirror optimization for environments using NetApp ONTAP 9 (Clustered Data ONTAP or cDOT) and legacy 7-mode environments in NetApp ONTAP 7 or Data ONTAP 8.
Working with Clustered Data ONTAP optimization
By default, SnapMirror optimization is enabled for clustered configurations.
In Clustered Data ONTAP, the SnapMirror replication works at the Storage Virtual Machine (SVM, formerly known as Vservers) level. Each SVM can have one or more volumes and, to perform replication, multiple network connections are established between the source and destination SVM. A single network connection is not dedicated to a single volume replication; instead a network connection can carry data belonging to different volumes and a single volume replication can span multiple connections. With this design, the SteelHead cannot uniquely identify volumes for a SnapMirror replication, but SteelHead can perform bandwidth and QoS optimization at the SVM level.
To configure the SteelHead for SnapMirror bandwidth optimization in clustered mode
•No explicit configuration is required for bandwidth optimization.
The default in-path rule lets you achieve bandwidth optimization of SnapMirror replication.
Note: To achieve better optimization from the SteelHead, do not enable compression for the replication in the NetApp Controller SnapMirror policy.
To configure QoS for SnapMirror optimization in clustered mode
1. Configure QoS rules on the SteelHead closest to the source SVM by defining the application and specifying the intercluster SVM IPs and port 11105.
Application definition for SnapMirror QoS
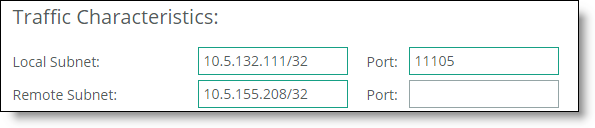
The local subnet is the source SVM and the remote subnet is the destination SVM.
Use subnet values of 0.0.0.0/0 and port 11105 to apply QoS rules for all SnapMirror traffic.
2. Go to Networking > Network Services: Quality of Service and in the QoS Rules section click Add a Rule.
3. Enter SnapMirror for the Application or Application Group, specify the QoS Class that meets your business needs, and specify and Outbound DSCP value.
SnapMirror QoS rule
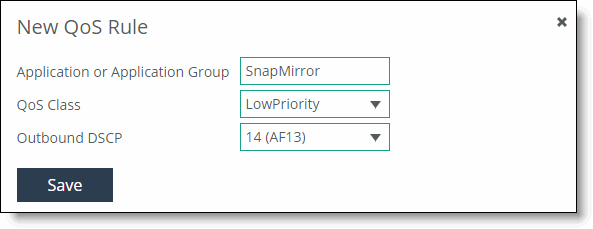
4. Click Save.
Note: If you use the throttle option of Clustered Data ONTAP Controller in the SnapMirror relationship, consider its interaction with the SteelHead QoS configuration to achieve desired the QoS.
For details about data replication deployments, see the SteelHead Deployment Guide.
Working with Legacy 7-Mode SnapMirror optimization
SteelHead provides the following optimization for SnapMirror replications between 7-mode Data ONTAP controllers:
•Bandwidth optimization – using Scalable Data Reference (SDR) and compression.
•Quality of Service (QoS) for guaranteed bandwidth.
Data ONTAP 7-mode creates a single dedicated network connection to replicate a SnapMirror volume. This behavior lets the SteelHead SnapMirror optimization work at volume level.
By default, SnapMirror optimization is disabled for legacy 7-mode configurations.
To benefit from SnapMirror optimization, both SteelHeads must be running RiOS 8.5 or later.
To configure SnapMirror optimization for 7-mode environments
1. On the source filer-side SteelHead, choose Optimization > Data Replication: SnapMirror to display the SnapMirror page.
2. Under SnapMirror Settings, select Enable 7-Mode SnapMirror optimization.
3. By default, RiOS directs all traffic on the standard port 10566 through the SnapMirror module for optimization. Optionally, specify nonstandard individual SnapMirror port numbers, separated by commas.
Do not specify a port range.
The SnapMirror ports field must always contain at least one port.
SnapMirror optimization doesn’t support port 10565 for multipath traffic.
4. Click Add a New Filer or Volume/QTree.
5. Select the Add a Filer tab.
6. Complete the configuration as described in this table.
Control | Description |
Filer Name | Specify the name of the filer. RiOS automatically detects the volumes associated with the filer, or you can optionally add volumes to it later. |
IP Addresses | Specify source IPv4 addresses to associate with the filer, separated by a comma. You can’t specify IPv6 addresses. |
Filer Default Optimization Policy | You can configure the optimization level from no compression (none) to full Scalable Data Replication (SDR-Default). SDR optimization includes LZ compression on the cold, first-pass of the data. You can also configure LZ-compression alone (LZ-only) with no SDR. For some applications, it might be more important to get maximum throughput with minimal latency, and without compression; for others, getting maximum reduction is more important. Select an optimization policy for the default volumes and qtrees on this filer: •SDR-Default - Performs SDR and LZ compression. This is the default policy. •LZ-only - Performs LZ compression only. There is no SDR optimization with this policy. •None - Disables SDR and LZ compression. |
Filer Default SnapMirror Priority | Select a priority for use later in a QoS service class: Highest, High, Medium, Low, Lowest, No Setting. The default priority is Medium. No setting means that there’s no priority and the QoS default rules apply. |
Description | Optionally, specify a volume description or provide additional comments. |
Add | Adds the filer to the list. The Management Console redisplays the Filer table and applies your modifications to the running configuration, which is stored in memory. |
Remove Selected | Select the check box next to the name and click Remove Selected. |
7. Click Apply to save your settings to the running configuration.
8. Click Save to Disk to save your settings permanently.
10. On the destination filer-side SteelHead, choose Optimization > Data Replication: SnapMirror, select Enable SnapMirror, and restart the optimization service.
For details about data replication deployments, see the SteelHead Deployment Guide.
Adding or modifying a filer
This section describes how to create a new filer or make changes to an existing filer. You must add a filer before you can add a volume. SnapMirror needs both a source and a destination IP address for each filer.
To add a SnapMirror filer
1. Choose Optimization > Data Replication: SnapMirror to display the SnapMirror page.
2. Click Add a New Filer or Volume/QTree.
3. Select the Add a Filer tab.
4. Complete the configuration as described in this table.
Control | Description |
Filer Name | Specify the name of the filer. RiOS automatically detects the volumes associated with the filer, or you can optionally add volumes to it later. |
IP Addresses | Specify source IPv4 addresses to associate with the filer, separated by a comma. You can’t specify IPv6 addresses. |
Filer Default Optimization Policy | You can configure the optimization level from no compression (none) to full Scalable Data Replication (SDR-Default). SDR optimization includes LZ compression on the cold, first-pass of the data. You can also configure LZ-compression alone (LZ-only) with no SDR. For some applications, it might be more important to get maximum throughput with minimal latency, and without compression; for others, getting maximum reduction is more important. Select an optimization policy for the default volumes and qtrees on this filer: •SDR-Default - Performs SDR and LZ compression. This is the default policy. •LZ-only - Performs LZ compression only. There is no SDR optimization with this policy. •None - Disables SDR and LZ compression. |
Filer Default SnapMirror Priority | Select a priority for use later in a QoS service class: Highest, High, Medium, Low, Lowest, No Setting. The default priority is Medium. No setting means that there’s no priority and the QoS default rules apply. |
Description | Optionally, specify a volume description or provide additional comments. |
Add | Adds the filer to the list. The Management Console redisplays the Filer table and applies your modifications to the running configuration, which is stored in memory. |
Remove Selected | Select the check box next to the name and click Remove Selected. |
5. Click Apply to save your settings to the running configuration.
6. Click Save to Disk to save your settings permanently.
To add a SnapMirror volume or qtree
1. Choose Optimization > Data Replication: SnapMirror to display the SnapMirror page.
2. Click Add a New Filer or Volume/QTree.
3. Select the Add a Volume/QTree tab.
4. Complete the configuration as described in this table.
Control | Description |
Volume Name | Specify the name of the volume. |
Filer | Select a predefined filer from the drop-down list. |
Optimization Policy | By default, the volumes use the same optimization policy as the filer. With this setting, when you change the policy on the filer, the policy setting on the volumes updates automatically. Select an optimization policy for the volume: •SDR-Default - Performs SDR and LZ compression. This is the default policy. •Filer-Default - Sets the volume optimization policy to be the same as the filer values. This is the default policy. •LZ-only - Enables LZ compression only. There is no SDR optimization with this policy. •None - Disables SDR and LZ compression. |
SnapMirror Priority | Select a priority for use later in a QoS service class: Highest, High, Filer-Default, Low, Lowest, No Setting. The default priority is Filer-Default, which uses the same priority as the filer. With this setting, when you change the priority on the filer, the priority for the volume updates automatically. |
Add | Adds the rule to the list. The Management Console redisplays the Rules table and applies your modifications to the running configuration, which is stored in memory. |
Remove Selected | Select the check box next to the name and click Remove Selected. |
5. Click Apply to save your settings to the running configuration.
Viewing SnapMirror connections
You can view the SnapMirror connections by choosing Reports > Optimization: SnapMirror. For details, see
Viewing SnapMirror reports.
Windows domain authentication
This section describes how to configure a SteelHead to optimize in an environment where there are:
•Microsoft Windows file servers using signed SMB or signed SMB2/3 for file sharing to Microsoft Windows clients.
•Microsoft Exchange Servers providing an encrypted MAPI communication to Microsoft Outlook clients.
•Microsoft Internet Information Services (IIS) web servers running HTTP or HTTP-based web applications such as SharePoint 2007.
Optimization in a secure Windows environment has changed with each software version of RiOS.
RiOS 8.5 and later support:
•Kerberos trust authentication as an alternative to creating and using a specific Kerberos replication user. This alternative is useful in trust models with split resource and management Active Directory domains such as Office 365 or other managed service providers.
•A set of domain health status commands that serves as a troubleshooting tool to identify, diagnose, and report possible problems with a SteelHead within a Windows domain environment. For details, see
Checking domain health.
•A set of widgets that simplify the SteelHead configuration necessary to optimize traffic in an secure environment.
This table shows the different combinations of Windows clients and authentication methods with the required minimum version of RiOS and Windows configuration (delegation, Kerberos, Active Directory integrated) for the server-side SteelHead.
Client OS | Authentication method | Pre-RiOS 9.x Active Directory integrated mode | Pre-RiOS 9.x Kerberos | RiOS 9.x Active Directory integrated mode |
Windows 7 | Negotiate authentication/SPNEGO | Optimized using NTLM | Optimized using Kerberos | Optimized transparent |
Any client up to Windows 7 | Kerberos | Optimized | Optimized | Optimized |
Windows 8 and 8.1 | NTLM | Optimized | Optimized | Optimized |
Windows 8 and 8.1 | Kerberos | Optimized (fallback) | Optimized | Optimized |
For Windows 8 clients behavior, use Windows 7 information in the above table, and RiOS 8.5 or later. For Windows 8.1 and Windows 10 clients, use RiOS 9.0 or later.
SteelHeads support end-to-end Kerberos authentication for these secure protocols:
•SMB signing
•SMB2/3 signing
•Encrypted MAPI/Outlook Anywhere
•HTTP
When you configure the server-side SteelHead to support end-to-end Kerberos authentication, you can join it to the domain in Active Directory integrated mode to support other clients that might be using NTLM authentication. This configuration can provide flexible and broad support for multiple combinations of Windows authentication types in use within the Active Directory environment.
SteelHeads protect authentication credentials for delegate and replication users by storing them in the SteelHead secure vault. The secure vault contains sensitive information about your SteelHead configuration.
You must unlock the secure vault to view, add, remove, or edit any replication or delegate user configuration details that are stored on the SteelHeads. The system initially locks the secure vault on a new SteelHead with a default password known only to RiOS. This lock allows the SteelHead to automatically unlock the vault during system start up. You can change the password, but the secure vault doesn’t automatically unlock on start up.
To migrate previously configured authentication credentials to the secure vault after upgrading from a RiOS version of 6.5.x or earlier, unlock the secure vault and then enter this CLI command at the system prompt:
protocol domain-auth migrate
For details, see the Riverbed Command-Line Interface Reference Manual.
Windows 7 clients can use Kerberos authentication for maximum security. Kerberos authentication doesn’t require delegation mode configuration, but you must configure both NTLM authentication (either transparent mode or delegation mode) along with Kerberos authentication (if desired).
Configuring domain authentication automatically
RiOS 8.5 and later simplify the SteelHead configuration necessary to optimize traffic in an environment where there are:
•Microsoft Windows file servers using signed SMB or signed SMB2/3 for file sharing to Microsoft Windows clients.
•Microsoft Exchange Servers providing an encrypted MAPI communication to Microsoft Outlook clients.
•Microsoft Internet Information Services (IIS) web servers running HTTP or HTTP-based web applications such as SharePoint 2007.
This section describes how to simplify configuration using these operations:
•Easy Config - Configures the server-side SteelHead in Active Directory integrated mode for Windows 2003 or Windows 2008 to enable secure protocol optimization for CIFS SMB1, SMB2/3, and encrypted MAPI for all clients and servers.
•Auto Config - Configures the following accounts and privileges:
–Configure Delegation Account - Configures the deployed delegation account with AD delegation privileges. This is a legacy configuration that has been deprecated. We recommend Active Directory Integrated mode.
–Configure Replication Account - Configures the deployed replication account with AD replication privileges.
–Add Delegation Servers - Configures a list of the Exchange and CIFS servers that have permission to delegate AD access privileges. We strongly recommend using Kerberos end-to-end or Integrated Active Directory mode, as delegation requires the most administration.
–Remove Delegation Servers - Removes Exchange and CIFS servers from the list of delegation server accounts with permission to delegate AD access privileges. This is a legacy configuration that has been deprecated. We recommend Active Directory Integrated mode.
Easy domain authentication configuration
Domain authentication automatic configuration simplifies the server-side SteelHead configuration for enabling latency optimizations in a secure environment. Using this widget automates the majority of the required configuration tasks, avoiding the need to perform step-by-step operations in different configuration tools and using the command line on the Windows AD platforms.
Use this widget to configure the server-side SteelHead in integrated Active Directory mode for Windows 2003 or 2008 and later, and enable secure protocol optimization for CIFS SMB1, SMB2, and SMB3 for all clients and servers. To enable secure protocol optimization for MAPI and encrypted MAPI, you need to enable MAPI protocol optimization on all clients after running the widget.
Domain Authentication Automatic Configuration performs these tasks:
1. Tests the DNS configuration.
2. Joins the server-side SteelHead to the domain.
3. Enables secure protocol optimization, such as SMB signing.
4. Configures a deployed replication user in Active Directory, with the necessary privileges.
If any of the steps fail during the configuration, the system automatically rolls back to the previous configuration.
You don’t necessarily need to use the replication user or delegate user facility to optimize secure Windows traffic if you deploy the server-side SteelHead so that it joins a domain in the Active Directory environment. To integrate the server-side SteelHead into Active Directory, you must configure the role when you join the SteelHead to the Windows domain.
When you integrate the server-side SteelHead in this way, it doesn’t provide any Windows domain controller functionality to any other machines in the domain and doesn’t advertise itself as a domain controller or register any SRV records (service records). In addition, the SteelHead doesn’t perform any replication nor hold any Active Directory objects. The server-side SteelHead has just enough privileges so that it can have a legitimate conversation with the domain controller and then use transparent mode for NTLM authentication.
To configure domain authentication using Easy Config
1. On the server-side SteelHead, choose Networking > Networking: Host Settings.
2. Under Primary DNS server, specify the DNS server IP address to use as the DNS server for the domain.
3. Under DNS domain list, add the primary DNS server name to the list.
4. Click Apply to apply your settings to the running configuration.
5. Choose Optimization > Active Directory: Auto Config.
6. Under Easy Config, select Configure Domain Auth.
7. On the server-side SteelHead, complete the configuration as described in this table.
Control | Description |
Admin User | Specify the name of the domain administrator. RiOS deletes domain administrator credentials after the join. |
Password | Specify the password for the domain administrator account. This control is case sensitive. |
Domain/Realm | Specify the fully qualified domain name of the Active Directory domain in which to make the SteelHead a member. Typically, this is your company domain name. RiOS supports Windows 2000 or later domains. |
Domain Controller | Specify the hosts that provide user login service in the domain, separated by commas. (Typically, with Windows 2000 Active Directory Service domains, given a domain name, the system automatically retrieves the DC name.) |
Short Domain Name | Specify the short (NETBIOS) domain name. You can identify the short domain name by pressing Ctrl+Alt+Delete on any member server. You must explicitly specify the short domain name if it doesn’t match the leftmost portion of the fully qualified domain name. |
Enable Encrypted MAPI | Select to enable encrypted MAPI optimization on the server-side SteelHead. After running this widget, you must also choose Optimization > Protocols: MAPI on the client-side SteelHead and select Enable MAPI Exchange Optimization and Enable Encrypted Optimization. |
Enable SMB Signing | Select to enable optimization on SMB-signed connections on the server-side and client-side SteelHeads. |
Enable SMB2 Signing | Select to enable optimization on SMB2-signed connections on the server-side and client-side SteelHeads. |
Enable SMB3 Signing | Select to enable optimization on SMB3-signed connections on the server-side and client-side SteelHeads. |
Join Account Type | Specifies which account type the server-side SteelHead uses to join the domain controller. You can optimize the traffic to and from hosted Exchange Servers. You must configure the server-side SteelHead in integrated Active Directory mode for Windows 2003 or Windows 2008 and higher domains. This mode allows the SteelHead to use authentication within the Active Directory on the Exchange Servers that provide Microsoft Exchange online services. The domain that the server-side SteelHead joins must be either the same as the client user or any domain that trusts the domain of the client user. When you configure the server-side SteelHead in integrated Active Directory mode, the server-side SteelHead doesn’t provide any Windows domain controller functionality to any other machines in the domain and doesn’t advertise itself as a domain controller. In addition, the SteelHead doesn’t perform any replication nor hold any AD objects. When integrated with the Active Directory, the server-side SteelHead has just enough privileges so that it can have a legitimate conversation with the domain controller and then use transparent mode for NTLM authentication. Select one of the following options from the drop‑down list: •Active Directory integrated (Windows 2008 and later) - Configures the server-side SteelHead in integrated Active Directory mode for Windows 2008 DCs and higher and supports authentication across domains. This is the default setting. You must explicitly specify the Windows 2008 DCs as a comma-separated list in the Domain Controller field. The list should contain either the name or IP address of the Windows 2008 DCs. You must have Administrator privileges to join the domain. Additionally, if the user account is in a domain that is different from the domain to which the join is being performed, specify the user account in the format domain\username. Do not specify the user account in the format username@realmname. In this case, domain is the short domain name of the domain to which the user belongs. •Active Directory integrated (Windows 2003) - Configures the server-side SteelHead in Active Directory integrated mode. If the account for the server-side SteelHead was not already present, it’s created in organizational unit (OU) domain controllers. If the account existed previously as a domain computer then its location doesn’t change. You can move the account to a different OU later. You must have Administrator privileges to join the domain. This option doesn’t support cross-domain authentication where the user is from a domain trusted by the domain to which the server-side SteelHead is joined. Even though the SteelHead is integrated with Active Directory, it doesn’t provide any Windows domain controller functionality to any other machines in the domain. |
Configure Domain Auth | Click to configure domain authentication. |
After you click
Configure Domain Auth, the status indicates whether the domain authentication was successful. For details, see
Status and logging. If the authentication succeeds, secure protocol optimization for CIFS (SMB1), SMB2, and SMB33 is enabled for all clients and servers. Encrypted MAPI is enabled for all servers. To enable encrypted MAPI for all clients, you must enable encrypted optimization on the client-side SteelHead. For details, see
Configuring MAPI optimization.
Configuring domain authentication for delegation
Historically, with earlier Windows releases, the preferred option was to have the server-side SteelHead join the domain as “Workstation” then use a Delegate User account and authenticate using constrained delegation. However, delegation requires the most administrative effort by both the SteelHead and Windows AD administrators. This configuration option has been deprecated. We recommend Active Directory Integrated mode due to its simplicity, ease of configuration, and low administrative maintenance.
Replication
You can assign a restricted set of privileges to a user, known as a replication user. You can configure the replication user on a per-forest basis so that the user assigned to it can retrieve machine credentials from any domain controller in any trusted domain within the forest. Remember that a forest can comprise multiple domains with trusts between them.
Automatic configuration simplifies setting up your SteelHead for delegation or replication. Use these widgets to:
•configure delegation or replication accounts.
•add or remove delegation servers.
Delegation (deprecated)
Using delegation mode to optimize SMB-signed or encrypted MAPI traffic requires additional configuration (beyond joining the server-side SteelHead to a domain) because delegation mode uses the Active Directory constrained delegation feature. You must configure both the server-side SteelHead and the Windows domain that it joins.
Constrained delegation is an Active Directory feature that enables configured services to obtain security related information for a user. Configuring constrained delegation requires the creation of a special delegate user account in the Windows domain. The account allows the delegate user the privilege of obtaining security information for use with specific applications (like CIFS and MAPI), and then configuring the delegate user credentials on the server-side SteelHead.
Configuring the delegation account (deprecated)
The configure delegation account widget configures a user with trusted delegation rights for a domain.
To configure the delegation account with AD delegation privileges
1. Choose Optimization > Active Directory: Auto Config.
2. Under Auto Config, select Configure Delegation Account.
3. On the server-side SteelHead, complete the configuration as described in this table.
Control | Description |
Admin User | Specify the delegate username. The maximum length is 20 characters. The username can’t contain any of the following characters: / \ [ ] : ; | = , + * ? < > @ " Note: The system translates the username into uppercase to match the registered server realm information. Note: You can only add one delegate user per domain. A delegate user is required in each of the domains where a server is going to be optimized. |
Password | Specify the user account password. |
Delegation Domain/Realm | Select the delegation domain in which you want to make the delegate user a trusted member from the drop-down list. |
Domain Controller | Specify the hosts that provide user login service in the domain, separated by commas. (Typically, with Windows 2000 Active Directory Service domains, given a domain name, the system automatically retrieves the DC name.) |
Configure Delegation Account | Click to configure the account. |
After you click
Configure Delegation Account, the status indicates whether the configuration was successful. For details, see
Status and logging.
Configuring the Replication Account
The configure replication account widget adds a user with trusted replication rights to a domain.
To configure the replication account
1. Choose Optimization > Active Directory: Auto Config.
2. Under Auto Config, select Configure Replication Account.
3. On the server-side SteelHead, complete the configuration as described in this table.
Control | Description |
Admin User | Specify the replication username. The maximum length is 20 characters. The username can’t contain any of the following characters: / \ [ ] : ; | = , + * ? < > @ " Note: The system translates the username into uppercase to match the registered server realm information. Note: You can only add one replication user per domain. A replication user is required in each of the domains where a server is going to be optimized. |
Password | Specify the user account password. |
Replication Domain/Realm | Select the replication domain in which you want to make the replication user a trusted member from the drop-down list. You must preconfigure the replication domain; it no replication domain exists, the list displays None. |
Domain Controller | Specify the hosts that provide user login service in the domain, separated by commas. (Typically, with Windows 2000 Active Directory Service domains, given a domain name, the system automatically retrieves the DC name.) |
Configure Replication Account | Click to configure the account. |
After you click
Configure Replication Account, the status indicates whether the replication account configuration was successful. For details, see
Status and logging.
Adding the delegation servers (deprecated)
The add delegation servers widget adds delegation servers from either the CIFS or Exchange MDB service.
To add delegation servers
1. Choose Optimization > Active Directory: Auto Config.
2. Under Auto Config, select Add Delegation Servers.
3. On the server-side SteelHead, complete the configuration as described in this table.
Control | Description |
Admin User | Specify the delegate username. The maximum length is 20 characters. The username can’t contain any of the following characters: / \ [ ] : ; | = , + * ? < > @ " Note: The system translates the username into uppercase to match the registered server realm information. Note: You can only add one delegate user per domain. A delegate user is required in each of the domains where a server is going to be optimized. |
Password | Specify the user account password. |
Delegation Domain/Realm | Select the delegation domain in which you want to make the delegate user a trusted member from the drop-down list. |
Domain Controller | Specify the hosts that provide user login service in the domain, separated by commas. (Typically, with Windows 2000 Active Directory Service domains, given a domain name, the system automatically retrieves the DC name.) |
Service | Select a service type for delegation: CIFS or Exchange MDB service. |
Server List | Specify the CIFS or MAPI servers as the local hostname, separated by commas. |
Add Delegation Servers | Click to add the servers for delegation. |
After you click Add Delegation Servers, the status indicates whether the configuration was successful.
Removing the delegation servers
The remove delegation servers widget removes delegation servers from either the CIFS or Exchange MDB service.
To remove delegation servers
1. Choose Optimization > Active Directory: Auto Config.
2. Under Auto Config, select Remove Delegation Servers.
3. On the server-side SteelHead, complete the configuration as described in this table.
Control | Description |
Admin User | Specify the domain administrator name assigned to the delegation server. The maximum length is 20 characters. The administrator name can’t contain any of the following characters: / \ [ ] : ; | = , + * ? < > @ " Note: The system translates the administrator name into uppercase to match the registered server realm information. |
Password | Specify the user account password. |
Delegation Domain/Realm | Select the delegation domain in which you want delegate user is a trusted member. |
Domain Controller | Specify the hosts that provide user login service in the domain, separated by commas. (Typically, with Windows 2000 Active Directory Service domains, given a domain name, the system automatically retrieves the DC name.) |
Service | Select the delegation service type: CIFS or Exchange MDB service. |
Server List | Specify the CIFS or MAPI servers as the local hostname, separated by commas. |
Remove Delegation Servers | Click to remove the servers from delegation. |
After you click Remove Delegation Servers, the status indicates whether the servers were removed.
Status and logging
After you run a widget, the status indicates one of these states:
•Not Started - The operation has never executed on this SteelHead.
•Success - The last time the operation executed, it completed successfully with no errors.
•Failed - The last time the operation executed, the results were unsuccessful. The operation was not carried out because it ran into an error condition.
•In Progress - The operation is actively running. In this state, the browser constantly polls the back end to see if the operation has completed. Once the operation completes, the browser stops polling.
Last Run displays the amount of time elapsed since the last execution and then the time and date the operation completed. The time is meaningful only if the status is success or failed.
Logging Data displays log output for the operation. You might want to view the log if the status indicates an operation failure. Two log files follow an operation:
•The summary log contains the highlights of the full log.
•The full log contains a detailed record of the operation.
You can control the logging data display using the tabs.
Select Hide Log to remove the logs from the display.
Select the Summary and Full Log tabs to view the logging data. The system displays a line count for the number of lines in the logging data. The system omits the tab if the log file is empty.
•For the summary and full log tabs, an abbreviated form of the time stamp appears in the left margin of each line. Mouse over a time stamp and view the entire time stamp in a tooltip.
Not all log lines have time stamps, because some of the logging data is generated by third-party (non-Riverbed) applications.
•The log highlights line errors in red and warnings in yellow.
Configuring domain authentication manually
The following topics describe the manual configuration on the server-side SteelHead for enabling latency optimizations in a secure environment. We recommend using the automatic configuration as described in
Configuring domain authentication automatically, because it performs these steps automatically. Use this operation instead of the automatic configuration to set up delegate users in Active Directory. After running this operation, you can enable secure protocol optimization for CIFS SMB1, SMB2, SMB3, and encrypted MAPI for all clients and servers.
For an overview of Windows Domain Authentication, see
Viewing SnapMirror connections.
Delegation (deprecated)
Historically, with earlier Windows releases, the preferred option was to have the server-side SteelHead join the domain as “Workstation” then use a Delegate User account and authenticate using constrained delegation. However, delegation requires the most administrative effort by both the SteelHead and Windows AD administrators. This configuration option has been deprecated. We strongly recommend using Active Directory Integrated mode due to its simplicity, ease of configuration, and low administrative maintenance.
To add NTLM delegate users on the SteelHead
1. On the server-side SteelHead, choose Optimization > Active Directory: Service Accounts to display the Service Accounts page.
2. Under NTLM Users with Delegation Rights, complete the configuration as described in this table.
Control | Description |
Add a New User | Displays the controls to add a user with trusted delegation rights to a domain. Note: You can only add one delegate user per domain. A delegate user is required in each of the domains where a server is going to be optimized. |
Active Directory Domain Name | Specify the delegation domain in which you want to make the delegate user a trusted member, for example: SIGNING.TEST Note: You can’t specify a single-label domain name (a name without anything after the dot), as in riverbed instead of riverbed.com. |
Username | Specify the delegate username. The maximum length is 20 characters. The username can’t contain any of these characters: / \ [ ] : ; | = , + * ? < > @ " Note: The system translates the username into uppercase to match the registered server realm information. |
Password | Specify the user account password. |
Password Confirm | Confirm the user account password. |
Add | Adds the user. |
3. Click Apply to apply your settings to the running configuration.
To set up manual delegation (specifying each server allowed to delegate), continue to the next procedure.
To set up automatic server detection, see
Autodelegation mode (deprecated).
To specify manual delegation mode and allowed servers using NTLM
1. On the server-side SteelHead, choose Optimization > Windows Domain Auth to display the Windows Domain Auth page.
2. Under NTLM, complete the configuration as described in this table.
Control | Description |
Delegation Mode: Manual | Select to enable transparent authentication using NTLM and provide more control to specify the exact servers to perform optimization for. When you select this mode, you must specify each server on which to delegate and sign for each domain using the Delegate-Only and Delegate-All-Except controls. |
Delegation Mode: Auto | Select to enable delegate user authentication and automatically discover the servers on which to delegate and sign. Automatic discovery eliminates the need to set up the servers on which to delegate and sign for each domain. This mode requires additional configuration. For details, see autodelegation mode. A delegate user is required in each of the domains where a server is going to be optimized. |
Allow delegated authentication to these servers (Delegate-Only) | Click to intercept the connections destined for the servers in this list. By default, this setting is enabled. Specify the file server IP addresses for SMB signed or MAPI encrypted traffic in the text box, separated by commas. Note: You can switch between the Delegate-Only and Delegate-All-Except controls without losing the list of IP addresses for the control. Only one list is active at a time. |
Allow delegated authentication to all servers except the following (Delegate-All-Except) | Click to intercept all of the connections except those destined for the servers in this list. Specify the file server IP addresses that don’t require SMB signing or MAPI encryption in the text box, separated by commas. By default, this setting is disabled. Only the file servers that don’t appear in the list are signed or encrypted. Note: You must register any servers not on this list with the domain controller or be using autodelegation mode. |
3. Click Apply to apply your settings to the running configuration.
4. Click Save to Disk to save your settings permanently.
5. If you change the delegation mode, you must restart the optimization service.
A delegate user with access to the CIFS and exchangeMDB (MAPI) service doesn’t have log on privileges.
Autodelegation mode (deprecated)
Historically, with earlier Windows releases, the preferred option was to have the server-side SteelHead join the domain as “Workstation,” use a Delegate User account, and authenticate using constrained delegation. However, delegation requires the most administrative effort by both the SteelHead and Windows AD administrators. This configuration option has been deprecated. We strongly recommend using Active Directory Integrated mode due to its simplicity, ease of configuration, and low administrative maintenance.
Delegation mode automatically updates the delegate user in Active Directory with delegation rights to servers. The service updates the user in real-time, eliminating the need to grant the user access to delegate on every server. Auto-delegation mode also updates the server IP address if it changes.
The following section describes the configuration on the server-side SteelHead.
1. On the server-side SteelHead, choose Optimization > Active Directory: Service Accounts to display the Service Accounts page.
2. Under NTLM, select Auto.
3. Specify the IP address of any servers you don’t want to allow delegated authentication.
4. Click Apply to apply your settings to the running configuration.
5. Click Save to Disk to save your settings permanently.
6. Click Restart Services to restart the optimization service.
Troubleshooting delegate users
This section provides information on troubleshooting the delegate user set up, if necessary.
•When the CIFS or exchangeMDB service (MAPI) can’t obtain a delegate user’s credentials, this message appears:
kinit: krb5_get_init_creds: Clients credentials have been revoked
This message indicates that Login Denied is set for the delegate user for the entire day. To verify when the delegate user has permission to log in, select the Account tab in the Delegate User Properties dialog box and click Logon Hours.
•When the CIFS or exchangeMDB service can’t obtain permissions to access certain required user account attributes, this message appears:
kgetcred: krb5_get_creds: Client (delegate@SIGNING.TEST) unknown
Add the delegate user to the Windows Authorization Access group. For details, see
Configuring replication users (Kerberos)
Kerberos end-to-end authentication relies on Active Directory replication to obtain machine credentials for any servers that require secure protocol optimization. The RiOS replication mechanism requires a domain user with AD replication privileges, and involves the same AD protocols used by Windows domain controllers. These procedures explain how to configure replication to use Kerberos authentication for these features:
•SMB signing
•SMB2 or SMB3 signing
•Encrypted MAPI and encrypted Outlook Anywhere
•HTTP or HTTP-based traffic
Kerberos one-way trust in RiOS 8.5 and later provide an alternative to creating and using a specific Kerberos replication user for trust models with split resource and management Active Directory domains, such as Office 365 or other managed service providers.
To enable Kerberos authentication for restricted trust environments, see
To enable one-way trust using Kerberos. To join the server-side SteelHead as an integrated Active Directory, see
Easy domain authentication configuration.
For details about restricted trust configurations, see the SteelHead Deployment Guide.
To add Kerberos replication users on the SteelHead
1. On the server-side SteelHead, choose Optimization > Active Directory: Service Accounts to display the Service Accounts page.
SteelHeads store authentication credentials for delegate and replication users in the secure vault. To unlock the secure vault, choose Administration > Security: Secure Vault and click Unlock Secure Vault.
To migrate previously configured authentication credentials to the secure vault after upgrading from a RiOS version of 6.5.x or earlier, enter this CLI command at the system prompt:
protocol domain-auth migrate
For details, see the Riverbed Command-Line Interface Reference Manual.
2. Under Kerberos Replication Users, complete the configuration as described in this table.
Control | Description |
Add a New User | Displays the controls to add a user with replication privileges to a domain. You can add one replication user per forest. |
Active Directory Domain Name | Specify the AD domain in which you want to make the replication user a trusted member. For example: SIGNING.TEST The SteelHead replicates accounts from this domain. To facilitate configuration, you can use wildcards in the domain name: for example, *.nbttech.com. You can’t specify a single-label domain name (a name without anything after the dot), as in riverbed instead of riverbed.com. |
User Domain | Specify the domain the user belongs to, if different from the Active Directory domain name. We recommend that you configure the user domain as close to the root as possible. |
Username | Specify the replication username. The user must have privileges to change the replicate directory. For details, see Granting replication user privileges on the DC. The username can be an administrator. A replicate user that is an administrator already has the necessary replication privileges. The maximum username length is 20 characters. The username can’t contain any of these characters: / \ [ ] : ; | = , + * ? < > @ " Note: The system translates the username into uppercase to match the registered server realm information. |
Password | Specify the user account password. |
Password Confirm | Confirm the user account password. |
Enable Password Replication Policy Support | When you deploy the server-side SteelHead for optimizing traffic in a native Kerberos environment, and configure it in Active Directory integrated mode, you can optionally limit its scope when you configure a PRP in the Windows domain. In this way, the SteelHead can only replicate accounts as permitted by the PRP rules. However, this can create additional administrative overhead in managing the PRP. You can’t configure PRP in Windows 2003 domains. A Windows server using Active Directory integration caches user and computer accounts performing authentication locally. The PRP is essentially a set rules describing which accounts the server is allowed to replicate. When PRP is enabled, the server-side SteelHead only replicates accounts that it’s allowed to as determined by PRP settings for the domain. When a user account is not cached locally, the server forwards the authentication to a writeable domain controller (DC) that does the authentication. If you allow the user’s password to be cached, then the server pulls that through a replication request. After the user is authenticated, the server caches the user password and handles any subsequent logins locally. Enabling a password replication policy (PRP) requires additional configuration in Windows: •Configure the replication user on the DC. •Check the domain functional level. •Configure PRP support on the DC. |
DC Name | Specify the Windows 2008 or later DC name, which is required when enabling PRP support. |
Add | Adds the user. |
3. Click Apply to apply your settings to the running configuration.
The following topics describe additional procedures necessary to configure PRP support.
Granting replication user privileges on the DC
1. In Windows, open Active Directory Users and Computers and choose Start > Administrative Tools > Active Directory Users and Computers.
2. Select the domain name, right-click, and select Delegate Control.
3. Select one or more users to whom you want to delegate control, and click Add.
4. Click Next.
5. Select Create a custom task to delegate and click Next.
6. Select This folder, existing objects in this folder, and creation of new objects in this folder. Click Next.
7. Select General > Replicate Directory Changes.
8. Select Replicate Directory Changes All and click Next.
9. Click Finish if the correct groups and users appear with the permissions Replicating Directory Changes and Replicate Directory Changes All.
Verifying the domain functional level
Verify that the current domain functional level is Windows 2008 or later. See
Verifying the domain functional level and host settings. For details on functional level support, see the
SteelHead Deployment Guide - Protocols.
Configuring PRP on the DC
The final step in configuring replication users is to add users to either the allowed password replication group or the denied password replication group.
1. Choose Start > Administrative Tools > Active Directory Users and Computers, select the domain name, right-click, and select Users.
2. Select either the Allowed RODC Password Replication Group or the Denied RODC Password Replication Group, select the members, and click Add.
3. Click OK.
Enabling Kerberos in a restricted trust environment
This section describes an alternative to creating and using a specific Kerberos replication user for environments with restricted security. Kerberos restricted trust includes trust models with split resource and management Active Directory domains such as Office 365 or other managed service providers.
For details about restricted trust configurations, see the SteelHead Deployment Guide - Protocols.
Windows XP clients must use TCP for Kerberos in a one-way trust configuration. By default, Kerberos uses UDP. You must change UDP to TCP in a Registry setting.
To enable one-way trust using Kerberos
1. To verify that the Active Directory environment has a one-way trust configuration, open Active Directory Domains and Trusts, right-click Account/Resource Domain, select Properties, and then select Trusts. From the account domain perspective, you should see an incoming trust from the resource domain. From the resource domain perspective, you should see an outgoing trust to the account domain.
For details on one-way trust configurations, see SteelHead Deployment Guide - Protocols.
2. If you have not previously configured signing or eMAPI on the server-side SteelHead, choose Optimization > Active Directory: Config Domain Auth to walk through these configuration steps:
–Point DNS to the DNS server
–Join a domain
–Enable signing or eMAPI
–Configure transparent or delegation mode
–Configure replication
–Enable end-to-end Kerberos for signing or eMAPI
3. On the server-side SteelHead, choose Optimization > Active Directory: Service Accounts.
4. Under Kerberos, select the Enable Kerberos support for restricted trust environments check box.
5. Click Apply to apply your settings to the running configuration.
6. On the client-side SteelHead, choose Networking > App Definitions: Port Labels.
7. Because the client-side SteelHead has a default in-path rule that bypasses all traffic classified in the secure port label, remove port 88 to allow the SteelHead to intercept Kerberos traffic instead of bypassing it.
8. Click Apply to apply your settings to the running configuration.
RiOS 8.5 and later feature a domain health tool to identify, diagnose, and report possible problems with a SteelHead within a Windows domain environment. For details, see
Checking domain health.
Related topics