Installing NICs in CX xx55, DX, EX xx60, and SteelFusion Core Appliances
This chapter describes how to install NICs in SteelHead CX xx55, DX, EX xx60, and SteelFusion Core 2000 and 3000 appliances. It includes the following sections:
This chapter assumes you have installed and configured the appliance. For details, see the installation and configuration guide for your product.
Note: For detailed information about installing NICs in the EX560 and EX760 appliances, see the Series EX560 and EX760 Systems Owner’s Manual.
Appliances Included in This Chapter
This chapter describes how to install cards in the following appliances:
• 1U xx55 and xx60 appliances, including CX1555 and EX1160.
• 2U xx55 and xx60 appliances, including CX5055, CX7055, DX8000, EX1260, EX1360, and SteelFusion Core 2000 and 3000.
Before You Begin
Before you install a NIC, ensure the NIC meets the software requirements described in
NICs for SteelHead CX xx55, DX, EX xx60, and SteelFusion Core Appliances.
During installation, make sure you follow proper ESD procedures when you handle the NIC:
• Wear properly grounded ESD straps.
• If an ESD strap is not available, touch a properly grounded metallic surface prior to handling the NIC.
• Do not touch the electronic components on the NIC.
NICs for SteelHead CX xx55, DX, EX xx60, and SteelFusion Core Appliances
This section describes the software requirements and cards that you can install on SteelHead CX xx55, DX, EX xx60, and SteelFusion Core appliances.
All the NICs for these appliances, including the onboard ports, support fail-to-block mode. For more information, see
Fail-to-Block Mode. Software Compatibility
NICs for SteelHead CX and SteelFusion appliances have the following software requirements:
• Two-Port Single Mode Fiber 10-Gigabit Ethernet cards for CX1555 appliances require RiOS 7.0.5a or 8.0.1 or later.
• Four-Port TX Copper Gigabit Ethernet and Two-Port LR/SR Fiber 10-Gigabit Ethernet SFP+ cards for SteelFusion Core 2000 appliances require SteelFusion 2.0.1 or later.
All other SteelHead CX, DX, and EX NICs have the following minimum software requirements:
• CX NICs require RiOS 6.5.4 or RiOS 7.0.1 or later.
• DX NICs require RiOS 8.5.2 or later.
• EX NICs require RiOS 7.0.1 or later.
Supported Cards
The following table summarizes the NICs compatible with SteelHead CX xx55, DX, and SteelFusion Core and SteelFusion EX appliances.
NICs for CX xx55, DX, EX, and SteelFusion Appliances | Manufacturing Part #/ Orderable Part # | CX
1
5
5
5 | CX5
0
5
5 | CX7055 | DX8000 | EX560 | EX760 | EX1160 | EX1260 | EX1
3
6
0 | SF2000 | SF3
0
0
0 |
Four-Port TX Copper Gigabit Ethernet Card (RB-R) | 410-00044-01/
NIC-002-4TX | | | | | X | X | | | | | |
Four-Port TX Copper Gigabit Ethernet Card (RB1-R) | 410-00047-01/
NIC-003-4TX | X | X | X | X | | | X | X | X | X | X |
Four-Port SX Multimode Fiber Gigabit Ethernet Card | 410-00045-01/
NIC-004-4SX | X | X | X | X | | | X | X | X | | |
Four-Port LX Single Mode Fiber Gigabit Ethernet Card | 410-00046-01/
NIC-005-4LX | X | X | X | X | | | X | X | X | | |
Two-Port LR/SR Fiber 10-Gigabit Ethernet SFP+ Card | 410-00049-01/
NIC-009-2XF | | | | | | | | | | X | X |
Two-Port LR Single Mode Fiber 10-Gigabit Ethernet Card (Second Generation) | 410-00301-02/
NIC-007-2LR | X | X | X | X | | | | | | | |
Two-Port SR Multimode Fiber 10-Gigabit Ethernet Card (Second Generation) | 410-00302-02/
NIC-008-2SR | X | X | X | X | | | | | | | |
Two-Port SX Multimode Fiber Gigabit Ethernet Card | 410-00101-01/
NIC-01G-2SX | X | X | X | X | | | X | X | X | | |
Two-Port LX Single Mode Fiber Gigabit Ethernet Card | 410-00105-01/
NIC-01G-2LX | X | X | X | X | | | X | X | X | | |
Two-Port FX Multimode Fiber 100-Mbps Card | 410-00107-01/
NIC-01M-2FX | X | X | X | X | | | X | X | X | | |
Installing NICs in 1U CX xx55 and EX xx60 Appliances
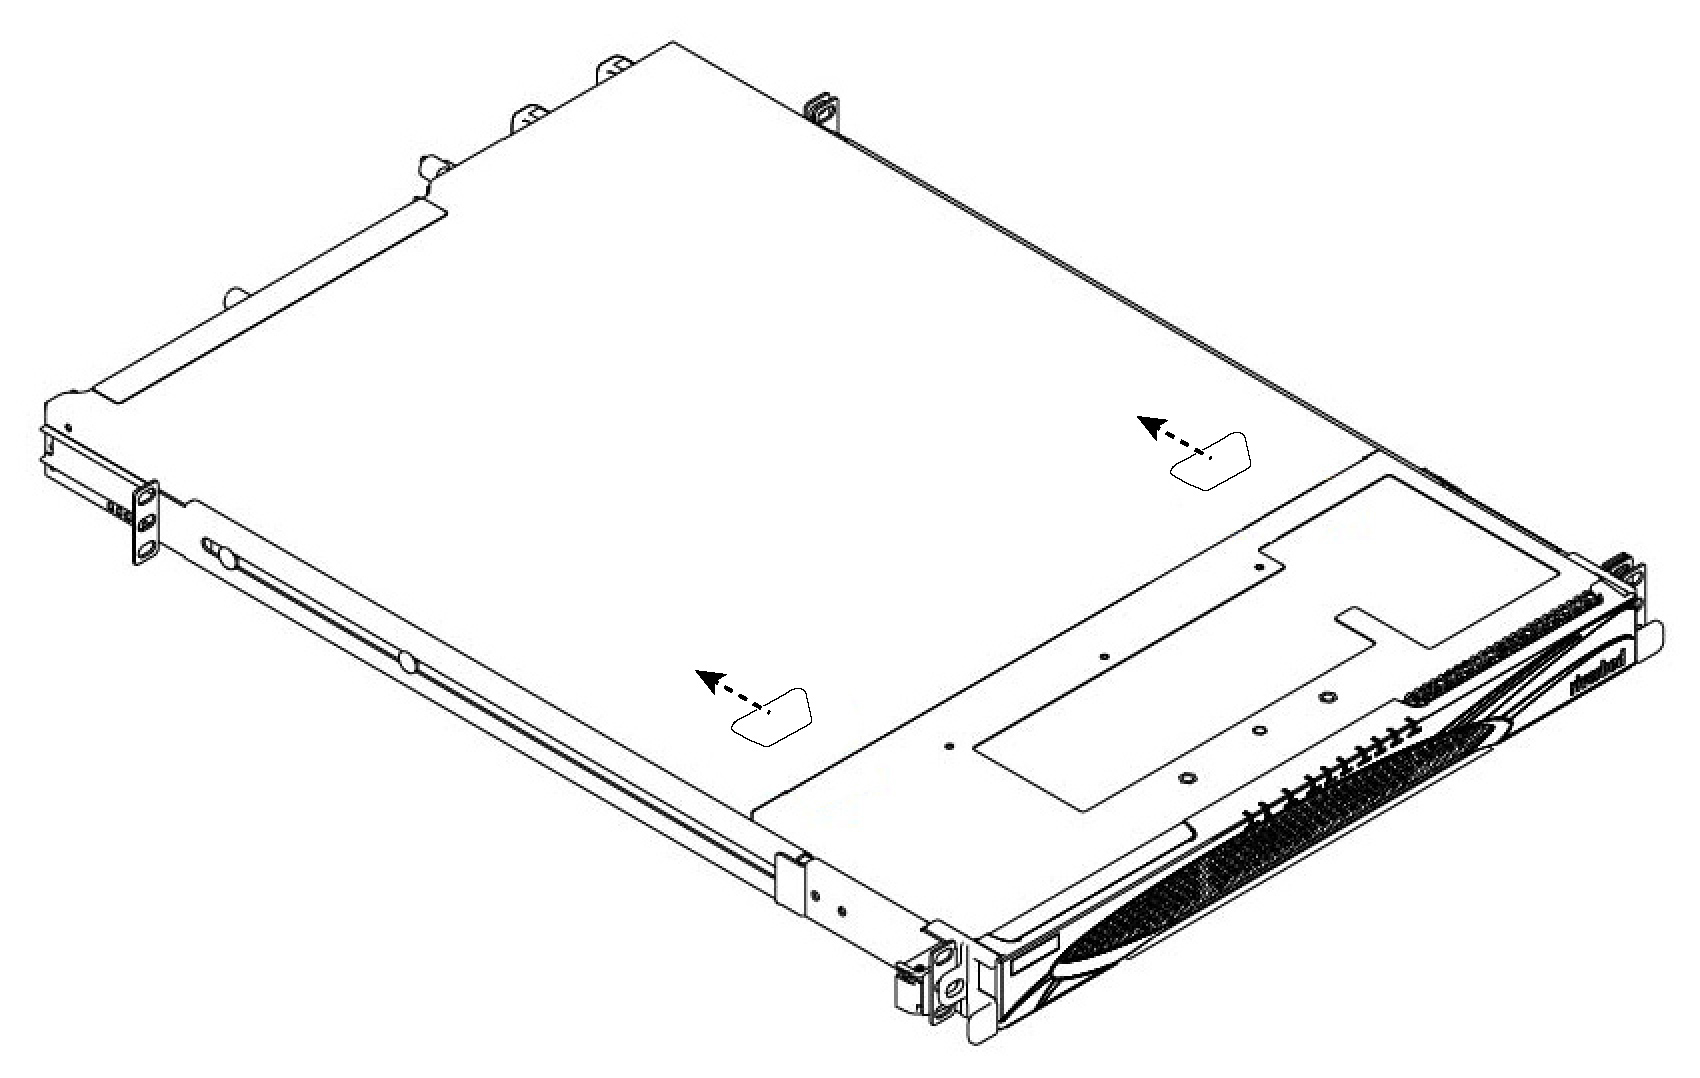
This section describes how to install NICs in the 1U SteelHead CX xx55and EX xx60 appliances. The following figure identifies the PCIe slot locations.
Figure: PCIe Slot Locations for 1U xx55 and xx60 Appliances

To install a NIC in the 1U appliances
1. Power down the appliance.
2. Remove the power-supply cord.
3. Remove the cables connected to the appliance.
4. Remove the appliance from the mounting rack, if necessary.
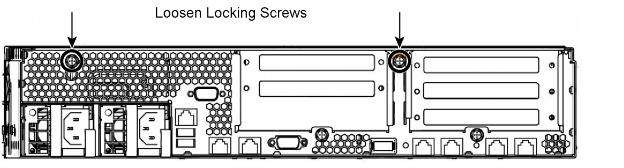
5. Unscrew the two locking screws on the back of the chassis.
Figure: Unscrewing the Locking Screws

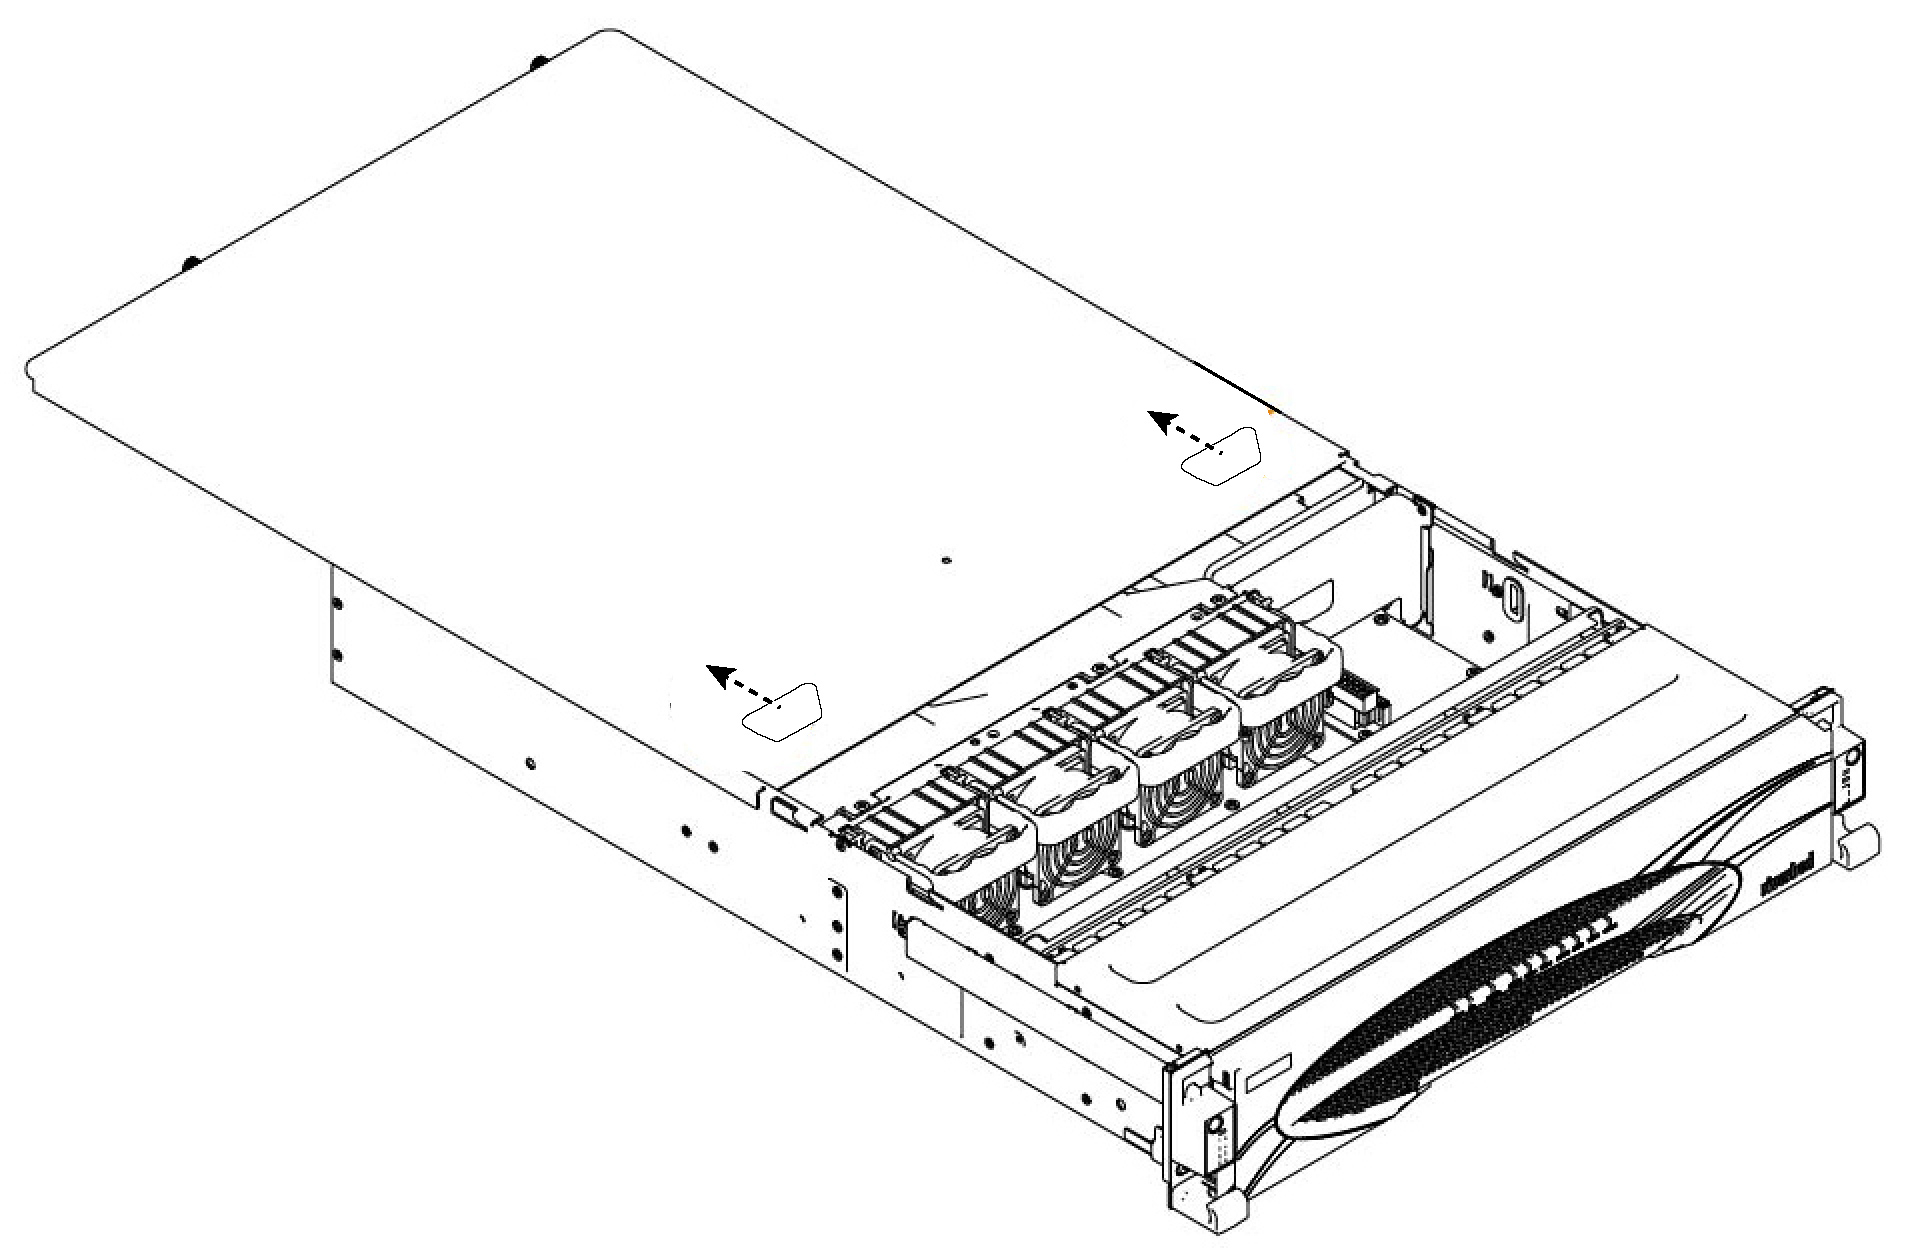
6. Remove a third locking screw on the left side near the back of the top cover.
7. Position your thumbs in the indentations at the front of the appliance and slide the cover back from the chassis.
Figure: Removing the Chassis Cover
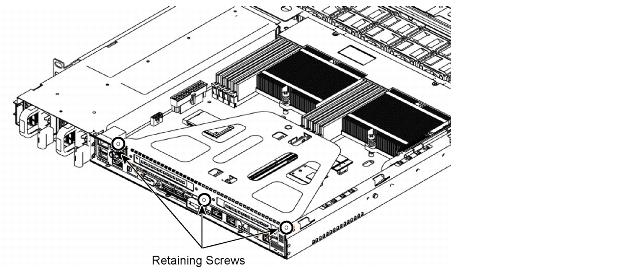
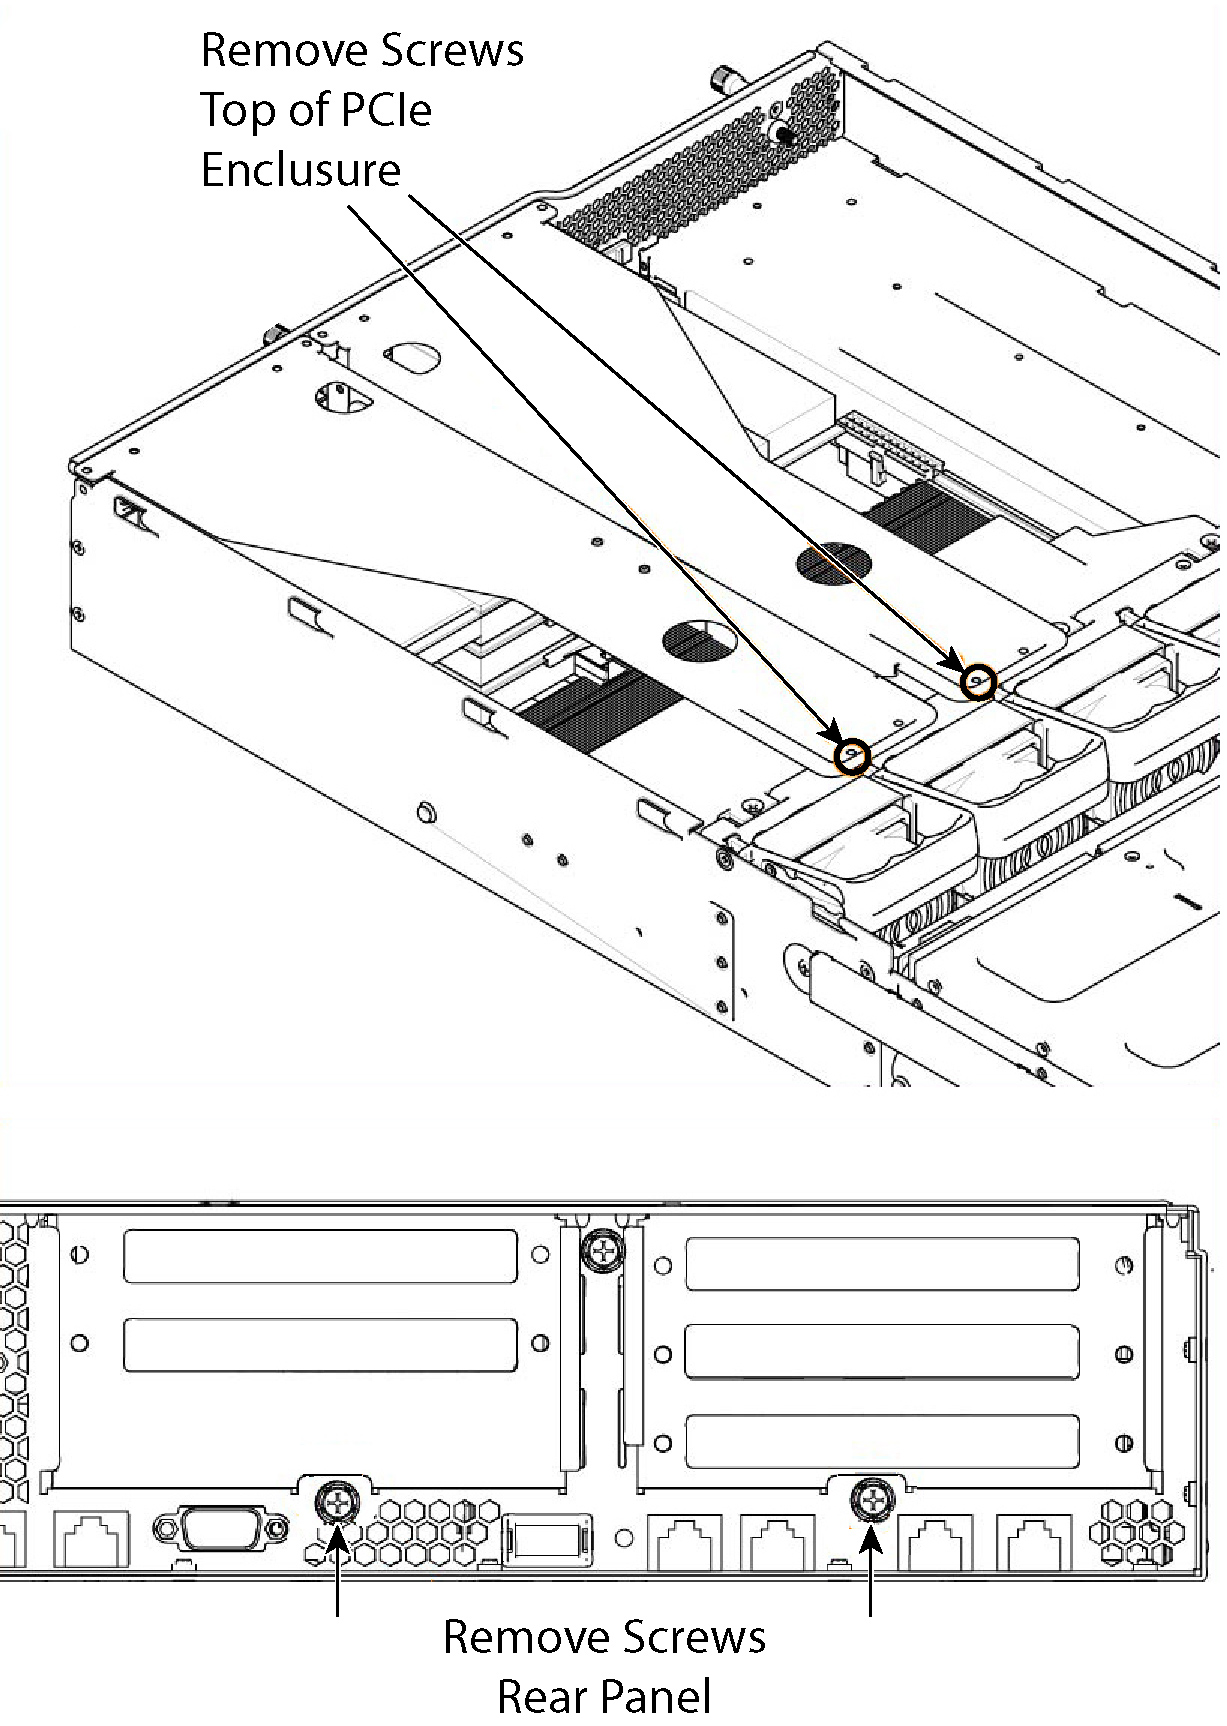
8. To release the PCIe enclosure, remove the two retaining screws on the top of the chassis and the retaining screw located on the rear panel.
Figure: Removing the Retaining Screws
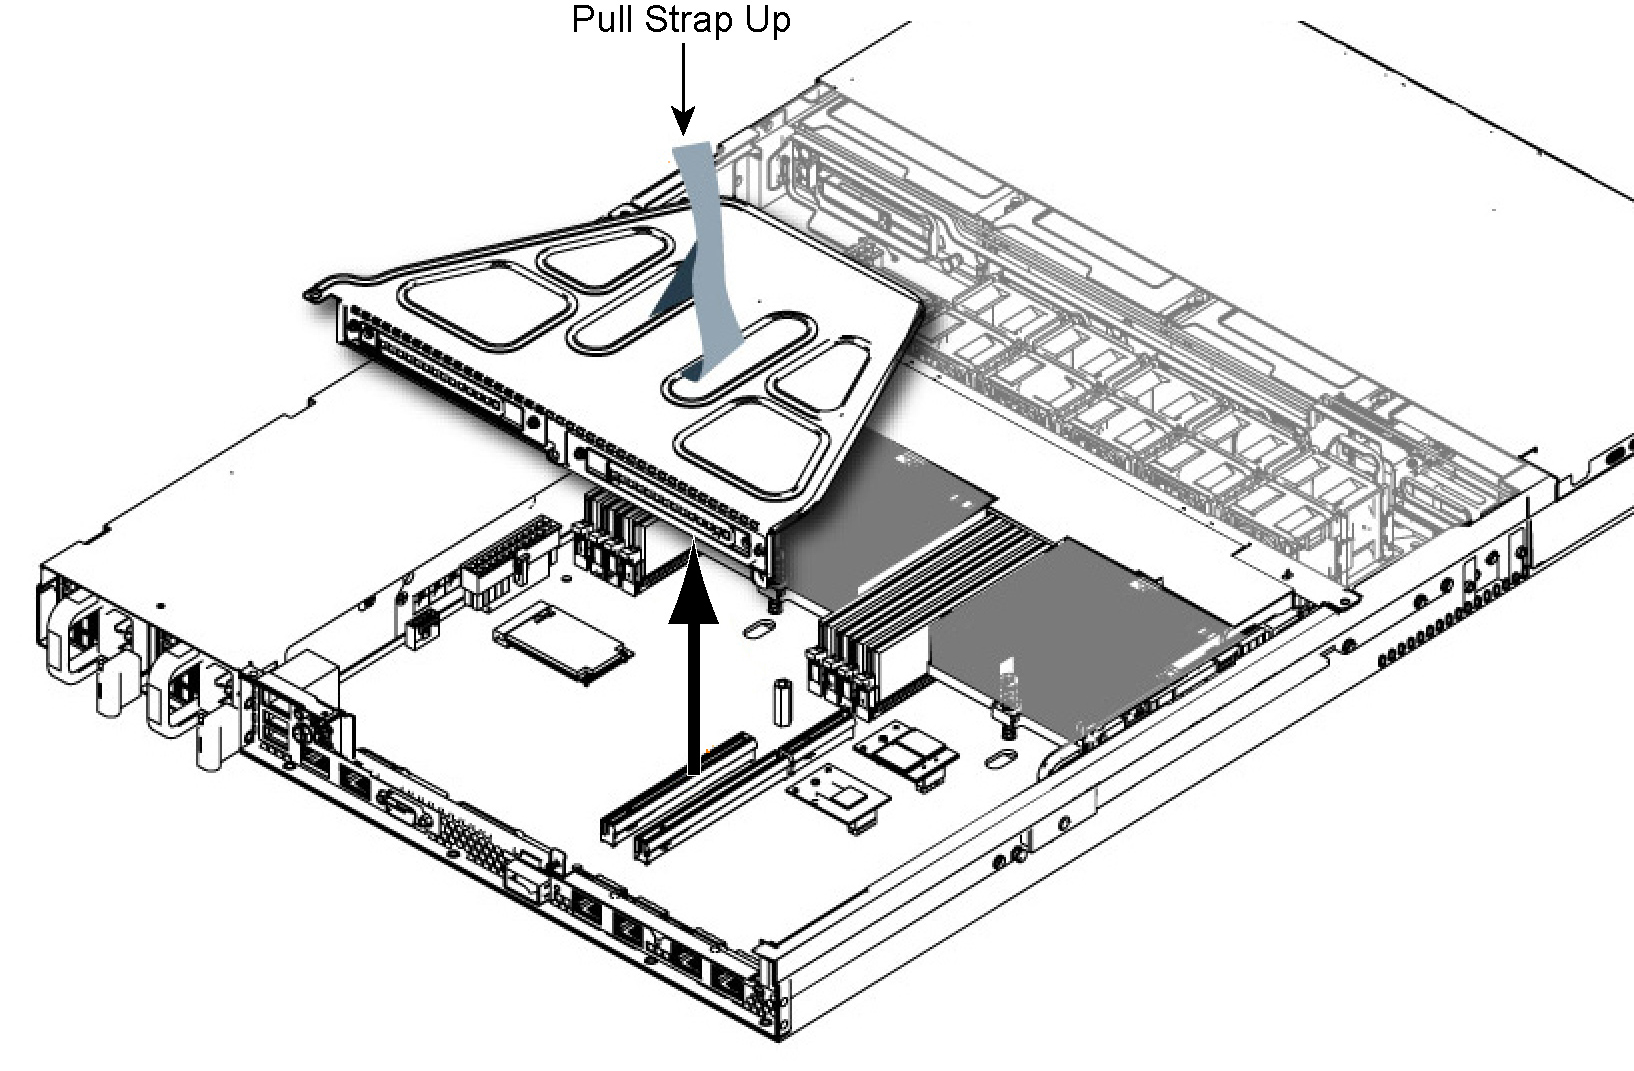
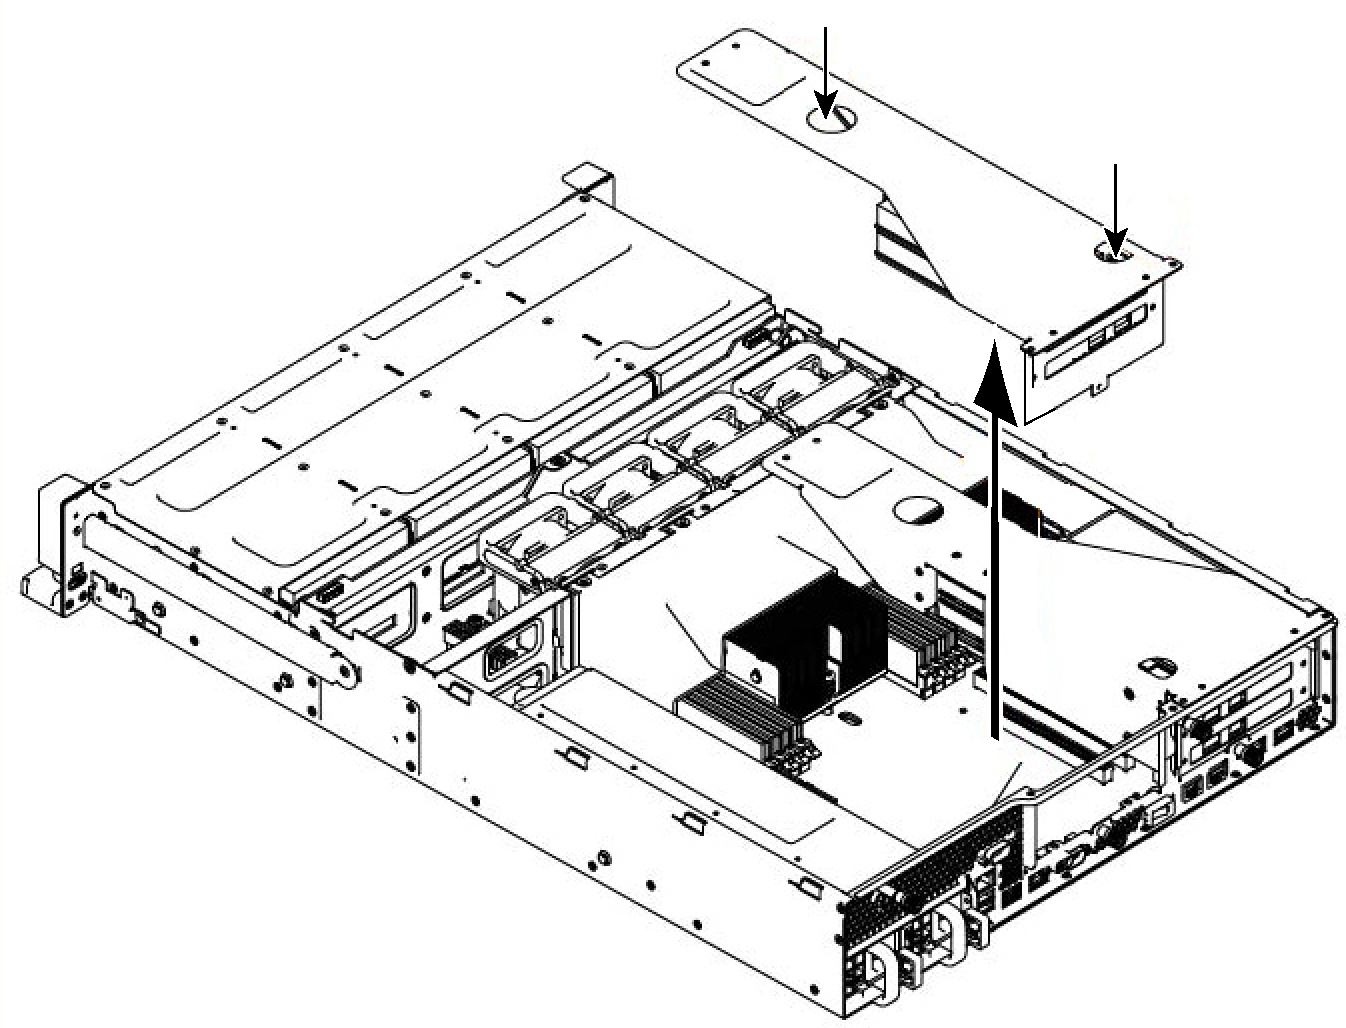
9. Using the strap, pull straight up to remove the PCIe enclosure.
Figure: Removing the PCIe Enclosure
10. Remove the two securing screws on the face plate of the filler bracket on the rear panel of the PCIe enclosure.
Figure: Removing the Filler Bracket PCIe Enclosure

11. Turn over the PCIe enclosure to expose the two horizontal NIC slots.
12. If you are replacing an existing PCIe NIC, carefully pull the NIC from the riser card.
Do not attempt to remove the onboard NIC built into the motherboard. The NICs fit horizontally into the PCIe enclosure. The NIC connectors fit into the bus slots on the motherboard.
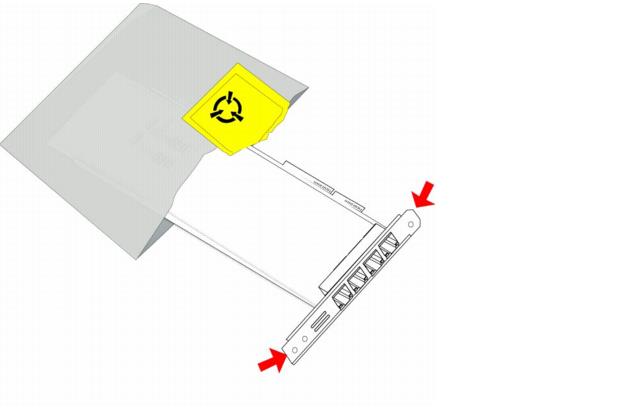
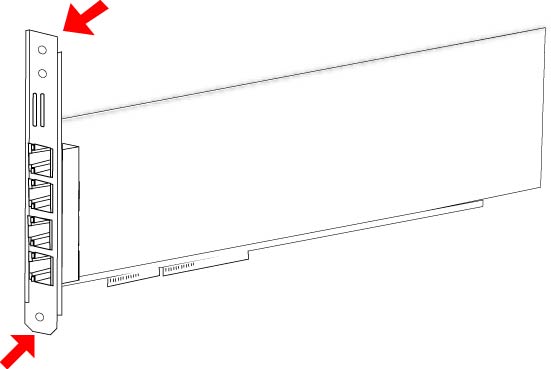
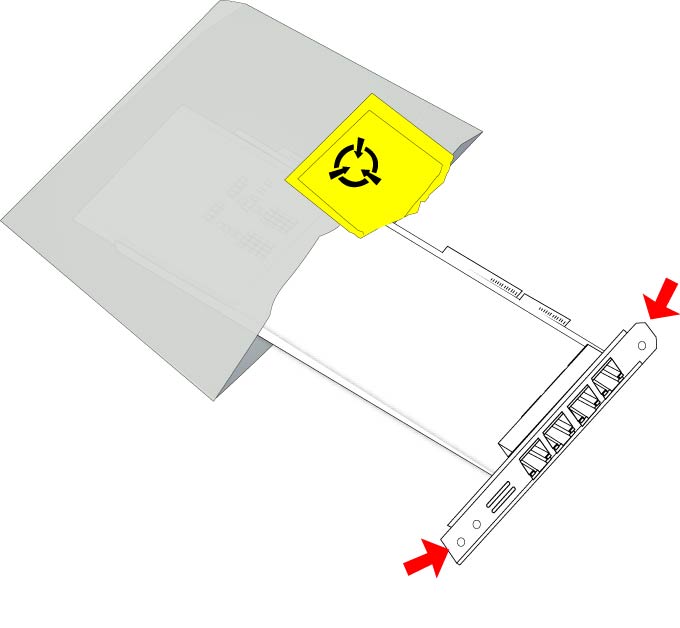
13. Gently pull the new NIC from the ESD bag.
Figure: Removing the NIC from the ESD Bag
14. Hold the new NIC between the front bezel and the rear of the card to avoid ESD damage.
Figure: Proper Handling of the NIC
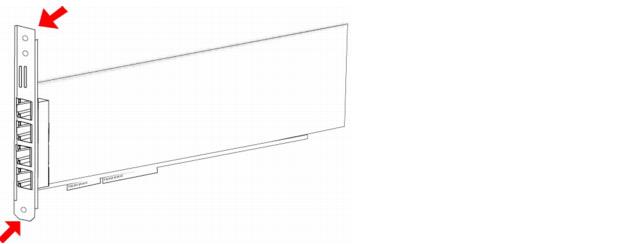
15. Plug the new NIC into the slot on the PCIe enclosure.
Figure: Installing the New NIC into the PCIe Enclosure
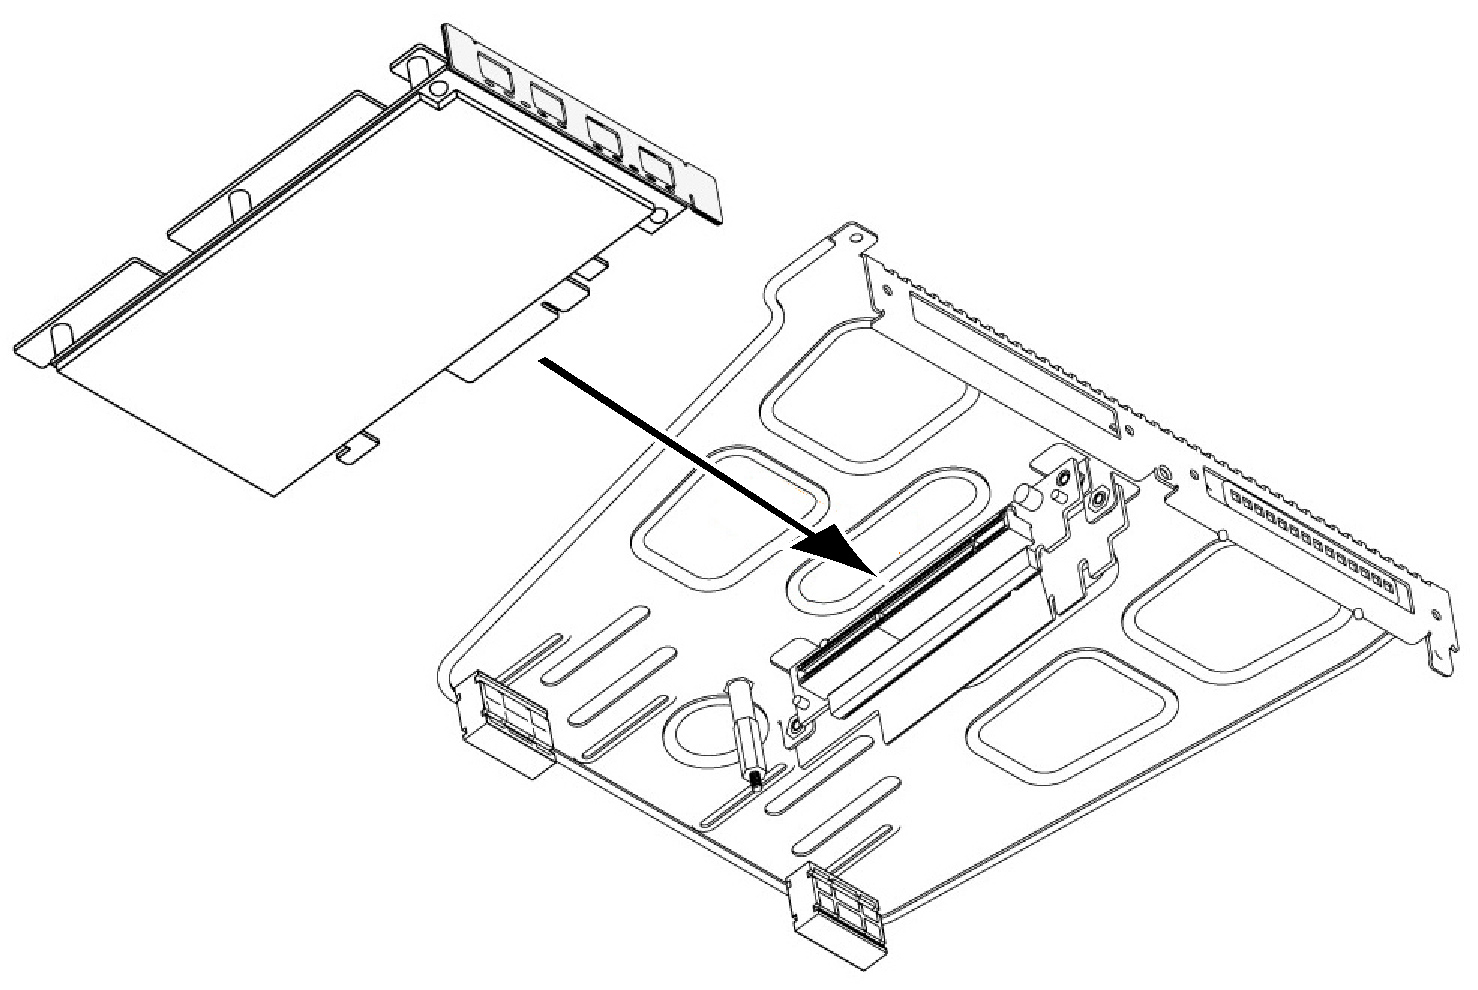
Note: Make sure the NICs are seated properly in the PCIe enclosure. If they are not seated properly, NICs do not function.
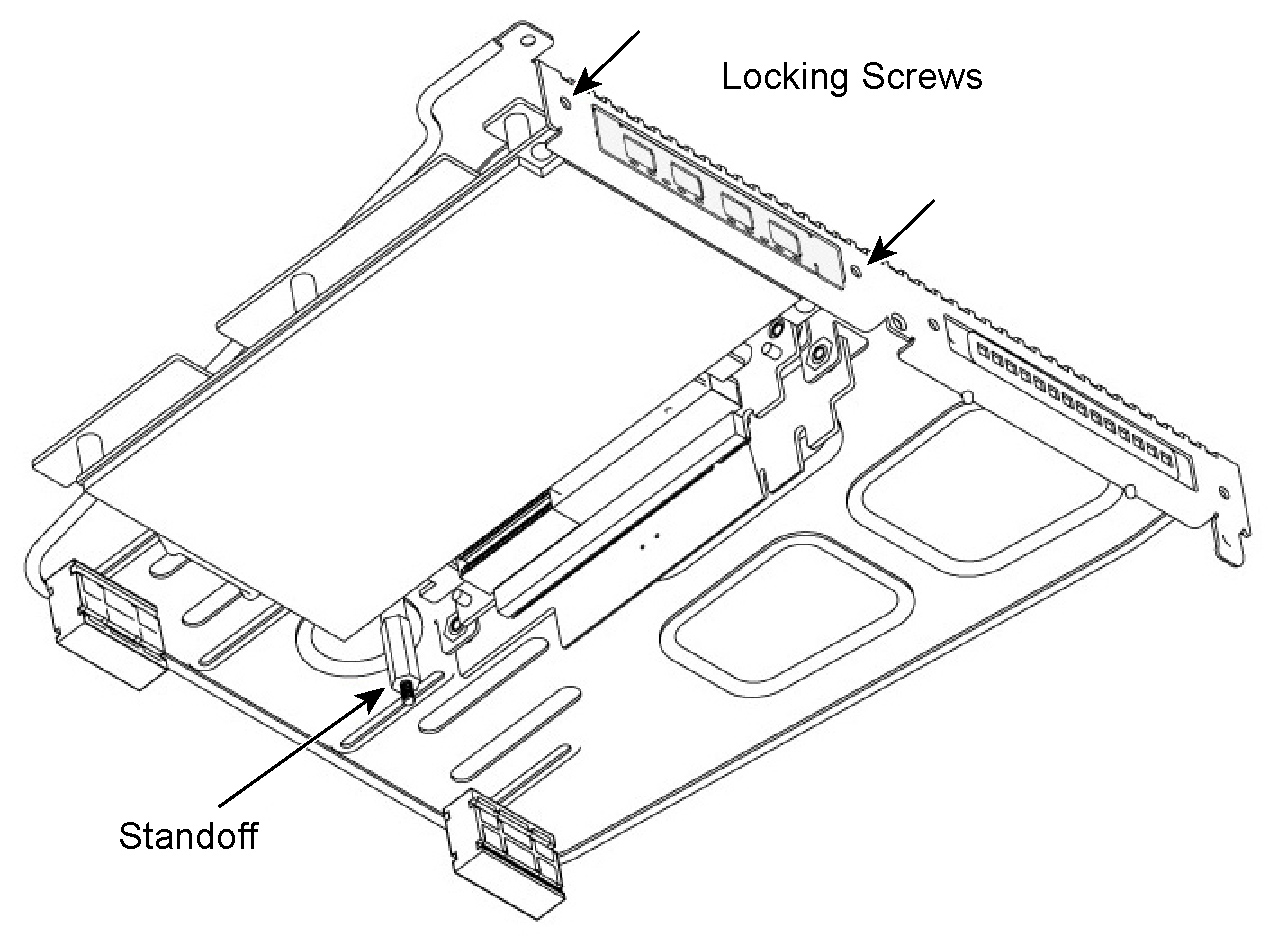
16. Secure the NIC in the PCIe enclosure at the back panel with the locking screws. When replacing the enclosure, the standoff pictured in
Figure: Securing the NIC to the PCIe Enclosure must line up with the stand on the motherboard.
Figure: Securing the NIC to the PCIe Enclosure
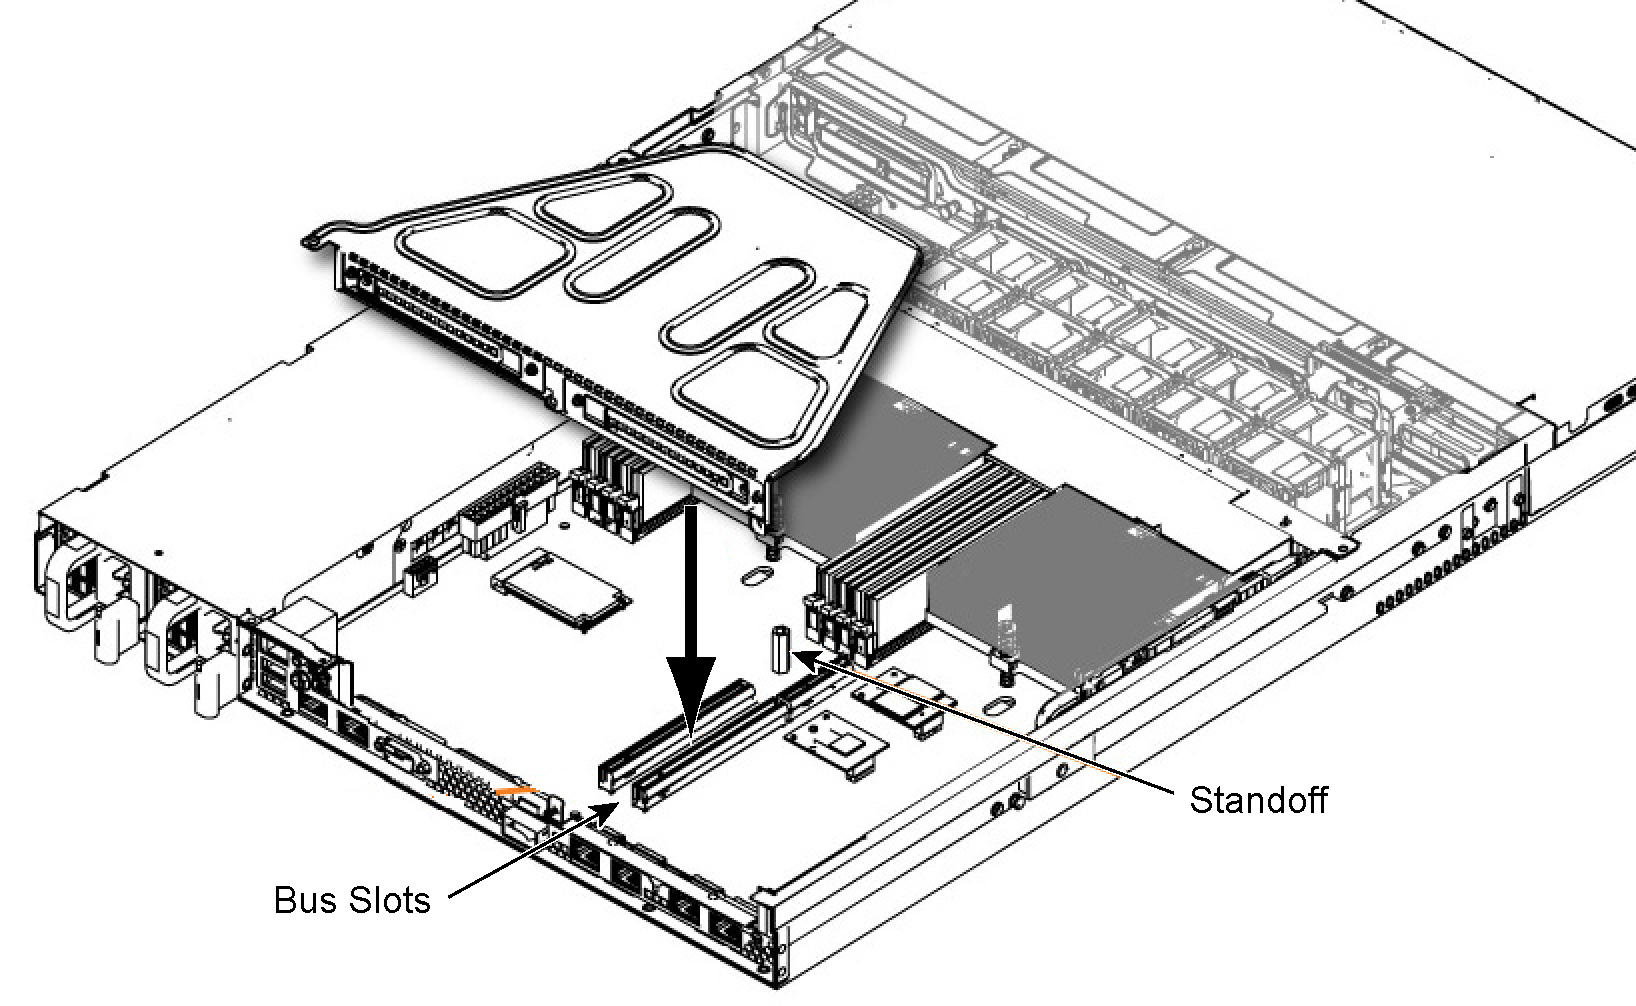
17. Replace the PCIe enclosure in the chassis. Make sure that the NIC connectors fit securely into the bus slots on the motherboard and that the standoff on the motherboard lines up with the peg on the PCIe enclosure.
Figure: Bus Slots on the Motherboard
18. Replace the two retaining screws on the top of the PCIe enclosure and the one screw on the rear panel.
19. Replace the cover on the chassis and tighten the locking screws at the back of the chassis.
20. Connect the power cords.
21. Connect the NIC cables.
22. Power up the appliance and check the status lights.
To test SteelHead NICs
1. Connect to the SteelHead CLI.
For detailed information, see the Riverbed Command-Line Interface Reference Manual.
2. Enter enable mode. At the system prompt, enter the following command:
amnesiac > enable
amnesiac #
3. Verify that the NIC is correctly installed.
For example, to verify a Two-Port Gigabit Ethernet Copper PCIe card, at the system prompt enter the following command:
amnesiac # show hardware all
Hardware revision: A
Mainboard: Blue Dell Motherboard, 425-00135-01
Slot 0: .......... 2 Port Copper GigE PCI-E Network Bypass Card, 410-00043-01
Note: Enter the in-path reset-iface command in configuration mode in the CLI to reset the main interface and recognize all ports.
Installing NICs in 2U CX xx55, EX xx60, DX, SteelFusion Core Appliances
This section describes how to install NICs in the 2U SteelHead CX xx55, DX, EX xx60, and SteelFusion Core 2000/3000 appliances.
The 7055M and 7055H appliances reserve PCIe slot 1 for the SDR acceleration card. For these appliances, install additional NICs in slots 2 to 5.
The DX8000 appliances reserve PCIe slot 1 for the SDR acceleration card and have a two-port 10-GB NIC configured in slot 3. Install additional NICs in slots 2, 4, or 5.
The following figure identifies the PCIe slot locations.
Figure: PCIe Slot Locations for 2U xx55 and xx60 Appliances

To install the NIC
1. Power down the appliance.
2. Remove the power-supply cord and all cables connected to the appliance.
3. Remove the appliance from the mounting rack, if necessary.
4. To remove the cover, release the two locking screws on the back of the appliance.
Figure: Releasing Locking Screws
5. Remove a third locking screw on the right side of the top cover.
6. Press down on the indentations and slide back the cover several inches, and then lift up and away from the chassis.
Figure: Removing the Rear Top Cover from the Chassis
7. To release the PCIe enclosure, remove the two retaining screws on the top of the enclosure and the two retaining screws on the rear panel.
Figure: Removing the PCIe Enclosure Retaining Screws
8. To remove the right or left PCIe enclosure from the chassis, place your fingers in the enclosure holes and lift straight up.
Figure: Removing the Right-Side PCIe Enclosure from the Chassis
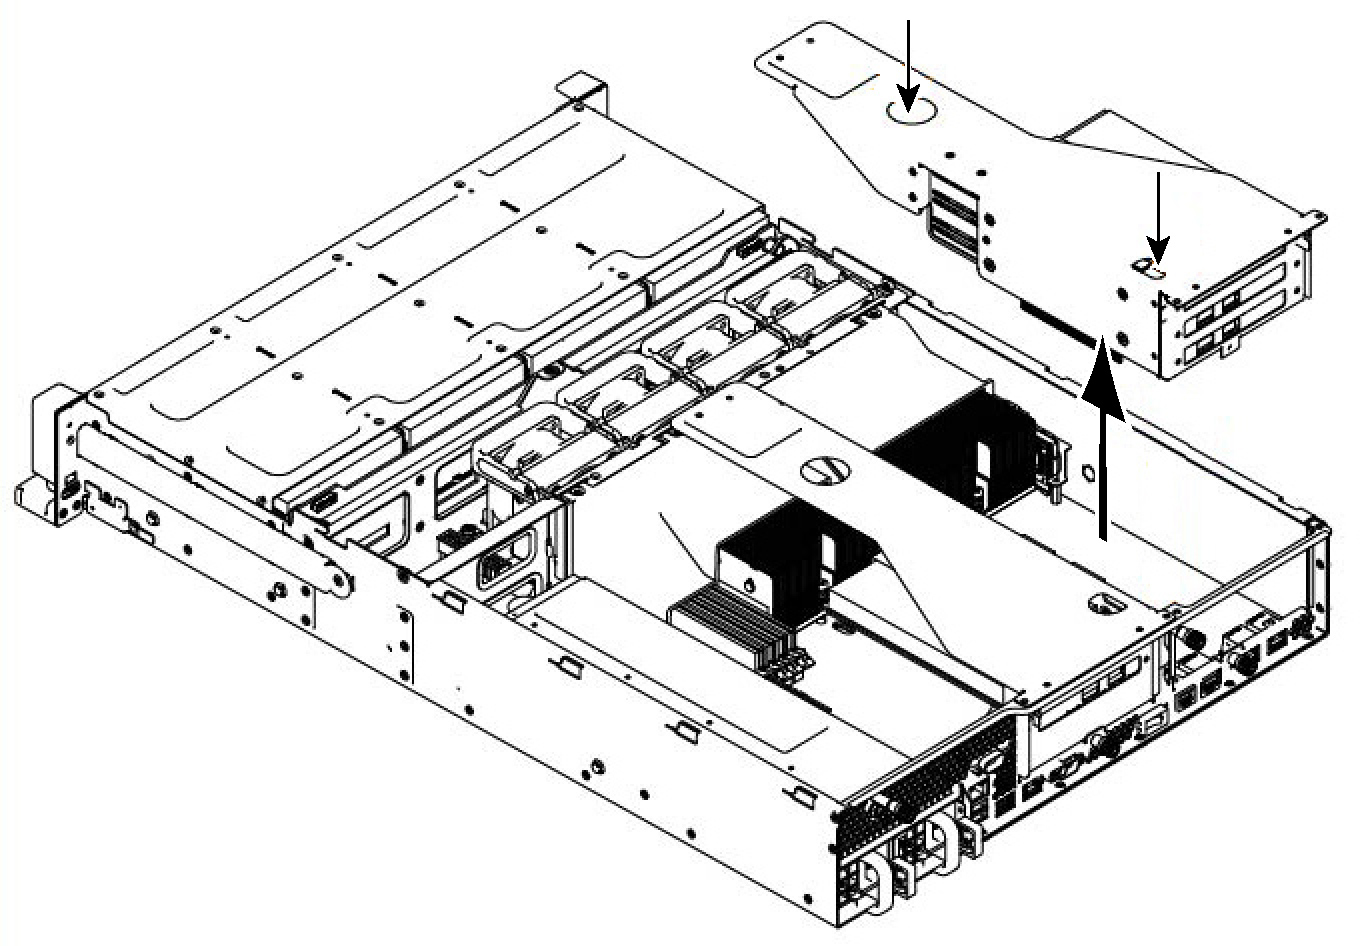
Figure: Removing the Left-Side PCIe Enclosure from the Chassis
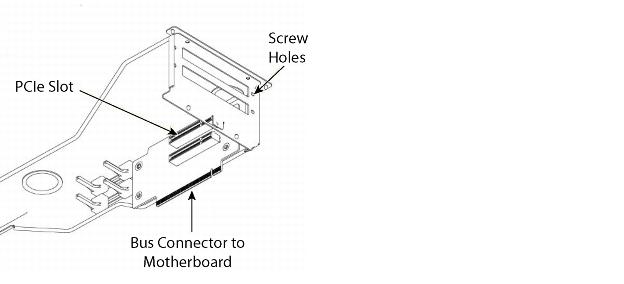
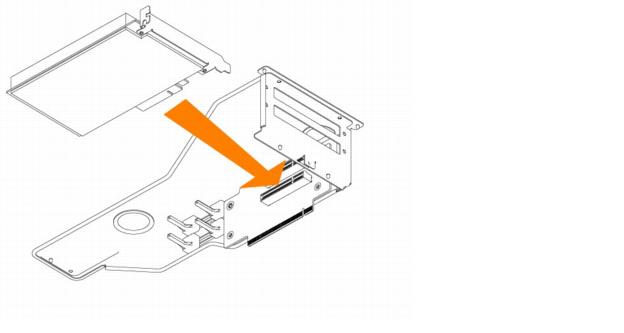
9. Turn over the enclosure to reveal the PCIe slots.
PCIe cards fit horizontally in the enclosure slots and are secured with screws in the rear panel. The connector at the bottom of the enclosure fits into bus slots on the motherboard.
Figure: PCIe Enclosure and PCIe Card
10. Remove the filler bracket on the rear of the PCIe enclosure.
11. Gently pull the new NIC from the ESD bag.
Figure: Removing the NIC from the ESD Bag
12. Hold the new NIC between the front bezel and the rear of the card to avoid ESD damage.
Figure: Proper Handling of the NIC
13. Plug the new NIC into the slot on the PCIe enclosure.
The NIC is attached with screws to the rear of the PCIe enclosure.
Figure: Installing the New NIC into the PCIe Enclosure
Note: Make sure the NICs are seated properly in the PCIe enclosure. If they are not seated properly, the NICs do not function.
14. Replace the PCIe enclosure in the chassis. Make sure that the enclosure connectors fit securely into the bus slots on the motherboard.
15. Replace the two retaining screws on the top of the PCIe enclosure and the one screw on the rear panel.
16. Replace the cover on the chassis and tighten the locking screws at the back of the chassis.
17. Connect the power cords.
18. Connect the NIC cables.
19. Power up the appliance and check the status lights.
To test NIC connections in the SteelHead
1. Connect to the SteelHead CLI.
For detailed information, see the Riverbed Command-Line Interface Reference Manual.
2. Enter enable mode. At the system prompt, enter the following command:
amnesiac > enable
amnesiac #
3. Verify that the NIC is correctly installed.
For example, to verify a Four-Port Copper Gigabit Ethernet PCIe card, at the system prompt enter the following command:
amnesiac #show hardware all
Hardware revision: A
Mainboard: Blue Dell Motherboard, 425-00135-01
Slot 0: .......... 4 Port Copper GigE PCI-E Network Bypass Card, 410-00044-01
Note: SteelHead xx60 appliances require RiOS 6.5.4 or later to recognize add-on NICs in conjunction with the appliance’s onboard ports, and CX xx55 appliances require RiOS 7.0.4 or later. Upgrade to an appropriate RiOS version and enter the in-path reset-iface command to recognize all ports.
Identifying Interface Names
The interface names for the NICs in the SteelHead Management Console and the CLI are a combination of the slot number and the port pairs (lan<slot>_<pair>, wan<slot>_<pair>). For example, if a four-port NIC is located in slot 1 of your appliance, the interface names are lan1_0, wan1_0, lan1_1, and wan1_1 respectively.
Configuring a SteelHead EX NIC for Data Interfaces
SteelHead EX appliances support installing a Four-Port TX Copper Gigabit Ethernet Card (410-00047-01/NIC-003-4TX) and configuring it with data interfaces. Support for SteelFusion traffic was introduced in EX 2.1; support for ESXi traffic was introduced in EX 3.5.
Data interfaces are identified by ethX_Y notation, where eth denotes a data NIC, X denotes the slot, and Y denotes the interface/port on the slot (such as eth0_0, eth0_1, eth0_2, and eth0_3).
When you add a NIC to a SteelHead EX appliance, the system automatically configures the card as additional LAN/WAN interfaces and only usable for optimization. Follow the steps in this section to configure it as a NIC with data interfaces.
You can use the data interfaces for SteelFusion iSCSI and Rdisk traffic and for ESXi NICs in the Virtual Services Platform.
Note: This procedure is not supported on the SteelHead EX560 and EX760 appliances or on SteelFusion Edge appliances.
To convert a SteelHead EX NIC to use data interfaces
1. Install the four-port NIC on the EX appliance.
To use data interfaces for ESXi, insert the card in slot 1. To use data interfaces, insert the card in any available slot.
The NIC card appears as another pair of LAN/WAN interfaces.
2. Use the show hardware nic slots command to identify the slot number for the card.
3. From configuration mode of the CLI, enter the hardware nic slot <nic-card-slot-number> mode data command to configure the NIC for data mode.
amnesiac > enable
amnesiac # configure terminal
amnesiac (config) # hardware nic slot 1 mode data
4. Reboot the appliance.
When the appliance restarts, the data interfaces appear as ethX_Y, where X is the slot number and Y is the interface 0 to 3.
5. Assign IP addresses to these data interfaces from either the CLI or Management Console.
Duplicate routes appear in the routing table.
6. Reboot the appliance to correct the routing table.
The card is ready to use in data mode.