Installing Hardware for Model Upgrades
This section describes how to install the hardware for model upgrades from CX755L and CX755M to CX755H and from CX1555L and CX1555M to CX1555H appliances. It includes the following procedures:
For model upgrades that require additional hardware, you can install the license but cannot fully activate the specification until you install the required hardware.
Note: Model upgrades that require additional hardware do not preserve the data store.
Installing Required Memory and Disk Drives for CX755H Upgrades
This section describes how to install memory modules and replacement disk drives for CX755L and CX755M to CX755H upgrades. For the disk drive upgrade, you replace the hard drive casing that contains two HDDs with a new casing that contains one SSD and one HDD.
To upgrade memory and disk drives for CX755 model upgrades
1. When you activate the upgrade license, the system shuts down.
2. Disconnect the system from the electrical outlet.
3. Remove the chassis cover.
4. Install the Upgrade Kit memory module in DIMM slot 1.
CX755L and CX755M ship with a 2 GB memory module installed in DIMM slot 0; install the Upgrade Kit memory module in DIMM slot 1.
Note: If you do not install the memory module in the correct slot, the system does not function properly.
Figure: Adding Memory Modules for CX755 Upgrades
5. Align the memory-module edge connector with the slot alignment keys and insert it into the slot.
The module slot has two alignment keys that allow you to install the module in only one direction.
Figure: Inserting and Securing the Memory Module in the DIMM Slot
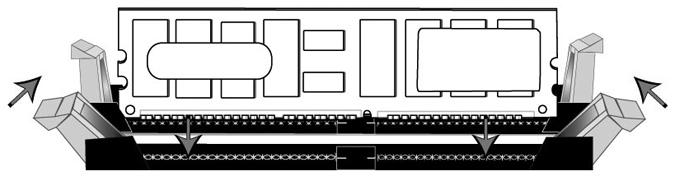
6. Ensure that all ejector tabs are in the upright locked position.
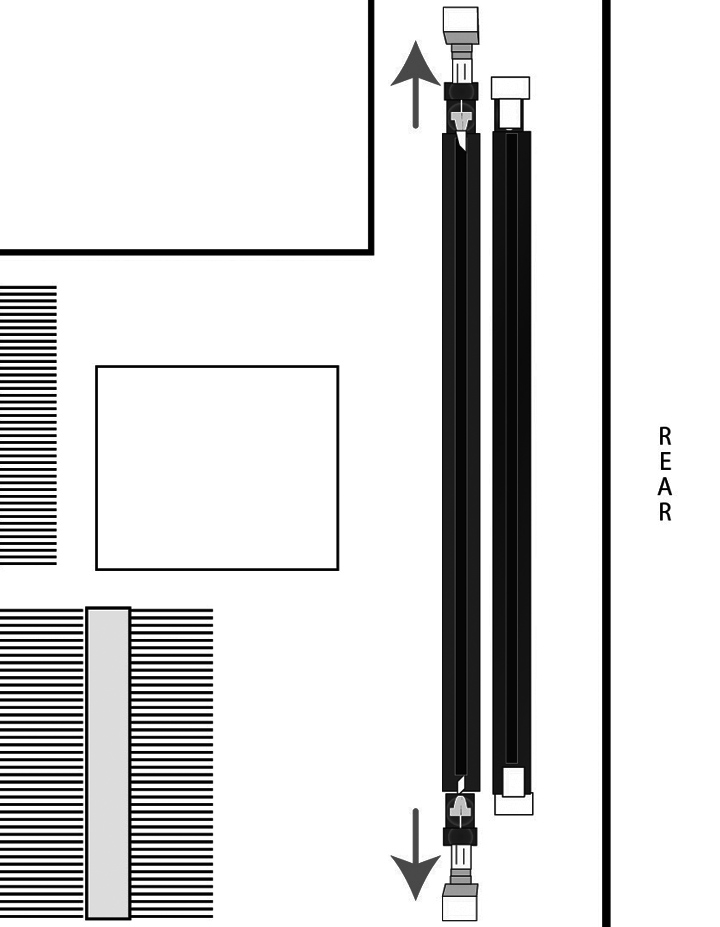
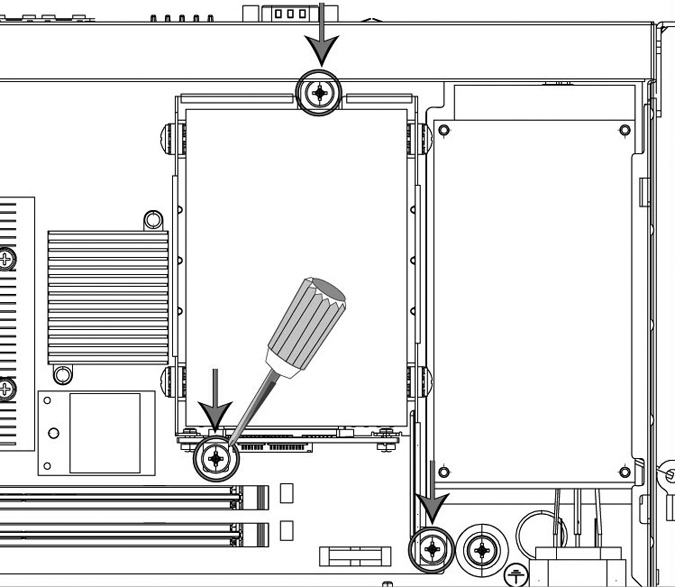
7. To remove the disk drive, remove the three screws and washers holding the disk drive casing to the chassis.
Caution: 
Use a magnetic screwdriver to remove the screws. Use caution when removing the screws and washers; do not drop them into the system.
8. Pull the entire disk drive casing upward and out of the chassis.
Figure: Removing the Disk Drive Casing from Chassis
9. Insert the new disk drive with casing in the same position and secure the casing to the chassis with the three screws.
10. Replace the system cover, making sure the tabs of the cover are under the front frame.
11. Plug the power cord into the AC circuit.
12. Power on the system.
The system automatically reformats the new drive. You do not need to set up or configure the new disk drive.
Replacing Hard Disk Drives for CX1555H Upgrades
This section describes how to install disk drives for CX1555H upgrades. For the upgrade, you replace two HDDs with two SSDs.
To upgrade the disk drives in the CX1555 appliances
1. When you activate the upgrade license, the system shuts down.
2. Open the bezel.
3. Identify the hard disk drives to replace.
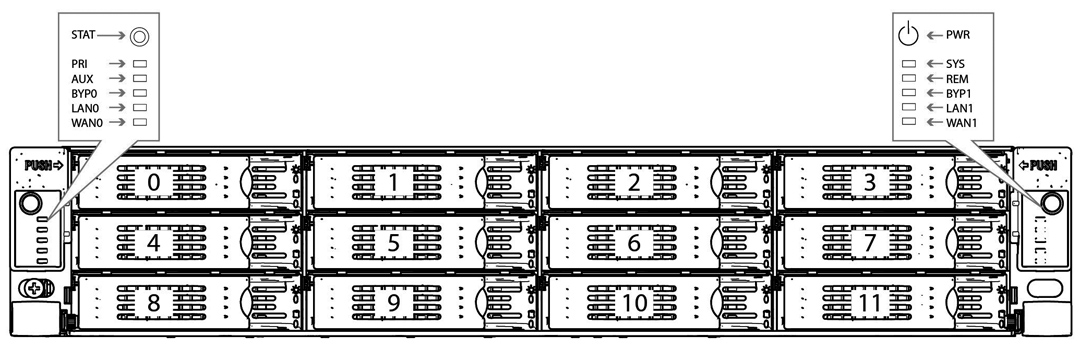
The drives are numbered in ascending order from left to right (that is, 0, 1, 2, 3). You replace disks in slots 2 and 3.
Figure: Disk Drive Numbers

4. Remove the disks from slots 2 and 3.
Press the orange release button and pull the drive handle toward you.
Figure: Releasing the Disk Drive
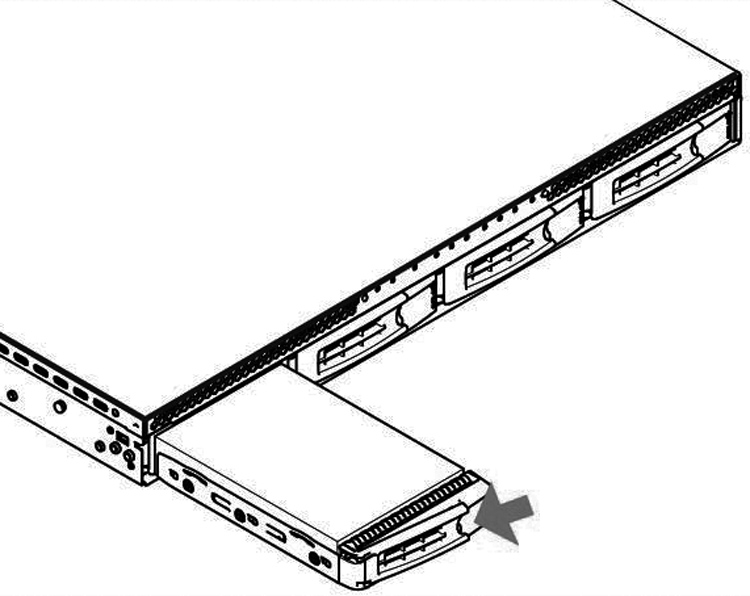
5. Slide the disk drive out of the slot.
6. Open the new disk-drive handles by pressing the orange release button.
7. Slide each new disk drive into the slots until they mate with the back connectors in the chassis.
8. Press in the disk-drive handles to close.
9. Restart the appliance.
The disk drive automatically begins proper operation with the other disk drives. You do not need to set up or configure the new disk drive. The disk drive LED lights blue when connected.
Installing Required Memory and Disk Drives for EX1160VH Upgrades
This section describes how to install memory modules and replacement disk drives for upgrades to EX1160VH appliances. For the disk drive upgrade, you replace the two existing SSDs with two 200-GB SSDs. If your EX1160 appliance has 20 GB of memory (SKU EXA-01160-B030), you add 4 GB of memory to upgrade to the EX1160VH (SKU EXA-01160-B020). If your EX1160 appliance has 48 GB of memory (SKU EXA-01160-B035), you do not need to add memory.
To upgrade memory and disk drives for EX1160VH model upgrades
1. When you activate the upgrade license, the system shuts down.
2. Disconnect the system from the electrical outlet.
3. Remove the chassis cover.
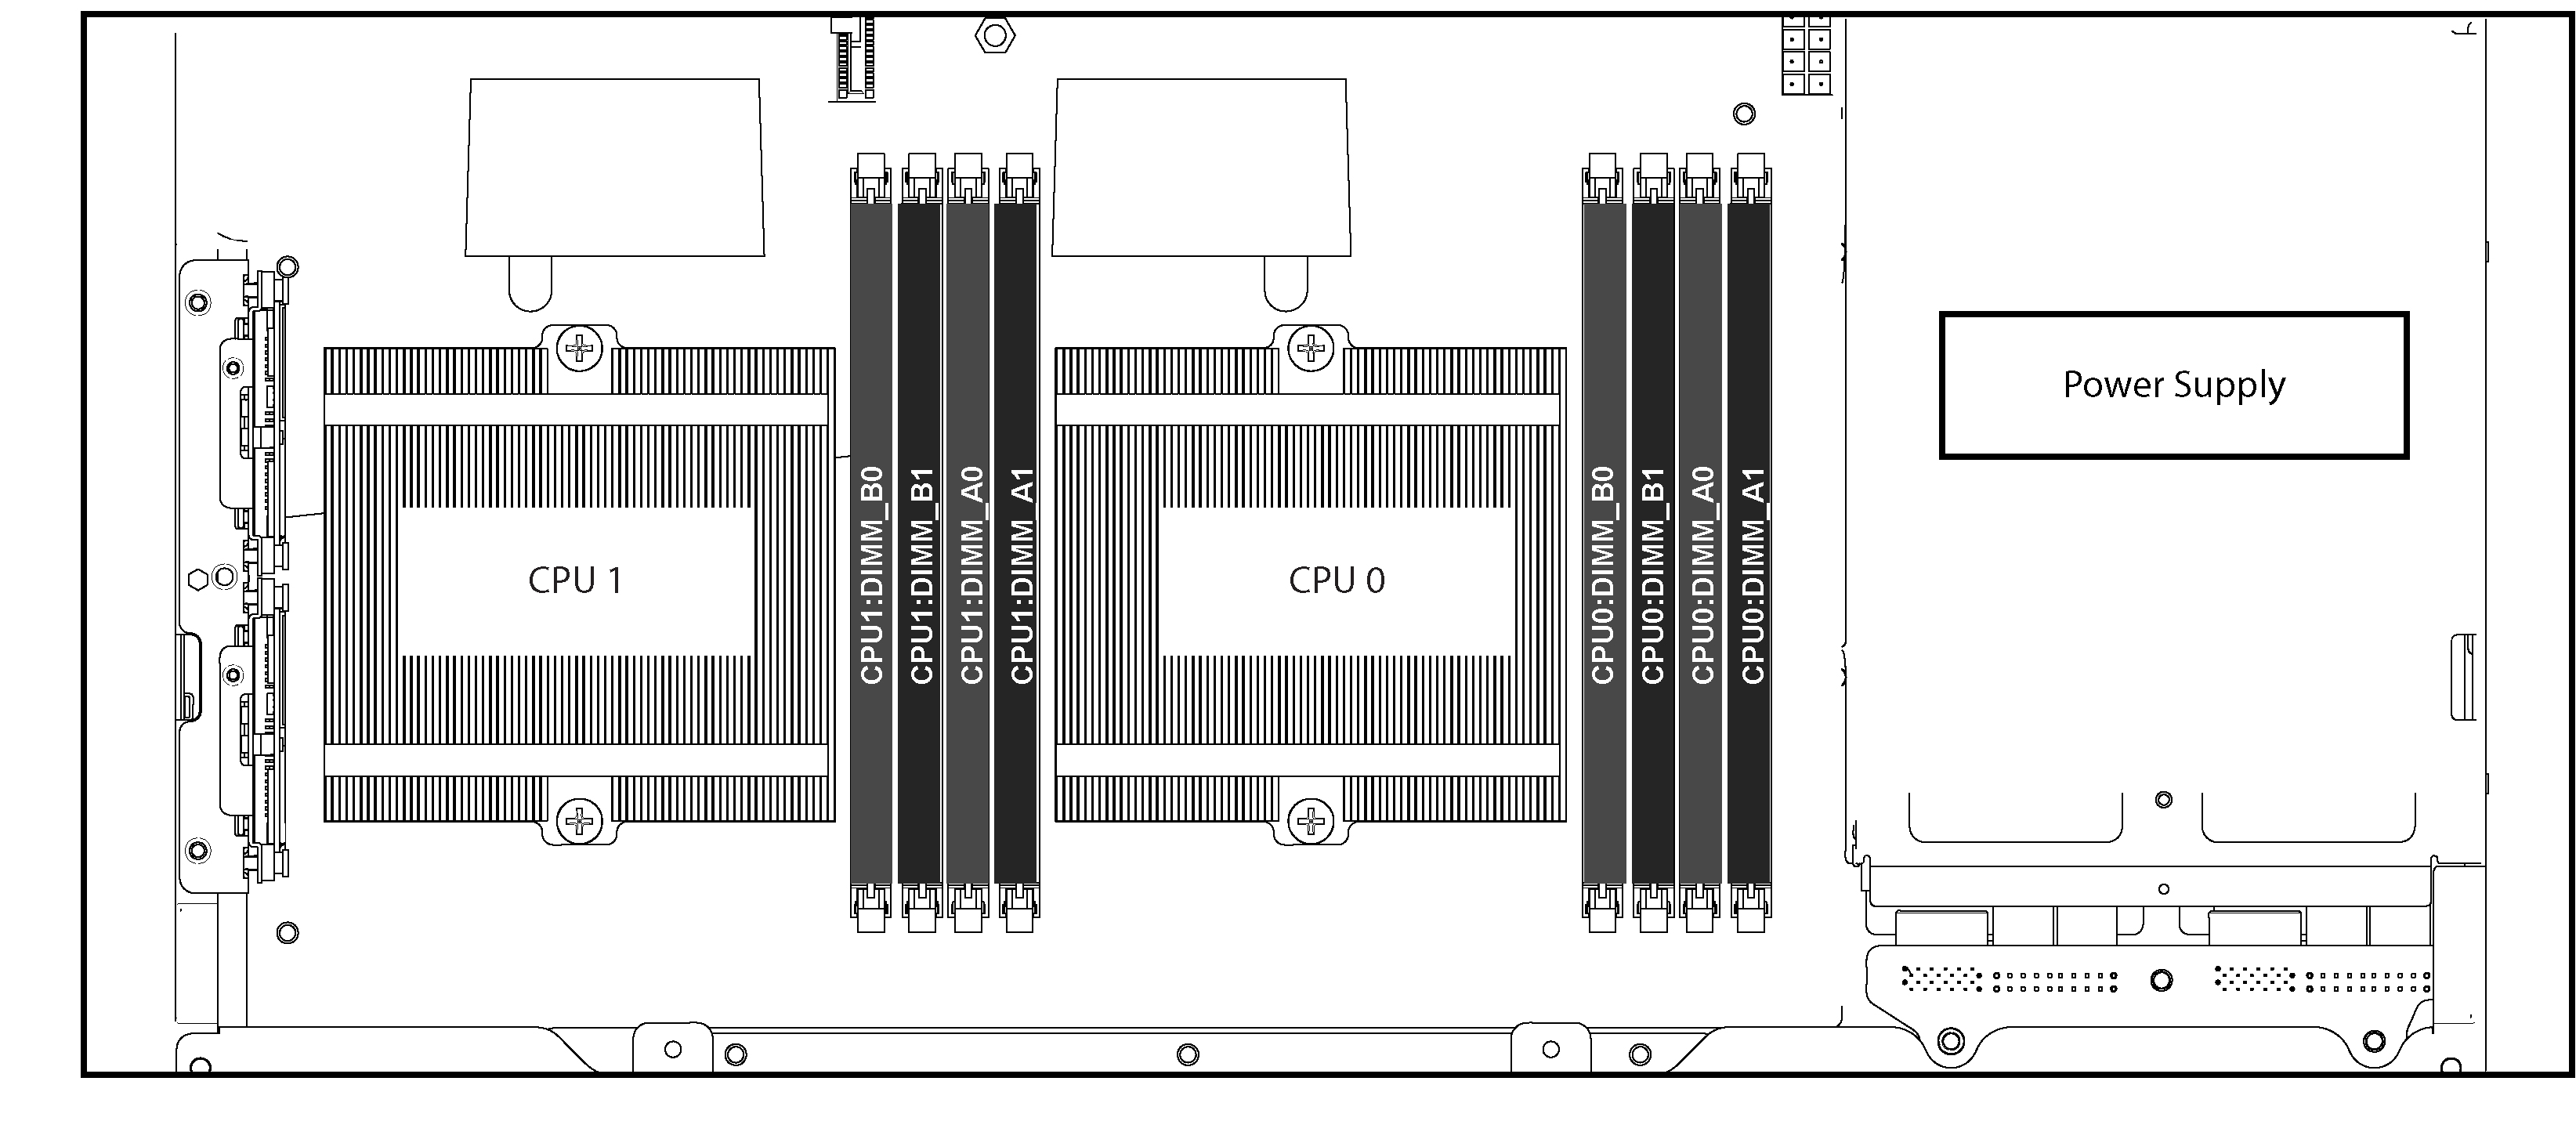
4. For the EX1160 with 20 GB of memory (SKU EXA-01160-B030), install the Upgrade Kit memory module in slot 5 (CPU1 A1).
EX1160 L/M/H ship with memory modules installed in DIMM slots 1 (4 GB), 3 (8 GB), and
7 (8 GB). These slots correspond to CPU0 A1, CPU0 B1, and CPU1 B1.
Note: If you do not install the memory module in the correct slot, the system does not function properly.
Figure: Memory Module Slot Locations in EX1160
5. Remove the existing SSD drives in slots 2 and 3 and insert the new 200-GB SSDs.
The drives are numbered in ascending order from left to right (that is, 0, 1, 2, 3).
Figure: Disk Drive Numbers
6. Plug the power cord into the AC circuit.
7. Power on the system.
The system automatically reformats the new drives. You do not need to set up or configure the new disk drives.
Adding Disk Drives for EX1260VH Upgrades
This section describes how to install disk drives for EX1260VH upgrades. For the upgrade, you add two 100-GB SSDs to the existing configuration.
To add disk drives in the EX1260 appliances for the VH upgrade
1. When you activate the upgrade license, the system shuts down.
2. Open the bezel.
3. Identify the location for the new SSDs.
The drives are numbered in ascending order from the upper-left corner to the lower-right corner. Add the two new SSDs to slots 10 and 11.
Figure: Disk Drive Numbers
4. Open the new disk-drive handles by pressing the orange release button.
5. Slide each new disk into the available SSD slots until they mate with the back connectors in the chassis.
6. Press in the disk-drive handles to close.
7. Power on the system.
The disk drive LED lights blue when connected. The new disk drive runs through a self-test automatically. The disk drive automatically begins proper operation with the other disk drives. You do not need to set up or configure the new disk drive.