Working with the Hypervisor
This chapter describes how to initialize and configure the VMware vSphere hypervisor. It includes these sections:
Configuring the hypervisor
This section describes how to configure the hypervisor for the Edge. It includes these topics:
The hypervisor feature is not available in Virtual Edge.
Before you begin
In SteelFusion version 5.5 and later, Edge provides support for ESXi 6.0 Patch 6. ESXi 6.0 Patch 6 is preloaded in the Edge software image—it does not require a separate download. The Hypervisor Installer gives you the option to choose the ESXi version you want to use. To use an ESXi version other than 6.0 Patch 6, download it through the Virtualization > Hypervisor: Software Upgrade page. For details, see
To add a new image.
If you are upgrading to Edge 5.5 or later, you must perform the upgrade in a particular order:
1. Upgrade the RiOS SteelFusion Edge software. For details, see the SteelFusion Edge Installation and Configuration Guide.
The procedures in this chapter assume that you are upgrading an Edge appliance running 4.0 or later.
If you are using a SteelFusion Core for storage, you should configure and connect it before you launch the Hypervisor Installer. A Core allows you to access remote storage at your data center and make that storage available to your hypervisor. To configure connectivity to SteelFusion Core, choose Storage > Storage Edge Configuration. For details, see
Connecting an Edge to a Core. As an alternative to using a SteelFusion Core for storage, you can create a local LUN on the Edge and expose it to the hypervisor without connecting a Core. For details, see
Configuring storage without a Core.
Configuring the hypervisor
You can configure the hypervisor in the Virtualization > Hypervisor: Hypervisor Configuration page.
An installer guides you through the initial configuration of the hypervisor. After you run the installer, you can change the hypervisor password in the Hypervisor Configuration page. You can also monitor the current status and resource allocation in the Hypervisor Configuration page.
The Edge includes a host private network (HPN) virtual switch on vmnic0, called rvbd_vswitch. The switch has a kernel port and a virtual machine port. This is an internal switch used for communication within the appliance. Do not modify or delete this virtual switch.
To configure the hypervisor
1. Choose Virtualization > Hypervisor: Hypervisor Configuration page.
If you have not configured the hypervisor, the page displays the Hypervisor Installer button.
Initial launch of Hypervisor Configuration page
2. If necessary, run the installer.
The Edge must be connected to a Core before running the installer.
After you have configured the hypervisor, the page displays the current hypervisor status, runtime resources, and the licensing status. It also provides access to the hypervisor credentials.
Hypervisor Configuration page
To modify or synchronize the hypervisor credentials
1. Specify the hypervisor username and password. Confirm the password in the Password Confirm text box.
If you change the hypervisor password in vCenter or vSphere, you must also change it in this page. Changing the hypervisor password in vCenter or vSphere triggers an alarm in RiOS. When the passwords are not synchronized, RiOS cannot communicate with the hypervisor.
2. Click Apply.
The system copies the settings to the hypervisor configuration.
3. Click Restart Hypervisor to restart the hypervisor.
If you receive a warning that the hypervisor is not in a safe state to restart, click Cancel to cancel the restart or Restart Hypervisor to proceed.
Viewing hypervisor operational status
A status in the Hypervisor section of the Dashboard describes the current hypervisor state. Each status is color coded: green indicates a working state while red indicates a degraded or critical state. A status followed by an ellipsis (…) indicates a transitory state such as when the installer is gathering information. A transitory state appears briefly before the status appears. The hypervisor status shows one of these states:
•Ready to Install - You can install the hypervisor.
•Normal - The hypervisor is running.
•Off - The hypervisor is off.
For details on the hypervisor support status that appears on the Help page, see
Getting help.
When the hypervisor is not in a working state, an error message appears. This table describes the hypervisor operation errors and how to clear them.
Status | Issue | Solution |
Gathering information failed | The Hypervisor Installer was unable to retrieve hardware and sensor information from hypervisor. | On the Edge CLI, enter the hypervisor restart command. Optionally, you can reinitialize the hypervisor using the Reinitialize button in the installer or the hypervisor initialize command. Reinitializing is a destructive operation that restores the hypervisor to the default factory settings. Reinitialize with caution and only to fix critical virtualization errors. |
Disconnected | VSP is unable to communicate with the hypervisor. | Check that the hpn_mgmt, rvbd_vswitch, and internal interconnects are connected and have not been modified. |
Not initialized | The Edge has detected changes to an initialized hypervisor. The hypervisor was configured outside of the installer. | Reinitialize the hypervisor using the Reinitialize button in the installer or the hypervisor initialize command. Reinitializing is a destructive operation that restores the hypervisor to the default factory settings. Reinitialize with caution and only to fix critical virtualization errors. |
Installation failed | The Hypervisor Installer (run through either the Management Console or the CLI) failed to complete. | Reinstall the hypervisor with the correct installer settings. |
Powered Off | VSP detects that the hypervisor is powered off, possibly a result of restarting or halting vSphere from the hypervisor node. | Restart the hypervisor. |
When the Edge high-availability status on the Storage > Storage Edge Configuration page indicates Active or Standby Rebuild, you cannot install the hypervisor. Once the status returns to Active Sync, you will be able to install the hypervisor.
Using the Hypervisor Installer
The Hypervisor Installer guides you through setting up your hostname, password, network settings, storage, and vCenter license (if applicable) and pushes these settings to the hypervisor configuration. Depending on your configuration, this process can take up to 30 minutes to complete. The hypervisor status must be Ready to Install, Normal, or Limited Qualification - VSP Managed before running the installer.
As shipped, the hypervisor is initialized but not installed. You must install the hypervisor before it can host virtual machines. The installer configures these settings:
Setting | Overview | Procedure |
Administration | — | |
Storage | | |
| | |
Network | — | |
Advanced Administration, Storage and Network Settings | | |
Exiting the installer before completion will lose all changed settings. Changes are not committed until the installer finishes. You can cancel and restart the installer at any time during the process to redo any steps.
To configure the hostname, password, and license
1. Choose Virtualization > Installer: Installer to launch the installer. You can also click Hypervisor Installer in the Dashboard if a hypervisor has not been installed.
The Hypervisor Installer opens and displays the Welcome page. The Welcome page displays the available dedicated hypervisor node resources and the hypervisor status.
Hypervisor Installer Welcome page
2. Click Next to display the Hypervisor page.
Hypervisor Installer - Hypervisor page

3. Select the hypervisor version you would like to install and click Next.
If you do not see the hypervisor version in the list, exit the Hypervisor Installer and add the image before proceeding. For details, see
Adding a new image.
4. If you have previously installed a hypervisor, you are prompted to confirm reinstallation. Select Reinstall hypervisor and click Next. In the Installer Default Settings page that appears next, click Previous Settings to continue using existing settings from the latest installation or click Factory Settings to reset the hypervisor to the original factory settings.
5. Click Next.
The Administration Overview page appears. The installer will guide you through configuring direct attached storage after you configure the password, hostname, and license.
If you have not configured a Core and would like to, click
SteelFusion Core Storage on the SteelFusion Core page. For details, see
Connecting an Edge to a Core. After the Edge is connected to a Core, relaunch the Hypervisor Installer. If you choose not to use a Core, click
Direct Attached Storage.
6. Click Next. The Password Configuration page appears.
7. Specify the password that will be used to log in to the root user account of the hypervisor through vSphere or vCenter client. The password must meet the default vSphere password complexity requirements. Confirm the password in the Password Confirm text box.
8. Click Next. The Hostname Configuration page appears.
Hostname Configuration page

9. Specify the hostname that maps to the IP address of your hypervisor.
10. Click Next. The License Configuration page appears.
License Configuration page
11. Select the Riverbed license or select Specify an alternate license with additional features and specify your own license.
The Riverbed VMware vSphere license, VSPESXI, enables basic hypervisor functions without support for more advanced vSphere features such as vCenter, vMotion, high availability, and so on. If you need additional features beyond what the embedded VSPESXI level licensing provides, you must purchase a license upgrade through your VMware reseller.
After installing the Riverbed hypervisor license, if you add functionality later, you can override the Riverbed license with your own by entering it through vSphere Client.
12. Click Next. A summary of your administration settings appears.
13. Review the settings and click Next to configure the storage settings, or click Back to change any settings.
Configuring hypervisor storage
All hypervisor storage is provided by RiOS through iSCSI using Riverbed BlockStream technology. A hypervisor has no local disks for storage. Edge provides two storage methods:
•When a SteelFusion Core is connected to the Edge, you can use it to manage remote storage at your data center. This configuration allows future expandability.
•When a SteelFusion Core is not connected to the Edge, you can:
–create a single, pinned, local LUN on the Edge to be used by the hypervisor for storage.
–use existing direct-attached storage.
–delete existing direct-attached storage and create a new single, pinned, local LUN on the Edge.
To use remote storage for the hypervisor through a Core
When a Core is connected to the Edge, the Storage Overview page appears, and BlockStream provides a list of LUNs. From this page, you can make remote storage at your data center available to the hypervisor. If you are not using Core for storage, skip to
Configuring storage without a Core.
Storage Overview page
1. To make remote storage at your data center available to the hypervisor, select the LUN(s) to expose to the hypervisor.
2. Click Next. The Storage Summary page lists the LUNs selected to expose to the hypervisor.
When the hypervisor installation is finished, the system maps the iSCSI initiator to any selected LUNs, adds the iSCSI Edge target, and rescans the system to discover these LUNs.
The installer does not format any datastore on the selected LUNs.
If you do not select any LUNs, you will need to add them manually after the hypervisor installation is complete. Adding the LUNs manually includes mapping the iSCSI initiator to the LUN, adding the iSCSI Edge target, and rescanning the system.
For LUNs that are configured before installing the hypervisor, the default path selection MPIO policy is set to Round Robin (VMware). When the hypervisor installation completes, the policy is reset to Most Recently Used (VMware). For best performance, you might want to reset the policy to Round Robin (VMware). For details, see
https://supportkb.riverbed.com/support/index?page=content&id=S26418.Configuring storage without a Core
We recommend configuring Core for storage before running the Hypervisor Installer. Running the installer before configuring the Core requires more manual steps, such as adding initiators, setting MPIO policies, and configuring the LUNs from the Core. However, if you are running the installer to install the hypervisor before connecting to the Core, on the Edge you can specify the size of the local LUN. Click Direct Attached Storage and choose a 0% allocation for the amount of available blockstore you want to use as local storage. This setting allocates the entire blockstore to be available to the Core. For details on adding initiators, setting MPIO policies, and configuring LUNs, see the SteelFusion Core User Guide or the SteelFusion Design Guide.
When a SteelFusion Core is not connected to the SteelFusion Edge, the Direct Attached Storage page appears. From this page, you can:
•create a single, pinned, local LUN on the Edge.
•use existing direct-attached storage.
•delete existing direct-attached storage and create a single, pinned, local LUN on the Edge.
Using a local LUN without connecting to a SteelFusion Core is the same as projecting an LUN through a Core connection, except that the Edge owns the configuration, whereas when you project an LUN through a Core, the Core owns the configuration. The Edge provides local storage for the VMs hosted on VSP.
The BlockStream blockstore partition exposes a single, local pinned LUN to the hypervisor as a preconfigured datastore over iSCSI. You can specify the amount of datastore space, which is allocated from the BlockStream blockstore.
In this configuration, the storage data is not synchronized back to the SteelFusion Core. These features are not available:
•Edge HA - You can only initiate high availability (HA) on an Edge that is connected to a Core.
•Blockstore Encryption - The coreless Edge cannot encrypt the blockstore.
•External Initiators - In the Edge xx00 2U series, the external MPIO interfaces are not exposed to the hypervisor initiator. In the Edge xx00 1U series, the external MPIO interfaces are exposed to allow path redundancy because this model has a single internal storage network portal. Note that the default iSCSI portals on the xx00 1U series include RIOS management interfaces. In a coreless Edge configuration, the system exposes the internal, nonconfigurable interface (or interfaces, depending on appliance model) for use by the hypervisor.
•CHAP Authentication - The coreless Edge cannot use CHAP authentication for iSCSI connections.
•Remote LUNs - The coreless Edge cannot expose remote LUNs to the hypervisor.
Direct Attached Storage configuration page with no existing LUNs
To use existing direct-attached storage
When the installer locates existing local LUNs, the page displays a list of LUNs.
1. Select the LUN or LUNs you would like to preserve and click Next.
The installer keeps the existing LUNs but allocates storage to a single local LUN. This is the only way to use more than one LUN in a coreless Edge configuration.
To remove existing direct-attached storage and create a new LUN
•Click Delete existing direct attached storage and continue with this procedure.
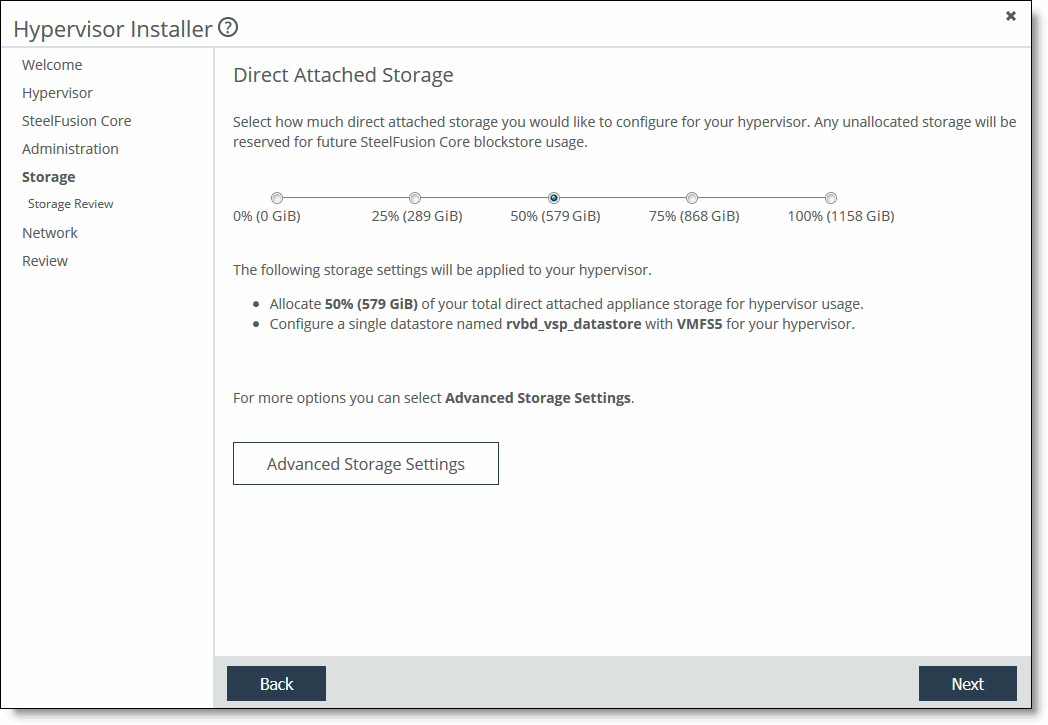
To create direct attached storage
When there are no existing local LUNs, the page displays the total available blockstore size.
1. Select the amount of attached storage to allocate to the hypervisor. The default value is 50 percent.
By default, the installer creates a VMFS5 formatted datastore (backed by direct-attached storage), using 50 percent of the available blockstore space, named rvbd vsp datastore, available to your hypervisor. The remaining 50 percent could be used to connect to a Core and project local LUNs in the future.
If you install or upgrade to ESXi 6.5, you can select the file system type as VMFS5 or VMFS6.
You can allocate 100 percent to the datastore, but to allow for future expansion, we recommend against using the entire amount. If you allocate 100 percent and then decide later to connect a Core to project LUNs, writes to remote LUNs could experience lower throughputs and low or no space conditions.
If any local LUNs exist, they appear in this page. You can leave them as is or choose to configure a new local LUN. When you leave existing local LUNs alone, they are exposed to the hypervisor and are not reformatted in any way. When you choose to configure a new local LUN, the installer deletes any existing LUNs.
To configure advanced storage options, such as selecting a different amount of storage, specifying another name for the datastore, or changing the file system type to VMFS3, click Advanced Storage Settings.
2. Click Next.
A summary of your storage settings appears.
3. Review the settings and click Next.
The Network Settings or Network Overview page appears, depending on whether you have previously configured advanced network settings.
To configure network settings
1. Click Next to accept the default settings (you will get a chance to review the settings before they are installed) or Advanced Network Settings to configure the network settings manually.
The advanced network settings include adding vSwitches, configuring VMkernel adapters with IP and tag settings, adding uplinks, teaming interfaces, or adding VMkernel (VMK) services such as vMotion. See
Configuring advanced storage and network settings for details on manual network configuration.
By default, the installer:
•creates one vSwitch called vSwitch0.
•attaches all onboard hypervisor NIC uplinks to the vSwitch (the number of uplinks depend on the appliance model), but excludes add-on NICs for the hypervisor node. You can configure add-on NICs for the hypervisor node through vSphere.
•creates 1 VMkernel port group named Management Network.
•creates one VM port group called VM Network.
•enables DHCP for IPv4 addressing and tagged with management traffic.
The Network Summary page appears.
Network Summary page
2. Review the default settings and click Next, or click Back and then Advanced Network Settings to change any settings.
3. Click Next. The installer validates the network settings, and the Review page appears.
If there is an error in the configuration, an error message appears and you must dismiss the message, correct your network settings, and click Next again to proceed to the Review Changes page.
Review Changes page

4. Click Next. The confirmation page displays the configuration settings for the hypervisor. The settings include both the values you specified in the installer as well as default configuration settings optimized for the hypervisor with the Edge.
5. Click Install Hypervisor.
The system copies the settings to the hypervisor configuration. This is a one-time, one-way transfer. The changes overwrite any changes that were made directly in the hypervisor outside of the installer. You can make future changes to the hypervisor configuration through vSphere and vCenter, but if you run the installer again, it overwrites all the changes in the hypervisor with the new values from the installer.
The installer places a green check mark next to the message indicating a successful installation, which takes up to 30 minutes.
After a successful installation, if the system can determine the management IP address for the vSphere/vCenter client, it appears in the page.
The installer automatically imports the DNS and NTP settings from RiOS to the hypervisor.
6. Click Close to close the installer and return to the Dashboard.
The Dashboard displays the current resource allocations along with the hypervisor version and uptime.
7. If you have Edges in a high-availability configuration, repeat the Hypervisor Installer steps for the peer appliance.
Configuring advanced storage and network settings
This section describes how to configure advanced storage and network options. The advanced network settings include adding vSwitches, configuring VMkernel adapters with IP and tag settings, adding uplinks, teaming interfaces, or adding VMK Services such as vMotion.
To configure administration settings (advanced settings)
1. Choose Virtualization > Installer: Installer to launch the installer. You can also click Hypervisor Installer in the Dashboard if a hypervisor has not been installed.
The installer opens and displays the Welcome page. If the system detects a previously installed hypervisor, it provides options to reinstall or quit the installer.
2. Step through the administration settings and licensing.
The Riverbed VMware vSphere license, VSPESXI, enables basic hypervisor functions without support for more advanced vSphere features such as vCenter, vMotion, high availability, and so on. If you need additional features beyond what the embedded VSPESXI level licensing provides, you must purchase a license upgrade through your VMware reseller.
When the installer is ready for the storage settings, the Direct Attached Storage page appears when a Core is not connected to the Edge. When a Core is connected to the Edge, the Storage Overview page appears.
To configure storage with a Core, select the LUNs to expose to the hypervisor, click
Next, and skip to
Step 3.
Direct Attached Storage page
3. Click Advanced Storage Settings.
To configure storage without a Core (advanced settings)
1. Select the amount of attached storage to allocate to the hypervisor or keep the default value of 50 percent. You can use up to 100 percent of the datastore, but if you connect a Core to project LUNs in the future, writes to remote LUNs could experience lower throughputs and low or no space conditions.
The SteelFusion blockstore allocation changes dynamically, depending on the amount of attached storage you specify.
2. Specify the datastore name.
3. Select the datastore format from the drop-down list.
4. Click Next.
A summary of your storage settings appears.
5. Review the settings and click Next. The Network Settings or Network Overview page appears, depending on whether you have previously configured advanced network settings.
To create a virtual switch (advanced settings)
1. Click Create a new vSwitch. The Configure vSwitch page appears, which updates dynamically as you configure the settings.
Configure vSwitch page

2. Specify the vSwitch label.
You can delete a vSwitch by clicking the x next to the vSwitch name. Click a vSwitch to change any settings.
3. Click Next.
The Configure vSwitch Uplinks page displays the active uplink in focus. Uplinks serve as bridges between physical and virtual networks.
Configure vSwitch Uplinks page
4. Select an uplink to associate with the vSwitch. You can select more than one to team the uplinks onto the vSwitch.
5. Click Next. The Configure VMKernel interface page appears. Creating a VMkernel interface is optional.
VMKernel Interface page
6. Select Continue without creating a VMKernel interface and skip to
Step 8 or select Create a VMKernel interface.
7. Specify a VLAN ID and a VMkernel port label.
8. Click Next. The Configure IP Address page appears. From this page, you can configure VMkernel adapters with IP settings.
Configure IP Address page
9. Select IPv4 (the default setting), IPv6, or both IPv4 and IPv6 from the drop-down list.
10. Click Next. The Configure VMKernel IPvx page appears.
Configure VMKernel IPv4 page
You must specify IP address settings for the hypervisor management interface.
11. Select Obtain IPvx Address Automatically to automatically obtain the interface IPvx address from a DHCP server. A DHCP server must be available so that the system can request the IP address from it.
Select Enable IPvx DHCP DNS to enable IPvx dynamic DNS.
Select Specify IPvx Address Manually if you do not use a DHCP server to set the interface IP address. Specify these values:
•IPvx Address - Specify an interface IPvx address.
•IPvx Subnet Mask - Specify an IPvx subnet mask.
If you select both IPv4 and IPv6, you need to select settings for both types of addresses.
12. Click Next. The Configure VMkernel Services page appears.
Configure VMkernel Services page

13. Select the vSphere services traffic to enable on this VMkernel interface. If you select vMotion, there are specific VMware rules and requirements that you must follow. For details, see the VMware website.
14. Click Next. The Add Virtual Machine Port Group page appears.
Add Virtual Machine Port Group page
15. Optionally, select Create a VM port group or select Continue without creating a VM port group.
If you are creating a port group, specify a VLAN ID and a VMkernel port group label.
If you specify a VLAN ID of 0, the port group can see only untagged (non-VLAN) traffic. If you specify a VLAN ID of 4095, the port group can see traffic on any VLAN while leaving the VLAN tags intact.
16. Click Next. The Create a vSwitch page reappears.
You have successfully created a vSwitch. To create another vSwitch, click Create vSwitch and repeat the previous steps.
17. Click Next. The vSwitch Review page reappears. Review the vSwitch settings.
18. Click Next. The Configure Gateway page appears. The page displays IPv4, IPv6, or both, depending on the IP address settings.
Configure Gateway page
To configure a gateway (advanced settings)
1. Select an IPv4 or IPv6 gateway, or both. The gateway field is available only for the interface that is currently selected as the hypervisor management interface. Select DHCP or specify a static IP gateway. If you select a static gateway, specify an IP address.
2. Click Next. The installer validates the network settings, and the Review page appears.
Review Changes page
If there is an error in the configuration, an error message appears and you must dismiss the message, correct your network settings, and click Next again to proceed to the Review Changes page.
The confirmation page displays the configuration settings for the hypervisor. The settings include both the values you specified in the installer as well as default configuration settings optimized for the hypervisor with the Edge.
3. Review the changes. Click Show more to view details that do not appear. Click Next.
4. Click Install Hypervisor.
The system copies the settings to the hypervisor configuration. This is a one-time, one-way transfer. The changes overwrite any changes that were made directly in the hypervisor outside of the installer. You can make future changes to the hypervisor configuration through vSphere and vCenter, but if you run the installer again, it overwrites all the changes in hypervisor with the new values from the installer.
The installer places a green check mark next to the message indicating a successful installation, which takes up to 30 minutes.
After a successful installation, if the system can determine the management IP address for the vSphere/vCenter client, it appears in the page.
The installer automatically:
•imports the DNS and NTP settings from RiOS to the hypervisor.
•configures the iSCSI software adapter and LUNs for optimal use with the hypervisor. If a Core is attached, the installer also updates the ACL list of the Core for the specified Core managed LUNs.
5. Click Close to close the installer and return to the Dashboard.
The hypervisor restarts with the new values. The Dashboard displays the current resource allocations along with the hypervisor version, status, uptime, and IQN.
The Edge includes a host private network (HPN) virtual switch on vmnic0, called rvbd_vswitch. The switch has a kernel port and a virtual machine port. This is an internal switch used for communication within the appliance. Do not modify or delete this virtual switch.
6. If you have Edges in a high-availability configuration, repeat the Hypervisor Installer steps for the peer appliance.
Upgrading the hypervisor
This section describes how to upgrade your hypervisor software. It includes these topics:
As of Edge 4.2, you can upgrade the hypervisor independently from the RiOS Edge software. ESXi 6.0 Patch 6 is preloaded in the software image and does not require a separate download. After upgrading the Edge software, the ESXi version will not change and will continue to be supported. However, you can optionally upgrade to ESXi 6.5 Patch 2 (available for download from the Riverbed Support at
https://support.riverbed.com).
To avoid data corruption, shut down all VMs on the hypervisor and put the hypervisor in Maintenance Mode before proceeding with an upgrade, reinstallation, or downgrade.
On the Virtualization > Hypervisor: Software Upgrade page, the Hypervisor Information section displays the current hypervisor’s status, type, and version number. Under Hypervisor Images, you can perform these tasks:
•Image management - Add or remove image files from the list.
•Upgrade - Upgrade the hypervisor version without having to run the Hypervisor Installer.
•Reinstall or downgrade - Choose a hypervisor image to reinstall or downgrade to.
Hypervisor Version History displays the vSphere version history and first boot date. Select a column heading to sort the column in ascending or descending order.
Working with the vSphere hypervisor during an upgrade
You can verify the version number and the support status of the running vSphere installation on the Help page of the Management Console.
Known issues
Upgrading the hypervisor includes these known issues or limitations:
•If you use vCenter to manage your Edge virtual machines, the vCenter version must be equal to or later than the version of ESXi running on the Edge. For ESXi 6.0, you need vCenter 6.0 or later. For ESXi 6.5, you need vCenter 6.5 or later. If you want to upgrade ESXi from 6.0 to 6.5, you must upgrade vCenter to version 6.5 or later before upgrading ESXi on the Edge.
•VMware vSphere provides the account lockout feature to secure the hypervisor from unauthorized access. By default, ESXi 6.0 allows a maximum of ten incorrect login attempts before the account is locked. The account is unlocked after two minutes. By default, ESXi 6.5 allows a maximum of five incorrect login attempts before the account is locked. The account is unlocked after 15 minutes.
•ESXi 6.5 supports VM encryption. However, SteelFusion Edge 5.5 and later do not support encrypted VMs for VM backup workflow. Encrypted VMs are excluded from the backup policy.
•The password complexity checker of ESXi can vary from version to version. The installer attempts to prevent you from using an invalid initial installation password. However, if installation fails, check the logs for messages indicating an invalid or weak password. If an error message displays, reattempt the installation with a password compatible with the version of ESXi you are installing.
This issue only affects initial installations or reinstallations, and does not affect upgrades.
•iSCSI connections fail and datastores become inaccessible when IQN changes.
This problem can occur if you change the IQN of an iSCSI adapter while iSCSI sessions on the adapter are still active.
Workaround: When you change the IQN of an iSCSI adapter, no session should be active on that adapter. Remove all iSCSI sessions and all targets on the adapter before changing the IQN.
•Active Directory settings are not retained.
The Active Directory settings configured in the vSphere host before upgrade are not retained when the host is upgraded to vSphere 6.0 or later.
Workaround: Add the host to the Active Directory Domain after the upgrade if the pre-upgrade vSphere version is 5.1 or later. Do not add the host to the Active Directory Domain after upgrade if the pre-upgrade vSphere version is vSphere 5.0.x.
•Hosts that were previously added to the domain are no longer joined to the domain.
When upgrading from vSphere 5.5 or later to 6.0 or later for the first time, the Active Directory configuration is not retained. After the upgrade, rejoin the hosts to the vCenter Server domain.
•vCenter licenses need to be reinstalled. The upgrade to ESXi 6.5 applies a new embedded license to the hypervisor. If ESXi is not managed by vCenter, there is no need to upgrade the default license. However, if you added a custom license in 6.0 that supported vCenter, you will lose that functionality. After the upgrade, you need to add a new 6.5 license that supports vCenter. You can add a new custom license from vCenter or vSphere.
Adding a new image
You can optionally upgrade to vSphere 6.5 Patch 2. There are three ways to download the hypervisor image:
•From the Virtualization > Hypervisor: Software Upgrade page - Specify a URL path to the image directly.
•From the Virtualization > Hypervisor: Software Upgrade page - Select a version to download from the Riverbed Support site.
To add a new image
1. Choose Virtualization > Hypervisor: Software Upgrade to display the Software Upgrade page.
2. Under Hypervisor Images, click Add Image.
Software Upgrade page - Add Image
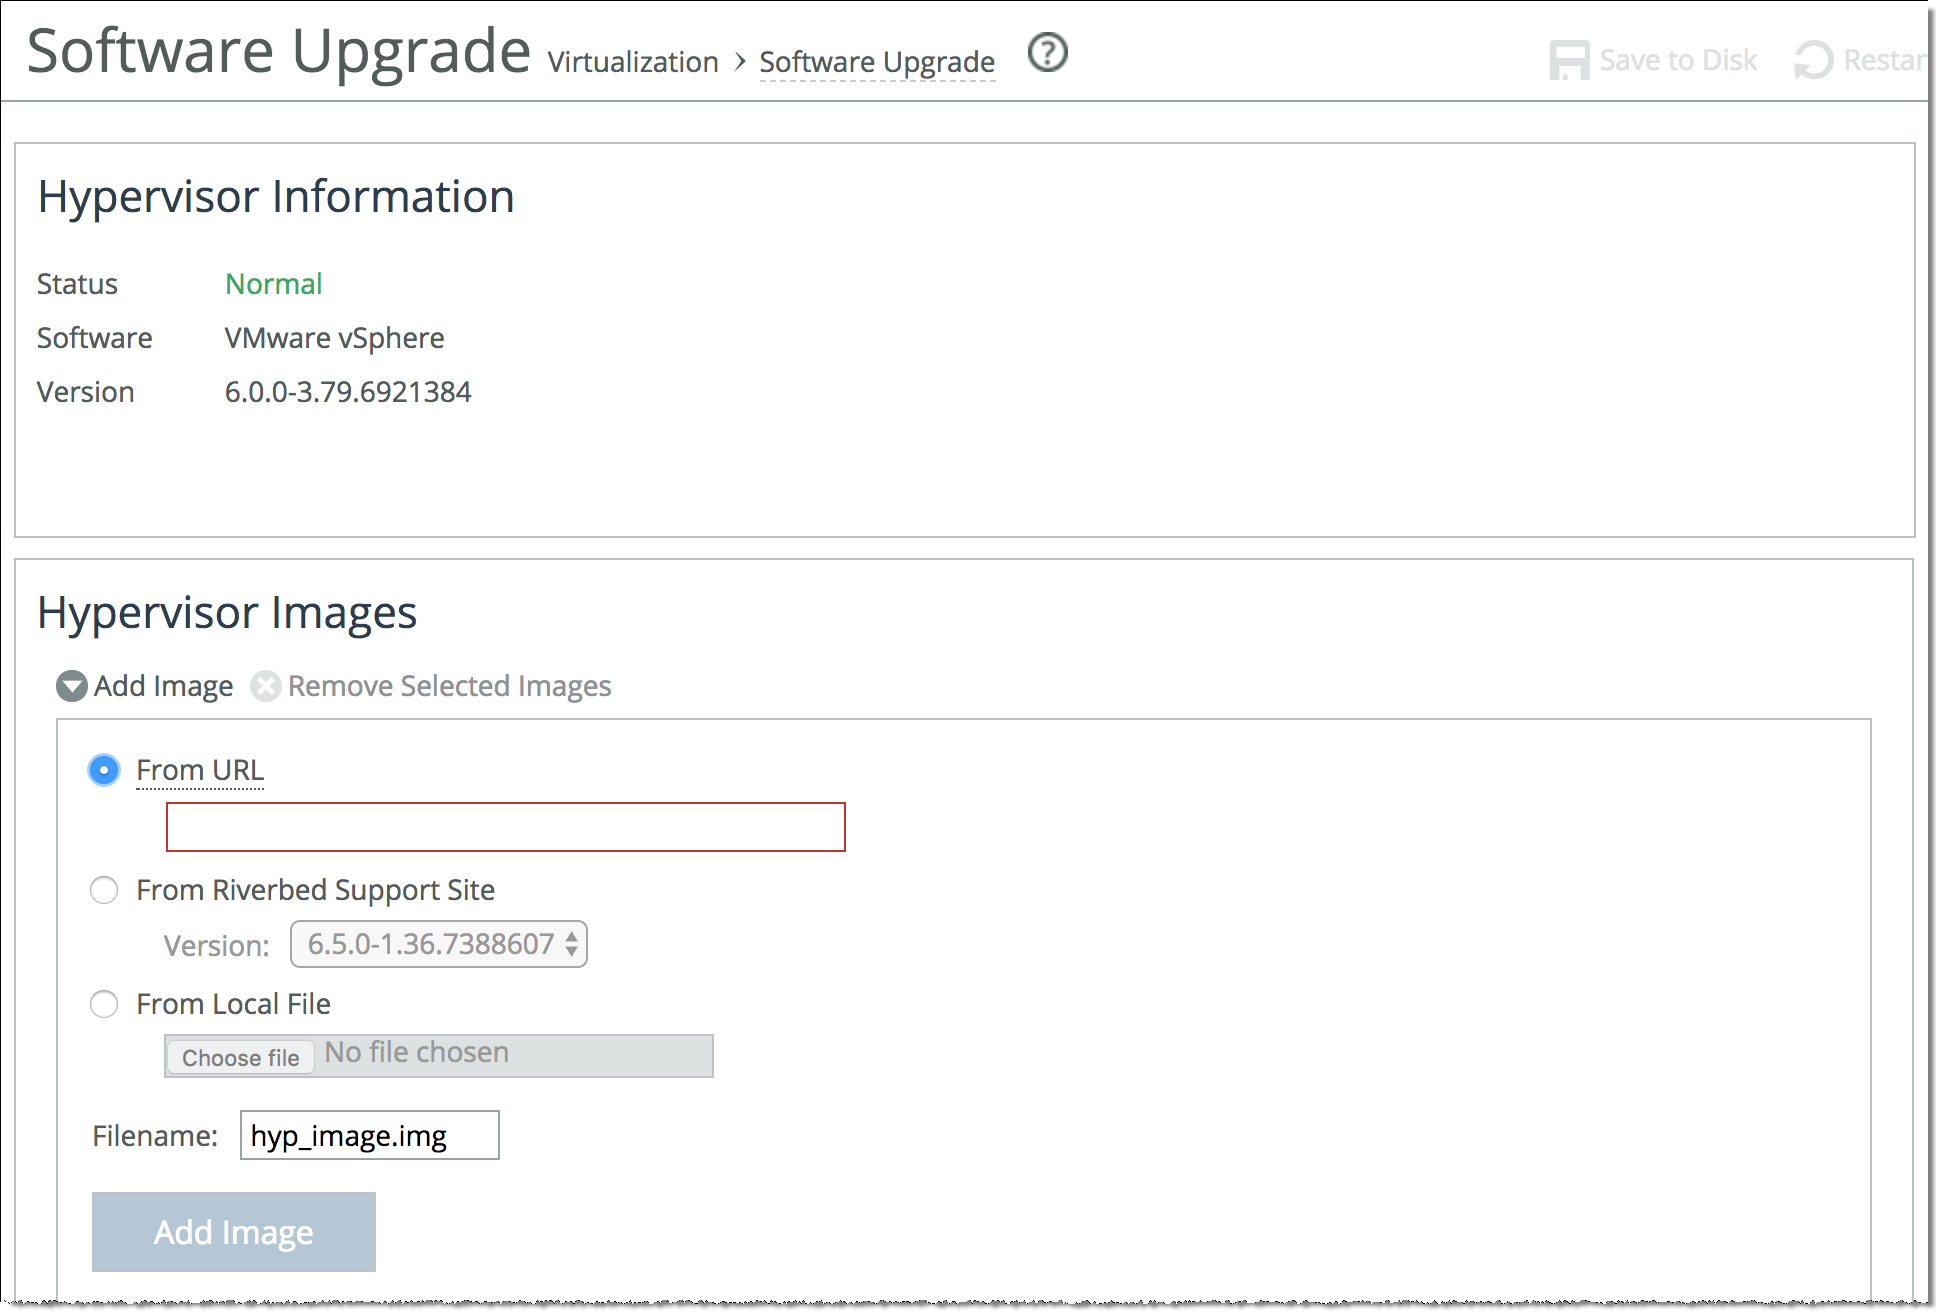
3. If you have downloaded the image, choose From Local File or use one of these other options to install the image from this page.
Control | Description |
From URL | Select this option and specify the URL. Use one of these formats: http://host/path/to/file
https://host/path/to/file |
From Riverbed Support Site | Select this option and select the target release number from the Version drop-down list. The system uploads the new image from the Riverbed Support site immediately after you click Add Image. If you receive an “entitlement error” warning, you may not have the correct credentials for the Riverbed Support site. Contact Riverbed Support at https://support.riverbed.com. |
From Local File | Select this option and click Browse to go to the local file directory. If you specify a file to upload in the Local File text box, the image is uploaded immediately; however, the image is installed and the system is rebooted at the time you specify. |
Filename | If you plan to add more than one image, we recommend that you specify a unique name for each added image so it does not get overwritten. The default name is hyp_image.img (the .iso file extension will be added automatically if you do not add it). To rename an existing image, specify a new name for the added hypervisor image and click Rename. |
Add Image | Click to add the new image to the Hypervisor Images list. |
To remove one or several images, select it and click Remove Selected Images.
Hypervisor images list support status
The Riverbed Support site provides a hypervisor version support matrix that lists the supported hypervisors between RiOS and ESXi.
The support status indicates the level of Riverbed support available for the appliance:
•Fully Supported - Indicates full Riverbed support for the hypervisor version. This status appears with this version format:
<major>.<minor>.<maintenance-patch>.<build>
For example, 6.0.0.1-17.3029758 (6.0 Update 1).
•Limited Qualification - VSP Managed - Indicates a minor version difference between the version of the hypervisor image and the version supported on the appliance, resulting in limited Riverbed support. VSP services will run but may not function correctly. This status appears with this version format:
<major>.<minor>
•Limited Qualification - Not VSP Managed - Indicates that this hypervisor version is not supported by RiOS. This occurs when there is a major difference between the version of the hypervisor image and the version supported on the appliance. VSP services will not run and Riverbed support will be limited.
Upgrading the hypervisor version
On the Software Upgrade page, after you have added the hypervisor image you want to download, you can upgrade the vSphere hypervisor version. The Hypervisor Images section displays the available downloaded images and their version numbers, support status, and the date they were added. Select a column heading to sort the column in ascending or descending order.
To upgrade the hypervisor version
1. To avoid data corruption, shut down all VMs on the hypervisor and put the hypervisor in Maintenance Mode through vSphere before proceeding.
2. Choose Virtualization > Hypervisor: Software Upgrade to display the Software Upgrade page.
All currently available hypervisor images are listed by filename. If the software image you want to install does not appear in the Hypervisor Images list, see
To add a new image.
3. Under Hypervisor Images, click the right arrow next to the image you want to install.
Software Upgrade page - Hypervisor Images
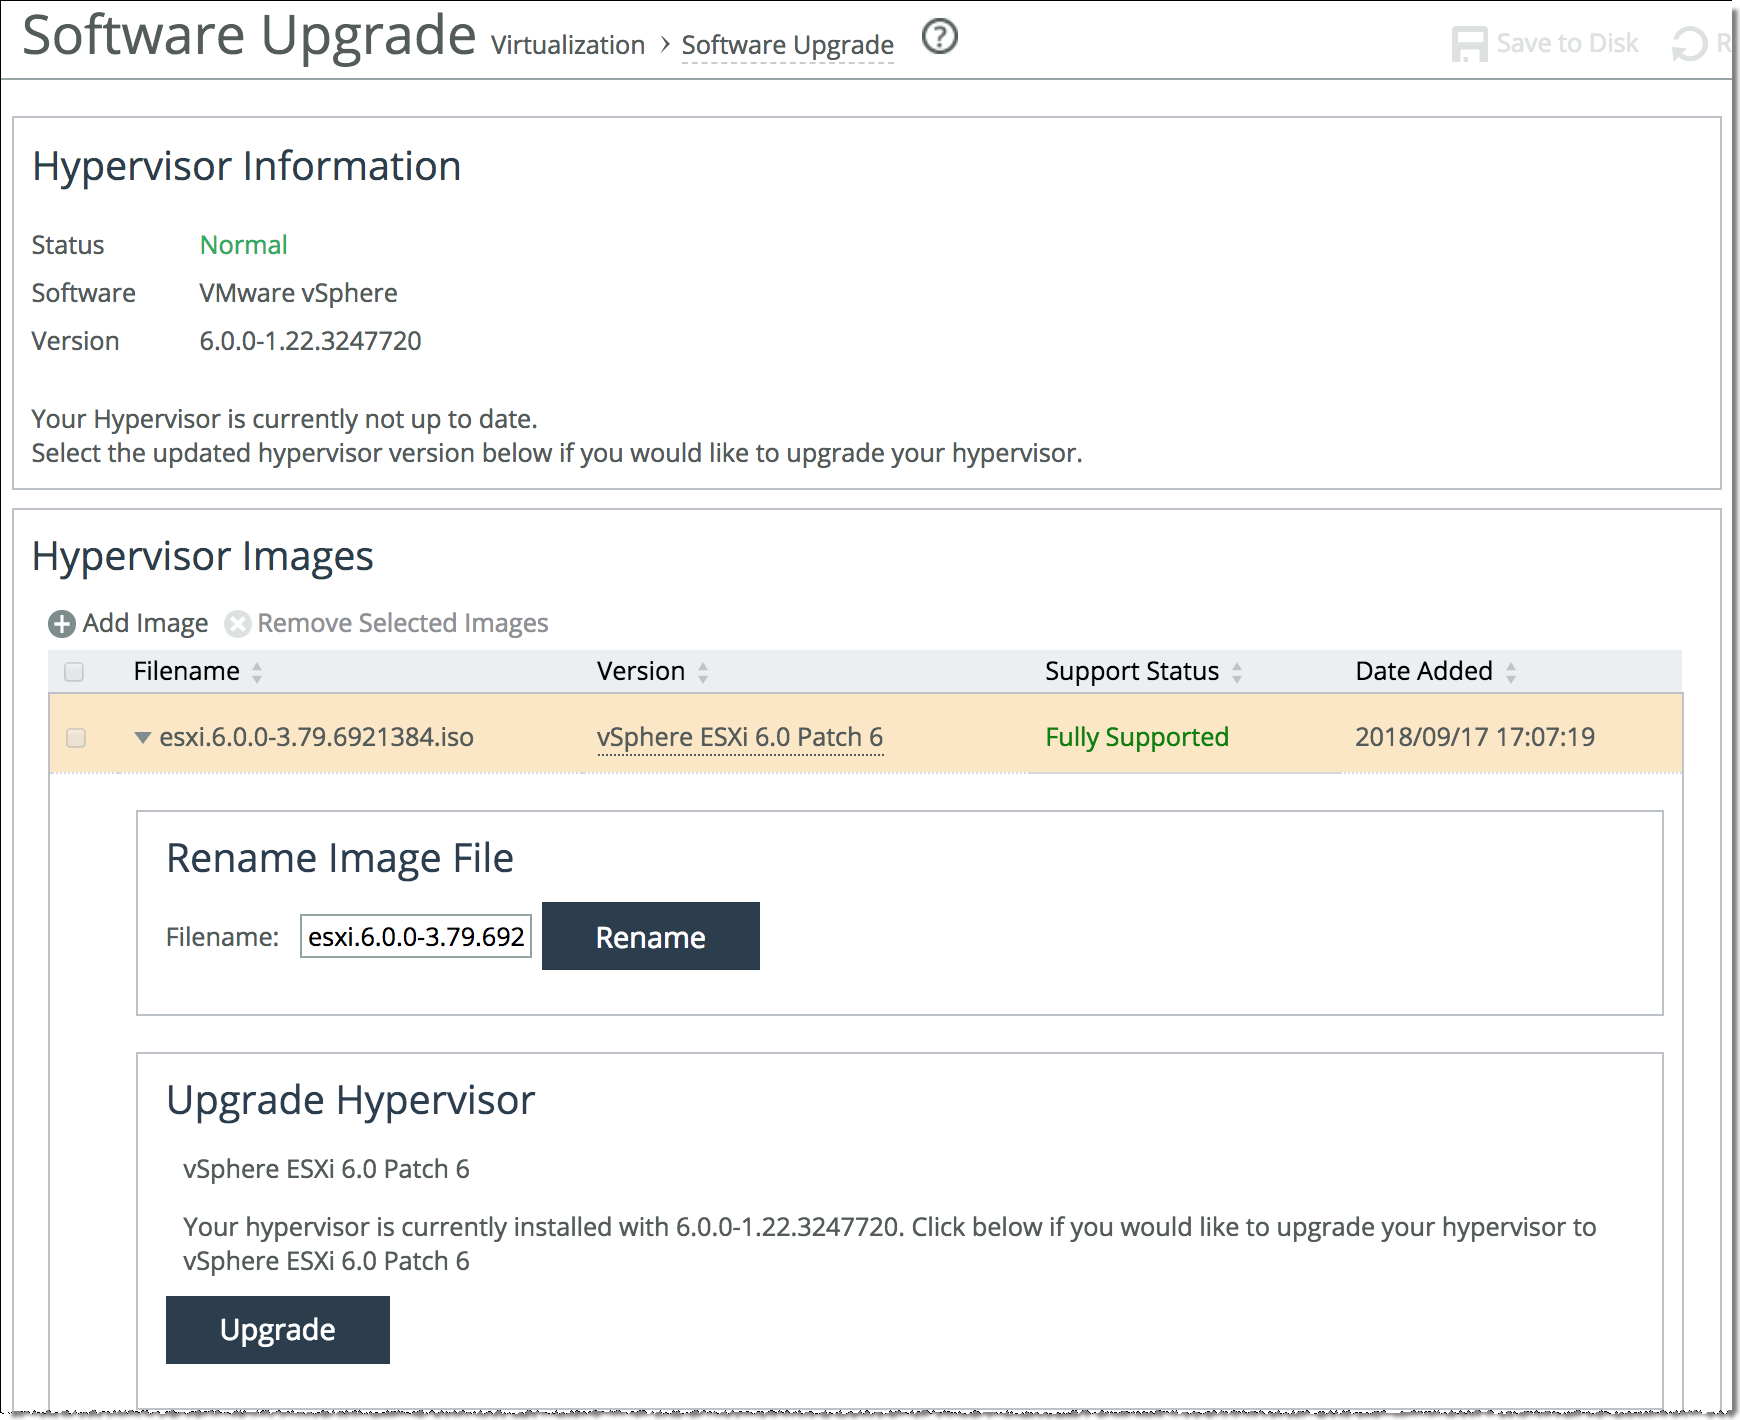
4. Click Upgrade.
5. Click OK to confirm.
A status message appears, displaying the upgrade progress.
If the image upgrade is successful, once the upgrade is complete the image name appears as “Currently Installed” in the Hypervisor Images list.
If the image upgrade fails, an error message displays at the top of the page.
After the upgrade is complete, the Dashboard, Software Upgrade, and Support pages of the Management Console display the new hypervisor version number.
Reinstalling or downgrading the hypervisor version
After a previous installation, you can reinstall the same hypervisor version or downgrade to an earlier version. Before proceeding, keep in mind that reinstalling a hypervisor:
•does not remove the datastores from the hypervisor.
•cancels all previous hypervisor settings. Any changes made to the hypervisor configuration after the latest installation are permanently lost.
•changes the hypervisor IQN but does not propagate the change to the peer Edge in a high availability pair. You must update any configuration that includes the IQN of the hypervisor to reflect the new IQN after the reinstallation completes. For example, you need to update the LUN ACLs on the Core to provide access to the new IQN.
To reinstall or downgrade the existing hypervisor
1. To avoid data corruption, shut down all VMs on the hypervisor and put the hypervisor in Maintenance Mode through vSphere before proceeding.
2. After downloading the hypervisor image you will be reinstalling, log in to the Management Console using the Administrator account (admin).
3. Choose Virtualization > Hypervisor: Software Upgrade to display the Software Upgrade page.
All currently available hypervisor images are listed by filename. If the software image you want to reinstall or downgrade to does not appear in the Hypervisor Images list, see
To add a new image.
4. Under Hypervisor Images, select the image you want to reinstall or downgrade to and click the right arrow.
Software Upgrade page - Reinstall Hypervisor
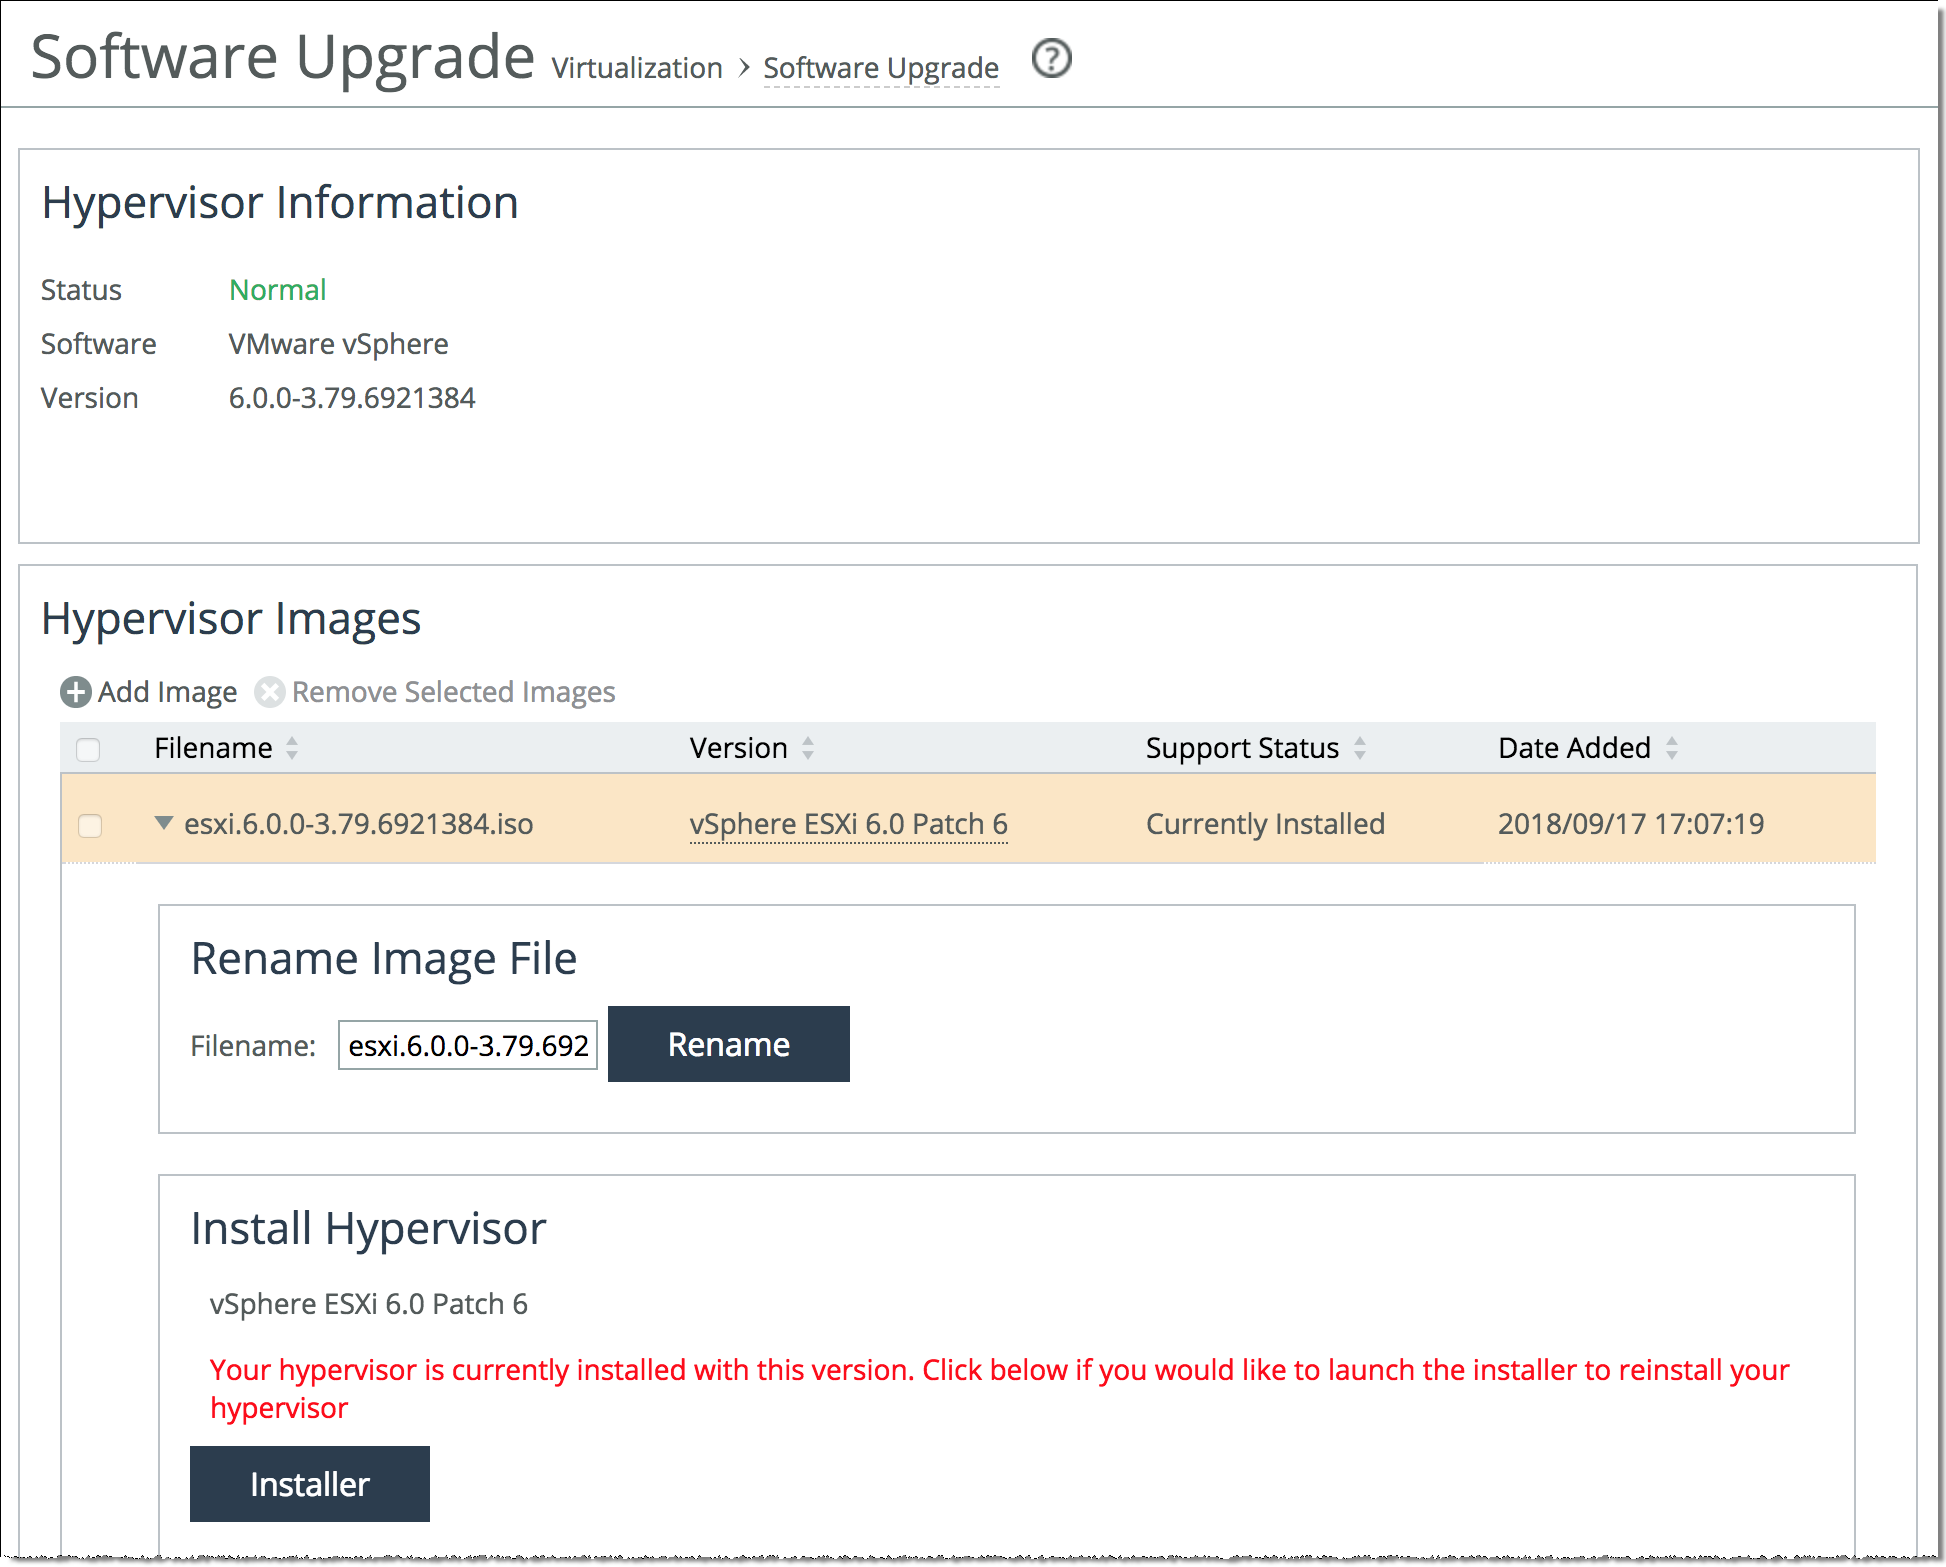
A message appears under Install Hypervisor, informing you that the hypervisor is currently installed with a newer version.
5. Click Installer.
If a warning appears informing you that vSphere cannot shut down properly, click Cancel and shut down all VMs on the hypervisor. Put the hypervisor in Maintenance Mode through vSphere before proceeding.
The Hypervisor Installer launches.
Hypervisor Installer
Managing the hypervisor and virtual machines with vSphere
You can install and use the VMware vSphere Client or use the vSphere Web Client for administering the hypervisor and vCenter Server. You can download the vSphere applications from the VMware website, or you can download the vSphere Client from the hypervisor host.
VSP is not available in Virtual Edge.
The vSphere Client user interface changes, depending on the server:
•When the server is a hypervisor host, the vSphere Client displays only the options appropriate to single host management. SteelFusion Edge provides this capability without the need for a separate license.
•When the server is a vCenter Server system, the vSphere Client displays all the options available to the vSphere environment, according to the licensing configuration and the user permissions. To use vCenter, you need a separate license from VMware.
To manage the host with the vSphere Client and vCenter Server, you must install the applications on a computer with network access to the hypervisor host. The hypervisor host must be powered on and available.
You can download the vSphere applications from the VMware website, or you can download the vSphere Client from the hypervisor host.
To download the vSphere Client from the hypervisor host
1. Connect to the hypervisor host using the IP address for the vSphere management interface.
This is the address used for hypervisor management. The IP address appears at the top of the Virtualization > Hypervisor: Hypervisor Configuration page of the SteelFusion Edge Management Console.
The VMware welcome page appears.
2. Click the link to download the vSphere Client.
To log in to the VSP hypervisor host using vSphere
1. Start the vSphere Client.
2. In the IP Address / Name field, type the management IP address that appears at the top of the Virtualization > Hypervisor: Hypervisor Configuration page of the SteelFusion Edge Management Console.
3. For the username, log in as root.
4. Enter the password you set up when you configured the hypervisor in the SteelHead Management Console.
5. Click Login.
Security warning messages appear because the vSphere Client detects certificates signed by the host or vCenter Server system (default setting).
6. To ignore the security warnings that appear, click Ignore.
The vSphere Client opens and displays information about the host.
To manage hypervisor using vCenter
1. Start the vSphere Client.
2. In the vSphere Client login window, type the vCenter Server IP address or hostname.
3. Type your username and password.
4. Click Login.
Security warning messages appear because the vSphere Client detects certificates signed by the host or vCenter Server system (default setting).
5. To ignore the security warnings that appear, click Ignore.
6. Add the hypervisor host.
vCenter discovers any virtual machines running on the host, as well as the server details.
Consult the VMware vSphere documentation for complete details about working with vSphere.
Creating and configuring virtual machines
After you have configured the hypervisor, you can add virtual machines using VMware tools. You can add a virtual machine to the SteelFusion Edge host by creating a new virtual machine or by deploying a virtual appliance (a virtual appliance is a prebuilt virtual machine with an operating system installed).
To learn how to add a virtual machine using VMware tools, go to the vSphere Documentation Center at
https://docs.vmware.com/en/VMware-vSphere/index.html.Helpful topics include:
Understanding high availability
SteelFusion Core projects storage from the data center to the Edge, and makes this storage available to the hypervisor. Edge provides high availability (HA) for this storage. High availability uses a pair of Edges: one as an active peer and the other as a standby peer. The active Edge in the pair connects to the Core and serves storage data. The active peer contains the authoritative copy of the blockstore and configuration data. The standby Edge is passive and does not service client requests but is ready to take over from the active peer immediately.
HA deployment considerations
Consider these restrictions when planning a high-availability deployment:
•High availability is supported only between Edges of the same model and series.
•High availability is supported between two Edges, and also between the hypervisors associated with those Edges if VMware vSphere high availability is configured.
•The primary interface of the active Edge must be in the same subnet as the primary interface of the standby Edge. In addition, the in-path interfaces on the active Edge must be in the same subnet as the in-path interfaces on the stand-by Edge.
•Core must be added to the Edges.
•vSphere must be licensed at the Standard level or higher.
Deploying hypervisors in a high-availability configuration
This section describes how to deploy hypervisors in a high-availability configuration.
To deploy hypervisors in a high-availability configuration
1. Deploy an active Edge and a passive, failover Edge.
2. Ensure that the Edge is properly licensed on the active appliance and on the passive appliance.
3. Enable multipath I/O (MPIO) interfaces on each appliance. For details about enabling MPIO interfaces, see the SteelFusion Core User Guide.
4. Provision a LUN to host virtual machine datastores. The LUN must be accessible to both the active and passive Edges. The LUN can be sourced from the active appliance’s local disk, or it can be sourced and projected from a Core.
5. Establish datastores on the LUN.
6. Ensure that the VMware vSphere licenses on each appliance are sufficient to enable native vSphere high availability. (Standard, Enterprise, and Enterprise Plus licenses enable high availability.)
7. Launch a vSphere Client and connect to your vCenter Server that manages the hypervisor on the Edges.
8. Using the vSphere Client, place the active Edge and the passive Edge into the same HA cluster.
9. Deploy your virtual machines to the hypervisor on the active Edge.