Powering, Connecting, and Configuring the Appliance
Before powering on, connecting, or configuring the appliance, decide how you plan to deploy it in your network. For example, determine whether it will be used in an in-path or out-of-path topology. For a brief overview of deployment scenarios, see
About connecting the appliance to the network. For detailed guidance, refer to the deployment guide for your specific appliance.
Also consider how the appliance should behave during a power outage or network issue—whether it should fail-to-block or fail-to-wire. For a brief explanation of these failure modes, see
Installing Network Interface Cards.About appliance power cords
Depending on the model, some appliances use one power cord, while others use two (see
Figure: Connecting the AC power). If your appliance has multiple power supplies, make sure to plug in all power cords. Otherwise, a visual and/or audible alarm will be triggered.
Connecting the AC power
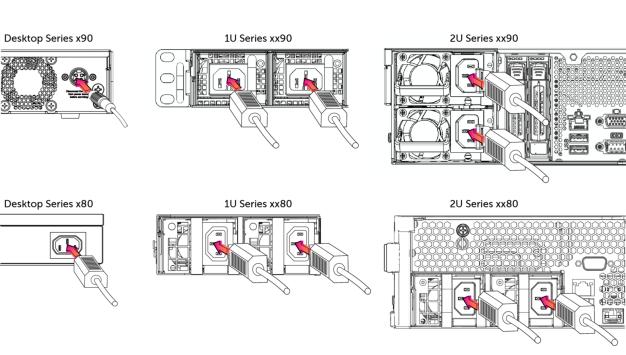
In European electrical systems, you must ground (earth) the green/yellow tab on the power cord to avoid the risk of electric shock.
Powering the appliance
1. If your system has a master power switch, make sure both the system and the master power switch on the rear of the appliance are off.
2. Plug the AC power cord into the appliance.
3. Plug the AC power cord into an uninterrupted AC power source.
4. Press the system power switch to turn on the appliance. If it doesn't start right away, turn the switch off, then on again.
About connecting the appliance to the network
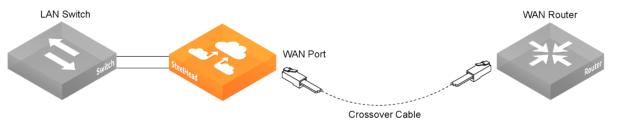
The way you deploy your appliance—either in-path or out-of-path—determines how it connects to your network. In an in-path deployment, the appliance sits directly between clients and servers, allowing them to see each other’s original IP addresses. This setup is suitable for locations where the total bandwidth stays within the appliance’s capacity. To connect in-path, use straight-through Ethernet cables from the appliance’s primary and LAN ports to the LAN switch, and a crossover cable from the WAN port to the WAN router.
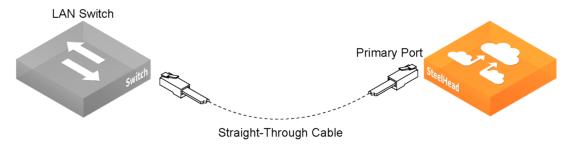
In an out-of-path deployment, the appliance is not placed directly between the client and server. Instead, the server sees the IP address of the server-side appliance, not the client’s. In this configuration, the client-side appliance is set up as in-path, while the server-side appliance is out-of-path. Out-of-path deployment is typically used in data centers where in-path configurations aren’t feasible. To connect out-of-path, use a straight-through Ethernet cable from the appliance’s Primary port to the LAN switch.
Cabling in-path deployments
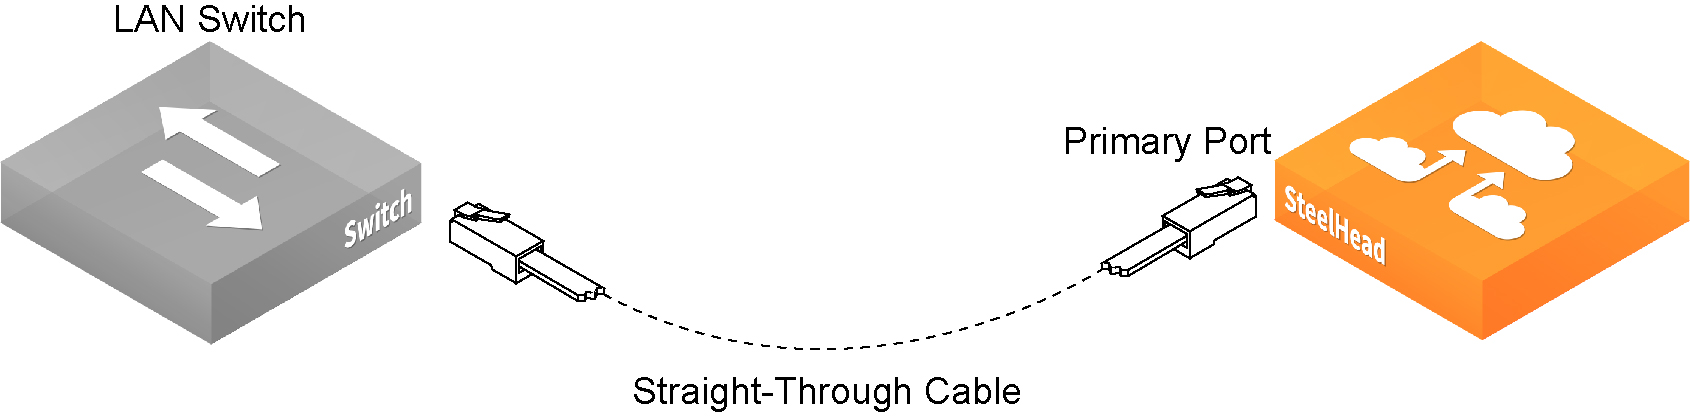
1. Plug the straight-through cable into the primary port of the appliance and the LAN switch. This can be any port on your LAN switch configured to connect to a host.
Connecting the primary port to the LAN switch
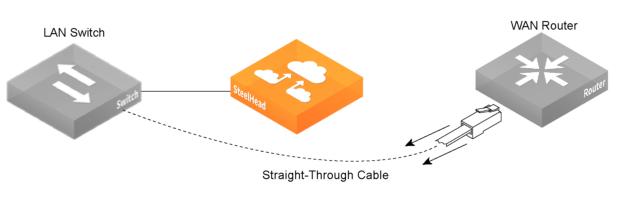
2. Identify the straight-through cable that connects your LAN switch to your WAN router. Unplug the end connected to the WAN router.
Disconnecting the WAN router
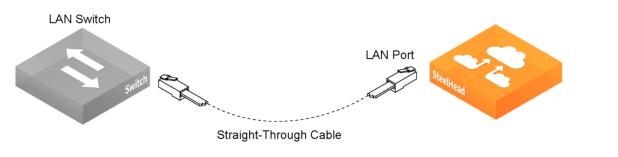
3. Plug the straight-through cable that you disconnected from the WAN router into the LAN port of the appliance.
Connecting the LAN switch to the LAN port
4. Using the provided crossover cable, plug the cable into the WAN port of the appliance and the WAN router. This must be a crossover cable.
Connecting the WAN port to the WAN router
Cabling out-of-path deployments
Plug the straight-through cable into the primary port of the appliance and the LAN switch. This can be any port on your LAN switch that is configured to connect to a host.
Connecting the primary port and LAN switch
About first-time configuration
To set up your appliance for the first time, you’ll need to complete an initial configuration using the setup wizard. This requires connecting a monitor to the appliance. Once the initial configuration is complete, you can access the graphical user interface (GUI), also known as the Management Console, for further configuration.
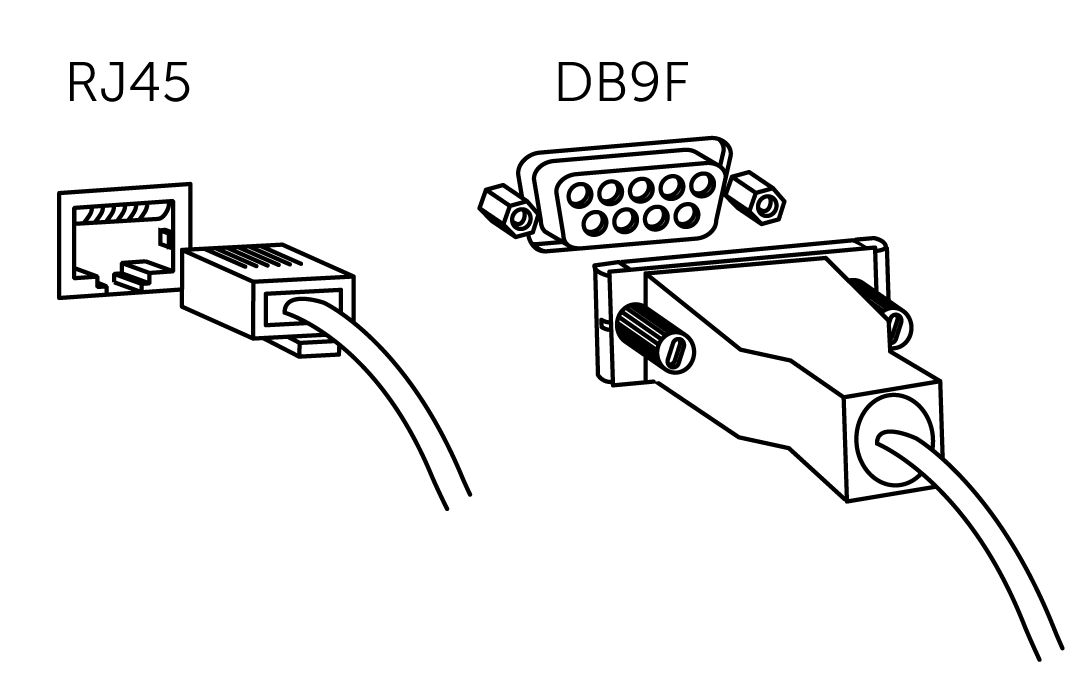
To access the configuration wizard and the command-line interface (CLI), connect a monitor and establish a serial connection using a terminal emulator program. Depending on your appliance model, the console port is either a DB9M port or an RJ45 port. The appropriate console cable is included with your appliance.
Connecting to the appliance console port
The terminal device must have these settings:
• Baud rate: 9600 bps
The xx90 platforms use a Baud rate of 115200.
• Data bits: 8
• Parity: none
• Stop bits: 1
• VT100 emulation
• No flow control
If you’re connecting the appliance to a terminal server, make sure the terminal server uses hardware flow control on the port connected to the appliance.
While not required, it’s a good idea to connect the console port to a device that logs output—this can help with troubleshooting.
When you log in to the CLI for the first time, the configuration wizard will start automatically. The following checklist lists the parameters you’ll need to specify to complete the initial configuration of the appliance. Be prepared to provide values for these parameters.
Appliance | Parameter | Your value |
|---|
SteelHead (the Primary Interface) | Host name | |
IP address | |
Netmask | |
Default gateway (the WAN gateway) | |
DNS IP address | |
Domain name for the system | |
Administrator password | |
SMTP server IP address | |
Events and failures notification email address | |
Primary interface speed | |
Primary interface duplex | |
In-Path Deployments | In-path interface IP address | |
In-path netmask | |
In-path gateway | |
In-path: LAN interface speed | |
In-path: LAN interface duplex | |
In-path: WAN interface speed | |
In-path: WAN interface duplex | |
If you make a mistake while using the configuration wizard, you can restart it by entering the jump-start command in configuration mode. At each prompt, you can press Enter to enter the default value, press ? for help, or press Ctrl+B to return to the previous step.
Once you finish the initial configuration, it’s a good idea to check that the appliance is properly connected. For instructions, see
Verifying the appliance connections.Running the initial configuration wizard
1. Plug the serial cable into the Console port and a terminal.
2. Start your terminal emulation program.
3. Log in to the appliance as the default administrator user admin and enter the default password password. The configuration wizard automatically starts.
4. If you have a SteelHead Central Controller (SCC) appliance installed in your network to manage multiple SteelHead appliances, you can use it to automatically configure them. If you answer yes, the system prompts you for the SCC host name or IP address. The host name or IP address is used to contact the SCC. The default value is riverbedcmc. If you enter no, the wizard continues.
5. Complete the configuration wizard steps on the client-side and the server-side SteelHeads as described in this table.
Wizard prompt | Description |
|---|
Step 1: Host name? | Enter the host name for the SteelHead. |
Step 2: Use DHCP on the primary interface? | You are given the option to enable the DHCP to automatically assign an IP address to the primary interface for the SteelHead. We recommend that you don’t set DHCP. The default value is no. |
Step 3: Primary IP address? | Enter the IP address for the SteelHead. |
Step 4: Netmask? | Enter the netmask address. |
Step 5: Default gateway? | Enter the default gateway for the SteelHead. |
Step 6: Primary DNS server? | Enter the primary DNS server IP address. |
Step 7: Domain name? | Enter the domain name for the network where the SteelHead is to reside. If you set a domain name, you can enter host names in the system without the domain name. |
Step 8: Use DHCPv6 on primary interface? | You are given the option to enable the DHCPv6 to automatically assign an IP address to the primary interface for the SteelHead. The default value is no. |
Step 9: Primary IPv6 address? | Enter the IPv6 address for the primary interface on the SteelHead. |
Step 10: Primary IPv6 prefix length? | Enter the IPv6 prefix length for the primary interface on the SteelHead. |
Step 11: Default gateway IPv6? | Enter the IPv6 default gateway for the SteelHead. |
Step 12: Admin password? | We strongly recommend that you change the default administrator password at this time. The password must be a minimum of six characters. The default administrator password is password. |
Step 13: SMTP server? | Enter the name of the SMTP server. External DNS and external access for SMTP traffic is required for email notification of events and failures to function. Make sure that you provide a valid SMTP server to ensure that the email notifications for events and failures can be sent. |
Step 14: Notification email address? | Enter a valid email address to which notification of events and failures are to be sent. |
Step 15: Set the primary interface speed? | Enter the speed on the primary interface (that is, the SteelHead). Make sure that this value matches the settings on your router or switch. The default value is auto. |
Step 16: Set the primary interface duplex? | Enter the duplex mode on the primary interface. Make sure that this value matches the settings on your router or switch. The default value is auto. |
Step 17: Would you like to activate the in-path configuration? | Enter yes at the system prompt to configure in-path support. An in-path configuration is a configuration in which the SteelHead is in the direct path of the client and server. For detailed information about in-path configurations, see the SteelHead Deployment Guide. |
Step 18: In-Path IP address? | Enter the in-path IP address for the SteelHead. |
Step 19: In-Path Netmask? | Enter the in-path netmask address. |
Step 20: In-Path Default gateway? | Enter the in-path default gateway (the WAN gateway). |
Step 21: Set the in-path: LAN interface speed? | Enter the in-path, LAN interface speed. Make sure that this value matches the settings on your router or switch. The default value is auto. |
Step 22: Set the in-path: LAN interface duplex? | Enter the in-path, LAN duplex value. Make sure that this value matches the settings on your router or switch. The default value is auto. |
Step 23: Set the in-path: WAN interface speed? | Enter the in-path, WAN interface speed. Make sure that this value matches the settings on your router or switch. The default value is auto. |
Step 24: Set the in-path: WAN interface duplex? | Enter the in-path, WAN duplex speed. Make sure that this value matches the setting on your router or switch. The default value is auto. |
6. Press Enter to confirm and save your configuration settings.
7. Enter the exit command to log out of the system.
If you need to restart the wizard, enter these commands:
enable
configure terminal
configuration jump-start
Verifying the appliance connections
1. Check the status lights to verify that the appliance is connected properly.
2. From a remote LAN-side system, connect to the CLI.
ssh admin@<host>.<domain>
–or–
ssh admin@<ip-address>
3. Enter these ping commands to verify the connections:
ping -I <primary-ip-address> <primary-default-gateway>
ping -I <inpath-ip-address> <address-on-lan-side>
ping -I <inpath-ip-address> <address-on-wan-side>
Next steps
After you complete the initial configuration, you can further configure the appliance through the Management Console. For details, see the user guide for your product.
You can also use the command-line interface. For details, see the Riverbed Command-Line Interface Reference Manual.