Rack Mounting Appliances
Before you begin rack mounting appliances, ensure your site meets these basic requirements:
• A standard electronic environment where the ambient temperature doesn’t exceed 40°C (104°F) and the relative humidity doesn’t exceed 80% (non-condensing).
• Ethernet connections are available within the standard Ethernet limit.
• There’s available space on a two-post or four-post 19-inch Telco-type mounting rack. 2U and 3U systems require a four-post rack. If your rack requires special mounting screws, contact your rack manufacturer.
• A clean power source is available, dedicated to computer devices and other electronic equipment. You can’t connect an appliance directly to multiphase outlets. You must use a rack PDU or power strip that provides the appropriate three-prong outlet (hot/neutral/ground).
All appliances ship completely assembled, with all the equipment parts in place and securely fastened. If any items are damaged or missing, contact Support immediately for replacements. Depending on your order, your shipping carton contains these items:
• The appliance
• One rack mounting kit
• One or two standard Ethernet straight-through cables
• One or two standard Ethernet crossover cables
• One serial null-modem cable
• One or two power cables
Aside from country-specific requirements, all systems ship with the same power cable. The power cable has an IEC 60320 C13 plug on one end (to connect to the appliance) and a country-specific plug that fits the wall socket for that country. If a system has two power supplies, it ships with two suitable cables.
You must always connect the appliance using either the cable in the accessories box or another cable that is approved for use by the IEC in the country in which the appliance is connected.
About safety guidelines
Follow the safety precautions outlined in the Safety and Compliance Guide when installing and setting up your equipment.
Failure to follow these safety guidelines can result in injury or damage to the equipment. Mishandling of the equipment voids all warranties. Read and follow safety guidelines and installation instructions carefully.
Many countries require the safety information to be presented in their national languages. If this requirement applies to your country, consult the Safety and Compliance Guide. The guide contains the safety information in many languages. Before you install, operate, or service Riverbed products, you must be familiar with the safety information associated with them.
About square post-hole adapters
Rack cabinets may have either square or circular holes in their vertical posts. If needed, you can use the included adapters to convert square holes to fit standard screws. To do this, squeeze the top and bottom of the adapter and insert it into the square hole from the inside of the rack post.
Installing a square post-hole adapter
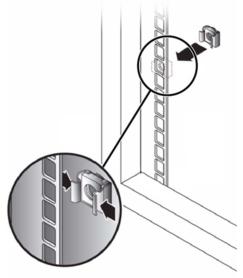
If needed, the kits include M5 screws and funnel-shaped washers (see
Figure: Screw kits). Use them to install the outer rails behind the rail posts with square holes. The outer rails are installed behind the rail posts with square holes. The washers are designed to fit perfectly into the square holes of the rack.
About rack mounting kits
Each appliance comes with a rack mounting kit (RMK) tailored to its size—desktop, 1U, or 2U. Some kits include sliding rails that allow the appliance to slide in and out of the rack for easy maintenance. Most kits also include screws and washers for attaching brackets or rails and securing the appliance to the rack. The type of screws provided depends on the specific RMK included.
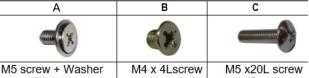
Screw kits
All kit part numbers begin with “RMK-”. The following table lists the kits available for each hardware platform. Contact Riverbed Support if you need to order replacement parts.
Platform and CX series | Included rack mounting kit |
|---|
2U xx90 | RMK-5-2U |
2U xx80, xx00 | RMK-4-2U
RMK-4-JBOD |
1U xx90 | RMK-5-1U (ordered separately) |
1U xx80 | RMK-4-1U
RMK-4-3080 |
Desktop x90 | RMK-5-DT |
Desktop x80 | RMK-4-DT |
Rack mounting kits for 2U appliances
The 2U xx90 appliances use the RMK-5-2U kit, which contains:
• Two sliding rails.
• One sliding rail screw kit: two M4 x 4L screws. For figures of screws, see
Figure: Screw kits above.
The 2U xx80 appliances use the RMK-4-2U kit, which contains:
• Two sliding rails.
• One sliding rail screw kit: eight M5 screw-and-washer pairs, and two M5 x 20L screws. For figures of screws, see
Figure: Screw kits above.
Rack mounting kits for 1U appliances
The 1U xx90 appliances optionally use the RMK-5-1U kit, which contains:
• Two sliding rails.
• One sliding rail screw kit: four M5 x25L screws, and two M4 x 6L screws. For figures of screws, see
Figure: Screw kits above.
The 1U 3080 appliances include the RMK-4-3080 kit, which contains:
• Front and rear mounting brackets.
All other 1U xx80 appliances use the RMK-4-1U, which contains:
• Two sliding rails.
• One sliding rail screw kit: eight M5 screw-and-washer pairs, four M4 x 4L screws, and two M5 x 20L screws.
Rack mounting kits for desktop appliances
All desktop models come with front ear brackets and a set of screws attaching the brackets to the appliance and securing the appliance (with ear brackets attached) to the rack. For mounting instructions, see
Reference: Figures for Rack Mounting Desktop Appliances.About rack mounting appliances
Rack mounting 2U appliances (RMK-5-2U)
For figures illustrating the installation procedure, see
Reference: Figures for Rack Mounting 2U Appliances.1. To install the inner rails to the chassis, pull out the inner rail from the rail assembly until it stops. Press the white tab to release the latch and draw the inner rail completely out.
3. Secure the inner rail to the side of the chassis with the included M4 x 4L screw.
4. Repeat Steps 1 through 3 to attach the inner rail to the other side of the appliance.
5. To attach the outer rails to the rack, open the latch at the front of the outer rail. Align the square stud with a square hole in the rack. Push it in fully, then close the latch to lock it. Repeat this step for the rear of the outer rail.
6. With the inner rails fully extended, pull the release tab and slide the chassis into the rack. (Tip: To make installation easier, you can remove all the HDD trays before you insert the chassis into the rack.)
7. When the appliance is fully inserted, you'll hear the rack ears click into place.
Rack mounting 2U appliances (RMK-4-2U)
For figures illustrating the installation procedure, see
Reference: Figures for Rack Mounting 2U Appliances.1. Pull out the inner rail from the rail assembly. When the rail comes to a stop, pull the tab to release the latch and completely extend the inner rail to its full length.
2. Align the inner sliding rail on the side of the appliance and pull it towards the arrow to secure the hooks.
3. Repeat
Step 1 and
Step 2 to attach the inner sliding rail to the other side of the appliance.
4. Attach the outer rails to the inner side of the rack post using eight M5 screws and eight washers. For figures of screws, see
About rack mounting kits. Ensure that you:
– Install the outer rails from behind the posts with square holes.
– Use the included washers as they have the shape of a funnel that fits in the square hole.
5. With the inner rails fully extended, pull the tab to release the latch and push the appliance in.
6. Attach the mounting ears of the appliance to the rack using the included screws.
Rack mounting 1U appliances (RMK-5-1U)
For figures illustrating the installation procedure, see
Reference: Figures for Rack Mounting 1U Appliances.1. Pull out the inner rail from the rail assembly. When the rail comes to a stop, pull the tab to release the latch and completely extend the inner rail to its full length.
2. Align the inner sliding rail on the side of the appliance, and pull towards the arrow to secure the hooks.
3. Secure the inner sliding rail to the appliance using one M4 x 6L screw. For figures of screws, see
About rack mounting kits.
4. Repeat
Step 1 through
Step 3 to secure the sliding rail to the other side of the appliance.
5. Before mounting the outer rail to the rack, release the safety latch on the outer rail by sliding it back.
6. To attach the outer rail to the rack, insert the rail stag into the upper and lower holes of the rack, then slide the safety lock forward to secure.
Rack mounting 1U appliances (RMK-4-3080)
For figures illustrating the installation procedure, see
Reference: Figures for Rack Mounting 1U Appliances.1. Attach the mounting ears to both side of the appliance using the included screws. Each ear bracket requires four screws.
2. Secure the chassis mounting ears to the front of the rack with the included screws, two on each side.
3. From the back of the rack, slide the rail onto the appliance, making sure the center of the rail aligns with the center screws on the side of the appliance.
4. Facing the back of the rack, attach the back rail to the rack using the two included screws on each side of the appliance.
Rack mounting 1U appliances (RMK-4-1U)
For figures illustrating the installation procedure, see
Reference: Figures for Rack Mounting 1U Appliances.1. Attach the mounting ears to each side of the appliance using the included screws.
2. Pull out the inner rail from the rail assembly.
3. When the rail comes to a stop, pull the tab to release the latch and completely extend the inner rail to its full length.
4. Align the inner sliding rail on the side of the appliance, and pull towards the arrow to secure the hooks.
5. Secure the inner sliding rail to the appliance using one M4 x 4L screw. For figures of screws, see
About rack mounting kits.
6. Repeat
Step 2 through
Step 5 to secure the sliding rail to the other side of the appliance.
7. Attach the outer rails to the inner side of the rack post using eight M5 screws and eight washers. For figures of screws, see
About rack mounting kits. Ensure that you:
– Install the outer rails from behind the posts with square holes.
– Use the included washers as they have the shape of a funnel that fits in the square hole.
8. With the inner rails fully extended, pull the tab to release the latch and push the appliance in.
9. Attach the mounting ears of the appliance to the rack using the included screws.