Configuring Security Settings
About general security settings
You can prioritize local, RADIUS, and TACACS+ authentication methods for the system and set the authorization policy and default user for RADIUS and TACACS+ authorization systems under Administration > Security: General Settings.
Make sure to put the authentication methods in the order you want authentication to occur. If authorization fails using the first method, the next method is attempted, and so forth, until all the methods have been attempted.
To set TACACS+ authorization levels (admin or read-only) to allow certain members of a group to log in, add these attribute to users on the TACACS+ server:
service = rbt-exec {
local-user-name = "monitor"
}
where you replace monitor with admin for write access.
For details about setting up RADIUS and TACACS+ servers, see the SteelHead Deployment Guide.
Configuring general security settings
You configure general security settings under Administration > Security: General Settings. These configuration options are available under Authentication Methods:
Authentication Methods
Specifies the authentication method. Select an authentication method from the drop-down list. The methods are listed in the order in which they occur. If authorization fails on the first method, the next method is attempted, and so on, until all of the methods have been attempted.
For RADIUS/TACACS+, fallback only when servers are unavailable
Specifies that the SteelHead falls back to a RADIUS or TACACS+ server only when all other servers don’t respond. This is the default setting. You must select this option if you want a safety account login on AAA servers that are unreachable. When this feature is disabled, the SteelHead doesn’t fall back to the RADIUS or TACACS+ servers. If it exhausts the other servers and doesn’t get a response, it returns a server failure.
Safety Account
Creates a safety account so that admin/sys admin users can login to the SCC even if remote authentication servers are unreachable. A safety account increases security and conforms to Defense Information Systems Agency (DISA) requirements. Only the selected safety account will be allowed to login in cases where the AAA server isn’t reachable. (Only one user can be assigned to the safety account.) You can create a system administrator user under Administrator > Security: User Permissions. For details, see
About user permissions.
Safety Account User
Specifies the user from the drop-down list.
Authorization Policy
(Appears only for some Authentication Methods.) Specifies one of these policies from the drop-down list:
• Remote First—Check the remote server first for an authentication policy, and only check locally if the remote server doesn’t have one set. This is the default behavior.
• Remote Only—Checks the remote server.
• Local Only—Checks the local server. All remote users are mapped to the user specified. Any vendor attributes received by an authentication server are ignored.
Default User
Specifies the default user from the drop-down list.
About SCC security settings
SCC Security Settings are under Administration > Security: SCC Security. The settings there enable you to control automated connections to managed devices. You can set:
• the conditions under which you are automatically logged in the Management Console of managed appliances.
• the protocol used to connect to the Management Console of managed appliances, and whether to use the hostnames/IP addresses or the fully-qualified domain names (FQDN) of managed appliances.
• a common set of administration credentials for logging into all managed appliances.
• strict key verification to prevent rogue appliances. We recommend enabling this feature if appliances contain sensitive data.
Configuring SCC security settings
Optionally, choose one of these automatic sign-in options:
• Never—Disables the feature. You must separately log in to managed appliances.
• When logged in as administrator—You are automatically logged into those managed appliances where your current credentials match those of an administrator user account on the managed appliances.
• When logged in as the appliance registered user—You are automatically logged into those managed appliances where your current credentials match those of a user account on the managed appliances.
Optionally, specify the protocol and connection address type for connections to managed appliances:
• Always use HTTP—Connections to all managed appliances use this protocol.
• Always use HTTPS—Connections to all managed appliances use this protocol.
• Use HTTPS if enabled, otherwise HTTP—Connections use HTTPS for SSL-enabled managed appliances. For those that are not SSL-enabled, connections use HTTP.
• Use the Fully-Qualified Domain Name provided by the appliance—Connections use the FQDN of managed appliances, or the address registered on the SCC for the appliance when the FQDN isn’t available. The SCC resolves FQDNs to IP addresses.
• Use the IP address or hostname registered with the SCC—Connections use the IP addresses and hostnames that are registered on the SCC for the managed appliances.
Optionally, enable the use of a common set of credentials to log in to managed appliances and specify the username and password.
Optionally, enable strict key verification to prevent the SCC from inadvertently connecting with rogue appliances. If you select this option, the SCC doesn’t connect with appliances whose SSH public keys aren’t known by the SCC. The SCC requires you to enter the appliance SSH public key before allowing communication. Existing appliances with SSH public keys that aren’t trusted are disconnected when strict key verification is enabled.
About the SCC certificate authority service
SCC Certificate Authority settings are under Administration > Security: Certificate Authority. The SCC includes a certificate authority (CA) service that can function either as a private root CA or as an intermediate CA trusted within your organization. This service enables allows the SCC to issue the following types of certificates to managed appliances:
• Secure peering certificates
• Proxy certificates for SSL optimization
• Web proxy certificates for HTTPS traffic proxy.
Managing certificates for secure protocol optimization and HTTPS proxying can be complex and time-consuming. The SCC CA service helps simplify and automate this process through the SCC Management Console. With it, you can issue and manage secure peering certificates and set up trust relationships between appliances—all from a central location.
Using the SCC CA eliminates the need to configure secure peering on each appliance individually. When a managed appliance receives a certificate from the SCC CA, it automatically trusts other appliances with SCC-issued certificates, because the SCC CA becomes a trusted entity on that device.
The SCC CA only issues certificates and automatically signs them. To maintain security, it only uses certificates that it signs itself. You cannot submit a Certificate Signing Request (CSR) to the SCC CA through the Management Console. Also, to use this service, the CA purpose must be set to TRUE.
Here’s an example for a root certificate where the extension is a CA:
X509v3 extensions:
X509v3 Key Usage:
Digital Signature, Certificate Sign, CRL Sign
X509v3 Basic Constraints: critical
CA:TRUE
X509v3 Subject Key Identifier:
8F:XX:A1:E6:XX:FC:D4:DD:XX:XX:04:05:D5:07:9B:6C:XX:XX:FA:B.1.3.6.1.4.1.31
Configuring the certificate authority service
1. Enable the certificate authority (CA) service.
2. Select the amount of cipher bits for the certificate key. Higher-bit ciphers provide stronger security.
3. Select a signing algorithm. Higher-number algorithms provide stronger security.
4. Apply your changes.
The details of the CA service’s certificate and keys appear. You can view certificate details, view the keys in PEM format, and replace certificate and its keys with private those from a third-party CAs or by generating a new set of keys and self-signed certificate.
About third-party CA certificates
You can import trusted third-party CA-signed public certificates and their private keys in PEM format. You can import by uploading local files, or by copy and pasting the PEM content into the provided text box. You’ll also need to provide the password for decrypting the private key.
Generating new CA certificates
You can replace an existing set of private keys and self-signed certificate by generating a new set.
1. Select the Replace tab.
2. Choose to generate a new key and certificate.
3. Select the amount of cipher bits for the certificate key. Higher-bit ciphers provide stronger security.
4. Enter certificate details such as a common name, organization name, unit, locality, administrator email address, and a duration in days after which the certificate expires.
5. Generate your new key and certificate.
About the trusted CA store
You can manage trusted certificate authorities (CAs) under Administration > Security > Trusted CA Store. This page lets you import signed certificates or full certificate chains from trusted third-party CAs into the SCC’s CA service. You can also update the trusted root store by clicking Update in the SSL Certificate Authorities Update section.
For SSL certificate verification to work properly, the complete certificate chain must be available. You can import root certificates on their own or as part of a full chain. The Trusted CA Store maintains a secure list of trusted CA certificates, which are used to verify any end-user certificates imported into the SCC.
The role of the SCC CA—whether as a root or intermediate CA—depends on how its certificate is signed. A self-signed certificate means it acts as a root CA; if it’s signed by another CA, it functions as an intermediate CA.
To import intermediate CAs, you have two options:
• Add the CA's public certificate to the trusted store, then import the end-user certificate from the SCC Certificate Authority page.
• Import the entire certificate chain from the same page, making sure the end-user certificate is listed first in the chain.
Updating the trusted root store
Under SSL Certificate Authorities Update, click Update.
Importing certificates into the trusted store
1. Expand Import new certificate.
2. Optionally, enter a display name to help identify the certificate on this SCC.
3. Select whether you want to import the certificate from a local file or enter the certificate text.
About user permissions
You can manage user permissions—including changing administrator or monitor passwords and defining role-based management (RBM) users—in the User Permissions page.
The system uses RBM roles to control what actions a user can perform:
• Admin—Has full access to the system. Admins can change configuration settings, manage users, restart services, reboot the SteelHead, and view performance and system reports. Admins can also assign or remove the administrator role from other users, but not from themselves.
• Monitor—Can view reports, view user logs, and change their own password. However, monitor users cannot change settings, access private keys, view system logs, or manage cryptographic modules.
You can also create new users, assign passwords, and define their permissions by assigning them RBM roles. These roles determine the level of access for specific features:
• Read-only—Can view configuration settings but cannot make changes.
• Read/Write—Can view and modify settings.
• Deny—Cannot view or change settings for the feature.
Menu items in the interface adjust automatically based on the user’s permissions. If a user tries to access a feature they don’t have rights to, they’ll be redirected to the User Permissions page.
Restricted policy visibility for RBM users
With SCC 9.7 and later, administrators and system administrators can restrict editing and deleting of policies in groups for which RBM users don’t have access under Administration > Security: User Permissions. RBM users can still view and edit the policies associated with the groups for which they have access. RBM users with only read/write access to a group can view and edit the policies associated for that group. This feature is disabled by default.
• If RBM users create a new policy by copying an existing policy for which they have deny access to, they can still view the existing policy’s configurations in the new policy they created.
• RBM users with deny access to a group can’t view the policies associated with that group from the Manage > Policy page.
• RBM users with read-only access to a group can only view the policies associated with that group from the Manage > Policy page. Read-only users can’t edit policies.
• RBM users with read/write permissions to a group can view, modify, and delete the policies associated to that group.
• RBM users can‘t edit or attach a policy to an accessible group if that policy is already attached to a group for which the user doesn’t have read/write permission.
You configure policy visibility restrictions when you add a new user account and select Policy Visibility Restricted. This feature is disabled by default.
Upgrade behavior
If you upgrade from a previous version of SCC and there are shared policies between groups that have independent and shared RBM users, the policies will continue to be visible to both types of users between the group the policy shares.
Combining permissions by feature
RiOS 9.0 and later require additional user permissions for hybrid networking features. For example, to change a QoS rule, a user needs read/write permission for the Network Settings role, read/write permission for QoS, and read/write permission for policy pushes.
RiOS 9.0 and later contain these changes to the user permission requirements.
Management Console page | Feature
(to configure or change this feature) | Required settings for read permission | Required settings for
read/write permission |
|---|
Manage > Topology: Sites & Networks | Networks | Network Settings Read-Only | Network Settings read/write Policy Push read/write |
Sites | Network Settings Read-Only QoS/Path Selection Read-Only | Network Settings read/write Policy Push read/write QoS/Path Selection read/write |
Manage > Applications: App Definitions | Applications | Network Settings Read-Only | Network Settings read/write Policy Push read/write |
Manage > Services: Quality of Service | Enable QoS | Network Settings Read-Only | Network Settings read/write QoS/Path Selection read/write Policy Push read/write |
Manage QoS Per Interface | Network Settings Read-Only | Network Settings read/write QoS/Path Selection read/write Policy Push read/write |
QoS Profile | QoS/Path Selection Read-Only | QoS/Path Selection read/write Policy Push read/write |
Manage > Services: QoS Profile Details | QoS Profile Name | QoS/Path Selection Read-Only | QoS/Path Selection read/write Policy Push read/write |
QoS Classes | QoS/Path Selection Read-Only | QoS/Path Selection read/write Policy Push read/write |
QoS Rules | QoS/Path Selection Read-Only | Network Settings read/write QoS/Path Selection read/write Policy Push read/write |
Manage > Services: Path Selection | Enable Path Selection | Network Settings Read-Only | Network Settings read/write Policy Push read/write |
Path Selection Rules | Network Settings Read-Only QoS/Path Selection Read-Only | Network Settings read/write QoS/Path Selection read/write Policy Push read/write |
Uplink Status | Network Settings Read-Only QoS/Path Selection Read-Only Reports read/write | — |
Manage > Topology: Clusters | Interceptor Clusters | Network Settings Read-Only | Interceptor/Cluster Settings read/write Policy Push read/write |
SCC roles and permissions
The SCC supports role-based administration privileges, allowing you to create specific privilege levels for network administrators, backup administrators, help-desk support, and IT management. In addition, the SCC supports integration with a RADIUS or TACACS server for single sign-on.
You can set these roles and permissions for the SCC:
SCC Settings
Manages the SCC features: for example, host settings, network settings and reports.
AAA Configurations
Authenticates and authorizes SCC users.
Group roles and permissions
You can set these group roles and permissions for the SCC:
Global
Configures Global group settings.
<group>
Configures the <group> settings.
You configure user permissions under Administration > Security: User Permissions. Click admin or monitor to expand the page. These configuration settings are available under Capability-Based Accounts:
admin/monitor
Modifies the admin and monitor accounts. Click the right arrow.
Clear Login Failure Details
Clears the account log in failure details and closes the fields for changing the password.
Change Password
Enables password protection. Password protection is an account control feature that allows you to select a password policy for more security. When you enable account control on the Administration > Security: Password Policy page, a user must use a password. When a user has a null password to start with, the administrator can still set the user password with account control enabled. However, once the user or administrator changes the password, it can’t be reset to null as long as account control is enabled.
• Password—Specify a password in the text box.
• Password Confirm—Retype the new administrator password.
Enable Account
Activates the account. Clear the check box to disable the administrator or monitor account. When enabled, you may make the account the default user for RADIUS and TACACS+ authorization. You may only designate one account as the default user. Once enabled, the default user account may not be disabled or removed. The Accounts table displays the account as permanent.
Allow Policy Push for Non-Admin Connected Appliances
Enables administrator users to perform configuration pushes to appliances connected with nonadministrator role-based management users, provided the nonadministrator role-based management users have read/write privileges on the appliance.
Add a New Account
Displays the controls for adding a new user account and defining the user permissions.
Account Name
Specifies a name for the role-based account.
Password
Specifies a password in the text box, and then retype the password for confirmation.
Enable Account
Enables the new account.
Make this The AAA Default User (for RADIUS and TACACS+ logins)
Makes the user the default AAA user to provide strict AAA access for RADIUS and TACACS+ logins.
Policy Visibility Restricted
Restricts viewing, editing, and deleting of policies in groups for which RBM users don’t have access.
• Users with deny access to a group can’t view the policies associated with that group from the Manage->Policy page.
• Users with read-only access to a group can only view the policies associated with that group from the Manage > Policy page. Read-only users can’t edit policies.
• Users can‘t view or attach a policy to an accessible group if that policy is already attached to a group for which the user doesn’t have read/write permission.
Users can still view and edit the policies associated with the groups for which they have access. Users with only read/write access to a group can view and edit the policies associated for that group.
User Roles
Creates system administrator or role-based management accounts for users.
Administrator
Creates a system administrator account for the user. This is an administrator account with full access to configurations and reports on this appliance. This account can also be used to create, edit, and remove user accounts. Create a system administrator account to increase security and to conform to Defense Information Systems Agency (DISA) requirements.
In cases where an AAA server isn’t reachable and the admin user or system administrator isn’t able to login, you can create a safety account in the Administrator > Security: General Settings page. For details, see
Configuring general security settings.
RBM User
Select to create a role based management user and apply permissions for each role below.
• CMC (SCC) Settings—Manages the SCC features: for example, host settings, network settings and reports.
• AAA Configurations—Authenticates and authorizes SCC users.
Groups Global
Configures Global group permissions.
Appliance Management
Controls appliance upgrades, policy pushes, and so forth.
• Appliance Upgrade—Configures permissions for appliance upgrade.
• File Transfer—Configures permissions for file transfers on managed appliances.
• Non Admin Connected Appliance's Policy—Enables administrator users to perform configuration pushes to appliances connected with nonadministrator role-based management users, provided the nonadministrator role-based management users have read/write privileges on the appliance. Note, if the push fails, verify if the nonadministrator role-based management user has the required permissions to modify the page that’s being pushed on the appliance and on the SCC: for example, to push QoS changes the user must also have read/write permissions for Role Based Accounts > Appliance Management Roles > Optimization Settings > QoS/Path Selection.
• SteelHead Backup—Configures permissions for SteelHead backups on managed appliances.
• Operation Status—Configures permissions for operation status on managed appliances.
• CLI Commands—Configures permissions for CLI commands to managed appliances.
Appliance Settings
Manages appliance permissions, such as cluster configuration, host settings, network settings, and so forth.
• Interceptor/Cluster Settings—Configures permissions for Interceptor clusters. You must also include the Policy Push role.
• General Settings—Configures permissions for general system settings.
• Network Settings—Configures permissions for topology definitions, site and network definitions, application definitions, host interface settings, network interface, DNS cache, hardware assist rules, host labels, and port labels. You must include this role for users configuring path selection or enforcing QoS policies in addition to the QoS and Path Selection roles.
• Reports—Configures permissions for reports.
• Basic Diagnostics—Configures permissions for basic diagnostic reports.
• SteelFusion Branch Storage Device Service—Configures permissions for SteelFusion Branch.
• TCP Dumps—Configures permissions for TCP Dump.
Appliance AAA Configuration Security Settings
Configures security permissions, including RADIUS and TACACS authentication settings and the secure vault password.
Optimization Settings
Manages appliance optimization setup.
• SteelHead In-Path Rules—Configures permissions for TCP traffic for optimization and optimizing traffic with in-path rules. This role includes WAN visibility to preserve TCP/IP address or port information. For details about WAN visibility, see the SteelHead Deployment Guide.
• QoS/Path Selection—Configures permissions for QoS policies and path selection. You must also include the Network Settings role for QoS and path selection.
Application Optimization Policies
Configures optimization permissions for different applications.
• Optimization Service—Configures permissions for alarms, performance features, SkipWare, HS-TCP, and TCP optimization.
• CIFS Optimization—Configures permissions for CIFS optimization settings (including SMB signing) and Overlapping Open optimization.
• HTTP Optimization—Configures permissions for enhanced HTTP optimization: URL learning, parse and prefetch, object prefetch table, keepalive, insert cookie, file extensions to prefetch, and the ability to set up HTTP optimization for a specific server subnet. Note that HTTP optimization is currently unavailable in cloud appliance models. This feature may become available in future releases of those models.
• Oracle Forms Optimization—Configures permissions for Oracle E-business application content and forms applications.
• MAPI Optimization—Configures permissions for MAPI and sets Exchange and NSPI ports.
• SQL Optimization—Configures permissions for SQL optimization.
• NFS Optimization—Configures permissions for NFS optimization.
• Notes Optimization—Configures permissions for Lotus Notes optimization.
• Citrix Optimization—Configures permissions for Citrix optimization.
• SSL Optimization—Configures permissions for SSL support and the secure inner channel.
• Domain Authentication—Configures permissions for joining a Windows domain and configuring Windows domain authentication.
Branch Services
Specifies branch services permissions.
Proxy File Service (PFS)
Configures permissions for a virtualized environment on the client SteelHead. The functionality can include third-party packages such as a firewall security package, a streaming video server, or a package that provides core networking services (for example, DNS and DHCP). This role includes permission to install VMware tools and add subnet side rules.
Add
Adds your settings to the system.
Configuring password policy
You can change the password policy and strength in the Password Policy page.
Selecting a password policy
To enforce password policies, select the Enable Account Control check box. This makes password use mandatory and immediately expires all existing passwords, requiring users to create new ones that meet the defined password policy. From that point on, all passwords are governed by the policy settings.
Passwords will also expire after the number of days specified by the administrator on the Password Policy page. When a user tries to log in with an expired password, the system shows an Expired Password page prompting them to create a new password. After doing so, they are automatically logged in to the Management Console. Empty passwords are not allowed when account control is enabled.
Depending on your security requirements, you can populate password policy values by selecting between the Strong or Basic Security Template and clicking the desired template. Selecting a template automatically fills in secure settings.
Strong
Sets the password policy to more stringent enforcement settings. Selecting this template automatically prepopulates the password policy with stricter settings commonly required by higher security standards such as for the Department of Defense.
Basic
Reverts the password policy to its predefined settings so you can customize your policy. Under the Basic template, the system prompts users to change their password every 60 days, and locks them out after 300 days without a password change.
Once locked out, only an administrator can unlock the account. For details, see
Unlocking an account.Setting a password policy
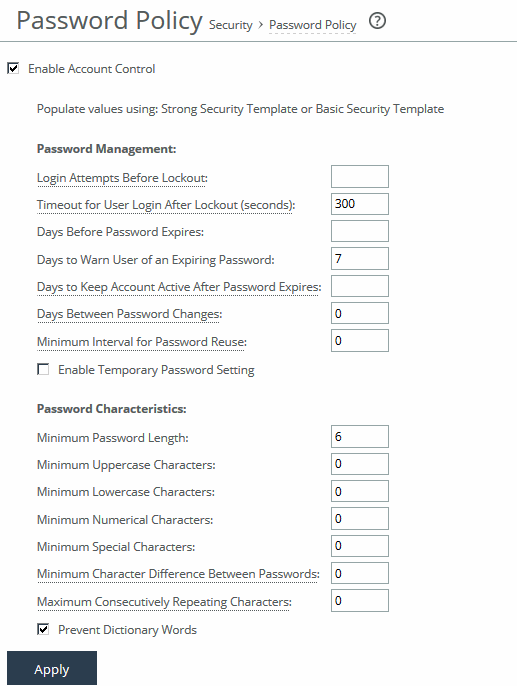
These configuration options are available under Password Management:
Login Attempts Before Lockout
Specifies the maximum number of unsuccessful login attempts before temporarily blocking user access to the SteelHead appliance. The user is prevented from further login attempts when the number is exceeded. The default for the strong security template is 3. The lockout expires after the amount of time specified in Timeout for User Login After Lockout elapses.
Timeout for User Login After Lockout
Specifies the amount of time, in seconds, that must elapse before a user can attempt to log in after an account lockout due to unsuccessful login attempts. The default for the strong security template is 300.
Days Before Password Expires
Specifies the number of days the current password remains in effect. The default for the strong security template is 60. To set the password expiration to 24 hours, specify 0. To set the password expiration to 48 hours, specify 1. Leave blank to turn off password expiration.
Days to Warn User of an Expiring Password
Specifies the number of days the user is warned before the password expires. The default for the strong security template is 7.
Days to Keep Account Active After Password Expires
Specifies the number of days the account remains active after the password expires. The default for the strong security template is 305. When the time elapses, RiOS locks the account permanently, preventing any further logins.
Days Between Password Changes
Specifies the minimum number of days before which passwords can’t be changed.
Minimum Interval for Password Reuse
Specifies the number of password changes allowed before a password can be reused. The default for the strong security template is 5.
Enable Temporary Password Setting
Specifies a temporary password to meet security best practices and DISA requirements. This option is only available if Account Control is enabled. When a temporary password is used, the password set by an Admin or System Admin will expire upon the user’s first login. The user will see a Password Expired page and be required to create a new password.
This applies both to new users and to existing users whose passwords have been reset by an Admin or System Admin. In both cases, the temporary password will expire immediately after the first login, prompting the user to change it.
These configuration options are available under Password Characteristics:
Minimum Password Length
Specifies the minimum password length. The default for the strong security template is 14 alphanumeric characters.
Minimum Uppercase Characters
Specifies the minimum number of uppercase characters required in a password. The default for the strong security template is 1.
Minimum Lowercase Characters
Specifies the minimum number of lowercase characters required in a password. The default for the strong security template is 1.
Minimum Numerical Characters
Specifies the minimum number of numerical characters required in a password. The default for the strong security template is 1.
Minimum Special Characters
Specifies the minimum number of special characters required in a password. The default for the strong security template is 1.
Minimum Character Differences Between Passwords
Specifies the minimum number of characters that must be changed between the old and new password. The default for the strong security template is 4.
Maximum Consecutively Repeating Characters
Specifies the maximum number of times a character can occur consecutively.
Prevent Dictionary Words
Prevents the use of any word that’s found in a dictionary as a password. By default, this control is enabled.
Unlocking an account
RiOS temporarily locks out an account after a user exceeds the configured number of login attempts.
Account lockout information appears on the User Permissions page.
When an account is locked out, the lockout ends after either the configured lockout time elapses, or the administrator unlocks the account. RiOS never locks out administrator accounts.
To unlock an account log in as an administrator (admin).
Under Administration > Security: User Permissions, click Clear Login Failure Details.
When the user logs in to their account successfully, RiOS resets the login failure count.
Resetting an expired password
RiOS temporarily locks out an account when its password expires. Passwords expire for one of these reasons:
• An administrator enables Account Control.
• The expiration time for a password elapses.
• An administrator disables a user account and then enables it.
• An administrator uses a CLI command to encrypt a password.
After a user password expires, the user must update their password within the number of days specified in Days to Keep Account Active After Password Expires. The default value is 305 days. After the time elapses, RiOS locks the account permanently, preventing any further logins.
To reset the password and unlock the account, log in as an administrator (admin). Under Administration > Security: User Permissions, click Clear Login Failure Details. Type and confirm the new password and click Change Password.
Setting RADIUS servers
You set RADIUS server authentication under Administration > Security: RADIUS. RADIUS is an access control protocol that uses a challenge and response method for authenticating users. Setting up RADIUS server authentication is optional. Enabling this feature is optional.
You can prioritize local, RADIUS, and TACACS+ authentication methods for the system and set the authorization policy and default user for RADIUS and TACACS+ authorization systems in the Security > General Settings page.
Setting RADIUS and adding RADIUS servers
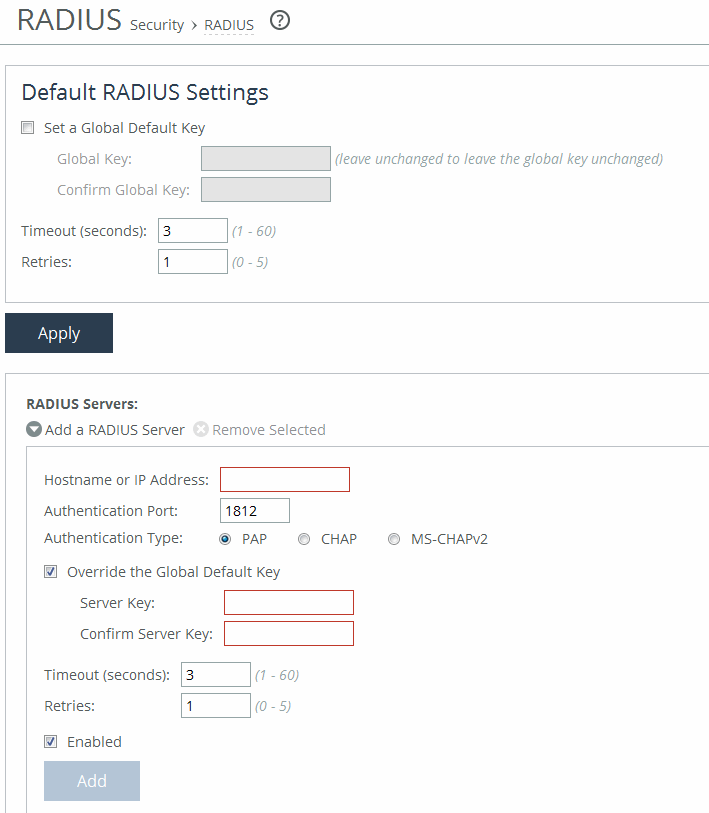
These configuration options are available under Default RADIUS Settings:
Set a Global Default Key
Enables a global server key for the RADIUS server.
Global Key
Specifies the global server key.
Confirm Global Key
Confirms the global server key.
Timeout
Specifies the time-out period in seconds (1 to 60). The default value is 3.
Retries
Specifies the number of times you want to allow the user to retry authentication. The default value is 1.
Add a RADIUS Server
Displays the controls to add a RADIUS server.
Hostname or IP Address
Specifies the hostname or server IP address. The IP address can be either IPv4 or IPv6. For IPv6 specify an IP address using this format: eight 16-bit hexadecimal strings separated by colons, 128-bits. For example: 2001:38dc:0052:0000:0000:e9a4:00c5:6282
You don’t need to include leading zeros. For example: 2001:38dc:52:0:0:e9a4:c5:6282
You can replace consecutive zero strings with double colons (::). For example: 2001:38dc:52::e9a4:c5:6282
Authentication Port
Specifies the port for the server.
Authentication Type
Specifies one of these authentication types:
• PAP—Password Authentication Protocol (PAP), which validates users before allowing them access to the RADIUS server resources. PAP is the most flexible protocol but is less secure than CHAP.
• CHAP—Challenge-Handshake Authentication Protocol (CHAP), which provides better security than PAP. CHAP validates the identity of remote clients by periodically verifying the identity of the client using a three-way handshake. This validation happens at the time of establishing the initial link and might happen again at any time. CHAP bases verification on a user password and transmits an MD5 sum of the password from the client to the server.
• MS-CHAPv2—MS-CHAP is the Microsoft version of CHAP. MS-CHAPv2 is a more secure authentication protocol than PAP or CHAP. (CHAP uses MD5 while MS-CHAPv2 uses MD4 and SHA-1 which might not be FIPS compliant.)
Override the Global Default Key
Overrides the global server key for the server.
• Server Key—Specify the override server key.
• Confirm Server Key—Confirm the override server key.
Timeout
Specifies the time-out period in seconds (1 to 60). The default value is 3.
Retries
Specifies the number of times you want to allow the user to retry authentication. Valid values are from 0 to 5. The default value is 1.
Enabled
Enables the new server.
Add
Adds the RADIUS server to the list.
To modify RADIUS server settings, click the server IP address in the list of radius servers. Use the Status drop-down list to enable or disable a server in the list.
Configuring TACACS+ access
You set up TACACS+ server authentication under Administration > Security: TACACS+. TACACS+ is an authentication protocol that allows a remote access server to forward a login password for a user to an authentication server to determine whether access is allowed to a given system. Enabling this feature is optional.
You can prioritize local, RADIUS, and TACACS+ authentication methods for the system and set the authorization policy and default user for RADIUS and TACACS+ authorization systems in the Security > General Settings page.
For details about configuring RADIUS and TACACS+ servers to accept login requests from the SteelHead, see the SteelHead Deployment Guide.
Setting TACACS+ and adding TACACS+ servers
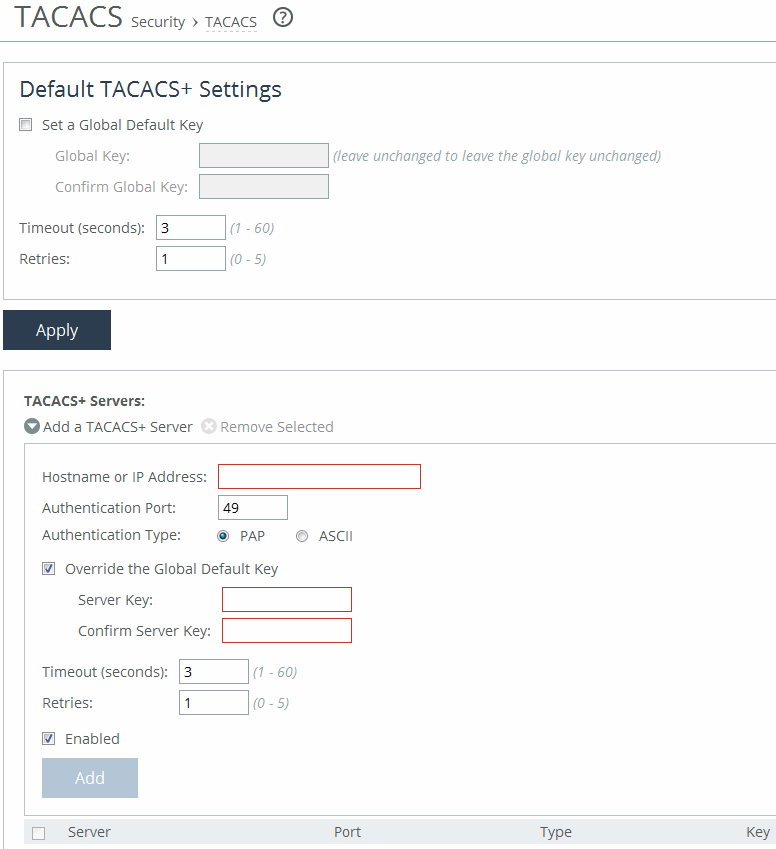
These configuration options are available under Default TACACS+ Settings:
Set a Global Default Key
Enables a global server key for the server.
Global Key
Specifies the global server key.
Confirm Global Key
Confirms the global server key.
Timeout
Specifies the time-out period in seconds (1 to 60). The default value is 3.
Retries
Specifies the number of times you want to allow the user to retry authentication. Valid values are from 0 to 5. The default is 1.
Add a TACACS+ Server
Displays the controls for adding a TACACS+ server.
Hostname or IP Address
Specifies the hostname or server IP address.
Authentication Port
Specifies the port for the server. The default value is 49.
Authentication Type
Specifies either PAP or ASCII as the authentication type. The default value is PAP.
Override the Global Default Key
Overrides the global server key for the server.
Server Key
Specifies the override server key.
Confirm Server Key
Confirms the override server key.
Timeout
Specifies the time-out period in seconds (1 to 60). The default is 3.
Retries
Specifies the number of times you want to allow the user to retry authentication. Valid values are from 0 to 5. The default is 1.
Enabled
Enables the new server.
Add
Adds the TACACS+ server to the list.
Configuring SAML
You set up SAML under Administration > Security: SAML.
Security Assertion Markup Language (SAML) 2.0 is an XML-based standard used for authentication between an SCC and an identity provider (IdP). It allows integration with additional authentication methods, such as multi-factor authentication using Common Access Cards (CAC) or Personal Identity Verification (PIV).
When a login request is received, the SCC first checks if local login is available. If it is, the user is authenticated using local credentials. However, if SAML is enabled, local AAA-based authentication is disabled, and the SCC redirects the login request to the IdP. The IdP then authenticates the user, confirms their identity to the SCC, and redirects the user back to the SCC, which then grants access.
SAML authentication process
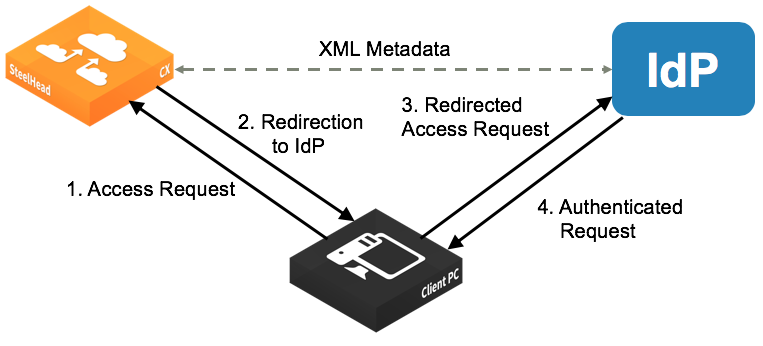
To enable IdP authentication, both the SCC and the identity provider (IdP) must be configured with XML metadata. This metadata identifies each appliance and establishes a trust relationship between the SCC and the IdP.
Administrators must create user accounts on the IdP to allow login access. These users must also match user accounts on the SCC. You can use a one-to-one mapping, where each IdP user has a corresponding SCC account with defined permissions. Alternatively, multiple IdP users can be mapped to a single SCC account, such as the admin account, though this approach reduces individual control.
Before enabling SAML on any appliance, you must configure the IdP individually for each one, because each appliance requires unique IdP metadata.
SAML can be enabled in two ways: directly on a single appliance through its SAML settings page, or by configuring SAML in a policy that is pushed to multiple appliances.
You must be logged in as the administrator to enable SAML.
Configuring IdP
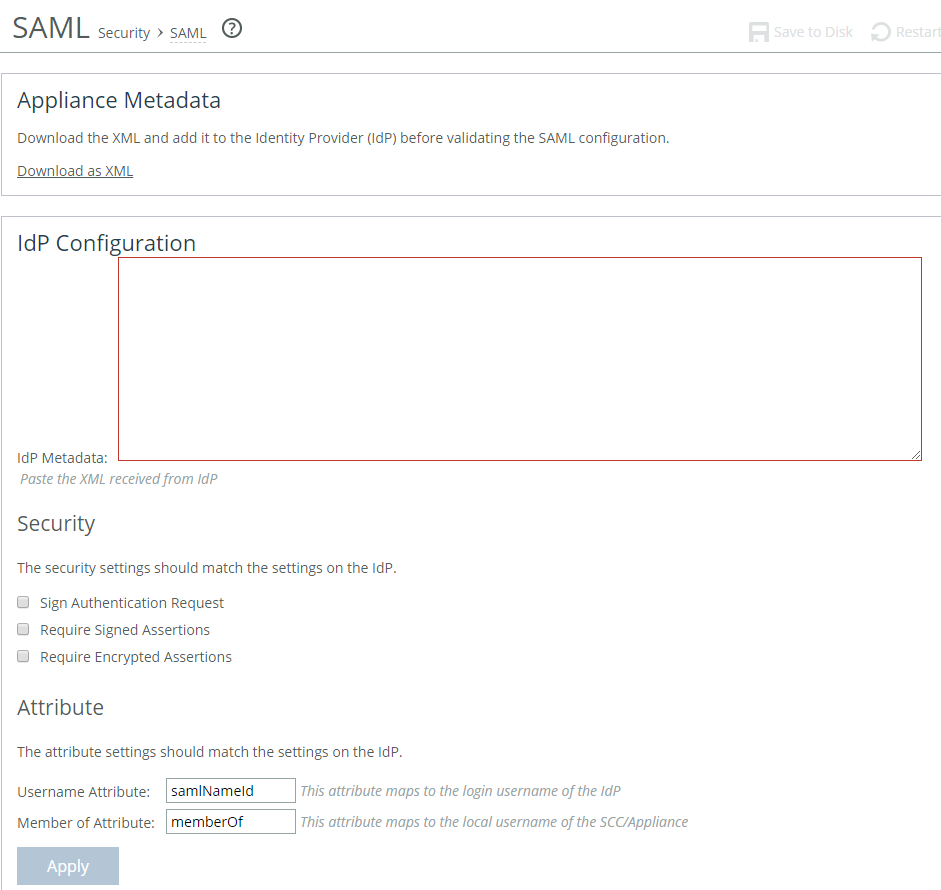
Under Download SteelCentral Controller Metadata, select Download XML to download the SCC metadata in XML format. The sp_metadata.xml file downloads to your local machine.
Configure SCC in your IdP. Refer to the documentation for your IdP for specific instructions. In general, you complete these steps:
• Log in to the IdP website.
• Upload the metadata from the sp_metadata.xml file and provide any other required details.
• When the configuration is complete, download the IdP metadata.
In the SCC Management console, under SAML > IdP Configuration, these SAML request and response settings are available:
IdP Metadata
Where you paste the IdP metadata you copied or received from the IdP website.
Security Settings Sign Authentication Request
Indicates SCC sign the SAML authentication request sent to the identity provider. Signing the initial login request sent by SCC allows the identity provider to verify that all login requests originate from a trusted service provider.
Security Settings Requires Signed Assertions
Indicates the SAML assertions must be signed. Some SAML configurations require signed assertions to improve security.
Security Settings Requires Encrypted Assertions
Indicates to the SAML identity provider that SCC requires encrypted SAML assertion responses. When this option is selected, the identity provider encrypts the assertion section of the SAML responses. Even though all SAML traffic to and from SCC is already encrypted by the use of HTTPS, this option adds another layer of encryption.
Attribute User Name Attribute
Specifies the name of the IdP variable that carries the username of the user. The user name attribute is mandatory and must be sent by your identify provider in the SAML response to align the login with a configured SteelHead account. Default value is samlNameId.
Attribute Member of Attribute
Specifies the name of the IdP variable that carries the role of the user. The default value is memberOf.
After you apply the changes, click Validate under Validate the IdP Configuration. The IdP Validation window appears.
Click Go to IdP. The IdP login page opens. Log in to the IdP website. The page indicates if your IdP configuration was successful.
After successful validation, return to the SAML page in the management console and select the Enable SAML check box and click Apply.
If the validation status on the SCC page does not update after a successful validation, reload the page to refresh the status.
With SAML enabled, all web login requests are redirected to the IdP.
If you make changes to the SAML settings after you validate the IdP configuration, you need to validate again with the new settings and enable SAML again.
Usage Notes
SAML authentications are only available in the Management Console web interface; they are not available through the CLI. Users can log in to a SAML-enabled SCC through the CLI but they are authenticated using the local, RADIUS, or TACACS+ authentication methods. We recommend that you set strong passwords for Riverbed appliances.
Troubleshooting
• If a user who has not been set up in the IdP tries to log in to the SCC, the login fails on the IdP login page. (This failed login is not tracked in the SCC logs.) Log in to SCC through CLI.
• If the user has been set up but their user role has not been defined in the IdP, the login succeeds but the SCC displays an error page (instead of the dashboard). Log in to SCC through CLI.
• If you cannot log in using SAML (for example, if the IdP server is unavailable), you can log in through the CLI and disable SAML using the no aaa saml enable command. Once SAML is disabled, you revert to the previously configured authentication method for the web interface. For command details, see the Riverbed Command-Line Interface Reference Guide.
• If SAML stopped working, in the Administration > Security: SAML page, click Apply. SAML authentication will be disabled for SCC. Then click Validate. The error message displayed can help you identify and fix the problem.
Unlocking the secure vault
You can unlock and change the password for the secure vault under Administration > Security: Secure Vault. The secure vault stores sensitive elements of the SCC configuration, such as SSL private keys and the RiOS data store encryption key. This data is always encrypted on disk using AES 256-bit encryption.
By default, the secure vault uses a system-known password that allows it to unlock automatically during startup. However, if you change this password, the vault will no longer unlock automatically. In such cases, you must manually unlock the vault to enable SSL optimization or use RiOS data store encryption.These configuration options are available under Unlock Secure Vault:
Password
Specifies a password. Click Unlock Secure Vault. Initially the secure vault is keyed with a default password known only to the RiOS software. This enables the system to automatically unlock the vault during system start up. You can change the password, but the secure vault doesn’t automatically unlock on startup. To optimize SSL connections or to use RiOS data store encryption, you must unlock the secure vault.
Unlock Secure Vault
Unlocks the vault.
These configuration options are available under Change Password:
Current Password
Specifies the current password. If you’re changing the default password that ships with the product, leave the text box blank.
New Password
Specifies a new password for the secure vault.
New Password Confirm
Confirms the new password for the secure vault when you retype it.
Change Password
Changes the password to the new value.
Configuring a management ACL
You can secure access to an SCC using an internal management Access Control List (ACL) under Administration > Security: Management ACL. SCCs are subject to the network policies defined by a corporate security policy, particularly in large networks. Using an internal management ACL, you can:
• restrict access to certain interfaces or protocols of an SCC.
• restrict inbound IP access to an SCC, protecting it from access by hosts that don’t have permission without using a separate device (such as a router or firewall).
• specify which hosts or groups of hosts can access and manage an SCC by IP address, simplifying the integration of SteelHeads into your network.
The management ACL provides these safeguards to prevent accidental disconnection from the SteelHead, the SCC, and the embedded Shark feature:
• It detects the IP address you’re connecting from and displays a warning if you add a rule that denies connections to that address.
• It always allows the default SteelHead ports 7800, 7801, 7810, 7820, and 7850.
• It always allows a previously connected SCC to connect and tracks any changes to the IP address of the SCC to prevent disconnection.
• It converts well-known port and protocol combinations, such as SSH, Telnet, HTTP, HTTPS, SNMP, and SOAP into their default management service and protects these services from disconnection: for example, if you specify protocol 6 (TCP) and port 22, the management ACL converts this port and protocol combination into SSH and protects it from denial.
• It tracks changes to default service ports and automatically updates any references to changed ports in the access rules.
You set up a management ACL under Administration > Security: Management ACL. Select Enable Management ACL to enable the management ACL.
Configuring management ACL and adding new rules
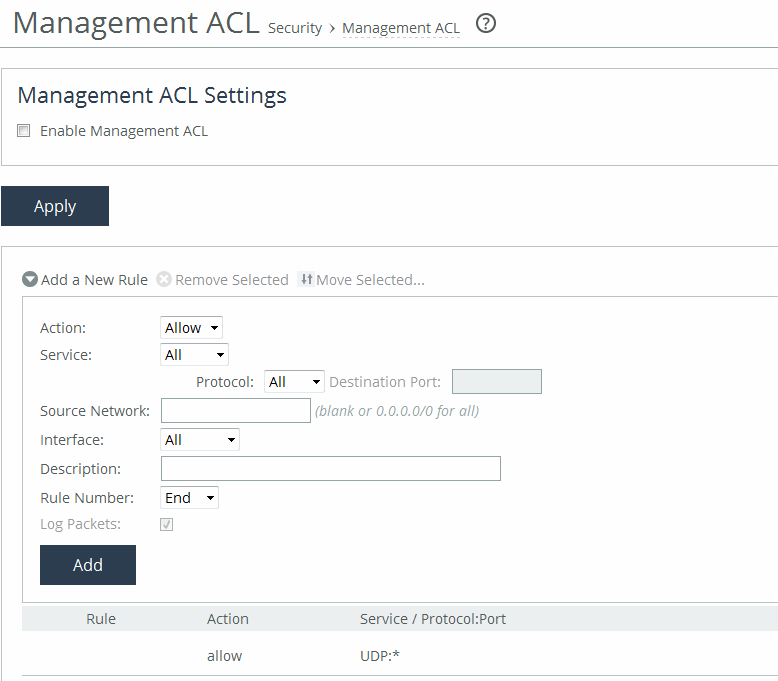
Adding ACL management rules
The management ACL (Access Control List) defines rules for handling inbound IP packets based on specified match conditions. Each rule determines whether to allow or deny access to packets that meet those conditions. When you configure a rule on an SCC, the destination is the SCC itself, and the source is a remote host attempting access.
The ACL includes a set of default rules that support essential branch service features in RiOS, such as DNS caching, by allowing traffic on necessary ports. It also contains default rules that permit access to the SCC and the embedded Shark feature.These configuration options are available under Management ACL Settings:
Add a New Rule
Displays the controls for adding a new ACL rule.
Action
Specifies one of these rule types from the drop-down list:
• Allow—Allows a matching packet access to the SteelHead. This is the default action.
• Deny—Denies access to any matching packets.
Service
Indicates Specify Protocol, or HTTP, HTTPS, SOAP, SNMP, SSH, Telnet. When specified, the Destination Port is dimmed.
Protocol
(Appears only when Service is set to Specify Protocol.) Specifies All, TCP, UDP, or ICMP from the drop-down list. The default setting is All. When set to All or ICMP, the Service and Destination Ports are dimmed.
Source Network
Specifies the source subnet of the inbound packet: for example, 1.2.3.0/24.
Destination Port
Specifies the destination port of the inbound packet, either a single port value or a port range of port1-port2, where port1 must be less than port2. Leave it blank to specify all ports.
Interface
Specifies an interface name from the drop-down list. Select All to specify all interfaces.
Description
Describes the rule to facilitate administration.
Rule Number
Specifies the position of an ACL rule in the evaluation order. You select a number from a drop-down list, and by default, the rule is added at the end of the table—just above the default rule.
SteelHeads evaluate rules sequentially, starting with rule 1. When a packet arrives, the system checks it against each rule in order:
• If a rule matches, it is applied, and the system stops evaluating further rules.
• If a rule does not match, the system moves to the next rule.
The default rule, which is always listed last, is Allow. It permits all traffic not previously matched by any other rule. This default rule cannot be removed.
Log Packets
Tracks denied packets in the log. By default, packet logging is enabled.
Add
Adds the rule to the list. The Management Console redisplays the Rules table and applies your modifications to the running configuration, which is stored in memory.
If you add, delete, edit, or move a rule that could disconnect connections to the SCC, a warning message appears. Click Confirm to override the warning and allow the rule definition anyway. Use caution when overriding a disconnect warning.
Usage notes
• When you change the default port of services, such as SSH, HTTP, HTTPS, on either the client or server-side SCC and create a management ACL rule denying that service, the rule will not work as expected. The SCC on the other end (either server or client) of an in-path deployment doesn’t know that the default service port has changed, and consequently optimizes the packets to that service port. To work-around this problem, add a pass-through rule to the client-side SCC for the management interfaces. The pass-through rule prevents the traffic from coming from the local host when optimized.
• A management ACL rule that denies access from port 20 on the server-side SCC in an out of-path deployment prevents data transfer using active FTP. In this deployment, the FTP server and client can’t establish a data connection because the FTP server initiates the SYN packet and the management rule on the server-side SCC blocks the SYN packet. To work-around this problem use passive FTP instead of active FTP. With passive FTP, the FTP client initiates both connections to the server. Alternately, you can add a rule to either allow source port 20 on the server-side SteelHead or allow the IP address of the FTP server.
For detailed information about restoring default rule settings for PPS, see the SteelHead User Guide.
Configuring web settings
You can configure web user interface settings under Administration > Security: Web Settings.
You can also manage SSL certificates used by the SCC in the Web Settings page:
• View certificate details.
• View certificate in PEM format.
• Replace a signed certificate by importing a certificate and private key or generating a self-signed certificate and new private key.
• Generate a certificate signing request (CSR).
These configuration options are available under Web Settings:
Default Web Login ID
Specifies the username that appears in the authentication page. The default value is admin.
Web Inactivity Timeout
Specifies the number of idle minutes before time-out. The default value is 15. A value of 0 disables the inactivity time-out. If the maximum session count is exceeded, the last recently used session will be expired regardless of its idle time.
The web session inactivity time-out and the CLI interface inactivity time-out are configured separately:
To set the CLI interface inactivity time-out for the current and future login sessions run the cli default auto-logout <minutes> command.
• To set the CLI interface inactivity time-out for the current session only run the cli session auto-logout <minutes> command.
• To view the CLI settings run the show cli command.
Allow Session Timeouts When Viewing Auto-Refreshing Pages
Stops the automatic updating of the report pages when the session times out. This option is enabled by default.
Disabling this feature poses a security risk. When you disable this feature, you are logged in indefinitely on pages that are automatically refreshed, such as reports.
You manage web certificates under Administration > Security: Web Settings. The Web Settings page displays the identity certificate details.
These configuration options are available:
Issued To/Issued By
Specifies these options:
• Common Name—Specifies the common name of the certificate authority.
• Email—Specifies the organization email.
• Organization—Specifies the organization name (for example, the company).
• Locality—Specifies the city.
• State—Specifies the state.
• Country—Specifies the country.
Validity
Specifies these options:
• Issued On—Specifies the date the certificate was issued.
• Expires On—Specifies the date the certificate expires.
Fingerprint
Specifies the SSL fingerprint.
Key
Specifies these options:
• Type—Specifies the key type.
• Size—Specifies the sizes in bytes.
To view the certificate in PEM format, under Web Certificate, select the PEM tab. The certificate appears in PEM format.
To replace an existing certificate, under Web Certificate, select the Replace tab, and complete these configuration options:
Import Certificate and Private Key
Imports the certificate and key. The page displays controls for browsing to and uploading the certificate and key files. You can also use the text box to copy and paste a PEM file. The private key is required regardless of whether you’re adding or updating the certificate.
Certificate
Specifies the action:
• Upload—Browse to the local file in PKCS-12, PEM, or DER formats.
• Paste it here (PEM)—Copy and then paste the contents of a PEM file.
Private Key
Specifies the private key origin.
• The Private Key is in a separate file (see below)—You can either upload it or copy and paste it.
• This file includes the Certificate and Private Key
• The Private Key for this Certificate was created with a CSR generated on this appliance.
Separate Private Key
Specifies the action:
• Upload (PEM or DER formats)—Browse to the local file in PEM or DER formats.
• Paste it here (PEM only)—Paste the contents of a PEM file.
Decryption Password
Specifies the decryption password, if necessary. Passwords are required for PKCS-12 files, optional for PEM files, and never needed for DER files.
Import Certificate and Key
Imports the certificate and key.
Generate Self-Signed Certificate and New Private Key
Generates a new private key and self-signed public certificate:
• Organization Name—Specify the organization name (for example, the company).
• Organization Unit Name—Specify the organization unit name (for example, the section or department).
• Locality—Specify the city.
• State (no abbreviations)—Specify the state.
• Country (2-letter code)—Specify the country (2-letter code only).
• Email Address—Specify the email address of the contact person.
• Validity Period (Days)—Specify how many days the certificate is valid. The default value is 730.
Private Key Cipher Bits
Specifies the key length from the drop-down list. The default value is 1024.
Generate Certificate and Key
Generates a private key and CSR.
To generate a CSR, under Web Certificate, select the Generate CSR tab and complete these configuration options:
Common Name (required)
Specifies the common name (hostname) of the peer.
Organization Name
Specifies the organization name (for example, the company).
Organization Unit Name
Specifies the organization unit name (for example, the section or department).
Locality
Specifies the city.
State
Specifies the state. Don’t abbreviate.
Country (2-letter code)
Specifies the country (2-letter code only).
Email Address
Specifies the email address of the contact person.
Generate CSR
Generates the Certificate Signing Request.
Enabling REST API access
You enable access to the Riverbed REST API under Administration > Security: REST API Access.
REST (Representational State Transfer) is a framework for API design. REST builds a simple API on top of the HTTP protocol. It is based on generic facilities of the standard HTTP protocol, including the six basic HTTP methods (GET, POST, PUT, DELETE, HEAD, INFO) and the full range of HTTP return codes. You can discover REST APIs by navigating links embedded in the resources provided by the REST API that follow common encoding and formatting practices.
For detailed information about REST API calls, see the SteelHead User Guide.
Under REST API Access Settings, select the Enable REST API Access check box.
Before an appliance can access the REST API, you must generate an access code for the system to use to authenticate access under Administration > Security: REST API Access. These configuration options are available:
Add Access Code
Displays the controls for adding an access code.
Description of Use
Allows you to provide a description, such as the hostname or IP address of the appliance you’re using.
Generate New Access Code
Generates the new access code. Click Add to add the code to the running configuration. The access code is displayed in the table.
Import New Access Code
Allows you to copy and paste an existing access code in the text box.
Add
Adds the access code to the running configuration. The access code is displayed in the table.
Click the access code name to expand the page and display the access code.
Copy the access code from the text field into a text editor such as Notepad.
To use the access code in an external script, copy the access code copied from the Management Console REST API Access page into the configuration file of your external script.
The script uses the access code to make a call to the appliance/system to request an access token. The appliance/system validates the access code and returns an access token for use by the script. Generally, the access token is kept by the script for a session only (defined within your script), but note that the script can make many requests using the same access token. These access tokens have some lifetime—usually around an hour —in which they’re valid. When they expire, the access code must fetch a new access token. The script uses the access token to make REST API calls with the appliance/system.
Configuring an External Certificate
You configure external certificates under Administration > Security: External Certificate. The External Certificates page displays the certificate details.
The external certificate must be enabled on both the SteelHead and the managing SCC appliances at the same time. Enabling this feature on only the SteelHead or only the SCC will result in the appliances disconnecting until the external certificate is enabled on both.
These configuration options are available under External certificate configuration:
Enable the external certificate
Add the external certificate first before selecting this check box then click Apply.
The following options are available under Certificate:
Details:
Issued To/Issued By
Specifies these options:
• Common Name—Specifies the common name of the certificate authority.
• Email—Specifies the organization email.
• Organization—Specifies the organization name (for example, the company).
• Locality—Specifies the city.
• State—Specifies the state.
• Country—Specifies the country.
Validity
Specifies these options:
• Issued On—Specifies the date the certificate was issued.
• Expires On—Specifies the date the certificate expires.
Signature Algorithm
Specifies the signature algorithm.
Fingerprint
Specifies the SSL fingerprint.
Key
Specifies these options:
• Type—Specifies the key type. The default value is RSA.
• Size—Specifies the key size. The default value is 2048.
To view the certificate in PEM format, under Certificate, select the PEM tab. The certificate appears in PEM format.
Import
Imports the certificate and key. The page displays controls for browsing to and uploading the certificate and key files. You can also use the text box to copy and paste a PEM file. The private key is required regardless of whether you’re adding or updating the certificate.
Certificate
Specifies the action:
• Upload—Browse to the local file in PKCS-12, PEM, or DER formats.
• Paste it here (PEM)—Copy and then paste the contents of a PEM file.
To generate a CSR, under Certificate, select the Generate CSR tab and complete these configuration options:
Common Name (required)
Specifies the common name (hostname) of the peer.
Organization Name
Specifies the organization name (for example, the company).
Organization Unit Name
Specifies the organization unit name (for example, the section or department).
Locality
Specifies the city.
State
Specifies the state. Don’t abbreviate.
Country (2-letter code)
Specifies the country (2-letter code only).
Email Address
Specifies the email address of the contact person.
Generate CSR
Generates the Certificate Signing Request.