Configuring SSL and a Secure Inner Channel
This chapter describes how to configure SSL support. It includes these sections:
Configuring SSL server certificates and certificate authorities
This section provides an overview of SSL support and describes how to configure SSL server certificates and certificate authorities. SSL is a cryptographic protocol that provides secure communications between two parties over the internet.
Typically in a web-based application, it is the client that authenticates the server. To identify itself, an SSL certificate is installed on a web server and the client checks the credentials of the certificate to make sure it is valid and signed by a trusted third party. Trusted third parties that sign SSL certificates are called certificate authorities (CA).
How does SSL work?
With Riverbed SSL, appliances are configured to have a trust relationship, so they can exchange information securely over an SSL connection. SSL clients and servers communicate with each other exactly as they do without Riverbed appliances; no changes are required for the client and server application, nor are they required for the configuration of proxies. RiOS splits up the SSL handshake, the sequence of message exchanges at the start of an SSL connection.
In an ordinary SSL handshake, the client and server first establish identity using public-key cryptography, and then negotiate a symmetric session key to be used for data transfer. With Riverbed SSL acceleration, the initial SSL message exchanges take place between the client-side appliance and the server-side SteelHead.
Riverbed SSL
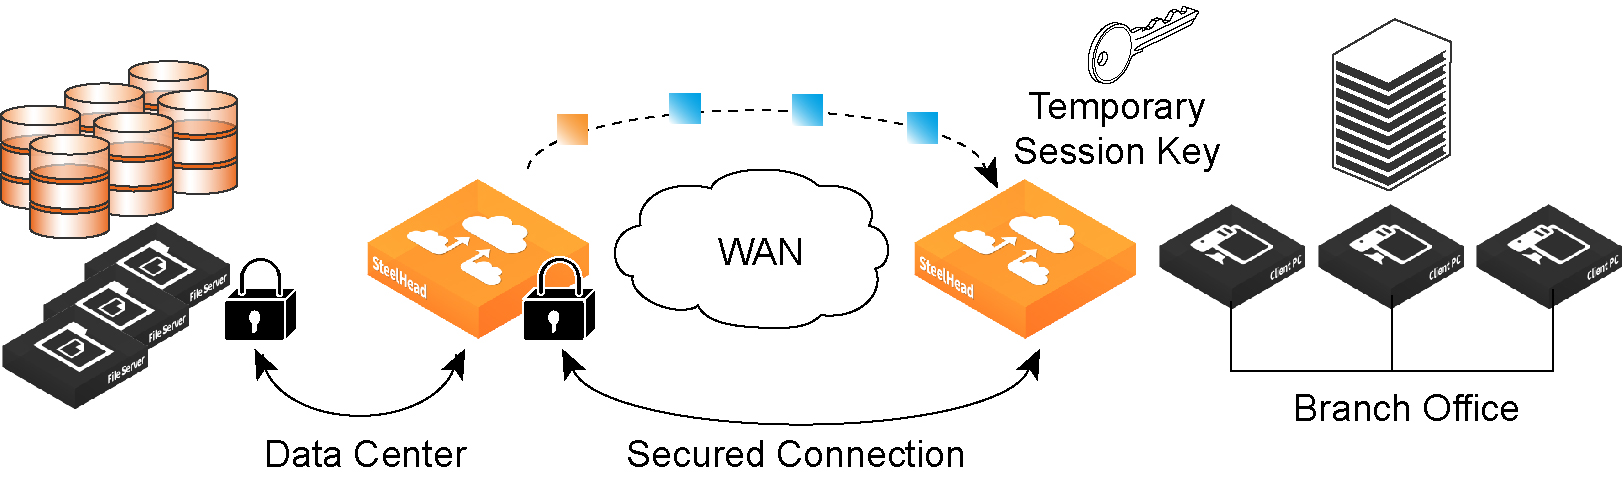
RiOS provides an alternative handshake, called distributed termination, which terminates full handshakes on the client-side appliance. The master secret containing information that allows the computation of the session key for reusing the session is transported to the session cache of the client-side appliance. The subsequent handshakes are reused and the client’s SSL connection is physically and logically terminated on the client-side appliance.
Distributed termination improves performance by lessening the CPU load because it eliminates expensive asymmetric key operations. It also shortens the key negotiation process by avoiding WAN roundtrips to the server. You can find the setting to reuse a client-side session for distributed termination in the Optimization > SSL: Advanced Settings page. See
Setting advanced SSL options.
RiOS provides client-side authentication, used to optimize SSL connections where the SSL server challenges the SSL client to present its own certificate, in addition to authenticating servers using SSL certificates. See
Configuring advanced and SSL cipher settings.
The appliance also contains a secure vault that stores all SSL server settings, other certificates (that is, the CA, peering trusts, and peering certificates), and the peering private key. The secure vault protects your SSL private keys and certificates when the appliance is not powered on. You set a password for the secure vault that is used to unlock it when the appliance is powered on. After rebooting the appliance, SSL traffic is not optimized until the secure vault is unlocked with the correct password. See
Unlocking the secure vault.
Prerequisite tasks
Complete these prerequisite tasks before you begin SSL configuration:
1. Connect to the Management Console using HTTPS to protect your SSL private keys and certificates.
2. On the client-side appliance and server-side SteelHead, make sure you have a valid Enhanced Cryptography License Key. To verify your license, see
Managing licenses and model upgrades. If you do not have a valid Enhanced Cryptography License Key file, go to https://sslcert.riverbed.com and follow the procedures documented there.
The SSL License is called the Enhanced Cryptographic License Key, because it also activates RiOS data store encryption and creates secure channels while optimizing encrypted MAPI and SMB-signed traffic (even if the appliances are not configured for optimizing SSL traffic).
3. Back up your private keys and the CA-signed certificates before you begin the SSL configuration process.
Basic steps
This section provides an overview of the basic steps to configure SSL, followed by detailed procedures.
Task | Reference |
1. Enable SSL support on the server-side SteelHead and client-side appliance. | |
2. Set the SSL secure vault password on the client-side appliance and server-side SteelHead. | |
3. Optionally, enable the appliance to reuse the client-side SSL session. This is a client-side setting that improves connection setup performance. Both the client-side appliance and the server-side SteelHead must be running RiOS 6.0 or later. Enabling this option requires an optimization service restart. Client-side session reuse is enabled by default. | |
4. On the server-side SteelHead, configure a proxy certificate and private key for the SSL back-end server. This step enables the server-side SteelHead to act as a proxy for the back-end server, which is necessary to intercept the SSL connection and to optimize it. | |
5. Create an in-path rule for the client-side appliance. In-path configurations - Create a client-side in-path rule with the Preoptimization Policy = SSL. If you want to enable the HTTP latency optimization module for connections to this server, you add a corresponding in-path rule with Latency Optimization Policy = HTTP. Out-of-path configurations - On the client-side appliance, add a new in-path rule to identify which connections are to be intercepted and applied to SSL optimization. Use these property values: •Type - Fixed target •Destination Subnet/Port - We recommend that you specify the exact SSL server IP address (for example, 10.11.41.14/32) and the default SSL port 443. •VLAN Tag - All •Preoptimization Policy - SSL •Data Reduction Policy - Normal •Latency Optimization Policy - HTTP Note: Latency optimization is not always HTTP, especially for applications that use the SSL protocol but are not HTTP based. In such cases, specify None for the latency optimization. •Neural Framing Mode - Always | |
6. Configure mutual peering trusts so the server-side SteelHead trusts the client-side appliance and vice versa. Use one of these approaches: Use the secure inner channel and peering lists: •To automatically discover appliances using self-signed certificates, open your secure application to send some traffic through the appliances. The connection is passed through to the server without optimization, but the appliances will automatically discover the peers and place them in the self-signed peer gray list. •Manually move the peers from the gray list to the trusted white list by simply marking them as trusted. The connections are not optimized until after you move the peers to the white list. •Reopen your secure application. —or— Add CA-signed peer certificates: •Add the PEM certificate of the designated CA as a new trusted entity to the peering trust list for each appliance. •For production networks with multiple appliances, use the SCC or the bulk import and export feature to simplify configuring trusted peer relationships. For details, see the SteelCentral Controller for SteelHead User Guide or Performing bulk imports and exports. Note: Your organization can choose to replace all of the default self-signed identity certificates and keys on their appliances with those certificates signed by another CA (either internal to your organization or an external well-known CA). In such cases, every appliance must simply have the certificate of the designated CA (that signed all those appliance identity certificates) added as a new trusted entity. | |
7. If your organization uses internal CAs to sign their SSL server certificates you must import each of the certificates (in the chain) on to the server-side SteelHead. You must perform this step if you use internal CAs because the SteelHead default list of well-known CAs (trusted by our server-side SteelHead) does not include your internal CA certificate. To identify the certificate of your internal CA (in some cases, the chain of certificate authorities) go to your web browser repository of trusted-root or intermediate CAs: for example, Internet Explorer > Tools > Internet Options > Certificates. | |
8. On the client-side appliance and server-side SteelHead, restart the optimization service. | |
Verifying SSL and secure inner channel optimization
Use these tools to verify that you have configured SSL support correctly:
•SSL Optimization - After completing the SSL configuration on both SteelHeads and restarting the optimization service, access the secure server from the web browser. These events take place in a successful optimization:
–If you specified a self-signed proxy certificate for the server on the server-side SteelHead, a pop-up window appears on the web browser. View the certificate details to ensure that it’s the same as the certificate on the server-side SteelHead.
–In the Management Console, the Current Connections report lists the new connection as optimized without a red protocol error.
–In the Management Console, the Traffic Summary report displays encrypted traffic (typically, HTTPS).
–Verify that the back-end server IP appears in the SSL Discovered Server Table (Optimizable) in the SSL Main Settings page.
Because all the SSL handshake operations are processed by the server-side SteelHead, all the SSL statistics are reported on the server-side SteelHead. No SSL statistics are reported on the client-side SteelHead.
•Monitoring SSL Connections - Use these tools to verify SSL optimization and to monitor SSL progress:
–On the client web browser, click the lock icon to obtain certificate details. The certificate must match the proxy certificate installed on server-side SteelHead.
–In the Current Connections report, verify the destination IP address, port 443, the Connection Count as Established (three yellow arrows on the left side of the table), SDR Enabled (three cascading yellow squares on the right side of the table), and that there’s no Protocol Error (a red triangle on the right side of the table).
–In the SSL Statistics report (on the server-side SteelHead only) look for connection requests (established and failed connections), connection establishment rate, and concurrent connections.
•Monitoring Secure Inner Channel Connections - Use these tools to verify that secure inner channels are in use for the selected application traffic types:
–In the Current Connections report, look for the lock icon and three yellow arrows, which indicate the connection is encrypted and optimized. If the lock icon is not visible or is dimmed, click the magnifying glass to view a failure reason that explains why the SteelHead is not using the secure inner channel to encrypt the connection. If there’s a red protocol error, click the magnifying glass to view the reason for the error.
–Search the client-side and server-side SteelHead logs for ERR and WARN.
–Check that both SteelHeads appear in the white peering trust list on the client-side and server-side SteelHeads, indicating that they trust each other.
For details about the secure inner channel, see
Secure inner channel overview.
•SSL Issues with Internet Explorer 6 and Oracle R12 - Previously, RiOS fixed a vulnerability found in CBC-based ciphers prior to versions 0.9.6e by inserting an empty frame on the wire to avoid a Chosen Plaintext Attack on cipher-block chaining (CBC) ciphers. Some versions of client and server applications do not understand the insertion of empty frames into the encrypted stream and close the connection when they detect these frames. Therefore, RiOS no longer inserts empty frames by default. Examples of applications that close the connection when they detect these empty frames are IE6 and Oracle R12. SharePoint under IIS has also exhibited this behavior.
The failure occurs when the SSL application fails to understand the data payload when either the client or server is using a block cipher using CBC mode as the chosen cipher. This failure can be with DES, AES, or 3DES using CBC. Note that when SteelHeads are deployed, the chosen cipher can be different than when the client is negotiating directly with the SSL server.
Because current web browsers do not protect themselves from this vulnerability, SteelHeads are no less secure than other vendor’s appliances. From a security perspective, fixing this vulnerability is the responsibility of a server, not a patched client.
To determine whether the SteelHeads are inserting empty frames to avoid an attack, capture TCP dumps on the server-side SteelHead LAN interface and look at the Server Hello message that displays the selected cipher. Verify that DES, AES, or 3DES is the cipher. Also, check for the existence of 32-byte length SSL application data (this is the empty frame) on the LAN traces, followed by an SSL Alert.
To change the default and insert empty frames, enter the CLI command no protocol ssl bug-work-around dnt-insrt-empty.
Configuring SSL main settings
You can configure SSL optimization in the Optimization > SSL: SSL Main Settings page. Enabling SSL allows you to accelerate encrypted traffic (for example, HTTPS).
The appliance securely decrypts, optimizes, and then reencrypts SSL traffic. To configure SSL support, you do not need to make configuration changes on the client and the server—clients continue connecting to the same server name or IP address.
To enable SSL
1. Choose Optimization > SSL: SSL Main Settings to display the SSL Main Settings page.
SSL Main Settings page
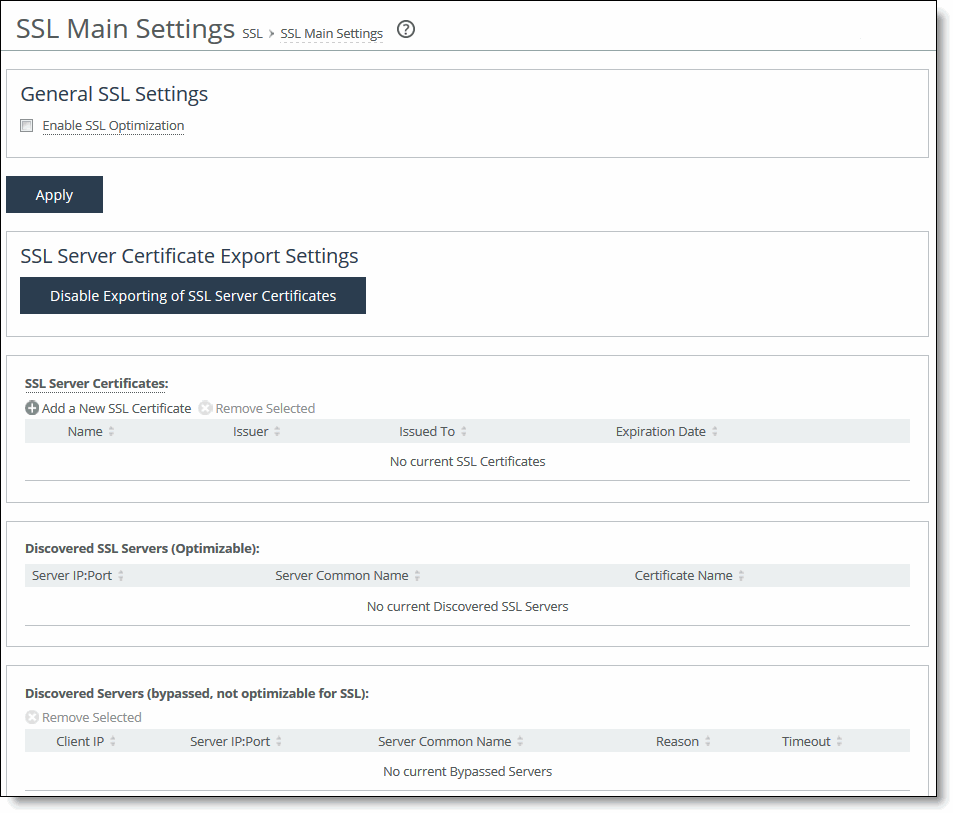
2. Under General SSL Settings, complete the configuration on both the client-side appliance and server-side SteelHead as described in this table.
Control | Description |
Enable SSL Optimization | Enables SSL optimization, which accelerates applications that use SSL to encrypt traffic. By default, this option is disabled. You can choose to enable SSL optimization only on certain sessions (based on source and destination addresses, subnets, and ports), or on all SSL sessions, or on no SSL sessions at all. An SSL session that is not optimized simply passes through the SteelHead unmodified. |
3. Click Apply to apply your settings.
4. Click Save to save your settings permanently.
Configuring SSL server certificates
You configure an SSL server certificate in the Optimization > SSL: SSL Main Settings page.
You do not need to add each server certificate individually. You need only add unique certificates to a certificate pool on the server-side SteelHead. When a client initiates an SSL connection with a server, the SteelHead matches the common name of the server’s certificate with one in its certificate pool. If it finds a match, it adds the server name to the list of discovered servers that are optimizable and all subsequent connections to that server are optimized.
If it does not find a match, it adds the server IP and port and client IP address (or wildcard) to the list of bypassed servers and all subsequent connections to that client-server pair are not optimized. The Discovered and Bypassed Server lists appear in the SSL Main Settings page.
The SteelHead supports RSA private keys for peers and SSL servers.
Optimization does not occur for a particular server IP address and port unless a suitable proxy server certificate is configured on the server-side SteelHead.
When you configure the back-end server proxy certificate and key on the server-side SteelHead, if you choose not to use the actual certificate for the back-end server and key, you can use a self-signed certificate and key or another CA-signed certificate and key. If you have a CA-signed certificate and key, import it.
If you do not have a CA-signed certificate and key, you can add the proxy server configuration with a self-signed certificate and key, back up the private key, generate a CSR, have it signed by a CA, and import the newly CA-signed certificate and the backed up private key.
To back up a single pair of certificate and key (that is, the peering certificate and key pair and a single certificate and key for the server), use the Export (in PEM format only) option. Make sure you check Include Private Key and enter the encryption password. Save the exported file that contains the certificate and the encrypted private key. For details, see
Configuring secure peers.
You can also simply use the generated self-signed certificate and key, but it might be undesirable because the clients by default do not trust it, requiring action from the end users.
To add an SSL server certificate
1. Choose Optimization > SSL: SSL Main Settings to display the SSL Main Settings page.
SSL Main Settings page
2. On the server-side SteelHead, under SSL Server Certificates, complete the configuration as described in this table.
Control | Description |
Add a New SSL Certificate | Displays the controls to add a new server certificate. |
Name | Specify a name for the proxy certificate (required when generating a certificate, leave blank when importing a certificate). |
Import Certificate and Private Key | Imports the certificate and key. The page displays controls for browsing to and uploading the certificate and key files. Or, you can use the text box to copy and paste a PEM file. The private key is required regardless of whether you are adding or updating the certificate. |
Certificate | Upload - Browse to the local file in PKCS-12, PEM, or DER formats. Paste it here (PEM) - Copy and then paste the contents of a PEM file. |
Private Key | Select the private key origin. •The Private Key is in a separate file (see below) - You can either upload it or copy and paste it. •This file includes the Certificate and Private Key |
Separate Private Key | Upload (PEM or DER formats) - Browse to the local file in PEM or DER formats. Paste it here (PEM only) - Paste the contents of a PEM file. Decryption Password - Specify the decryption password, if necessary. Passwords are required for PKCS-12 files, optional for PEM files, and never needed for DER files. Exportable - (Appears only when global exporting of SSL server certificates is enabled.) Allows the certificate and server key to be exported. This is the default setting. Disable this setting to make sure the private key doesn’t leave the SteelHead. |
Generate Self-Signed Certificate and New Private Key | Select this option to generate a new private key and self-signed public certificate. The page displays controls to identify and generate the new certificate and key. Common Name - Specify the common name of a certificate. To facilitate configuration, you can use wildcards in the name: for example, *.nbttech.com. If you have three origin servers using different certificates such as webmail.nbttech.com, internal.nbttech.com, and marketingweb.nbttech.com, on the server-side SteelHeads, all three server configurations can use the same certificate name *.nbttech.com. Organization Name - Specify the organization name (for example, the company). Organization Unit Name - Specify the organization unit name (for example, the section or department). Locality - Specify the city. State (no abbreviations) - Specify the state. Country (2-letter code) - Specify the country (two-letter code only). Email Address - Specify the email address of the contact person. Validity Period (Days) - Specify how many days the certificate is valid. |
Private Key | Cipher Bits - Select the key length from the drop-down list. The default is 2048. |
Add | Paste it here (PEM) - Paste the contents of a PEM file. |
Remove Selected | Select the check box next to the name and click Remove Selected. |
Preventing the export of SSL server certificates and private keys
The bulk export feature on the Optimization > SSL: Advanced Settings page allows you to export SSL server certificates and private keys. You can also select SSL server certificates for export individually in the Optimization > SSL: SSL Main Settings page. These features are useful to back up SSL configurations or move them to another appliance; however, security-conscious organizations might want to make SSL configurations nonexportable. You can ensure a secure SSL deployment by preventing your SSL server certificates and private keys from leaving the appliance.
Consider making SSL server certificates and private keys nonexportable with your particular security goals in mind. Before doing so, you must have a thorough understanding of its impact. Use caution and consider these limitations before making SSL configurations nonexportable:
•After disabling export on an appliance, you cannot reenable it unless you perform a factory reset on the appliance (losing the configuration) or clear the secure vault.
•After disabling export, you cannot export any preexisting or newly added server certificates and private keys to another appliance.
•After disabling export, any newly added server certificates and keys are marked as nonexportable.
•After disabling export and then downgrading a SteelHead to a previous RiOS version, you cannot export any of the existing server certificates and private keys. You can export any newly added server certificates and private keys.
•Disabling export prevents the copy of the secure vault content.
To prevent exporting of SSL server certificates and private keys
1. Choose Optimization > SSL: SSL Main Settings to display the SSL Main Settings page.
2. Under SSL Server Certificate Export Settings, click Disable Exporting of SSL Server Certificates.
The system reminds you that disabling export cannot be undone.
3. Click Disable Export.
4. Click Apply to apply your settings.
5. Click Save to save your settings permanently.
Configuring SSL certificate authorities
You add SSL certificate authorities (CA) in the Optimization > SSL: Certificate Authorities page.
A CA is a third-party entity in a network that issues digital certificates and manages security credentials and public keys for message encryption. A CA issues a public key certificate, which states that the CA attests that the public key contained in the certificate belongs to the person, organization, server, or other entity noted in the certificate. The CA verifies applicant credentials, so that relying parties can trust the information in the CA certificates. If you trust the CA and can verify the CA signature, then you can also verify that a certain public key does indeed belong to whomever is identified in the certificate.
Before adding a CA, it is critical to verify that it is genuine; a malicious CA can compromise network security by signing fake certificates.
You might need to add a new CA in these situations:
•Your organization has an internal CA that signs the certificates or peering certificates for the back-end server.
•The server certificates are signed by an intermediate or root CA unknown to the appliance (perhaps external to the organization).
•The CA certificate included in the trusted list has expired or has been revoked and needs replacing.
To add SSL certificate authorities
1. On the server-side SteelHead, choose Optimization > SSL: Certificate Authorities to display the Certificate Authorities page.
Certificate Authorities page

2. Under Certificate Authorities, complete the configuration as described in this table.
Control | Description |
Add a New Certificate Authority | Optional Local Name (ignored if importing multiple certificates) - Specify the local name. Local File - Browse to the local certificate authority file. Cert Text - Paste the certificate authority into the text box and click Add. |
Add | Adds the certificate authority. |
Remove Selected | Select the check box next to the name and click Remove Selected. |
3. Select the Certificate Authority name to display details.
Modifying SSL server certificate settings
After initial SSL server configuration, you can modify server certificate settings in the Optimization > SSL Main Settings page. You can remove a server certificate, view the server certificate details, change the server certificate and private key, export a certificate, or generate a CSR.
For details about initial SSL server configuration, see
Configuring SSL main settings.
After initial configuration, you might need to generate a Certificate Signing Request and import a Certificate Authority-signed certificate before activating the SSL server for optimization.
Removing or changing an SSL server certificate
This section describes how to remove or change an existing SSL server certificate.
To remove a server certificate
1. Choose Optimization > SSL: SSL Main Settings to display the SSL Main Settings page.
2. Under Bypassed SSL Servers, select the certificate name you want to remove and click Remove Selected.
To change an SSL server certificate
1. Choose Optimization > SSL: SSL Main Settings to display the SSL Main Settings page.
2. Under SSL Server Certificates, select the certificate name.
3. Click Modify.
4. Complete the configuration as described in this table.
Control | Description |
Rename Certificate | Displays the controls to rename the certificate. Name - Specify the new certificate name. Change - Changes the certificate name. |
Import Existing Private Key and CA-Signed Public Certificate (One File in PEM or PKCS12 formats) | Select this option if the existing private key and CA-signed certificate are located in one file. The page expands displaying Private Key and CA-Signed Public Certificate controls for browsing to the key and certificate files or a text box for copying and pasting the key and certificate. The private key is required regardless of whether you are adding or updating. Local File - Browse to the local file. Text - Paste the content of the file. Decryption Password - Specify the password used to decrypt, if necessary. Change - Changes the settings. |
Import Existing Private Keys and CA-Signed Public Certificate (Two Files in PEM or DER formats) | Select this option if the existing private key and CA-signed certificate are located in two files. The page expands displaying Private Key and CA-Signed Public Certificate controls for browsing to the key and certificate files or text boxes for copying and pasting the keys and certificates. A private key is optional for existing server configurations. |
Private Key | Private Key Local File - Browse to the local file containing the private key. Private Key Text - Paste the private key text. |
CA-Signed Public Certificate | Local File - Browse to the local file. Cert Text - Paste the content of the certificate text file. Decryption Password - Specify the password used to decrypt, if necessary. Change - Changes the settings. |
Generate New Private Key and Self-Signed Public Certificate | Select this option to generate a new private key and self-signed public certificate. Cipher Bits - Select the key length from the drop-down list. The default value is 2048. Common Name - Specify the domain name of the server. Organization Name - Specify the organization name (for example, the company). Organization Unit Name - Specify the organization unit name (for example, the section or department). Locality - Specify the city. State (no abbreviations) - Specify the state. Country (2-letter code) - Specify the country (two-letter code only). Email Address - Specify the email address of the contact person. Validity Period (Days) - Specify how many days the certificate is valid. Change - Changes the settings. |
Exporting an SSL server certificate
This section describes how to export an existing certificate for an SSL server. For details about making SSL server certificates nonexportable, see
To prevent exporting of SSL server certificates and private keys.
To export an SSL server certificate
1. Choose Optimization > SSL: SSL Main Settings to display the SSL Main Settings page.
2. Under SSL Server Certificates, select the certificate name.
3. To export an existing certificate, click Export and complete the configuration as described in this table. This option is unavailable if global exporting of SSL server certificates and private keys is disabled from the SSL Main Settings page.
Control | Description |
Include Private Key | Includes the private key in the export. |
Password/Password Confirm | Specify and confirm the encrypted password if you are including the private key (required if including the key). The password must be at least four characters. |
Export | Exports the SteelHead peering certificate and key. |
4. Click Apply to save your settings to the running configuration.
5. Click Save to save your settings permanently.
Generating a CSR
This section describes how to generate a Certificate Signing Request (CSR) for an existing SSL server off the current private key.
To generate a CSR
1. Choose Optimization > SSL: SSL Main Settings to display the SSL Main Settings page.
2. Under SSL Server Certificates, select the certificate name.
3. Click Generate CSR and complete the configuration as described in this table.
Control | Description |
Common Name (required) | Specify the common name (hostname) of the peer. |
Organization Name | Specify the organization name (for example, the company). |
Organization Unit Name | Specify the organization unit name (for example, the section or department). |
Locality | Specify the city. |
State | Specify the state. Do not abbreviate. |
Country (2-letter code) | Specify the country (two-letter code only). |
Email Address | Specify the email address of the contact person. |
Generate CSR | Generates the Certificate Signing Request. |
4. Click Save to save the settings permanently.
Adding a chain certificate
This section describes how to add or remove a chain certificate for an existing SSL server.
To add a chain certificate
1. Choose Optimization > SSL: SSL Main Settings to display the SSL Main Settings page.
2. Under SSL Server Certificates, select the certificate name.
3. Click Chain and complete the configuration as described in this table.
Control | Description |
Add a New Chain Certificate | Displays the controls to add a chain certificate. |
Use Existing CA | Select to use an existing certificate authority, and then select the certificate authority from the drop-down list. |
Use New Certificate(s) PEM or DER formats | Select to use a new certificate. |
Optional Local Name | Optionally, specify a local name for the certificate. |
Local File | Browse to the local file. |
Cert Text | Paste the contents of the certificate text file into the text box. |
Add | Adds the chain certificate to the chain certificate list. |
Remove Selected | Select the check box next to the name and click Remove Selected. |
4. Click Save to save the settings permanently.
Related topics
Configuring CRL management
RiOS provides a way to configure Certificate Revocation Lists (CRLs) for an automatically discovered CA using the Management Console. CRLs allow CAs to revoke issued certificates (for example, when the private key of the certificate has been compromised). By default, CRLs are not used in Riverbed appliances.
A CRL is a database that contains a list of digital certificates invalidated before their expiration date, including the reasons for the revocation and the names of the issuing certificate signing authorities. The CRL is issued by the CA, which issues the corresponding certificates. All CRLs have a lifetime during which they are valid (often 24 hours or less).
CRLs are used when a:
•server-side SteelHead appliance verifies the certificate presented by the server in the SSL handshake between the server-side SteelHead appliance and the server.
•server-side SteelHead appliance verifies the certificate presented by the client-side appliance in the handshake between the two SteelHead appliances for establishing a secure inner channel over the WAN.
•client-side appliance verifies the certificate presented by the server-side SteelHead appliance in the handshake between the two appliances for establishing a secure inner channel over the WAN.
The two types of CAs issuing CRLs are:
•conventional CAs, which are listed in the Certificate Authorities page.
•peering CAs, which are listed in the Trusted Entities list in the Secure Peering page.
You configure each type of CA separately.
Currently, Riverbed appliances only support downloading CRLs from Lightweight Directory Access Protocol (LDAP) servers.
To enable CRL management
1. On the server-side SteelHead, choose Optimization > SSL: CRL Management to display the CRL Management page.
CRL Management page
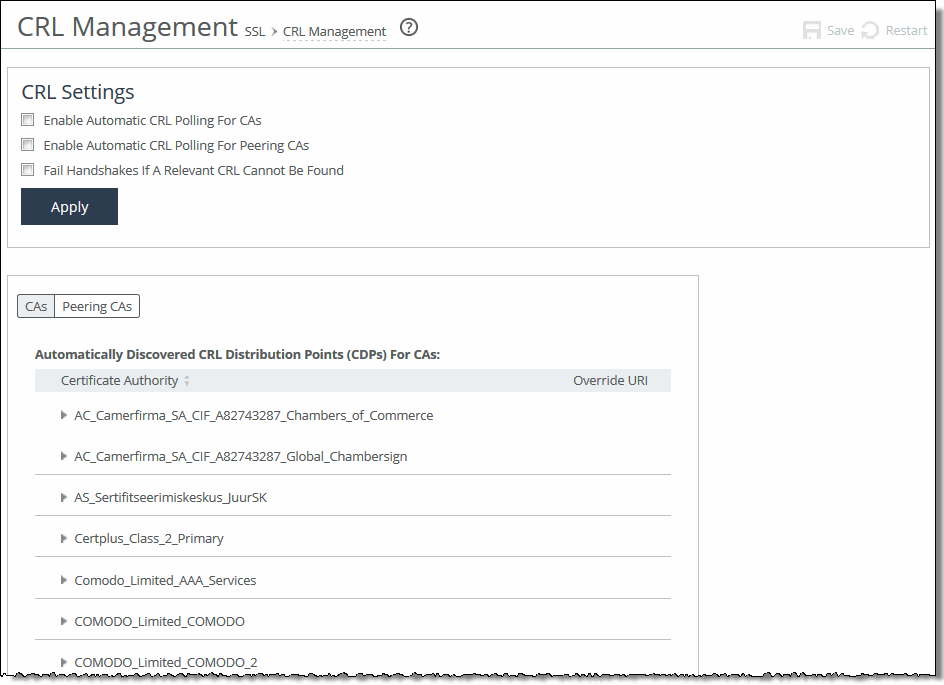
2. Under CRL Settings, complete the configuration as described in this table.
Control | Description |
Enable Automatic CRL Polling for CAs | Enables CRL polling and use of a CRL in handshake verifications of CA certificates. Currently, the SteelHead only supports downloading CRLs from Lightweight Directory Access Protocol (LDAP) servers. |
Enable Automatic CRL Polling for Peering CAs | Configures a CRL for an automatically discovered peering CA. |
Fail Handshakes If A Relevant CRL Cannot Be Found | Configures handshake behavior for a CRL. Fails the handshake verification if a relevant CRL for either a peering or server certificate can’t be found. |
3. Click Apply to save your settings to the running configuration.
4. Click Save to save your settings permanently.
Managing CRL distribution points
You can view, override, or remove CRL distribution points (CDPs) for CAs in the Optimization > CRL Management page.
A CDP is a field within a certificate containing information that describes where to retrieve the CRL for the certificate.
To view a list of CDPs for a CA
1. On the server-side SteelHead, choose Optimization > SSL: CRL Management to display the CRL Management page.
2. Select the CAs tab to view conventional CAs or the Peering CAs tab to view secure CAs.
The Automatically Discovered CRL Distribution Points table displays a list of CAs for which CDPs automatically discovered. Because not all CAs have CDPs, this list is a subset of the main CA list in the Certificate Authorities page or a subset of the CAs in the Peering Trust table in the Optimization > SSL: Secure Peering page.
CRL Management page - automatically discovered CDPs
3. Select the CA name in the Automatically Discovered CRL Distribution Points table.
If a CDP has been manually overridden for the CA, it appears in the override column.
To view CDP details and access history
1. Click the right arrow next to the CDP name.
2. To see the CDP access points, select the CDP Details tab.
Use the scroll bar to view the entire address.
3. To see the Certificate Revocation List, select the View CRL tab.
The display includes a CRL Access History list.
4. Click Check for Update to refresh the display.
To override an existing CDP
Perform this task to manually override the existing CDP for a certificate with an LDAP server specification.
1. Click Add Manual Override.
2. Select a CA name from the drop-down list.
3. Specify the CDP Uniform Resource Indicator (URI) for an LDAP server. For example:
http://ca.actalis.it/crl/root/getCRL
4. Click Add.
Configuring secure peers
You configure secure peers in the Optimization > SSL: Secure Peering (SSL) page. Secure, encrypted peering extends beyond traditional SSL traffic encryption. In addition to SSL-based traffic like HTTPS that always needs a secure connection between the client-side appliance and the server-side SteelHead, you can also secure other types of traffic such as:
•MAPI-encrypted, SMB1, and SMB2-signed traffic.
•Citrix traffic.
•all other traffic that inherently does not require a secure connection.
In RiOS 9.0, SSL secure peering and secure transport traffic can coexist.
Secure inner channel overview
Each appliance is manufactured with its own self-signed certificate and private key, which uniquely identify that appliance. The secure inner channel setup process begins with the peer appliances authenticating each other by exchanging certificates and negotiating a separate encryption key for each intercepted connection. Next, the appliances create corresponding inner connections for all outer connections between the client and the client-side appliance and between the server and the server-side SteelHead.
Peers are detected the first time a client-side appliance attempts to connect to the server. The optimization service bypasses this initial connection and does not perform data reduction, but rather uses it to detect peers and populate the peer entry tables. On both appliances, an entry appears in a peering list with the certificate of the other peer and identifying information such as IP address and hostname. You can then accept or decline the trust relationship with each appliance requesting a secure inner channel.
After the appliances trust each other, they send encrypted data between themselves over secure inner connections matching the outer connections of the selected traffic types. The trust relationship between the appliances is bidirectional; the client-side appliance trusts the server-side SteelHead, and vice versa.
We recommend using the secure inner channel in place of IPSec encryption to secure traffic.
Enabling secure peers
This section describes how to secure traffic between client-side appliances and server-side SteelHeads.
You rarely need to replace a self-signed certificate on a SteelHead; however, if you do, add the CA’s certificate to the peering trust section so each SteelHead can verify the peer certificate for its peers. For details, see
Configuring peer trust.
To enable secure peering
1. If you are securing encrypted MAPI traffic or Citrix traffic, enable one of these settings on both the server-side and client-side appliances:
•Choose Optimization > Protocols: MAPI and select Enable Encrypted Optimization.
—or—
•Choose Optimization > Protocols: Citrix and select Enable SecureICA Encryption. Both appliances must be running RiOS 7.0 or later.
If you are securing SMB-signed traffic, choose Optimization > Protocols: CIFS and select Enable SMB Signing on the server-side SteelHead.
2. We recommend using NTP time synchronization or manually synchronizing the clocks on both the server-side SteelHead and client-side appliances. It is critical that the peer appliance time is the same for the trust relationship to work.
3. On both the server-side SteelHeads and client-side appliances, choose Optimization > SSL: Secure Peering (SSL) to display the Secure Peering (SSL) page.
Secure Peering (SSL) page
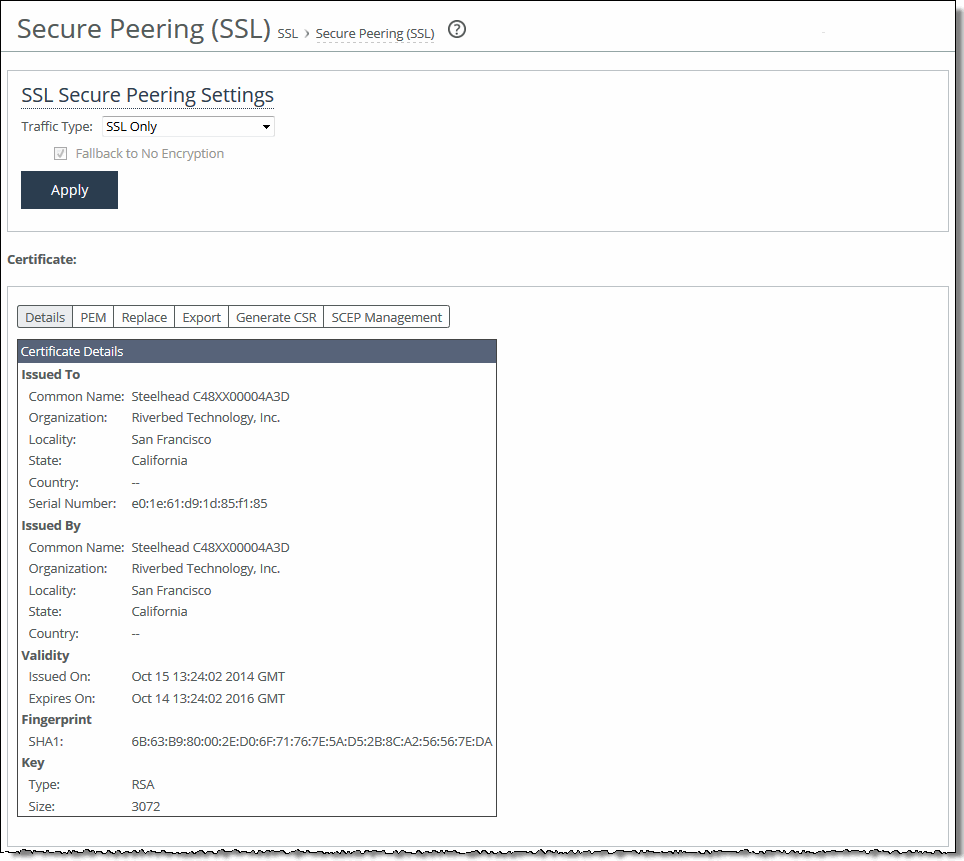
4. Under SSL Secure Peering Settings, complete the configuration as described in this table.
Control | Description |
Traffic Type | Select one of these traffic types from the drop-down list: •SSL Only - The peer client-side SteelHead and the server-side SteelHead authenticate each other and then encrypt and optimize all SSL traffic: for example, HTTPS traffic on port 443. This is the default setting. •SSL and Secure Protocols - The peer client-side SteelHead and the server-side SteelHead authenticate each other and then encrypt and optimize all traffic traveling over these secure protocols: Citrix, SSL, SMB-signed, and encrypted MAPI. MAPI encryption or Secure ICA encryption must be enabled on both the client-side and server-side SteelHeads when securing encrypted MAPI traffic, or encrypted Citrix ICA traffic (RiOS 7.0 and later). Enabling this option requires an optimization service restart. •All - The peer client-side SteelHead and the server-side SteelHead authenticate each other and then encrypt and optimize all traffic. Only the optimized traffic is secure; pass-through traffic is not. Enabling this option requires an optimization service restart. Selecting All can cause up to a 10 percent performance decline in higher-capacity SteelHeads. Take this performance metric into account when sizing a complete secure SteelHead peering environment. |
Fallback to No Encryption | Specifies that the SteelHead optimizes but doesn’t encrypt the connection when it’s unable to negotiate a secure, encrypted inner channel connection with the peer. This is the default setting. Enabling this option requires an optimization service restart. Note: We strongly recommend enabling this setting on both the client-side and the server-side SteelHeads, especially in mixed deployments where one SteelHead is running RiOS 7.0 or later and the other SteelHead is running an earlier RiOS version. This option applies only to non-SSL traffic and is unavailable when you select SSL Only as the traffic type. Clear the check box to pass through connections that don’t have a secure encrypted inner channel connection with the peer. Use caution when disabling this setting, as doing so specifies that you strictly don’t want traffic optimized between nonsecure SteelHeads. Consequently, when this setting is disabled connections might be dropped. For example, consider a configuration with a client-side SteelHead running RiOS 5.5 and a server-side SteelHead running RiOS 6.0. When this setting is disabled on the server-side SteelHead and All is selected as the traffic type, it will not optimize the connection when a secure channel is unavailable, and might drop it. |
5. Click Apply to save your settings to the running configuration.
6. Click Save to save your settings permanently.
The SteelHead supports RSA private keys for peers and SSL servers.
Configuring peer trust
The first time a client-side appliance attempts to connect to the server, the optimization service detects peers and populates the peer entry tables. On both appliances, an entry appears in a peering list with the information and certificate of the other peer. A peer list provides you with the option of accepting or declining the trust relationship with each appliance requesting a secure inner channel. The self-signed peer lists are designated by these color categories:
•White - Lists all trusted appliances. When you select Trust for a peer in a black or gray list, the public key of the peer is copied into the white list of the local trusted host. The list includes the peer expiration date, IP address, and hostname.
•Black - Lists all untrusted appliances. When you select Do Not Trust for a peer in a white or gray list, the public key of the peer is copied into the black list of the local untrusted host. The list includes the peer expiration date, IP address, and hostname.
•Gray - Lists all appliances of unknown status. This list serves as a temporary holding place for all discovered peers that are attempting to establish a secure inner channel. The list includes the peer expiration date, IP address, and hostname. You can select one of these actions to change the status of the peer and move it to the white or black lists: Trust, Do Not Trust, or Remove.
When a self-signed peer has already been added to a peering trust list manually, the SSL server recognizes it upon the first connection from that peer and automatically places it in the white list (without action by the administrator). The certificate that was previously copied and pasted (or imported) into the trusted list is not removed.
The Optimization > SSL: Secure Peering (SSL) page also provides you with these options for configuring peer certificates and Mobile Controller trust:
•Peering Trust - Add and view these types of entities:
–Certificates of trusted peers.
–Certificates of trusted Certificate Authorities (CAs) that may sign certificates for peers.
•SCEP Peering Trust - Add and view trusted Simple Certificate Enrollment Protocol (SCEP) entities.
This list is a subset of the Peering Trust list, and it is used to tag certificates that can be used by SCEP. The SCEP Peering Trust must contain these types of entities:
–SCEP CA certificates
–The CA that was used to sign the Web Certificate for SCEP over HTTPS
•Mobile Trust - Add and view trusted SteelCentral Controller for SteelHead Mobile entities that may sign certificates for SteelHead Mobiles.
To configure SSL peers
1. Choose Optimization > SSL: Secure Peering (SSL) to display the Secure Peering (SSL) page.
Secure Peering (SSL) page
The appliance identity certificate details appear, as described in this table.
Control | Description |
Issued To/Issued By | Common Name - Specifies the common name of the certificate authority. |
Organization - Specifies the organization name (for example, the company). |
Locality - Specifies the city. |
State - Specifies the state. |
Country - Specifies the country. |
Serial Number - Specifies the serial number (Issued To, only). |
Signature Algorithm | Specifies the signature secure hash algorithm (SHA) in use by certification authorities to sign certificates and the certificates revocation list (CRL). |
Validity | Issued On - Specifies the date the certificate was issued. |
Expires On - Specifies the date the certificate expires. |
Fingerprint | Specifies the SSL fingerprint. |
Key | Type - Specifies the key type. |
Size - Specifies the size in bytes. |
2. To replace an existing certificate, under Certificate, select the Replace tab and complete the configuration as described in this table.
Control | Description |
Import Certificate and Private Key | Imports the certificate and key. The page displays controls for browsing to and uploading the certificate and key files. Or, you can use the text box to copy and paste a PEM file. The private key is required regardless of whether you are adding or updating the certificate. |
Certificate | Upload - Browse to the local file in PKCS-12, PEM, or DER formats. Paste it here (PEM) - Copy and then paste the contents of a PEM file. |
Private Key | Select the private key origin. •The Private Key is in a separate file (see below) - you can either upload it or copy and paste it. •This file includes the Certificate and Private Key •The Private Key for this Certificate was created with a CSR generated on this appliance. |
Separate Private Key | Upload (PEM or DER formats) - Browse to the local file in PEM or DER formats. Paste it here (PEM only) - Paste the contents of a PEM file. Decryption Password - Specify the decryption password, if necessary. Passwords are required for PKCS-12 files, optional for PEM files, and never needed for DER files. |
Generate Self-Signed Certificate and New Private Key | Select to generate a new private key and self-signed public certificate. Common Name (required) - Specify the hostname of the peer. Organization Name - Specify the organization name (for example, the company). Organization Unit Name - Specify the organization unit name (for example, the section or department). Locality - Specify the city. State (no abbreviations) - Specify the state. Country (2-letter code) - Specify the country (two-letter code only). Email Address - Specify the email address of the contact person. Validity Period (Days) - Specify how many days the certificate is valid. The default value is 730. |
Private Key | Cipher Bits - Select the key length from the drop-down list. The default value is 2048. |
Update Certificate Through SCEP Enrollment | Select to generate a private key and CSR using an SCEP responder. Select the SCEP Management tab to configure the SCEP responder. |
3. To export an existing certificate, under Certificate, select the Export tab and complete the configuration as described in this table.
Control | Description |
Password/Password Confirm | Specify and confirm the encrypted password if you are including the private key (required if including key). The password must be at least four characters long. |
Include Private Key | Includes the private key in the export. |
Export | Exports the SteelHead peering certificate and key. |
4. To generate a CSR, under Certificate, select the Generate CSR tab and complete the configuration as described in this table.
Control | Description |
Common Name (required) | Specify the common name (hostname) of the peer. |
Organization Name | Specify the organization name (for example, the company). |
Organization Unit Name | Specify the organization unit name (for example, the section or department). |
Locality | Specify the city. |
State | Specify the state. Do not abbreviate. |
Country (2-letter code) | Specify the country (two-letter code only). |
Email Address | Specify the email address of the contact person. |
Generate CSR | Generates the Certificate Signing Request. |
5. To use SCEP to manage the certificate, under Certificate, select the SCEP Management tab and complete the configuration as described in this table.
Control | Description |
URL | Specify the URL of the SCEP responder. Use this format: http://<host>/<path-to-service> or https://<host>/<path-to-service> Example: http://<ip-address>/certsrv/mscep/mscep.dll RiOS 9.5 and later support HTTPS URLs for the SCEP responder. RiOS 8.5 and later support single-tier, two-tier, and three-tier hierarchies to validate the chain certificates it receives. |
Maximum Number of Polls | Specify the maximum number of polls before the SteelHead cancels the enrollment. The peering certificate is not modified. The default value is 5. A poll is a request to the server for an enrolled certificate by the SteelHead. The SteelHead polls only if the server responds with pending. If the server responds with fail then the SteelHead doesn’t poll. |
Poll Period | Specify the poll frequency in minutes. The default value is 5. |
Change Challenge Passphrase | Specify the challenge password phrase. |
Enable Auto Enrollment | Enables automatic reenrollment of a certificate to be signed by a CA using SCEP. •Expiration Threshold - Specify the amount of time (in days) to schedule reenrollment before the certificate expires. The range is from 1 to 60 days. The default value is 30 days. |
Update SCEP Settings | Updates the SCEP settings. |
6. To add or remove a Trusted entity, under Peering Trust, complete the configuration as described in this table.
Control | Description |
Add a New Trusted Entity | Displays the controls for adding trusted entities. |
Trust Existing CA | Select an existing CA from the drop-down list. |
Trust New Certificate | Adds a new CA or peer certificate. The SteelHead supports RSA and DSA for peering trust entities. |
Optional Local Name | Optionally, specify a local name for the entity (for example, the fully qualified domain name). |
Local File | Browse to the local file. |
Cert Text | Paste the content of the certificate text file into the text box. |
Add | Adds the trusted entity (or peer) to the trusted peers list. |
Remove Selected | Select the check box next to the name and click Remove Selected. |
7. To add or remove an SCEP Trusted entity, under SCEP Peering Trust, complete the configuration as described in this table.
Control | Description |
Add a New SCEP Entity | Displays the controls for adding a trusted SCEP entity. |
Peering Trust | Select a peering trust from the drop-down list. |
Add | Adds the trusted entity (or peer) to the trusted peers list. |
Remove Selected | Select the check box next to the name and click Remove Selected. |
8. To add or remove a SteelCentral Controller for SteelHead Mobile trusted entity, under Mobile Trust, complete the configuration as described in this table.
Control | Description |
Add a New Mobile Entity | Displays the controls for adding a trusted SteelCentral Controller for SteelHead Mobile entity. |
Optional Local Name | Optionally, specify a local name for the entity (for example, the fully qualified domain name). |
Local File | Browse to the local file. |
Cert Text | Paste the content of the certificate text file into the text box. |
Add | Adds the trusted entity (or peer) to the trusted peers list. |
Remove Selected | Select the check box next to the name and click Remove Selected. |
9. To change the trust status of a self-signed peer and move it to another list, or to remove a peer from a list, click the down arrow in the Actions drop-down list and complete the configuration as described in this table.
The white, gray, and black peering lists sort the peers by IP address.
Before moving a peer from the gray list to the trusted peers white list, it is critical to verify that the certificate fingerprint does indeed belong to a peer appliance, particularly to avoid the potential risk of a man-in-the-middle attack.
Control | Description |
Trust | Changes the peer SteelHead to a trusted entity. The SteelHead automatically finds all SteelHeads in your deployment and lists them in the gray list. When a self-signed peer becomes a trusted entity it moves to the white list. |
Do Not Trust | Changes the self-signed peer from a trusted entity to an untrusted entity. The SteelHead automatically finds all SteelHeads in your deployment and lists them by IP address in the gray list. When a self-signed peer becomes an untrusted entity it moves to the black list. |
Remove Selected | Select the check box next to the name and click Remove Selected. |
When the same certificate appears in both the trusted entity and a self-signed peer list, deleting the certificate from one list automatically deletes it from the other.
10. Click Apply to save your settings to the running configuration.
11. Click Save to save your settings permanently.
Verifying the secure inner channel connections
This section describes what happens when a secure inner channel cannot be established for traffic between appliances and how to verify whether connections are using a secure inner channel.
When the appliances are configured to use secure inner channels for SSL traffic only or All optimized traffic:
•The first connection that runs into a failure is passed through without optimization. This connection appears as established in the Current Connections report, but it is flagged with a red protocol error.
•For up to five minutes all follow-on or subsequent connections are passed through. These follow-on connections appear as pass-through in the Current Connections report. You can click the magnifying glass icon for details about the pass-through reason.
When the appliances are configured to use secure inner channels for SSL and Secure Protocols:
•The first secure protocol connection (either encrypted MAPI, SMB Signed, or Citrix) that runs into a failure is passed through without optimization if Fallback to No Encryption is disabled. See
Enabling secure peers.
•The first SSL connection that runs into a failure is passed through without optimization. This connection appears as established in the Current Connections report, but it is flagged with a red protocol error.
•For up to five minutes all follow-on or subsequent connections are passed through.
To verify that the secure inner channel is encrypting and optimizing traffic, choose Reports > Networking: Current Connections. Look for the lock icon and three yellow arrows, which indicate the connection is encrypted and optimized. If the lock icon is not visible, or is dimmed, click the connection to view a failure reason that explains why the appliance is not encrypting the connection. If there is a red protocol error, click the connection to view the reason for the error. For details, see
Viewing current connection reports and
Verifying SSL and secure inner channel optimization.
Related topics
Configuring advanced and SSL cipher settings
This section describes the SSL advanced settings you can use to expedite SSL configurations, improve performance for short-lived SSL connections, and configure SSL cipher settings. It includes these topics:
Setting advanced SSL options
You can synchronize the SSL chain certificate configuration, configure SteelCentral Controller for SteelHead Mobile for SSL, improve performance for SSL connection establishment, and enable client certificate authentication in the Optimization > SSL: Advanced Settings page.
To set advanced SSL options
1. Choose Optimization > SSL: Advanced Settings to display the Advanced Settings page.
Advanced Settings page
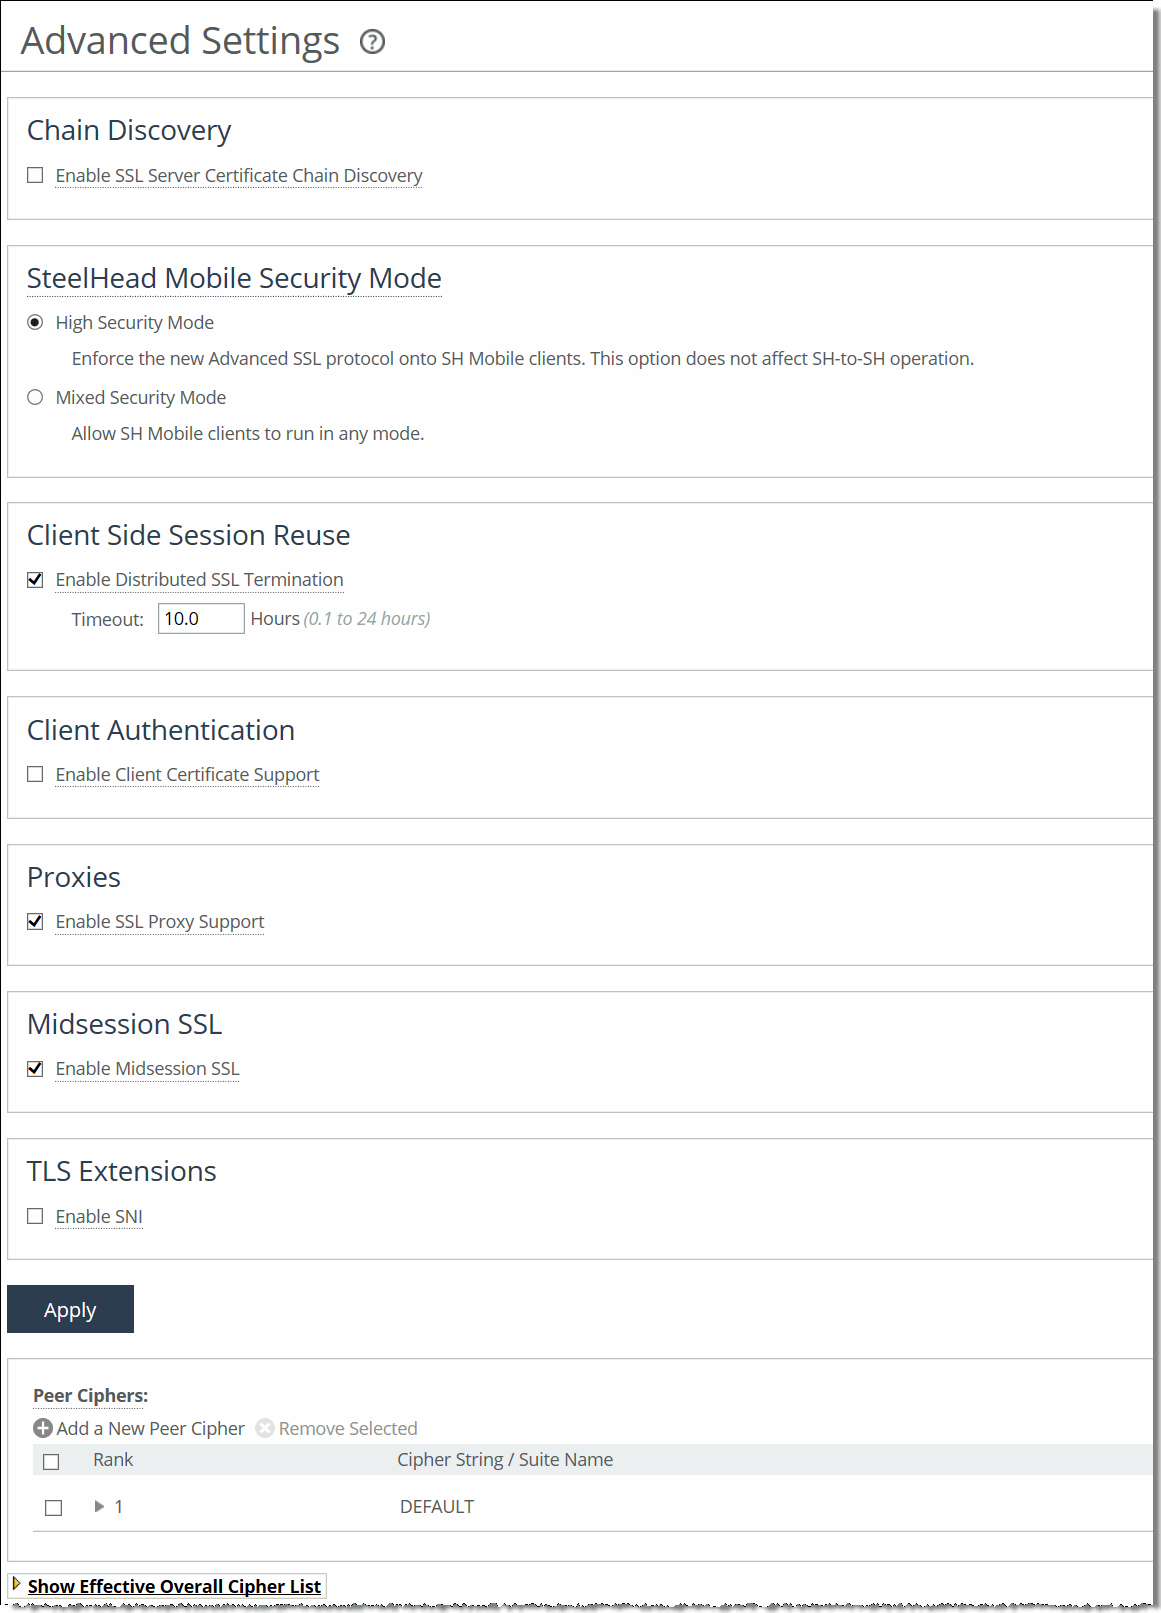
2. Complete the configuration as described in this table.
Control | Description |
Enable SSL Server Certificate Chain Discovery | Synchronizes the chain certificate configuration on the server-side SteelHead with the chain certificate configuration on the back-end server. The synchronization occurs after a handshake fails between the client-side appliance and server-side SteelHead. By default, this option is disabled. Enable this option when you replace an existing chain certificate on the back-end server with a new chain to ensure that the certificate chain remains in sync on both the server-side SteelHead and the back-end server. Note: This option never replaces the server certificate. It updates the chain containing the intermediate certificates and the root certificate in the client context. |
SteelHead Mobile Security Mode | On the server-side SteelHead, select one of these security modes: •High Security Mode - Enforces the advanced SSL protocol on the SteelHead Mobile appliances for increased security. •Mixed Security Mode - Allows SteelCentral Controller for SteelHead Mobile clients to run in any SSL mode. This mode is required to optimize with mobile clients running on VMware Fusion. Note: This option does not affect SteelHead-to-SteelHead operation. |
Enable Distributed SSL Termination | Enables reuse of the original session on a client-side appliance when the client reconnects to an SSL server. Reusing the session provides two benefits: it lessens the CPU load because it eliminates expensive asymmetric key operations and it shortens the key negotiation process by avoiding WAN roundtrips to the server. By default, this option is enabled. Both the client-side appliance and server-side SteelHead must be configured to optimize SSL traffic. •Timeout - Specify the amount of time the client can reuse a session with an SSL server after the initial connection ends. The range is from 0.1 to 24 hours. The default value is 10 hours. Enabling this option requires an optimization service restart. |
Enable Client Certificate Support | Enables acceleration of SSL traffic to those SSL servers that authenticate SSL clients. The SSL server verifies the SSL client certificate. In the client authentication SSL handshake, each client has a unique client certificate and the SSL server, in most cases, maintains the state that is specific to each client when answering the client's requests. The SSL server must receive exactly the same certificate that is originally issued for a client on all the connections between the client and the server. Typically the client's unique certificate and private key are stored on a smart card, such as a Common Access Card (CAC), or on a similar location that is inaccessible to other devices on the network. By default, client authentication is disabled. Enabling the client authentication feature allows appliances to compute the encryption key while the SSL server continues to authenticate the original SSL client exactly as it would without the appliances. The server-side SteelHead observes the SSL handshake messages as they go back and forth. With access to the SSL server's private key, the SteelHead computes the session key exactly as the SSL server does. The SSL server continues to perform the actual verification of the client, so any dependencies on the uniqueness of the client certificate for correct operation of the application are met. Because the SteelHead does not modify any of the certificates (or the handshake messages) exchanged between the client and the server, there is no change to their trust model. The client and server continue to trust the same set of certificate authorities as they did without the appliances accelerating their traffic. Note: If the data center has a mixed environment with a few SSL servers that authenticate clients along with those that do not authenticate clients, we recommend enabling client authentication. Requirements •Both the client-side appliance and the server-side SteelHead must be running RiOS 6.5 or later. •Enable client certificate support on the server-side SteelHead. •The server-side SteelHead must have access to the exact private key used by the SSL server. •The SSL server must be configured to ask for client certificates. •The SteelHead must have a compatible cipher chosen by the server. •SSL sessions that reuse previous secrets that are unknown to the SteelHead cannot be decrypted. •Client-side certificates with renegotiation handshakes are not supported. •Client certificate supports the RSA key exchange only. It does not support the Diffie-Hellman key exchange. Basic Steps The basic steps to enable client authentication are: 1. Perform the basic steps to enable SSL optimization (described in Configuring SSL Server Certificates and Certificate Authorities). 2. On the server-side SteelHead, choose Optimization > SSL: Advanced Settings, select Enable Client Certificate Support, and click Apply. 3. Choose Optimization > SSL: SSL Main Settings, import the private key and certificate used by the SSL server to the server-side SteelHead, and click Save to save the configuration. You do not need to restart the optimization service. |
| Verification To verify client authentication, on the server-side SteelHead, check the Discovered Server (Optimizable) table in the Optimization > SSL: SSL Main Settings page. Optimizable servers that are using client authentication appear as optimizable. For servers that are not using client authentication, the server appears in the Discovered Server (bypassed, not optimizable) table with the reason No proxy certificate configured for the server. |
Enable SSL Proxy Support | Enable this control on both the client-side appliance and server-side SteelHead when clients are communicating with SSL to a server through one or more proxies. Proxy support allows the appliance to optimize traffic to a proxy server. SSL traffic communication with a proxy initiates with an HTTP CONNECT message. The appliance recognizes the HTTP CONNECT message in the connection, extracts the hostname, and then optimizes the SSL connection that follows into the proxy state machine (expecting an SSL handshake following the CONNECT message). In addition to enabling this feature on both appliances, you must: •create an in-path rule on the client-side appliance to identify the proxy server IP address and port number. Select the SSL preoptimization policy for the rule. •enable SSL optimization on both the client-side appliance and server-side SteelHead. •ensure the server-side SteelHead is running RiOS 7.0 or later. •restart the optimization service on both appliances. By default, SSL proxy support is disabled. When the appliance connects, the proxy servers appear in the SSL Main Settings page on the server-side SteelHead in the Discovered SSL Server (Optimizable) list. The same IP address appears on multiple lines, followed by the word proxy. The hostname of the back-end server appears in the Server Common Name field. All subsequent connections to the proxy servers are optimized. When an error occurs, the proxy servers appear in the SSL Main Settings page on the server-side SteelHead in the Discovered Servers (bypassed, not optimized) list. The same IP address appears on multiple lines, followed by the word proxy. The hostname of the back-end server appears in the Server Common Name field. All subsequent connections to the servers are not optimized. If you disable proxy support, you must delete the corresponding in-path rule and restart the optimization service. |
Enable Midsession SSL | Enable this control on both the client-side appliance and server-side SteelHead when there is a delayed start to the Transport Layer Security (TLS) handshake because clients are transitioning into SSL after the initial handshake occurs. This feature optimizes connections that transition into SSL. Client examples include SMTP/POP/IMAP-over-TLS and Microsoft .NET Windows Communication Foundation (WCF)-based TLS applications. This feature also enables SSL communication with protocols like Exchange-Hub to Exchange-Hub replications (for example, the SMTP-over-TLS protocol). For details on SMTP over TLS Optimization, see the SteelHead Deployment Guide - Protocols. The SteelHead looks for an SSL handshake for the life of the connection, and then optimizes the SSL connection that follows (except for an SSL handshake following the HTTP CONNECT message, in which case the SSL proxy support feature needs to be enabled). After enabling this feature on both appliances you must restart the optimization service. When the SteelHead connects, the servers appear in the SSL Main Settings page on the server-side SteelHead in the Discovered SSL Server (Optimizable) list. All subsequent connections to the servers are optimized. By default, midsession SSL is disabled. Requirements: •The SSL client must be the same as the TCP client. •SSL messages cannot be wrapped with any other non-SSL or non-TCP protocol headers or footers. •SSL optimization must be enabled on both the client-side appliance and server-side SteelHead. |
Enable SNI | Enable this control on the server-side SteelHead while using name-based virtual hosts with SSL. Server name indication (SNI) is a transport layer security extension to the SSL protocol. With SNI, the first SSL client hello handshake message sent to the HTTPS server includes the requested virtual hostname to which the client is connecting. Because the server is aware of the hostname, it returns a host-specific security certificate. Without SNI, an HTTPS server returns a default certificate that satisfies hostnames for all virtual hosts. The SSL connection setup uses the default virtual host configuration for the address where the connection was received. Browser messages warn that certificates have the wrong hostname. With SNI enabled, RiOS provides the hostname. Knowing the hostname enables the server to determine the correct named virtual host for the request and set up the connection accordingly from the start. The browser validates the certificate names against the requested URL, and the server-side SteelHead verifies that the selected proxy certificate is compatible with the client hostname. This verification ensures that the browser does not reject the proxy certificate for the server-side SteelHead. If SNI provides a hostname that does not exactly match the common name or any of the subject alternate names for the certificate on the server-side SteelHead, the system determines that a valid certificate is not present and bypasses that hostname. No configuration is necessary on the client-side appliance. The client browser must also support SNI. |
3. Click Apply to apply your settings.
4. Click Save to save your settings permanently.
For details about SteelCentral Controller for SteelHead Mobile security mode and client-side session reuse, see the SteelHead Deployment Guide - Protocols.
Configuring SSL cipher settings
You configure SSL cipher settings in the Optimization > SSL: Advanced Settings page.
Unless you have specific organizational requirements, typically you do not need to change SSL cipher settings.
In cryptography, a cipher is an algorithm for performing encryption and decryption. In RiOS, the types of ciphers are:
•Server ciphers - communicate with the server on the segment between the server-side SteelHead and the SSL server.
•Client ciphers - communicate with the client on the segment between the client-side appliance and the SSL client. Although this segment does not include the server-side SteelHead, you must configure the client ciphers on the server-side SteelHead, because the server-side SteelHead actually handles the SSL handshake with the SSL client.
•Peer ciphers - communicate between the two SteelHeads.
The default cipher setting is DEFAULT, which represents a variety of high-strength ciphers that allow for compatibility with many browsers and servers.
Use the default cipher configuration to limit the possible ciphers that are negotiated on the three parts of the secure inner channel connection (the client-to-SteelHead, the server-to-SteelHead, and SteelHead-to-SteelHead).
To configure SSL ciphers
1. Choose Optimization > SSL: Advanced Settings to display the Advanced Settings page.
2. Under Peer Ciphers, complete the configuration on both the client-side appliance and server-side SteelHead, as described in this table.
Control | Description |
Add a New Peer Cipher | Displays the controls for adding a new peer cipher. |
Cipher | Select the cipher type for communicating with peers from the drop-down list. The Hint text box displays information about the cipher. You must specify at least one cipher for peers, clients, and servers for SSL to function properly. The default cipher setting is DEFAULT, which represents a variety of high-strength ciphers that allow for compatibility with many browsers and servers. |
Insert Cipher At | Select Start, End, or the cipher number from the drop-down list. The default cipher, if used, must be rule number 1. |
Add | Adds the cipher to the list. |
Remove Selected | Select the check box next to the name and click Remove Selected. |
3. On the server-side SteelHead, under Client Ciphers, you can add or remove a client or peer cipher by completing the configuration as described in these tables.
Control | Description |
Add a New Client Cipher | Displays the controls for adding a new client cipher. |
Cipher | Select the cipher type for communicating with clients from the drop-down list. The Hint text box displays information about the cipher. You must specify at least one cipher for peers, clients, and servers for SSL to function properly. The default cipher setting is DEFAULT. which represents a variety of high- strength ciphers that allow for compatibility with many browsers and servers. |
Insert Cipher At | Select Start, End, or a cipher number from the drop-down list. The default cipher, if used, must be rule number 1. |
Add | Adds the cipher to the list. |
Cancel | Cancels your settings. |
Removed Selected | Select the check box next to the name and click Remove Selected. |
4. On the server-side SteelHead, you can add or remove a server cipher by completing the configuration as described in this table.
Control | Description |
Add a New Server Cipher | Displays the controls for adding a new server cipher. |
Cipher | Select the cipher type for communicating with servers from the drop-down list. The Hint text box displays information about the cipher. You must specify at least one cipher for peers, clients, and servers for SSL to function properly. The default cipher setting is DEFAULT, which represents a variety of high- strength ciphers that are compatible with many browsers and servers. |
Insert Cipher At | Select Start, End, or a cipher number from the drop-down list. The default cipher, if used, must be rule number 1. |
Add | Adds the cipher to the list. |
Cancel | Cancels your settings. |
Removed Selected | Select the check box next to the name and click Remove Selected. |
5. Click Show Effective Overall Cipher List to display a list of ciphers.
Related topics
Performing bulk imports and exports
You can perform bulk import and export operations in the Optimization > SSL: Advanced Settings page.
These import and export features expedite configuring backup and peer trust relationships:
•Backup - You can use the bulk export feature to back up your SSL configurations, including your server configurations and private keys.
To protect your server private keys, you can choose to not include your
Server Configurations and Private Keys when performing bulk exports of trusted peers. You can prevent your SSL configurations from leaving the SteelHead by making SSL certificates and private keys nonexportable. For details, see
Configuring SSL server certificates.
•Peer Trust - If you use self-signed peering certificates and have multiple SteelHeads (including multiple server-side appliances), you can use the bulk import feature to avoid configuring each peering trust relationship between the pairs of appliances.
The bulk data that you import contains the serial number of the exporting appliance. The appliance importing the data compares its own serial number with the serial number contained in the bulk data.
These rules apply to bulk data when importing and exporting the data:
•Peering Certificate and Key Data - If the serial numbers match, the SteelHead importing the bulk data overwrites its existing peering certificates and keys with that bulk data. If the serial numbers do not match, the SteelHead importing the bulk data does not overwrite its peering certificate and key.
•Certificate Authority, Peering Trust, and SSL Server Configuration Data - For all other configuration data such as certificate authorities, peering trusts, and server configurations (if included), if there is a conflict, the imported configuration data takes precedence (that is, the imported configuration data overwrites any existing configurations).
Bulk data importing operations do not delete configurations; they can only add or overwrite them.
Bulk importing does not require a optimization service restart.
To perform bulk export operations
1. Select one SteelHead (A) and trust all the SteelHeads peering certificates. Make sure you include the peering certificate for SteelHead A. For details about configuring trusted peers, see
Configuring secure peers.
2. Choose Optimization > SSL: Advanced Settings to display the Advanced Settings page.
3. Under Bulk Export, complete the configuration as described in this table.
Control | Description |
Include Server Certificates and Private Keys | (Doesn’t appear when exporting of server certificates and keys is disabled globally from the SSL Main Settings Page.) Includes the server certificates and keys in the export file. Note: To protect your server private keys, don’t select when performing bulk exports of trusted peers. |
Include SCEP/CRL Configuration | Includes the SCEP and CRL configurations with the export file. |
Password | Specify and confirm the password used for the export file. |
Export | Exports your SSL configuration and optionally your server private keys and certificates. |
4. Click Save to save your settings permanently.
To perform bulk import operations
1. Choose Optimization > SSL: Advanced Settings to display the Advanced Settings page.
Advanced Settings page
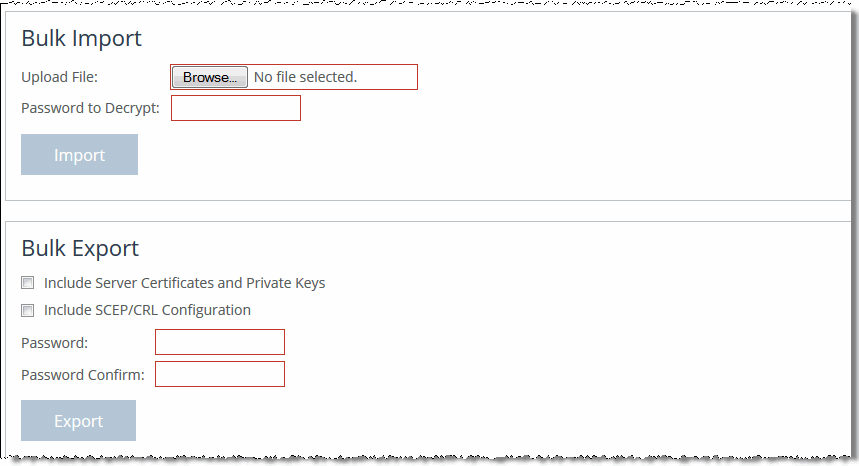
2. Under Bulk Import, complete the configuration as described in this table.
Control | Description |
Upload File | Browse to the previously exported bulk file that contains the certificates and keys. |
Password to Decrypt | Specify the password used to decrypt the file. |
Import | Imports your SSL configuration, keys, and certificates, so that all of the SteelHeads trust one another as peers. |
3. Click Save to save your settings permanently.
Related topics