Configuring SnapMirror optimization
You manage SnapMirror storage optimization settings in the Configure > Optimization: SnapMirror page.
SnapMirror is used mainly for disaster recovery and replication. To provide maximum protection and ease of management, many enterprises choose to perform SnapMirror operations across the wide-area network. However, WAN links are often costly, and the limited bandwidth and high-network latency they provide often severely degrade SnapMirror operations.
SteelHead improves the performance of the WAN for NetApp SnapMirror traffic by overcoming limited bandwidth restrictions, high latency, and poor network quality commonly associated with wide-area networks.
RiOS also improves WAN performance, visibility, and control of NetApp SnapMirror traffic with features that allow you to:
• present performance statistics and apply optimization policies based on source and destination volume and host pairs.
• define QoS policies for SnapMirror traffic.
• collect SnapMirror statistics, such as the total LAN/WAN bytes in and out and the active cycle time.
SteelHead supports SnapMirror optimization for environments using NetApp ONTAP 9 (Clustered Data ONTAP or cDOT) and legacy 7-mode environments in NetApp ONTAP 7 or Data ONTAP 8.
Working with Clustered Data ONTAP optimization
By default, SnapMirror optimization is enabled for clustered configurations.
In Clustered Data ONTAP, the SnapMirror replication works at the Storage Virtual Machine (SVM, formerly known as Vservers) level. Each SVM can have one or more volumes and, to perform replication, multiple network connections are established between the source and destination SVM. A single network connection is not dedicated to a single volume replication; instead a network connection can carry data belonging to different volumes and a single volume replication can span multiple connections. With this design, the SteelHead cannot uniquely identify volumes for a SnapMirror replication, but SteelHead can perform bandwidth and QoS optimization at the SVM level.
To configure the SteelHead for SnapMirror bandwidth optimization in clustered mode
• No explicit configuration is required for bandwidth optimization.
The default in-path rule lets you achieve bandwidth optimization of SnapMirror replication.
To achieve better optimization from the SteelHead, do not enable compression for the replication in the NetApp Controller SnapMirror policy.
To configure QoS for SnapMirror optimization in clustered mode
1. Configure QoS rules on the SteelHead closest to the source SVM by defining the application and specifying the intercluster SVM IPs and port 11105.
The local subnet is the source SVM and the remote subnet is the destination SVM.
Use subnet values of 0.0.0.0/0 and port 11105 to apply QoS rules for all SnapMirror traffic.
2. Go to Networking > Network Services: Quality of Service and in the QoS Rules section click Add a Rule.
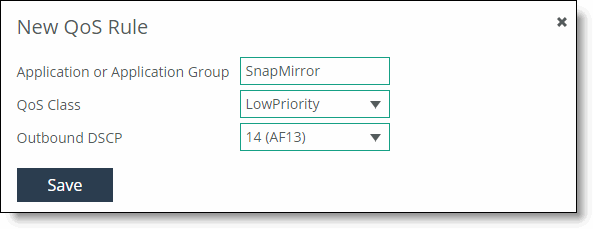
3. Enter SnapMirror for the Application or Application Group, specify the QoS Class that meets your business needs, and specify and Outbound DSCP value.
SnapMirror QoS rule

4. Click Save.
If you use the throttle option of Clustered Data ONTAP Controller in the SnapMirror relationship, consider its interaction with the SteelHead QoS configuration to achieve desired the QoS.
For details about data replication deployments, see the SteelHead Deployment Guide.
Working with Legacy 7-Mode SnapMirror optimization
SteelHead provides the following optimization for SnapMirror replications between 7-mode Data ONTAP controllers:
• Bandwidth optimization – using Scalable Data Reference (SDR) and compression.
• Quality of Service (QoS) for guaranteed bandwidth.
Data ONTAP 7-mode creates a single dedicated network connection to replicate a SnapMirror volume. This behavior lets the SteelHead SnapMirror optimization work at volume level.
By default, SnapMirror optimization is disabled for legacy 7-mode configurations.
To benefit from SnapMirror optimization, both SteelHeads must be running RiOS 8.5 or later.
To configure SnapMirror optimization for 7-mode environments
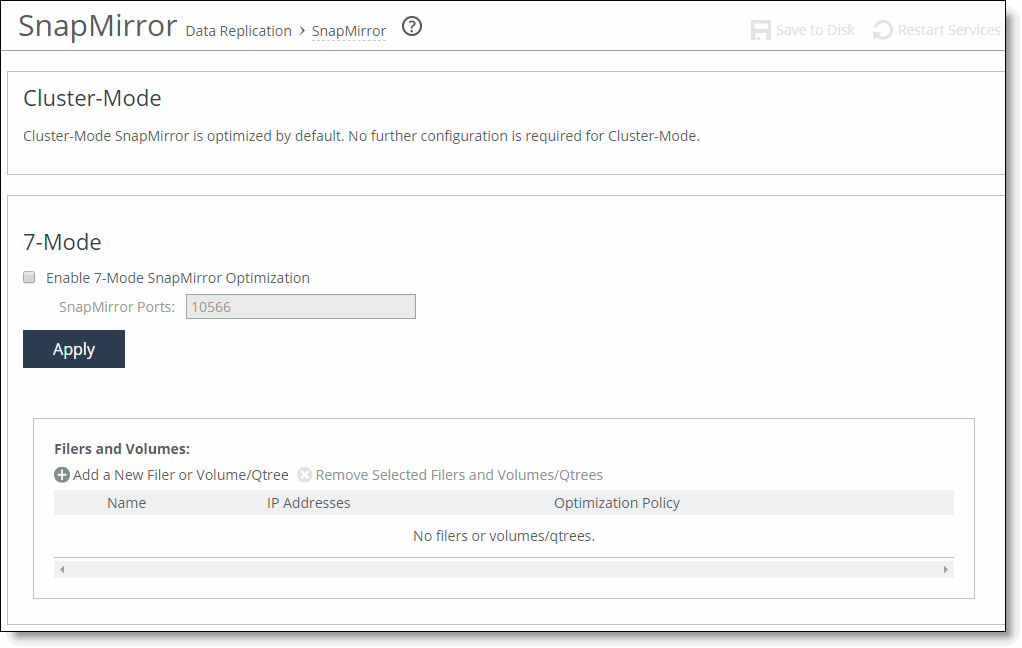
1. On the source filer-side SteelHead, choose Optimization > Data Replication: SnapMirror to display the SnapMirror page.
SnapMirror page

2. Under SnapMirror Settings, select Enable 7-Mode SnapMirror optimization.
3. By default, RiOS directs all traffic on the standard port 10566 through the SnapMirror module for optimization. Optionally, specify nonstandard individual SnapMirror port numbers, separated by commas.
Do not specify a port range.
The SnapMirror ports field must always contain at least one port.
SnapMirror optimization doesn’t support port 10565 for multipath traffic.
4. Click Add a New Filer or Volume/QTree.
5. Select the Add a Filer tab.
6. Complete the configuration as described in this table.
Control | Description |
Filer Name | Specify the name of the filer. RiOS automatically detects the volumes associated with the filer, or you can optionally add volumes to it later. |
IP Addresses | Specify source IPv4 addresses to associate with the filer, separated by a comma. You can’t specify IPv6 addresses. |
Filer Default Optimization Policy | You can configure the optimization level from no compression (none) to full Scalable Data Replication (SDR-Default). SDR optimization includes LZ compression on the cold, first-pass of the data. You can also configure LZ-compression alone (LZ-only) with no SDR. For some applications, it might be more important to get maximum throughput with minimal latency, and without compression; for others, getting maximum reduction is more important. Select an optimization policy for the default volumes and qtrees on this filer: • SDR-Default—Performs SDR and LZ compression. This is the default policy. • LZ-only—Performs LZ compression only. There is no SDR optimization with this policy. • None—Disables SDR and LZ compression. |
Filer Default SnapMirror Priority | Select a priority for use later in a QoS service class: Highest, High, Medium, Low, Lowest, No Setting. The default priority is Medium. No setting means that there’s no priority and the QoS default rules apply. |
Description | Optionally, specify a volume description or provide additional comments. |
Add | Adds the filer to the list. The Management Console redisplays the Filer table and applies your modifications to the running configuration, which is stored in memory. |
Remove Selected | Select the check box next to the name and click Remove Selected. |
7. Click Apply to save your settings to the running configuration.
8. Click Save to Disk to save your settings permanently.
10. On the destination filer-side SteelHead, choose Optimization > Data Replication: SnapMirror, select Enable SnapMirror, and restart the optimization service.
For details about data replication deployments, see the SteelHead Deployment Guide.
Adding or modifying a filer
This section describes how to create a new filer or make changes to an existing filer. You must add a filer before you can add a volume. SnapMirror needs both a source and a destination IP address for each filer.
To add a SnapMirror filer
1. Choose Optimization > Data Replication: SnapMirror to display the SnapMirror page.
2. Click Add a New Filer or Volume/QTree.
3. Select the Add a Filer tab.
4. Complete the configuration as described in this table.
Control | Description |
Filer Name | Specify the name of the filer. RiOS automatically detects the volumes associated with the filer, or you can optionally add volumes to it later. |
IP Addresses | Specify source IPv4 addresses to associate with the filer, separated by a comma. You can’t specify IPv6 addresses. |
Filer Default Optimization Policy | You can configure the optimization level from no compression (none) to full Scalable Data Replication (SDR-Default). SDR optimization includes LZ compression on the cold, first-pass of the data. You can also configure LZ-compression alone (LZ-only) with no SDR. For some applications, it might be more important to get maximum throughput with minimal latency, and without compression; for others, getting maximum reduction is more important. Select an optimization policy for the default volumes and qtrees on this filer: • SDR-Default—Performs SDR and LZ compression. This is the default policy. • LZ-only—Performs LZ compression only. There is no SDR optimization with this policy. • None—Disables SDR and LZ compression. |
Filer Default SnapMirror Priority | Select a priority for use later in a QoS service class: Highest, High, Medium, Low, Lowest, No Setting. The default priority is Medium. No setting means that there’s no priority and the QoS default rules apply. |
Description | Optionally, specify a volume description or provide additional comments. |
Add | Adds the filer to the list. The Management Console redisplays the Filer table and applies your modifications to the running configuration, which is stored in memory. |
Remove Selected | Select the check box next to the name and click Remove Selected. |
5. Click Apply to save your settings to the running configuration.
6. Click Save to Disk to save your settings permanently.
To add a SnapMirror volume or qtree
1. Choose Optimization > Data Replication: SnapMirror to display the SnapMirror page.
2. Click Add a New Filer or Volume/QTree.
3. Select the Add a Volume/QTree tab.
4. Complete the configuration as described in this table.
Control | Description |
Volume Name | Specify the name of the volume. |
Filer | Select a predefined filer from the drop-down list. |
Optimization Policy | By default, the volumes use the same optimization policy as the filer. With this setting, when you change the policy on the filer, the policy setting on the volumes updates automatically. Select an optimization policy for the volume: • SDR-Default—Performs SDR and LZ compression. This is the default policy. • Filer-Default—Sets the volume optimization policy to be the same as the filer values. This is the default policy. • LZ-only—Enables LZ compression only. There is no SDR optimization with this policy. • None—Disables SDR and LZ compression. |
SnapMirror Priority | Select a priority for use later in a QoS service class: Highest, High, Filer-Default, Low, Lowest, No Setting. The default priority is Filer-Default, which uses the same priority as the filer. With this setting, when you change the priority on the filer, the priority for the volume updates automatically. |
Add | Adds the rule to the list. The Management Console redisplays the Rules table and applies your modifications to the running configuration, which is stored in memory. |
Remove Selected | Select the check box next to the name and click Remove Selected. |
5. Click Apply to save your settings to the running configuration.
Viewing SnapMirror connections
You can view the SnapMirror connections by choosing Reports > Optimization: SnapMirror. For details, see
Viewing SnapMirror reports.


