About audit logs
Audit logging is enabled for the Portal system by default. The audit log records configuration changes made to the Portal system using the CLI and web UI. The associated details of the modified data/settings are the same for the two user interfaces, and include appropriate source, user, and session information.
The Audit Log Configuration tab lists a set of configuration object changes that can be logged; by default, all configuration objects are selected (enabled) for logging. Deselect one or more configuration objects if you don't feel it's necessary to record changes made to it.
The controls are provided that enable you to specify the retention time and number of the log entries, as well as a control for specifying one or more recipients of the audit log. Audit log data is sent out for each event.
Example authentication email
From: [myhost]
Date: Wednesday, April 1, 2020 at 14:21
To: [recipient-list]
Subject: Audit Event Notification from 10.1.121.36 - operation authentication.login at Wed Apr 1 11:20:00 2020
The following auditable event occurred at Wed Apr 1 11:20:00 2020 on 10.1.121.36:
* Action: operation
* Event Type: authentication.login
* User ID: 0
* Username: admin
* IP Address: 127.0.0.1
* User Agent: Apache-HttpClient/4.5 (Java/1.8.0_242)
* Process ID: 0
* Session ID:
* System Module:
* Successful (1 = Yes, 0 = No)? 1
* REST Link: request
* REST namespace: mgmt.aaa
* REST version: 2
* REST resource: access_tokens
* Occurred 1 times
* Additional details: [{"field": "auth_method", "value": "LOCAL"}, {"field": "username", "value": "admin"}]
You are receiving this email because this address is listed as a Recipient for NPM Audit Events"
Example configuration change email
From: [myhost]
Date: Friday, April 3, 2020 at 13:45
To: [recipient-list]
Subject: Audit Event Notification from 10.1.121.36 - update configuration_change.networking at Fri Apr 3 10:44:30 2020
The following auditable event occurred at Fri Apr 3 10:44:30 2020 on 10.1.121.36:
* Action: update
* Event Type: configuration_change.networking
* User ID: 0
* Username: admin
* IP Address: 10.18.24.7
* User Agent: webui
* Process ID: 0
* Session ID:
* System Module:
* Successful (1 = Yes, 0 = No)? 1
* REST Link: set
* REST namespace: mgmt.networking
* REST version: 1.1
* REST resource: host_settings
* Occurred 1 times
* Additional details: [{"field": "hostname", "old": "localhost", "new": "localhost2"}]
You are receiving this email because this address is listed as a Recipient for NPM Audit Events.
About audit trail
View the audit trail under Administration > System Status: Audit Trail.
In the audit trail window, you can see all audit log events and filter the data by username, audit type, action, or whether it was successful.
About recipients
Settings for recipients are under Administration > System Settings: Recipients.
Recipients are listed names consisting of one or more email addresses or a single SNMP receiver. You can send recipients audit log data via email or syslog notifications. Recipients must be defined before they are available for inclusion on the Audit Log Configuration page.
New recipient options
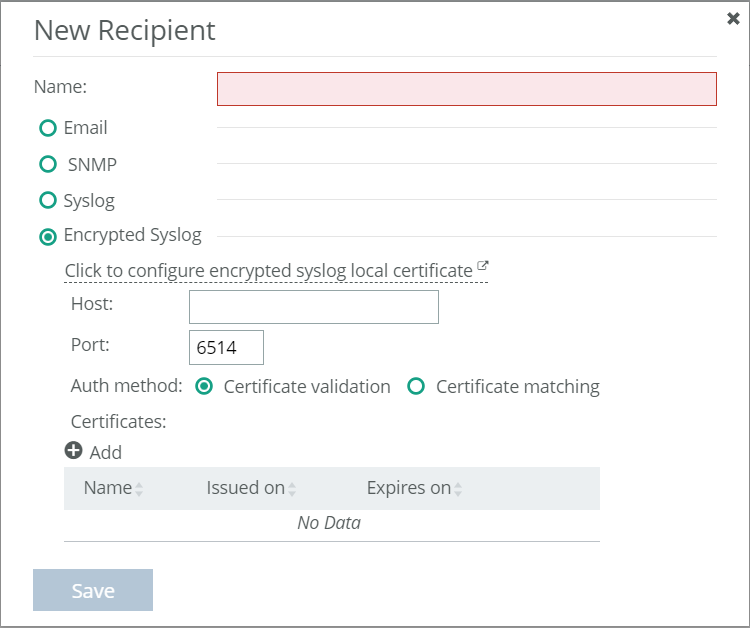
Adding a recipient
1. Choose Administration > System Settings: Recipients.
2. Choose Add to create a new recipient entry.
3. Enter a name.
4. Select the type of the recipient: Email, SNMP, Syslog, or Encrypted Syslog, with each recipient being a single type. Selecting an option makes relevant fields for it accessible. Specify the details that will enable a notification to reach that recipient.
5. Save your changes.
Recipients and their details are listed on the Recipients page. You can click Test to send a notification to the recipient to confirm that it’s been configured as you expect.
Editing recipient entries
1. Mouse over an entry to display the edit icon (pencil).
2. Choose the edit icon and make your edits on the Edit Recipient page.
3. Choose Apply to keep your edits or Revert to return to the previous specification.
Deleting recipient entries
1. Mouse over an entry to display the check box at the beginning of the entry and the Delete icon at the end of the row.
2. Either
– choose the Delete icon to delete a single entry, or
– select the check box at the beginning of the row, and then choose Delete near the top of the page.
About system health notifications
Settings for system health notifications are under Administration > System Settings: System Health Notifications.
You can configure the recipients for health notifications for a number of system status health indicators. Mouse over an alert to display the edit icon (pencil) and choose recipients. Apply the changes, or revert back to the original settings.
Coredump Detected indicates a problem if any of the critical services goes down. A coredump is collected at “/coredumps”. This alert is enabled by default.
Time Synchronization indicates a problem if NTP or PTP is enabled, and the system has not synchronized to a clock for 60 seconds. (It checks every 30 seconds, and triggers if two consecutive checks show that the clock is not synchronized.) This alert is enabled by default.
Status notifications will be sent via Email, SNMP trap, Syslog and Encrypted Syslog recipients.
Specifically, notifications are sent when:
• there is a transition from any good status (for example, OK, New, Rebuilding) to a bad status (for example, Failing, Failed, Missing, Invalid). This also triggers an alert that's visible in the Alert Events log in the web UI.
• an object transitions back to a good status from a bad status. In alert terms, the alert has ended.
For each recipient, notifications can be sent for Minor, Major, and Critical conditions. Notifications can be sent continuously if a bad storage condition persists for some period of time.
The status polling interval is every 60 seconds.
Licensing Portal
Portal requires a license to display metric data from data sources. All data sources are disabled until a license is added.
To relocate a license from one instance of Portal to another (including migrating a license from an instance of Portal 1.5.x to 2.1.x), follow the instructions in Knowledge Base article
S27654. (You must log in to view this Knowledge Base article.)
Adding licenses
2. Copy the token string.
3. Obtain a License Request Key. License Request Keys identify the product installation. In Portal, from the Administration menu, choose Licensing.
4. Paste the token string in the Token field and click Get License Request Key.
5. Copy the License Request Key string.
Obtaining licenses
1.
Go to https://support.riverbed.com/content/support/licensing.html.
2. Paste the License Request Key in the Enter Unique Product Identifier field, click Next, and follow the instructions. The License is sent to you by email.
3. Copy the license string.
4. Add the license to the product. On the Portal License Management page, click Add Licenses. In the Add Licenses dialog box, press Ctrl+V to paste the License string and then click Save.
The saved license appears in the list of current licenses, and the Configure Data Sources dialog box appears.
Command-line interface
Most system operations can be done using the Administration menu in the Portal menu bar in the web UI. The web UI is the recommended way of managing Portal when possible.
The Portal command-line interface (CLI) is accessed using SSH to the Portal IP address, using an account with System Administrator privileges. The default administrator account is username admin and password admin. You can also access Portal running on a VMware virtual machine with the VM console.
Different CLI commands are available in different CLI modes. Each mode has a unique command-line prompt. When entering CLI commands, the use of two special keys can provide information, options, and auto-completion of commands:
• Use the question mark key (?) for an explanation of available CLI commands.
• Use the Tab key to show the next entries on a command line and to autocomplete a CLI entry.
Here is an example CLI session, from login to exit. Text in angle brackets (< >) demonstrates how special keys can be used.
login as: admin
localhost's password: admin
Last login: Wed Mar 14 07:08:04 2018 from 10.44.119.5
localhost ><?>
enable Enter enable mode
exit Exit config mode or logout
no Negate or clear certain configuration options
show Display system configuration or statistics
localhost > enable
localhost #<?>
configure Enter configuration mode
disable Leave enable mode
exit Exit config mode or logout
no Negate or clear certain configuration options
show Display system configuration or statistics
localhost # con<Tab> terminal
localhost (config) #<?>
auth Configure authentication settings
data-collection Turn on/off data collection
exit Exit config mode or logout
http HTTP settings
https HTTPS settings
interface Configure network interfaces
ip Configure IP settings
no Negate or clear certain configuration options
Portal-broker Configure Portal broker settings
Portal-core Configure Portal core settings
reboot Reboot the system immediately
secure_vault Configure secure vault
show Display system configuration or statistics
shutdown Shut down the system immediately
storage Configure storage settings
sysdump Sysdump operation
system System commands
user Add/Modify a user account
wizard Run the configuration wizard
localhost (config) # exit
localhost # exit
Connection to 680-olaf114.lab.nbttech.com closed.