Configuring the Date and Time
You set the date and time in the Date and Time page. This section includes these topics:
You can either set the system date and time by entering it manually or by assigning an NTP server to the SCC. By default, the appliance uses the Riverbed-provided NTP server:
• 0.riverbed.pool.ntp.org
• 1.riverbed.pool.ntp.org
• 2.riverbed.pool.ntp.org
• 3.riverbed.pool.ntp.org
To configure the date and time
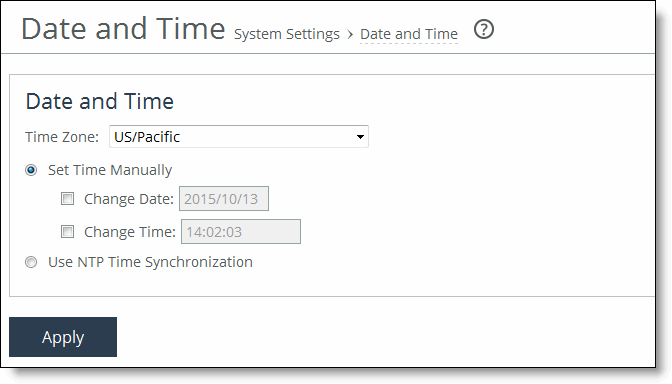
1. Choose Administration > System Settings: Date and Time to display the Date and Time page.
Figure: Setting the Date and Time

2. Under Date and Time, complete the configuration as described in this table.
Control | Description |
Time Zone | Select a time zone from the drop-down list. The default value is GMT. Note: If you change the time zone, log messages retain the previous time zone until you reboot. |
Set Time Manually | Select to set the time manually. Select these options: • Change date - Specify the date in this format: YYYY/MM/DD. • Change time - Specify military time in this format: HH:MM:SS. |
Use NTP Time Synchronization | Select to use NTP time synchronization. |
Change Date | Specify the date in this format: YYYY/MM/DD. |
Change Time | Specify military time in this format: HH:MM:SS. |
Apply | Applies your settings to the running configuration. |
3. Click Save to Disk to save your settings permanently.
NTP Authentication and Servers
NTP authentication verifies the identity of the NTP server sending time information to the SCC. RiOS 8.5 supports MD5-based Message-Digest Algorithm symmetric keys and Secure Hash Algorithm (SHA1) for NTP authentication. MD5 is a widely used cryptographic hash function that produces a 128-bit (16-byte) hash value. SHA1 is a set of related cryptographic hash functions. SHA1 is considered to be the successor to MD5.
NTP authentication is optional.
• Configuring NTP authentication involves these steps that you can perform in any order:
• Configure a key ID and a secret pair.
• Configure the key type.
• Configure the NTP server with the key ID.
The default NTP configuration points to the Riverbed-provided NTP server IP address 208.70.196.25 and these public NTP servers:
• 0.riverbed.pool.ntp.org
• 1.riverbed.pool.ntp.org
• 2.riverbed.pool.ntp.org
• 3.riverbed.pool.ntp.org
Riverbed recommends synchronizing appliances to an NTP server of your choice.
To add a new NTP server
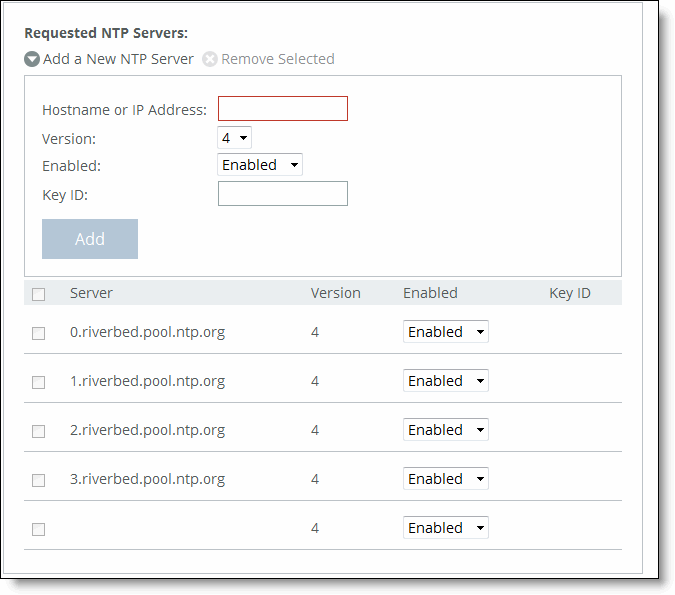
1. Choose Administration > System Settings: Date and Time to display the Date and Time page.
Figure: Adding NTP Servers

2. Complete the configuration as described in this table.
Control | Description |
Add a New NTP Server | Displays the controls to add a server. |
Hostname or IP Address | Specify the hostname or IP address for the NTP server. You can connect to an NTP public server pool: for example, 0.riverbed.pool.ntp.org. When you add an NTP server pool, the server is selected from a pool of time servers. |
Version | Select the NTP server version from the drop-down list: 3 or 4. |
Enabled/Disabled | Select Enabled from the drop-down list to connect to the NTP server. Select Disabled from the drop-down list to disconnect from the NTP server. |
Key ID | Specify the MD5 or SH1 key identifier to use to authenticate the NTP server. The valid range is from 1 to 65534. The key ID must appear on the trusted keys list. |
Add | Adds the NTP server to the server list. |
Remove Selected | Select the check box next to the name and click Remove Selected. |
3. Click Save to Disk to save your settings permanently.
Current NTP Server Status
NTP server state information appears in these server tables:
• Requested NTP server table - displays all of the configured NTP server addresses.
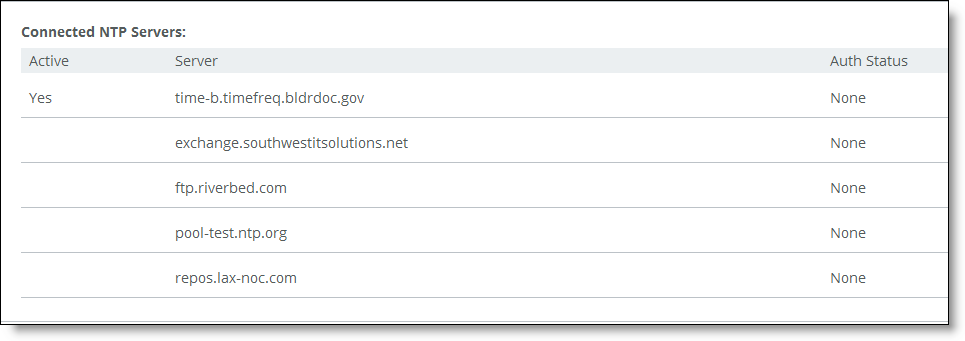
• Connected NTP server table - displays all of the servers to which the SteelHeads is actually connected.
When you request a connection to an NTP server in a public NTP server pool, the server IP address does not map to the actual NTP server to which the SCC connects. For example, if you request *.riverbed.pool.ntp.org, querying the pool address does not return the IP address of the pool hostname, but instead returns the IP address of an NTP server within its pool. For example, when resolving 0.riverbed.pool.ntp.org returns the first NTP server, the connected NTP server table displays the IP address of this first NTP server.
This information appears after an NTP server name:
• Authentication information; unauthenticated appears after the server name when it is not using authentication.
When RiOS has no NTP information about the current server, nothing appears.
To view NTP server information
1. Choose Administration > System Settings: Date and Time to display the Date and Time page.
Figure: Viewing NTP Server Information

NTP Authentication Keys
NTP authentication uses a key and a shared secret to verify the identity of the NTP server sending timing information to the SCC. RiOS encrypts the shared secret text using MD5 or SHA1, and uses the authentication key to access the secret.
NTP keys appear in a list that includes the key ID, type, secret (displays as the MD5 or SHA1 hash value), and whether RiOS trusts the key for authentication.
You can only remove a key from the trust list using the CLI command ntp authentication trustedkeys. For details, see the Riverbed Command-Line Interface Reference Manual.
To add a new NTP authentication key
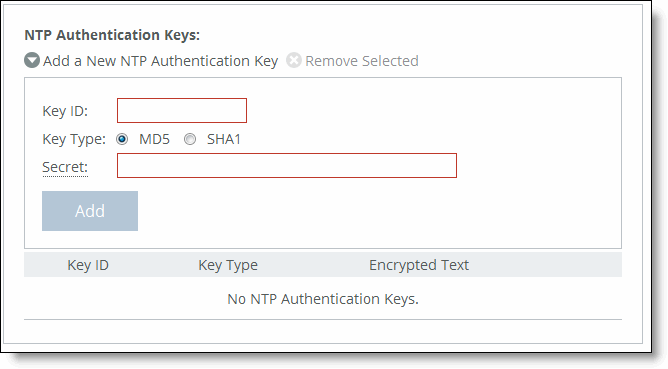
1. Choose Administration > System Settings: Date and Time to display the Date and Time page.
Figure: Adding an NTP Authentication Key

2. Complete the configuration as described in this table.
Control | Description |
Add a New NTP Authentication Key | Displays the controls to add an authentication key to the key list. Both trusted and untrusted keys appear on the list. |
Key ID | Optionally, specify the secret MD5 or SHA1 key identifier for the NTP server. The valid range is from 1 to 65534. |
Key Type | Select the authentication key type: MD5 or SHA1. |
Secret | Specify the shared secret. You must configure the same shared secret for both the NTP server and the NTP client. The MD5 shared secret • is limited to 16 alphanumeric characters or less, or exactly 40 characters hexadecimal. • cannot include spaces or pound signs (#) • cannot be empty • is case sensitive The SHA1 shared secret: • is limited to exactly 40 characters hexadecimal • cannot include spaces or pound signs (#) • cannot be empty • is case sensitive The secret appears in the key list as its MD5 or SHA1 hash value. |
Add | Adds the authentication key to the trusted keys list. |
Remove Selected | Select the check box next to the name and click Remove Selected. |
3. Click Save to Disk to save your settings permanently.


