Using the ESXi Installation Wizard
The VSP and ESXi installation wizard guides you through setting up your network settings, your local datastore, and your vCenter license (if applicable) and pushes these settings to the ESXi configuration.
Before running the installation wizard, configure the VSP disk space allocation, if necessary. For details, see
Configuring Disk Management.To set up ESXi using the installation wizard
1. Choose EX Features > Virtualization: Virtual Services Platform to display the Virtual Services Platform page.
2. Click the button to launch the ESXi Installation Wizard.
The ESXi Installation Wizard opens and displays the Welcome page.
3. Click Next.
The Network Settings page appears.
Figure: Network Settings Page
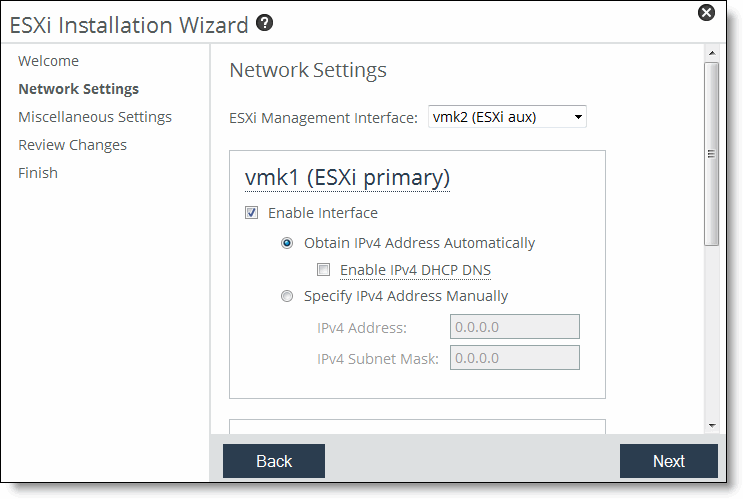
4. Under Network Settings, complete the network configuration as described in the following table.
Note: During the ESXi installation, an HPN virtual switch on vnic0 is created. The switch has a kernel port and a virtual machine port. This is used for communication within the appliance. Do not modify or delete this virtual switch.
You must specify IP address settings for the ESXi management interface.
Control | Description |
ESXi Management Interface | Select which interface (vmk1 for primary or vmk2 for auxiliary) you want to use for vSphere management access. The default is vmk1. When only one vmk interface is enabled, the wizard selects it automatically. If you disable a vmk interface and later decide to enable it, you must either manually create the vmk interface through vSphere or reinstall VSP. |
Obtain IPv4 Address Automatically | Specify this option to automatically obtain the ESXi IPv4 address from a DHCP server. A DHCP server must be available so that the system can request the IP address from it. • Enable IPv4 DHCP DNS - Select this option to enable IPv4 dynamic DNS. Dynamic DNS is a method, protocol, or network service that enables a network device, such as a router or computer system using the Internet Protocol Suite, to notify a Domain Name System (DNS) name server to change, in real time, the active DNS configuration of its configured hostnames, addresses, or other information. |
Specify IPv4 Address Manually | Specify this option if you do not use a DHCP server to set the ESXi IP address. Specify the following: • IPv4 Address - Specify an ESXi IPv4 address. Do not enter a RiOS IPv4 address. • IPv4 Subnet Mask - Specify an IPv4 subnet mask. • IPv4 Gateway - Specify an IPv4 gateway. The gateway field is available only for the interface that is currently selected as the ESXi management interface. |
5. Click Next.
The wizard validates the network settings, and the Miscellaneous Settings page appears.
If there is an error in the configuration, an error message appears and you must dismiss the message, correct your network settings, and click Next again to proceed to the Miscellaneous Settings page.
Figure: Miscellaneous Settings Page
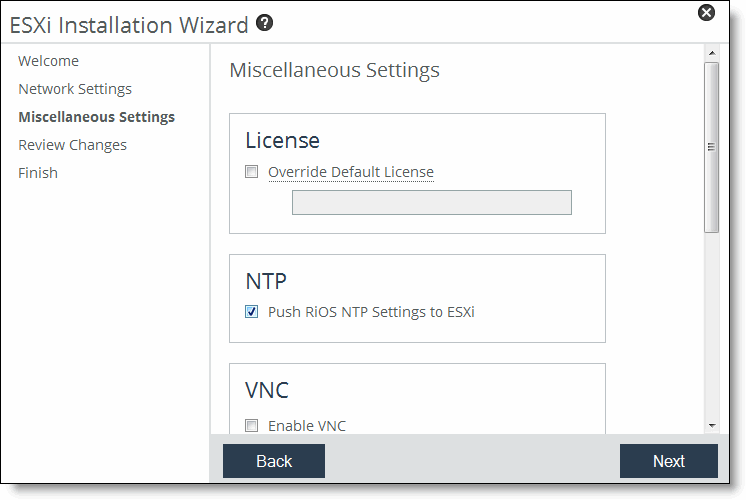
6. Complete the configuration as described in the following table.
Control | Description |
Override Default License | Specify a vCenter license to override the default ESXi license. The EX software includes a base ESXi license for you to manage your virtual machines, but this license does not include vCenter support. If you want to use vCenter for management, you must purchase a vCenter license from VMware and enter it here. |
Push RiOS NTP Settings to ESXi | Select to use the NTP settings from RiOS for ESXi. By default, this is enabled. |
VNC | Enable VNC - Enables the use of a VNC (Virtual Network Computing) client to connect directly to an ESXi host that is running on a SteelHead EX. Port - Specify a port. By default, a VNC client uses port 5900. Password/Confirm Password - Specify a password. The password must be a maximum of eight characters. Confirm the password in the Password Confirm text box. |
ESXi Credentials | Specify and confirm the ESXi password. The password must meet the password requirements currently set in ESXi. Important: If you change the ESXi password using VNC or vSphere, you must change it in the Management Console. Changing the ESXi password using VNC or vSphere triggers the ESXi Communication Failed alarm in RiOS. When the passwords are not synchronized, RiOS cannot communicate with ESXi. To synchronize the passwords, enter the new password in the EX Features > Virtualization: Virtual Services Platform page. |
7. Click Next.
The confirmation page appears and displays the configuration settings for ESXi. The settings include both the values you specified in the wizard as well as default configuration settings optimized for ESXi with the SteelHead EX.
8. Review the changes.
9. Click Install ESXi.
The system copies the settings to the ESXi configuration. This is a one-time, one-way transfer. The changes overwrite any changes that were made directly in ESXi outside of the wizard. You can make future changes to the ESXi configuration through vSphere and vCenter, but if you run the Installation Wizard again, it overwrites all the changes in ESXi with the new values from the wizard.
The wizard places a green check mark next to each item as the installation completes, which takes approximately 10 minutes.
10. Click Close to close the wizard and return to the Management Console page.
VSP and ESXi restart with the new values. VSP is now available and the page displays the current resource allocations and a VSP status of Available.
Managing ESXi and Virtual Machines with vSphere
The vSphere Client is a downloadable interface for administering ESXi and vCenter Server.
The vSphere Client user interface changes, depending on the server:
• When the server is an ESXi host, the vSphere Client displays only the options appropriate to single host management. SteelHead EX provides this capability without the need for a separate license.
• When the server is a vCenter Server system, the vSphere Client displays all the options available to the vSphere environment, according to the licensing configuration and the user permissions. To use vCenter, you need a separate license from VMware.
To manage the host with the vSphere Client and vCenter Server, you must install the applications on a computer with network access to the ESXi host. The ESXi host must be powered on and the VSP status must be available.
You can download the vSphere applications from the VMware website, or download the vSphere Client from the ESXi host.
To download the vSphere Client from the ESXi host
1. Connect to the ESXi host using the IP address for the vSphere management interface.
This is the address used for ESXi management. The IP address appears in the VSP Status section of the EX Features > Virtualization: Virtual Services Platform page of the SteelHead Management Console.
The VMware ESXi welcome page appears.
2. Click the link to download the vSphere Client.
To log in to the VSP ESXi host using vSphere
1. Start the vSphere Client.
2. In the IP Address / Name field, type the management IP address that appears in the VSP Status section of the EX Features > Virtualization: Virtual Services Platform page of the SteelHead Management Console.
3. For the user name, log in as root.
4. Enter the password you set up when you configured ESXi in the SteelHead Management Console.
5. Click Login.
Security warning messages appear because the vSphere Client detects certificates signed by the ESXi host or vCenter Server system (default setting).
6. To ignore the security warnings that appear, click Ignore.
The vSphere Client opens and displays information about the ESXi host.
To manage ESXi using vCenter
1. Start the vSphere Client.
2. In the vSphere Client login window, type the vCenter Server IP address or host name.
3. Type your user name and password.
4. Click Login.
Security warning messages appear because the vSphere Client detects certificates signed by the ESXi host or vCenter Server system (default setting).
5. To ignore the security warnings that appear, click Ignore.
6. Add the ESXi host.
vCenter discovers any virtual machines running on the host, as well as the server details.
Consult the VMware vSphere documentation for complete details about working with vSphere.
Creating and Configuring Virtual Machines
After you have configured VSP and ESXi, you can add virtual machines using VMware tools. You can add a virtual machine to the SteelHead EX host by creating a new virtual machine or by deploying a virtual appliance. (A virtual appliance is a prebuilt virtual machine with an operating system installed.)
To learn how to add a virtual machine using VMware tools, go to the vSphere 6.0 Documentation Center at
http://pubs.vmware.com/vsphere-60/index.jsp.
Helpful topics include:
Managing Virtual Machines Using VNC
You can use a VNC (virtual network computing) client to connect to the direct console user interface (DCUI) of the ESXi server. You can use a client such as TightVNC on a Windows or Linux host or client system.
VSP must be running and indicate an active status before you can connect to the ESXi host on the SteelHead EX with a VNC client.
To use a VNC client, configure VNC for VSP in the Management Console.
To enable VNC access
1. Choose EX Features > Virtualization: Virtual Services Platform.
2. Select Enable VNC.
3. Accept the default port of 5900 or specify another port.
4. Provide a password for VNC and confirm the password.
5. Click Apply.
6. Click Restart.
To connect to the ESXi host with a VNC client, start the VNC client application and specify the hostname or the IP address of the RiOS interface associated with the EXSi management interface, along with the VNC port number. For example, if you chose vmk1 (ESXi primary) as the ESXi management interface, enter the RiOS primary IP address to get VNC access to ESXi.
After you connect to the ESXi host, you must log in. Log in as root and use the password specified in the Management Console.
If you do not see the ESXi console after connecting with the VNC client, check your VNC display settings or try another VNC client.
Using the VNC Client
From the VNC, you have the following options:
• Configure Password - Set the password.
Changing the ESXi password using VNC or vSphere Management triggers the ESXi Communication Failed alarm in RiOS. When the passwords are not synchronized, RiOS cannot communicate with ESXi. To synchronize the passwords, enter the new password in the EX Features > Virtualization: Virtual Services Platform page.
• Configure Management Network - View or modify the host's network management settings.
• Restart Management Network - Restart the management interface and obtain or renew the DHCP lease.
• Test Management Network - Perform a brief network test.
• Restore Network Setting - Revert all network configuration values to their default values.
• Configure Keyboard - Select the layout type of the keyboard.
• Troubleshooting Options - View or change the state of ESXi troubleshooting options, such as ESXi Shell, SSH, and Restart Agents.
• View System Logs - View log files for the system, such as Syslog, Vmkernel, Config, Management Agent, VirtualCenter Agent, and VMware ESXi Observation.
• View Support Information - View information such as serial number, license serial number, SSL thumbprint, and SSH DSA key fingerprint.
• Reset System Configuration - Revert all system parameters to their software defaults, including resetting the root password.
• Shut down/Restart - Shut down or restart the ESXi platform.