Enabling Security Using Rules
This topic describes how to add inbound and outbound rules to create a secure firewall policy.
How do inbound and outbound rules work?
Rules determine a secure firewall policy that regulates who you want to have access to what. Security policies can apply to the entire network, such as a single security policy to turn zone access on and off. You can also make the policy more granular to accommodate specific security needs. For example, you can create firewalled zones that require specific user permission to use specific applications. Or, you can create one or more firewalled sites.
Policy controls
Policy controls are built on two types of rules:
•Outbound/Internal Rules - Define the policy for internal users and devices accessing internal or external applications.
•Inbound (NAT) Rules - Define the policy for external (internet) access to internal applications. Inbound rules offer optional support for NAT, port translations, and an external host white list.
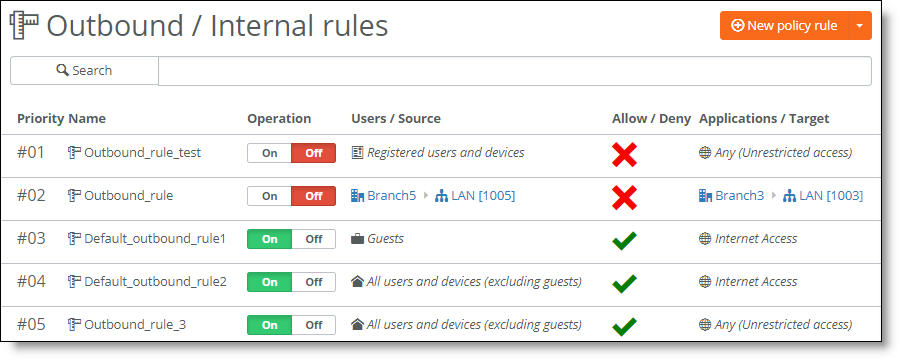
SteelConnect provides two outbound rules that define the default policy for an organization. The first rule allows all guests to access the internet and the second rule allows all other users and devices (excluding guests) to access the internet.
By default, communication between sites is disallowed through an explicit “deny” rule until you create a rule to allow access.
Outbound and internal rules
The outbound and internal rules specify a source, a target, and an action. The source can be either a special catch-all selection like all registered users and devices, or a custom selection of user groups, hosts and networks, zones, device groups, individual users, individual devices, or policy tags.
We recommend that you base the outbound and internal rules on user groups and device groups, and then make exceptions using policy tags.
The target is either the special selector Any that matches any target, Internet that matches all traffic not belong to the corporate network, a selection of zones, a selection of Classic VPN remote networks, or a selection of application groups and applications.
You create a rule, place it in the desired order, and select whether it’s allowed or denied.
Creating outbound rules to set a security policy
SteelConnect evaluates the rules in numerical order starting with rule 1. If the conditions set in the rule match, then the rule is applied. If the conditions set in the rule don’t match, then the rule isn’t applied and the system moves on to the next rule. For example, if the conditions of rule 1 don’t match, rule 2 is consulted. If rule 2 matches the conditions, it is applied, and no further rules are consulted.
In the list of rules, a green check mark indicates that the rule’s action is Allow and a red x indicates that the rule’s action is Deny.
By default, SteelConnect allows ICMP packets to enter the zone using a separate ICMP policy. You can change this setting. ICMP policy rules override the security policy set by rules. For details, see
Zone settings.
To create an outbound rule to allow all users access to all zones
1. Choose Rules > Outbound/Internal.
2. Click New policy rule.
3. Select All (excluding guests).
4. Click Allow.
5. Under Applications / Targets, select each zone from the drop-down list.
6. Click Submit.
To create an outbound rule that is limited to one or more sites
1. Choose Rules > Outbound/Internal.
2. Click New policy rule.
3. Select the rule position.
4. By default, the rule applies to all sites. To apply the rule to certain sites, click the search box and select one or more sites.
5. Under Users/Sources, select the users and sources the rule applies to from the drop-down list.
6. Click the search box to select users or sources from the drop-down list.
7. Click Allow.
8. Click Submit.
To create an outbound rule that is limited to one or more hosts and networks
1. Choose Rules > Outbound/Internal.
2. Click New policy rule.
3. Select the rule position.
4. By default, the rule applies to all sites. To apply the rule to certain sites, click the search box and select one or more sites.
5. Under Users/Source, choose Hosts and Networks.
6. Specify one or more IPv4 or IPv6 host or network IP addresses. Put each IP address on a new line.
7. Click Allow.
8. Click Submit.
To create an outbound rule that blocks Facebook from a single IP address
1. Choose Rules > Outbound/Internal.
2. Click New policy rule.
3. Select the rule position.
4. Under Users/Source, choose Hosts and Networks.
5. Specify an IPv4 or IPv6 address.
6. Click Deny.
7. Under Applications / Targets, choose Selected applications or groups.
8. Select Facebook from the drop-down list.
9. Click Submit.
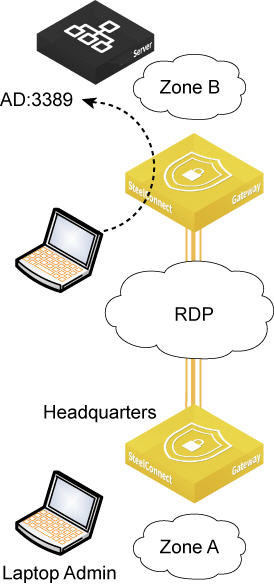
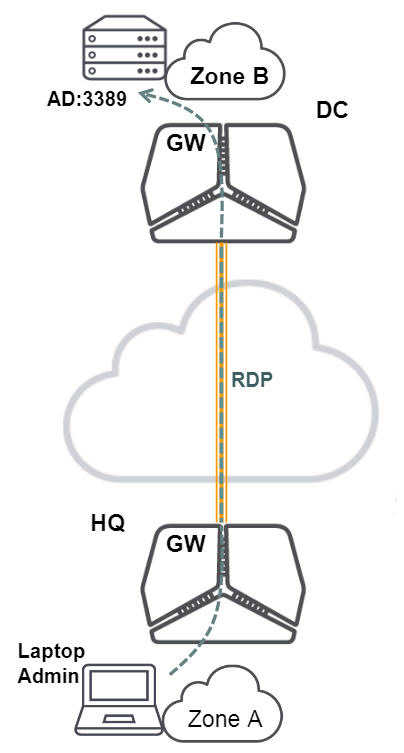
To create a rule that allows a laptop administrator access to the Active Directory server in the data center using port 3389
This procedure uses the custom application RDP_AD created in
Custom applications.
1. Choose Rules > Outbound/Internal.
2. Click New policy rule.
3. Select the rule position.
4. Choose Selected Users, Devices, Groups or Tags.
5. Choose Laptop Admin.
6. Click Allow.
7. Under Applications / Targets, choose Selected applications or groups.
8. Select the custom application RDP_AD from the drop-down list.
9. Click Submit.
Rule allowing laptop administrator access to the Active Directory server in the data center
Inbound (NAT) rules
Because the gateways use a firewalled system, you need rules to allow traffic for both outbound and inbound access. Everything is blocked until you create a rule to allow access. Use inbound rules to control any services you want to advertise to the internet. An inbound rule can use destination NAT (DNAT) or full NAT, and you can also apply a port offset.
To simplify inbound rule configuration, you can configure a private WAN as trusted. When a WAN is trusted, you allow access for all connections that arrive on an uplink to that WAN. This saves you from creating specific rules for each type of connection you want to allow. For details, see
WAN settings.
Use inbound NAT when the return traffic in the zone is not routed back to the gateway. With inbound NAT, the source IP address of the inbound traffic is NATed to the IP address of the Riverbed gateway within the zone.
For inbound NAT rules on SteelConnect gateways, the device providing the service must be in a zone that is local to the gateway advertising the service.
A white list is available to limit access to the exposed application to specific external hosts.
On SteelHead SD 570-SD, 770-SD, and 3070-SD appliances, SteelConnect performs the inbound NAT rule check on the first packet per flow. After a rule allows the first packet in the flow and the flow is created, SteelConnect doesn’t apply any more inbound rules on the flow.
Configuring external to internal port forwarding on a SteelConnect gateway
This section describes how to allow clients on the internet to access select applications on your internal network, behind the gateway. It includes instructions on how to create a custom application when the device is behind a Layer 3 switch.
Some use cases for this type of configuration are:
•Opening a port to a web server.
•Opening a port to a voice gateway using the Session Initiation Protocol (SIP).
Basic steps
The basic configuration steps are:
1. Create a third-party zone that the device hosting the service behind the Layer 3 switch resides in.
2. Register the host device with SCM.
3. Create a custom device-type application for use in an inbound NAT rule.
4. Create an inbound (NAT) rule that uses the device-type application.
The next sections provide detailed steps.
Creating a third-party zone
The device hosting the service must reside in a zone that is local to the gateway advertising the service.
To create a third-party zone
1. Choose Network Design > Zones.
2. Click New Zone.
3. Select the site in which to deploy the new zone from the drop-down list.
4. Name the zone. For example, Remote Network.
5. Click Submit.
Registering a device with SCM
You need to register a device with SCM so that you can select it in the inbound (NAT) rule later.
To register a device
1. Choose Devices.
2. Click New Device.
Registering a device for a requested host
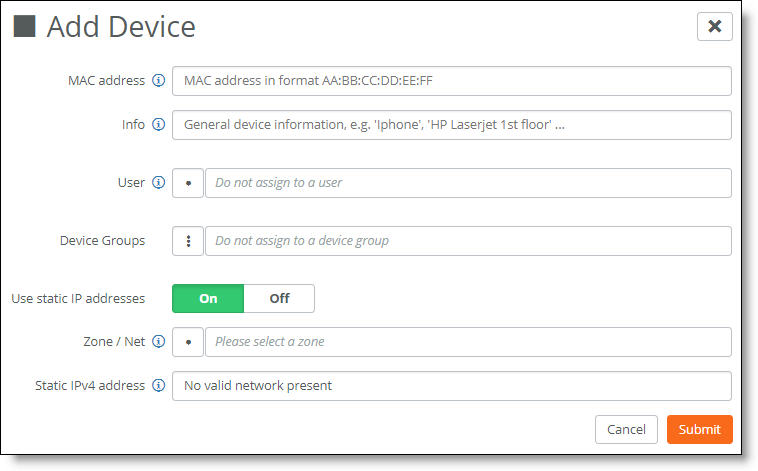
3. Enter a fake MAC address for the device. A device’s unique MAC address is assigned by its manufacturer. The MAC address field is a required field, but because SteelConnect doesn’t actually authorize the address you can enter a fake MAC address.
4. After Use static IP addresses, click
On. Using a static IP lease to the client/host to which you are setting up forwarding ensures that the IP address does not change and disrupt your inbound NAT rules, described in
Creating an inbound (NAT) rule.
If the device is Layer 2 adjacent to the gateway, a zone will already exist, and you can skip
Step 5.
6. Enter the static IPv4 address for the local host system.
7. Click Submit.
Creating a custom application
The next task is to create a custom application that is defined as a Device application type. The custom application defines which incoming ports are allowed and will be added later in the inbound rule created in the next task.
To create an application
1. Choose Applications > Custom.
2. Click Add Application.
Registering a device for a requested host
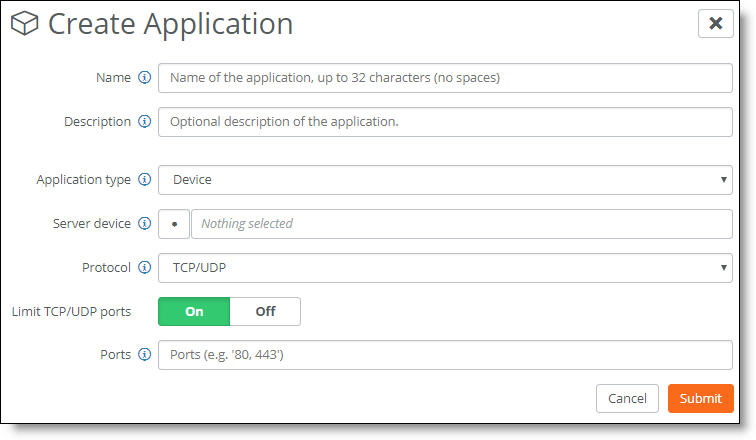
3. Name the application.
4. Describe the application.
5. After Application type, select Device from the drop-down list.
6. After Server Device, click the search selector and select the relevant server from the device list. The server will be used as the destination target.
7. After Protocol, select TCP/UDP from the drop-down list.
8. To forward specific ports, click On after limit the TCP/UDP ports.
9. Enter the incoming ports to be forwarded. Specify ranges with a dash. Separate several ports or ranges with a comma.
10. Click Submit.
Creating an inbound (NAT) rule
1. Choose Rules > Inbound/NAT.
2. Click New inbound rule.
3. Enter a name for the rule.
5. Select one or more uplinks where you want to implement this rule.
6. Leave the other fields with their default values.
7. Click Submit.
The rule appears on the inbound (NAT) rule list.
Inbound rule examples
Example: Creating an inbound rule to allow all users access to a web server inside of your location using port 80
1. Choose Rules > Inbound/NAT.
2. Click New Inbound Rule.
3. Select an internal application.
4. Select an uplink or multiple sets of uplinks to advertise the service on port 80 out; whether it be across an MPLS uplink or a public internet uplink.
5. Select the mode in which to advertise the service. Optionally, select No NAT and type a single, registered WAN IP classful address for that specific web server.
6. Turn reflection on to provide internal users access to the service from inside the local zones.
Turn the external host white list on to define a list of IP hosts that are able to access the service. Specify one IPv4/IPv6 host/network or DNS hostname per line.
7. Click Submit.
Example: Creating an inbound rule to make the Active Directory server available to the internet
This example uses the custom application RDP_AD, created in
Custom applications. Only device application types are allowed with inbound rules.
1. Choose Rules > Inbound/NAT.
2. Click New inbound rule.
3. Select RDP_AD.
4. Select the DC uplink.
5. Select DNAT to use destination NAT.
6. Under NAT Port mappings, select 3389 > 3389 internal.
7. Leave the NAT port offset and the external host white list off.
8. Click Submit.
An inbound rule to make the Active Directory server available to the internet