SteelConnect in the Cloud
This topic describes how to integrate Amazon Web Services and Microsoft Azure with SteelConnect. It includes these sections:
Cloud overview
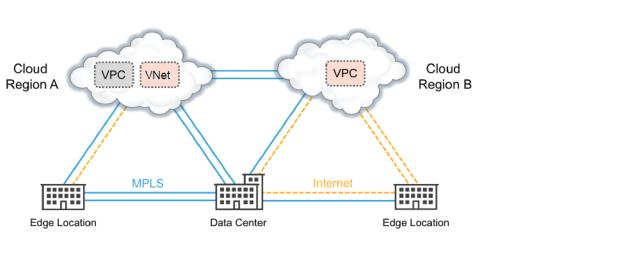
SteelConnect offers seamless integration with AWS and Microsoft Azure. Connect your IaaS/cloud vendor accounts to SCM, and SteelConnect will find all your subnets, in all networks, in all regions. Import an entire network, or individual subnets, into SCM with the simple click of a button. Then deploy virtual SteelConnect gateways—with optional SteelHead WAN optimization and redundancy—onto your SCM-managed subnets to build an interconnected, full-mesh virtual private network (VPN).
AWS, Azure, and SteelConnect use different terms to refer to similar network concepts. Virtual private clouds (in AWS) and VNets (in Azure) are called sites in SteelConnect, and subnets are referred to as zones.
Sample organization with applications and services in the cloud
The cloud deployment process is simple and fast, involving these basic steps:
1. Subscribe to Riverbed cloud services.
2. Configure your cloud account on SteelConnect Manager.
3. Determine options, such as redundancy and SteelHead WAN optimization.
4. Import networks and connect subnets into SteelConnect.
5. Deploy gateways into your virtual network.
Although the process is similar for AWS and Azure deployments, there are some features only available in AWS and there are some unique elements in each deployment. To avoid any confusion, this topic provides separate instructions for AWS and Azure.
To get started, determine if you want to include WAN optimization in your cloud deployment and then go to the section for your cloud provider:
For information about more advanced cloud deployments and features, see the SteelConnect SD-WAN Deployment Guide.
Including SteelHead WAN optimization with your cloud deployment
You can configure SteelConnect gateways with SteelHeads to provide WAN optimization. When you include WAN optimization, SteelHead images engineered for SteelConnect are deployed with your gateways into your virtual network. All routing and licensing is automatic, and the SteelHead is covered by Riverbed support.
Logically, the SteelHead sits between the gateway and the subnets within the virtual network, or data center or branch. SteelHeads use autodiscovery to peer with each other and begin optimizing traffic throughout your SteelConnect network.
WAN transparency is not enabled by default on SteelHeads in SteelConnect. Effectively, this means that if the gateway is configured with rules that rely on client/server IP addresses, those rules will not apply. However, you can manually configure WAN transparency through the SteelHead management console.
SteelConnect SteelHeads in AWS require RiOS 9.6 or later. SteelConnect SteelHeads in Azure require RiOS 9.5 and later.
To add WAN optimization to your cloud deployment, you need to subscribe to SteelConnect SteelHead WAN optimization in the cloud marketplace and then specify an instance size for the SteelHead in the gateway configuration. The procedures are included in the following sections.
Connecting to Amazon Web Services
To deploy SteelConnect and AWS, complete these tasks:
Optionally, you can add high availability through redundancy. See this section:
AWS also offers advanced features, including:
Subscribing to Riverbed AWS products
Riverbed offers products in the AWS marketplace. Once you subscribe to a product, you can configure your cloud accounts in SCM and begin deploying appliances.
Subscribing to a Riverbed product does not require the creation of a “dummy” virtual machine instance. However, if you launch an instance during the subscription process, you can ignore or delete that virtual machine.
To subscribe to a SteelConnect gateway in AWS
You will be directed to the AWS Marketplace.
2. Click Continue to Subscribe.
3. Log in or set up an account and follow the on-screen instructions.
If you already have an SCM, you only need to accept the terms. If you don’t have an SCM, you need to select the Manual Launch tab and set up your instance.
To subscribe to a SteelHead (WAN optimization) in AWS
2. Click Continue.
3. Log in or set up an account and follow the on-screen instructions.
If you already have an SCM, you only need to accept the terms. If you don’t have an SCM, you need to select the Manual Launch tab and set up your instance.
Refer to the AWS price list for instance pricing.
Configuring your AWS accounts with SteelConnect Manager
You need to add your AWS account details to SCM before you can view and manage your cloud networks within the SteelConnect environment. You can add multiple accounts to SCM.
To add an AWS account to SCM
1. Log in to SCM.
2. Choose Network Design > AWS.
3. Click Add Account.
The Add AWS Account dialog box appears.
4. Type an account name.
5. Select IAM role as the account type.
IAM is preferred because it’s more secure and provides a clear audit trail of activity. Instructions for creating an IAM role for use with SteelConnect appear in the Add AWS Account dialog box. Keep these instructions handy.
When you add an AWS account on a locally hosted, on-premises SCM, select an account type of IAM credentials instead of IAM role. An access key and a secret key are required.
6. Copy and save the account ID and the external ID to a location where you can easily access them. You’ll need them later in this procedure.
7. Return to the AWS console and choose Services > Security, Identity & Compliance > IAM > Roles. For an on-premises SCM, choose Services > Security, Identity & Compliance > IAM > Credentials.
8. Follow the instructions in the Add AWS Account dialog box.
9. When finished, return to SCM and click Submit.
Importing AWS networks
Once you’ve set up your AWS accounts in SCM, you can import some or all of your networks.
To import cloud networks
1. In SCM, choose Network Design > AWS.
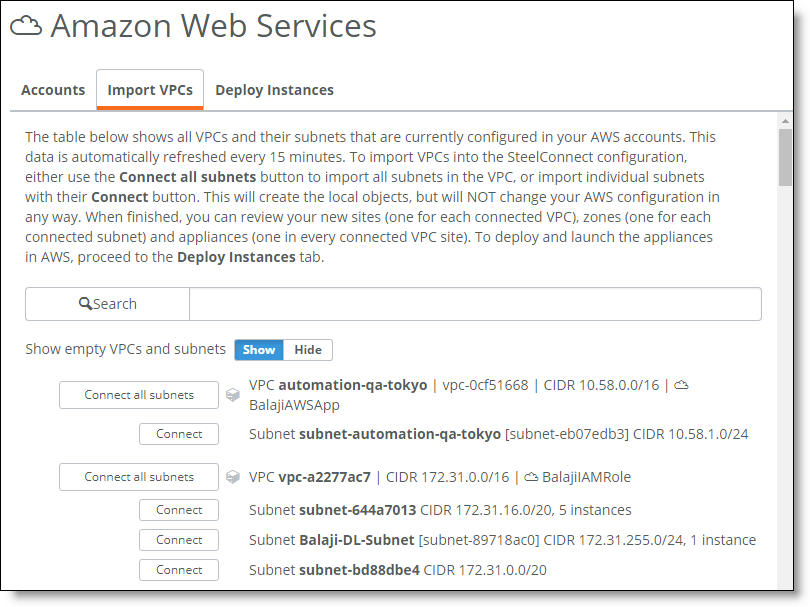
2. Select the Import VPCs tab.
Your cloud network appears. SCM displays all networks and their subnets in your accounts. The list automatically refreshes every 15 minutes.
You can filter the list by typing a term in the search box.
3. Click Connect all subnets to import a network and all of its subnets, or import individual subnets with their Connect button.
This step prepares the necessary updates and configurations locally on SteelConnect Manager, but it does not yet propagate them to your AWS account.
Importing VPCs and connecting subnets
Deploying SteelConnect gateways to your AWS network
After importing and connecting your AWS networks, you’re ready to deploy gateways.
To deploy gateways to your virtual network
1. In SCM, choose Network Design > AWS.
2. Select the Deploy Instances tab.
3. Click Deploy next to a site name.
The Deploy Instances dialog box appears.
4. From the Gateway drop-down list, select an instance size for your gateway.
5. Optionally, add WAN optimization across this site by selecting a specification for the SteelHead.
The specifications include throughput limits that indicate the amount of optimized traffic the instance supports.
7. Optionally, change the AWS routing to one of these options:
–Auto. This is the default setting. With this option, SCM adds a route to the route table for each branch and AWS subnet.
–Manual Routing. Switch to manual routing if your deployments will exceed the AWS limit for route table entries (50 maximum) or if you prefer to manage your route tables yourself.
–Supernet. Choose this option to address a large number of subnets with a single supernet (route summary). This setting adds three entries (192.168.0.0/16, 172.16.0.0/12, and 10.0.0.0/8) to the AWS route table and these entries address traffic not covered by existing route table entries.
8. From the Uplink drop‑down menu, select an uplink type to specify how to send traffic from the gateway. The default uplink is Internet.
9. Click Submit.
Configuring redundancy
You can turn on redundancy when you deploy your SteelConnect gateways or at a later time. You can enable redundancy for SteelConnect gateway-only deployments or for a SteelConnect gateway with WAN optimization deployments.
When you enable this option, redundant appliances are deployed in different availability zones. The appliances that actively route and optimize your network traffic are the primary appliances. Secondary appliances stand by and are ready to take over if a primary appliance fails. You can determine whether an appliance is primary or secondary by viewing its role in the appliance details page. See
To view gateway or SteelHead appliance details.
For gateways with optimization, when the primary SteelHead fails, traffic is sent directly to its associated (the master) gateway first, bypassing optimization. If the SteelHead fails to revive within two minutes, traffic is redirected to the secondary stack and WAN optimization starts again.
Redundancy is only available on AWS.
Managing your AWS deployments
You can view and change deployment details from SCM.
To view gateway or SteelHead appliance details
1. In SCM, choose Appliances.
2. Select a gateway.
The appliance details page appears. Information in this page is organized under several tabs.
3. Select the SteelHead tab to view SteelHead appliance details.
To manage SteelHead appliances
1. Choose Appliances.
2. Select a gateway.
3. Select the SteelHead tab.
4. Click the appliance IP address.
The SteelHead Management Console appears.
5. Log in to the SteelHead Management Console.
For a first-time login, use admin for the username. In AWS, the password is the instance ID for the SteelHead. Change these credentials after you log in for the first time and be sure to record your new username and password in a safe location.
You can complete configuration and management of the SteelHead directly through the SteelHead Management Console or through a SteelCentral Controller for SteelHead. See the SteelHead Management Console’s documentation for details.
To change the instance size, WAN optimization, redundancy, or routing
1. In SCM, choose Network Design > AWS.
2. Select the Deploy Instances tab.
3. Click Manage next to the site.
4. Make the changes to your settings and click Submit.
You cannot change the uplink type for an active deployment. You must undeploy the instance to change the uplink type.
To remove a gateway from a site
1. In SCM, choose Network Design > AWS.
2. Click Undeploy next to a site.
A confirmation dialog box appears.
3. Click Confirm.
The system terminates the gateways and SteelHeads, and it removes all traces of SteelConnect from the site.
To remove a subnet or entire site from the full-mesh network
1. In SCM, choose Network Design > AWS.
2. Select the Import VPCs tab.
3. Click Disconnect next to an item.
You must undeploy a site before you can remove it or its last remaining subnet.
AWS Direct Connect
You can use AWS Direct Connect to establish a private virtual interface from your on-premises network directly to your Amazon VPC, providing a private, high-bandwidth network connection between your network and your VPC.
AWS Direct Connect links an internal network to an AWS Direct Connect location over a standard 1‑gigabit or 10‑gigabit Ethernet fiber-optic cable. One end of the cable is connected to an on-premises router, and the other end is connected to an AWS Direct Connect router. With this connection in place, you can create virtual interfaces directly to Amazon VPC. Virtual interfaces are bound to specific VPCs.
SteelConnect supports an overlay across Direct Connect. This means that a branch office that has an MPLS connection that has a Direct Connect pathway into AWS, and an internet connection that is capable of AutoVPN, can have separate VPN paths into AWS.
Because AWS does not offer multiple uplinks to the internet from a single instance, it isn’t possible to have more than one internet uplink.
With the SteelConnect implementation, the gateway in AWS has two uplinks: one uses the internet and one uses Direct Connect.
SteelConnect with AWS Direct Connect
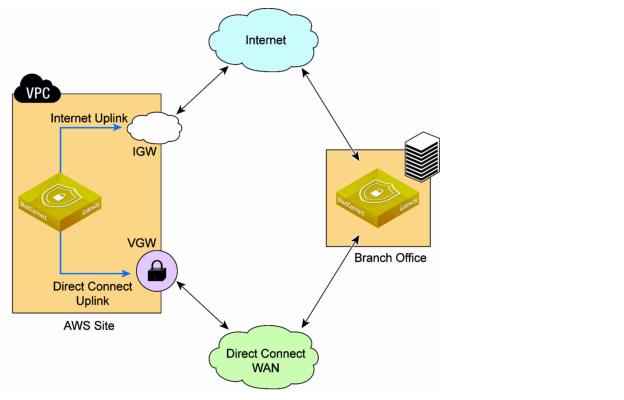
By having a gateway with two separate uplinks in different WANs, traffic management options are available, such as application steering with priority, balancing, fail-over, and latency-based policies.
Each gateway in AWS using Direct Connect integration requires an internet gateway and Direct Connect path. Configuring a SteelConnect gateway with a single uplink only on the Direct Connect WAN is not supported. SteelConnect gateways need the internet to communicate with SCM and reach other services.
Setting up SteelConnect with Direct Connect
Before you begin, ensure you have completed these requirements:
•You have added your AWS account to SCM and you can import AWS VPCs.
•You have set up the Direct Connect connection between your physical site and AWS region and you have a corresponding virtual private gateway (VGW) associated with the VPC.
To deploy AWS Direct Connect in SteelConnect
1. In SCM, create a WAN for your overlay network.
Choose Network Design > WANs and click New WAN. Provide a name for your WAN (such as CloudMPLS), ensure Encryption is On, and click Submit.
Note: You can use a single WAN for different Direct Connect connections provided they have connectivity.
2. Choose Network Design > AWS to begin the set up of a gateway on the SteelConnect side of Direct Connect.
3. Connect the VPC.
In the Import VPCs tab, search for the Direct Connect VPC and click Connect.
4. Select the Deploy Instances tab.
5. Click Deploy next to a site name.
The Deploy Instances dialog box appears.
6. In the Gateway drop-down list, select an instance size.
You need an instance size that supports at least three network interface cards (NICs). The minimum gateway size for Direct Connect deployment is t2.medium.
As your needs change, you can resize the gateway at any time after deployment.
SteelConnect with Direct Connect supports high-availability configurations.
9. Optionally, change the AWS routing to one of these options:
–Auto. This is the default setting. With this option, SCM adds a route to the route table for each branch and AWS subnet.
–Manual Routing. Switch to manual routing if your deployments will exceed the AWS limit on route table entries (50 maximum) or if you prefer to manage your route tables yourself.
For manual routing, you must enable route propagation on the Direct Connect uplink route table.
–Supernet. Choose this option to address a large number of subnets with a single supernet. This setting adds three entries (192.168.0.0/16, 172.16.0.0/12, and 10.0.0.0/8) to the AWS route table and these entries address all traffic not covered by existing route table entries.
10. In the Uplink drop-down list, select Internet + Direct Connect.
11. In the Direct Connect WAN field, select the overlay that you created in
Step 1.
This field displays only user-created WANs with encryption enabled.
12. Click Submit.
If the Submit button is unavailable, increase the size of your instance.
SteelConnect establishes two tunnels between the physical site and the AWS VPC: one over the internet and one over the WAN you created.
To review and verify your configuration
•Choose Network Design > AWS, select the Deploy Instances tab, and click Details for the VPC to review the configuration.
•Choose Network Design > Uplinks. In the list, you can see the new Direct Connect uplink deployed on the WAN you created.
•Choose Appliances > Ports, filter by the site, and verify three ports exist for the new gateway: one for Internet Uplink, one for Downlink, and one for Direct Connect.
The Direct Connect uplink uses an available /28 subnet.
Managing Your Deployment
You cannot change Direct Connect WAN and uplink options using the Manage button next to your deployed instances. You must undeploy the site and redeploy. So if you already have an AWS site deployed, you cannot change it to Direct Connect without undeploying, adding the Direct Connect feature, and redeploying.
Setting Traffic Rules
Once deployed, you can adjust traffic rules to control WAN usage.
•You can set WAN usage preferences at the organization level on the Organization page in the Network Defaults tab.
•You can set more granular traffic rules and set traffic path preferences, such as sending all SSH traffic over the Direct Connect WAN, from the Rules > Traffic Rules page.
SteelConnect AWS transit VPC
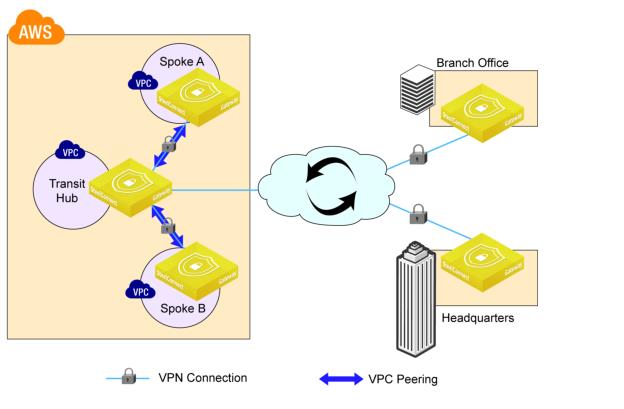
The AWS transit VPC feature in SteelConnect enables communication among multiple virtual private clouds (VPCs) by using a hub-and-spoke topology. One VPC is designated as the hub and all other VPCs are spokes. All VPCs are connected to each other through the hub by using SteelConnect gateways and AutoVPN tunnels over VPC peering connections. The hub gateway is also automatically configured with an uplink to an AWS internet gateway, which enables AutoVPN tunnels to branch offices over the internet.
Starting in SCM version 2.11, AWS transit VPC allows peering relationships to be established between VPCs across different AWS regions.
Example AWS transit VPC topology
The benefits of this feature include:
•Enhanced security. The hub can be configured as a bastioned VPC, protecting its spokes behind a firewall or other security measures.
•Overcoming AWS VPC peering limitations. AWS VPC peering allows communication between two directly connected VPCs. SteelConnect AWS transit VPC enables network traffic to travel among multiple VPCs without a direct connection between them. Transitive peering and edge-to-edge routing are possible with SteelConnect AWS transit VPC.
SteelConnect AWS transit VPC interoperability and requirements
The following features are interoperable with AWS transit VPC topologies:
•High availability (redundancy) is supported for hub gateways and spoke gateways.
•WAN optimization using SteelHead is supported in both hub sites and spoke sites.
Your topology must meet the following requirements to use this feature:
•The minimum instance size for the hub gateway is t2.medium.
•In SteelConnect, the hub site must not be configured as an AutoVPN leaf of any other site.
•In SteelConnect, spoke sites must not be configured as a master site.
•In SteelConnect, the hub site must be deployed prior to deploying spoke sites.
Performing parallel deploy, undeploy, or manage operations on a transit VPC hub site or spoke site is not recommended.
Deploying an AWS transit VPC topology
Before you deploy an AWS transit VPC topology, ensure that:
•you have identified which of your VPCs will serve as the hub site.
•you have identified which of your VPCs will serve as spoke sites.
•all VPCs are imported into SteelConnect Manager.
The hub site must be deployed prior to deploying spoke sites.
To deploy a hub site
1. In SCM, choose Network Design > AWS.
2. Select the Import VPCs tab.
3. Find the site that you want to use as your hub.
4. Click Connect all subnets for that site.
5. Select the Deploy Instances tab.
6. Find the site that you want to use as your hub.
7. Click Deploy for that site.
The Deploy Instances dialog box appears.
8. Select an instance size from the Gateway drop‑down menu. The minimum required instance size is t2.medium.
9. Select Internet from the Uplink drop‑down menu.
10. Click Submit.
To deploy a spoke site
1. In SCM, choose Network Design > AWS.
2. Select the Import VPCs tab.
3. Find the site that you want to use as a spoke site.
4. Click Connect all subnets for that site.
5. Select the Deploy Instances tab.
6. Find the site that you want to use as a spoke site.
7. Click Deploy for that site.
The Deploy Instances dialog box appears.
8. Select an instance size from the Gateway drop‑down menu.
There is no minimum required instance size.
9. Select Transit VPC from the Uplink drop‑down menu.
The Transit Hub field appears.
10. Specify the name of the hub site in the Transit Hub field.
11. Click Submit.
Verifying your AWS transit VPC deployment
Perform the tasks in this section to verify your hub site deployment and spoke site deployments.
To verify your hub site deployment
1. In SCM, choose Network Design > Sites.
2. Select the hub site.
3. In the WAN/AutoVPN tab, confirm that the AutoVPN Leaf Mode option is set to Off.
4. Choose Network Design > WANs and confirm that two WANs are listed: Internet and RouteVPN.
5. Choose Network Design > Uplinks and confirm that the hub site has one uplink: Internet.
6. Choose Appliances > Ports and confirm that the gateway appliance for the hub site has two ports: one uplink (Internet) and one downlink.
To verify your spoke site deployments
1. In SCM, choose Network Design > Sites.
2. Select the spoke site.
3. In the WAN/AutoVPN tab, confirm the following:
–Internet breakout preference is set to AWSTransitVPC.
–AutoVPN Leaf Mode option is set to ON.
–Master Site is set to the hub site.
4. Choose Network Design > WANs and confirm that an additional WAN has been added to the list: AWSTransitVPC.
All sites in your AWS transit VPC topology will be members of this WAN.
5. Confirm that the breakout site for the AWSTransitVPC WAN is set to the hub site.
6. Choose Network Design > Uplinks and confirm the following:
–An additional uplink labeled AWSTransitVPC is associated with the hub site. The hub site should now have two uplinks: AWSTransitVPC and Internet.
–The spoke site has one uplink (AWSTransitVPC).
7. Choose Appliances > Ports and confirm the following:
–An additional port, LAN3, is associated with the gateway appliance for the hub site and this port is an uplink labeled AWSTransitVPC.
–The spoke site has, like any default site configuration, two ports associated with its gateway appliance: an uplink (AWSTransitVPC) and a downlink.
8. Choose Appliances > Overview and select the gateway appliance for the hub site.
9. Select the IPs tab and confirm that there are three IP addresses for the hub site: an IP address for the internet uplink, an IP address for the AWSTransitVPC uplink, and an address for the downlink.
Also confirm that spoke sites have, like the default configuration for any site, two IP address: one for the uplink and one for the downlink.
Removing an AWS transit VPC topology
To remove an AWS transit VPC topology, simply undeploy all sites in the topology. All spoke sites must be undeployed before you can undeploy a hub site. For instructions, see
To remove a gateway from a site.
Connecting to Microsoft Azure
To deploy SteelConnect and Azure, complete these steps:
Optionally, you can work with this feature for a secondary uplink to Azure:
Subscribing to Riverbed Azure products
Riverbed offers products in the Azure marketplace. Once you subscribe to a product, you can configure your cloud accounts in SCM and begin deploying appliances.
Subscribing to a Riverbed product does not require the creation of a “dummy” virtual machine instance. However, if you launch an instance during the subscription process, you can ignore or delete that virtual machine.
To subscribe to a SteelConnect gateway in Azure
You will be directed to the Azure Marketplace.
2. Log in to the Azure Marketplace.
3. Click Want to deploy programmatically? Get started.
4. Click Enable.
5. Click Save.
To subscribe to a SteelHead (WAN optimization) in Azure
You will be directed to the Azure Marketplace.
2. Log in to the Azure Marketplace.
3. Click Want to deploy programmatically? Get started.
4. Click Enable.
5. Click Save.
Refer to the Azure price list for instance pricing.
Configuring your Azure accounts with SteelConnect Manager
You need to add your account details to SCM before you can view and manage your Azure networks within the SteelConnect environment. You can add multiple accounts.
To add your Azure account to SCM
1. Log in to SCM.
2. Choose Network Design > Azure.
3. Click Add Account.
The Add Azure Account dialog box appears.
4. Type your account name.
5. Enter a subscription ID, application ID, secret key, and tenant ID from Azure.
6. Click Submit.
Generating Azure credentials for SteelConnect Manager integration
Use one of the following methods to generate Azure credentials.
Method 1: Running a Script
We recommend using this method if you already have Azure-CLI installed on your local machine. It takes fewer steps and includes a script for your convenience.
The script in this procedure is supported on Azure CLI 1.0. The script will not run with Azure CLI 2.0.
1. Ensure you have Azure-CLI installed on your local machine to run this script. Copy the following script and save it on that machine with the name azure_credentials_generate.sh.
#!/bin/bash
azure config mode arm
azure login
if [ -z "$1" ]
then
SubsID=$(azure account show | grep "ID" | grep -v "Tenant ID"|
awk -F ":" '{print $3}' | awk '{print $1}')
echo "Using default Subscription ID: $SubsID"
else
SubsID=$1
echo "Using user provided Subscription ID: $SubsID"
fi
AppName="SteelConnect$RANDOM"
AppSecret="SteelConnect123$RANDOM"
AppID=$(azure ad app create --name $AppName \
--home-page https://www.riverbed.com/$RANDOM \
--password $AppSecret \
--identifier-uris https://www.riverbed.com/$RANDOM |
grep "AppId" | awk -F ":" '{print $3}' | awk '{print $1}')
SPObjID=$(azure ad sp create --applicationId $AppID |
grep "Object Id" | awk -F ":" '{print $3}' | awk '{print $1}')
echo "On Azure Portal, created an application with name: $AppName"
echo "Waiting for changes to propagate to Azure..."
sleep 120
azure role assignment create --objectId $SPObjID -o Owner -c \
/subscriptions/$SubsID > /dev/null 2>&1
TenantID=$(azure account show $SubsID | grep "Tenant ID" |
awk -F ":" '{print $3}' | awk '{print $1}')
echo "*******************************************************"
echo "Credentials to enter on SCM:"
echo "Subscription ID: $SubsID"
echo "Application ID: $AppID"
echo "Secret Key: $AppSecret"
echo "Tenant ID: $TenantID"
echo "***************************************************"
2. Run the script from the Azure CLI using the following syntax:
./azure_credentials_generate.sh
Do not use any other syntax to run this command, such as sh azure_credentials_generate.sh.
To use a subscription ID that is different than the one on your system, enter the command in the format
./azure_credentials_generate.sh <b3xxxxx-xxxx-xxxx-xx07>, where b3xxxxx-xxxx-xxxx-xx07 is the preferred subscription ID.
3. Make a note of the subscription ID, application ID, secret key, and tenant ID that appears in the command output and enter these credentials in SCM by completing the following steps:
•In SCM, choose Network Design > Azure and click Add account.
•Enter the subscription ID, application ID, secret key, and tenant ID.
•Click Submit.
The entry appears in the Azure account list.
The status changes from Configuring to OK after a short time.
Method 2: Generating credentials manually
Manually obtain and enter a subscription ID, application ID, secret key, and tenant ID from the Azure portal. For details, see article S29078 in the Riverbed Knowledge Base at
https://supportkb.riverbed.com/support/index?page=content&id=s29078.
Importing Azure networks
Once you’ve set up your Azure accounts in SCM, you can view your configured Azure networks and you can import some or all of your networks into your SteelConnect configuration.
To import Azure networks
1. In SCM, choose Network Design > Azure.
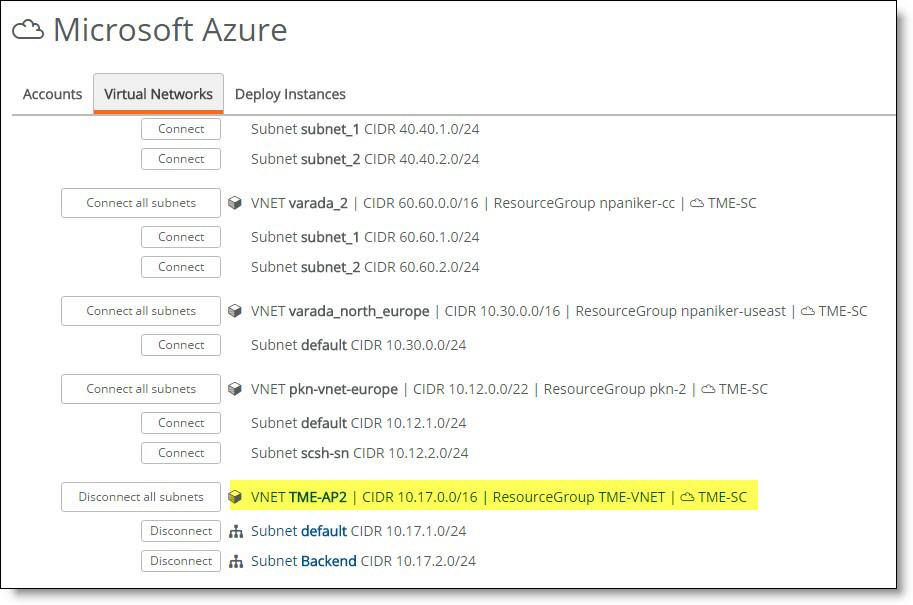
2. Select the Virtual Networks tab.
Your cloud network appears. SCM displays all networks and their subnets in your accounts and automatically refreshes the list every 15 minutes.
You can focus the list by typing a search filter in the search box.
3. Click Connect all subnets to import a network and all of its subnets, or import individual subnets with their associated Connect button.
This step prepares the necessary updates and configurations locally on SteelConnect Manager, but it does not yet propagate them to your Azure account.
Importing VNets and connecting subnets
After importing and connecting, you’re ready to deploy gateways into your SCM-connected network.
Deploying SteelConnect gateways to your Azure network
Once you’ve connected the networks in the VNet, you can deploy gateways.
To deploy gateways to your virtual network
1. In SCM, choose Network Design > Azure.
2. Select the Deploy Instances tab.
3. Click Deploy next to a site name.
The Deploy Instances dialog box appears.
4. In the Deploy Instances dialog box, select an instance size for your gateways based on the bandwidth you need.
5. Optionally, add WAN optimization across this site by selecting a specification for the SteelHead.
The specifications include throughput limits that indicate the amount of optimized traffic the instance supports.
You can add this features to a gateway during deployment or at any time.
6. Optionally, change the Azure routing to one of these options:
–Auto. This is the default setting. With this option, SCM adds a route to the route table for each branch and subnet.
–Manual. Switch to manual routing if you prefer to manage your route tables yourself.
–Supernet. Choose this option to address a large number of subnets with a single supernet (route summary). This setting adds three entries (192.168.0.0/16, 172.16.0.0/12, and 10.0.0.0/8) to the route table and these entries address traffic not covered by existing route table entries.
7. From the Uplink drop‑down menu, select an uplink type to specify how to send traffic from the gateway. The default option is Internet.
8. Click Submit.
Redundancy is not available on Azure.
Managing your Azure deployments
You can view and change deployment details from SCM.
To view gateway or SteelHead appliance details
1. After the deployment completes, in SCM choose Appliances.
2. Select a gateway.
The appliance details page appears. Information in this page is organized under several tabs.
3. Select the SteelHead tab to view SteelHead appliance details.
To manage SteelHead appliances
1. Choose Appliances.
2. Select a gateway.
3. Select the SteelHead tab.
4. Click the appliance’s IP address.
The SteelHead Management Console appears.
5. Log in to the SteelHead Management Console.
For a first-time login, use admin for the username. In Azure, the default password is password. Change these credentials after you log in for the first time and be sure to record your new username and password in a safe location.
You can perform additional configuration and management of the SteelHead directly through the SteelHead Management Console or through a SteelCentral Controller for SteelHead. See the SteelHead Management Console’s documentation for details.
To remove a gateway from a site
1. In SCM, choose Network Design > Azure.
2. Click Undeploy next to a site.
A confirmation dialog box appears.
3. Click Confirm.
The system terminates the gateways and SteelHeads, and it removes all traces of SteelConnect from the site.
To remove a subnet or entire site from the full-mesh network
You must undeploy a site before you can remove it or its last remaining subnet.
1. In SCM, choose Network Design > Azure.
2. Select the Import Virtual Networks tab.
3. Click Disconnect next to an item.
To change the instance size, WAN optimization, or routing
1. In SCM, choose Network Design > Azure.
2. Select the Deploy Instances tab.
3. Click Manage next to the site.
4. Make the changes to your settings and click Submit.
You cannot change the uplink type for an active deployment. You must undeploy the instance to change the uplink type.
Microsoft Azure ExpressRoute
You can use Azure ExpressRoute to create private connections between Azure data centers and infrastructure on your premises or in a colocation environment. ExpressRoute connections don't go over the public internet, and they offer more reliability, faster speeds, and lower latencies than typical internet connections.
With an ExpressRoute connection in place, you can create virtual interfaces directly to Azure VNets. A virtual network gateway sends network traffic between Azure virtual networks and on-premises locations.
SteelConnect supports an overlay across ExpressRoute. This means that a branch office that has an MPLS connection that has an ExpressRoute pathway into Azure and an internet connection that is capable of AutoVPN can have separate VPN paths into Azure.
Because Azure does not offer multiple uplinks to the internet from a single instance, it isn’t possible to have more than one internet uplink.
With the SteelConnect implementation, the gateway in ExpressRoute has two uplinks: one uses the internet and one uses ExpressRoute.
SteelConnect with Azure ExpressRoute

By having a gateway with two separate uplinks in different WANs, traffic management options are available and you can control and route traffic, users, and devices.
Each gateway in Azure using ExpressRoute integration requires an internet gateway and an ExpressRoute path. Configuring a SteelConnect Gateway with a single uplink only on the ExpressRoute WAN is not supported. SteelConnect gateways need the internet to communicate with SCM and reach other services.
The ExpressRoute functionality and deployment process is very similar to Direct Connect in AWS. One notable difference is the subnet assignments are different as Azure allows for /29 networks and AWS uses /28. Another difference is SteelConnect uses static IP addresses for the ExpressRoute uplink and dynamic IP addresses for the Direct Connect uplink.
Setting up SteelConnect with ExpressRoute
Before you begin, ensure you meet these requirements:
•You have added your Azure account to SCM and you can import VNets.
•You have set up the ExpressRoute connection between your physical site and Azure region and you have a corresponding Virtual Network Gateway (VGW) associated with a VNet.
To deploy ExpressRoute in SteelConnect
1. In SCM, create a WAN for your overlay network.
Choose Network Design > WANs and click New WAN. Provide a name for your WAN (such as CloudMPLS), ensure Encryption is On, and click Submit.
2. Choose Network Design > Azure.
3. Connect the VNet.
In the Virtual Networks tab, search for the ExpressRoute VNet and click Connect.
4. Select the Deploy Instances tab.
5. Click Deploy next to the VNet name.
The Deploy Instances dialog box appears.
6. In the Gateway drop-down list, select an instance size.
You need an instance size that supports at least three NICs. The minimum gateway size for the ExpressRoute deployment is Standard_DS3_v2.
You can resize the gateway at any time after deployment as long as you meet the minimum requirement.
8. Optionally, change the Azure routing to one of these options:
–Auto. This is the default setting. With this option, SCM adds a route to the route table for each branch and subnet.
–Manual. Switch to manual routing if you prefer to manage your route tables yourself.
–Supernet. Choose this option to address a large number of subnets with a single supernet. This setting adds three entries (192.168.0.0/16, 172.16.0.0/12, and 10.0.0.0/8) to the route table and these entries address traffic not covered by existing route table entries.
9. In the Uplink drop-down list, select Internet + ExpressRoute.
10. In the ExpressRoute WAN field, select the overlay that you created in
Step 1.
This field displays only user-created WANs with encryption enabled.
11. Click Submit.
If the Submit button is unavailable, increase the size of your instance.
SteelConnect establishes two tunnels between the physical site and the Azure VNet, one over the internet and one over the WAN you created.
To review and verify your configuration
•Choose Network Design > Azure, select the Deploy Instances tab, and click Details for the VNet to review the configuration.
•Choose Network Design > Uplinks. In the list, you can see the new ExpressRoute uplink deployed on the WAN you created in addition to the internet uplink. Note, the ExpressRoute uplink uses a static IP address.
•Choose Appliances > Ports, filter by the site, and verify three ports exist for the new gateway: one for uplink, one for downlink, and one for ExpressRoute.
The ExpressRoute uplink uses an available /29 subnet.
Managing Your Deployment
You cannot change ExpressRoute WAN and uplink options using the Manage button next to your deployed instance. You must undeploy the site and redeploy. So if you already have an Azure site deployed, you cannot change it to ExpressRoute without undeploying, adding the ExpressRoute feature, and redeploying.
Setting Traffic Rules
Once deployed, you can adjust traffic rules to control WAN usage.
•You can set WAN usage preferences at the organization level on the Organization page in the Network Defaults tab.
•You can set more granular traffic rules and set traffic path preferences, such as sending all SSH traffic over the ExpressRoute WAN, from the Rules > Traffic Rules page.