Defining an Organization
Organization overview
An organization is a company representing an end customer. It contains the customer details, sites, devices, zones associated with the devices, the uplinks, and so on.
You can assign administrative rights to individual administrator accounts per organization. You can also manage appliances and licensing per organization.
SCM ships with a default organization. This section explains the default settings and how to create a new site within an organization.
You can change settings associated with an organization using the tabs on the Organization page.
Defining an organization
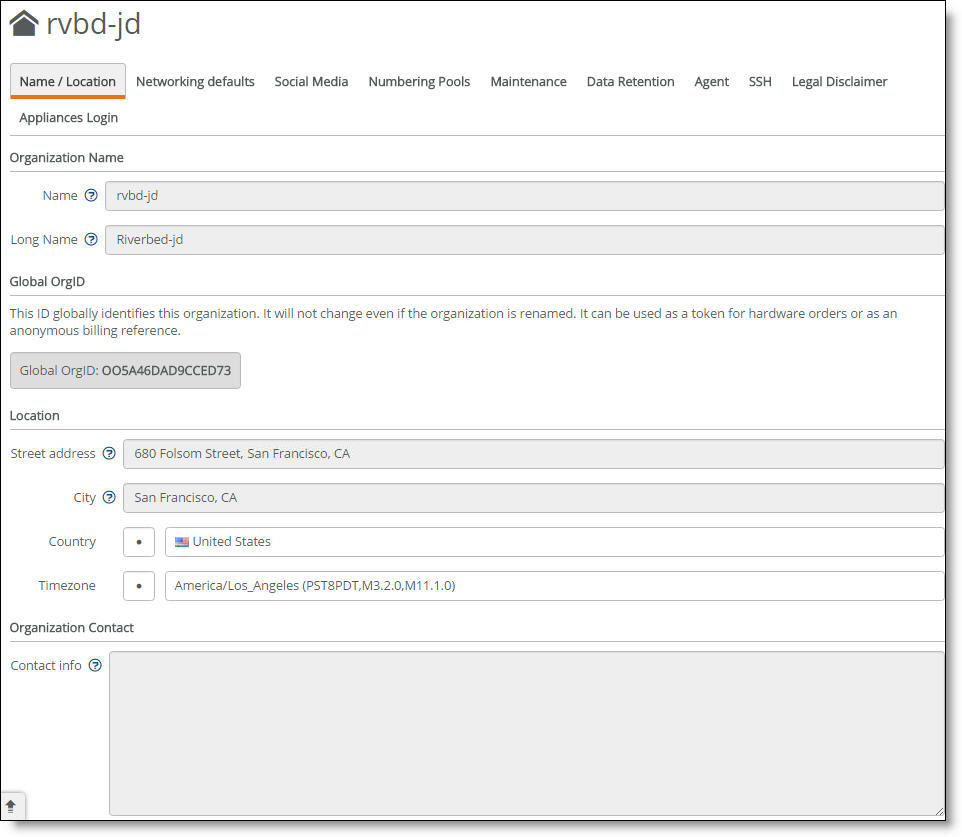
Name/Location
This tab provides a place to set the name referenced in SCM and the reports. This tab also displays the global organization ID generated by SCM that uniquely identifies the organization system wide. You can also define the location and the contact information for the entire organization.
Networking defaults
To select the networking defaults
1. Choose Organization and select the Networking defaults tab.
2. Specify your preference for these items:
•Internet breakout preference - Determines how you want internet traffic to flow for each site that you deploy throughout the organization. When sending traffic to the internet, the default is to send internet bound traffic directly out the local connection. You can also use RouteVPN or WANs as alternative breakouts. When including RouteVPN in your preference list, specify the default site that will handle the breakout. For details, see
Local internet breakout or backhaul.
This setting is global and affects the entire organization if you don’t override the settings by sites and zones.
Moving the internet breakout location to a central location forces all internet traffic to that location regardless of the presence of a local internet breakout.
•WAN usage preference - If using more than one WAN, select the preferred path. For example, if you have two paths to reach your corporate headquarters, you can select an MPLS as the preferred path.
•NTP Settings - Specify the local Network Time Protocol (NTP) servers of your choice, one per line. We recommend that you configure your own internal NTP servers; however, you can leave the field blank to use these default Riverbed-provided NTP servers:
0.ocedo.pool.ntp.org
1.ocedo.pool.ntp.org
2.ocedo.pool.ntp.org
3.ocedo.pool.ntp.org
Social Media
This tab provides a place for an administrator to configure guest access using a social media app. For details, see
Registering guest devices using social media.
Numbering Pools
When SCM creates new zones, it uses the default zone numbering specified on the Numbering Pools tab for VLANs, IPv4, and IPv6 addressing. These are global pool settings used as the base identifiers throughout the organization. Optionally, you can manually configure the numbering for each zone. A simple method is to assign a 10.x.0.0/16 network such as 10.1.0.0/16, which every zone created will then pull an IP address from.
The default numbers are:
•VLAN pool base: 1000
•IPv4 network pool: 172.16.0.0/12
•IPv6 ULA network pool: fd00:ced0:ced0::/48
Both IPv4 and IPv6 addresses come from finite pools of numbers. Don’t create a zone with a subnet the size of the full IP address pool, because doing so can exhaust the pool. After the pool is exhausted, SteelConnect is unable to create the zones with the allocated subnets.
To manually configure the numbering pools
1. Choose Organization and select the Numbering Pools tab.
2. Change the default IP addresses or VLAN pool base.
3. Click Submit.
You can also configure the pool settings when you create a zone. For details, see
Zones within a site.
Data Retention
This tab provides a place to specify how long SCM retains its traffic data history and unregistered device information for an organization. The maximum number of days is 366. The default setting for traffic history is 14 days and 7 days for unregistered devices.
To change the amount of time SCM retains data
1. Choose Organization and select the Data Retention tab.
2. Change the number of days for traffic history, unregistered devices, or both.
3. Click Submit.
Agent
A SteelConnect agent is a software VPN client that you can download and install on your laptop. The agent provides remote access to company applications automatically, when employees travel or work from home. The SteelConnect agent is available for Windows and Mac.
Remote access using an agent
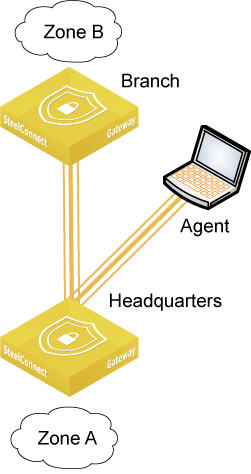
The inbound VPN agent uses UDP port 4500 to connect to a single gateway for an organization. The agent detects the gateway automatically, so there isn’t an IPSec tunnel for the user’s client if the user connects to the LAN side of a gateway.
After installing and registering the agent, you need to make sure that the users associated with the agent can be authenticated using their email address or mobile phone number to log in and gain access to inbound VPN from those sites. You will also have to define policy rules to allow traffic from the agent.
You need to install and register the agent once. After installation, whenever the computer is online, the agent connects to the organization and establishes a tunnel automatically.
Where do I find the agent software?
As the SteelConnect agent is branded for each organization, you’ll download it from SCM, as described in the following procedures.
Installing the Windows agent
To install the Windows agent
1. In the Windows Control Panel, select Programs and Features, and uninstall any previous versions of the agent.
2. Choose Organization > Organization.
3. Select the Agent tab.
4. Click Download Agent for Windows.
5. Double-click the Agent-acme.exe file to install the agent.
6. Verify your organization information, agree to the end-user license agreement, and click Install.
7. Register your agent installation with the corresponding SteelConnect Manager.
The Windows task bar displays the agent status:
•Onsite - Indicates that the agent has recognized that the device is already located behind a Riverbed appliance of its organization. The agent doesn’t negotiate a dedicated IPSec tunnel.
•Offsite - Indicates that the agent has recognized that the device is not located behind a Riverbed appliance of its organization. The agent doesn’t negotiate a dedicated IPSec tunnel.
If the agent installation is unsuccessful, see
SteelConnect Windows Agent.
Installing the Mac agent
After installing the agent, you must register it. As part of the installation process, you will install a helper application that will step you through the registration process. To register, you will need to provide an email address or phone number where you can receive a confirmation code. Have this information handy.
To install the Mac agent
1. Uninstall any previous versions of the agent.
2. Choose Organization > Organization.
3. Select the Agent tab.
4. Click Download Agent for Mac.
5. Navigate into the Downloads folder and launch the Agent-acme.dmg file.
6. Double-click the Install Agent.app file to launch the installer.
7. Click Open to verify that you want to install the application.
8. Review the license agreement and click Install.
The agent is installed.
9. Click Open.
10. Click Install to authorize the installation of the helper tool.
11. Enter your username and password and click Install Helper.
12. Enter an email address or phone number where you can receive a confirmation code.
13. Click Next.
14. Enter your 8-digit confirmation code.
15. Click Finish.
To uninstall the Mac agent
Follow these steps to remove the agent and all associated data.
To remove the agent but not items such as log files, VPN certificates, and so on, simply delete the agent from the Applications folder.
2. Right click the Install Agent.app file and choose Show Package Contents.
3. Navigate to Contents > Resources.
4. Right click the agent_unistall.sh file.
5. Choose Open With > Other.
6. Search for Terminal.
7. Select Terminal and click Open.
8. Type your password and press Enter.
Selecting the default agent home site
The agent always connects to a single site within the organization. By default, all agents connect to the same site. You can select the default site.
The default site is the headend for all agent traffic. There can only be one headend for the agents.
To select a default home site
1. Choose Network Design > Sites.
2. Select the current default home site for the agent, indicated by the Agent home icon.
The default home site for the agent

3. Select the Agent tab.
4. After Default site, click Off.
5. Click Submit.
6. Select the site you want to make the default home site.
7. Select the Agent tab.
8. After Default site, click On.
9. Click Submit.
Changing the agent IP address pool
Agents receive their IP address assignment from a pool of IPv4 addresses. You can choose the pool from which the headend will assign the IPv4 addresses to the agents.
To change the agent IP address pool
1. Choose Network Design > Sites.
2. Select the default home site for the agent, indicated by the Agent home icon.
3. Select the Agent tab.
4. Type an IPv4 address: for example, xxxx.xx.x.x/24. The subnet must be at least 24 (/24.)
5. Click Submit.
SSH
SteelConnect gateways, switches, and access points are zero touch configuration and don’t require console access; however, if you need to access the appliance console for troubleshooting, the controller can create an SSH tunnel. You enable SSH access to an appliance on the SSH tab. You must add a public SSH key.
Be sure to shut off SSH access when it is not needed.
Legal Disclaimer
This tab provides a place to add a predefined legal disclaimer that appears each time a user logs in to SCM. For example, “This computer system is the private property of its owner, whether individual, corporate, or government. It is for authorized use only.”
Appliances Login
This tab sets a login password required on all appliances in an organization for root access. We strongly recommend that you use an appliance console login password. The password must be a minimum of six characters. Leave the login password field blank and click Submit to generate a random console appliance password.