Installing the SteelHead Interceptor
This chapter describes deployment designs and how to install and configure the SteelHead Interceptor.
Read and follow the safety guidelines described in the Safety and Compliance Guide. Failure to follow these safety guidelines can result in damage to the equipment.
About deployment design
You can use multiple SteelHead Interceptors to ensure that optimization occurs even when there are multiple, physically separated paths to the WAN, or to ensure that optimization continues during a planned or unplanned SteelHead Interceptor outage. Use multiple SteelHeads to ensure redundancy or to specify that certain applications, subnets, and hosts are optimized by different SteelHeads.
For details on deployment scenarios, see the SteelHead Interceptor Deployment Guide.
About LAN-side versus WAN-side SteelHead
You connect SteelHeads to the local network on either the LAN side or WAN side of the SteelHead Interceptor. For most deployments, LAN-side SteelHead placement minimizes the amount of traffic that traverses the SteelHead Interceptor. LAN-side SteelHead placement is, therefore, the recommended choice. You can’t cable the SteelHead directly to the SteelHead Interceptor.
For details, see the SteelHead Interceptor Deployment Guide.
About Layer-2 versus Layer-3 connectivity
The SteelHead and SteelHead Interceptor in-path IP addresses can be on the same, or different subnets. The actions taken to redirect traffic are the same during autodiscovery and optimization. Unlike when you use WCCP to redirect traffic to a SteelHead, there is no resource use or MTU concerns from having the SteelHead and SteelHead Interceptor in-path IP addresses on different subnets.
For details, see the SteelHead Interceptor Deployment Guide.
About Multiple SteelHead link support
A SteelHead can have multiple in-path interfaces configured so that SteelHead Interceptor can use multiple IP addresses to reach the same SteelHead. The SteelHead Interceptor only redirects traffic to one interface on the SteelHead at any time.
For details, see the SteelHead Interceptor Deployment Guide.
About Multiple SteelHead support
Using the steelhead communication commands, the clustered SteelHeads configure each clustered SteelHead Interceptor as a connection forwarding neighbor. Each clustered SteelHead typically has one SteelHead Interceptor in-path interface (for example, inpath0_0, but this varies by model) configured as the clustered SteelHead main interface, and the other SteelHead Interceptor interfaces configured as additional choices. Don’t configure a connection between the clustered SteelHeads.
You can use the RiOS data store synchronization between any local pair of SteelHeads, including SteelHead pairs in a SteelHead Interceptor cluster. You typically perform data synchronization when the load-balance configuration on the SteelHead Interceptor causes similar traffic to be sent to the pair of SteelHeads.
For details, see the SteelHead Interceptor Deployment Guide.
About site preparation
The SteelHead Interceptor is shipped completely assembled, with all the equipment parts in place and securely fastened. The SteelHead Interceptor is ready for installation with no further assembly required. You need a Phillips-head screwdriver to secure the SteelHead Interceptor to the rack.
Before you install the SteelHead Interceptor, make sure that your site meets these requirements:
• A standard electronic environment where the ambient temperature doesn’t exceed 95°F (35°C) and the relative humidity doesn’t exceed 95% (noncondensing).
• An Ethernet connection available within the standard Ethernet limit.
• Space on a two-post or four-post, 19-inch, Telco-type mounting rack. The SteelHead Interceptor requires 3U of rack space. For details on installing the SteelHead Interceptor to a rack, see the Rack Installation Guide or the printed instructions that were shipped with the SteelHead Interceptor.
• A clean power source dedicated to computer devices and other electronic devices.
About registration with the SCC
If you have SteelCentral Controller for SteelHead (SCC) installed in your network to centrally manage and monitor SteelHeads, you can use a subset of SCC features to centrally manage and monitor SteelHead Interceptors. From the SCC, you can define SteelHead Interceptor groups and policies that you use to perform administrative tasks on managed SteelHead Interceptors.
Use the SCC to perform these administrative tasks on managed SteelHead Interceptors:
• Configuration of event notification
• Collection of logs
• Configuration of backup and restore functions
SCC features not supported on the SteelHead Interceptor include these items:
• Automatic configuration of new SteelHead Interceptors
• Sending of configuration settings to SteelHead Interceptors in remote offices
• Initiating centralized configuration and reporting on SteelHead Interceptors
For information about SCC features, see the SteelCentral Controller for SteelHead User Guide.
Before you can centrally manage and monitor a SteelHead Interceptor from an SCC, the SteelHead Interceptor must be registered with the SCC. Registration provides the SCC with the information necessary to establish a management connection to the SteelHead Interceptor. You can register new appliances with the SCC before you deploy them. You can also allow new appliances to automatically register with the SCC running on the default-named host.
About manual registration on the SCC
Before you can deploy the SteelHead Interceptor, you have to register the new SteelHead Interceptor with the SCC. Use the Appliances page of the SCC to manually register the appliance. You specify the serial number, IP address, and administrative username and password for the SteelHead Interceptor. After you deploy the appliance, the SCC uses the appliance registration information to establish a management connection to the appliance.
About automatic registration on the SteelHead Interceptor
In a new SteelHead Interceptor, default settings in the configuration specify that the appliance is to automatically register itself with the SCC reachable by the hostname riverbedcmc. The SteelHead Interceptor initiates a short-lived connection to add its IP address to an appliance registration entry on the SCC.
The SteelHead Interceptor default configuration setting that specifies the SCC hostname can’t be modified through the Configuration Wizard or the Management Console.
Registering the SteelHead Interceptor automatically
If your network runs the SCC software on a host that is reachable by the name riverbedcmc, new SteelHead Interceptors automatically register with the SCC as soon as you connect the appliances to your network.
If your network runs the SCC software on a host that is reachable by the specified hostname, new SteelHead Interceptors automatically register with the SCC as soon as you connect the appliances to your network provided that both the specified hostname and the default hostname riverbedcmc are resolvable to the same SCC IP address.
If your network runs the SCC software on a host that is reachable by the specified hostname but you are unable to make the default hostname riverbedcmc resolvable to the SCC IP address, the SteelHead Interceptors won’t automatically register as soon as you connect the appliances to your network. However, you can modify newly deployed SteelHead Interceptors so that they automatically register with the SCC software on a host that is reachable by the specified hostname. These steps summarize the sequence of events for each new SteelHead Interceptor.
To automatically register a new appliance after you modify the configurations
1. Connect the new SteelHead Interceptor to your network.
3. At the serial console connection, enter CLI commands to modify the appliance configuration, replacing the default SCC hostname
riverbedcmc with the name
<hostname>. For details, see
Completing the configuration checklist.
Completing the configuration checklist
Before you begin, consult the Rack Installation Guide for detailed information about how to install your model to a rack.
This checklist displays the parameters you specify to complete the initial configuration of the SteelHead. Be prepared to provide values for these parameters.
Appliance | Parameter | Your value |
SteelHead Interceptor | Hostname | |
| IP address | |
| Netmask | |
| Default gateway | |
| Domain Name System (DNS) IP address | |
| Domain Name | |
SCC with which the SteelHead Interceptor is to automatically register. Default hostname is riverbedcmc. | (if applicable) Hostname | |
(for DNS) IP address | |
(for DNS) Alias, if used | |
Powering on the system
This section describes how to connect and power on the SteelHead Interceptor.
To power on the system
1. If your model has a master power switch, make sure it is in the off position (on the rear panel).
2. Plug the alternating current (AC) power cord provided in your shipment into the SteelHead Interceptor.
3. Plug the AC power cord into an uninterrupted AC outlet.
4. If your model has a master power switch, press the master power switch (ON).
5. Press the system power switch on the front of the SteelHead Interceptor.
Running the configuration wizard
To access the configuration wizard and the Interceptor CLI, you establish a serial connection using a terminal emulator program.
To run the configuration wizard
1. Plug the serial cable provided in your shipment into the console port on the SteelHead Interceptor.
The appropriate serial cable ships with your appliance.
Connecting the SteelHead Interceptor
2. Start your terminal emulation program, such as Tera Term Pro or HyperTerminal. The terminal device must have these settings:
– Baud rate: 9600 bps
– Data bits: 8
– Parity: none
– Stop bits: 1
– No flow control
3. Log in as an administrator.
The configuration wizard automatically starts after you have entered the login and default password. After you have established a connection, you configure the SteelHead Interceptor using the configuration wizard.
4. To start the configuration wizard, enter yes at the system prompt.
Press Enter to enter the default value; press ? for help; press Ctrl+B to go back to the previous step.
5. Complete the configuration wizard steps as described in this table.
Wizard prompt | Description |
Step 1: Hostname? | Enter the hostname for the SteelHead Interceptor. |
Step 2: Use DHCP? | You are given the option to enable DHCP to automatically assign an IP address to the primary interface for the SteelHead Interceptor. We recommend that you don’t set DHCP. The default value is no. |
Step 3: Primary IP address? | Enter the IP address for the SteelHead Interceptor. |
Step 4: Netmask? | Enter the netmask for the network on which the SteelHead Interceptor is to reside. |
Step 5: Default gateway? 10.0.0.1 | Enter the default gateway for the network on which the SteelHead Interceptor is to reside. |
Step 6: Primary DNS server? | Enter the primary DNS server for the network on which the SteelHead Interceptor is to reside. |
Step 7: Domain name? | Enter the domain name for the network on which the SteelHead Interceptor is to reside. If you set a domain name, you don’t need to specify the domain names when you set up remote SteelHeads to be load-balanced by the SteelHead Interceptor. When you configure DNS server settings, map interceptor to the IP address for the SteelHead Interceptor. |
Step 8: Admin password? | We strongly recommend that you change the default password at this time. The password must be minimum of six characters. The default administrator password is password. |
Press Enter to save your changes and exit.
6. To log out of the system, enter the exit command at the system prompt:
7. (Optional) To configure the SteelHead Interceptor to automatically register with an SCC other than riverbedcmc, enter these commands at the user mode system prompt of the administrative CLI:
enable
configure terminal
show cmc
cmc hostname <hostname>
cmc enable
show cmc
write memory
exit
exit
This example shows how to enter CLI commands at the SteelHead Interceptor to change the auto-registration SCC hostname from riverbedcmc to rvbd_cmc_host9:
amnesiac > enable
amnesiac # configure terminal
amnesiac (config) # show cmc
CMC auto-registration enabled: yes
CMC auto-registration hostname: riverbedcmc
Managed by CMC: no
CMC hostname:
Auto configuration status: Inactive
Last message sent to cmc: n/a
amnesiac (config) # cmc hostname rvbd_cmc_host9
amnesiac (config) # cmc enable
amnesiac (config) # show cmc
CMC auto-registration enabled: yes
CMC auto-registration hostname: rvbd_cmc_host9
Managed by CMC: no
CMC hostname:
Auto configuration status: Inactive
Last message sent to cmc: n/a
amnesiac (config) # write memory
amnesiac (config) # exit
amnesiac # exit
amnesiac > _
For detailed information about the CLI commands, see the Riverbed Command-Line Interface Reference Manual.
Configuring in-path Interceptor appliances
The SteelHead Interceptor manages connections to LAN-side SteelHeads. You can connect them as in-path appliances.
To connect an in-path appliances to your network
1. Plug one end of the straight-through cable into the LAN in-path interface of the SteelHead Interceptor (lan0_0, for example).
Plug the other end of the cable to the LAN switch. This can be any port on your LAN switch that acts as a host.
2. Plug one end of the cross-over cable into the WAN in-path interface of the SteelHead Interceptor (wan0_0, for example).
Plug the other end of the cable to the WAN router.
Basic deployment: cable connections between network devices
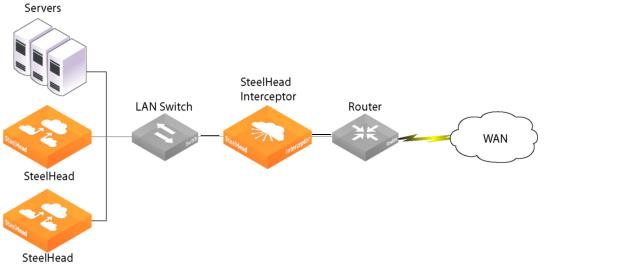
Figure: Basic deployment: cable connections between network devices when you use bypass cards shows the basic cable connections between network devices when you deploy a SteelHead Interceptor with bypass cards.
Basic deployment: cable connections between network devices when you use bypass cards
For specifications on supported bypass cards, see the Network and Storage Card Installation Guide.
Figure: Serial deployment to provide failover support shows the cable connections between network devices deployed to support failover. Use a cross-over cable to connect the SteelHead Interceptors to each other.
Serial deployment to provide failover support
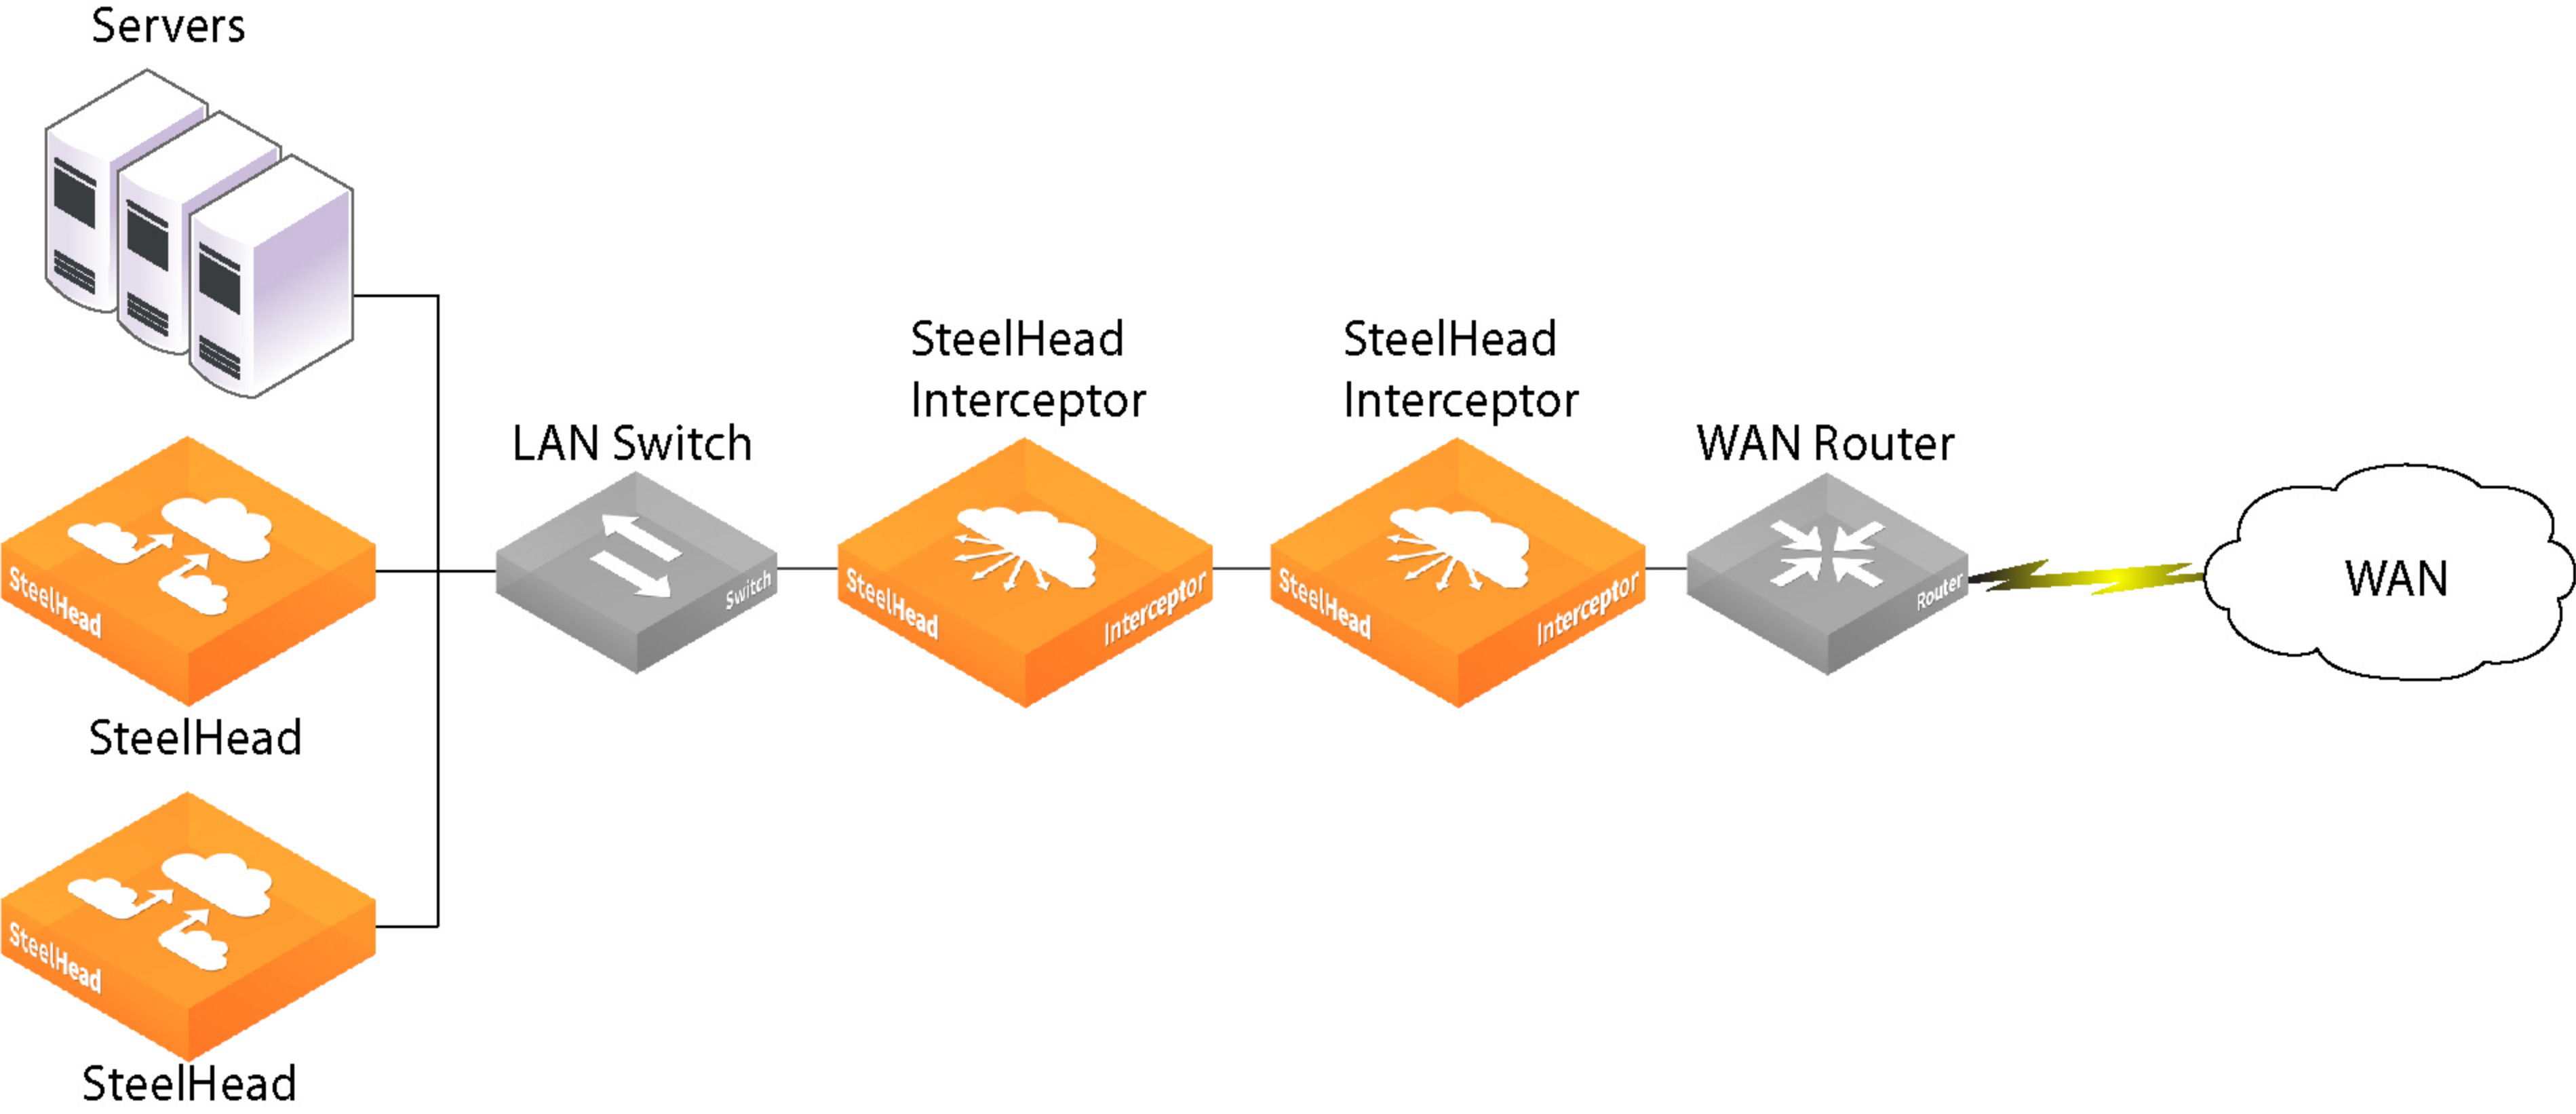
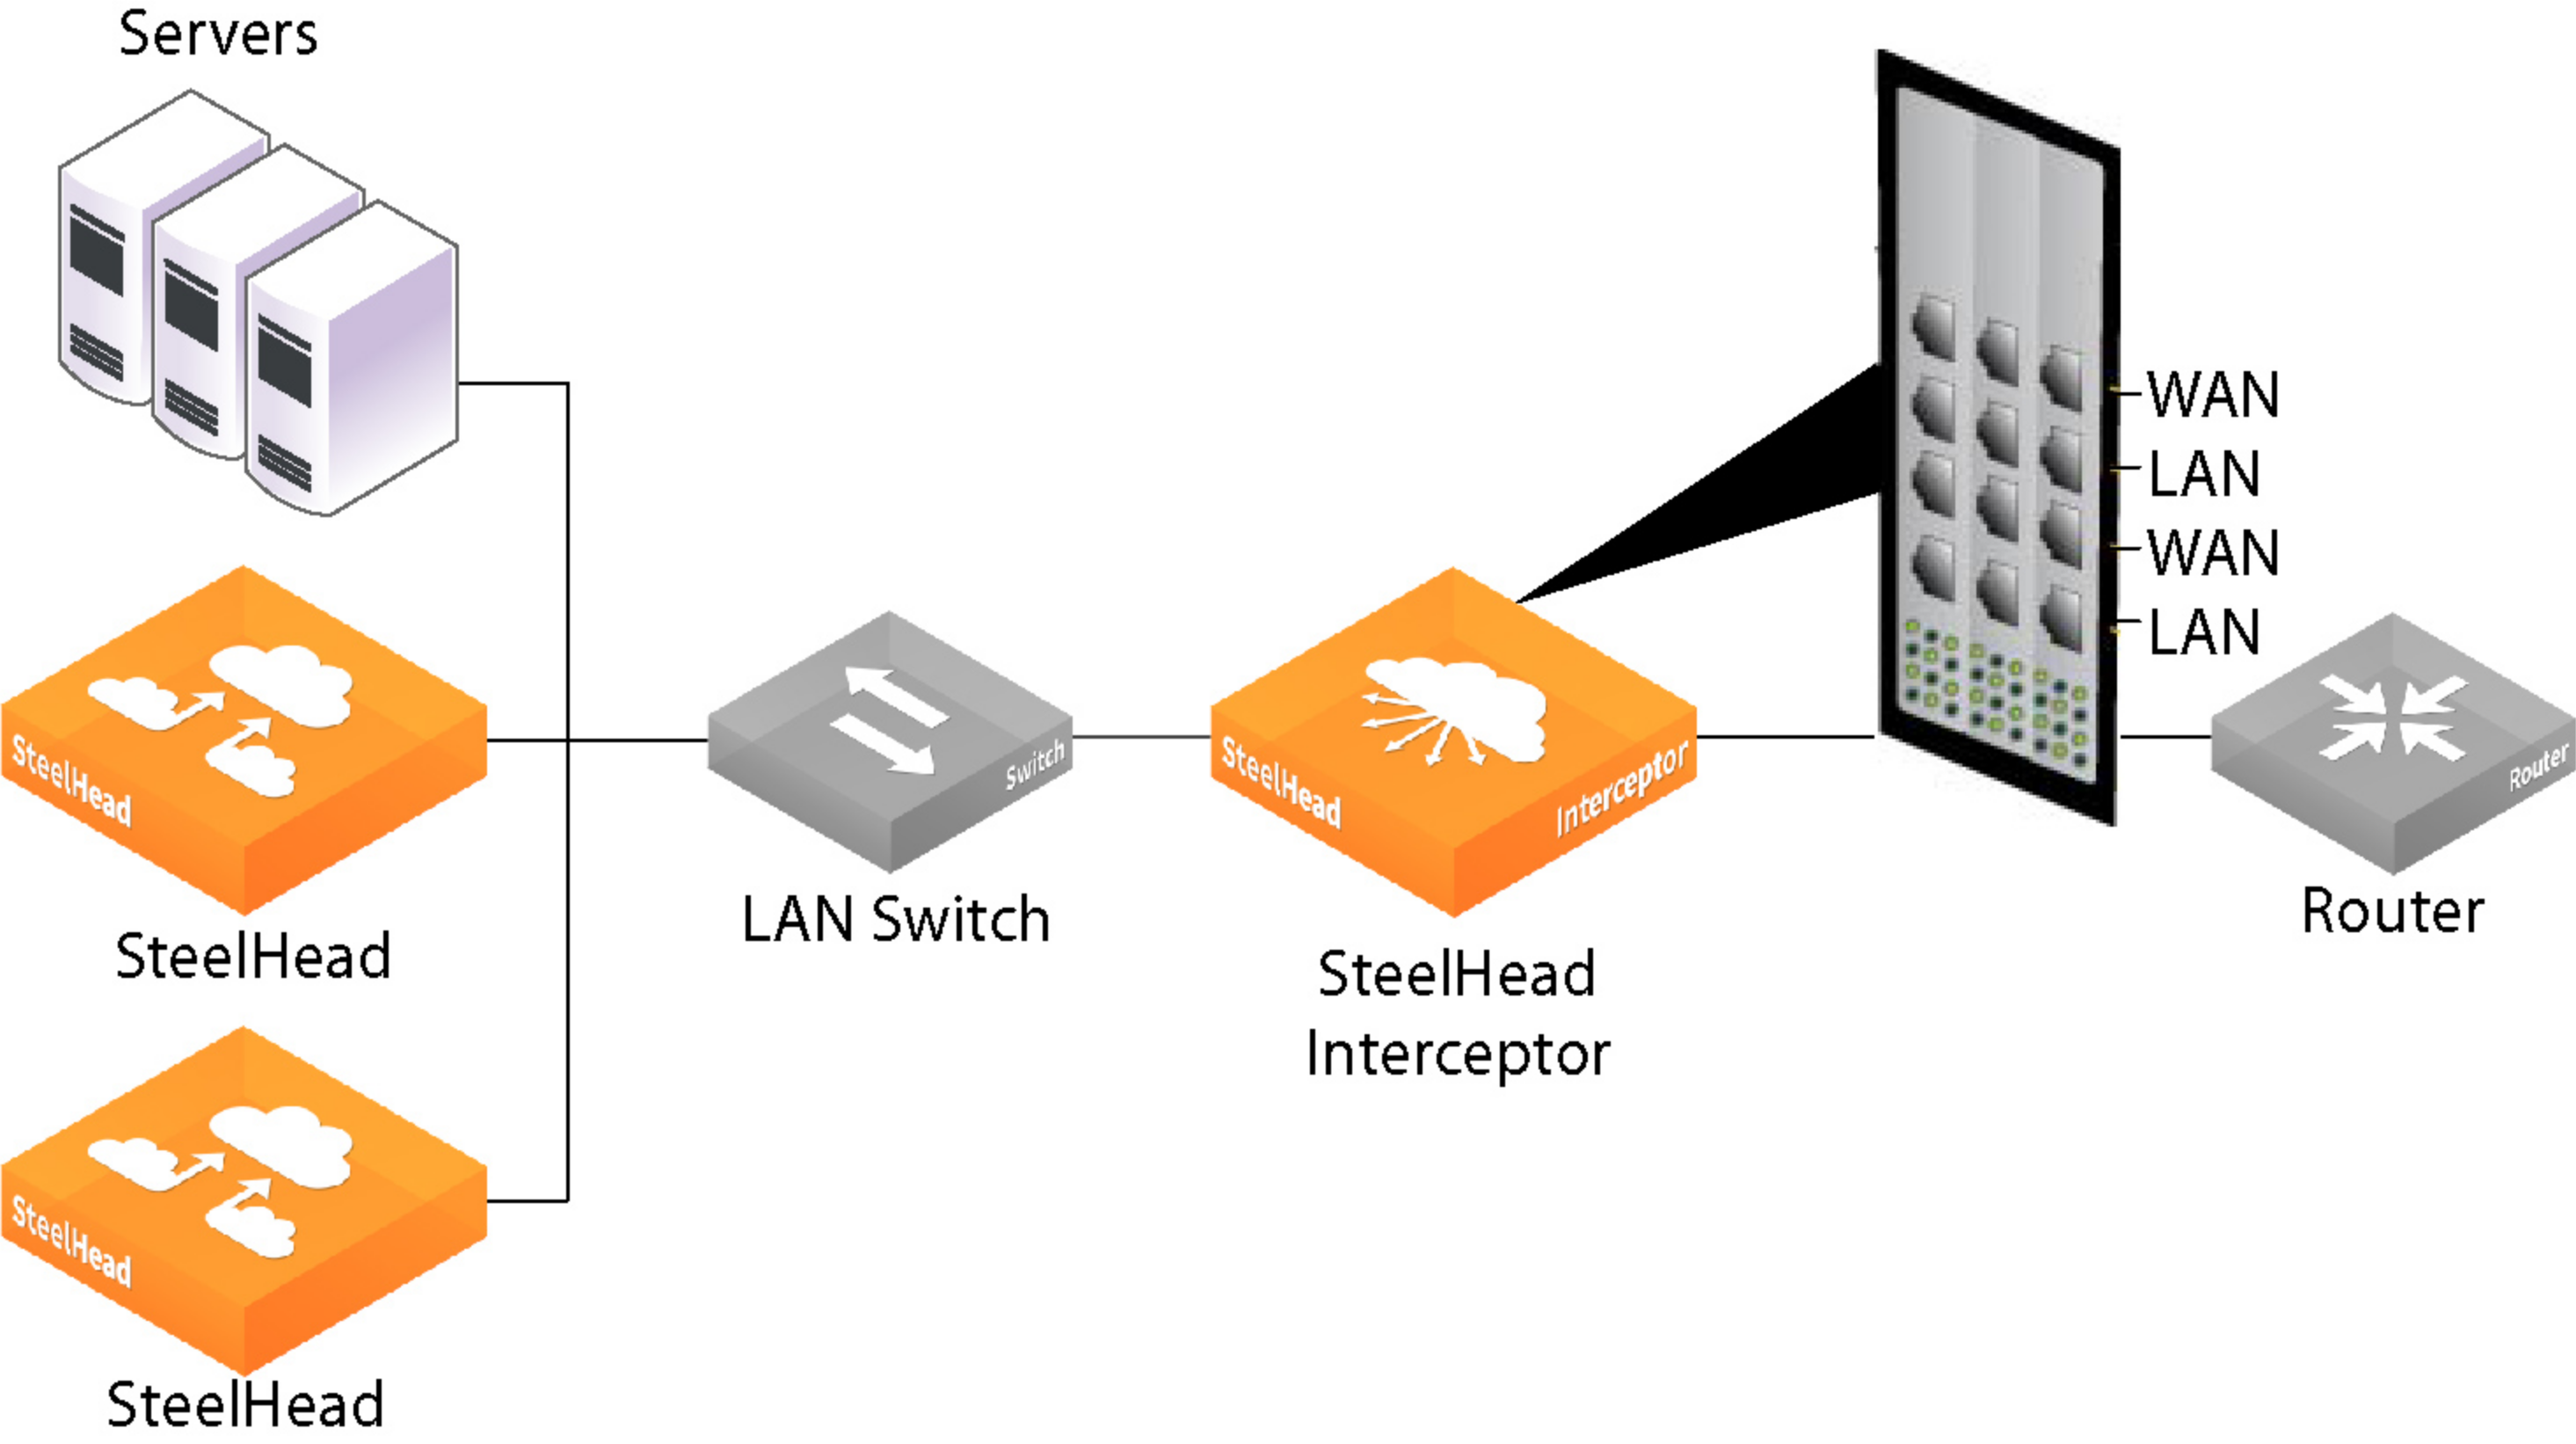
Figure: Parallel deployment in asymmetric networks shows the cable connections between network devices deployed to support networks with asymmetric routes.
Parallel deployment in asymmetric networks
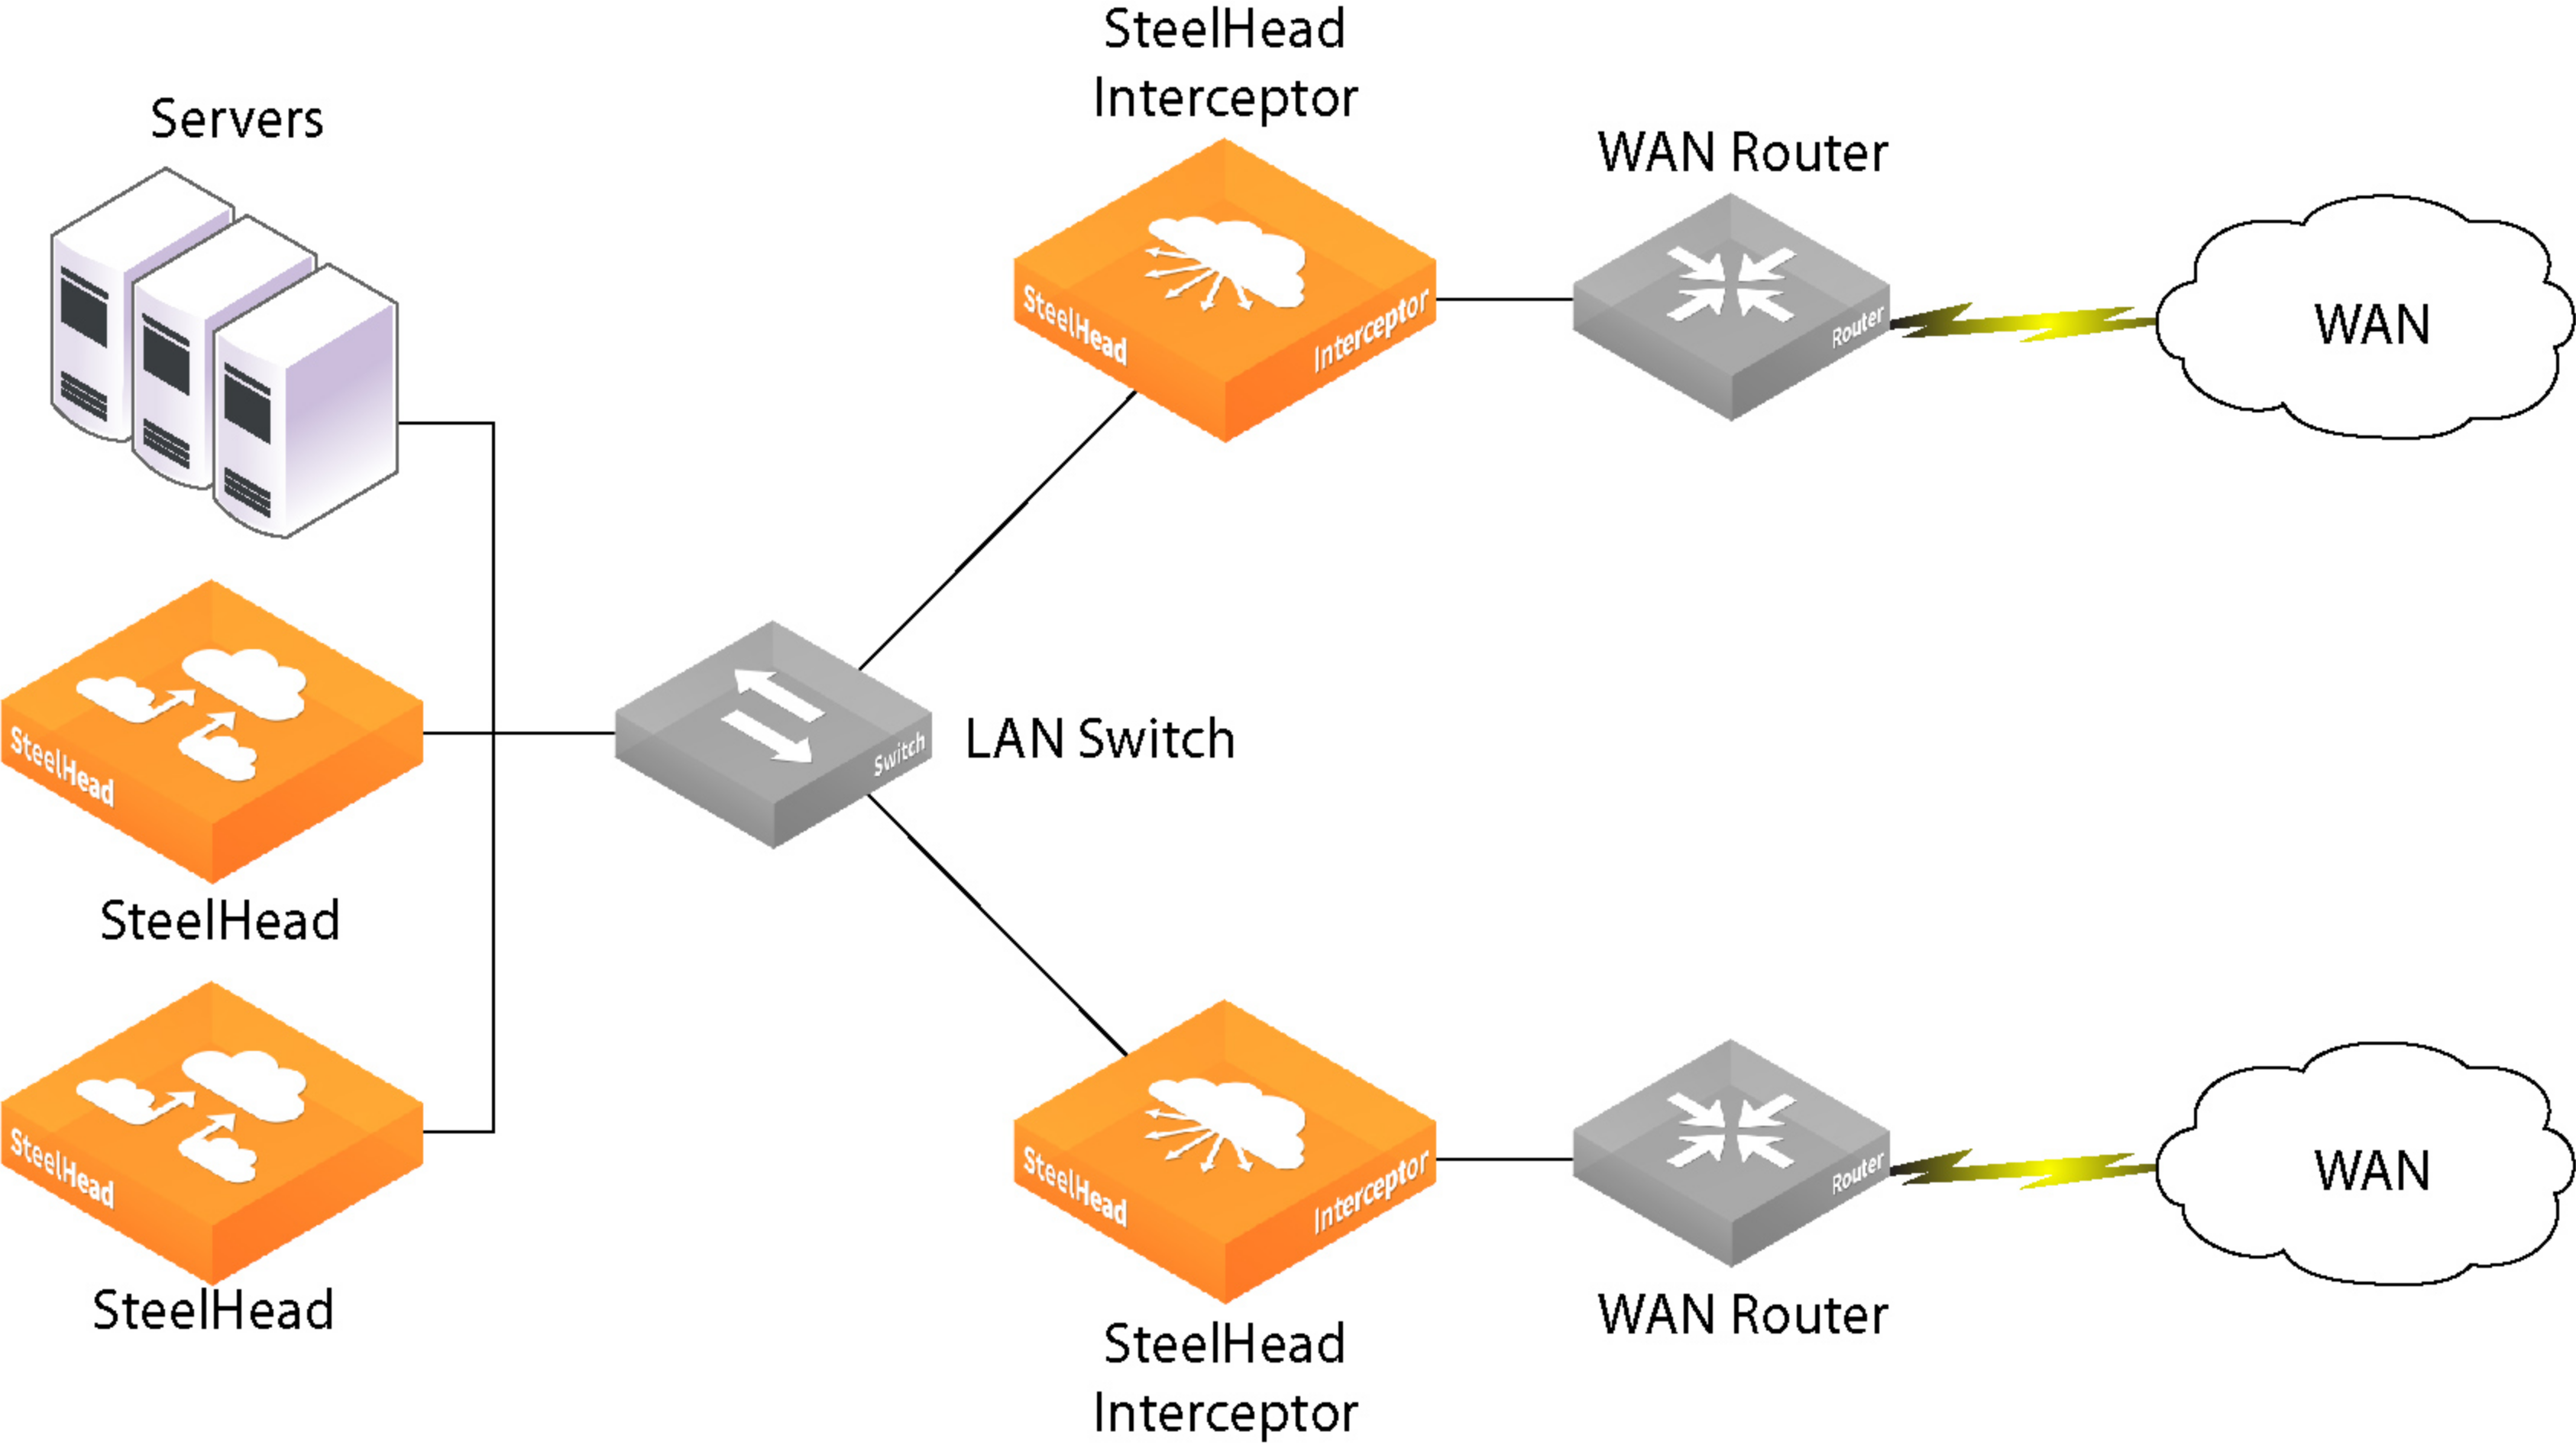
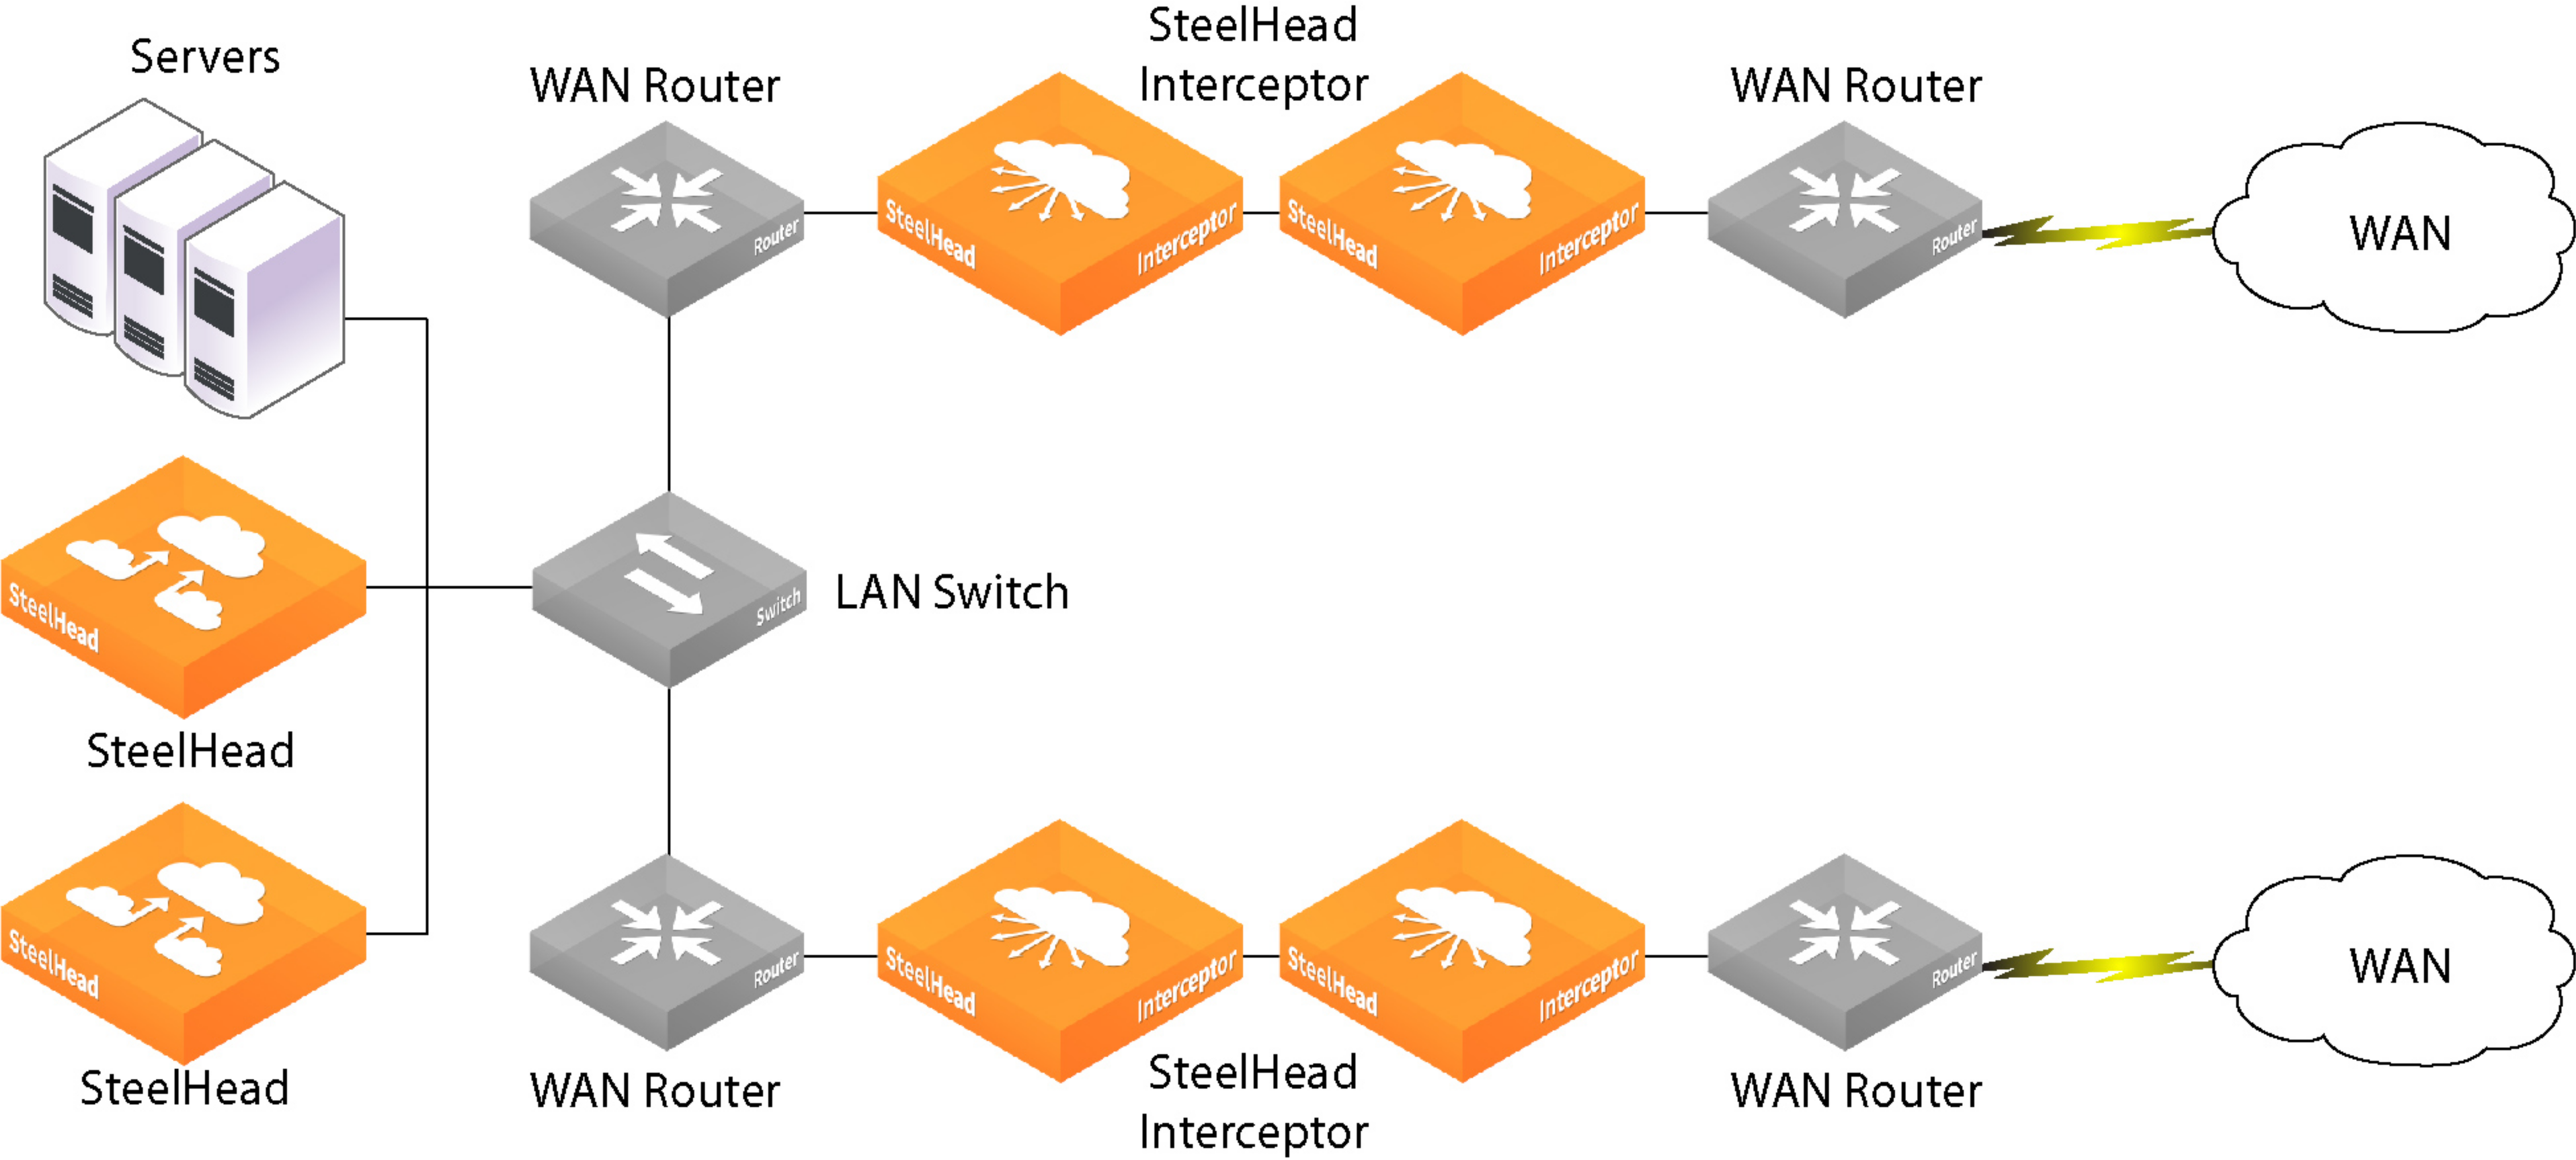
Figure: Parallel deployment in asymmetric networks shows a serial and parallel deployment designed to provide failover and handle asymmetric routes.
Parallel deployment in asymmetric networks
Verifying your connections
This section describes how to verify that you have properly connected the SteelHead Interceptor.
To verify your connections
1. Check the status lights to verify that the SteelHead Interceptor is connected properly.
2. From a remote LAN-side system, connect to the CLI.
ssh admin@<host>.<domain>
–or–
ssh admin@<ip-address>
3. Enter these ping commands to verify the connections:
ping -I <primary-ip-address> <primary-default-gateway>
ping -I <inpath-ip-address> <address-on-lan-side>
ping -I <inpath-ip-address> <address-on-wan-side>
Next steps
After you have installed and initially configured the SteelHead Interceptor, refer to the SteelHead Interceptor User Guide to complete the next steps.
• Open the Interceptor Management Console and become familiar with its navigation and administrative features.
• Configure in-path rules to pass through or deny traffic you don’t want to optimize.
• Add to the configuration the cluster of neighbor SteelHeads you want to load balance.
• Configure peering with other SteelHead Interceptors, if applicable.
• Configure load-balancing rules.
• Verify connections among your network devices by viewing Interceptor Management Console reports.
• Review and, if you choose, modify the SteelHead Interceptor default host and networking settings.