Installing NICs in SteelHead xx50 Appliances
This chapter describes how to install NICs in SteelHead xx50 appliances. It includes the following sections:
This chapter assumes you have installed and configured the SteelHead.
Before You Begin
The xx50 appliances are only compatible with PCIe NICs. Before you install a NIC in an xx50 appliance, ensure the NIC meets the requirements described in
NICs for SteelHead xx50 Appliances.
The xx50 appliances require RiOS 5.0.3 or later to recognize an add-on NIC in conjunction with the appliance’s onboard ports. Upgrade to 5.0.3 or later and run the in-path reset-iface command to recognize all ports.
Make sure you follow proper ESD procedures when you handle the NIC:
• Wear properly grounded ESD straps.
• If an ESD strap is not available, touch a properly grounded metallic surface prior to handling the NIC.
• Do not touch the electronic components on the NIC.
NICs for SteelHead xx50 Appliances
This section describes the software requirements and NIC cards that you can install on an xx50 appliance.
SteelHead xx50 appliances are only compatible with PCI Express (PCIe) cards. All supported PCIe NICs for the xx50 appliances can be used with each other.
All the NICs for the xx50 appliances, including the onboard ports, support fail-to-block mode. For more information, see
Fail-to-Block Mode. Software Compatibility
This section describes the software requirements for NICs:
• SteelHead xx50 appliance require RiOS 5.0.3 or later to recognize add-on NICs in conjunction with the appliance’s onboard ports. Upgrade to 5.0.3 or later and enter the in-path reset-iface command to recognize all ports.
• The Two-Port LR Single Mode Fiber 10-Gigabit Ethernet PCIe card requires RiOS software 5.5.8 or 6.0.2 or later.
• To run the Two-Port LR Single Mode Fiber 10-Gigabit Ethernet PCIe card on an Interceptor 9350 appliance requires Interceptor software 2.0.4 or later.
• The Two-Port SR Multimode Fiber 10-Gigabit Ethernet PCIe card requires RiOS software 5.5.7 or 6.0.2 or later.
• Interceptor software 2.0.2a or 1.2.0a or later is required to run the Two-Port SR Multimode Fiber 10-Gigabit Ethernet PCIe card on Interceptor 9350 appliances. Interceptor software 2.0.3 is required to run four (4) Two-Port SR Multimode Fiber 10-Gigabit Ethernet PCIe cards.
• It is not necessary to plug in the 12-volt connector of the Two-Port SR Multimode Fiber 10-Gigabit Ethernet PCIe card.
• The LX Fiber PCIe NICs require RiOS software 4.1.9, 5.0.7, or 5.5.2 or later.
• The Two-Port FX Multimode Fiber 100-Mbps PCIe card requires RiOS software 5.5.9 or 6.0.4 or later.
• SteelHead xx50 appliances are only compatible with PCIe NICs.
Supported Cards
The following table summarizes the NICs compatible with SteelHead xx50 appliances.
NICs for SteelHead xx50 | Manufacturing Part # | Orderable Part # |
Two-Port SX Multimode Fiber Gigabit Ethernet PCIe Card | 410-00101-01 | NIC-01G-2SX |
Four-Port SX Multimode Fiber Gigabit Ethernet PCIe Card | 410-00102-01 | NIC-01G-4SX |
Four-Port TX Copper Gigabit Ethernet PCIe Card | 410-00103-01 | NIC-01G-4TX |
Two-Port LX Single Mode Fiber Gigabit Ethernet PCIe Card | 410-00105-01 | NIC-01G-2LX |
Four-Port LX Single Mode Fiber Gigabit Ethernet PCIe Card | 410-00106-01 | NIC-01G-4LX |
Two-Port FX Multimode Fiber 100-Mbps PCIe Card | 410-00107-01 | NIC-01M-2FX |
Two-Port LR Single Mode Fiber 10-Gigabit Ethernet PCIe Card | 410-00301-01 | NIC-10G-2LR |
Two-Port SR Multimode Fiber 10-Gigabit Ethernet PCIe Card | 410-00302-01 | NIC-10G-2SR |
The following table summarizes the maximum number of NICs you can install in SteelHead xx50 platforms.
NIC | Interceptor 9350 |
Max. # of
410-00101 | 4 |
Max. # of
410-00102 | 4 |
Max. # of 410-00103 | 4 |
Max. # of 410-00105 | 4 |
Max. # of 410-00106 | 4 |
Max. # of 410-00107 | 4 |
Max. # of 410-00301 | 4 (with Interceptor software 2.0.4 or later) |
Max. # of 410-00302 | 4 (with Interceptor software 2.0.3 or later) |
Maximum Number of Interface Pairs for 3U xx50 Appliances
The maximum number of LAN/WAN interface pairs for a 3U xx50 is 10: 4 four-port fiber or copper NICs in addition to the onboard interfaces.
Installing NICs in 1U xx50 Appliances
This section describes how to install NICs in the SteelHead 1U appliances. These 1U appliances can accommodate one add-on NIC and have an integrated Four-Port Copper Gigabit Ethernet PCI-X card in the appliance.
To install a NIC in the 1U appliances
1. Power down the SteelHead.
2. Remove the power-supply cord.
3. Remove the cables connected to the NIC that you want to replace.
These are the cables connected to the LAN and WAN ports on the NIC.
4. Remove the SteelHead from its mounting rack, if necessary.
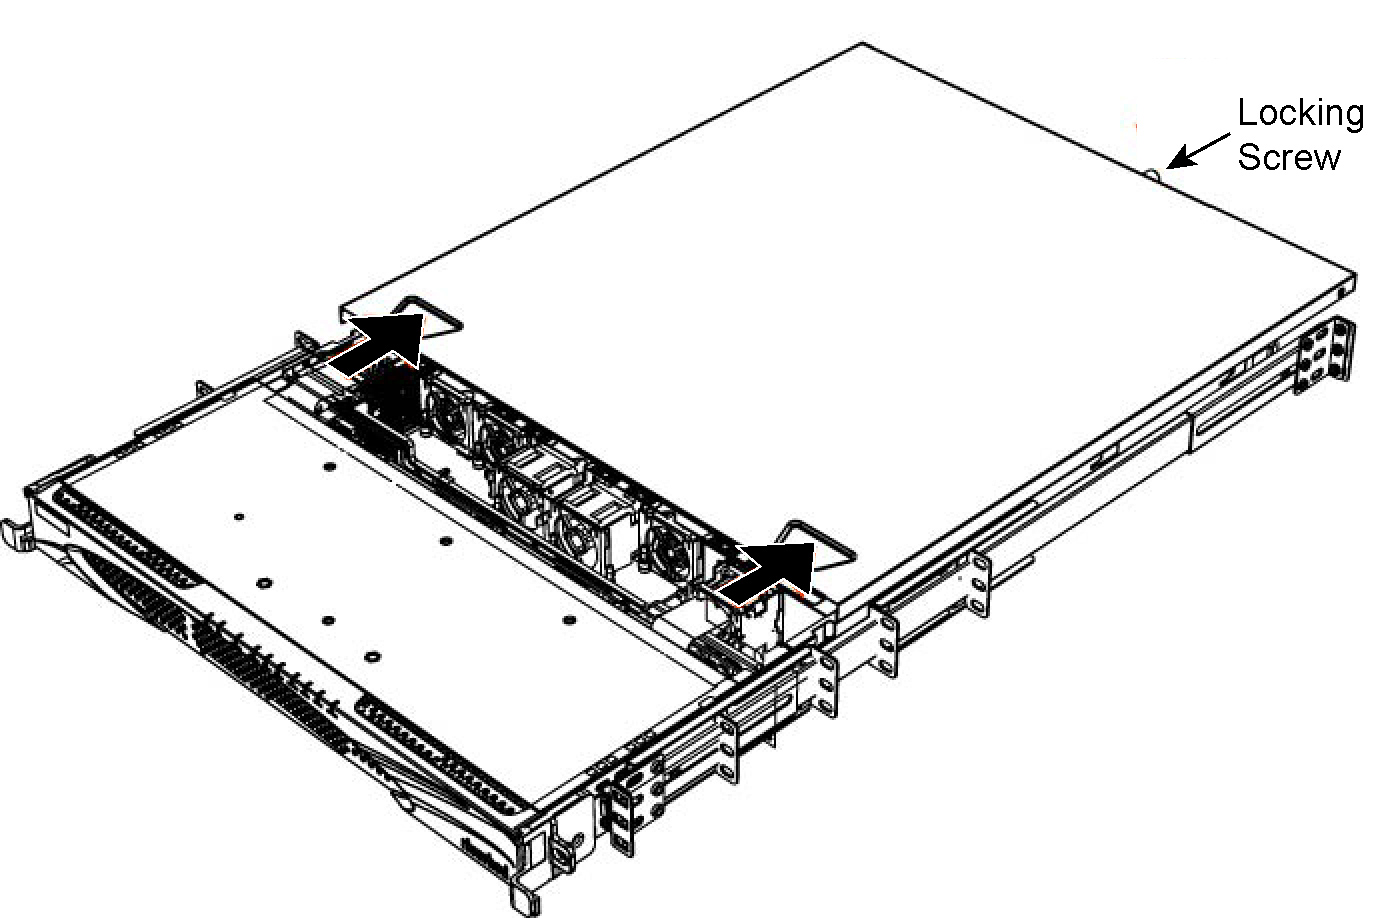
5. Unscrew the locking screw on the back of the chassis.
6. Position your thumbs in the indentations at the front of the appliance and slide back the cover from the chassis.
Figure: Removing the Chassis Cover
7. Unscrew the two securing screws on the face plate of the existing NIC or the filler bracket. If your appliance has a filler bracket, remove the filler bracket.
Figure: Removing Filler Bracket Screws

Note: Keep this filler bracket. Filler brackets must be installed over empty expansion card slots to maintain Federal Communications Commission security certification of the appliance. The brackets also keep dust and dirt out of the appliance and aid in proper cooling and airflow inside the appliance.
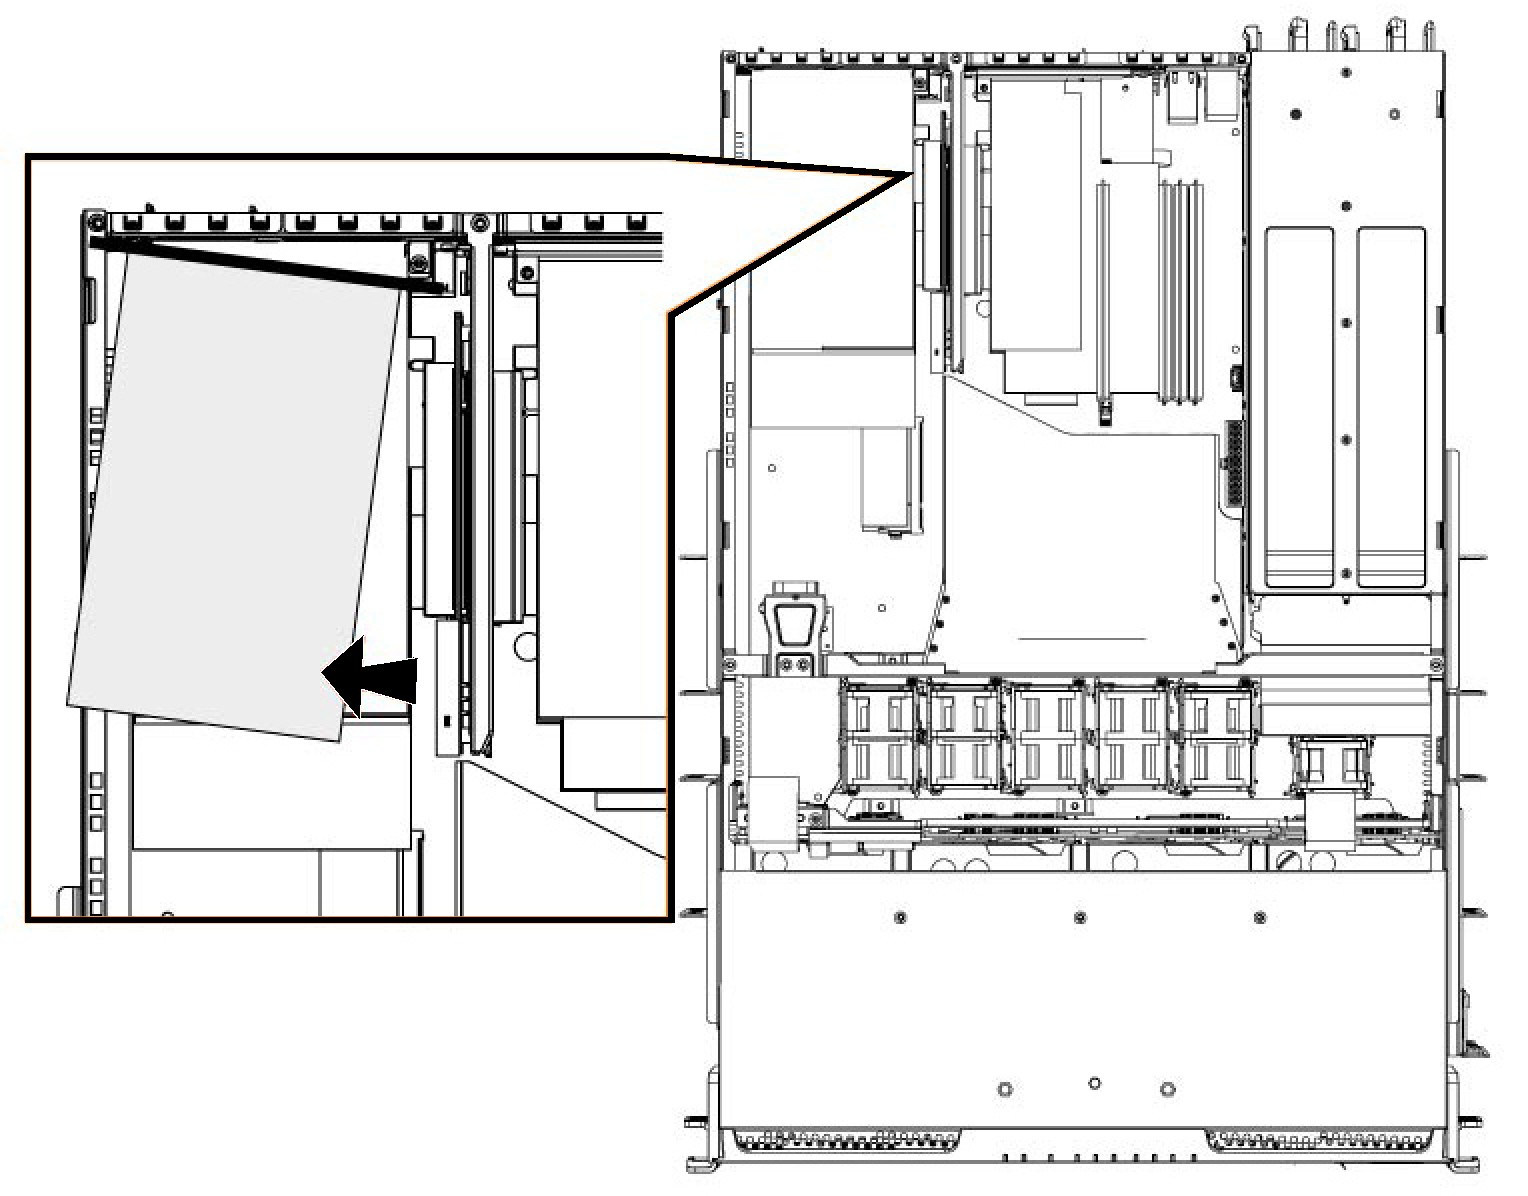
8. If you are replacing an existing NIC, carefully pull the NIC away from the riser card. Do not attempt to remove the onboard NIC built into the motherboard.
Figure: Removing a NIC
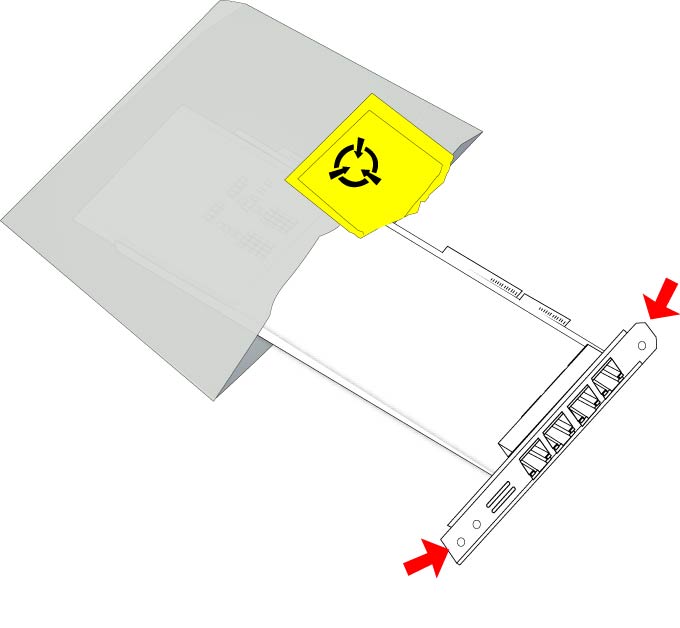
9. Gently pull the new NIC from the ESD bag.
Figure: Removing the NIC from the ESD Bag
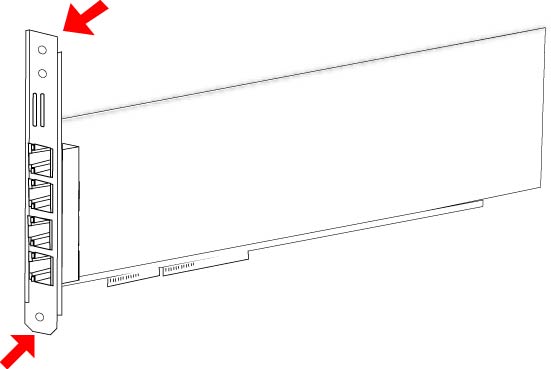
10. Hold the new NIC between the front bezel and the rear of the card to avoid ESD damage.
Figure: Proper Handling of the NIC
11. Plug the new NIC into the horizontal riser.
Figure: Installing the New NIC
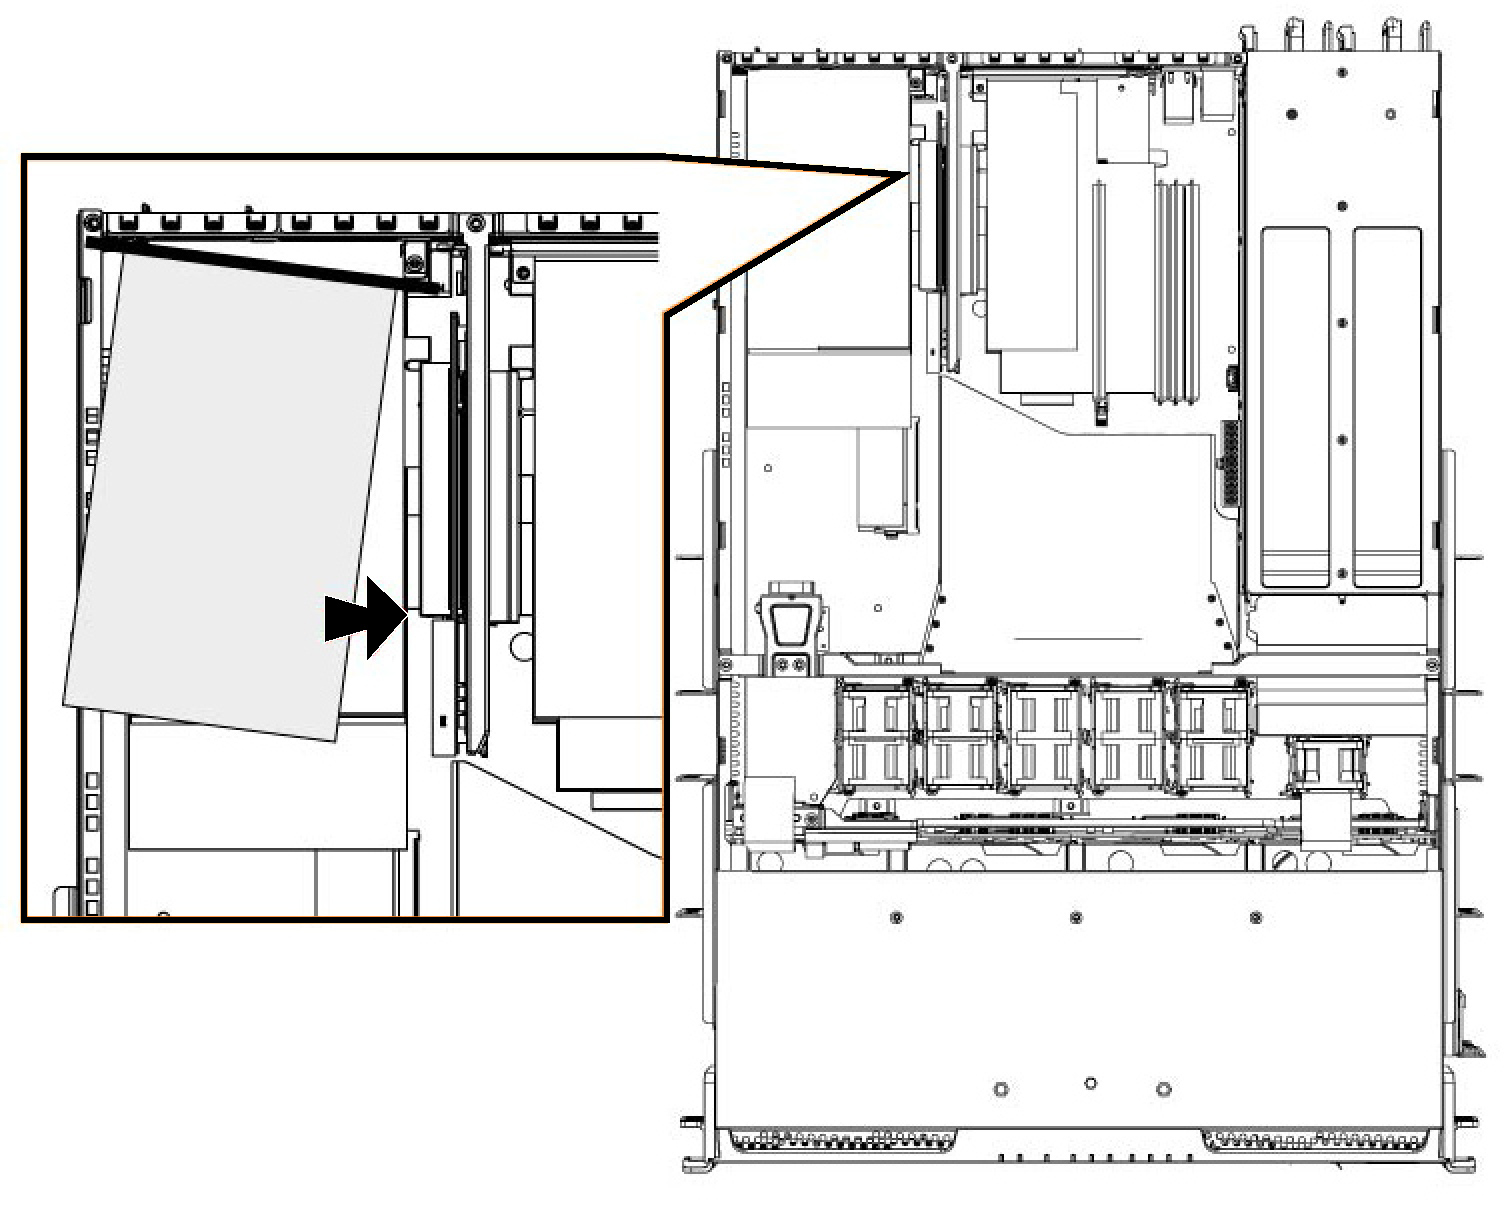
Note: Make sure the NIC and riser card are seated properly. If they are not seated properly, the NIC does not function.
12. Insert and tighten the two screws that secure the NIC at the back of the appliance.
13. Close the top cover of the SteelHead.
14. Connect the power cords.
15. Connect the LAN and WAN cables.
Note: Straight-through cables connect the LAN ports to the LAN switches; crossover cables connect the WAN ports to the WAN routers.
16. Power up the SteelHead and check the status lights.
17. Connect to the SteelHead CLI.
For detailed information, see the Riverbed Command-Line Interface Reference Manual.
18. Enter enable mode.
At the system prompt, enter the following command:
amnesiac > enable
amnesiac #
19. Verify that the NIC is installed correctly.
For example, to verify a Four-Port Copper Gigabit Ethernet PCIe card, at the system prompt enter the following command:
amnesiac # show hardware
ECC Memory Check Enabled: yes
Hardware revision: A
Mainboard: Platform 1UABA Motherboard, 400-00100-01
Slot 0: .......... 4 Port Copper GigE Network Bypass Module, Integrated
Slot 1: .......... 4 Port Copper GigE PCI-E 8 Lane, Low Profile, Network Bypass Card, 410-00
Note: Enter the in-path reset-iface command in configuration mode in the CLI to reset the main interface and recognize all ports.
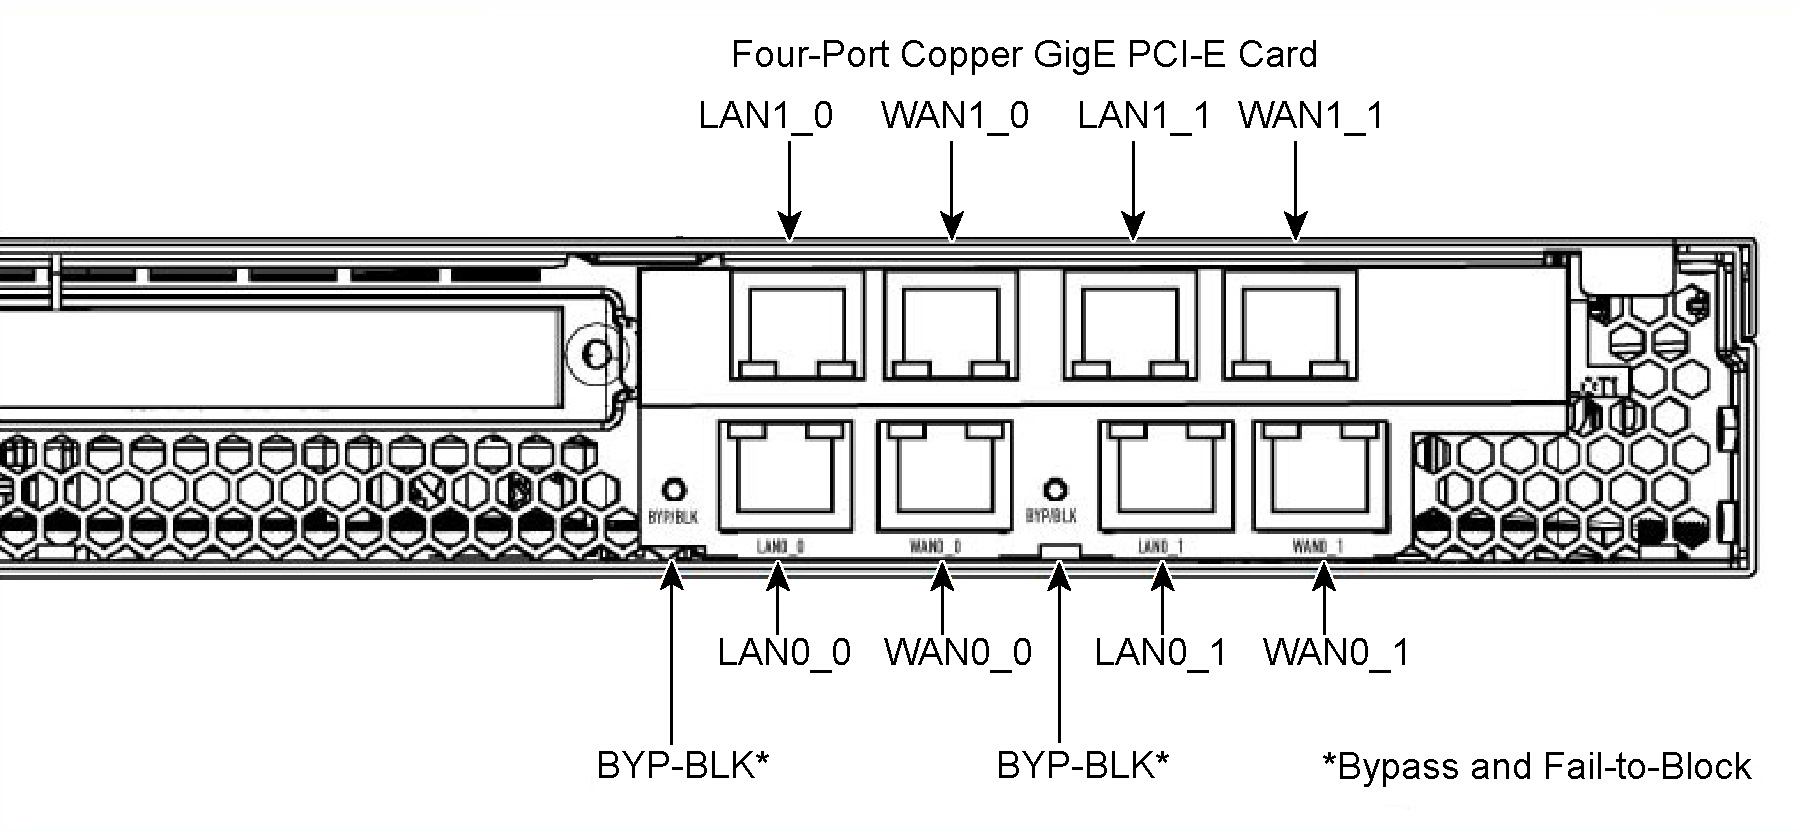
Figure: 1U xx50 Appliance with a Four-Port Copper Gigabit Ethernet PCIe Card in Slot 1
Installing NICs in 3U xx50 Appliances and SteelHead Interceptor 9350
This section describes how to install NICs in the Interceptor 9350 appliance. This appliance can accommodate up to four PCIe NICs (depending on the software version) and have four copper Gigabit Ethernet ports onboard.
This section contains the following topics:
Note: SteelHead xx50 appliances are only compatible with PCIe NICs.
Note: SteelHead xx50 appliances require RiOS v5.0.3 or later to recognize add-on NICs in conjunction with the appliance’s onboard ports. Upgrade to v5.0.3 or later and enter the in-path reset-iface command to recognize all ports.
Identifying PCI Slots in 3U xx50 Appliances
• If your SteelHead does not have a label identifying the PCI slots, slot 5 is the slot closest to the power-supply unit. Slot 1 is the slot closest to the outermost side of the chassis. Slot 0 refers to the onboard ports.
• Your in-path NIC must be in slot 1, 2, 3, or 4. If your in-path NIC is not in slot 1, 2, 3, or 4, it is not displayed in the Management Console.
• When adding 10 Gigabit Ethernet cards, populate slots 2, 3, and 5 before the other slots for best performance. Use slot 1 next, use slot 4 last. For Gigabit Ethernet cards (1 GbE), the slot position for the card does not matter.
Replacing a NIC in 3U xx50 Appliances
This section describes how to install NICs in the Interceptor 9350 appliances.
Make sure you follow proper ESD procedures when you are handling the NIC:
• Wear properly grounded ESD straps.
• If an ESD strap is not available, touch a properly grounded metallic surface prior to handling the NIC.
• Do not touch the electronic components on the NIC.
To install the NIC
1. Power down the SteelHead.
2. Disconnect the appliance from the electrical outlet and peripherals.
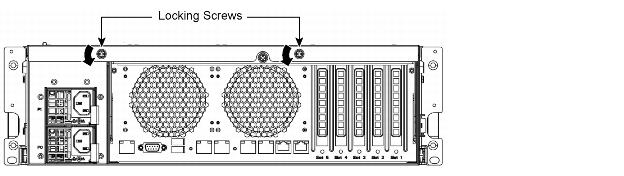
3. To remove the rear appliance cover, release the two locking screws on the back of the system.
Figure: Releasing Locking Screws
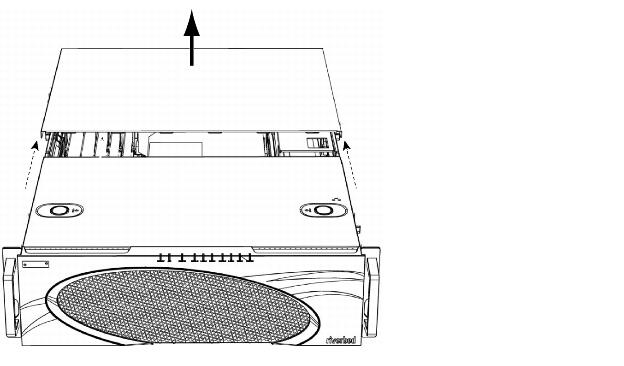
4. Slide back the rear cover several inches, and then lift up and away from the chassis.
Figure: Removing the Rear Top Cover from the Chassis
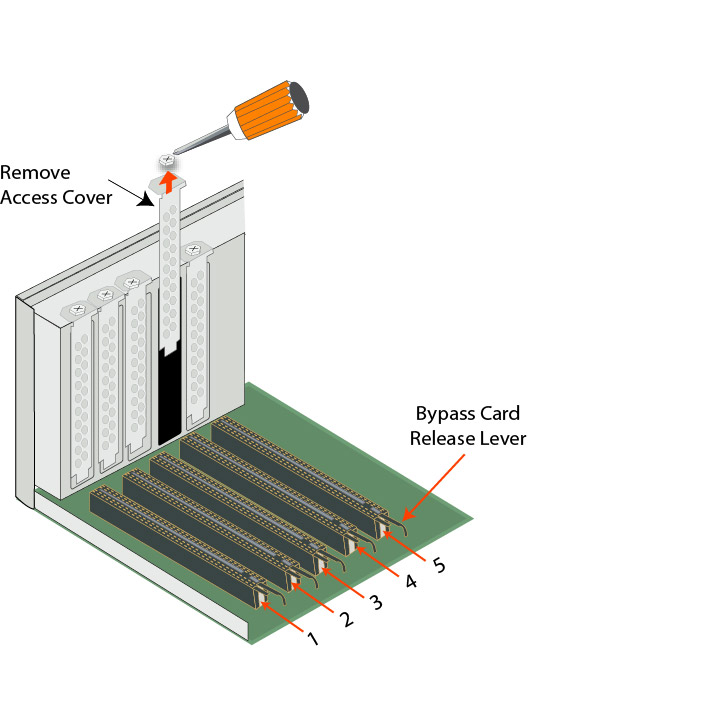
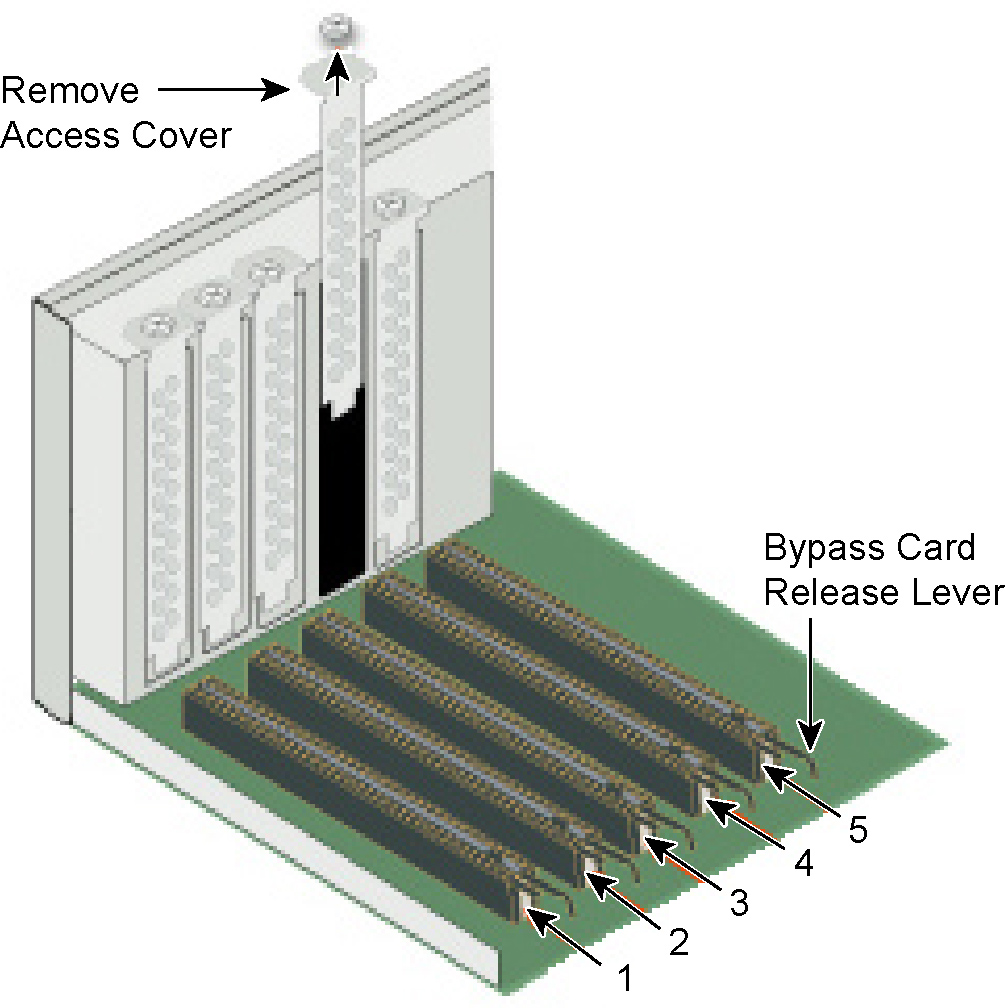
5. Remove the securing screw and access cover.
6. If you are replacing a NIC, remove the securing screw on the top of the NIC that you want to replace.
Note: To release a NIC from the PCI slot, push the NIC release lever outward and pull out the card.
Figure: Removing the NIC Securing Screw
7. Gently pull the new NIC from the ESD bag.
Figure: Removing the NIC from the ESD Bag
8. Hold the new NIC between the front bezel and the rear of the card to avoid ESD damage.
Figure: Proper Handling of the NIC
9. Plug the new NIC into a PCI slot and secure with the screw from the access cover.
Figure: Plugging the New NIC into the PCI Slot
Note: Your in-path NIC must be in slot 1, 2, 3, or 4. If your in-path NIC is not in slot 1, 2, 3, or 4, it is not displayed in the Management Console.
Note: When adding 10-Gigabit Ethernet cards, populate slots 2, 3, and 5 before the other slots for best performance. Use slot 1 next, and use slot 4 last. For 1-GbE cards, the slot position for the card does not matter.
Note: Make sure the NIC is seated properly. If it is not seated properly, the NIC does not function.
Note: It is not necessary to plug in the 12-volt connector of the Two-Port SR Multimode Fiber 10-Gigabit Ethernet PCIe card.
10. Close the top cover of the SteelHead.
11. Connect the power cords.
12. Connect the LAN and WAN cables.
Note: Straight-through cables connect the LAN ports to the LAN switches; crossover cables connect the WAN ports to the WAN routers.
13. Power up the SteelHead and check the status lights.
14. Connect to the SteelHead CLI.
For detailed information, see the Riverbed Command-Line Interface Reference Manual.
15. Enter enable mode. At the system prompt, enter the following command:
amnesiac > enable
amnesiac #
16. Verify that the NIC is correctly installed.
For example, to verify a Four-Port Copper Gigabit Ethernet PCIe card, at the system prompt enter the following command:
1073> gen1-sh210 (config) # show hardware
1073> Hardware revision: A
1073> Mainboard: Platform 3UABA Motherboard, 400-00300-01
1073> Slot 0: .......... 4 Port Copper GigE Network Bypass Module, Integrated
1073> Slot 4: ........... 4 Port Copper GigE PCI-E 8 Lane, Low Profile, Network Bypass Card, 410-00
Note: SteelHead xx50 appliances require RiOS 5.0.3 or later to recognize add-on NICs in conjunction with the appliance’s onboard ports. Upgrade to 5.0.3 or later and enter the in-path reset-iface command to recognize all ports.
Identifying Interface Names in 3U xx50 Appliances
The interface names for the NICs in the SteelHead Management Console and the CLI are a combination of the slot number and the port pairs (lan<slot>_<pair>, wan<slot>_<pair>). For example, if a four-port NIC is located in slot 1 of your appliance, the interface names are lan1_0, wan1_0, lan1_1, and wan1_1 respectively. The maximum number of pairs for a 3U xx50 is 10: 4 four-port fiber or copper NICs in addition to the onboard interfaces.
Figure: 3U xx50 Appliance Populated by a Four-Port Copper Gigabit Ethernet PCIe Card in Slot
1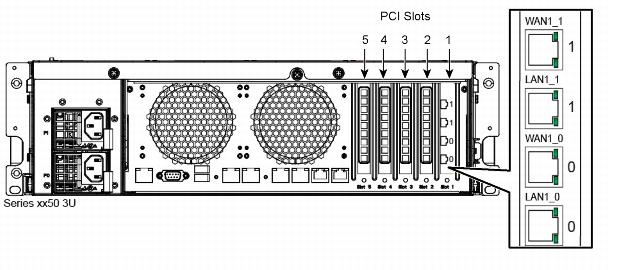
Figure: 3U xx50 Appliance Populated by a Four-Port SX Multimode Fiber Gigabit Ethernet PCIe Card in Slot
1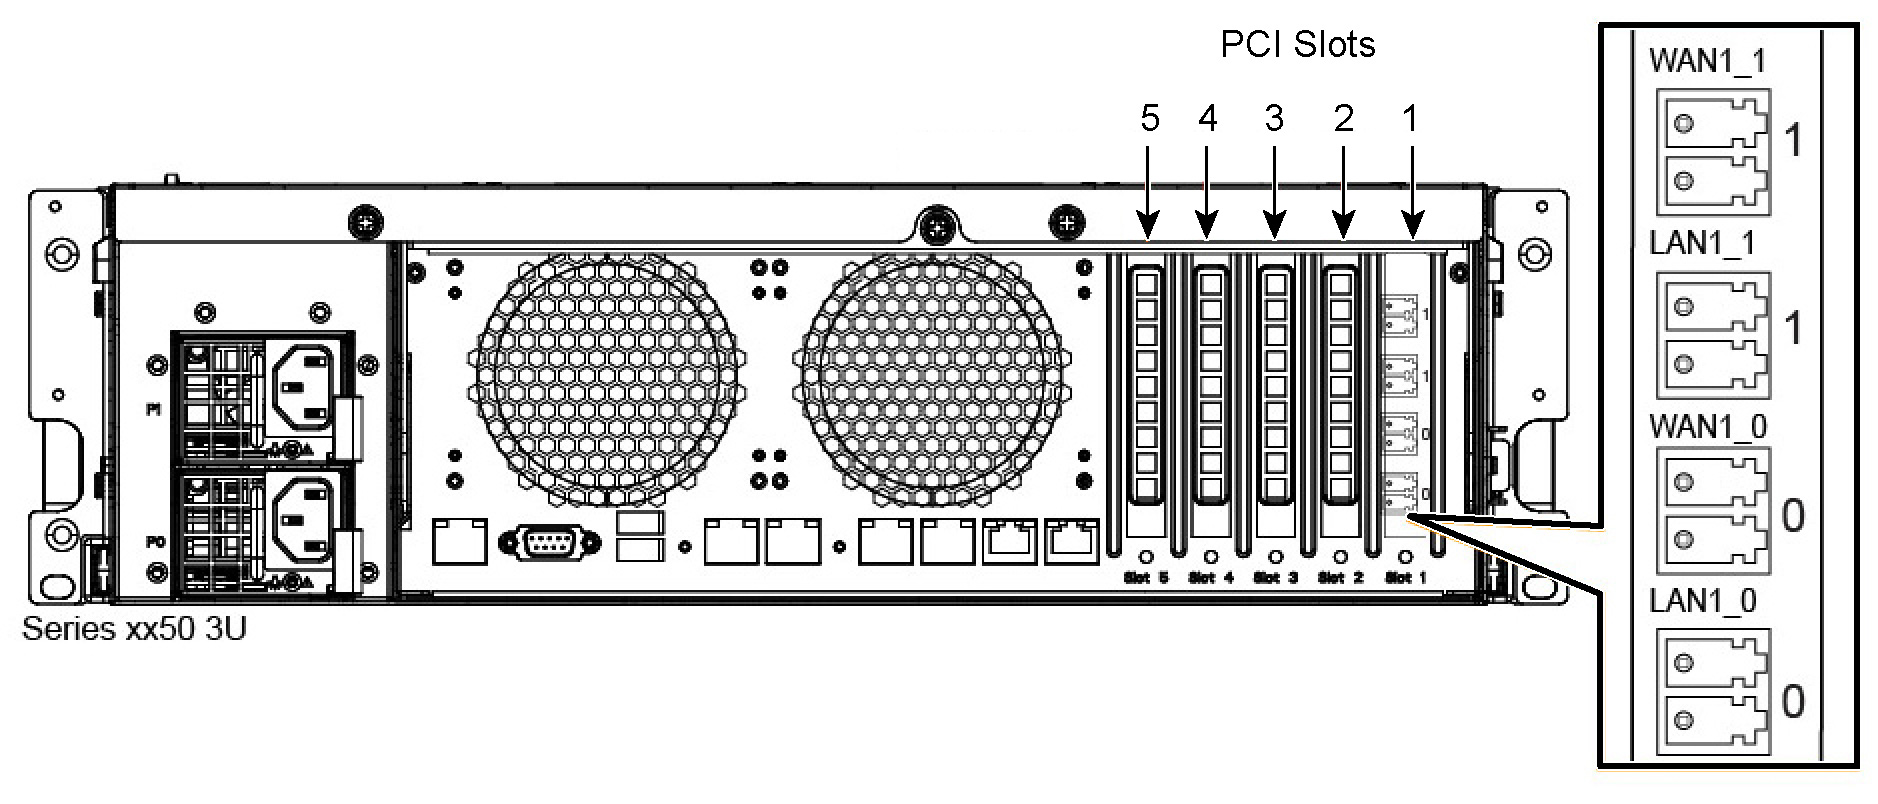
Obtaining a Gigabit Ethernet Link with the Multimode Fiber 100-Mbps/GbE Card
After installation, the Two-Port FX Multimode Fiber 100-Mbps/1-GbE PCIe card defaults to 100-Mbps. To change the interface speed to Gigabit Ethernet enter the interface <interface-name> speed 1000 RiOS command. For details about CLI commands, see the Riverbed Command-Line Interface Reference Manual.
Note: Some switches require use of the commands to obtain a Gigabit Ethernet link with the Two-Port FX Multimode Fiber 100-Mbps PCIe card. A 100-Mbps link does not require additional configuration.
Some switches connected to the Two-Port FX Multimode Fiber 100 Mbps PCIe card require a fixed speed and duplex setting and autonegotiation turned off to obtain a Gigabit Ethernet network link. A 100-Mbps link does not require configuration. The following CLI switch commands describe how to turn off autonegotiation on the switch.
To turn off autonegotiation on the switch
1. On the switch, enter configuration mode:
switch > enable
switch # configure terminal
switch (config)#
2. Enter configuration mode for the interface:
switch (config)# interface gigabitethernet <blade/port>
switch (config-if)#
3. Turn off autonegotiation on the interface:
switch (config-if) # speed nonegotiate