Alarms page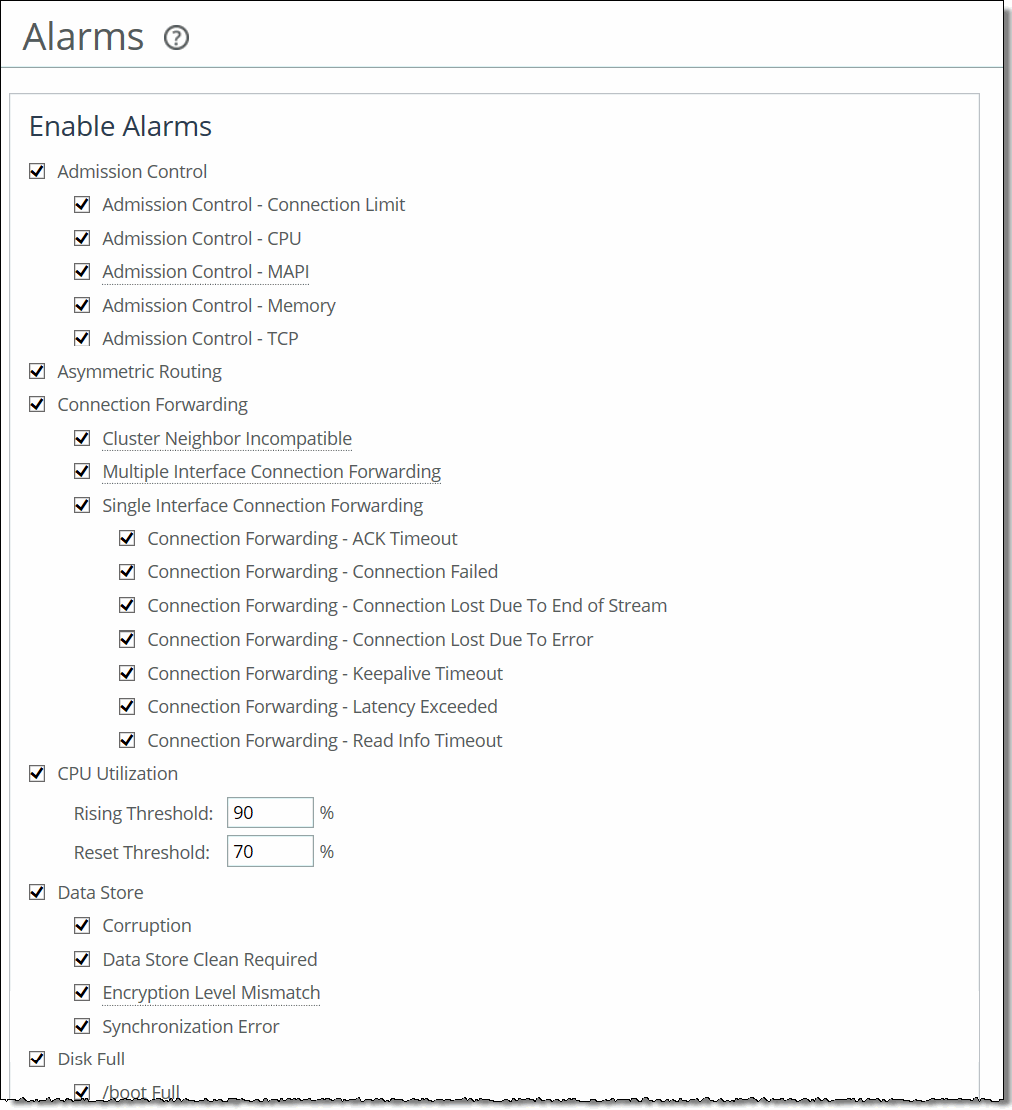
Control | Description |
Admission Control | Enables an alarm and sends an email notification if the SteelHead enters admission control. When this occurs, the SteelHead optimizes traffic beyond its rated capability and is unable to handle the amount of traffic passing through the WAN link. During this event, the SteelHead continues to optimize existing connections, but new connections are passed through without optimization. •Connection Limit - Indicates the system connection limit has been reached. Additional connections are passed through unoptimized. The alarm clears when the SteelHead moves out of this condition. •CPU - The appliance has entered admission control due to high CPU use. During this event, the appliance continues to optimize existing connections, but new connections are passed through without optimization. The alarm clears automatically when the CPU usage has decreased. •MAPI - The total number of MAPI optimized connections have exceeded the maximum admission control threshold. By default, the maximum admission control threshold is 85 percent of the total maximum optimized connection count for the client-side SteelHead. The SteelHead reserves the remaining 15 percent so that the MAPI admission control doesn’t affect the other protocols. The 85 percent threshold is applied only to MAPI connections. RiOS is now passing through MAPI connections from new clients but continues to intercept and optimize MAPI connections from existing clients (including new MAPI connections from these clients). RiOS continues optimizing non-MAPI connections from all clients. The alarm clears automatically when the MAPI traffic has decreased; however, it can take one minute for the alarm to clear. RiOS preemptively closes MAPI sessions to reduce the connection count in an attempt to bring the SteelHead out of admission control by bringing the connection count below the 85 percent threshold. RiOS closes the MAPI sessions in this order: –MAPI prepopulation connections –MAPI sessions with the largest number of connections –MAPI sessions with most idle connections –Most recently optimized MAPI sessions or oldest MAPI session –MAPI sessions exceeding the memory threshold •Memory - The appliance has entered admission control due to memory consumption. The appliance is optimizing traffic beyond its rated capability and is unable to handle the amount of traffic passing through the WAN link. During this event, the appliance continues to optimize existing connections, but new connections are passed through without optimization. No other action is necessary; the alarm clears automatically when the traffic has decreased. •TCP - The appliance has entered admission control due to high TCP memory use. During this event, the appliance continues to optimize existing connections, but new connections are passed through without optimization. The alarm clears automatically when the TCP memory pressure has decreased. By default, this alarm is enabled. |
Asymmetric Routing | Enables an alarm if asymmetric routing is detected on the network. Asymmetric routing is usually due to a failover event of an inner router or VPN. By default, this alarm is enabled. |
Connection Forwarding | Enables an alarm if the system detects a problem with a connection-forwarding neighbor. The connection-forwarding alarms are inclusive of all connection-forwarding neighbors. For example, if a SteelHead has three neighbors, the alarm triggers if any one of the neighbors are in error. In the same way, the alarm clears only when all three neighbors are no longer in error. •Cluster Neighbor Incompatible - Enables an alarm and sends an email notification if a connection-forwarding neighbor in a SteelHead Interceptor cluster has path selection enabled while path selection isn’t enabled on another appliance in the cluster. This alarm is also raised when a connection-forwarding neighbor is running a RiOS version that is incompatible with IPv6, or if the IP address configuration between neighbors doesn’t match. Neighbors must be running RiOS 8.5 or later. •Multiple Interface - Enables an alarm and sends an email notification if the connection to an appliance in a connection forwarding cluster is lost or is disconnected due to a configuration incompatibility. •Single Interface - Enables an alarm and sends an email notification if the connection to a SteelHead connection-forwarding neighbor is lost. By default, this alarm is enabled. |
CPU Utilization | Enables an alarm and sends an email notification if the average and peak threshold for the CPU utilization is exceeded. When an alarm reaches the rising threshold, it is activated; when it reaches the lowest or reset threshold, it is reset. After an alarm is triggered, it isn’t triggered again until it has fallen below the reset threshold. By default, this alarm is enabled. •Rising Threshold - Specify the rising threshold. When an alarm reaches the rising threshold, it is activated. The default value is 90 percent. •Reset Threshold - Specify the reset threshold. When an alarm reaches the lowest or reset threshold, it is reset. After an alarm is triggered, it isn’t triggered again until it has fallen below the reset threshold. The default value is 70 percent. |
Data Store | •Corruption - Enables an alarm and sends an email notification if the RiOS data store is corrupt or has become incompatible with the current configuration. To clear the RiOS data store of data, restart the optimization service and click Clear the Data Store. If the alarm was caused by an unintended change to the configuration, the configuration can be changed to match the old data store settings again and then a service restart (without clearing) will clear the alarm. Typical configuration changes that require a restart clear are changes to the data store encryption (choose Optimization > Data Replication: Data Store) or enabling extended peer table (choose Optimization > Network Services: Peering Rules). •Data Store Clean Required - Enables an alarm and sends an email notification if you need to clear the RiOS data store. •Encryption Level Mismatch - Enables an alarm and sends an email notification if a data store error such as an encryption, header, or format error occurs. •Synchronization Error - Enables an alarm if RiOS data store synchronization has failed. The RiOS data store synchronization between two SteelHeads has been disrupted and the RiOS data stores are no longer synchronized. By default, this alarm is enabled. |
Disk Full | Enables an alarm if the system partitions (not the RiOS data store) are full or almost full. For example, RiOS monitors the available space on /var, which is used to hold logs, statistics, system dumps, TCP dumps, and so on. By default, this alarm is enabled. |
Domain Authentication Alert | Enables an alarm when the system is either unable to communicate with the domain controller, or has detected an SMB signing error, or that delegation has failed. CIFS-signed and Encrypted-MAPI traffic is passed through without optimization. By default, this alarm is enabled. |
Domain Join Error | Enables an alarm if an attempt to join a Windows domain has failed. The number one cause of failing to join a domain is a significant difference in the system time on the Windows domain controller and the SteelHead. A domain join can also fail when the DNS server returns an invalid IP address for the domain controller. By default, this alarm is enabled. |
Flash Protection Failure | Enables an alarm if the USB flash drive has not been backed up because there isn’t enough available space in the /var filesystem directory. |
Hardware | •Disk Error - Enables an alarm when one or more disks is offline. To see which disk is offline, enter this CLI command from the system prompt: show raid diagram By default, this alarm is enabled. This alarm applies only to the SteelHead RAID Series 3000, 5000, and 6000. •Fan Error - Enables an alarm and sends an email notification if a fan is failing or has failed and needs to be replaced. By default, this alarm is enabled. •Flash Error - Enables an alarm when the system detects an error with the flash drive hardware. By default, this alarm is enabled. •IPMI - Enables an alarm and sends an email notification if an Intelligent Platform Management Interface (IPMI) event is detected. (Not supported on all appliance models.) This alarm triggers when there has been a physical security intrusion. These events trigger this alarm: –Chassis intrusion (physical opening and closing of the appliance case) –Memory errors (correctable or uncorrectable ECC memory errors) –Hard drive faults or predictive failures –Power cycle, such as turning the power switch on or off, physically unplugging and replugging the cable, or issuing a power cycle from the power switch controller. By default, this alarm is enabled. •Management Disk Size Error - Enables an alarm if the size of the management disk is too small to support the SteelHead (virtual edition) model. •Memory Error - Enables an alarm and sends an email notification if a memory error is detected, for example, when a system memory stick fails. •Other Hardware Error - Enables an alarm if a hardware error is detected. These issues trigger the hardware error alarm: –The SteelHead doesn’t have enough disk, memory, CPU cores, or NIC cards to support the current configuration. –The SteelHead is using a memory Dual In-line Memory Module (DIMM), a hard disk, or a NIC that isn’t qualified by Riverbed. –DIMMs are plugged into the SteelHead but RiOS can’t recognize them because: –a DIMM is in the wrong slot. You must plug DIMMs into the black slots first and then use the blue slots when all of the black slots are in use. —or— –a DIMM is broken and you must replace it. |
–Safety Valve: disk access exceeds response times - Enables an alarm when the SteelHead is experiencing increased disk access time and has started the safety valve disk bypass mechanism that switches connections into SDR-A. SDR-A performs data reduction in memory until the disk access latency falls below the safety valve activation threshold. Disk access time can exceed the safety valve activation threshold for several reasons: the SteelHead might be undersized for the amount of traffic it is required to optimize, a larger than usual amount of traffic is being optimized temporarily, or a disk is experiencing hardware issues such as sector errors, failing mechanicals, or RAID disk rebuilding. You configure the safety valve activation threshold and timeout using CLI commands: datastore safety-valve threshold datastore safety-value timeout For details, see the Riverbed Command-Line Interface Reference Manual. –Other hardware issues By default, this alarm is enabled. •Power Supply - Enables an alarm and sends an email notification if an inserted power supply cord doesn’t have power, as opposed to a power supply slot with no power supply cord inserted. By default, this alarm is enabled. •SSD Write Cycle Level Exceeded - Enables an alarm if the accumulated SSD write cycles exceed a predefined write cycle 95 percent level on SteelHead models 7050L and 7050M. If the alarm is triggered, the administrator can swap out the disk before any problems arise. By default, this alarm is enabled. | |
Inbound QoS WAN Bandwidth Configuration | Enables an alarm and sends an email notification if the inbound QoS WAN bandwidth for one or more of the interfaces is set incorrectly. You must configure the WAN bandwidth to be less than or equal to the interface bandwidth link rate. This alarm triggers when the system encounters one of these conditions: •An interface is connected and the WAN bandwidth is set higher than its bandwidth link rate: for example, if the bandwidth link rate is 1536 kbps, and the WAN bandwidth is set to 2000 kbps. •A nonzero WAN bandwidth is set and QoS is enabled on an interface that is disconnected; that is, the bandwidth link rate is 0. •A previously disconnected interface is reconnected, and its previously configured WAN bandwidth was set higher than the bandwidth link rate. The Management Console refreshes the alarm message to inform you that the configured WAN bandwidth is set higher than the interface bandwidth link rate. While this alarm appears, the SteelHead puts existing connections into the default class. The alarm clears when you configure the WAN bandwidth to be less than or equal to the bandwidth link rate or reconnect an interface configured with the correct WAN bandwidth. By default, this alarm is enabled. |
Licensing | Enables an alarm and sends an email notification if a license on the SteelHead is removed, is about to expire, has expired, or is invalid. •Appliance Unlicensed - This alarm triggers if the SteelHead does not have a license installed for its currently configured model. For details about updating licenses, see Managing licenses and model upgrades. •Autolicense Critical Event - This alarm triggers on a SteelHead (virtual edition) appliance when the Riverbed Licensing Portal can’t respond to a license request with valid licenses. The Licensing Portal can’t issue a valid license for one of these reasons: –A newer SteelHead (virtual edition) appliance is already using the token, so you can’t use it on the SteelHead (virtual edition) appliance displaying the critical alarm. Every time the SteelHead (virtual edition) appliance attempts to refetch a license token, the alarm retriggers. –The token has been redeemed too many times. Every time the SteelHead (virtual edition) appliance attempts to refetch a license token, the alarm retriggers. •Autolicense Informational Event - This alarm triggers if the Riverbed Licensing Portal has information regarding the licenses for a SteelHead (virtual edition) appliance. For example, the SteelHead (virtual edition) appliance displays this alarm when the portal returns licenses that are associated with a token that has been used on a different SteelHead (virtual edition) appliance. •Licenses Expired - This alarm triggers if one or more features has at least one license installed, but all of them are expired. •Licenses Expiring - This alarm triggers if the license for one or more features is going to expire within two weeks. Note: The licenses expiring and licenses expired alarms are triggered per feature. For example: if you install two license keys for a feature, LK1-FOO-xxx (expired) and LK1-FOO-yyy (not expired), the alarms don’t trigger, because the feature has one valid license. By default, this alarm is enabled. |
Link Duplex | Enables an alarm and sends an email notification when an interface was not configured for half-duplex negotiation but has negotiated half-duplex mode. Half-duplex significantly limits the optimization service results. The alarm displays which interface is triggering the duplex alarm. By default, this alarm is enabled. You can enable or disable the alarm for a specific interface. To enable or disable an alarm, choose Administration > System Settings: Alarms and select or clear the check box next to the link name. |
Link I/O Errors | Enables an alarm and sends an email notification when the link error rate exceeds 0.1 percent while either sending or receiving packets. This threshold is based on the observation that even a small link error rate reduces TCP throughput significantly. A properly configured LAN connection experiences very few errors. The alarm clears when the rate drops below 0.05 percent. You can change the default alarm thresholds by entering the alarm link_io_errors err-threshold <threshold-value> CLI command at the system prompt. For details, see the Riverbed Command-Line Interface Reference Manual. By default, this alarm is enabled. You can enable or disable the alarm for a specific interface. For example, you can disable the alarm for a link after deciding to tolerate the errors. To enable or disable an alarm, choose Administration > System Settings: Alarms and select or clear the check box next to the link name. |
Link State | Enables an alarm and sends an email notification if an Ethernet link is lost due to an unplugged cable or dead switch port. Depending on which link is down, the system might no longer be optimizing and a network outage could occur. This condition is often caused by surrounding devices, like routers or switches, interface transitioning. This alarm also accompanies service or system restarts on the SteelHead. For WAN/LAN interfaces, the alarm triggers if in-path support is enabled for that WAN/LAN pair. By default, this alarm is disabled. You can enable or disable the alarm for a specific interface. To enable or disable an alarm, choose Administration > System Settings: Alarms and select or clear the check box next to the link name. |
Memory Paging | Enables an alarm and sends an email notification if memory paging is detected. If 100 pages are swapped every couple of hours, the system is functioning properly. If thousands of pages are swapped every few minutes, contact Riverbed Support at https://support.riverbed.com. By default, this alarm is enabled. |
Neighbor Incompatibility | Enables an alarm if the system has encountered an error in reaching a SteelHead configured for connection forwarding. By default, this alarm is enabled. |
Network Bypass | Enables an alarm and sends an email notification if the system is in bypass failover mode. By default, this alarm is enabled. |
NFS V2/V4 alarm | Enables an alarm and sends an email notification if the SteelHead detects that either NFSv2 or NFSv4 is in use. The SteelHead only supports NFSv3 and passes through all other versions. By default, this alarm is enabled. |
Optimization Service | •Internal Error - Enables an alarm and sends an email notification if the RiOS optimization service encounters a condition that might degrade optimization performance. By default, this alarm is enabled. Go to the Administration > Maintenance: Services page and restart the optimization service. •Service Status - Enables an alarm and sends an email notification if the RiOS optimization service encounters a service condition. By default, this alarm is enabled. The message indicates the reason for the condition. These conditions trigger this alarm: –Configuration errors. –A SteelHead reboot. –A system crash. –An optimization service restart. –A user enters the CLI command no service enable or shuts down the optimization service from the Management Console. –A user restarts the optimization service from either the Management Console or CLI. •Unexpected Halt - Enables an alarm and sends an email notification if the RiOS optimization service halts due to a serious software error. By default, this alarm is enabled. |
Outbound QoS WAN Bandwidth Configuration | Enables an alarm and sends an email notification if the outbound QoS WAN bandwidth for one or more of the interfaces is set incorrectly. You must configure the WAN bandwidth to be less than or equal to the interface bandwidth link rate. This alarm triggers when the system encounters one of these conditions: •An interface is connected and the WAN bandwidth is set to higher than its bandwidth link rate: for example, if the bandwidth link rate is 100 Mbps, and the WAN bandwidth is set to 200 Mbps. •A nonzero WAN bandwidth is set and QoS is enabled on an interface that is disconnected; that is, the bandwidth link rate is 0. •A previously disconnected interface is reconnected, and its previously configured WAN bandwidth was set higher than the bandwidth link rate. The Management Console refreshes the alarm message to inform you that the configured WAN bandwidth is set greater than the interface bandwidth link rate. While this alarm appears, the system puts existing connections into the default class. The alarm clears when you configure the WAN bandwidth to be less than or equal to the bandwidth link rate or reconnect an interface configured with the correct WAN bandwidth. By default, this alarm is enabled. |
Path Selection Path Down | Enables an alarm and sends an email notification if the system detects that one of the predefined uplinks for a connection is unavailable. The uplink has exceeded either the timeout value for uplink latency or the threshold for observed packet loss. When an uplink fails, the SteelHead directs traffic through another available uplink. When the original uplink comes back up, the SteelHead redirects the traffic back to it. By default, this alarm is enabled. |
Path Selection Path Probing Error | Enables an alarm and sends an email notification if a path selection monitoring probe for a predefined uplink has received a probe response from an unexpected relay or interface. By default, this alarm is enabled. |
Process Dump Creation Error | Enables an alarm and sends an email notification if the system detects an error while trying to create a process dump. This alarm indicates an abnormal condition where RiOS can’t collect the core file after three retries. It can be caused when the /var directory is reaching capacity or other conditions. When the alarm is raised, the directory is blacklisted. By default, this alarm is enabled. |
Proxy File Service | Enables an alarm and sends an email notification when the system detects a PFS operation or configuration error: •Proxy File Service Configuration - Indicates that a configuration attempt has failed. If the system detects a configuration failure, attempt the configuration again. •Proxy File Service Operation - Indicates that a synchronization operation has failed. If the system detects an operation failure, attempt the operation again. By default, this alarm is enabled. |
Secure Transport | Enables an alarm and sends an email notification if a peer SteelHead encounters a problem with the secure transport controller connection. The secure transport controller is a SteelHead that typically resides in the data center and manages the control channel and operations required for secure transport between SteelHead peers. The control channel uses SSL to secure the connection between the peer SteelHead and the secure transport controller. •Connection with Controller Lost - Indicates that the peer SteelHead is no longer connected to the secure transport controller because: –The connectivity between the peer SteelHead and the secure transport controller is lost. –The SSL for the connection isn’t configured correctly. •Registration with Controller Unsuccessful - Indicates that the peer SteelHead isn’t registered with the secure transport controller, and the controller doesn’t recognize it as a member of the secure transport group. |
Secure Vault | Enables an alarm and sends an email notification if the system encounters a problem with the secure vault: •Secure Vault Locked - Indicates that the secure vault is locked. To optimize SSL connections or to use RiOS data store encryption, the secure vault must be unlocked. Go to Administration > Security: Secure Vault and unlock the secure vault. •Secure Vault New Password Recommended - Indicates that the secure vault requires a new, nondefault password. Reenter the password. •Secure Vault Not Initialized - Indicates that an error has occurred while initializing the secure vault. When the vault is locked, SSL traffic isn’t optimized and you can’t encrypt the RiOS data store. For details, see Unlocking the secure vault. |
Software Compatibility | Enables an alarm and sends an email notification if the system encounters a problem with software compatibility: •Peer Mismatch - Needs Attention - Indicates that the appliance has encountered another appliance that is running an incompatible version of system software. Refer to the CLI, Management Console, or the SNMP peer table to determine which appliance is causing the conflict. Connections with that peer will not be optimized, connections with other peers running compatible RiOS versions are unaffected. To resolve the problem, upgrade your system software. No other action is required as the alarm clears automatically. •Software Version Mismatch - Degraded - Indicates that the appliance is running an incompatible version of system software. To resolve the problem, upgrade your system software. No other action is required as the alarm clears automatically. By default, this alarm is enabled. |
SSL | Enables an alarm if an error is detected in your SSL configuration. For details about checking your settings, see Configuring SSL main settings. •Non-443 SSL Servers - Indicates that during a RiOS upgrade (for example, from 8.5 to 9.0), the system has detected a preexisting SSL server certificate configuration on a port other than the default SSL port 443. SSL traffic might not be optimized. To restore SSL optimization, you can add an in-path rule to the client-side SteelHead to intercept the connection and optimize the SSL traffic on the nondefault SSL server port. After adding an in-path rule, you must clear this alarm manually by entering this CLI command: stats alarm non_443_ssl_servers_detected_on_upgrade clear •SSL Certificates Error (SSL CAs) - Indicates that an SSL peering certificate has failed to reenroll automatically within the Simple Certificate Enrollment Protocol (SCEP) polling interval. •SSL Certificates Error (SSL Peering CAs) - Indicates that an SSL peering certificate has failed to re-enroll automatically within the SCEP polling interval. •SSL Certificates Expiring - Indicates that an SSL certificate is about to expire. Two types of certificates can trigger this alarm: Certificate Authority certificates used to validate servers and SSL Server Certificates that the SteelHead uses when acting as a trusted man in the middle. Depending on the type of certificate, you can review the expiring certificates on the Optimization: SSL > Certificate Authorities page or the Optimization: SSL > SSL Main Settings page. (The alarm only redirects you to the Certificate Authorities page, but you might need to review the SSL Main Settings page for your certificate.) Note, certificates are sorted by name and the expiring certificates might not be visible until you scroll through the list. •SSL Certificates SCEP - Indicates that an SSL certificate has failed to re-enroll automatically within the SCEP polling interval. •SSL HSM private key not accessible - Indicates that the server-side SteelHead can’t import the private key corresponding to the proxy certificate from a SafeNet Luna Hardware Security Module (HSM) server. The private key is necessary to establish mutual trust between the SteelHead and the HSM for proxied SSL traffic optimization. Check that the server-side SteelHead can access the HSM device and that the private key exists on the HSM server. For details, see the Riverbed Command-Line Interface Reference Manual. By default, this alarm is enabled. |
Storage Profile Switch Failed | Enables an alarm when an error occurs while repartitioning the disk drives during a storage profile switch. A profile switch changes the disk space allocation on the drives, clears the SteelFusion and VSP data stores, and repartitions the data stores to the appropriate sizes. By default, this alarm is enabled. You switch a storage profile by entering the disk-config layout CLI command at the system prompt or by choosing Administration > System Settings: Disk Management on an EX or EX+SteelFusion SteelHead. |
System Detail Report | Enables an alarm if a system component has encountered a problem. By default, this alarm is disabled (RiOS 7.0.3 and later). |
Temperature | •Critical Temperature - Enables an alarm and sends an email notification if the CPU temperature exceeds the rising threshold. When the CPU returns to the reset threshold, the critical alarm is cleared. The default value for the rising threshold temperature is 70ºC; the default reset threshold temperature is 67ºC. •Warning Temperature - Enables an alarm and sends an email notification if the CPU temperature approaches the rising threshold. When the CPU returns to the reset threshold, the warning alarm is cleared. –Rising Threshold - Specifies the rising threshold. The alarm activates when the temperature exceeds the rising threshold. The default value is 70 percent. –Reset Threshold - Specifies the reset threshold. The alarm clears when the temperature falls below the reset threshold. The default value is 67 percent. After the alarm triggers, it can’t trigger again until after the temperature falls below the reset threshold and then exceeds the rising threshold again. |
Web Proxy | •Configuration - Enables an alarm when an error occurs with the web proxy configuration. •Service Status - Enables an alarm when an error occurs with the web proxy service. By default, this alarm is enabled. |
Control | Description |
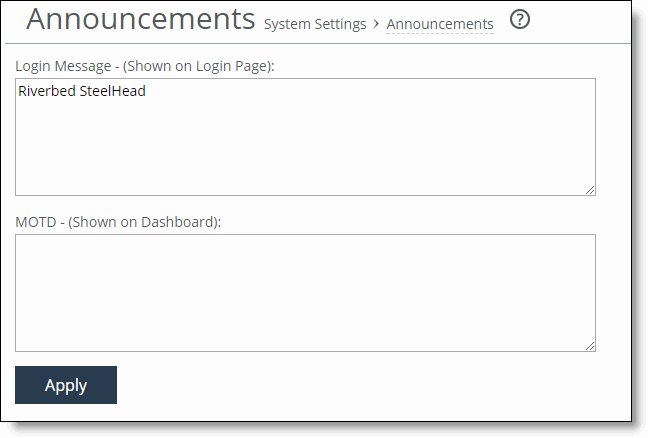
Login Message | Specify a message in the text box to appear in the Login page. |
MOTD | Specify a message in the text box to appear in the Dashboard. |
Control | Description |
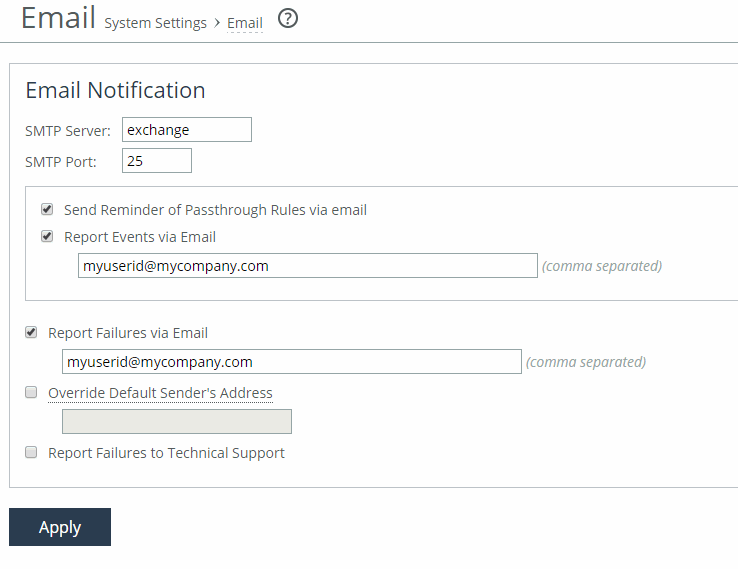
SMTP Server | Specify the SMTP server. You must have external DNS and external access for SMTP traffic for this feature to function. This field doesn’t support IPv6 addresses to specify an SMTP server. For sending email over IPv6, specify the hostname of the email server. Note: Make sure you provide a valid SMTP server to ensure that the users you specify receive email notifications for events and failures. |
SMTP Port | Specify the port number for the SMTP server. Typically you don’t need to change the default, which is port 25. |
Send Reminder of Passthrough Rules via email | Allows emails to be sent when one or more pass-through in-path rules are configured. Reminder emails are also sent every 15 days. In addition to selecting this check box, you must also make or verify the following changes: •Select the Report Events via Email check box in this page and specify an email address. •Select the Enable Email Notification check box in the Optimization > Network Services: In-Path Rules page. This field is active only if you specify a pass-through rule. You cannot create notifications for other types of rules. To change the frequency of reminder emails, enter the email notify passthrough rule notify-timer <notification-time-in-days> command. For more information, see the Riverbed Command-Line Interface Reference Manual. To disable reminder emails for pass-through rules, clear this check box or enter the no email notify passthrough rule command. |
Report Events via Email | Reports alarm events through email. Specify a list of email addresses to receive the notification messages. Separate addresses by spaces, semicolons, commas, or vertical bars. These alarms are events: •Admission control •CPU utilization (rising threshold, reset threshold) •Temperature (rising threshold, reset threshold) •Data store wrap frequency •Domain authentication alert •Network interface duplex errors •Network interface link errors •Fan error •Flash error •Hardware error •IPMI •Licensing •Memory error •Neighbor incompatibility •Network bypass •NFS V2/V4 alarm •Non-SSL servers detected on upgrade •Optimization service (general service status, optimization service) •Extended memory paging activity •Secure vault •System disk full •Software version mismatch •Storage profile switch failed •TCP Stop Trigger scan has started •Asymmetric routes •Expiring SSL certificates •SSL peering certificate SCEP automatic re-enrollment •Connection forwarding (ACK timeout, failure, lost EOS, lost ERR, keepalive timeout, latency exceeded, read info timeout) •Prepopulation or Proxy File Service •Addition of in-path rules |
Report Failures via Email | Reports alarm failures through email. Specify a list of email addresses to receive the notification messages. Separate addresses by spaces, semicolons, commas, or vertical bars. These alarms are failures: •Data store corruption •System details report •Domain join error •RAID •Optimization service - unexpected halt •Critical temperature •Disk error •SSD wear warning |
Override Default Sender’s Address | Configures the SMTP protocol for outgoing server messages for errors or events. Specify a list of email addresses to receive the notification messages. Separate addresses by commas. You can also configure the outgoing email address sent to the client recipients. The default outgoing address is do-not-reply@<hostname>.<domain>. If you don’t specify a domain, the default outgoing email is do-not-reply@<hostname>. You can configure the host and domain settings in the Networking > Networking: Host Settings page. |
Report Failures to Technical Support | Reports serious failures such as system crashes to Riverbed Support. We recommend that you activate this feature so that problems are promptly corrected. Note: This option doesn’t automatically report a disk drive failure. In the event of a disk drive failure, please contact Riverbed Support at support@riverbed.com. |
Control | Description |
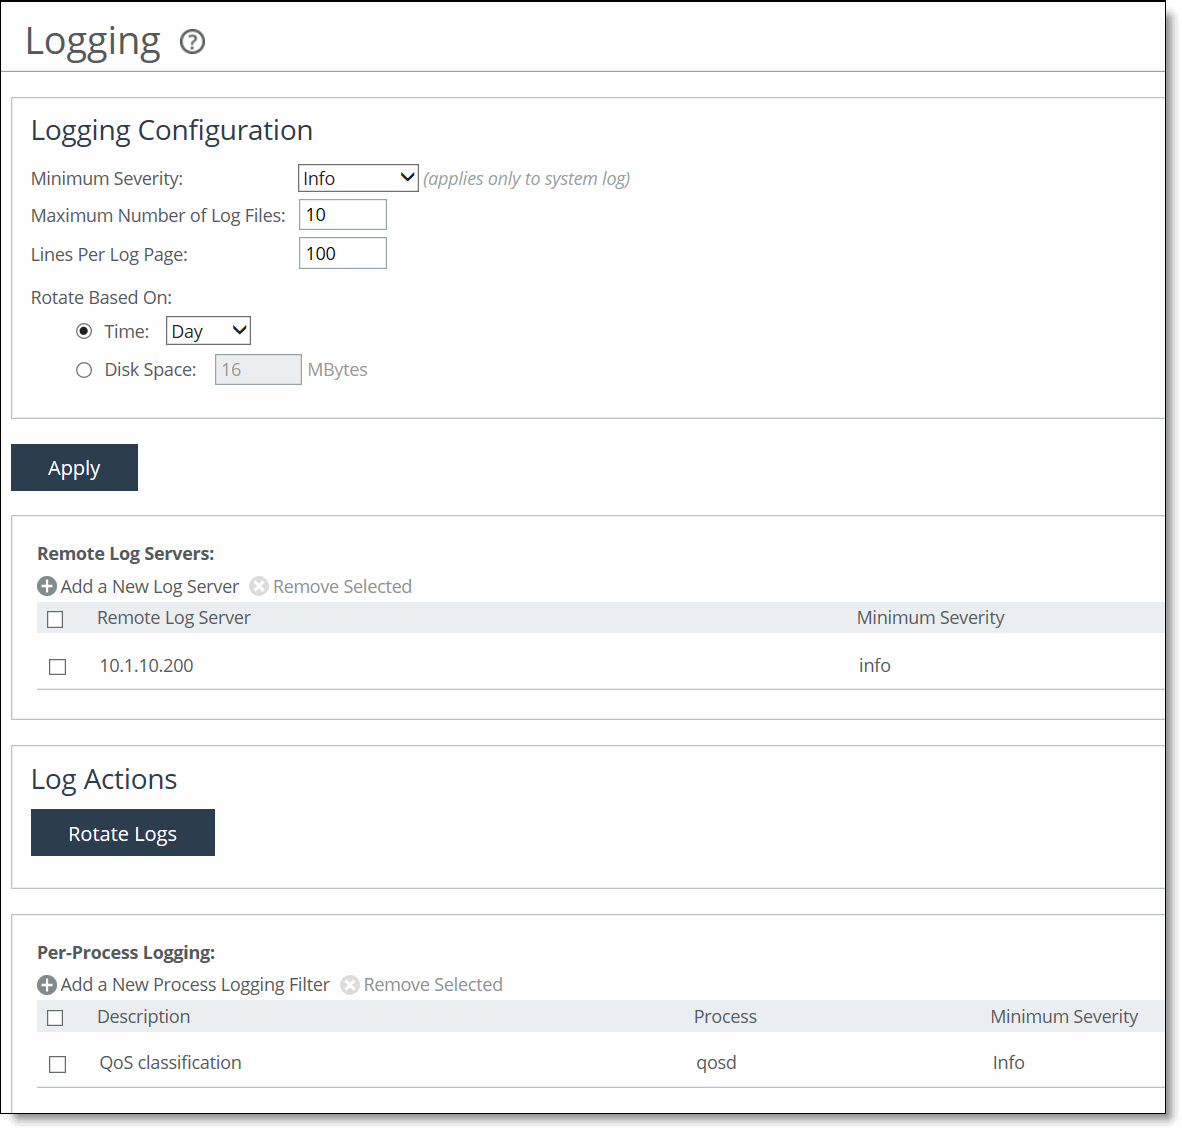
Minimum Severity | Select the minimum severity level for the system log messages. The log contains all messages with this severity level or higher. Select one of these levels from the drop-down list: •Emergency - Emergency, the system is unusable. •Alert - Action must be taken immediately. •Critical - Conditions that affect the functionality of the SteelHead. •Error - Conditions that probably affect the functionality of the SteelHead. •Warning - Conditions that could affect the functionality of the SteelHead, such as authentication failures. •Notice - Normal but significant conditions, such as a configuration change. This is the default setting. •Info - Informational messages that provide general information about system operations. Note: This control applies to the system log only. It doesn’t apply to the user log. |
Maximum Number of Log Files | Specify the maximum number of logs to store. The default value is 10. |
Lines Per Log Page | Specify the number of lines per log page. The default value is 100. |
Rotate Based On | Specifies the rotation option: •Time - Select Day, Week, or Month from the drop-down list. The default setting is Day. •Disk Space - Specify how much disk space, in megabytes, the log uses before it rotates. The default value is 16 MB. Note: The log file size is checked at 10-minute intervals. If there’s an unusually large amount of logging activity, it’s possible for a log file to grow larger than the set disk space limit in that period of time. |
Control | Description |
Add a New Log Server | Displays the controls for configuring new log servers. |
Server IP | Specify the server IP address. |
Minimum Severity | Select the minimum severity level for the log messages. The log contains all messages with this severity level or higher. Select one of these levels from the drop-down list: •Emergency - Emergency, the system is unusable. •Alert - Action must be taken immediately. •Critical - Conditions that affect the functionality of the SteelHead. •Error - Conditions that probably affect the functionality of the SteelHead. •Warning - Conditions that could affect the functionality of the SteelHead, such as authentication failures. •Notice - Normal but significant conditions, such as a configuration change. This is the default setting. •Info - Informational messages that provide general information about system operations. |
Add | Adds the server to the list. |
Remove Selected | Select the check box next to the name and click Remove Selected. |
Control | Description |
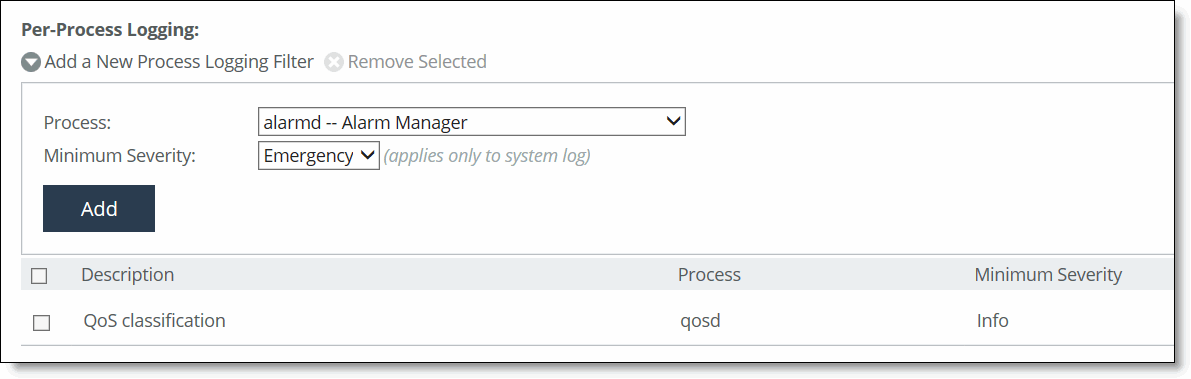
Add a New Process Logging Filter | Displays the controls for adding a process level logging filter. |
Process | Select a process to include in the log from the drop-down list: •alarmd - alarm manager, which processes all alarms, including their thresholds and severity. •collectord - Application visibility NetFlow collector. •cifs - CIFS optimization. •cmcfc - SCC automatic registration utility. •rgp - SCC connector, which handles SCC appliance communication. •rgpd - SCC client daemon, the connection manager. •cli - Command-line interface. •mgmtd - Device control and management, which directs the entire device management system. It handles message passing between various management daemons, managing system configuration, and general application of system configuration on the hardware underneath through the hardware abstraction layer daemon (hald). •http - HTTP optimization. •hald - Hardware abstraction layer daemon, which handles access to the hardware. •notes - Lotus Notes optimization. •mapi - MAPI optimization. •nfs - NFS optimization. •pm - Process manager, which handles launching of internal system daemons and keeps them running. •qosd - QoS scheduler and DPI engine. •rscored - REST API core services. •rstild - REST translation interface layer. •sched - Process scheduler, which handles one-time scheduled events. •ssl - SSL optimization. •statsd - Statistics collector, which handles queries, storage, and trending of system statistics. •wdt - Watchdog timer, the motherboard watchdog daemon. •webasd - web application process, which handles the web user interface. •domain auth - Windows domain authentication. |
Minimum Severity | Select the minimum severity level for the log messages. The log contains all messages with this severity level or higher. Select a level from the drop-down list: •Emergency - Emergency, the system is unusable. •Alert - Action must be taken immediately. •Critical - Conditions that affect the functionality of the SteelHead. •Error - Conditions that probably affect the functionality of the SteelHead. •Warning - Conditions that could affect the functionality of the SteelHead, such authentication failures. •Notice - Normal but significant conditions, such as a configuration change. •Info - Informational messages that provide general information about system operations. |
Add | Adds the filter to the list. The process now logs at the selected severity and higher level. |
Remove Selected | Select the check box next to the name and click Remove Selected to remove the filter. |
Control | Description |
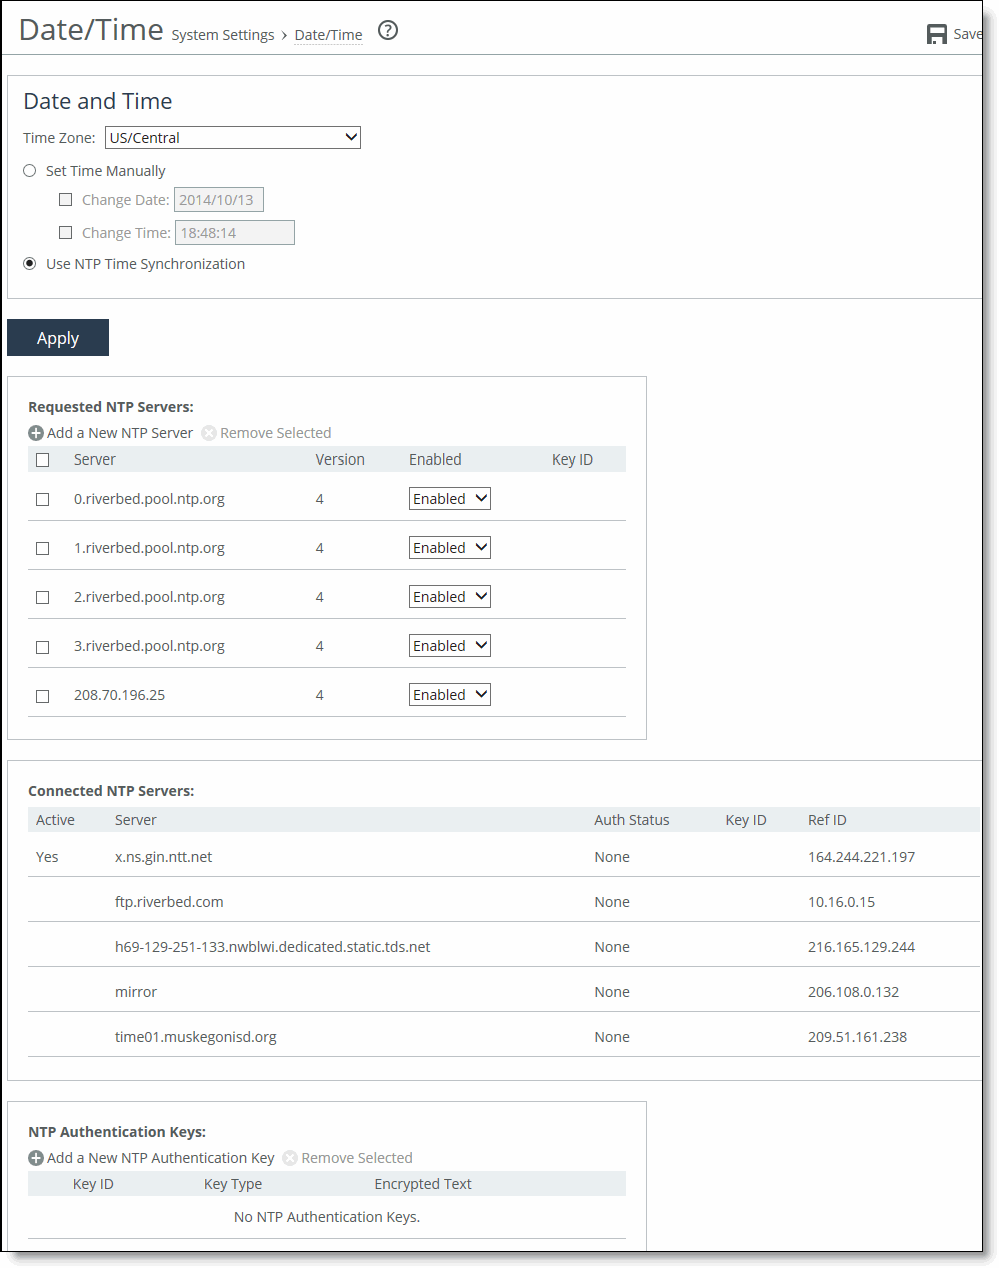
Time Zone | Select a time zone from the drop-down list. The default value is GMT. Note: If you change the time zone, log messages retain the previous time zone until you reboot. |
Change Date | Specify the date in this format: YYYY/MM/DD. |
Change Time | Specify military time in this format: HH:MM:SS. |
Control | Description |
Add a New NTP Server | Displays the controls to add a server. |
Hostname or IP Address | Specify the hostname or IP address for the NTP server. You can connect to an NTP public server pool: for example, 0.riverbed.pool.ntp.org. When you add an NTP server pool, the server is selected from a pool of time servers. Starting with RiOS 9.5, you can use IPv6 addresses. |
Version | Select the NTP server version from the drop-down list: 3 or 4. |
Enabled/Disabled | Select Enabled from the drop-down list to connect to the NTP server. Select Disabled from the drop-down list to disconnect from the NTP server. |
Key ID | Specify the MD5 or SH1 key identifier to use to authenticate the NTP server. The valid range is from 1 to 65534. The key ID must appear on the trusted keys list. |
Add | Adds the NTP server to the server list. |
Remove Selected | Select the check box next to the name and click Remove Selected. |
Control | Description |
Add a New NTP Authentication Key | Displays the controls to add an authentication key to the key list. Both trusted and untrusted keys appear on the list. |
Key ID | Optionally, specify the secret MD5 or SHA1 key identifier for the NTP server. The valid range is from 1 to 65534. |
Key Type | Select the authentication key type: MD5 or SHA1. |
Secret | Specify the shared secret. You must configure the same shared secret for both the NTP server and the NTP client. The MD5 shared secret: •is limited to 16 alphanumeric characters or fewer, or exactly 40 characters hexadecimal. • can’t include spaces or pound signs (#) • can’t be empty • is case sensitive The SHA1 shared secret: • is limited to exactly 40 characters hexadecimal • can’t include spaces or pound signs (#) • can’t be empty • is case sensitive The secret appears in the key list as its MD5 or SHA1 hash value. |
Add | Adds the authentication key to the trusted keys list. |
Remove Selected | Select the check box next to the name and click Remove Selected. |

Control | Description |
Add Port | Displays the controls to add a new port. |
Port Number | Specify the port to be monitored. |
Port Description | Specify a description of the type of traffic on the port. |
Add | Displays the controls for adding a port. |
Remove Selected | Select the check box next to the name and click Remove Selected. |
Control | Description |
Port Description | Specify a description of the type of traffic on the port. |
Apply | Applies your settings to the running configuration. |

Control | Description |
Enable SNMP Traps | Enables event reporting to an SNMP entity. |
System Contact | Specify the username for the SNMP contact. |
System Location | Specify the physical location of the SNMP system. |
Read-Only Community String | Specify a password-like string to identify the read-only community: for example, public. This community string overrides any VACM settings. Community strings can’t contain the pound sign (#). |
Control | Description |
Add a New Trap Receiver | Displays the controls to add a new trap receiver. |
Receiver | Specify the destination IPv4 or IPv6 address or hostname for the SNMP trap. |
Destination Port | Specify the destination port. |
Receiver Type | Select SNMP v1, v2c, or v3 (user-based security model). |
Remote User | (Appears only when you select v3.) Specify a remote username. |
Authentication | (Appears only when you select v3). Optionally, select either Supply a Password or Supply a Key to use while authenticating users. |
Authentication Protocol | (Appears only when you select v3.) Select an authentication method from the drop-down list: •MD5 - Specifies the Message-Digest 5 algorithm, a widely used cryptographic hash function with a 128-bit hash value. This is the default value. •SHA - Specifies the Secure Hash Algorithm, a set of related cryptographic hash functions. SHA is considered to be the successor to MD5. |
Password/Password Confirm | (Appears only when you select v3 and Supply a Password.) Specify a password. The password must have a minimum of eight characters. Confirm the password in the Password Confirm text box. |
Security Level | (Appears only when you select v3.) Determines whether a single atomic message exchange is authenticated. Select one of these levels from the drop-down list: •No Auth - Doesn’t authenticate packets and doesn’t use privacy. This is the default setting. •Auth - Authenticates packets but doesn’t use privacy. •AuthPriv - Authenticates packets using AES 128 and DES to encrypt messages for privacy. Note: A security level applies to a group, not to an individual user. |
Privacy Protocol | (Appears only when you select v3 and AuthPriv.) Select either the AES or DES protocol from the drop-down list. AES uses the AES128 algorithm. |
Privacy | (Appears only when you select v3 and AuthPriv.) Select Same as Authentication Key, Supply a Password, or Supply a Key to use while authenticating users. The default setting is Same as Authentication Key. |
Privacy Password | (Appears only when you select v3 and Supply a Password.) Specify a password. The password must have a minimum of eight characters. Confirm the password in the Privacy Password Confirm text box. |
MD5/SHA Key | (Appears only when you select v3 and Authentication as Supply a Key.) Specify a unique authentication key. The key is either a 32-hexadecimal digit MD5 or a 40-hexadecimal digit SHA digest created using md5sum or sha1sum. |
Privacy MD5/SHA Key | (Appears only when you select v3 and Privacy as Supply a Key.) Specify the privacy authentication key. The key is either a 32-hexadecimal digit MD5 or a 40-hexadecimal digit SHA digest created using md5sum or sha1sum. |
Community | For v1 or v2 trap receivers, specify the SNMP community name. For example, public or private v3 trap receivers need a remote user with an authentication protocol, a password, and a security level. |
Enable Receiver | Select to enable the new trap receiver. Clear to disable the receiver. |
Add | Adds a new trap receiver to the list. |
Remove Selected | Select the check box next to the name and click Remove Selected. |

Control | Description |
Add a New User | Displays the controls to add a new user. |
User Name | Specify the username. |
Authentication Protocol | Select an authentication method from the drop-down list: •MD5 - Specifies the Message-Digest 5 algorithm, a widely used cryptographic hash function with a 128-bit hash value. This is the default value. •SHA - Specifies the Secure Hash Algorithm, a set of related cryptographic hash functions. SHA is considered to be the successor to MD5. |
Authentication | Optionally, select either Supply a Password or Supply a Key to use while authenticating users. |
Password/Password Confirm | Specify a password. The password must have a minimum of eight characters. Confirm the password in the Password Confirm text box. |
Use Privacy Option | Select to use SNMPv3 encryption. |
Privacy Protocol | Select either the AES or DES protocol from the drop-down list. AES uses the AES128 algorithm. |
Privacy | Select Same as Authentication, Supply a Password, or Supply a Key to use while authenticating users. The default setting is Same as Authentication. |
Privacy Password | (Appears only when you select Supply a Password.) Specify a password. The password must have a minimum of eight characters. Confirm the password in the Privacy Password Confirm text box. |
Key | (Appears only when you select Supply a Key.) Specify a unique authentication key. The key is an MD5 or SHA-1 digest created using md5sum or sha1sum. |
MD5/SHA Key | (Appears only when you select Supply a Key.) Specify a unique authentication key. The key is either a 32-hexadecimal digit MD5 or a 40-hexadecimal digit SHA digest created using md5sum or sha1sum. |
Add | Adds the user. |
Remove Selected | Select the check box next to the name and click Remove Selected. |
Control | Description |
Add a New Security Name | Displays the controls to add a security name. |
Security Name | Specify a name to identify a requestor allowed to issue gets and sets (v1 and v2c only). The specified requestor can make changes to the view-based access-control model (VACM) security name configuration. This control doesn’t apply to SNMPv3 queries. To restrict v3 USM users from polling a particular subnet, use the RiOS Management ACL feature, located in the Administration > Security: Management ACL page. Traps for v1 and v2c are independent of the security name. |
Community String | Specify the password-like community string to control access. Use a combination of uppercase, lowercase, and numerical characters to reduce the chance of unauthorized access to the SteelHead. Community strings don’t allow printable 7-bit ASCII characters, except for white spaces. Also, the community strings can’t begin with a pound sign (#) or a hyphen (-). If you specify a read-only community string (located in the SNMP Basic page under SNMP Server Settings), it takes precedence over this community name and allows users to access the entire MIB tree from any source host. If this is not desired, delete the read-only community string. To create multiple SNMP community strings on a SteelHead, leave the default public community string and then create a second read-only community string with a different security name. Or, you can delete the default public string and create two new SNMP ACLs with unique names. |
Source IP Address and Mask Bits | Specify the host IPv4 or IPv6 address and mask bits to which you permit access using the security name and community string. |
Add | Adds the security name. |
Remove Selected | Select the check box next to the name and click Remove Selected. |
Control | Description |
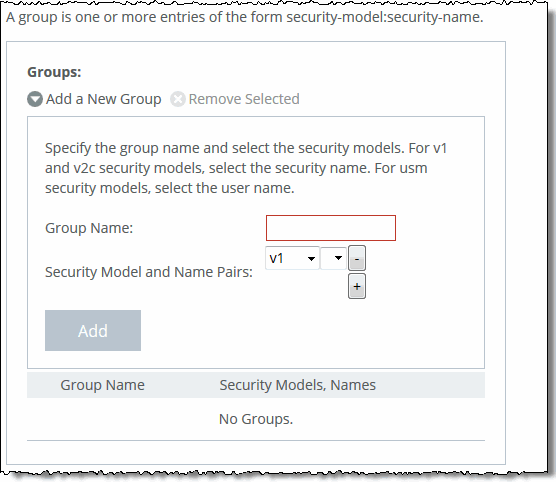
Add a New Group | Displays the controls to add a new group. |
Group Name | Specify a group name. |
Security Models and Name Pairs | Click the + button and select a security model from the drop-down list: •v1 or v2c - Displays another drop-down menu. Select a security name. •v3 (usm) - Displays another drop-down menu. Select a user. To add another Security Model and Name pair, click the plus sign (+). |
Add | Adds the group name and security model and name pairs. |
Remove Selected | Select the check box next to the name and click Remove Selected. |
Control | Description |
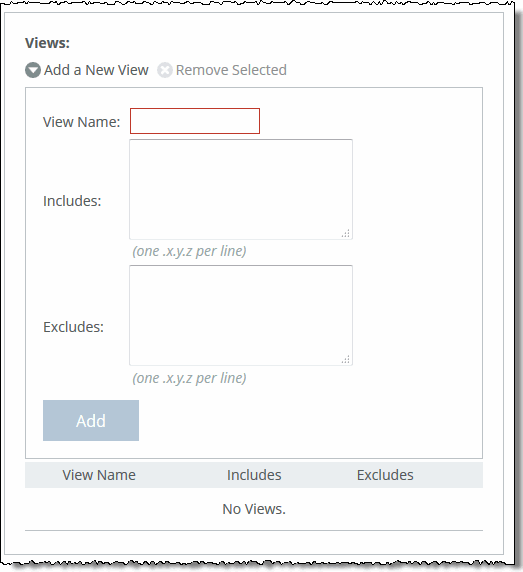
Add a New View | Displays the controls to add a new view. |
View Name | Specify a descriptive view name to facilitate administration. |
Includes | Specify the Object Identifiers (OIDs) to include in the view, separated by commas. For example, .1.3.6.1.4.1. By default, the view excludes all OIDs. You can specify .iso or any subtree or subtree branch. You can specify an OID number or use its string form. For example, .iso.org.dod.internet.private.enterprises.rbt.products.steelhead.system.model |
Excludes | Specify the OIDs to exclude in the view, separated by commas. By default, the view excludes all OIDs. |
Add | Adds the view. |
Remove Selected | Select the check box next to the name and click Remove Selected. |
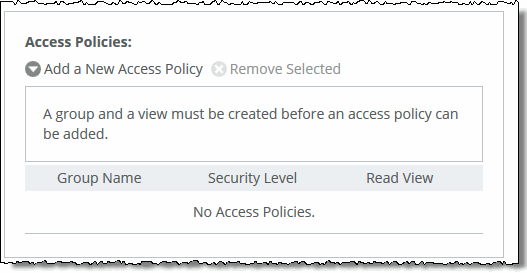
Control | Description |
Add a New Access Policy | Displays the controls to add a new access policy. |
Group Name | Select a group name from the drop-down list. |
Security Level | Determines whether a single atomic message exchange is authenticated. Select one of these from the drop-down list: •No Auth - Doesn’t authenticate packets and doesn’t use privacy. This is the default setting. •Auth - Authenticates packets but doesn’t use privacy. •AuthPriv - Authenticates packets using AES or DES to encrypt messages for privacy. A security level applies to a group, not to an individual user. |
Read View | Select a view from the drop-down list. |
Add | Adds the policy to the policy list. |
Remove Selected | Select the check box next to the name and click Remove Selected. |