Configuring WCCP
This section describes how to configure WCCP and provides example deployments. This section includes the following topics:
Basic Steps for Configuring WCCPConfiguring a Simple WCCP DeploymentAdding a SteelHead to an Existing WCCP DeploymentConfiguring a WCCP High Availability DeploymentConfiguring a Basic WCCP RouterBasic Steps for Configuring WCCP
This section describes the basics steps to set up WCCP.
To perform the basic steps to configure WCCP
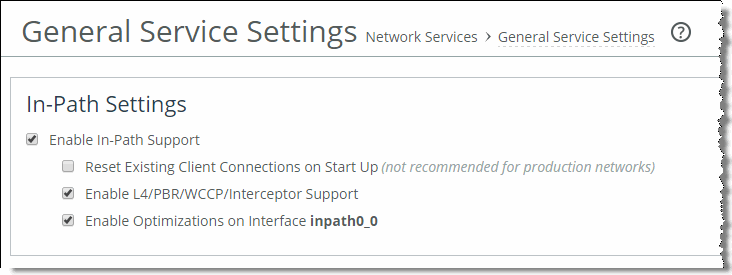
Configure the SteelHead as an in-path device and enable in-path support.
You can use the CLI commands
in-path enable and
in-path oop enable, or you can use In-Path Settings page shown in
Figure 11‑2.
Figure 11‑2. In-Path Settings
Enable WCCP on the router by creating a service group on the router.
Set the router to use WCCP to redirect traffic to the WCCP SteelHead.
Attach the desired SteelHead in-path interface WAN interface to the network. The WAN interface must be able to communicate with the switch or router on which WCCP is configured and where WCCP redirection takes place.
Add the service group on the WCCP SteelHead interface.
Enable WCCP on the WCCP SteelHead.
Configuring a Simple WCCP Deployment
Figure 11‑3 shows a WCCP deployment that is simple to deploy and administer, and achieves high performance. This example includes a single router and a single SteelHead.
Figure 11‑3. A Single SteelHead and a Single Router
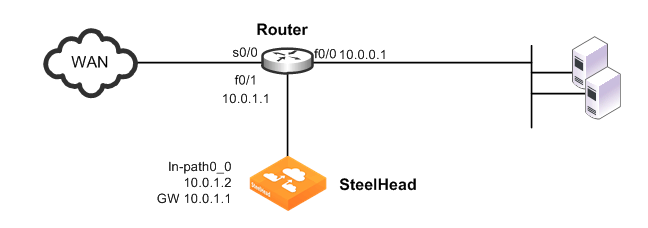
In this example:
The router and the SteelHead use WCCP service groups 61 and 62. In this example, as long as the SteelHead interface is a member of all of the service groups, and the service groups include all of the interfaces on all of the paths to and from the WAN, it does not matter whether a single service group or multiple service groups are configured. The SteelHead wan0_0 interface is directly attached to the router, using a crossover cable. The SteelHead virtual inpath0_0 interface uses the IP information that is visible to the router and the remote SteelHeads for data transfer. The SteelHead does not have an encapsulation scheme in the WCCP service group configuration. Therefore, the SteelHead informs the router that it supports both the GRE and the Layer-2 redirection methods. The method negotiated and used depends on the methods that the router supports. You can force the SteelHead to perform Layer-2 return of packets, regardless of the negotiated method of return, by using either of the following commands: wccp override-return route-no-gre or wccp override-return-sticky-no-gre. Enabling one of these commands potentially decreases the resource utilization on the router, especially with Layer-3 switches that must perform de-encapsulation of GRE packets in software. The router uses the ip wccp redirect exclude CLI command on the router interface connected to the SteelHead wan0_0 interface. This CLI command configures the router to never redirect packets arriving on this interface, even if they are later sent out of an interface with an ip wccp redirect out command. Unless you configure the router with the ip wccp redirect out command on an interface, then you do not need to configure the ip wccp redirect exclude command. Almost all Cisco WCCP capable Layer-3 switches prefer the ip wccp redirect in command, so using the ip wccp redirect exclude command serves no purpose, and furthermore, can add overhead to the switch CPU. Although the primary interface is not included in this example, Riverbed recommends that you connect the primary interface for management purposes. For information about configuring the primary interface, see the SteelHead Management Console User’s Guide.
To configure WCCP on the SteelHead
On the SteelHead, connect to the CLI and enter the following commands:enable
configure terminal
interface primary ip address 10.0.0.2 /24
ip default-gateway 10.0.0.1
interface inpath0_0 ip address 10.0.1.2 /24
ip in-path-gateway inpath0_0 10.0.1.1
in-path enable
in-path oop enable
wccp enable
wccp interface inpath0_0 service-group 61 routers 10.0.1.1
wccp interface inpath0_0 service-group 62 routers 10.0.1.1
write memory
restart
You must save your changes or they are lost upon reboot. Restart the optimization service for the changes to take effect.
In the following example, only traffic to or from IP addresses 192.168.1.1 is sent to the SteelHead.
To configure WCCP on the Cisco router
On the router, at the system prompt, enter the following commands:enable
configure terminal
ip access-list extended wccp_acl_61
deny tcp 10.0.1.0 0.0.0.255 any
deny tcp any 10.0.1.0 0.0.0.255
permit tcp <client subnets> <server subnets>
ip access-list extended wccp acl 62
deny tcp 10.0.1.0 0.0.0.255 any
deny tcp any 10.0.1.0 0.0.0.255
permit tcp <server subnets> <client subnets>
ip wccp version 2
ip wccp 61 redirect-list wccp_acl_61
ip wccp 62 redirect-list wccp_acl_62
interface f0/0
ip wccp 62 redirect in
interface s0/0
ip wccp 61 redirect in
interface f0/1
ip wccp redirect exclude in
end
write memory
Tip: Enter configuration commands, one per line. End each command with Ctrl-Z.
For information about how to verify the WCCP configuration,
Verifying and Troubleshooting WCCP Configurations.
Configuring WCCP using the mask assignment method is very similar to the standard WCCP configuration. The following example uses the mask of 0x3 that creates four buckets.
To configure WCCP on the SteelHead using the mask assignment method
On the SteelHead, connect to the CLI and enter the following commands:enable
configure terminal
interface primary ip address 10.0.0.2 /24
ip default-gateway 10.0.0.1
interface inpath0_0 ip address 10.0.1.2 /24
ip in-path-gateway inpath0_0 10.0.1.1
in-path enable
in-path oop enable
wccp enable
wccp interface inpath0_0 service-group 61 routers 10.0.1.1 assign-scheme mask src-ip-mask 0x3
wccp interface inpath0_0 service-group 62 routers 10.0.1.1 assign-scheme mask dst-ip-mask 0x3
write memory
restart
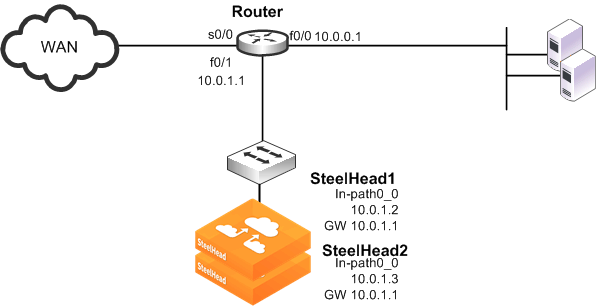
Adding a SteelHead to an Existing WCCP Deployment
You can have a maximum of 32 SteelHeads in your WCCP deployment. When you add new SteelHeads to an existing deployment, the buckets used by the router for load distribution are recalculated. New connections that were previously directed to one SteelHead might be redirected, resulting initially in cold performance after you restart service.
Adding a configuration to the existing SteelHeads requires a service restart during a performance window.
Figure 11‑4. Adding a SteelHead to an Existing WCCP Deployment
To add an additional SteelHead to an existing WCCP deployment
On SteelHead 1, connect to the CLI and enter the following commands:
enable
configure terminal
interface inpath0_0 ip address 10.0.1.2 /24
ip in-path-gateway inpath0_0 10.0.1.1
in-path enable
in-path oop enable
wccp enable
wccp interface inpath0_0 service-group 61 routers 10.0.1.1
wccp interface inpath0_0 service-group 62 routers 10.0.1.1
wccp override-return route-no-gre
steelhead communication enable
steelhead name SteelHead2 main-ip 10.0.1.3
steelhead communication allow-failure
steelhead communication advertiseresync
write memory
restart
On SteelHead 2, connect to the CLI and enter the following commands:
enable
configure terminal
interface inpath0_0 ip address 10.0.1.3 /24
ip in-path-gateway inpath0_0 10.0.1.1
in-path enable
in-path oop enable
wccp enable
wccp interface inpath0_0 service-group 61 routers 10.0.1.1
wccp interface inpath0_0 service-group 62 routers 10.0.1.1
steelhead communication enable
steelhead name SteelHead1 main-ip 10.0.1.2
steelhead communication allow-failure
steelhead communication advertiseresync
write memory
restart
Configuring a WCCP High Availability Deployment
This section described configuring a WCCP high availability deployment. This section includes the following topics:
Single SteelHead with Interface High AvailabilityDual WCCP SteelHeads and Interfaces with High AvailabilityRiOS v6.1 or later supports redundancy across multiple interfaces. Previously, high availability was only available at the appliance level. The following examples show appliances running v6.1 or later with multiple WCCP interfaces. The same configuration concepts apply to versions before v6.1, except that each appliance can have only one WCCP interface configured.
If you use RiOS versions before v6.1, you cannot achieve the high availability shown in
Single SteelHead with Interface High Availability. In
Dual WCCP SteelHeads and Interfaces with High Availability, you can provide appliance redundancy, but each SteelHead does not have interface redundancy.
The examples in
Single SteelHead with Interface High Availability and
Dual WCCP SteelHeads and Interfaces with High Availability show the configuration of SteelHeads for interface high availability. These examples focus solely on setting up multiple SteelHead interfaces to communicate with multiple routers, and therefore omit any best practice recommendations on redirection and assignment method configurations.
Single SteelHead with Interface High Availability
Figure 11‑5 shows a high availability WCCP deployment in which a single SteelHead with two in-path interfaces and two routers are used in a WCCP configuration. This ensures that traffic continues to optimize in the event of a SteelHead interface, router, or link failure. This example does not provide SteelHead high availability.
This deployment requires multiple in-path WCCP in RiOS v6.1 or later.
Figure 11‑5. WCCP with Interface High Availability
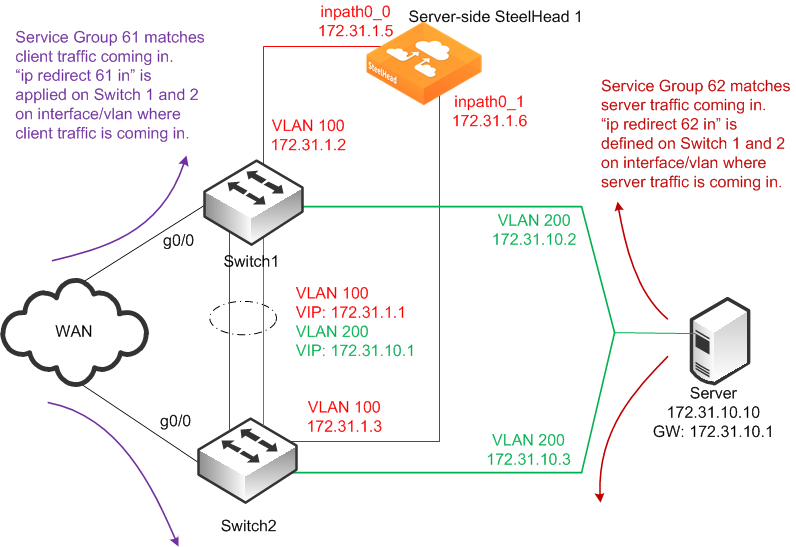
In this example:
The WCCP service groups are composed of two routers (Layer-3 switches) redirecting traffic and two SteelHead interfaces acting as the cache engines. The SteelHead is connected to both routers: wan0_0 goes to switch 1, and wan0_1 goes to Switch 2. If a single SteelHead interface fails, all traffic is forwarded to the remaining SteelHead interface.To configure WCCP with a single SteelHead with interface high availability
On the SteelHead 1, connect to the CLI and enter the following commands:
enable
configure terminal
interface primary ip address 10.10.1.10 /24
ip default-gateway 10.10.1.2
interface inpath0_0 ip address 172.31.1.5 /24
ip in-path-gateway inpath0_0 172.31.1.1
interface inpath0_1 ip address 172.31.1.6 /24
ip in-path-gateway inpath0_1 172.31.1.1
in-path enable
in-path oop enable
wccp enable
wccp interface inpath0_0 service-group 61 routers 172.31.1.2 172.31.1.3
wccp interface inpath0_0 service-group 62 routers 172.31.1.2 172.31.1.3
wccp interface inpath0_1 service-group 61 routers 172.31.1.2 172.31.1.3
wccp interface inpath0_1 service-group 62 routers 172.31.1.2 172.31.1.3
write memory
restart
You must save your changes or they are lost upon reboot. Restart the optimization service for the changes to take effect.
To configure WCCP on Cisco router 1 (Switch 1), at the system prompt, enter the following commands:
enable
configure terminal
!--- the server subnets
ip access-list extended wccp_acl_61
deny tcp 172.31.1.0.0.0.255 any
deny tcp any 172.31.1.0 0.0.0.255
permit tcp <client subnets> <server subnets>
!--- the client subnets
ip access-list extended wccp_acl_62
deny tcp 172.31.1.0.0.0.255 any
deny tcp any 172.31.1.0 0.0.0.255
permit tcp <server subnets> <client subnets>
ip wccp version 2
ip wccp 61 redirect-list wccp_acl_61
ip wccp 62 redirect-list wccp_acl_62
interface vlan 100
interface g0
ip wccp 61 redirect in
interface vlan 200
ip wccp 62 redirect in
end
write memory
Tip: Enter configuration commands, one per line. End each command with Ctrl-Z.
To configure WCCP on Cisco router 2 (Switch 2), at the system prompt, enter the following commands:
enable
configure terminal
ip access-list extended wccp_acl_61
deny tcp 172.31.1.0.0.0.255 any
deny tcp any 172.31.1.0 0.0.0.255
permit tcp <client subnets> <server subnets>
ip access-list extended wccp_acl_62
deny tcp 172.31.1.0.0.0.255 any
deny tcp any 172.31.1.0 0.0.0.255
permit tcp <server subnets> <client subnets>
ip wccp version 2
ip wccp 61 redirect-list wccp_acl_61
ip wccp 62 redirect-list wccp_acl_62
interface vlan 100
interface g0/0
ip wccp 61 redirect in
interface vlan 200
ip wccp 62 redirect in
end
write memory
Tip: Enter configuration commands, one per line. End each command with CTRL-Z.
For information about verifying the WCCP configuration, see
Verifying and Troubleshooting WCCP Configurations.
Dual WCCP SteelHeads and Interfaces with High Availability
Figure 11‑6 shows a high availability WCCP deployment where two SteelHeads with two in-path interfaces and two routers are used in a WCCP configuration. This ensures that traffic continues to be optimized in the event of a SteelHead interface or router failure.
This deployment requires multiple in-path WCCP in RiOS v6.1 or later.
RiOS
data store synchronization is commonly used in high availability designs. You can configure RiOS
data store synchronization between any two local SteelHeads, regardless of how they are deployed: physical in-path, virtual in-path, or out-of-path. For information about data store synchronization, see
RiOS Data Store Synchronization.
Figure 11‑6. High Availability WCCP with RiOS Data Store Synchronization
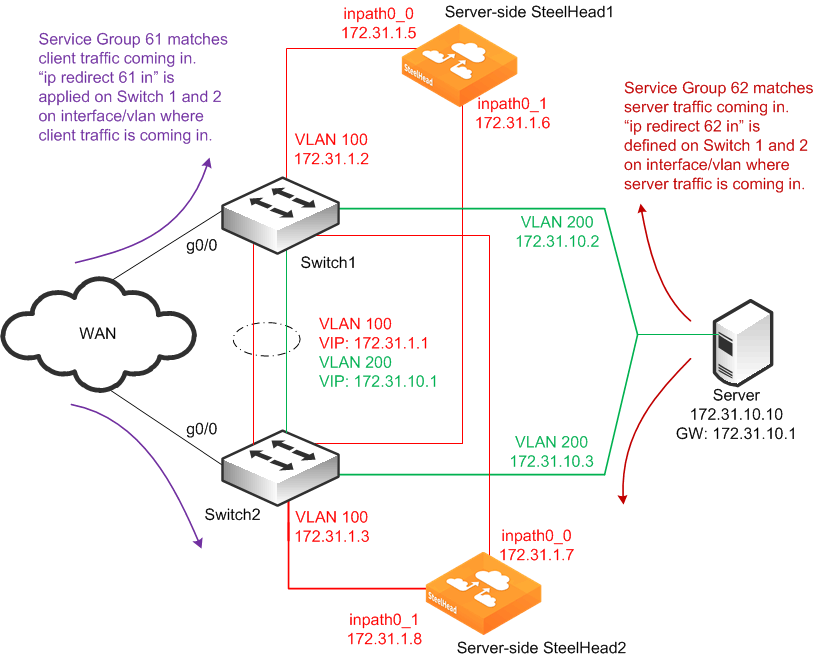
In this example:
The SteelHeads are connected to both routers (Layer-3 switches). For each SteelHead, wan0_0 is connected to Switch 1, and wan0_1 is connected to Switch 2. The WCCP service groups are composed of two routers redirecting traffic and four SteelHead interfaces acting as the cache engines. If a single SteelHead interface fails, all traffic is forwarded to the remaining SteelHead interfaces, including the second interface on the same SteelHead. If a single SteelHead fails, all traffic is forwarded to the other SteelHead's two in-path interfaces. Because the two SteelHeads synchronize their RiOS data stores, the remaining SteelHead provides the same level of acceleration as the failed SteelHead. If you are using a cluster of WCCP-attached SteelHeads, all remote client-side SteelHeads must have probe caching disabled using the no in-path probe-caching enable command.
To configure dual WCCP SteelHeads with interfaces with high availability
To configure WCCP on SteelHead1, connect to the CLI and enter the following commands:
enable
configure terminal
interface primary ip address 10.10.1.10 /24
ip default-gateway 10.10.1.2
interface inpath0_0 ip address 172.31.1.5 /24
ip in-path-gateway inpath0_0 172.31.1.1
interface inpath0_1 ip address 172.31.1.6 /24
ip in-path-gateway inpath0_1 172.31.1.1
in-path enable
in-path oop enable
steelhead communication enable
steelhead name SH2 main-ip 172.31.1.7
steelhead communication allow-failure
steelhead communication advertiseresync
wccp enable
wccp interface inpath0_0 service-group 61 routers 172.31.1.2 172.31.1.3
wccp interface inpath0_0 service-group 62 routers 172.31.1.2 172.31.1.3
wccp interface inpath0_1 service-group 61 routers 172.31.1.2 172.31.1.3
wccp interface inpath0_1 service-group 62 routers 172.31.1.2 172.31.1.3
datastore sync master
datastore sync peer-ip 10.10.1.13
datastore sync enable
write memory
restart
You must save your changes or they are lost upon reboot. Restart the optimization service for the changes to take effect.
To configure WCCP on SteelHead2, connect to the CLI and enter the following commands:
enable
configure terminal
interface primary ip address 10.1.1.13 /24
ip default-gateway 10.10.1.3
interface inpath0_0 ip address 172.31.1.7 /24
ip in-path-gateway inpath0_0 172.31.1.1
interface inpath0_1 ip address 172.31.1.8 /24
ip in-path-gateway inpath0_1 172.31.1.1
in-path enable
in-path oop enable
steelhead communication enable
steelhead name SH1 main-ip 172.31.1.5
steelhead communication allow-failure
steelhead communication advertiseresync
wccp enable
wccp interface inpath0_0 service-group 61 routers 172.31.1.2 172.31.1.3
wccp interface inpath0_0 service-group 62 routers 172.31.1.2 172.31.1.3
wccp interface inpath0_1 service-group 61 routers 172.31.1.2 172.31.1.3
wccp interface inpath0_1 service-group 62 routers 172.31.1.2 172.31.1.3
no datastore sync master
datastore sync peer-ip 10.10.1.10
datastore sync enable
write memory
restart
You must save your changes or they are lost upon reboot. Restart the optimization service for the changes to take effect.
To configure WCCP on Cisco router 1 (Switch 1), at the system prompt, enter the following commands:
enable
configure terminal
ip access-list extended wccp_acl_61
deny tcp 172.31.1.0.0.0.255 any
deny tcp any 172.31.1.0 0.0.0.255
permit tcp <client subnets> <server subnets>
ip access-list extended wccp_acl_62
deny tcp 172.31.1.0.0.0.255 any
deny tcp any 172.31.1.0 0.0.0.255
permit tcp <server subnets> <client subnets>
ip wccp version 2
ip wccp 61 redirect-list wccp_acl_61
ip wccp 62 redirect-list wccp_acl_62
interface vlan 100
interface g0/0
ip wccp 61 redirect in
interface vlan 200
ip wccp 62 redirect in
end
write memory
Tip: Enter configuration commands, one per line. End each command with Ctrl-Z.
To configure WCCP on Cisco router 2 (Switch 2), at the system prompt, enter the following commands:
enable
configure terminal
ip access-list extended wccp_acl_61
deny tcp 172.31.1.0.0.0.255 any
deny tcp any 172.31.1.0 0.0.0.255
permit tcp <client subnets> <server subnets>
ip access-list extended wccp_acl_62
deny tcp 172.31.1.0.0.0.255 any
deny tcp any 172.31.1.0 0.0.0.255
permit tcp <server subnets> <client subnets>
ip wccp version 2
ip wccp 61 redirect-list wccp_acl_61
ip wccp 62 redirect-list wccp_acl_62
interface vlan 100
interface g0/0
ip wccp 61 redirect in
interface vlan 200
ip wccp 62 redirect in
end
write memory
Tip: Enter configuration commands, one per line. End each command with Ctrl-Z.
For information about how to verify the WCCP configuration,
Verifying and Troubleshooting WCCP Configurations.
Configuring a Basic WCCP Router
This section summarizes some of the basic WCCP router configuration commands. For complete information about WCCP router configuration commands, refer to your router documentation.
To enable WCCP and define a service group on the router
On the router, at the system prompt, enter the following commands:enable
configure terminal
ip wccp <service_group> <redirect list>
end
write memory
The service group you specify on the router must also be set on the WCCP SteelHead.
The WCCP protocol allows you to add up to 32 SteelHeads and 32 routers to a service group.
To specify inbound traffic redirection for each router interface
On the router, at the system prompt, enter the following commands:enable
configure terminal
interface FastEthernet 0/0
ip wccp 61 redirect in
interface serial 0
ip wccp 62 redirect in
end
write memory
The ip wccp [SR] router command is not additive. After you run the end and write memory options for an ip wccp [SR] command, you cannot use another ip wccp [SR] command to augment information you previously specified. This is not true with the SteelHead wccp interface command.
To retain information you previously specified with ip wccp [SR], you must enter a new ip wccp command that includes the information you previously specified, and whatever you want to configure.
For example, you can configure your router using the following set of commands:
enable
configure terminal
ip wccp 61 redirect-list 100
end
write memory
If you want to specify a password on the router later, the command ip wccp 61 password <your_password> overwrites the previous redirect list configuration.
To retain the previous redirect list configuration and set a password, you must use the following command:
ip wccp 61 redirect-list 100 password <your_password>
For example:
enable
configure terminal
ip wccp 61 redirect-list 100 password XXXYYYZZ
end
write memory