Running and Viewing Synthetic Tests
This section describes the running and viewing of synthetic tests which are first created and then installed. For more information on creating and installing synthetic tests, see
“Configuring Synthetic Test Profiles" and
“Installing Synthetic Test Engines".This section includes the following topics:
Working with Tests on the Synthetic Tests Tab
It is important to note the interaction between the Synthetic Testing page profiles (CONFIGURE > All Settings->Administer->Synthetic Test Sources) and tests that exist on the Synthetic Tests screen (MORE > Synthetic Tests). Specifically:
• Each row on the Synthetic Tests page represents one test. A “test” is the unique combination of one type, one test source (test engine), and one test target. Initially, tests are generated by profiles in the Wizard.
• Using the Hamburger menu

to toggle the
Active state of an individual test affects only that test. Toggling the
Active checkbox in the original profile affects all individual tests that were generated by that profile.
• Using the Hamburger menu

to
Move or
Copy selected tests to another source automatically modifies the
Test Sources settings in the profile that generated the test(s). Modifying the
Test Sources list in a profile is equivalent to moving or copying individual tests on the
Synthetic Tests page.
• Using the Hamburger menu

to modify the
Target URI of an individual test automatically modifies the
Test Targets list in profile that generated that test. Modifying the
Test Targets list in a profile affects all individual tests generated by that profile.
• Using the Hamburger men

to modify the
Name of an individual test has no effect on the profile that generated that test. Modifying certain parameters in a profile affects the
Name of all individual tests generated by that profile.
List of Tests on the Synthetic Tests Page

The controls and indicators on the Synthetic Tests page are:
• Select checkbox - Click the check box in the
Name Column to select a test of interest. All selected tests are subject to action in the Hamburger menu

.
• Hamburger menu

- From this menu you can do the following:
– Quick View - Show the results of the last test.
– Edit - Allows you to modify the test name and the test URI.
– Run Now - Runs the selected test
– Activate - Enables the test to run at the frequency that is set in the test profile.
– Deactivate - Disables the test from running.
– Delete - Deletes the test.
– Copy to Test Source - Copies the test to the Synthetic Test Sources page
– Move to Test Source - Moves the test to the Synthetic Test Sources page
Filtering the Set of Tests that Appear on the Synthetic Tests Screen
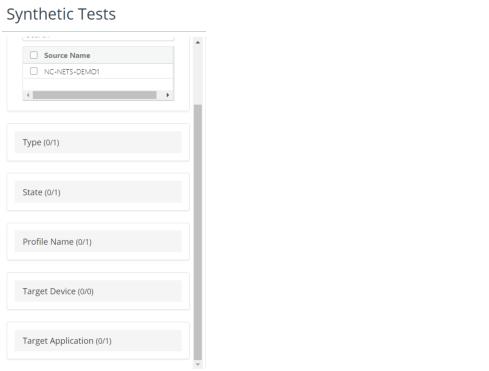
To limit the set of tests that appear in the list, use the Test filter tool in the left-hand panel. Each category corresponds to a property that can be associated with an individual test, as shown in the following screen:
Working with Test Engines on the Synthetic Test Sources Tab
The Test Sources page presents a list of the Test Engines associated with this instance of NetIM, as shown in the following screen:
The controls and indicators on the Synthetic Test Sources page are
• Select checkbox - Click the check box in the
Name Column to select a test of interest. All selected tests are subject to action in the Hamburger menu

.
• Hamburger men

- From this menu you can do the following:
– Edit Name - modifies the display name(s) of test sources in all profiles and in all tests. Display names are initially derived from hostnames, but this command does not modify hostnames.
– Set location - assigns a country and region, and city o this test source.
– Unset Location - deletes location information.
– Delete - removes the selected test source from the Synthetic Test Sources list and all associated tests from the Synthetic Tests list.
Filtering the Set of Test Sources that Appear on the Test Sources tab
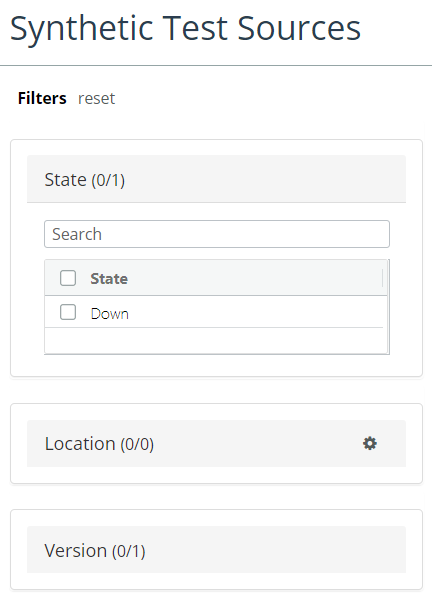
To limit the set of tests sources that appear in the list, click Up or Down. Click All to show all test sources.
‘Test Sources’ Filter on the Synthetic Test Sources Tab
About Deprecated and Incompatible Test Engines and Tests
The following conditions occur if you upgrade to NetIM without upgrading test engine software. (See
“Installing Synthetic Test Engines".) After you upgrade test engine software, NetIM automatically redeploys tests to the sources, and these conditions will not occur.
• A deprecated test source
(

), is a test engine that is outdated but which continues to operate in a limited way. Tests on a deprecated engine continue to run, and their statuses continue to be gathered, but no details appear on the
Sample Details tab. No test on a deprecated source can be edited, and no test can be copied or moved to that source. In addition, no test on a deprecated source can be
Run Now because that action includes a redeployment.
• A deprecated test (

), is a test deployed on a deprecated test source. It continues to run, and its results continue to be gathered, but it cannot be edited, copied, or moved among test sources. It cannot be
Run Now.
• An incompatible test source
(

), is a test engine that is outdated and non-functional. Tests on an incompatible engine can be removed, but not edited, copied, or moved.
• An incompatible test (

), is a test deployed on an incompatible test source. It does not function. It can be removed from its source, but not edited, copied, or moved.
Viewing Test Results on the Test Details Tab(s)
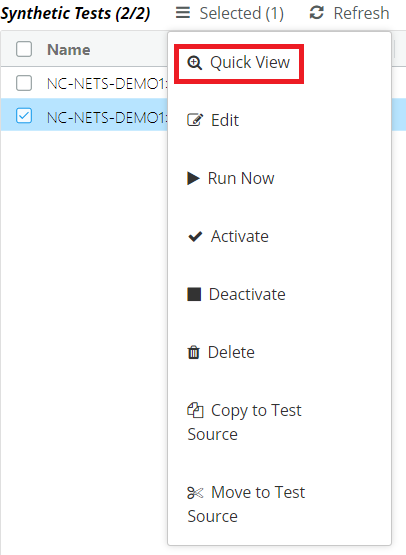
To view test results, select a test, click on the Hamburger menu

and select
Quick View, as show in the following screen:
A popup window appears with the test results, as shown in the following screen:
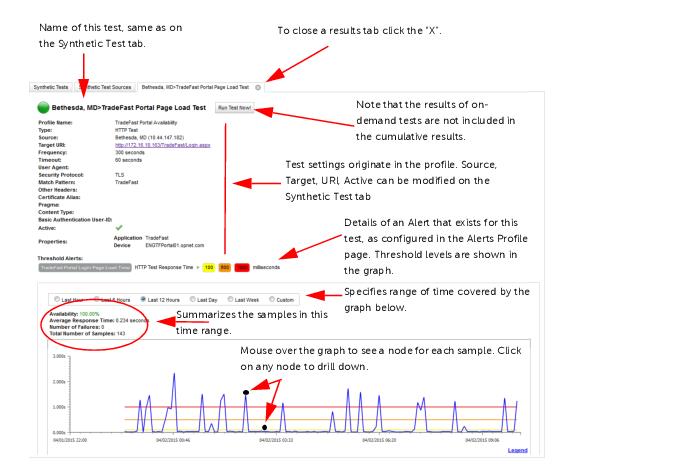
Viewing The Synthetic Rest Details
Drilling Down
When you click a node on the results graph (as in
Figure 13‑3.), the next panel depends on the currently selected time range:
• If the selected time range is
Last Hour,
Last 6 Hours,
Last 12 Hours, or a
Custom range that covers less than a day, the
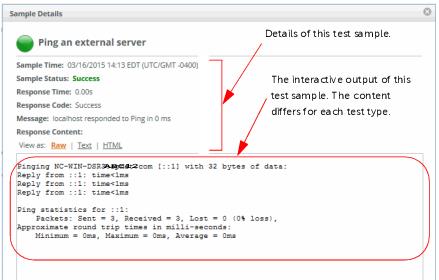
Sample Details page appears (as in
Figure 13‑3.) with the logged output of a single sample.
• If the selected time range is
Last Day or
Last Week, or a
Custom range that covers a day or more, the
Sample Details page appears (as in
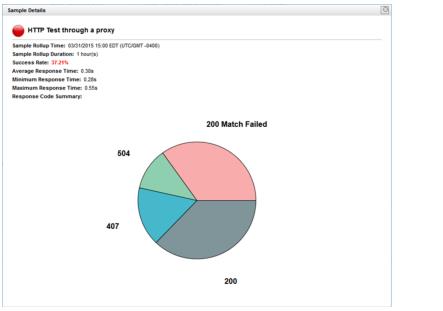
Figure 13‑5.) with a pie chart that presents the distribution of various Response Codes. The pie chart in
Figure 13‑5., for example, shows the distribution of HTTP response codes.
Sample Details page when Time Range <1 Day (for a ‘Ping Test’)
Sample Details page when Time Range >=1 Day (for an ‘HTTP Test’)
Viewing Synthetic Test Sources
In 2.4.0, NetIM introduced support for a landing page for each synthetic test. To access the landing pages, follow these steps:
1. Login to the NetIM UI as admin.
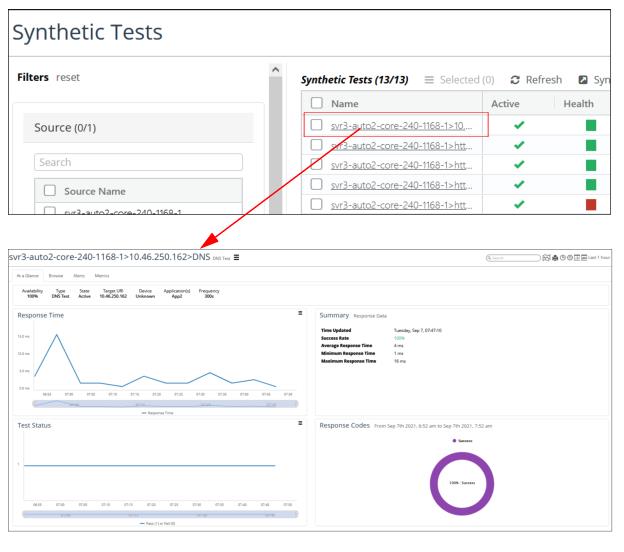
2. Navigate to MORE->Synthetic Tests. The Synthetic Tests page displays, as shown in the following screen:
3. To view a synthetic test source page, click on a synthetic test of interest under the Name column, and the source page displays, as shown in the following screens:
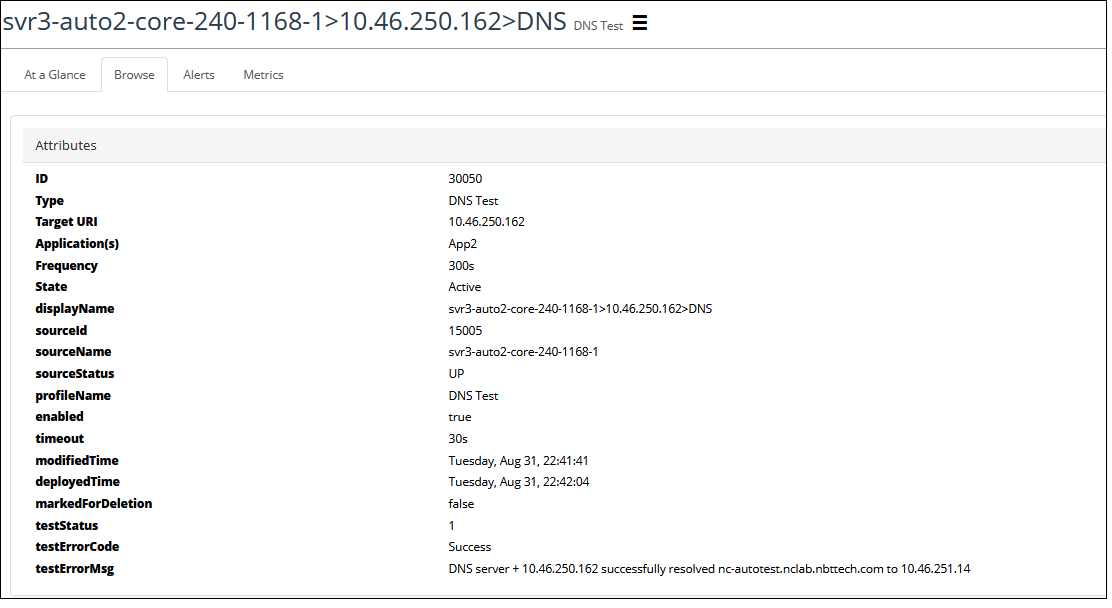
The Synthetic Test source page displays the At a Glance tab by default, and supports a Browse tab for associated test configuration, and Metrics and Alerts tabs to allow you to view the associated metrics and alerts for the synthetic test.
The following screen shows the synthetic test attributes displayed on the Browse tab:
Alerting the Network Operator to Synthetic Test Results
The
“Configuring an Alert" can alert the network operator to the positive or negative results of a synthetic test. See
“Configuring an Alert" in the
“Configuring Metric Alerts" chapter.
 to toggle the Active state of an individual test affects only that test. Toggling the Active checkbox in the original profile affects all individual tests that were generated by that profile.


 ), is a test engine that is outdated but which continues to operate in a limited way. Tests on a deprecated engine continue to run, and their statuses continue to be gathered, but no details appear on the Sample Details tab. No test on a deprecated source can be edited, and no test can be copied or moved to that source. In addition, no test on a deprecated source can be Run Now because that action includes a redeployment.
 ), is a test deployed on a deprecated test source. It continues to run, and its results continue to be gathered, but it cannot be edited, copied, or moved among test sources. It cannot be Run Now.
 ), is a test engine that is outdated and non-functional. Tests on an incompatible engine can be removed, but not edited, copied, or moved.
 ), is a test deployed on an incompatible test source. It does not function. It can be removed from its source, but not edited, copied, or moved.
 Viewing The Synthetic Rest Details
