About Cloud Deployments
Riverbed cloud products are available through cloud vendor marketplaces. If your organization hosts its own cloud, you can obtain the SteelHead Cloud product from the Riverbed Support site.
About Microsoft Azure deployments
The information here describes deployment through Azure’s Resource Manager wizard. Appliances can be deployed through Azure’s programmatic deployment mode, but that is not covered in this document. See the Azure documentation for details about that mode.
Resources deployed through different deployment modes cannot interoperate. Select the deployment mode that matches the rest of your infrastructure in Azure.
The default password is password regardless of the value you specified while provisioning or creating the SteelHead Mobile Controller from the Azure marketplace image. You can change the password after you provision the appliance. This caveat is only applicable for SteelHead Mobile Controller appliances provisioned from Azure marketplace.
Out-of-path deployments using fixed-target rules are supported.
In Azure, NAT rules to a virtual machine are very aggressive. These rules can cause frequent failures of the inner connection pool. To avoid this issue, enter this command to configure your client-side appliances that peer with a SteelHead Cloud in Azure so that their inner keepalive interval is 30 seconds or less:
protocol connection addr <azure-sh-ip> inner-intvl 30 oob-intvl 30
For enhanced security, enable TCP proxy on the appliance under Networking > Host Settings.
If you are using the appliance together with the Cloud Portal, the appliance must have continuous access to the portal in order to verify that the license is active. If the SteelHead Cloud cannot contact the portal, it stops acceleration and bypasses connections until it reconnects.
Deploying on Azure
For first-time login to the appliance, use the password you specify here along with the username admin. After initial login, you can change your credentials at any time.
1. Log in to the Microsoft Azure portal and search for the product you want.
2. Create a new instance. You’ll need to specify values for the basics, disks, and networking. Optionally, configure management, monitoring, advanced, and tag settings.
3. Enter basic details such as subscription model and resource group. Create a new resource group, if needed.
4. Enter basic instance details such as a display name for the virtual appliance, region where you want to deploy it, availability options, and security type.
5. Select an image, and specify a virtual machine architecture.
6. Select a size for the virtual machine. The size determines the maximum amount of compute resources (CPU, RAM memory) available to the virtual machine.
7. Create an administrator account, and specify SSH details.
8. Specify the OS disk details type for the appliance’s management disk. Optionally, enable Ultra SSD compatibility.
9. Specify data disk details for the appliance’s data store. Ensure host caching is set to read/write.
10. Specify networking details such as network and subnet. Optionally, select a public IP address. A public IP enables you to communicate with the appliance from outside the virtual network. The network interface card (NIC) network security group is Advanced. NIC network security group settings are preconfigured.
11. Ensure accelerated networking is disabled. Accelerated networking is not supported.
12. Do not enable load balancing.
13. Optionally, configure management, monitoring, advanced, and tags settings.
14. Review your selections, and then create the instance.
About user-defined routing in Azure
Azure routes traffic between all subnets within a virtual network, by default. You can create your own routes to override Azure's default routing. These user-defined routes (UDRs) are helpful when, for example, you want to route traffic between subnets through a network virtual appliance (NVA). For example, the following diagrams show traffic flowing between a server subnet and an acceleration subnet. The acceleration subnet connects to a VNET gateway using user-defined routes. Branch offices connect to the VNET gateway over the internet.
Example of user-defined routing
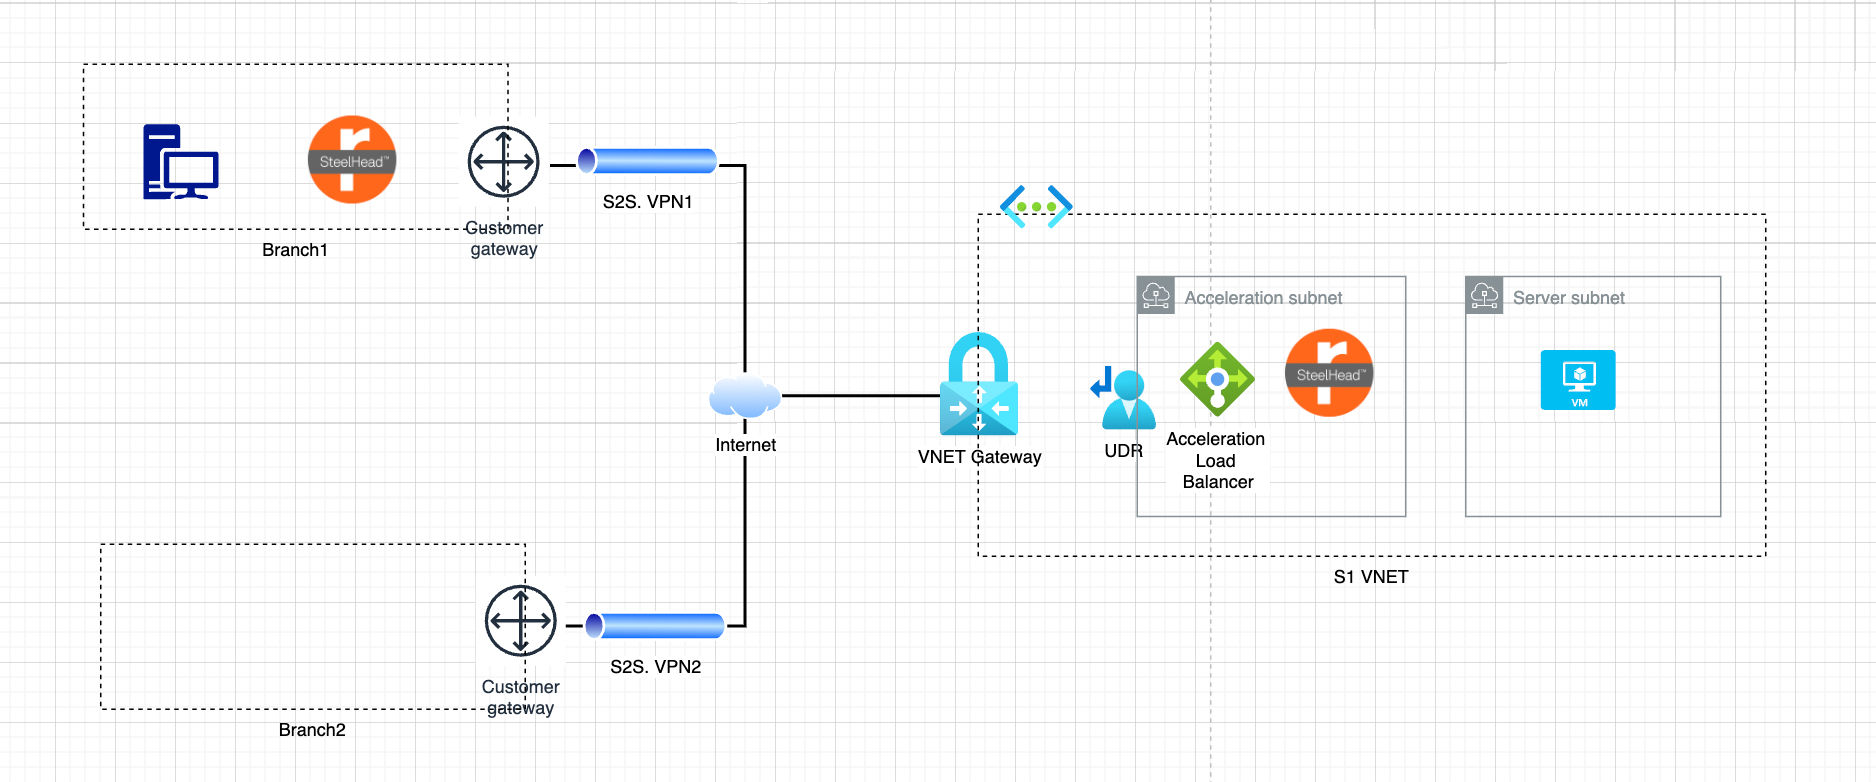
Example of user-defined routing topology

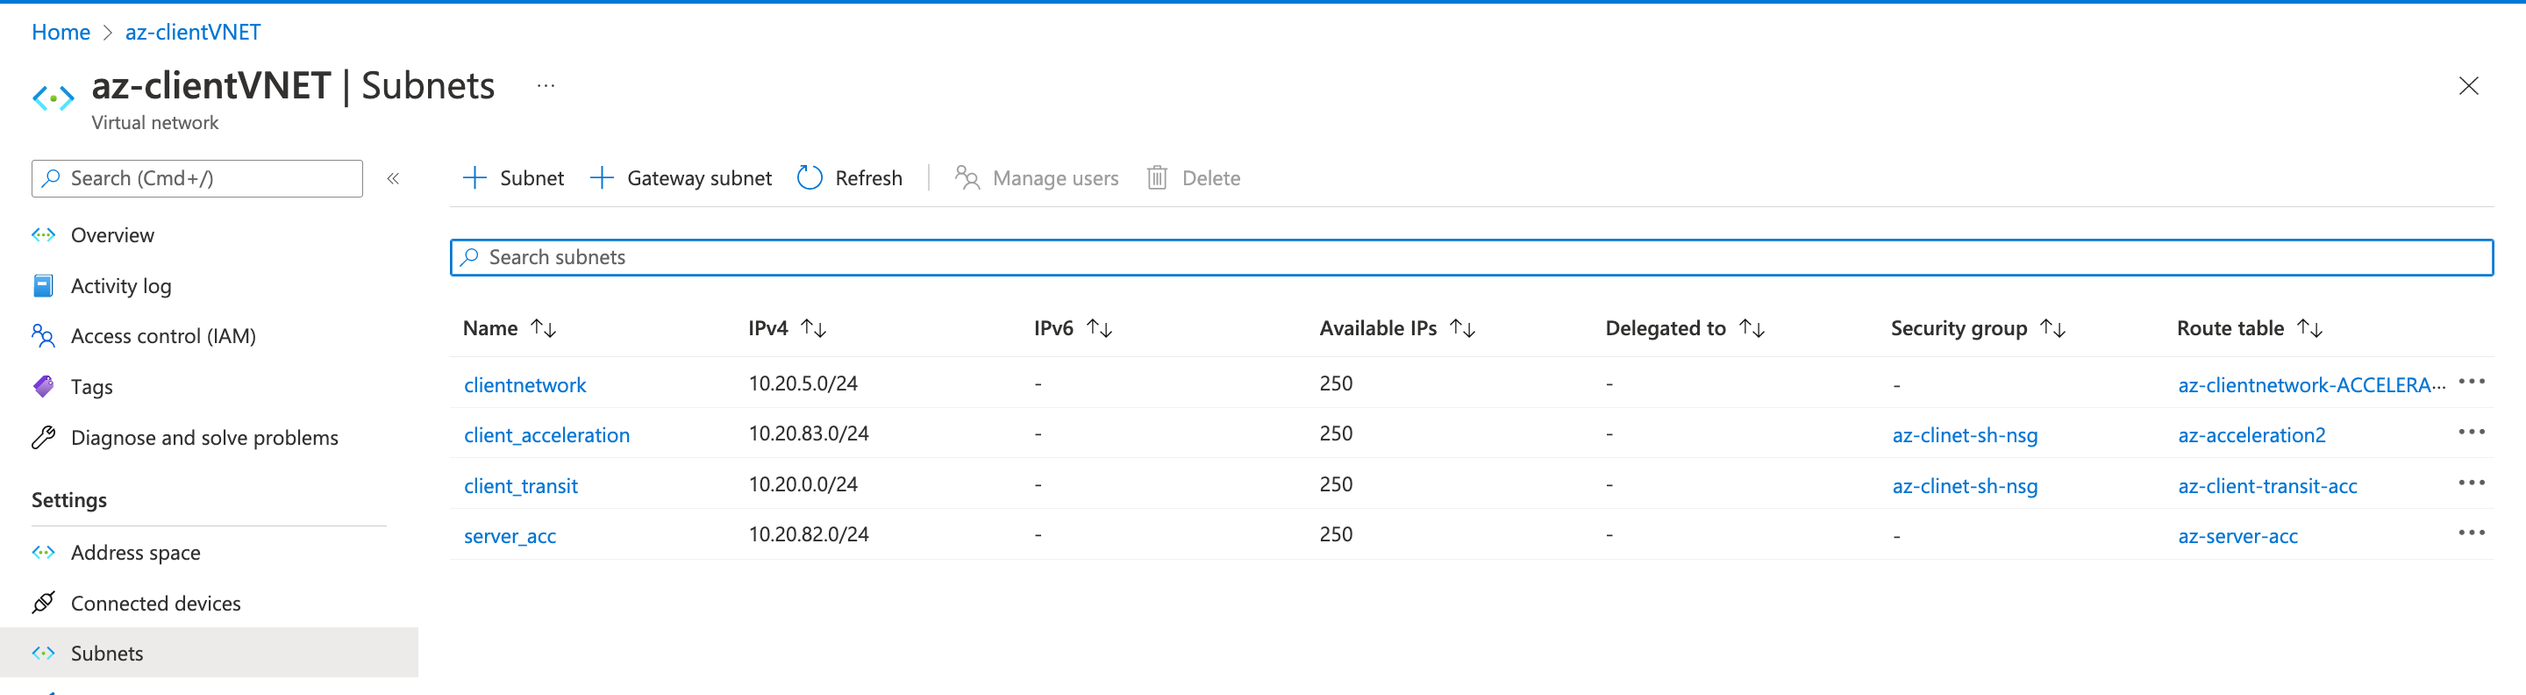
Example of user-defined routing with IP addresses

Example of user-defined route tables
Configuring user-defined routing in Azure
These are the general steps for setting up user-defined routing. Consult Microsoft Azure documentation for details about its user-defined routing feature.
1. Create subnets. You may want one each for transit, acceleration, and server network.
2. Create network virtual appliances in the subnets. You may want a gateway appliance in the transit subnet, the SteelHead Cloud in the acceleration subnet, and your workload servers in the server network subnet.
3. Create a route table.
4. Add routes to the table, interconnecting your subnets.
5. On the network interface of the SteelHead Cloud, enable IP forwarding on its network interface.
Configuring failover for user-defined routing in Azure
A failover configuration enables traffic to bypass SteelHead Cloud in the event of a failure and go directly to client networks. When the SteelHead Cloud becomes available again, traffic reroutes through it. Failover requires an Azure API management service, runbook, and logic app. These are the general steps for setting up failover for user-defined routing. Consult Microsoft Azure documentation for details about its user-defined routing feature.
1. In Azure, create an API management service.
2. Add the SteelHead Cloud’s key certificate as the root certificate. You’ll need to copy the PEM certificate, save it with the file extension .cer, and then upload the .cer file as the root certificate.
3. Enter a name and suffix for the API.
4. Add a GET method.
5. Point the front end URL to #.
6. Point the back end URL to https://<device-ip>/api/common/1.0/ping. Replace <device-ip> with the SteelHead Cloud’s public IP address or DNS name.
7. Disable Subscription required.
8. Create a standalone Azure automation account.
9. Create a Run As account in the automation account.
10. Open PowerShell, and then define the runbook parameters.
11. Create acceleration routes using runbook using the following script. You’ll need to change parameters for your specific configuration:
.\scripts\Create-AccelerationRoutes-Runbook.ps1 -ProjectName "azk" -Location "koreacentral" ` -AutomationAccountName "azk-automation-koreacentral" -searchResourcesDetailByName @parameters
12. Start the runbook. The main parameters are: BYPASSACCELERATION and VERBOSE. By default, the runbook attaches the acceleration route tables to subnets in order to chain the acceleration service. If BYPASSACCELERATION=true, then the runbook will bypass the acceleration routes. VERBOSE=true enables capture of the runbook output.
13. Create Logic apps
14. Add Recurrence timer. Set the time interval to 10-30 seconds.
15. Select the API management service, and then disable retry policy.
16. Define an if-else condition based on the status code of the Body attribute in the HTTP response packet. The True and False conditions call the web hook defined for the job in the runbook automation.
17. Select all run-after conditions.
Example runbook parameters
### Create the runbook for the sample AZK
$parameters = @{
>> VirtualNetworkName = "Vnet-server"
>> VirtualNetworkResourceGroupName = "Vnet-to-Vnet-LB"
>> RouteTablesResourceGroupName = "Vnet-to-Vnet-LB"
>> subnetName_transit = "GatewaySubnet"
>> subnetName_servernetwork = "server-nw"
>> subnetName_acceleration = "server-SH-LB"
>> routeTableName_servernetwork = ""
>> routeTableName_acceleration = ""
>> routeTableName_transit_ACCELERATION = "lb-gw-to-server"
>> routeTableName_transit = ""
>> routeTableName_servernetwork_ACCELERATION = "lb-to-vpnbgp"
>> }
Example runbook
<#
.DESCRIPTION
Riverbed Community Toolkit
Cloud Community Cookbooks for Acceleration in Azure
Set or Bypass Acceleration Routes, attaching/detaching Route Tables to subnets: transit, servernetwork and acceleration.
This is a script template to be used as a PowerShell Runbook. It requires configuration in the Customization region, setting variables for VNET, resource group, routes details.
By default, the execution of the script will enable acceleration attaching Acceleration Route Tables.
Setting parameter $BypassAcceleration will detach acceleration route tables and attach bypass routes instead.
Usage in Azure Automation Runbook
Requirements in Automation Account, Shared Resources
* Modules: Az.Accounts, Az.Automation, Az.Network
* Connections: AzureRunAsAccount
Runbook definition
* name: Set-AccelerationRoutes
* type: PowerShell
* description: Set or Bypass Acceleration
* edit PowerShell runbook: copy and paste, configure the Customization region if needed
* Save and Publish
.EXAMPLE
# Set acceleration
Run job without parameters to enable Acceleration
.EXAMPLE
# Bypass Acceleration
Run job with BypassAcceleration = true ("true" is correct. It is not "$true", as there Azure PowerShell RunBook does not take $ sign)
.EXAMPLE
# Verbose
Run job with Verbose = true
#>
# parameters
param(
[switch][bool]$BypassAcceleration = $false,
[switch][bool]$Verbose = $false,
[switch][bool]$WhatIf = $false
)
#region Customization
$virtualNetworkName = "Vnet-server" # VNET, ex. "azu-hub-westus"
$virtualNetworkResourceGroupName = "Vnet-to-Vnet-LB" # ex. "azu-hub-westus"
$AccelerationRoutes = @{
"server-nw" = @{
AddressPrefix = "10.8.2.0/24" # ex. "10.1.1.0/24"
RouteTableId = "/subscriptions/4c29628e-bd15-4877-b8ac-61be9439e3d0/resourceGroups/Vnet-to-Vnet-LB/providers/Microsoft.Network/routeTables/lb-to-vpnbgp" # ex. "/subscriptions/1234-12341243-1243-12341324/resourceGroups/azu-acceleration/providers/Microsoft.Network/routeTables/azu-servernetwork-ACCELERATION"
}
GatewaySubnet = @{
AddressPrefix = "10.8.3.0/24" # ex. "10.1.0.0/24"
RouteTableId = "/subscriptions/4c29628e-bd15-4877-b8ac-61be9439e3d0/resourceGroups/Vnet-to-Vnet-LB/providers/Microsoft.Network/routeTables/lb-gw-to-server" # ex."/subscriptions/1234-12341243-1243-12341324/resourceGroups/azu-acceleration/providers/Microsoft.Network/routeTables/azu-transit-ACCELERATION"
}
}
$BypassRoutes = @{
"server-nw" = @{
AddressPrefix = "10.8.2.0/24" # ex. "10.1.1.0/24"
RouteTableId = "" # ex. "/subscriptions/1234-12341243-1243-12341324/resourceGroups/azu-acceleration/providers/Microsoft.Network/routeTables/azu-servernetwork"
}
GatewaySubnet = @{
AddressPrefix = "10.8.3.0/24" # ex. "10.1.0.0/24"
RouteTableId = "" # ex. empty to detach the Route Table
}
}
#endregion
#region lib
Import-Module Az.Accounts
Import-Module Az.Network
Import-Module Az.Automation
try
{
$connectionName = "AzureRunAsConnection"
$servicePrincipalConnection=Get-AutomationConnection -Name $connectionName
"Logging in to Azure..."
Add-AzAccount `
-ServicePrincipal `
-TenantId $servicePrincipalConnection.TenantId
-ApplicationId $servicePrincipalConnection.ApplicationId
-CertificateThumbprint $servicePrincipalConnection.CertificateThumbprint
}
catch
{
"IN catch"
if (!$servicePrincipalConnection)
{
$ErrorMessage = "Connection $connectionName failed."
throw $ErrorMessage
} else{
Write-Error -Message $_.Exception
throw $_.Exception
}
}
#endregion
#variables
$routes = $AccelerationRoutes
if ($BypassAcceleration) {
$routes = $BypassRoutes
}
$vnet = Get-AzVirtualNetwork -ResourceGroupName $virtualNetworkResourceGroupName -Name $virtualNetworkName
#verbose
if ($Verbose) {
# Check subnet name, prefix and route table id
Write-Output "-----------------"
Write-Output "INITIAL STATE"
Get-AzVirtualNetworkSubnetConfig -VirtualNetwork $vnet | % { "$($_.Name) , $($_.AddressPrefix) , $($_.RouteTable.Id)" }
Write-Output "-----------------"
if ($BypassAcceleration) { Write-Output "BYPASS ACCELERATION ROUTES:" }
else { Write-Output "SET ACCELERATION ROUTES:" }
foreach ($subnetName in $routes.Keys) { "$subnetName $($routes[$subnetName].AddressPrefix ; $routes[$subnetName].RouteTableId)" }
}
# Prepare and apply config on the vnet
foreach ($subnetName in $routes.Keys) {
$routeTableId = $routes[$subnetName].RouteTableId
$addressPrefix = $routes[$subnetName].AddressPrefix
if (!$routeTableId) {
#Disassociate"
$subnet = ($vnet.Subnets | Where-Object { $_.Name -eq $subnetName })
$subnet.RouteTable = $null
}
else {
# Prepare config to associate Route tables to subnets
$output = Set-AzVirtualNetworkSubnetConfig -VirtualNetwork $vnet -Name $subnetName -AddressPrefix $addressPrefix -RouteTableId $routeTableId -WarningAction SilentlyContinue
}
}
#verbose
if ($Verbose) {
# Check subnet name, prefix and route table id
Write-Output "-----------------"
Write-Output "VNET NEW CONFIG TO APPLY"
Get-AzVirtualNetworkSubnetConfig -VirtualNetwork $vnet | % { "$($_.Name) , $($_.AddressPrefix) , $($_.RouteTable.Id)" }
}
# Apply
if (!$WhatIf) {
Write-Output "-----------------"
Write-Output "APLYING VNET NEW CONFIG"
$output = Set-AzVirtualNetwork -VirtualNetwork $vnet
}
#verbose
if ($Verbose) {
# Check subnet name, prefix and route table id
Write-Output "-----------------"
Write-Output "END STATE"
$vnet = Get-AzVirtualNetwork -ResourceGroupName $virtualNetworkResourceGroupName -Name $virtualNetworkName
Get-AzVirtualNetworkSubnetConfig -VirtualNetwork $vnet | % { "$($_.Name) , $($_.AddressPrefix) , $($_.RouteTable.Id)" }
}
About Amazon AWS deployments
While the Cloud Portal makes it easy to provision appliances, you may want to manually deploy them if:
• you are provisioning appliances in the AWS in the GovCloud (US) region.
• you are provisioning appliances in the AWS in the China region.
• you have multiple AWS accounts and need appliances in more than one region.
• you are provisioning SteelHead Cloud AWS, SteelHead Cloud Azure and SteelHead Cloud OCI models.
To migrate your appliance configuration from an M4 to M5 instance, upgrade your M4 instance to the same version running on your M5 instance, export the configuration from the appliance on the M4 instance, and then import the configuration to a newly installed appliance on the M5 instance. Appliance tier and version must match between exported and imported configuration.
Deploying on AWS Marketplace
To complete this process you must provide an Amazon Machine Image (AMI), security group, key pair, and one-time token. Have this information at hand before beginning the process.
1. Log in to your AWS account, and navigate to the EC2 dashboard.
2. Select AMIs in the Images section of the navigation pane. Select Public Images from the drop-down menu to the left of the search bar. Choose the Riverbed SteelHead AMI and launch it.
3. Select an instance type and configure it. For advanced details, under User Data, select As Text and enter this information into the text field:
ds=<mount-path-to-datastore>
appname=MarketplaceDeployedSteelHead
lshost=cloudportal.riverbed.com
rvbd_dshost=cloudportal.riverbed.com
lott=XXXXXXXX-XXXX-XXXX-XXXX-XXXXXXXXXXXX
where:
ds—The device node in which the appliance expects the data store EBS volume to appear. For versions 9.16.0 and later, set this to /dev/sd[b-z], where b-z enumerates multiple datastores. For versions 9.9.1 through 9.15.x, set this to /dev/xvdq.
appname—Name of the appliance.
lshost—Fully qualified domain name of the licensing server. This name is usually the Cloud Portal.
rvbd_dshost—Fully qualified domain name of the discovery server. This name is usually the Cloud Portal.
lott—One-time token used to redeem the license. You obtain this token on the Cloud Portal. Apply the token to the appliance through its Management Console.
4. Add storage. Optionally, add tags. You might find tags useful if you want to group resources together.
5. Choose a security group for the virtual appliance. To connect together the server-side and client-side appliances, configure the security group so that the appliance allows:
– incoming TCP connections from client-side appliances on ports 7800, and 7810 to 7850 for acceleration; and ports 7881 and 7882 for SSL/TLS optimization.
– CLI and Management Console access on ports 22, 80, and 443.
– TCP connections between the SteelHead Cloud and client-side appliances.
Deploying on AWS Virtual Private Cloud
Amazon Virtual Private Cloud (VPC) provides logically isolated virtual networks that you configure and control. Each virtual private network is isolated from other networks in AWS. You can specify an IP address range of your choice, and add subnets, gateways, and security groups to your VPC.
Amazon VPC provides various levels of security. At the highest level, you connect to the VPC through a VPN tunnel. Less secure traffic can access private subnets through an internet gateway. You can also configure a VPC with both a VPN gateway and an internet gateway to enable some instances to receive internet traffic (for example, web servers), whereas others could remain unexposed (for example, database servers).
This section describes how to deploy an appliance using different levels of security and includes configuration caveats.
VPC with VPN connections to data centers
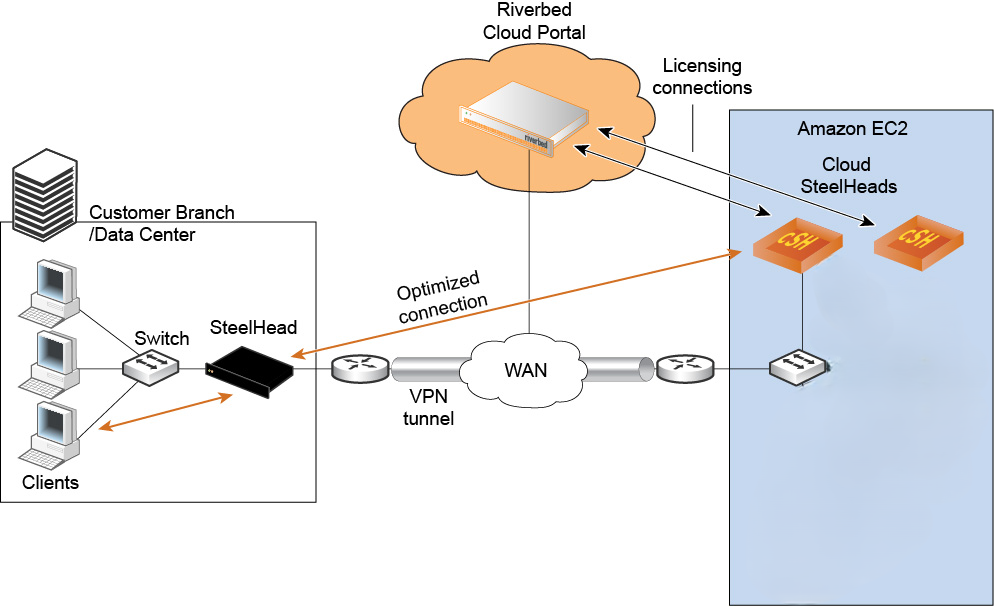
In this scenario, the appliance has a single IP address from the pool of private VPC addresses. Therefore, there is no special configuration required to deploy the appliance. As long as you connect the appliance to the Cloud Portal, autodiscovery and auto-reconfiguration work; that is, when instances change their IP addresses, the portal automatically detects them.
Figure: Using Amazon VPC through a VPN tunnel without NAT shows how to deploy appliances and servers in a VPC with a VPN connection. In this network, servers in Amazon use private IP addresses, and the VPN tunnel provides an extension of your network into AWS.
Using Amazon VPC through a VPN tunnel without NAT
VPC without VPN connections to data centers
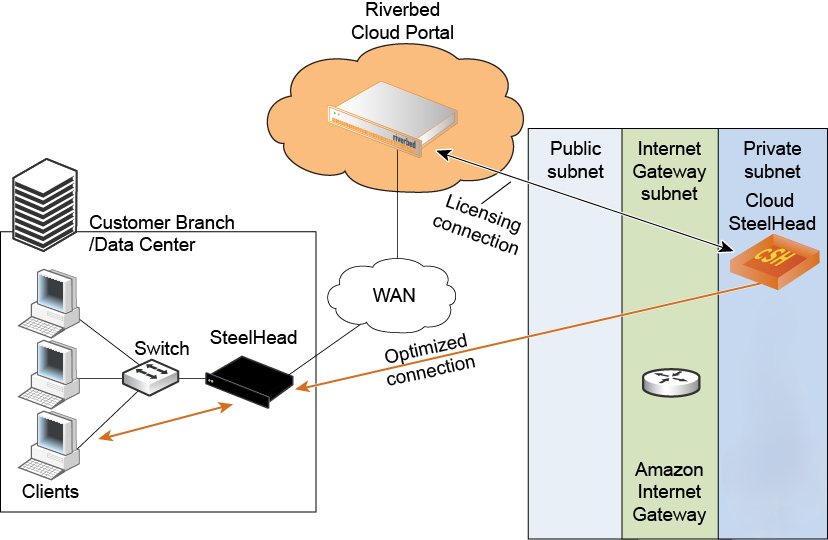
When you use a VPC without a VPN connection, you access the Amazon VPC through the Amazon internet gateway that translates the private IP addresses in the VPC to public IP addresses. In this scenario, the Cloud Portal detects the private IP address of appliances. It also detects the elastic IP address that you manually configure using the AWS console. Ensure that you configure ACLs and security groups so that the appliance can communicate with the Cloud Portal.
Figure: Using Amazon VPC through the internet with NAT shows how to deploy appliances and servers in a VPC without a VPN connection.
Using Amazon VPC through the internet with NAT
VPC through internet with NAT
Configure a VPC without an IPsec tunnel by modifying the security group of the AWS EC2 instances. Add the public IP address of the machines that access the server from outside the VPC, such as the virtual appliances in the customer data center. Add the security group of the appliance (enable access to all ports). On the security group, add the public IP address of the machines that access the server from outside the VPC, such as the virtual appliances in the customer data center, and then enable access to port 7800 and port 7810 for TCP.
VPC through VPN without NAT
Configure a VPC through the VPN by modifying the security group of the AWS EC2 instances.
Add the private IP address of the remote server for the ports used by the application to accelerate. Add the security group of the appliance (enable access to all ports). On the security group, add the public IP address of the remote appliance and enable it to access port 7800 and port 7810.
About VMware ESXi deployments
Deploying cloud appliances to an ESXi cloud environment is similar to deploying virtual appliances.
About Oracle Cloud Infrastructure deployments
Releases 10.1.0 and later support optimization as a main functionality on Oracle Cloud Infrastructure (OCI) with SteelHead Cloud. The supported deployment in OCI is with User-Defined Routing (UDR). SteelHead Cloud is out-of path.
UDR allows users to set route tables, which can override OCI default route table used by the resource. This helps in service chaining as specific routes can be added to route traffic.
Upgrading from a previous Beta release in OCI is not supported. A fresh installation is necessary because the partitioning scheme has been enhanced.
Summary of qualified features:
• Basic CLI and UI working
• UEFI Boot with enhanced partitioning
• Optimization Working with Cloud Portal Licensing
• FLEX-50: supports up to 50 Mbps
• FLEX-200: supports up to 200 Mbps
• FLEX-2000: supports up to 2000 Mbps
• Improved Stability and Performance
• SCC management
• SHM interoperability
The following table lists the supported instance types.
Model | FLEX-50 | FLEX-200 | FLEX-2000 |
|---|
Optimized WAN Capacity | 50 Mbps | 200 Mbps | 2000 Mbps |
Optimized TCP Connections | 4500 | 9000 | 50000 |
Total Block Volume Size | 430 GB (1 x 430 GB) | 430 GB (1 x 430 GB) | 2.4 TB (2 x 1.2 TB) |
OCI shape (instance type) | VM.Standard3.Flex -> 2 OCPU, 16 GB RAM Network bandwidth: 2 Gbps (1 Gbps per OCPU) | VM.Standard3.Flex -> 4 OCPU, 32 GB RAM Network bandwidth: 4 Gbps (1 Gbps per OCPU) | VM Standard3.Flex -> 16 OCPU, 128 GB RAM Network bandwidth: 16 Gbps (1 Gbps per OCPU) |
Deploying
1. Sign in to our Oracle Cloud Infrastructure account.
2. Navigate to the market place, and then search for Riverbed SteelHead Cloud under all Applications.
3. Select the your desired version, model, and compartment, and then launch your selected instance.
4. Select Intel for the shape.
5. Select an Intel shape.
6. Assign system resources according to the model appliance you want to run.
7. Select or create virtual NICs, VNC, and subnet according to your environment..
8. Add SSH keys.
9. Create a new block volume with a size that meets or exceeds the requirements of the model appliance you want to run, and then attach it. Ensure the attachment type is custom and paravirtualized.
10. Create the instance. This may take several minutes.
11. Edit the virtual NIC and enable the option to skip source/destination checks.
Configuring
1. Log in to the appliance’s web Management Console, or through SSH. Default username: admin; default password: <OCI instance ID>.
2. Change the default password, and safely record your new password for future reference.
3. Open a command window and run cli.
4. Run the commands license server <ip-address>, license client init <one-time-token>, and write memory.
5. Ensure the optimization service is running by running the show service command.