About Riverbed Cloud Portal
The Riverbed Cloud Portal is a web-based portal hosted and maintained by Riverbed. The portal provides license management, light-weight appliance management, direct provisioning of virtual appliances to supported cloud platforms, and automated peer discovery.
About portal accounts
At least one company is associated with every portal account. Configuring multiple companies under an account enables you to organize your appliances by organization. When you log in to the portal, the information displayed on the various portal pages pertains to appliances associated with the currently selected company.
To select a different company, click Change Company in the upper-left corner.
Accessing account settings
Mouse over your username or email address in the upper-right corner of the portal, and then select Account Settings.
Settings include name, email address, and companies associated with the account. You can also change your password in this page.
Viewing event history
Mouse over your username in the upper-left section of the page and select Event History.
The Event History report displays all of the events that occurred for a particular company. This page enables multiple end users in the same company to view all events pertaining to their company. It describes events such as creation and deletion of users and acceleration groups, and the registration, provisioning, and deprovisioning of appliances.
The Event History page displays the date when the event occurred, the username of the entity that performed the action, and a description of the event.
Finding support
The Support menu provides these options:
• Help—Launches the online help information about the portal.
• News—Displays relevant news stories published on the portal by Riverbed employees.
• Downloads—Navigates to the page on the Riverbed Support site where you can access software images used along with the portal.
• Cloud Support—Navigates to the page on the Riverbed Support site where you can download software images and product documentation.
Viewing service summary
The Service Summary page provides a dashboard view of the system:
Company displays the name of the currently selected organization.
Riverbed Appliances lists the appliances that are currently provisioned for the selected organization. Select the name of an appliance for details about it.
Licenses lists the serial number, type, and model of each available license.
Optimization Groups displays the optimization groups you configured. Select an optimization group name for details about it.
Portal News displays the last three news stories published by Riverbed employees to the portal.
Recent Events describes recent events and activity in your company. For example, it might report that a user launched or shut down a particular appliance or provide a list of licenses granted to the company.
Managing licenses
The portal acts as a license server for your cloud appliances. Licenses are stored on the portal and each license is associated with a one-time token that is unique to it. You use the one-time tokens to associate a specific appliance with a specific license.
When a license expires, the appliance automatically stops the acceleration service. The license expires on the termination date regardless of whether you use it.
To view summary information about your licenses, select Licenses in the Cloud Appliances tab. The Licenses page displays information about your unused, active, and expired licenses:
Serial Number displays the license serial number. Select the serial number for more details about the license.
Model displays the Cloud Accelerator model.
The Active Licenses table displays this information:
Serial Number displays the license serial number. This number is also the appliance serial number. Select the serial number for more details about the license.
Appliance displays the user-configurable name and the type of appliance (such as ESXi or AWS).
Version displays the software version of RiOS running on the appliance. This information is displayed only for active licenses that have been provisioned through the Cloud Portal.
Viewing license details
You can access detailed information about a specific license by selecting the license serial number in the Licenses page. The License Details page contains three tabbed sections: Details, Features, and Event Log.
Select the Details tab to view this information:
License Serial Number displays the serial number of the license and of the appliance.
State indicates the current state of the appliance that is associated with the selected license.
Product Type displays the type of product (SteelHead Cloud).
One Time Token (unused licenses only) displays the token associated with the selected license. Enter this value into a manually provisioned appliance to associate the selected license with the appliance. The licensing process is automatic for appliances that are provisioned through the portal.
One Time Token State indicates the status of the one-time token and the date and time it expires.
Appliance Software Version displays the RiOS version on the appliance. Displayed only for running appliances.
Last Checkout displays the date and time when the appliance last checked out the license.
Select the Features tab to view license information:
Feature displays the model of the appliance.
Status indicates whether the license is valid or invalid.
Start date displays the date and time when the feature becomes active.
End date displays the date and time when the feature becomes inactive.
Termination date displays the date and time when the license expires. The license expires on the termination date regardless of whether you use it.
Select the Events Log tab to set these optional parameters:
• Specify the level of log detail you want.
– Critical reports conditions that severely affect the functionality of the appliance.
– Error reports conditions that affect the functionality of the appliance.
– Warning reports conditions that could affect the functionality of the appliance, such as authentication failures.
– Notice reports normal but significant conditions, such as a configuration change.
– Informational reports informational messages that provide general information about system operations.
– Debug reports messages that help you debug a failure.
• Specify the number of records to display per page.
• Specify whether the system should periodically refresh the display.
Each log entry contains an entry ID, time stamp, IP address of the system where the event was initiated, username of the user who initiated the event, log level, and message.
About AWS deployments
This section describes how to deploy a SteelHead Cloud virtual appliance to Amazon Web Services (AWS) by using the Cloud Portal.
Manual deployment is the only supported deployment method for AWS GovCloud (US) and AWS in China regions.
When you provision a license to AWS, the portal automatically creates a licensed SteelHead Cloud virtual appliance hosted on a virtual machine in the AWS cloud service.
Additionally, a region-free Amazon Machine Image (AMI) for SteelHead Cloud is available on the AWS Marketplace. SteelHead Cloud has these benefits:
• You can instantiate SteelHead Cloud instances directly from AWS Marketplace.
• You update SteelHead Cloud instances directly from the SteelHead Management Console. You accomplish this task by downloading the image from the Riverbed Support site, and then use the SteelHead Management Console to select the downloaded image and install it.
• You can use a license from the Cloud Portal to activate the SteelHead Cloud. This feature is known as Bring Your Own License (BYOL).
About AWS deployment settings
These configuration options are available:
Appliance Name specifies a display name for the appliance.
Description specifies a description for the appliance.
Version specifies a RiOS software version from the drop-down list.
Optimization Group specifies an optimization group in which to add the appliance.
Region specifies the geographic region closest to you from the drop-down list.
Availability Zone specifies a geographic zone from the drop-down list. A zone is a physical data center site managed by Amazon that provides standby computing power to its assigned regions. Appliances communicate through IP addresses, and there are no traffic restrictions between zones (or costs for data passing between zones).
VPC Subnet specifies a subnet for the Virtual Private Cloud (VPC) IP address from the drop-down menu. Subnets are segments of a VPC's IP address space. The subnets enable you to separate the isolated resources (such as Amazon EC2 instances) in the VPC based on security and operational requirements. If you create more than one subnet in a VPC, they are attached to each other by a logical router in a star topology. If you do not select a subnet, the system provisions the appliance in the public AWS cloud.
Elastic IP Address specifies an elastic IP address from the drop-down list. Elastic IP addresses are static IP addresses designed for dynamic cloud computing. An elastic IP address is associated with your account, not a particular instance, and you control that address until you choose to explicitly release it. The portal allows you to associate an elastic IP address with your Cloud Accelerator. If you choose to assign an elastic IP address to a Cloud Accelerator, the Cloud Accelerator will have the same IP address every time it is started.
Key Pair specifies an SSH key pair in your Amazon account for the appliance. AWS uses SSH key pairs instead of passwords for login. However, to allow SCC to manage SteelHead Cloud instances (in AWS, Azure, and OCI), password authentication must be enabled. Use the following CLI commands to enable it:
ssh server allow-password enable
show ssh server
For more information, refer to the Riverbed Command-Line Interface Reference Guide.
Deploying to AWS through the Cloud Portal
1. Log in to the portal and select the Cloud Appliances tab.
2. Select Licenses, and then select an unused license.
3. In the License Details page, select the Details tab.
4. Click Provision to AWS. The Launch SteelHead Cloud dialog box is displayed.
5. Click Launch to provision the SteelHead Cloud. The system creates a SteelHead Cloud in AWS and applies the license to it.
After the provisioning process is complete, the SteelHead Cloud automatically restarts and the portal displays the Appliance Summary page.
About one-time tokens
Each Riverbed license issued through the portal is associated with a one-time token unique to that license. The one-time token provides the appliance with secure access to the portal and associates its license with the appliance.
When an appliance, and its license, is provisioned through the portal, the token is automatically associated with the appliance. For appliances that cannot be provisioned through the portal, the token must manually be applied to the appliance.
In rare cases, it may be necessary to regenerate the one-time token. Regenerating a token creates a new unique token for the license, and the old token becomes obsolete. The new token must be applied to the appliance. These situations might require regenerating a token:
• A token has been compromised and there is a possibility that an unauthorized entity can obtain the associated license.
• An existing and formerly licensed appliance has been missing for a long enough time that the portal reclaims its license.
Regenerating the one-time token can reassociate the appliance with its former license. In the Licenses page, select the serial number for which you want to generate a one-time token. In the License Details page, select the Details tab. Click Regenerate Token.
Reclaiming a license
After an appliance is registered, the license associated with it cannot be used by other appliances. Reclaiming a license removes the appliance from the portal database and generates a new one-time token for the license. The previous one-time token that was installed on the appliance is no longer valid. The portal displays the license in the Unused Licenses section of the Licenses page.
Reclaiming a license does not affect the appliance’s underlying virtual machine. If you want to fully deprovision the appliance, you must manually deprovision it using tools available from your cloud platform provider.
The ability to reclaim a license can be useful in situations like evaluating several cloud platform providers. You need only one license to include the SteelHead Cloud as part of the evaluation, because the license is portable between different cloud providers.
Registering appliances
Auto-registration is the process in which a licensed appliance reports to the Cloud Portal. If a one-time token is installed on the appliance, the portal automatically creates an entry in its database for the appliance. After the appliance is registered, it is listed as a Riverbed Appliance in your portal account.
An appliance can be unregistered by reclaiming its license or by regenerating the one-time token associated with its license.
Managing appliances
The Appliances page lists all appliances associated with the currently selected company and includes this information about each appliance.
Some features are available only for appliances hosted in AWS and deployed directly through the portal.
Name displays the user-configurable appliance name. This name is specific to the Cloud Portal; it might not appear in a cloud vendor’s management tool (such as the Amazon EC2 Management Console) because the vendor might not support such metadata.
Cloud indicates the cloud service or platform on which the appliance is hosted.
License displays the Riverbed license associated with the appliance.
State indicates the current state of the appliance or its license or both.
VM Uptime displays the duration for which the appliance has been running.
Creation Time indicates date and time when the appliance was provisioned.
Description displays the user-configurable description entered when the appliance was created.
You can view information about and perform simple management operations on specific appliances directly through the portal by selecting the name of an appliance listed on the Appliances page.
You can also manage your SteelHead Cloud virtual appliances through the SteelHead Central Controller. See the SteelHead Central Controller User Guide for details.
An appliance’s home page is organized into tabs.
Cloud
platform | Tab | Description |
|---|
All cloud platforms | Summary | Displays basic information about the appliance such as Name, Description, State, License, Version, and a link to the appliance’s Management Console. |
Details* | Displays information such as Uptime, Creation Time, UUID, and Architecture. |
Event Log | Displays information about events associated with the appliance. |
AWS only | Network Controls | Displays information about the appliance’s network configuration. |
AWS Console | Displays output of the virtual serial console that is connected to the host virtual machine. |
* Details for SteelHead Cloud for AWS virtual appliances are different than those for appliances on other platforms. |
About license states
This table lists the possible states for a license.
Cloud Platform | State | Description |
|---|
AWS | Unprovisioned | The license is not used. |
Unknown | The portal cannot determine the state of the license, probably due to an error. |
Not Running | The license is attached to a Riverbed appliance, but the appliance is not running. |
Running | The license is attached to a Riverbed appliance, and the appliance is running. |
Stopping | The license is attached to a Riverbed appliance, but the appliance is in the process of being stopped. |
Starting | The license is attached to a Riverbed appliance, but the appliance is in the process of starting. |
Missing | The license is attached to a Riverbed appliance, but the appliance is missing. This usually occurs when the appliance is deleted by tools other than the Cloud Portal. If the license is in the Missing state, deprovision the appliance to release the license and provision it again. |
ESXi, Azure | Active | The license is associated with a running appliance. |
Inactive | The license is associated with an appliance that is not in use. |
Unlicensed | No license is associated with the appliance. |
Viewing appliance properties
You can view information about, and perform simple operations on, a specific appliance in the Summary tab of the appliance’s page. The Summary tab displays this information.
Appliances in the GovCloud and China regions display Name, License, and a link to the appliance’s console. You can also reclaim licenses used by appliances in those regions and to use with any SteelHead Cloud anywhere.
Name displays the user-configurable name of the appliance. This name is specific to the Cloud Portal and might not appear in a cloud vendor’s management tool.
Description displays the user-configurable description entered when the appliance was created.
State indicates the current state of the appliance.
License displays the Riverbed license associated with the appliance.
Version displays the version number of the RiOS software on the appliance.
Management Console displays a link to the appliance’s Management Console. It displays Not Available until the appliance is fully provisioned.
Editing appliance names
You can edit the name of an appliance in the Appliance Summary page. Log in to the portal and select the Cloud Appliances tab. If your user account is associated with multiple companies, select the company that contains the appliance you want to edit. Select Appliances, and then select the name of the appliance you want to edit. Select the Summary tab, and then enter a new name in the Name text field. Click Update Details.
Changing appliance software version
You can change the version of RiOS running on the appliance in the Appliance Summary page.
This feature is available to appliances provisioned through the portal to the AWS cloud platform. RiOS software on appliances on other cloud platforms can be upgraded through the Management Console or Riverbed CLI commands.
Accessing the Management Console
The Management Console enables you to perform many management activities on an appliance. You can access the Management Console to an appliance from the Appliance Summary page.
First, ensure that the appliance is fully provisioned, licensed, and running. Then log in to the portal and select the Cloud Appliances tab. If your user account is associated with multiple companies, select the company that contains the appliance you want to access.
Select Appliances, and then select the name of the appliance you want to access. Select the Summary tab, and then select the link under Management Console.
In the Management Console login page, enter your credentials for the appliance.
Starting, shutting down, and deprovisioning
You can start, shut down, and deprovision an appliance in the Appliance Summary page.
This feature is available to appliances provisioned through the portal to the AWS cloud platform.
• Starting an appliance starts the acceleration service. The Start button is enabled only if the appliance is currently stopped.
• Shutting down an appliance stops the acceleration service. The Shut down button is enabled only if the appliance is currently running.
• Deprovisioning an appliance deletes the configuration volume and all data store volumes. The license is reclaimed and available for reuse. The Deprovision button is enabled only if the appliance is not running. This operation cannot be undone.
Viewing appliance AWS details
The AWS Details tab in the Appliance Details page contains AWS-specific information about an appliance hosted on the AWS cloud service. You can view this information in the AWS Details tab:
EC2 Instance Uptime indicates the duration for which the virtual appliance has been running.
Creation Time displays the time when the virtual appliance was created.
Availability Zone indicates the zone where the virtual appliance is provisioned. Zones are physical sites that Amazon provides, which are racked and ready to supply additional computing power to the region to which they are assigned.
Key Pair displays the SSH key pair in your Amazon account for the virtual appliance.
Subnet indicates the subnet for the Virtual Private Cloud (VPC) IP address.
AMI displays the name of the virtual machine, or Amazon Machine Instance (AMI), hosting the virtual appliance; the appliance name can be different than the AMI name.
Last Known Instance ID displays the last known EC2 instance ID associated with the appliance.
Instance Type displays the type of EC2 instance launched when the virtual appliance is started.
Architecture displays the virtual appliance architecture type: i386 (32-bit) or x86_64 (64-bit).
Configuration Volume indicates the volume that stores the virtual appliance configuration and log files. Also displays the Elastic Block Store (EBS) volume ID and the total size of the volume.
Datastore Volume displays the EBS volume that stores the appliance data store. Some SteelHead Cloud models do not use a dedicated EBS volume for the data store; this information is not displayed for those models.
Viewing network controls and security groups
The Network Controls tab displays information about the appliance’s network configuration. You can also configure custom rules and access security group information here.
This feature is available to appliances provisioned through the portal to the AWS cloud platform.
The Network Controls tab contains these items:
Elastic IP Address displays the selected elastic IP address. Elastic IP addresses are static IP addresses designed for dynamic cloud computing. An elastic IP address is associated with your account, not a particular instance, and you control that address until you choose to explicitly release it. The Cloud Portal allows you to associate an elastic IP address with your SteelHead Cloud. If you choose to assign an elastic IP address to a SteelHead Cloud, the SteelHead Cloud will have the same IP address every time it is started.
Public IP Address displays the current public IP address of the appliance.
Public DNS Name displays the public DNS name of the appliance.
Private IP Address displays the current private (cloud vendor) IP address of the appliance.
Private DNS Name displays the internal DNS name of the appliance.
Security Group Name displays the name of the security group where the appliance belongs.
Discovery Service Rules
Protocol displays the protocol used to communicate with the portal (TCP, UDP, or ICMP).
From Port displays the starting port number of a range of ports that peer nodes are allowed to access.
To Port displays the ending port number of a range of ports that peer nodes are allowed to access.
Source displays the IP address of the source node.
Policy indicates the rule policy for access to the appliance (Allow or Deny).
Delete deletes the Discovery Service Rule.
Custom Rules contains the same information fields as Discovery Service Rules.
About security groups
Correctly configured security groups are critical for an appliance in an optimization group to discover and accelerate with its peers. The Cloud Portal automates many steps in the security group configuration.
This feature is available to appliances provisioned through the portal to the AWS cloud platform.
For example, consider a configuration in which SteelHead Cloud 1, SteelHead Cloud 2, and Cloud Server A are members (nodes) of the same optimization group. The Cloud Portal automatically creates a security group (Security Group 1) when SteelHead Cloud 1 is provisioned.
Security groups example
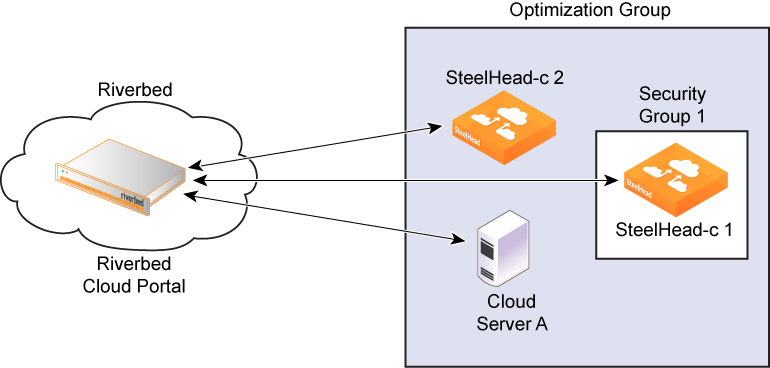
Initially, Security Group 1 does not let SteelHead Cloud 2 or Cloud Server A access SteelHead Cloud 1. However, after each node in the optimization group communicates with the Cloud Portal and transmits its IP address, the portal automatically adds rules, called discovery service rules, to Security Group 1 so that the group allows access to SteelHead Cloud 1 from the node.
To complete the configuration, you must also add your own rules, called custom rules, because:
• You can configure and manage a SteelHead Cloud only if its security group allows connections from outside AWS on ports 22, 80, and 443.
• SteelHeads outside the AWS cloud must access ports 7800 and 7810 of the SteelHead Cloud for AWS to accelerate connections to it.
Custom rules are not added to the security group for the Discovery Service and are not tracked by the Cloud Portal.
The Cloud Portal ensures that discovery service rules are automatically added to the security group whenever you restart the appliance. Even if you delete a Discovery Service Rule using a third-party tool such as the AWS user interface, the portal adds it back when you restart the appliance.
To remove a Discovery Service Rule, you must delete it from the Cloud Portal; click delete in the Discovery Service Rule table.
You can add or delete custom rules through the Cloud Portal, which adds or deletes the rules from the security group immediately. But if you subsequently delete a custom rule from the security group using a third-party tool, the Cloud Portal does not ensure that the rule is reapplied when you start the appliance. The custom rules table simply reflects what is currently configured for the security group in the Amazon cloud at the time you visit the page on the Cloud Portal.
For acceleration to work, you must add rules to the Cloud Server security group to allow traffic from the SteelHead Cloud to reach the server TCP ports used by the application you want to accelerate.
Adding custom rules for security groups
This feature is available to appliances provisioned through the portal to the AWS cloud platform.
Log in to the portal and select the Cloud Appliances tab. If your user account is associated with multiple companies, select the company that contains the appliance for which you want to add a custom rule.
Select Appliances, and then select the name of the appliance for which you want to add a custom rule.
Select the Network Controls tab, and then click Add Custom Rule.
These options are available in the Add Custom Rule dialog box:
Protocol specifies a protocol for communication with the portal (TCP, UDP, or ICMP).
From Port specifies the starting port number for a range of ports on the appliance that peer nodes are allowed to access.
To Port specifies the ending port number of a range of ports on the appliance that peer nodes are allowed to access.
Source specifies the IP address of the virtual machine hosting the appliance. Click Get My Host Address to enter the IP address.
Viewing the AWS console
The AWS Console page displays the output of the virtual serial console connected to the EC2 instance hosting the appliance.
This feature is available to appliances provisioned through the portal to the AWS cloud platform.
In the Cloud Appliances tab on the Cloud Portal, select Appliances and select the name of the appliance in the Appliances page to display the Appliance Summary page. Select the AWS Console tab to display the output of the virtual serial console connected to the EC2 instance.
Viewing the event log for an appliance
The Event Log page displays this information for each message listed in the log:
ID displays the serial number of the event.
Timestamp displays the date and time when the event occurred.
IP Address displays the IP address of the client machine that initiated the action. In NAT environments, this address might be network address translated.
User displays the username of the entity that performed the action.
Log Level indicates the severity level of the event.
Critical indicates the conditions that affect the functionality of the appliance.
Error indicates the conditions that probably affect the functionality of the appliance.
Warning indicates the conditions that could affect the functionality of the appliance, such as authentication failures.
Notice indicates normal but significant conditions, such as a configuration change.
Informational displays informational messages that provide general information about system operations.
Debug displays messages that help you debug a system failure.
Message displays the log message that describes the event.
Managing optimization groups
Optimization groups enable you to associate multiple appliances with an application server for load balancing. The Optimization Group page lists existing groups and enables you to add new groups. Select a group name to access additional properties of that group.
This feature is available to appliances provisioned through the portal to the AWS cloud platform.
These load-balancing policies are available:
Priority specifies a SteelHead Cloud for load balancing until its connection count exceeds the maximum limit and then moves on to the next available SteelHead Cloud. When the first SteelHead Cloud’s load decreases below the maximum limit, it is available again. This is the default policy.
Round robin specifies a SteelHead Cloud and then another (using the round-robin policy) for load balancing. Use the round-robin policy only if the connection rate is high and you need more than one SteelHead Cloud to handle the load.
Adding or deleting optimization groups
Optimization groups are relevant only to appliances on AWS. Log in to the portal and select the Cloud Appliances tab. If your user account is associated with multiple companies, select the company that contains the appliance for which you want to add an optimization group.
Select Optimization Groups, and then click Add New Optimization Group. Enter a display name for the group, and enter a description for the group. Select a Load Balance Policy, and click Create.
Editing optimization groups
You can edit a group’s display name, description, and load-balancing policy, and you can add appliances and application servers to the group. The Optimization Group Details page is organized into these tabs:
Summary displays the name, description, and load-balancing policy.
Group Members displays the appliances and servers associated with the group. Includes the public IP and the internal IP for each entity.
Event Log displays log information.
Adding appliances to optimization groups
In the Optimization Group Details page, select the Group Members tab. Click Add SteelHead, and then select an appliance from the drop-down list. Specify the priority in which the SteelHead Cloud should be selected for acceleration. A larger numerical value signifies a higher priority.
Adding servers to optimization groups
In the Optimization Group Details page, select the Group Members tab. Click Add Server, select a server from the drop-down list, and then select the server type.
Viewing event logs for optimization groups
Log in to the portal and select the Cloud Appliances tab. If your user account is associated with multiple companies, select the company that contains the appliance you want to view.
Select Optimization Groups, and then select the name of the group you want to view.
Select the Event Log tab, and then select a severity level. The log contains messages up to and including the selected level.
Adding or removing AWS credentials
The Amazon Web Services Credentials page enables you to manage your AWS account and to update your AWS security credentials.
Log in to the portal and select the Cloud Appliances tab. If your user account is associated with multiple companies, select the company that contains the appliance you want to update.
Select Amazon Web Services Credentials. Click Update AWS Credentials to display the Amazon Web Services Credentials dialog box.
Edit the AWS account number, access key ID, and secret access key. Click Update.
Viewing the discovered appliances report
The Discovered Appliances report page displays the list of appliances deployed and operational.
This feature is available to appliances provisioned through the portal to the AWS cloud platform.
Group indicates the optimization group with which the appliance is associated.
Name displays the name of the discovered appliance.
Public IP address displays the current public IP address of the discovered appliance.
Internal IP address displays the current internal IP address of the discovered appliance. This a private network IP address and is reachable only by machines within the same private network. The private network is supplied by the cloud platform provider.
Type indicates the type of appliance.