Authentication and Security
This chapter describes information you need to secure and authenticate your Interceptor. This chapter includes the following sections:
Overview of security
The Interceptor is a fundamental element in the Riverbed optimization architecture and could potentially receive attacks that compromise your network.
If you abstractly view the Interceptor components in a layered model, you can approach the security needs in a systematic way. You can use
Figure: High-level architecture model, based on the Certified Information Systems Security Professional (CISSP) certification classification, as a high-level architecture reference.
High-level architecture model
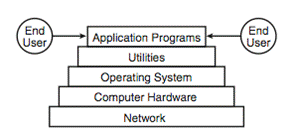
With this high-level architecture in mind, consider security implementation in the following areas:
n Management access:
– Authentication (local, RADIUS, TACACS+)
– Authorization
– Secure remote management (SSH, HTTPS, SNMPv3) communication
– Logging, alarms, and NTP authentication
n Management ACL (Interceptor 4.0 and later)
n Image and configuration lifecycle:
– Riverbed vulnerability announcements
– Management and backup configuration
– Auditing and penetration tools
n Physical control:
– Physical access to the appliance
– Passwords
As a best practice, we recommend that you deploy the Interceptor in a private network. If you must have public access to the management interfaces, make sure you secure access with a VPN or other methods used by your organization. More than likely, an Interceptor would not be the first objective of an attack. Servers and end-user computers are the most likely targets; however, you should understanding that a potential threat remains.
For best practices to secure your appliance, see
Securing Interceptors.
The most common types of attacks are to:
n compromise the OS of the appliance (buffer overflow, known security vulnerabilities, password exploitation).
n eavesdrop on data through sniffing and traffic replay.
n attack the optimized, connection-setup process.
If the attack renders the Interceptor out of service, until you can restore service, traffic isn’t load balanced among SteelHeads. To continue the optimization service before you restore the Interceptor, you must either reconfigure fixed-target rules and server-side out-of-path connections on the SteelHeads or rely on another network load-balancing mechanism such as PBR or WCCP.
We recommend that you document what ports the devices are listening to and how the traffic moves through the network. Remember that the Interceptor redirects the traffic to the SteelHead, which perform the optimization process. The Interceptor looks at the traffic and forwards it to the SteelHeads on the data plane using NAT or GRE encapsulation. The Interceptor uses ports 7850 (connection forwarding) and 7860 (Interceptor cluster protocol) with messages sourced from the devices (control plane). From a network management point of view, an Interceptor with a default configuration is listening to 22 (SSH), 80 (HTTP), and 443 (HTTPS).
The following table summarizes the ports used by the Interceptor and the SteelHead data communication related to the optimization process.
Port | Purpose |
7744 | Datastore synchronization |
7800 | In-path |
7810 | Out-of-path |
7820 | Failover |
7830 | MAPI Exchange |
7840 | NSPI |
7850 | Connection forwarding (neighbor) |
7860 | Interceptor |
7870 | SteelHead Mobile communicating to the Mobile Controller |
Vulnerability management
Riverbed proactively and periodically manages the security of our products with different strategies, including penetration testing using the most common tools in the industry.
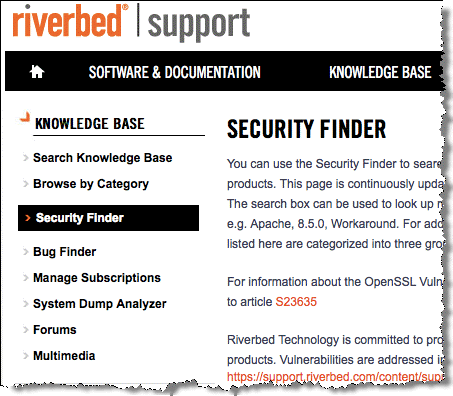
The Riverbed Knowledge Base contains many articles on security. You can also use the Security Finder (
Figure: Security finder on the Riverbed Knowledge Base site) to look up known security issues documented by Riverbed.
Security finder on the Riverbed Knowledge Base site
Riverbed works to achieve different security certifications and validations for the different products.
The Interceptor works with SteelHead to achieve a FIPS 140-2 level, Common Criteria EAL 4+, and requirements 2, 3, 4, 9 for the PCI card. The Interceptor meets FIPS Level 1 with Interceptor 4.5.
Overview of authentication
You can log in to an Interceptor with a RADIUS or TACACS+ authentication system for administrative and monitoring purposes. The following methods for user authentication are provided with the Interceptor:
n Local
n RADIUS
n TACACS+
For details on per-command authorization and per-command accounting, see the Riverbed Command-Line Interface Reference Manual.
The order in which authentication is attempted is based on the order specified in the AAA method list. The authentication list provides backup authentication methods in case one method fails to authenticate the server. If the first server is unavailable, the next server in the list is contacted depending on the RADIUS/TACACS+ settings.
If there are multiple servers within a method (assuming the method is contacting authentication servers) and a server time-out is encountered, the next server in the list is tried. If the current server being contacted issues an authentication reject, another server is contacted according to the RADIUS/TACACS+ setting. If none of the methods validate a user, the user isn’t allowed access to the server.
The Interceptor doesn’t have the ability to set a per interface authentication policy. The same default authentication method list is used for all interfaces. You can’t configure authentication methods with subsets of the RADIUS or TACACS+ servers specified (that is, there are no server groups).
Authentication features
Interceptor supports the following features (available only through the CLI):
n Per-command authorization - Your TACACS+ server can authorize all CLI commands with the aaa authorization per-command default command. The methods available for per-command authorization are local (default) and TACACS+.
To use TACACS+ for per-command authorization, configure the Interceptor for TACACS+ and define the users and commands authorized to run on your TACACS+ server. For details on how to configure your TACACS+ server, see the TACACS+ server documentation.
Per-command authorization applies to the CLI only.
If you don’t have a TACACS+ server, use local accounts on the Interceptor. Administrator and monitoring accounts are available.
n Per-command accounting - You always enable per-command accounting locally. You must specifically enable the command for TACACS+ by defining the TACACS+ method using the aaa accounting per-command default command. TACACS+ per-command accounting is always sent to all the configured TACACS+ servers. The local method logs the command in the system logs.
n TACACS+ Server First Hit - When the tacacs-server first-hit is enabled, the Interceptor rejects authentication after the first rejection received from a TACACS+ server rather than continuing through all the TACACS+ servers in the list. This feature applies to user authentication and per-command authorization.
n Fallback - The fallback feature decides how the successive authentication methods are tried. When you enable fallback, if authentication fails, the system continues through all authentication methods (TACACS+, RADIUS, local) in the order you configure them in the authentication method list. Fallback is enabled by default. When you enable conditional fallback using the aaa authentication cond-fallback command, you can configure the system to only proceed beyond TACACS+ or RADIUS if the servers are unreachable. Conditional fallback enables you to reject the login once the first method rejects the attempt, instead of proceeding to the next method in the authentication method list.
n Remote and console method lists - There are two method lists: remote (ssh, Web UI) and console (serial, terminal, SteelHead, telnet). The console method requires a local method to be present but the remote list doesn’t. You enable the remote method using the aaa authentication login default command. You enable the console method using the aaa authentication console-login default command.
Configuring a RADIUS server
This section describes how to configure a RADIUS server for the Interceptor. This section includes the following topics:
Configuring a RADIUS server with FreeRADIUS
On a per-user basis, you can specify a different local account mapping by using a vendor-specific attribute. This section describes how to configure the FreeRADIUS server to return an attribute (which specifies the local user account as an ASCII string). The file paths are the default values. If the RADIUS server installation has been customized, the paths might differ.
Dictionary files are stored in the directory /usr/local/share/freeradius. You can define RADIUS attributes in this directory. Assuming the vendor doesn’t have an established dictionary file in the FreeRADIUS distribution, begin the process by creating a file called dictionary.<vendor> in this directory.
The contents of the dictionary.<vendor> file define a vendor identifier (which should be the Structure of Management Information [SMI] Network Management Private Enterprise Code of the Vendor) and any vendor-specific attributes.
In the following example, the Vendor Enterprise Number for Riverbed is 17163 and the Enterprise Local User Name Attribute is 1. These numbers specify that a given user is an admin or monitor user in the RADIUS server (instead of using the SteelHead default for users not named admin and monitor).
These instructions assume you are running FreeRADIUS v.1.0, which is available from
http://www.freeradius.org. You can also find more details in the
SteelHead User Guide.
To install FreeRADIUS on a Linux computer
2. At your system prompt, enter the following commands:
tar xvzf freeradius-$VERSION.tar.gz
cd freeradius-$VERSION
./configure
make
make install #as root
To add acceptance requests on the RADIUS server
1. In a text editor, open the /usr/local/etc/raddb/clients.conf file.
2. To create the key for the RADIUS server, add the following text to the clients.conf file:
client 10.0.0.0/16 {
secret = testradius
shortname = main-network
nastype = other
}
The secret you specify here must also be specified in the SteelHead when you set up RADIUS server support.
3. In a text editor, create a /usr/local/share/freeradius/dictionary.rbt file for Riverbed.
4. Add the following text to the dictionary.rbt file.
VENDOR RBT 17163
ATTRIBUTE Local-User 1 string RBT
5. Add the following line to the /usr/local/share/freeradius/dictionary:
$INCLUDE dictionary.rbt
6. Add users to the RADIUS server by editing the /usr/local/etc/raddb/users file. For example:
“admin” Auth-Type := Local, User-Password == "radadmin"
Reply-Message = "Hello, %u"
"monitor" Auth-Type := Local, User-Password == "radmonitor"
Reply-Message = "Hello, %u"
"raduser" Auth-Type := Local, User-Password == "radpass"
Local-User = "monitor", Reply-Message = "Hello, %u"
7. Start the server using /usr/local/sbin/radiusd. Use the -X option if you want to debug the server.
The raduser is the monitor user as specified by Local, User-Password.
Configuring RADIUS authentication in the Interceptor
This section describes the basic steps for configuring RADIUS authentication in the Interceptor. For details, see the SteelHead Interceptor Installation Guide and the SteelHead Interceptor User Guide.
You prioritize RADIUS authentication methods for the system and set the authorization policy and default user.
Make sure to put the authentication methods in the order in which you want authentication to occur. If authorization fails on the first method, the next method is attempted, and this process is continued until all the methods have been attempted.
Perform the following basic steps to configure RADIUS support.
To configure RADIUS support
1. Add the IP address of the RADIUS server and specify the key used when you added the device to the ACS server:
(config)# radius-server host 192.168.1.200 key rvbd
2. Enable AAA.
3. Define the authentication method.
The following configuration attempts to use RADIUS and then local:
(config)# aaa authentication login default radius local
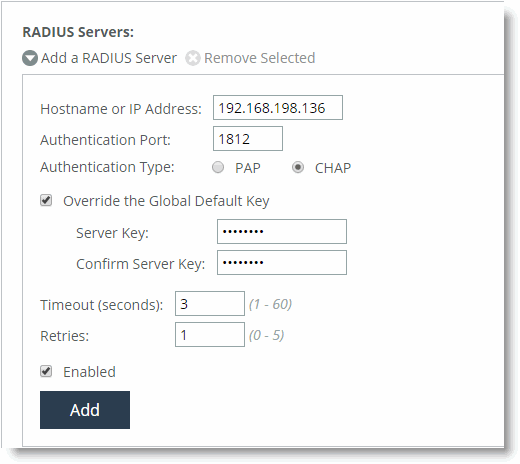
Configuring RADIUS CHAP authentication
In Interceptor 3.0.x or later you can configure RADIUS CHAP authentication through the CLI or the Interceptor Management Console. Riverbed doesn’t recommend that you configure CHAP or PAP authentication for RADIUS. Choose which method to use based on the appropriate risk mitigation strategy provided by either option. For example, CHAP transmits the password in a more secure manner, but various RADIUS servers can store the password in an unencrypted format.
radius-server host 192.168.198.136 auth-type chap timeout 3 retransmit 1 key testradius
We recommend that you only use CHAP as long as you can ensure that user passwords are protected on your RADIUS server. FreeRADIUS recommends that you don’t use CHAP.
To configure CHAP authentication in the Interceptor Management Console, configure the RADIUS server (Administration > Security: RADIUS).
RADIUS CHAP authentication
After you add the server, include RADIUS in the order of authentication methods. A best practice to ensure that you can still perform authentication in the absence of the RADIUS server is to:
n Use the RADIUS server first for authentication, but
n Fall back to the Interceptor username and password database if the RADIUS server is unavailable.
RADIUS authentication

Configuring a TACACS+ server
This section describes how to configure a TACACS+ server for the Interceptor. This section includes the following topics:
Configuring TACACS+ with Cisco secure access control servers
This section requires that you are running a Cisco Secure Access Control Server (ACS) and you want to configure it for TACACS+.
The TACACS+ Local User Service is rbt-exec. The Local User Name Attribute is local-user-name. This attribute controls whether a user who isn’t named admin or monitor is an administrator or monitor user (instead of using the SteelHead default value). For the SteelHead, the users listed in the TACACS+ server must have PAP authentication enabled.
Use the following procedures to configure TACACS+ with Cisco Secure ACS.
n For details about configuring TACACS+ with Cisco ACS 4.x, go to Knowledge Base article
S14831.
n For details about configuring TACACS+ with Cisco ACS 5.x, go to Knowledge Base article
S16158.
Configuring TACACS+ authentication in the Interceptor
The section describes the basic steps for configuring TACACS+ authentication in the Interceptor. You prioritize TACACS+ authentication methods for the system and set the authorization policy and default user.
For more information and detailed procedures, see the SteelHead Interceptor User Guide.
Make sure to put the authentication methods in the order in which you want authentication to occur. If authorization fails on the first method, the next method is attempted, and this process is continued until all the methods have been attempted.
Perform the following basic steps to configure TACACS+ support.
To configure TACACS+ support
1. Add the IP address of the ACS server and specify the key used when you added the device to the ACS server.
(config)# tacacs-server host 192.168.1.200 key rvbd
2. Enable AAA.
3. Define the authentication method.
The following configuration attempts to use TACACS+ and then local:
(config)# aaa authentication login default tacacs+ local
Securing Interceptors
This section describes security features you can use to harden your network, including ways to secure the Interceptors and some common sense security policies. This section includes the following topics:
Overview of securing Interceptors
In the past, organizations have focused attention on securing their networks by providing security for and preventing attacks against hosts. Unfortunately, there are also many security risks associated with networking devices. Attacks against such devices can be used to gather valuable information. For example, an attacker could use tools to fill up the MAC address tables of Ethernet switches, causing the switches to flood packets. These packets might contain passwords that can easily be captured.
The Interceptor with the SteelHead have been certified and subsequently deployed for internal use by several highly security-conscious organizations, including military, government, and financial organizations. However, these appliances are complex network-facing systems and must be treated accordingly.
Because security requirements vary by organization, consider these recommendations with your particular security goals in mind. Before implementing any security measure described in this section, you must have a thorough understanding of its impact. For example, you don’t want to disable access to an Interceptor by mistake and not be able to undo the change because you inadvertently blocked your own access.
If you have a specific security concern, we recommend that you consult with Riverbed Professional Services.
Best practices for securing access to Interceptors
This section describes best practices for securing access to your Interceptors. These practices aren’t requirements, but we recommend that you consider these suggestions as implementing them can enforce a secure deployment:
n Restrict physical access - You must restrict physical access to any network device. An unauthorized user can easily gain access to an Interceptor if that person has physical access. Every device has the ability to recover lost passwords. By acquiring physical access to a device, an unauthorized user can gain control by using the lost password recovery procedures. Even without breaking into the Interceptor software, it is possible to gain access to the contents of disks by gaining access to the Interceptor itself. You should treat the Interceptor as comparable in value to the servers or clients that hold sensitive data. For example, if servers are in locked rooms, we recommend the Interceptors also be in locked rooms. The main function of the Interceptor is to load balance traffic, but it doesn’t store traffic packets unless you perform a TCP dump operation. The risk of accessing stored content is lower than that of a SteelHead.
Someone with physical access can also remove the Interceptor without authorization, allowing an unauthorized user to gain access to confidential data.
Physical access increases susceptibility of the networking device to denial-of-service attacks. An unauthorized user could conceivably power the Interceptor down, disarrange the cabling, swap hard drives, or even steal the Interceptor.
n Use an appropriate login message - The login message appears on the Management Console Home page. You must display a login message that reinforces your organization’s access and security policies. Have your organization’s legal council approve an appropriate login message.
Typical login messages include, but aren’t limited to:
– statements pertaining to authorized access only
– consequences of unauthorized access
– elimination of right to privacy
– acknowledgment that the user might be monitored
The default login message is “Welcome to the Management Console for Interceptor_name!” You can change this message by navigating to the Administration > System Settings: Announcements page in the Management Console and specifying another message. You can also use the CLI, as shown in the following example.
Syntax:
[no] banner login <“message-string”>
Example:
banner login - "This computer system is the property of Company XYZ Inc. Disconnect NOW if you have not been expressly authorized to use this system. Unauthorized use is a criminal offence under the Computer Misuse Act 1990.
Communications on or through Company XYZ Inc. computer systems may be monitored or recorded to secure effective system operation and for other lawful purposes.”
n Allow management only from the primary interface - Limiting SSH and HTTPS access to the Primary interface allows you to restrict who can access the Interceptors by the use of filters or Administration: Security > Management ACLs. These filters are typically based on the source IP addresses of hosts and are applied on network devices like routers, Layer-3 switches, or firewalls. Limiting remote management access to Interceptors helps prevent unauthorized user access.
Syntax:
[no] web httpd listen enable
[no] web httpd listen interface <interface>
[no] ssh server listen enable
[no] ssh server listen interface <interface>
[no] access inbound rule add [allow | deny] protocol <protocol number> service <service> dstport <port> srcaddr <ip-address> interface <interface> description <description> rulenum <rulenum> [log {on | off}][override]
Example:
web httpd listen enable
web httpd listen interface primary
ssh server listen enable
ssh server listen interface primary
access inbound rule add allows service https interface primary srcaddr10.0.0.0/24 rulenum 2
n Use SSH version 2 - SSH version 2 is more secure than previous versions of SSH. The major differences between SSH1 and SSH2 fall into two main categories: technical and licensing. SSH2 uses different encryption and authentication algorithms.
SSH1 offers four encryption algorithms (DES, 3DES, IDEA, and Blowfish), because SSH2 dropped support for DES and IDEA but added three algorithms. SSH1 also uses the RSA authentication algorithm; however, SSH2 uses the Digital Signature Algorithm (DSA). These changes were designed to increase the base level of security in SSH2 by using stronger algorithms.
Syntax:
[no] ssh server v2-only enable
Example:
ssh server v2-only enable
n Disable unencrypted communication protocols such as Telnet and HTTP - An attacker can easily gain access to usernames and passwords by sniffing network communications. You might consider a switched Ethernet environment secure because packets are only forwarded out ports based on the destination MAC address; however, this isn’t necessarily the case.
Several hacking tools are available that can generate large amounts of bogus MAC addresses. These packets flood the MAC address table of the switch in an attempt to overflow the table. A switch typically floods packets out all ports if it doesn’t have an entry in its MAC address table. Therefore, after the MAC address table for the switch is filled, the switch floods packets out all ports.
The attacker can now use a packet-capturing application to capture the flooded packets and can then look for remote management connections. After the attacker discovers remote management connections, the attacker can reset those TCP connections, causing the user to log in again allowing the attacker to capture the username and password.
If only HTTPS and SSH are used, the attacker can’t obtain the usernames and passwords because they are encrypted.
Even if you try to use an HTTPS from the client to connect to the Interceptor, the attacker can perform an SSL strip attack, SSL sniff, or HTTPS bridging attack in a way that you might think you are using a secure channel; however, the attacker can retrieve passwords and sniff the communication.
Man-in-the-middle attacks are also possible using IPv6. IPv6 is activated in most operating systems and the first option in operating systems such as Windows. Limit access to secure methods (HTTPS and SSH) and restrict the source of connections to minimize the probability of being compromised.
Syntax:
[no] telnet-server enable
[no] web http enable
Example:
no telnet-server enable
no web http enable
n Use TLS only for the Management Console - Only permit TLS between the browser and the Management Console.
Syntax:
web ssl protocol tlsv1
no web ssl protocol sslv3
web ssl protocol tlsv1.1
web ssl protocol tlsv1.2
n Remove the default username from the Web preference settings - The default username in the login field is admin. Don’t display a default username because it gives an attacker an example of a username against which to wage a brute-force password attack. Brute-force attacks typically go through an extensive list of words (for example, a dictionary attack) in an attempt to guess the password.
Syntax:
web prefs login default
Example:
web prefs login default ""
n Change all default passwords and community strings - Be sure to change the default password for the administrator and monitor accounts. The monitor account is disabled by default.
The most common problem with SNMP is that it uses the default community string of public. Change the default to something different.
Syntax:
username <user-id> password 0 <cleartext>
Example:
username admin password 0 o2fMu5TS!
Syntax:
snmp-server community
snmp trap-community
Example:
snmp-server community o2fMu5TS!
n Use strong passwords - Strong passwords typically include combinations of uppercase and lowercase letters, numbers, special characters, and are at least eight characters in length. Strong passwords reduce the likelihood of a successful brute-force attack because they aren’t found in dictionaries and exponentially increase the complexity of the passwords.
An example of a strong password is o2fMu5TS!
n Use AAA authentication - One of the challenges with using local usernames and passwords is that when an employee leaves an organization, an administrator must modify every device that has a username and password configured for that former employee.
By leveraging TACACS+, you gain the advantage of having a single location for configuring usernames and passwords. When a person leaves your organization, you can simply disable that single account thereby preventing the user from access to all of the network devices configured to use TACACS+. Another benefit of TACACS+ is the ability to lock out an account after several unsuccessful login attempts.
TACACS+ also provides greater reporting capabilities regarding who is accessing which devices at what time. With a global username and password, you have no idea which administrator actually logged in at a specific time. These reports can be invaluable for tracking network changes and identifying who is making changes. Therefore, it is a critical tool for change management controls.
Refer to Riverbed Command-Line Interface Reference Manual and the SteelHead Interceptor User Guide for more detailed information about how to configure AAA.
n Configure the CLI session time-out - By default, the Interceptor closes the SSH session to the command line after 15 minutes. You can change this interval using the following command:
Syntax:
cli default auto-logout *
Example:
cli default auto-logout 10
This command only affects new SSH sessions. If you want to modify the time-out session only for the current session (and not affect the default settings), use the following command:
Syntax:
cli session auto-logout *
You can disable the auto-logout feature with the following command:
no cli default auto-logout
This command changes both the current and the default settings.
You can display the current auto-logout settings with the following command:
show cli
n Set an inactivity timer for console, SSH, and HTTPS sessions - Be sure to set a proper inactivity time-out value for management sessions. Don’t set a console inactivity time-out value to 0. This setting could allow an attacker to take over a previous management session if the previous administrator didn’t manually log off.
Syntax:
[no] web auto-logout <minutes>
[no] cli default auto-logout <minutes>
Example:
web auto-logout 10
cli default auto-logout 10
n Ensure SNMP is listening on the management interface only - To prevent unauthorized SNMP access, we recommend enabling SNMP access on the Primary interface only. This action allows you to control who can access Interceptors through SNMP by way of using filters applied to routers, Layer-3 switches, or firewalls.
Syntax:
[no] snmp-server listen enable
[no] snmp-server listen interface <interface>
Example:
snmp-server listen enable
snmp-server listen interface Primary
n Enable link state alarms - Enable the link state alarms, which are disabled by default. This action can alert you to any attempt to modify the cabling on the Interceptors by inserting a tap for illegal sniffing functions.
Syntax:
[no] stats alarm [<type> <options>]
Example:
stats alarm linkstate enable
n Disable the auto-discover SCC feature - By default, all SteelHeads try to register with the SCC using the default hostname riverbedcmc. If you don’t have an SCC, disable this feature.
If you do have an SCC, we recommend that you use it to manually discover Interceptors, thereby reducing the possibility that an attacker could compromise the DNS environment and change the IP address of the riverbedcmc A record to a rogue SCC.
Syntax:
[no] cmc enable
Example:
no cmc enable
n Use a BIOS password - Enable a password for BIOS, which prevents admin password recovery without the supervisor password. To configure a BIOS password:
– Connect a null modem cable to an Interceptor.
– Open up a terminal on your host to the Interceptor.
– Power up the Interceptor.
– Press F4 to enter BIOS.
– Navigate to Security tab.
– Specify a supervisor password.
– Make sure that the user password option is set to OFF.
– Save your configuration and continue to boot the Interceptor.
n Use a boot loader password - When you reboot the Interceptor, you can select from one of the two Interceptor images on the menu. You can perform password recovery at this point by pressing the E for edit. Pressing E alters the boot sequence to change the administrative password. Using the following commands, you can enable the boot loader to lock the password recovery process until a password is entered.
Interceptor (config) # boot bootloader password test1234
Interceptor (config) # write memory
Interceptor (config) # reload
...
-------------------------------------------------------------------
0: Riverbed Interceptor Software v. 5.5.3 (64bit)
1: Riverbed Interceptor Software v. 5.5.3 (64bit)
-------------------------------------------------------------------
Use the ^ and v keys to select which entry is highlighted.
Press enter to boot the selected OS or 'p' to enter a
password to unlock the next set of features.
Press 'P'
Password: *******
Best practices for enabling Interceptor security features
The following best practices enable important security features provided by Interceptor. These best practices aren’t requirements, but we recommend that you follow these suggestions as implementing them can enforce a secure deployment:
n Authenticate WCCP service groups - By default, WCCP peers in a WCCP group don’t use authentication when registering. This setting could allow an attacker to join a WCCP group and potentially cause a denial of service attack. Also an administrator could accidentally misconfigure a router to use a WCCP group that already is in use. Authentication controls would prevent these rogue devices from peering, thereby preventing possible network outages or degradation of performance.
Syntax:
[no] wccp service-group <service-id> {routers <routers> | assign-scheme [either | hash | mask]
| src-ip-mask <mask> | dst-ip-mask <mask> | src-port-mask <mask> | dst-port-mask <mask>} protocol [tcp | icmp] | encap-scheme [either | gre | l2] | dst-ip-mask <mask> flags <flags> | password <password> | ports <ports> | priority <priority> | weight <weight> | assign-scheme [either | hash | mask] | src-ip-mask <mask> | dst-ip-mask <mask> | src-portmask <mask> | dst-port-mask <mask>}
Example:
wccp service-group 91 routers x.x.x.x password S3cuRity!
n Disable automatic email notification - This feature proactively sends email notification of critical issues on the SteelHead (such as significant alarms and events) to Riverbed Support. Your organization might not want to send these automatic notifications.
Syntax:
[no] email autosupport enable
Example:
no email autosupport enable
n Delete the preconfigured NTP servers - If your organization has NTP configured internally, we recommend removing the preconfigured NTP servers.
Syntax:
[no] ntp server <ip-address> [version <number>]
Example:
no ntp server 66.187.224.4
n Configure Network Time Protocol (NTP) settings - We recommend that you synchronize the Interceptor to an NTP server of your choice. By default, the appliance uses the Riverbed-provided NTP server. Time is a critical function for the appliances and other network devices. Networks rely on accurate time determination for managing, securing, planning, and debugging. Tampering with time sources or posing as a rogue time server can lead to critical issues such as network authentication, or less critical issues such as conflicting log message time stamps.
n Disable any interfaces not in use - Be sure to disable any interfaces that aren’t being used. Examples include the auxiliary interface and any unused in-path interfaces.
Syntax:
[no] interface <interface-name> <options>
Example:
interface inpath0_1 shutdown
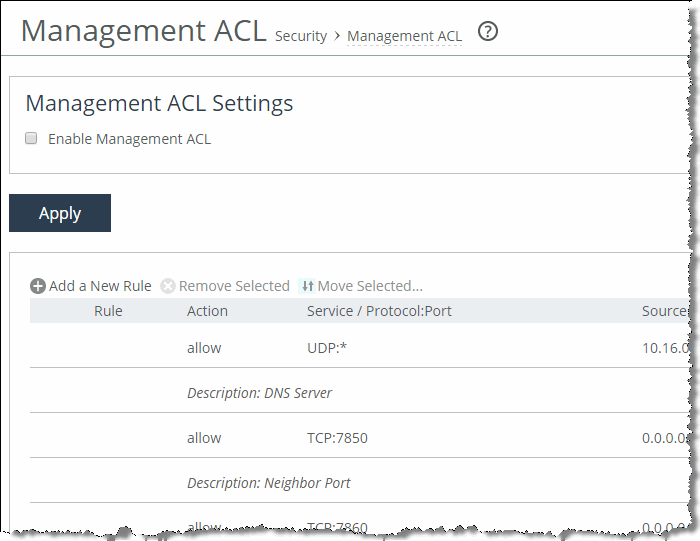
n Limit which hosts can communicate with the Interceptor - Interceptors communicate with other Interceptor and SteelHeads. Assuming the user subnets are different than the subnets you used to configure the Interceptors and SteelHeads (in-path interfaces), you can restrict the source networks to the optimization node subnets. At a minimum, you can restrict ports 7850 and 7860 using the management ACLs to avoid an attacker from a user subnet trying to connect to an Interceptor using these ports, which minimizes the risk of a Denial of Service attack.
Figure: Example of limited host communication shows an example configuration.
Example of limited host communication
Best practices for security monitoring
After implementing security measures for your organization, we recommend enabling the following security monitoring features:
n Enable Logging - Be sure to enable logging and log to a syslog server. At a minimum, set logging to the notice level to capture failed login attempts. You can also change the default logging facility (CLI only) (system=local0, user=local1, and per-process=local2). Use the logging facility user <local-facility>system <local-facility>perprocess <local-facility> command to configure the syslog facility.
Example—A failed login attempt:
May 13 05:19:49 PHY-int1 webasd[6004]: [web.NOTICE]: web: Attempt to Authenticate admin
May 13 05:19:49 PHY-int1 webasd(pam_unix)[6004]: authentication failure; logname= uid=0 euid=0 tty= ruser= rhost= user=admin
May 13 05:19:49 PHY-int1 webasd[6004]: [web.NOTICE]: web: Failed to authenticate user admin: You must provide a valid account name and password.
After you enable syslog and log to a server, we recommend you review the logs regularly.
Interceptor 4.5 and later also includes several SNMP traps to notify you of Interceptor configuration changes, successful logins, and system dump initiation. For more information, see the SteelHead Interceptor User Guide.
Syntax:
[no] logging <ip-address> [trap <log-level>]
Example:
logging x.x.x.x trap notice
n Email alerts - Be sure to enable email alerts internally.
Syntax:
[no] email mailhub {<hostname>|<ip-address>}
[no] email notify events enable
[no] email notify failures enable
[no] email notify events recipient <email-address>
[no] email notify failures recipient <email-address>
Example:
email mailhub x.x.x.x
email notify events enable
email notify failures enable
email notify events recipient helpdesk@companyxyz.com
email notify failures recipient helpdesk@companyxyz.com
Refer to the Riverbed Command-Line Interface Reference Manual for more details on configuring email alerts.
n Register with the Riverbed forums - Riverbed has several forums that enable you to receive advanced notifications for:
– general announcements and updates
– software releases
– features
n Riverbed Knowledge Base - Follow relevant Knowledge Base articles and use the Security Finder.
Configuring SSL certificates for web user interface
The Interceptor automatically generates and uses a self-signed certificate to provide HTTPS access to the web UI to manage the appliance.
Management of SSL certificates for the web UI pertains to the SSL certificate used by the appliance’s web UI when HTTPS is used.
You can replace the self-signed certificate with one created by the administrator or generated by a third-party certificate authority.
To upload a key or certificate
n Connect to the Interceptor CLI and enter the following command:
web ssl cert import-cert <pem-text>
Don’t enter more than one certification and more than one key. Because neither is required, you can opt to update only the certificate.
To generate a brand new self-signed certificate and key pair for use with HTTPS management on the SteelHead
n Connect to the Interceptor CLI and enter the following command:
web ssl cert generate
This command overwrites the existing certificate and key pair regardless of whether the previous one was self-signed or user added. This command generates a self-signed certificate that is authorized for one year (365 days).
Configuring SNMPv3 authentication and privacy
The SNMPv3 feature supports authentication and privacy encryption of SNMPv3 messages. You can use AES 128 (CFB128-AES-128) and DES (CBC-DES) to send an SNMPv3 encryption for GET action.
All SNMPv3 passwords (authentication/privacy) are stored as hashed (MD5/SHA), and they are all master keys, even if you provide plain-text password during configuration.
An SNMP agent runs in every Interceptor that supports SNMP GET request action. Among the techniques to secure SNMP traffic, such as access control lists, you can use SNMPv3 to provide authentication and privacy. The main benefit for SNMPv3 authentication is to ensure the integrity of SNMP traffic, while privacy provides encryption protecting data from being seen by a third party.
Configuring an SNMPv3 GET request encryption is a two-part process:
n Configure USM user
The user corresponds with the authentication and privacy mechanism that a management station uses to access the Interceptor.
n Configure ACLs
To configure the ACLs, you need to add or edit a group and be able to view and access policy. You can’t add an access policy with a group and a view. Security names aren’t supported by SNMPv3. To restrict SNMPv3 USM users from polling a specific subnet, use the ACL feature on the Administration > Security: Management ACL page.
Views represent the OIDs a management station is allowed to access. You can create multiple views and restrict specific OIDs. A view starts with the highest level OID that you specify, and you can view all OIDs further down in the hierarchy, unless you specifically restrict them. You can only view OIDs in the hierarchy.
You must associate a group with a view. After you associate a group with a view, you can define an access policy to link the user, group, and view together.
The following procedure shows an example of a user named SteelCentral created with SHA authentication and AES encryption for privacy.
To configure a USM user
1. From the Interceptor Management Console, choose Administration > System Settings: SNMPv3.
2. Select the Add a New User tab.
Add a new USM user
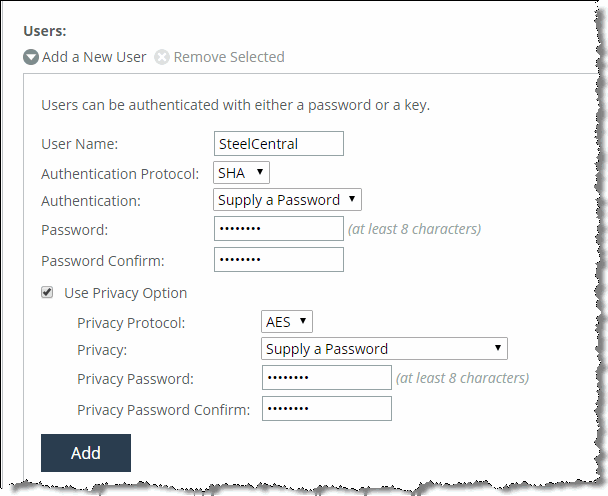
3. Select Use Privacy Option.
4. Select AES or DES from the Privacy Protocol drop-down list.
5. Select any of the options in the Privacy drop-down list and complete any corresponding steps.
6. Click Add.
The following procedure shows an example of group Profiler created, and then user Cascade is associated with the group Profiler.
To configure SNMP ACLs
1. From the SteelHead Management Console, choose Administration > System Settings: SNMP ACLs.
2. Select the Add a New Group tab.
Add a new group
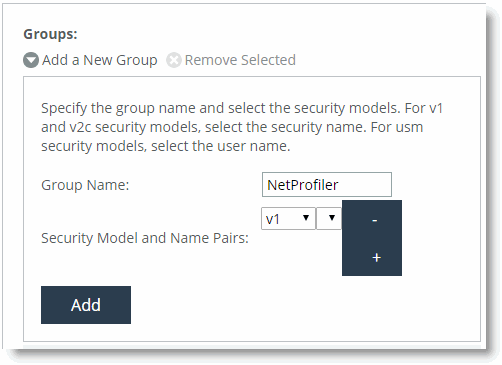
3. Specify a group name.
5. Click Add.
6. Select the Add a New View tab.
Add a new view
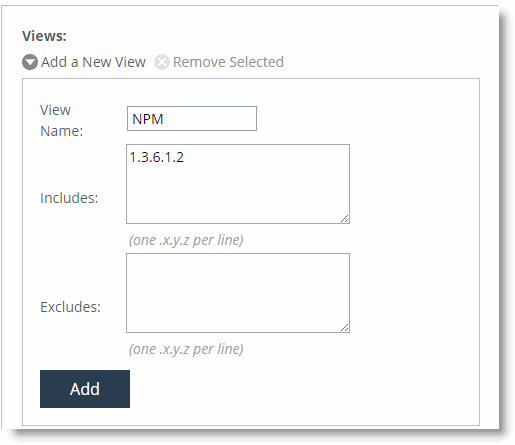
7. Specify a view name.
8. Specify the OIDs to include and exclude from the view.
9. Click Add.
10. Select the Add a New Policy tab.
11. Select the group name you created from the Group Name drop-down list.
12. Select AuthPriv from the Security Level drop-down list.
13. Select the view you created from the Read View drop-down list.
14. Click Add.
You can verify your configuration in Wireshark. Make sure the SNMP PDUs are encrypted.
Wireshark verification

To decrypt the SNMP packets for further troubleshooting
1. From the Wireshark menu, choose Edit > Preferences > Protocols > SNMP.
2. Select the Edit for the SNMP Users window.
SNMP users window
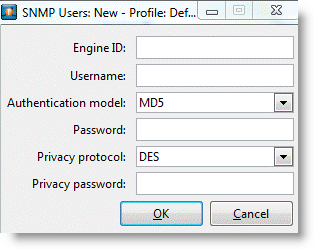
3. Complete the information in the SNMP Users window.
The engine ID is available on the Interceptor through the show snmp CLI command or near the end of the running-configuration. The username, authentication model, password, privacy protocol and privacy password are the same settings you configured for the SNMPv3 user on the SteelHead.
4. Click OK.
Wireshark decrypts the SNMP encrypted packets and you can analyze further for troubleshooting.