Upgrading the SteelHead Appliance Memory
This chapter describes how to upgrade the SteelHead CX570, CX770, and CX3070 dual in-line memory modules (DIMMs) to convert to a SteelHead SD 570-SD, 770-SD, or 3070-SD appliance. It also describes how to recable the appliance. It includes these sections:
Upgrading the appliance memory
To upgrade your SteelHead appliance to a SteelHead SD appliance, you must add additional memory. The amount of memory depends on your appliance model.
Your in-field upgrade kit contains these DIMMs to upgrade your appliance to a SteelHead SD:
SteelHead
model name | Current DIMM | Upgrade kit DIMM | Total DIMM to be added | Total
DIMM after upgrade | Upgraded
SteelHead SD model name |
CX570 | 1 x 2 GB | 3 x 2 GB | 4 x 2 GB | 8 GB | 570-SD |
CX770 | 2 x 2 GB | 1 x 8 GB | 2 x 2 GB | 12 GB | 770-SD |
1 x 8 GB |
CX3070 | 3 x 4 GB | 1 x 4 GB | 4 x 4 GB | 16 GB | 3070-SD |
The hardware upgrade takes about 30 minutes.
Prerequisites and requirements
•Make sure you are upgrading a SteelHead CX570, CX770, or CX3070 appliance. Any other SteelHead models can’t be field upgraded to a SteelHead SD appliance.
•Check the serial number of the appliance to make sure it is eligible for upgrade. Refer to the first email from Riverbed—all SteelHead serial numbers slated for upgrade are listed in that email. For details regarding the emails you will receive, see
SteelConnect SD-WAN service licensing.
•If you have the Two-Port 10-GbE Fiber SR NIC (410-00302-03/NIC-1-010G-2SR-BP) installed on the CX3070 appliance, you must remove the card before you begin the in-field upgrade. The CX3070 motherboard contains 1-GB NICs that can be used for uplinks if capacity planning doesn't mandate 10-GB. You can buy or exchange the 10G bypass NIC with a 10-GB nonbypass NIC prior to upgrading if you prefer.
For details on NIC support, see
NIC support.
Adding DIMMs to the SteelHead CX570 appliance
The SteelHead CX570 appliance has one 2-GB DIMM in slot A1. You add the three 2-GB DIMMs to slots BI, A0, and B0 in the appliance.
To add DIMMs to the SteelHead CX570 appliance
1. Power down the appliance and unplug all peripheral devices and the power cable.
Removing the chassis cover
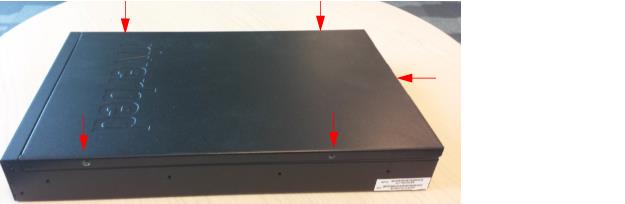
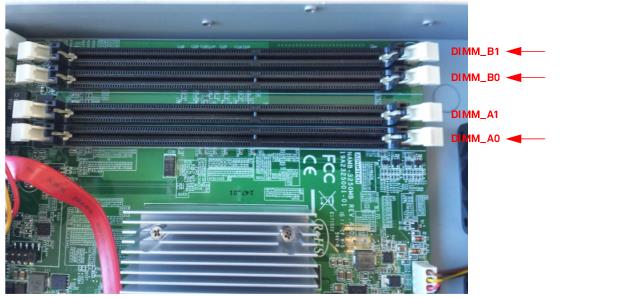
Locating the DIMM slots
4. Add the three 2-GB DIMMs to fill all the slots. Make sure you align the memory-module edge connector with the slot alignment keys and insert it into the slot. The module slot has two alignment keys that allow you to install the module in only one direction.
Inserting the DIMM into the connector slot and securing
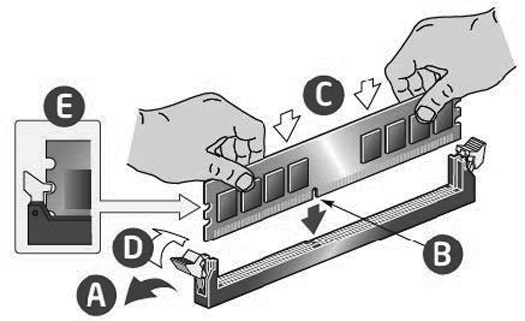
5. Press down on the DIMM with your thumbs while pulling up on the ejectors with your index fingers to lock the module into the slot.
6. Ensure that all ejector tabs are in the upright locked position. If the ejector tabs aren’t in the upright locked position, the memory might not be recognized when you reboot the appliance.
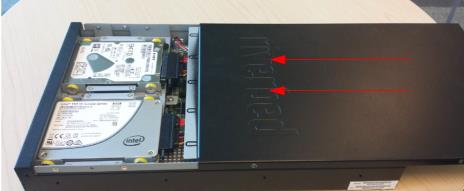
7. To replace the chassis cover, place the top cover on the appliance and slide it toward the front of the chassis until the recessed front edge fits smoothly under the chassis edge.
Installing the appliance cover
8. Install the screws on the sides, and then install the screw at the back.
9. Replace the power cords and peripherals.
10. Power on the appliance.
11. Connect to the SteelHead Management Console and choose Reports > Diagnostics: System Details. Under Memory, the status states OK.
12. Under Memory, click the right arrow (>) to expand the page. The installed and available memory is listed.
If the screen doesn’t show OK or if the memory listed is incorrect, open the appliance and make sure that each memory module is seated firmly in the slots and that the white ejector tabs are in the upright, locked position.
Adding a DIMM to the SteelHead CX770 appliance
The SteelHead CX770 appliance has two 2-GB DIMMs in slots A1 and B1. First, you must move the DIMM in slot A1 to B0, and then you add the 8-GB DIMM to slot A1.
If the DIMMs aren’t in the correct slots, the system won’t recognize the new memory when you boot the appliance.
To add a DIMM to the SteelHead CX770 appliance
1. Power down the appliance and unplug all peripheral devices and the power cable.
Removing the chassis cover

3. Slide the cover back and lift upward. The DIMMs are shown in
Locating the DIMM slots. The system has two 2-GB DIMMs in slots A1 and B1.
Locating the DIMM slots
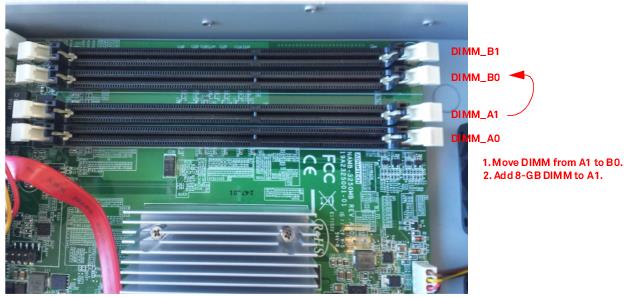
4. Move the 2-GB DIMM in slot A1 to slot B0.
5. Add the new 8-GB DIMM in slot A1. Make sure you align the memory-module edge connector with the slot alignment keys and insert it into the slot. The module slot has two alignment keys that allow you to install the module in only one direction.
Inserting the DIMM into the connector slot and securing
Make sure you add the memory to the correct slot. If you don’t add the memory to the correct slot, the system won’t recognize the new memory when you boot the appliance.
6. Press down on the DIMM with your thumbs while pulling up on the ejectors with your index fingers to lock the module into the slot.
7. Ensure that all ejector tabs are in the upright locked position. If the ejector tabs aren’t in the upright locked position, the memory won’t be recognized when you reboot the appliance.
8. To replace the chassis cover, place the top cover on the appliance and slide it toward the front of the chassis until the recessed front edge fits smoothly under the chassis edge.
Installing the appliance cover

9. Install the screws on the sides, and then install the screw at the back.
10. Replace the power cords and peripherals.
11. Power on the appliance.
12. Connect to the SteelHead Management Console and choose Reports > Diagnostics: System Details. Under Memory, the status states OK.
13. Under Memory, click the right arrow (>) to expand the page. The installed and available memory is listed.
If the screen doesn’t show OK or if the memory listed is incorrect, open the appliance and make sure that each memory module is seated firmly in the slots and that the white ejector tabs are in the upright locked position.
Adding a DIMM to the SteelHead CX3070 appliance
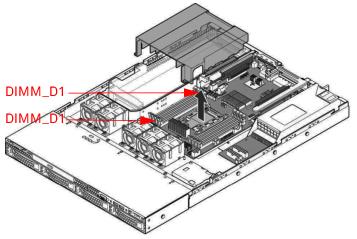
Memory module slot locations in 1U appliances shows memory module slot locations. You add a 4-GB DIMM to the empty slot located at D1. If you don’t add the DIMM to the correct slot, the system won’t recognize the new memory when you boot the appliance.
Memory module slot locations in 1U appliances

To add a DIMM to the SteelHead CX3070 appliance
1. Power down the appliance and unplug all peripheral devices and the power cable.
2. To remove the chassis cover, unscrew the four screws (letter A).
Removing the appliance cover
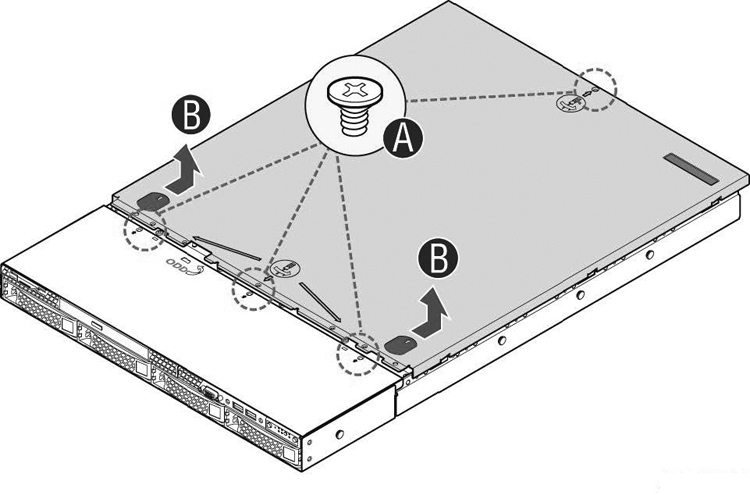
3. Slide the cover back and lift upward (letter B).
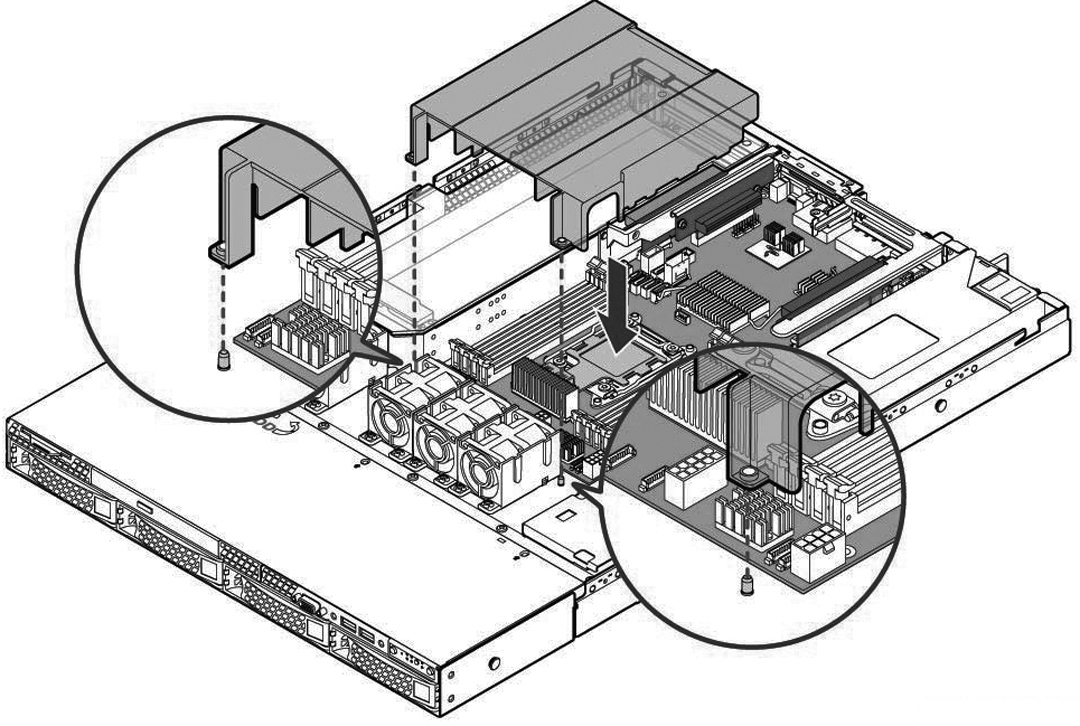
4. Locate the air duct and lift straight up.
Removing the air duct
5. If you have the Two-Port 10-GbE Fiber SR NIC (410-00302-03/NIC-1-010G-2SR-BP) installed, you must remove the card before you begin the in-field upgrade. The CX3070 motherboard contains
1-GB NICs that can be used for uplinks if capacity planning doesn't mandate 10-GB. You can buy or exchange the 10-GB bypass NIC with a 10-GB nonbypass NIC prior to upgrading if you prefer. For details on NIC support, see
NIC support.
6. Add the 4-GB DIMM to slot D1. The DIMM locations are labeled on the appliance.
Align the memory-module edge connector with the slot alignment keys and insert it into the slot. The module slot has two alignment keys that allow you to install the module in only one direction.
Inserting the DIMM into the connector slot and securing
Make sure you add the memory to the correct slot. If you don’t add the memory to the correct slot, the system won’t recognize the new memory when you boot the appliance.
7. Press down on the DIMM with your thumbs while pulling up on the ejectors with your index fingers to lock the module into the slot.
8. Ensure that all ejector tabs are in the upright locked position. If the ejector tabs aren’t in the upright locked position, the memory might not be recognized when you reboot the appliance.
9. Before replacing the air duct, ensure the HDD cable is inside the air duct.
10. Align the two holes on the air duct with the alignment pins on the chassis, and lower the air duct into place.
Installing the air duct
11. To replace the chassis cover, place the top cover on the appliance and slide it toward the front of the chassis until the recessed front edge fits smoothly under the chassis edge and the locking pins (letter A) are fully engaged.
Installing the appliance cover
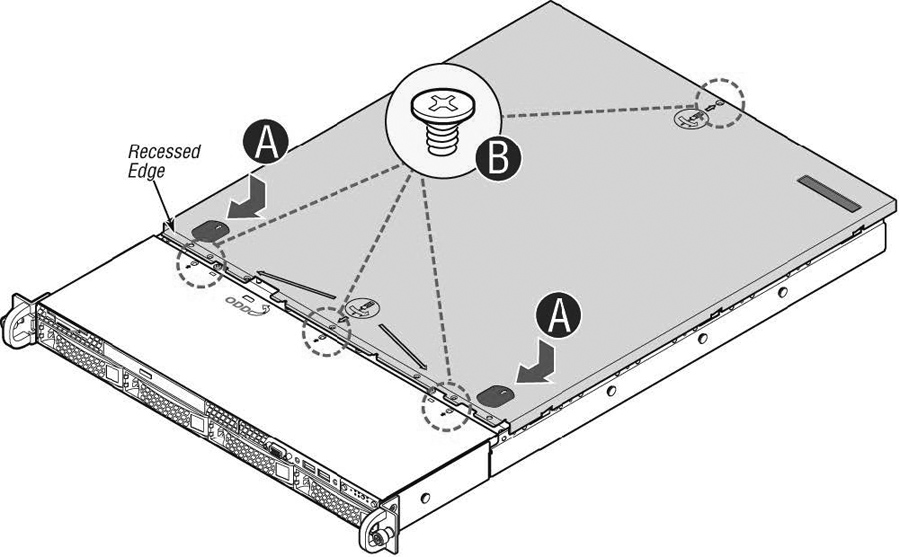
12. Install the three screws at the front, and then install the screw at the back (letter B).
13. Replace the power cords and peripherals.
14. Power on the appliance.
15. Connect to the SteelHead Management Console and choose Reports > Diagnostics: System Details. Under Memory, the status states OK.
16. Under Memory, click the right arrow (>) to expand the page. The installed and available memory is listed.
If the screen doesn’t show OK or if the memory listed is incorrect, open the appliance and make sure that each memory module is seated firmly in the slots and that the white ejector tabs are in the upright locked position.
Troubleshooting
If you haven’t performed the memory module installation correctly, an error message appears:
Image install of 'image.img' failed. The upgrade image provided does not support this model.
Open the appliance and make sure that each memory module is seated firmly in the slots and that the white ejector tabs are in the upright locked position.