Sites and Networks, Path Selection, and QoS
This chapter describes how to configure sites and networks, path selection, and QoS for the SCC. It includes the following sections:
This chapter requires you be familiar with path selection, Quality of Service (QoS), topology, sites, and networks. For more information, see the SteelHead Deployment Guide and the SteelCentral Controller for SteelHead User Guide.
Overview of sites and networks, path selection, and QoS
The new Sites & Networks configuration page combines a set of parameters that enables SteelHeads to build their view of the WAN. The network configuration defines the WAN clouds, and sites include the representation of the IP address network and definition of how the appliances connect to the various defined networks.
With the architectural model of topology, SteelHeads can automatically build the various paths to other remotes sites (a function needed for path selection and secure transport) and calculate the bandwidth available on these paths—a function needed for QoS.
You must be running SCC 9.0 or later to configure sites and networks on SteelHeads running RiOS 9.0 or later.
In RiOS 9.0, Riverbed introduces a new process to configure path selection and QoS on SteelHeads. This new process greatly simplifies the configuration and administration efforts, compared to earlier releases. As such, this new process relies heavily on a common central configuration, which is best managed and configured using a central management: the SCC.
We recommend that you use the SCC to manage Riverbed QoS, path selection, and secure transport configurations for the following reasons:
• QoS and path selection with RiOS 9.0 - Starting with SCC 9.0, you can deploy a single global QoS and path selection configuration to all the managed SteelHeads running RiOS 9.0 and later. This new configuration is in contrast to earlier RiOS releases in which you configured multiple SteelHead policies for QoS and path selection.
• Secure transport - The secure transport feature requires you to use SCC 9.0 or later and RiOS 9.0 or later.
Configuring sites and networks
This section discusses a high-level configuration of sites and networks. For more information about sites and networks, see the SteelHead Deployment Guide and the SteelCentral Controller for SteelHead User Guide.
The topology process in SCC 9.0 focuses on ease of deployment and manageability. As such, SCC focuses on a central configuration that you can deploy across the entire SteelHead enterprise—a configure once, deploy to many concept. This configuration process relies on making effective use of templates when possible to ease the repeatability of configuration steps.
When you start a configuration for path selection, including secure transport or QoS, you must have a well-planned design vision of the overall network. This section uses the example network shown in
Figure: Example network scenario.
Figure: Example network scenario shows multiple dual-homed sites with an MPLS WAN link provided by a carrier, labeled MPLS, and the second link is a private VPN circuit. A third site, RemoteBranch3, has a single connection back to the MPLS cloud and a secondary link through an internet-based firewall. All traffic, including public internet, is backhauled through the main headquarters site and egresses directly through the firewall connection.
Example network scenario
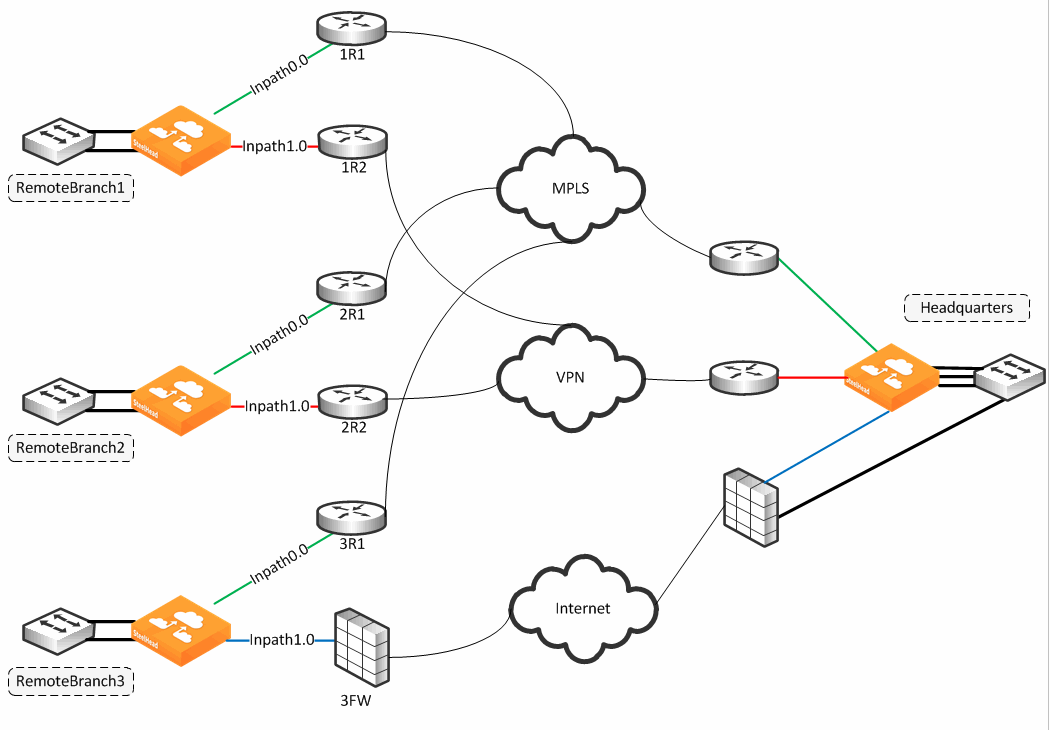
The following steps are a high-level configuration for sites and networks:
1. Identify the networks you want to configure: MPLS, VPN, and Internet.
2. Configure the multiple sites.
Site configuration contains basic information such as site name, contact information, SteelHead (if any), and network information.
For the example shown in
Figure: Example network scenario, you need to add the following sites: RemoteBranch1, RemoteBranch2, RemoteBranch3, and Headquarters. As part of the configuration, notice that RemoteBranch1 and RemoteBranch2 have similar uplinks, and you can use a connectivity template to ease the configuration.
You can initiate site configuration by:
• manual single site creation (
here).
• bulk site migration using the CSV template (
here).
Manual site creation is the simplest, but you’ve to configure one site at a time. The bulk site migration requires you to complete a CSV file entry and then upload to the SCC as a one-time push.
Site creation is a required task even if you’ve an existing SteelHead/SCC deployment. Current appliances aren’t added to sites as part of an upgrade from earlier releases, and they aren’t automatically discovered as part of a new deployment. SCC maintains a separate inventory of the appliances for both management and topology features. SteelHeads need to be identified under sites inventory as well as the management if using path selection or QoS.
For more details about migration, see the SteelCentral Controller for SteelHead Installation Guide.
After you’ve defined the sites and networks, you can continue to configure QoS, secure transport, and path selection independently.
For more information about configuring path selection, see
Configuring path selection. For more information about configuring QoS, see
Configuring global QoS. For more information about secure transport, see
Secure Transport.
The following configuration steps apply only for SCC 9.0 and later and SteelHead RiOS 9.0 and later. For earlier RiOS versions, configuration is still managed through classic policies. SCC 9.0 enables you to maintain both configuration features simultaneously to manage your appliances across the enterprise. If you’re running versions earlier than 9.0 for RiOS and SCC, see the documentation for the appropriate release on the Riverbed Support site.
You must enable REST API on the SteelHeads prior to configuring Topology configuration. REST API is enabled by default. For more information on REST API, see the SteelHead Deployment Guide.
To configure the SCC to manage networks
1. Choose Manage > Topology: Sites & Networks.
2. Select Add a Network.
Add a network
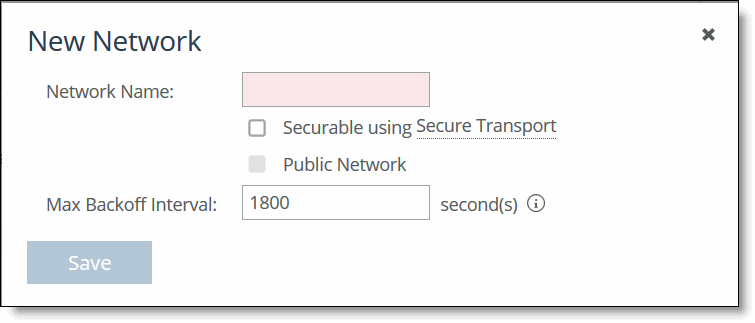
– Network Name - Specify the name of your network. A network represents a shared communication domain. In other words, a network is any site with uplinks to a network, and can communicate to other sites on the same network. SCC is prepopulated with two networks: MPLS and Internet.
– Securable using Secure Transport - Select this check box if you want to secure data communication by enabling encryption of traffic as it traverses this WAN cloud.
– Public Network - Select this check box to specify to the SteelHead that the network is a public network. If the network is a private network, do not select the check box. If you define your network as a public network by selecting this check box, the SteelHead assumes that the traffic sent to this network traverses a device that performs NAT. The public network option only takes effect if you also configure secure transport.
– Max Backoff Interval - Specify the number of seconds of the probing frequency. This setting reduces the number of probes on links that aren’t frequently used This value indicates the maximum probing frequency if there’s no traffic detected on the path and reduces the number of probes initiated by the SteelHead. If the path experiences any traffic, the configured uplink probe frequency value is assumed (default value is 2 seconds). As traffic lessens, a gradual exponential backoff in probing frequency begins and continues until the maximum value of probing with no traffic is reached. If there’s a path failover, the probe timeout value (default of 2 seconds) is assumed.
To configure networks for the example shown in
Figure: Example network scenario, you need to configure the following networks: MPLS, VPN, and Internet.
Figure: Configured networks shows how the network table looks upon completion.
Configured networks

RiOS 9.2 and later support up to 500 configured sites as part of the overall topology.
To manually configure the SCC to manage a single site
1. Choose Manage > Topology: Sites & Networks.
2. Select Add a Site.
3. Specify the information for the site:
– Site Name - Specify a name to replace the Local site field on the SteelHead belonging to that site.
– Site Type - Used to identify the site's operational purpose and used for organizational purposes. By default, three types are constructed: Branch, Data Center, and Headquarters. To create a new site type, enter the new site type name.
– Region - Specify a region for organizational purposes. A region enables you to group appliances based on location.
– Description and Contact information - Specify optional information for site identification.
– Network Information - Specify the subnets local to this site.
– Internet Traffic - Describes how this site accesses the internet (for example: directly through a local gateway or through a backhauled connection to another site, such as a data center or hub site).
You must configure each site correctly depending on the type of deployment you’ve. If Direct-to-Internet, SCC automatically creates a rule to relay and not use a path selection rule on Internet-bound traffic from that site. Normal routing is then expected to provide access to the internet.
For sites that access the internet through a backhauled remote location, SCC prompts for that remote site. SCC uses the peer of that remote site to monitor for path availability. You can configure a path selection policy for internet-bound traffic between sites. Note that backhauled sites are considered Direct-to-Internet and we recommend that you configure them as such.
– Riverbed appliances - Specify the SteelHead local to this site, if any. The appliance must be registered (that is, added as an appliance) in SCC. This field, when selected, lists all available managed appliances to select from.
– Custom Probe Endpoint - Specify an IP address to use as the probe point for site availability. If you do not specify an IP address, the SCC automatically assigns the in-path IP addresses of the SteelHeads that are part of the specific site you’re configuring. You can enter as many IP addresses as needed.
The endpoint IP address is not required as part of the LAN-side IP addressing. An example use case for a custom probe endpoint is when you want your spoke to probe only the hub and no other spokes (that is, a true hub-and-spoke design without the need for full mesh connectivity). You can point all the spokes to probe a single IP address in the data center to ensure that no probing traverses the WAN between the spokes.
– Uplinks - Specify a new uplink.
An uplink connects a site to a network. A site can have one or more uplinks to the same network and can connect to multiple networks. If using QoS you must specify, per uplink, the bandwidth available for uploading and downloading data. The bandwidth statement serves for QoS throughput enforcement.
Uplinks are used for path selection traffic steering. You can configure uplinks manually or from a preconfigured uplink template. If the uplink you’re configuring also shares the physical interface with another uplink, you must select one as Default for inpathX_X so that this uplink is considered the default gateway for the link. This latter configuration doesn’t match a direct configuration on SteelHeads.
Configuring an IP address on the gateway IP setting enables the SteelHead to use the IP address you enter as the next hop gateway for traffic to be sent down a specified path (for path selection purposes). If you leave the field blank and enable the default for inpathX_X setting, the SteelHead uses the configured default gateway IP address of the associated in-path interface. We recommend you use the latter for parallel deployments in which the SteelHeads might share the same in-path interface slot number but with differing gateway IP addresses. Make sure to have the in-path default gateway IP address pointing to the WAN-side IP address instead of the LAN-side gateway.
In SCC 9.2 or later, you’ve the option to set a bandwidth limit on the number of probes consumed per uplink. This field sets the maximum rate limit of the probes this uplink initiates. The limit is only in the outbound direction and doesn’t enforce inbound probes. Be cautious using this setting because when you limit the throughput for probing, you essentially limit the number of probes. Limiting probes can create a longer than expected failover time.
For more information about uplinks, see the SteelHead Deployment Guide 9.0 or later and the SteelCentral Controller for SteelHead User Guide.
You can configure the primary interface as an uplink for sites that can be used in QoS (path selection doesn’t apply).
– Secure Transport Concentrator - Select the SteelHead at the site that you want to use as a secure transport concentrator, and provide the uplinks to connect to securable networks.
A secure transport concentrator serves as an appliance to provide encryption services.
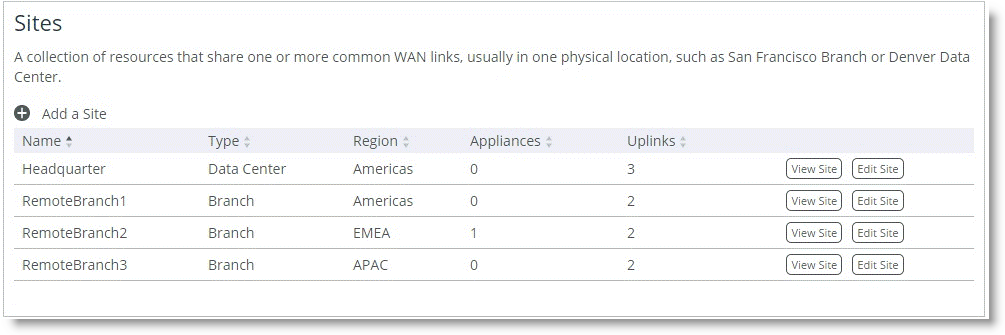
Figure: Configured sites shows how the Sites table looks upon completion for the example shown in
Figure: Example network scenario. We recommend that you start with the headquarters (data center) that’s the backhauled site, because you need to reference it for the branch sites.
Configured sites
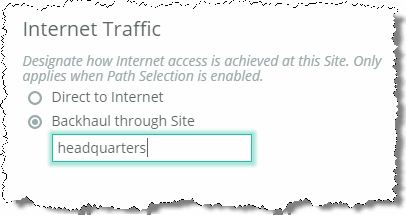
If the headquarters site is backhauling all internet traffic, you select the site as a Direct-to-Internet site. In the example shown in
Figure: Example network scenario, the headquarters is the data center in which all the servers are located. All branch offices are set to backhaul through the headquarter site.
The Direct-to-Internet designation signals to the SCC to create a top-level path selection rule to be applied at that specific site you’re configuring. This automatically generated path selection rule denotes to relay any traffic with a destination to the default 0.0.0.0/0 site, and it is placed at the start of the path selection rule set.
The rule is needed to trigger on Internet-bound traffic that doesn’t have a specific site destination, hence the 0.0.0.0/0 (catch all) site matching. This rule allows the traffic to be processed across the SteelHead without exerting any path selection logic on it. You want Internet-bound traffic to traverse to a local internet connection instead of being backhauled through the main data center access (
Figure: Data center internet traffic setting).
Data center internet traffic setting
As part of the site configuration, you can construct a site connectivity template (Manage > Topology: Sites & Networks), which you can reuse across multiple sites that share the same configuration. For the example shown in
Figure: Example network scenario, you can create a template (
Figure: Site connectivity templates) to reuse for RemoteBranch1 and RemoteBranch2 because they have a common uplink configuration.
Site connectivity templates
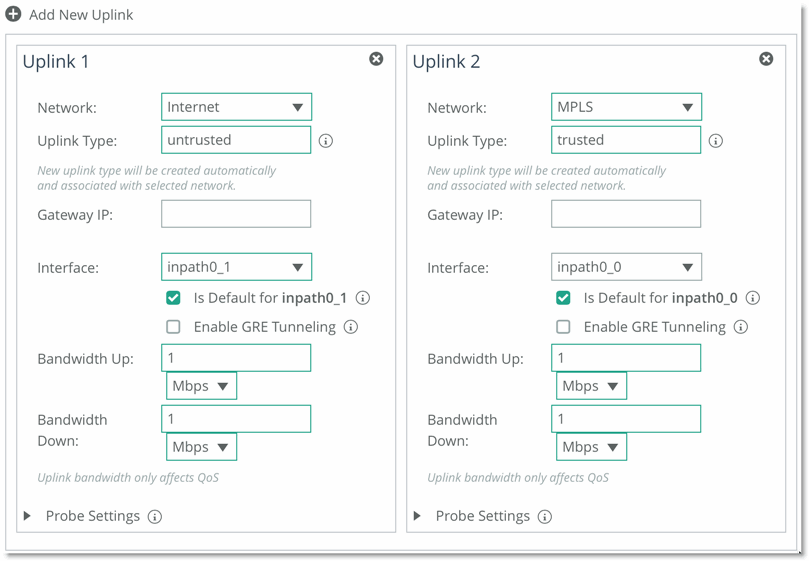
To use CSV for bulk site migration
1. Choose Manage > Topology: Appliances.
2. Click Migrate Appliances to Sites.
Download CSV
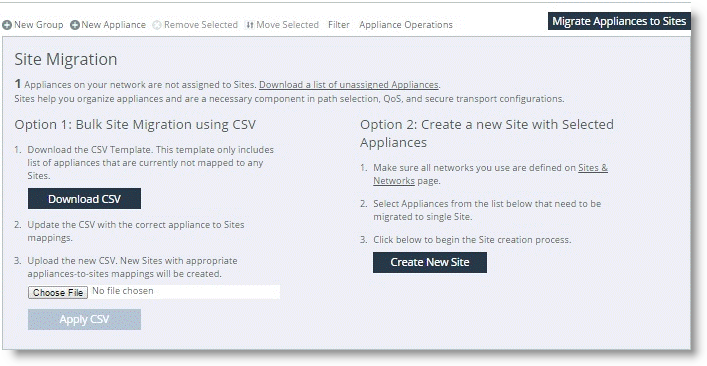
3. Click Download CSV.
5. After you’ve completed the information, upload the CSV file and click Apply CSV.
If there’s an error in the CSV file, those rows are silently ignored and the migration continues at the next correct row.
After you’ve configured the sites and network, you can complete your path selection and QoS configurations, referencing the topology you’ve just built.
Configuring path selection
The path selection configuration process involves choosing applications to steer onto uplinks as defined in sites and networks and then enabling the path selection feature. You can select the sites that receive the common set of configured path selection rules. Be aware that there can only be one global path selection to be pushed out to the SteelHeads. You can’t configure a path selection rule based on different destinations or different path selection rules to different SteelHeads.
If you’re using path selection in a release earlier than SCC 9.0, see earlier versions of the
SteelCentral Controller for SteelHead Deployment Guide on the Riverbed Support site at
https://support.riverbed.com.
After upgrading from a 9.x version of RiOS to 9.2, the first policy push from SCC can cause pre-existing path selected connections to be blocked and/or QoS shaped connections to be misclassified. For details, go to Knowledge Base article
S28250.
To configure path selection on the SCC
1. Choose Manage > Services: Path Selection.
Begin path selection setup
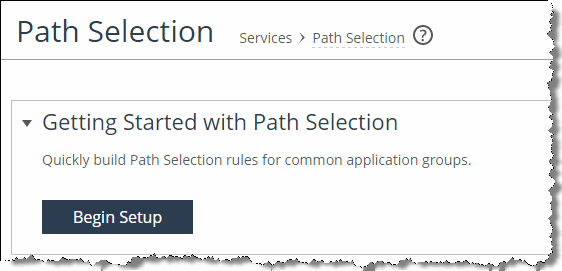
Path selection applications
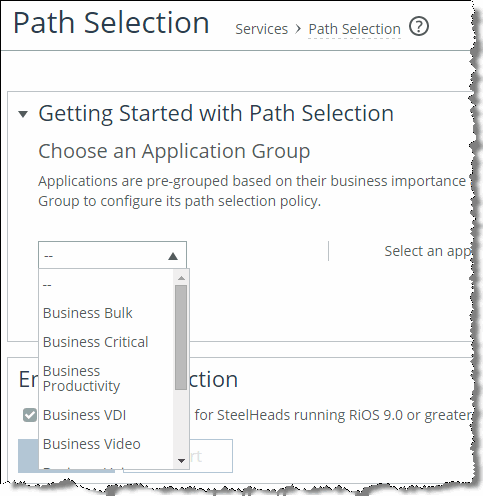
You can manipulate the order of the uplinks.
Path selection uplinks
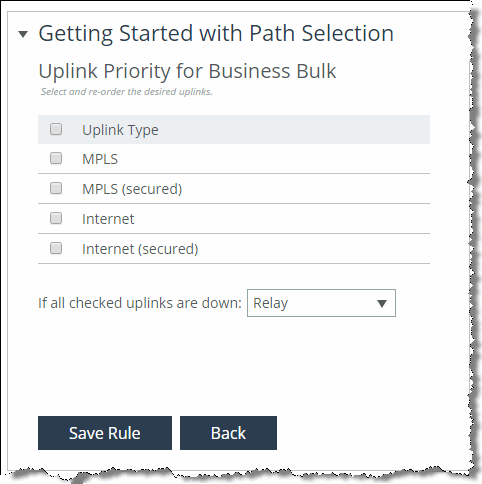
5. Click Save Rule.
6. Repeat
Step 4 and
Step 5 to add additional rules if needed.
7. In the Enable Path Selection page, select Enable Path Selection for SteelHeads running RiOS 9.0 or later and click Save.
8. Select the SteelHeads to which you want to push the path selection rules.
9. Click Include in Push.
10. Select the SteelHeads you want to include as part of the configuration push.
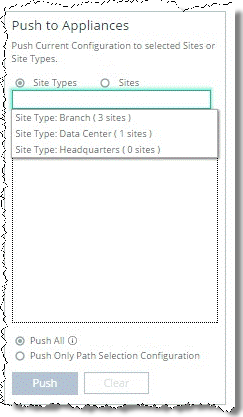
You can select SteelHeads based on site type or per site.
You’ve the option to push only path selection rules or include the sites and networks configuration. Push the entire topology (sites and networks) configuration if there was a change made to the topology or application section (
Figure: Push to appliances).
Push to appliances
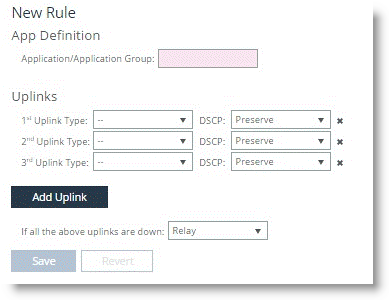
11. Optionally, to use path selection for a specific or custom application, you can select Add a Rule to create a new rule (
Figure: New rule), or select the rule itself to edit it.
You can select up to 16 uplink types for a path selection rule. SCC pushes the first three uplinks to the SteelHead that apply to that site.
New rule
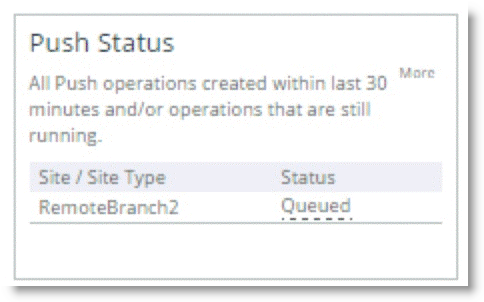
After you’ve pushed the changes, the Push Status window shows additional detail on the operation (
Figure: Push status).
Push status
Configuring global QoS
To configure QoS, you need to enable QoS as a feature and build QoS profiles based on source and destination sites. The profile includes QoS rule configurations. The final task is to choose certain SteelHeads to obtain this common configuration.
To configure global QoS on the SCC
1. Choose Manage > Services: Quality of Service.
2. Enable QoS for SteelHeads running RiOS 9.0 or later.
Global QoS configuration
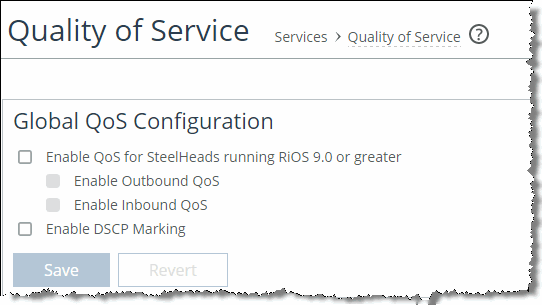
You’ve the option to override QoS interface settings on a per SteelHead basis. You might need to disable QoS configuration on an interface level because certain deployments do not support QoS across all SteelHead interfaces.
3. Select Add a QoS Profile.
The following step is specific to SCC only and is not available directly on the SteelHead.
4. When you configuring a new profile, you must indicate the source and destination sites (
Figure: New QoS profile).
You can configure the source and destination sites per site or by types of site that have already been defined in the sites and networks. You also have the option to select Any Site to indicate that the profile is applied to all known predefined sites.
This configuration example doesn’t have an equivalent configuration directly on a SteelHead. Unlike the path selection single global configuration, the SCC can deploy a different QoS configuration based on the site or the site types. A global QoS configuration is not capable of differentiating between different types of sites, requiring different QoS parameters. With these settings, SCC only applies the proper profile that matches the correct sites and site types the profile is tied to. During an SCC push, the site profile is matched to the SteelHead first, and if that profile is not present, then the site types profile is matched. If neither is present, then Any Site profile is matched.
Figure: New QoS profile indicates the source and destination sites as part of the QoS profile, and SCC then applies the proper profile based on the sites already configured in sites and networks.
New QoS profile
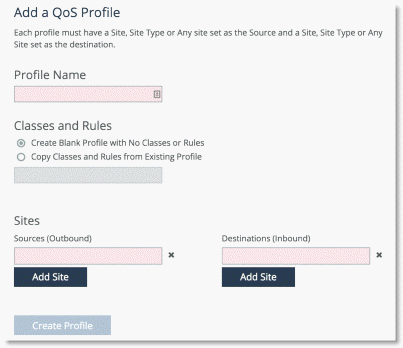
5. Choose either to start with new QoS classes and rules or copy from another existing profile. New installations generally require starting with new QoS classes. By default, SCC creates an Any Site-to-Any Site configuration; therefore, you can’t create a new profile based upon a similar site delineation, although you’re able to edit the default profile if needed.
6. Click Create Profile.
7. Select Edit Profile to manage the associated QoS classes and rules.
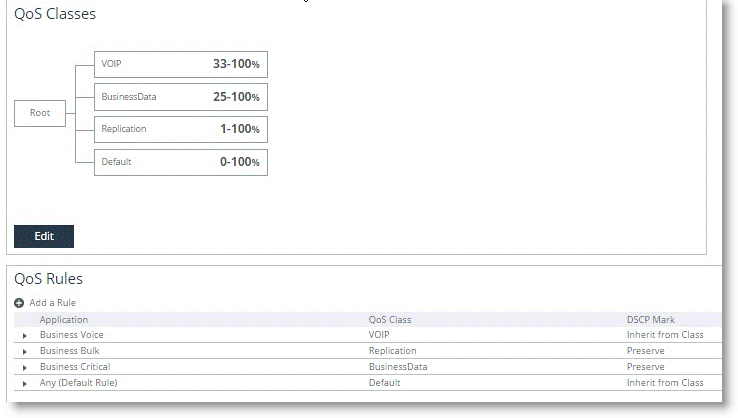
QoS classes
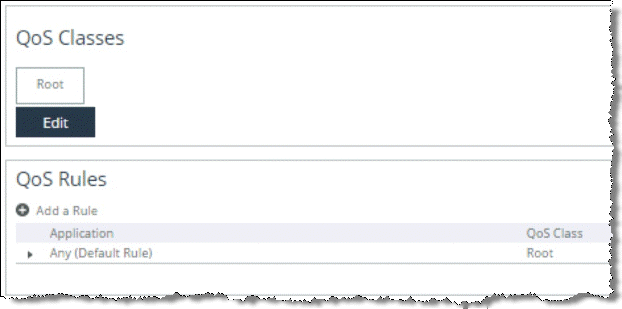
Adding a class

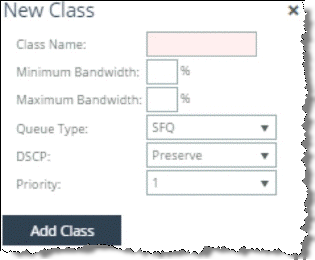
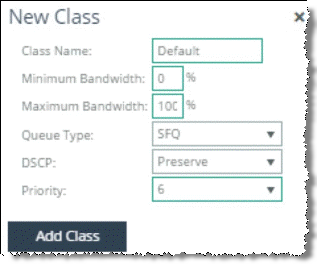
10. Specify a name and desired percentage for a minimum and maximum bandwidth range (
Figure: New class).
You can also alter the queue type, change the DSCP mark, and manipulate the priority level from 1 to 6 with 1 being highest.
New class
We recommend that you start with the default catch-all class parameters (as shown in
Figure: Default class), and then configure the other additional classes.
Default class
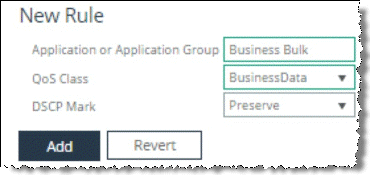
11. After you’ve created all the classes, you must create the QoS rules and associate them to the classes you’ve just created (
Figure: New rule).
QoS rules are application centric. You select an application or application group, choose the class from the list you had just completed, and optionally manipulate the DSCP marking for this traffic. The DSCP marking overrides whatever you set at the class level.
New rule
QoS class structure and rules
12. Click Include in Push.
13. Select the SteelHeads for which you want to obtain the QoS configuration based on site type or per site.
14. You’ve the option to push only QoS profiles or include the sites and networks configuration. Push the entire topology (sites and networks) and application configuration if there was a change made to the topology or application sections.
After you’ve pushed the changes, the Push Status window shows additional detail on the operation.


