Deploying NetIM in Azure and AWS
This chapter provides best practices to deploy NetIM in Microsoft Azure and Amazon Web Services (AWS). You should:
• understand the general Azure and/or AWS deployment requirements.
• deploy on geographic affinity and proximity.
• be cautious using VM snapshots.
• properly size your VMs.
• be familiar with NetIM access ports.
• plan your security strategy.
NetIM in Microsoft Azure
To deploy NetIM in Microsoft Azure, consider these recommendations and best practices.
General Azure deployment requirements
The Azure subscription you use must be capable of supporting three virtual machines (VMs) with these features:
• Four virtual CPUs
• 16 GB of RAM per VM
• 175 GB of storage per VM (75 GB for OS partition; 100 GB for Application & Persistence)
The NetIM Manager and Data Managers must have:
• Enterprise-class high-performance storage (Premium SSD, Standard/General Purpose SSD)
• Sustained throughput per physical host: 8,000 IOPS / 800 MBps
• Average Response Time: 2 to 4 ms
The NetIM Workers and NetIM Core must have:
• Enterprise-class storage (Standard/General Purpose SSD, SSD Accelerated)
• Sustained throughput per physical host: 6,000 IOPS / 600 MBps
• Average Response Time: 3 to 5 ms
The IP addresses are assigned by Azure and should not be changed.
In versions 2.5.0 and earlier, NetIM internal uses IPv4 addresses in these subnets:
• 10.255.0.0/16
• 10.50.0.0/16
• 10.60.0.0/16
• 172.17.0.0/16
• 172.18.0.0/16
In versions 2.5.1 and later (see
NetIM 2.5.1 Release Notes), the range of NetIM default IP addresses is:
• bridge: 198.18.0.0/18
• docker_gwbridge: 198.18.64.0/18
• ingress: 198.18.128.0/18
• default_primary-network: 198.18.192.0/18
• default_agent-network: 198.19.0.0/18
During setup, NetIM modifies subnet usage if it detects one of the above subnets is or may be in use in your network. NetIM setup’s Advanced Docker configuration step allows you to view and manually select alternative subnets. Subnets used by NetIM internal should not be routable subnets in your enterprise network.
The Network Time Protocol Server is required for time-synchronization between components.
The supported web browsers are:
• Chrome 90 (and later)
• Firefox 90 (and later)
• Edge 90 (and later)
• Safari 13 (and later)
Deploy on the same Microsoft Azure region
All virtual infrastructure on which NetIM is deployed must be in the same Azure region.
VM snapshots use and limitations
VM snapshots are not supported while the NetIM services are running.
System requirements (sizing)
Actual deployment sizing requirements depend on your licensed polling limits. To select the compute capacity (CPUs), memory, and storage to deploy NetIM, check the Alluvio NetIM System and Deployment Requirements Guide.
Access to ports
NetIM requires different ports open to communicate in your network. Check the ports table and its function in the Alluvio NetIM Virtual Edition AZURE Installation Guide.
Before you begin
Each Azure package (one for Microservices, one for Core) is a zip file that comes with a deploy.bat file that deploys VMs without manually uploading VHD files to the Azure storage account and creates VMs in the Microsoft Azure.
1. Ensure that you have read the “General Azure deployment requirements” section above and determined the characteristics and scenarios for your NetIM deployment on Azure.
2. Download and install the Windows version of
Azure CLI (version 2.3.1 or later) and
AzCopy (version 10.3.4 or later) from Microsoft's website.
3. Download the NetIM Azure installation zip files—one for Microservices and the other for Core —from the Support site.
4. Extract the Core and Microservices zip files into a directory structure like this:
NetIM Azure Deployment > <NetIM-version> > Core
NetIM Azure Deployment > <NetIM-version> > Microservices
5. Add azcopy.exe to the path environment variable or copy azcopy.exe to the Core and Microservices directories.
Overview of the Azure deployment
To deploy NetIM on Azure, you run the deploy.bat file for NetIM Microservices and Core, which creates:
• a single NetIM Manager from the microservices VHD file.
• one or more NetIM Workers from the microservices VHD file.
• zero or more NetIM Data Managers from the microservices VHD file.
• a single NetIM Core from the netim_core VHD file.
Once all VMs are running on Azure, you then use SSH, putty, or WINSCP to log in to the VMs and complete the initial configuration using the NetIM setup wizard, which starts automatically once you log in.
Running the deploy.bat file
For detailed steps to run the deploy.bat file, see the Alluvio NetIM Virtual Edition AZURE Installation Guide.
Configuring NetIM in Microsoft Azure
The initial configuration sets up the NetIM components such that they are associated and can communicate with each other. You perform this configuration through the Azure console. After configuration and startup of all NetIM components, the NetIM web UI is accessible by a web browser for licensing.
Find detailed configuration steps in the Alluvio NetIM Virtual Edition AZURE Installation Guide. These steps include:
• Setting up the NetIM Manager, Data-Manager, Workers, Swarm, and Core
• Performing post deployment VM adjustments for scalability
• Scaling NetIM with additional Data Managers
• Troubleshooting the deployment
NetIM in AWS
Native Amazon Web Services (AWS) Amazon Machine Images (AMIs) are available for deploying NetIM in AWS. Contact Riverbed Product Management for fulfillment by emailing to sc-netimcloud-setup@riverbed.com.
General AWS deployment requirements
The AWS subscription you use must be capable of supporting virtual machines with these types:
• Instance type
– Refer to the NetIM Deployment Guidelines table in Alluvio NetIM System and Deployment Requirements Guide for the appropriate number of vCPUs and memory size.
• Volume type
– We recommend General Purpose SSD (gp2) or Provisioned IOPS SSD (io1). See
AWS Volume Types for all volume types.
– Refer to the NetIM Deployment Guidelines table in Alluvio NetIM System and Deployment Requirements Guide for the required volume sizes.
Storage optimized instance types, such as the i3 series, cannot be used as-is; additional configuration is required post-installation. With storage-optimized instance types, high-performance volumes are attached in addition to the regular EBS volume for root and data1. Without post-deployment and manual modifications, NetIM does not take advantage of the high-performance volumes. If you plan to use storage-optimized instance types, you must follow additional deployment instructions.
Default IP addresses
In versions 2.5.0 and earlier, NetIM uses IPv4 addresses in these subnets:
• 10.255.0.0/16
• 10.50.0.0/16
• 10.60.0.0/16
• 172.17.0.0/16
• 172.18.0.0/16
In versions 2.5.0 and earlier (see
NetIM 2.5.1 Release Notes), the range of NetIM default IP addresses is:
• bridge: 198.18.0.0/18
• docker_gwbridge: 198.18.64.0/18
• ingress: 198.18.128.0/18
• default_primary-network: 198.18.192.0/18
• default_agent-network: 198.19.0.0/18
During setup, NetIM modifies subnet usage if it suspects or detects one of the above subnets is in use in your network. NetIM setup’s Advanced Docker configuration step allows you to view and manually select alternative subnets. Subnets used by NetIM internal should not be routable subnets in your enterprise network.
If security policies are not in place for NetIM to discover the above networks while the NetIM Manager is being configured, NetIM does not know to change the subnets it uses internally. This can result in devices being unreachable later. In this case, the advanced configuration must be used to manually change the internal subnets.
Network Time Protocol Server in AWS
The Network Time Protocol Server is required for time-synchronization between all NetIM components. This is required while installing each component, so do not begin installation without one of these options:
• Option 1: Use your own installed NTP server within, or external to, your AWS instance. In this case, you have an appropriate and functioning installed NTP server and appropriate security policy rights for all virtual appliances of NetIM to access it.
• Option 2: Use the AWS Time Sync Service. This is a service within the AWS infrastructure itself and is available from all Virtual Private Cloud (VPC) domains. Security policies may be required to exit your subnet to gain access to the AWS Time Sync Service with the IP address 169.254.169.123. Further information is available at
Keeping Time With Amazon Time Sync Service.
Supported web browsers
The supported web browsers are:
• Chrome 90 (and later)
• Firefox 90 (and later)
• Edge 90 (and later)
• Safari 13 (and later)
VM snapshots use and limitations
VM snapshots are not supported while the NetIM services are running in any circumstance.
System requirements (sizing)
Actual deployment sizing requirements depend on your licensed polling limits. To select the compute capacity (CPUs), memory, and storage to deploy NetIM, check the Alluvio NetIM System and Deployment Requirements Guide.
Access to ports
NetIM requires different ports open to communicate in your network. Check the ports table and its function in the Alluvio NetIM System and Deployment Requirements Guide.
Security policies within the installation subnet
AWS assumes a zero-trust stance at the initialization of a VPC domain. During and after the installation of NetIM, the individual VMs need to communicate with each other to build the required associations and normal operation. Several ports for these conversations can be found in the Alluvio NetIM System and Deployment Requirements Guide. IP addresses are assigned by AWS during the initialization of the AMI file for each VM.
We recommend two options to define security policies within the installation subnet:
• Option 1
– AWS assumes a non-zero-trust stance at the initialization of a VPC domain.
– All devices within the subnet can communicate to any other IP within the subnet. In this case, the subnet should be small enough to contain the NetIM devices and no more.
– Sizing consideration should be given to growth possibilities as well.
– Since no traffic can reach the NetIM devices from the outside without passing through the security policies from outside the subnet, it is safe to allow all devices within the subnet to communicate with any other device in the subnet. This is, however, only true when the subnet contains no other devices and is isolated from other subnets within the security policy.
If you use Alluvio NetProfiler, you can place NetProfiler within this subnet as the NetIM and NetProfiler work together. Your company’s requirements for NIST Zero Trust Architecture must be considered here.
• Option 2
– All items within the VPC domain are zero trust.
– Security policies must be added for each IP address within a given subnet to communicate in both directions with the other IP addresses in the same subnet.
– If using this method to maintain zero trust within the subnet, refer to the ports list requirements in the “Access to ports” section above. After the NetIM VMs are running, before configuring them you have access to the IP addresses, and rules for each one can be added. This requires adding security policies, sometimes several at a time, as each IP becomes available.
– If you are building a larger subnet and combining tools from other brands, you must ensure the subnet does not become so large that the number of allowed rules in a security policy is exceeded.
Security policies to and from outside of the installation subnet
Review the inbound/outbound ports required for access to the NetIM service as well as the need for NetIM Core and Workers to access devices outside of the installed subnet. See
Access to ports.Essentially, you must be able to access NetIM Core via port 443 for day-to-day use and port 22 for SSH administrative and maintenance purposes. All other NetIM components (for example, Manager, Workers) require port 22 access as well. At a minimum, these ports are required to complete installation. Other ports are required depending on the intended purpose of NetIM in this installation.
Geographic affinity and proximity
All virtual infrastructure on which NetIM is deployed must be in the same AWS region and should be within the same subnet within that region. Proximity helps to minimize latency between NetIM components. Affinity is required if moving from one region to another such that all NetIM VMs move together.
Overview of AWS deployment
Earlier, your account team requested certain information, including:
• Customer name
• AWS account ID
• AWS region
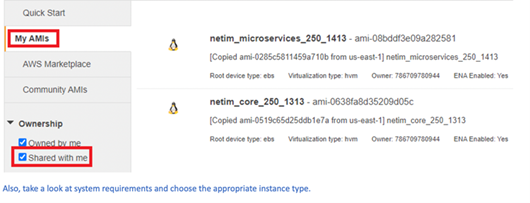
When licenses are ready, the AMI files are deployed to your AWS Region such that they can be found in the “My AMIs” section under quick start as “shared with me.” You also receive a license key request after the installation below is complete.
Shared NetIM AMI files in Amazon Portal
Deploying NetIM on AWS
1. Create a single NetIM Manager from the microservices AMI file.
2. Create one or more NetIM Workers from the microservices AMI file.
3. Create zero or more NetIM Data Managers from the microservices AMI file.
4. Create a single NetIM Core from the netim_core AMI file.
Once all VMs are running on AWS, you now have access to the IPs for required security policies. You then use SSH to log in to the VMs, starting with the Manager, then Workers, and finally Core, to complete the initial configuration using the NetIM setup wizard, which starts automatically once you log in.
The default credentials are:
login: netimadmin
password: netimadmin
You are asked first to assign a role; the Manager is always first, and the Data Manager or Workers later for all VMs built from the Micro Services AMI. Then you are prompted for the IP addresses of all the NetIM components. You need to create new passwords and set up the time zone. By configuring the NetIM Manager, you can change subnets for internal communications. See the “Default IP addresses” section above.
The NetIM Manager must complete before moving on to the NetIM Workers, which must complete before the NetIM Core. Each wizard directs you to the next step when needed.
Lastly, you log in to NetIM with a secure web browser. Point your browser to:
https://<netim-core-hostname or IP address>:8543
The system prompts you to add the NetIM license for which you receive instructions from Riverbed with the license keys.