Rack Mounting the SteelFusion Edge Appliances
This chapter describes how to install SteelFusion Edge appliances in a rack. It includes the following sections:
Use only the racks that ship with this appliance. Use of other racks is not supported.
Rack installation safety guidelines
When installing the appliance in a rack, follow these guidelines:
• Do not block or cover the openings to the appliance.
• Never push objects of any kind through openings in the appliance. Dangerous voltages might be present.
• Do not use conductive foreign objects; they can produce a short circuit and cause fire, electric shock, or damage to your appliance.
• Lift appliances using both hands and with your knees bent.
• Observe local occupational health and safety requirements and guidelines for manual materials handling.
• Do not attempt to move a rack by yourself; a minimum of two people is needed to move a rack.
• Do not attempt to move a rack on an incline that is greater than 10 degrees from the horizontal.
• Installing components in a rack without the front and side stabilizers can cause the rack to tip over. Always install rack stabilizers before you install components in a rack.
• Make sure the rack is properly secured to the floor or ceiling.
• Always load the rack from the bottom. Load the heaviest component in the rack first.
• Make sure racks are coupled together if it is a multiple-rack installation.
• Make sure the rack is level and stable before installing an appliance in the rack.
• Make sure the leveling jacks are extended to the floor.
• Make sure the full weight of the rack rests on the leveling jacks.
• Make sure the rack is level and stable before pulling a component out of the rack.
• Make sure only one component is extended at a time. A rack might become unstable if more than one component is extended.
• Ensure that there is adequate airflow in the rack. Improper installation or restricted airflow can damage the appliance.
• The rack cannot have solid or restricted airflow doors. You must use a mesh door on the front and back of the rack or remove the doors to ensure adequate airflow to the appliance.
• The rack width and depth must allow for proper serviceability and cable management.
• Ensure that there is adequate airflow in the rack. Improper installation or restricted airflow can damage the appliance.
• Make sure the product is properly mated with the rails. Products that are improperly mated with the rails might be unstable.
• Verify that the AC power supply branch circuit that provides power to the rack is not overloaded. Overload power increases the risk of personal injury, fire, or damage to the appliance. The total rack load should not exceed 80 percent of the branch circuit rating. Consult the electrical authority having jurisdiction over your facility wiring and installation requirements.
• The appliances produce front-to-back cooling airflow that requires an unobstructed airflow to the fan housing. Do not mount the appliance near other electronic devices that produce back-to-front airflow.
• This appliance is for use only in a machine room or IT room.
• Make sure that the area in which you install the appliance is properly ventilated and climate controlled.
• Ensure the voltage and frequency of your power source match the voltage and frequency inscribed on the electrical rating label of the appliance.
• Do not install the appliance in or near a plenum, air duct, radiator, or heat register.
• Never use the appliance in a wet location.
For detailed safety information, see the Safety and Compliance Guide.
Required tools and equipment
You need the following tools and equipment to mount the appliance in a rack:
• A standard server-type rack
• A standard Phillips screwdriver
• The enclosed rack mount kit that ships with your appliance
Mounting the SteelFusion Edge appliances using the extendable rail
This section describes how to mount an appliance using the extendable rail (RMK-2-EXPRAIL) and contains the following procedures:
Setting up the rails
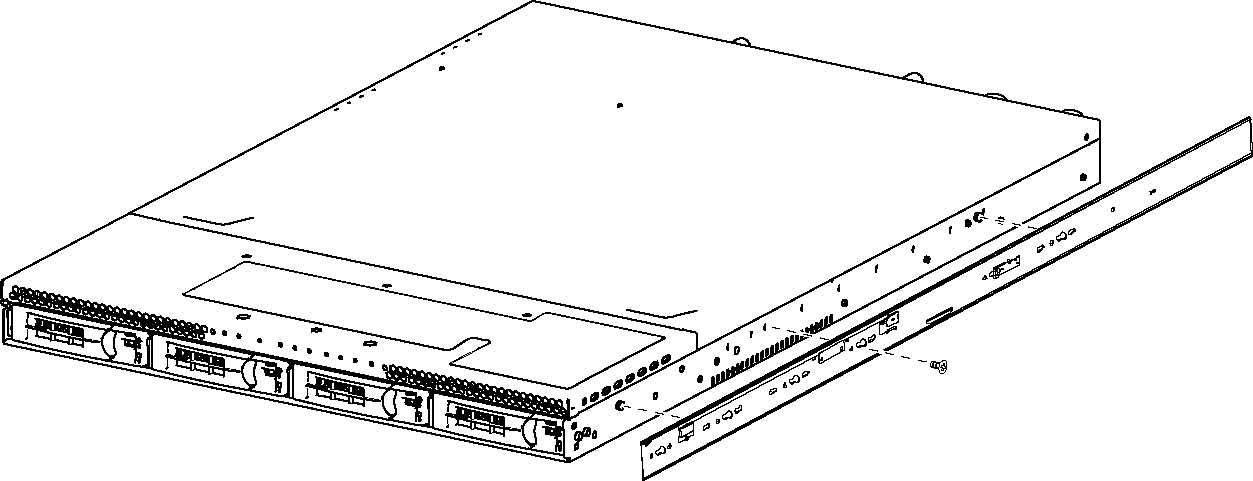
To set up the rails, attach the inner rails to the appliance. (See
Figure: Attaching the inner rails.)
Figure: Attaching the inner rails
Mounting the appliance
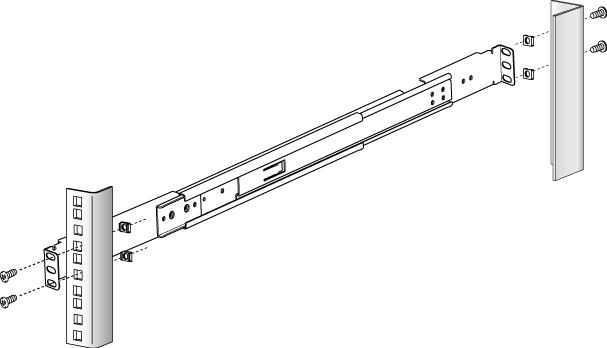
After you have adjusted the length of the outer rails to fit your rack posts, you are ready to install the outer rail assemblies to the rack.
Note: All 2U appliances must be mounted to a four-post rack.
Caution: 
A minimum of two people is required to move a 2U appliance. Lift the appliance using both hands and with your knees bent.
To mount the appliance to a four-post rack
Figure: Installing the outer rails to the rack
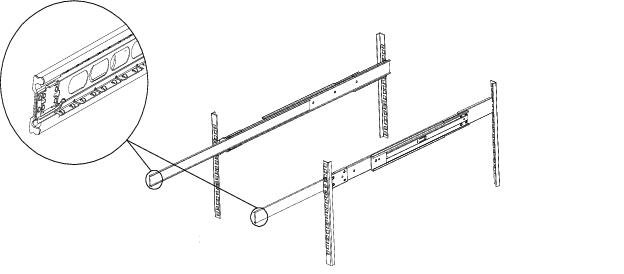
Caution: The ball bearing retainer on the outer rail must be returned to the forward position to connect with the inner rail on the chassis. The bearings might fall off if the ball bearing retainer is not pushed forward.
Figure: Ensuring the ball bearing retainer is locked
3. With two people lifting the appliance, gently slide the inner rails into the outer rails until you reach a hard stop.
Figure: Sliding the appliance into the rack and pulling the inner rail release tab
Operating the rails
To operate the rails, follow these guidelines:
• To pull the appliance from the rack without removing it, pull it until it stops.
• To remove the appliance from the rack, push the release tab and remove the appliance.
Caution: Use caution when the appliance is mounted in a rack and the outer rails are extended; do not place objects or additional weight on the appliance.
Center mounting 1U appliances in a two-post rack
You can mount 1U appliances in a two-post rack in the center-mount position.
Note: 2U appliances cannot be mounted to a two-post rack.
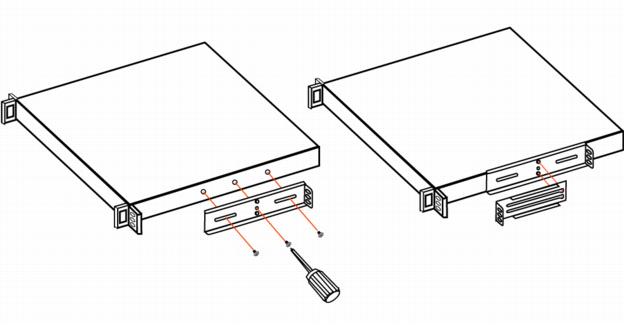
To center mount appliances in a two-post rack
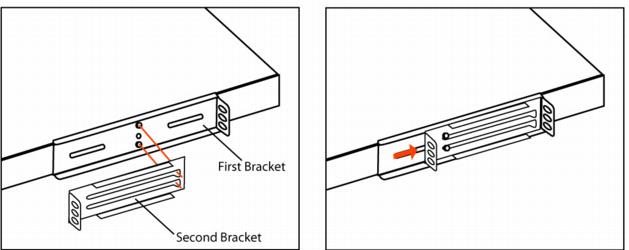
Figure: Attaching two-post center-mount brackets
2. Slide the second bracket onto the pegs of the first bracket by placing the second bracket over the first bracket at the widest opening and then slide toward the narrower part to secure. (See
Figure: Attaching second bracket to first bracket.)
Figure: Attaching second bracket to first bracket
3. Repeat Steps 1 and 2 on the other side of the chassis.
4. Center mount the appliance in a two-post rack.
Connecting the SteelFusion Edge to your network
Use standard Ethernet straight-through and crossover cables to connect to your network in an in-path configuration. Make sure that you use the correct cables to establish your network connections:
• Straight-through cables - Typically used for RiOS management or data ports. The straight-though cables are used to connect the primary, LAN, and AUX ports as well as the hypervisor node interfaces for branch hypervisor connectivity.
• Crossover cable - Connects the WAN port on the appliance to the WAN router.
To connect the appliance to your network
Figure: Connecting the primary port to the LAN switch
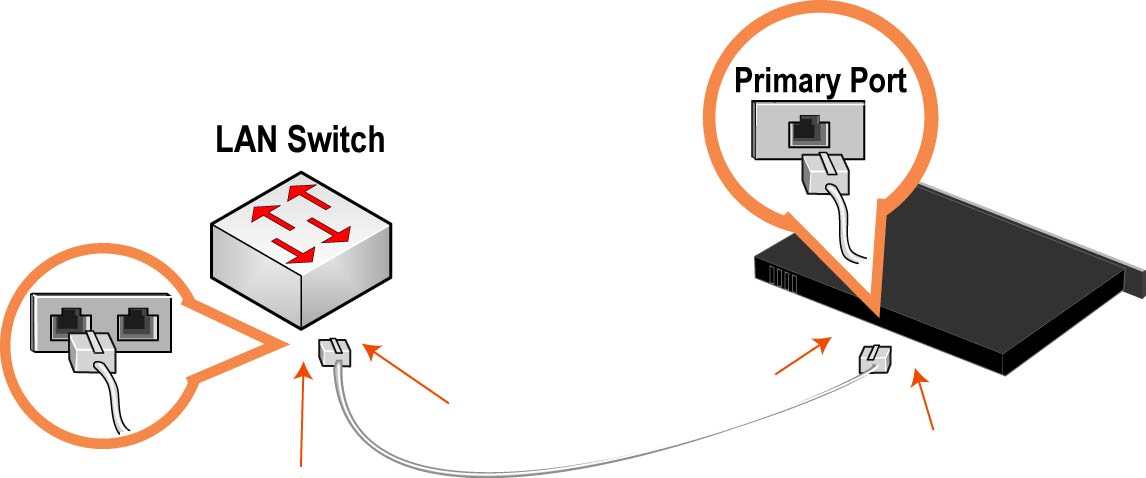
For more information on how to connect the appliance to your network, refer to the SteelFusion Edge Installation and Configuration Guide.
Powering on the system
This section describes how to connect the AC power and how to power on the system.
Caution: In European electrical environments, you must ground (earth) the Green/Yellow tab on the power cord or risk electrical shock.
To power on the appliance
1. Remove the foam piece that sits between the bezel and the hard drives.
Caution: Failure to remove this piece on newly shipped appliances will block proper airflow through the unit and cause overheating.
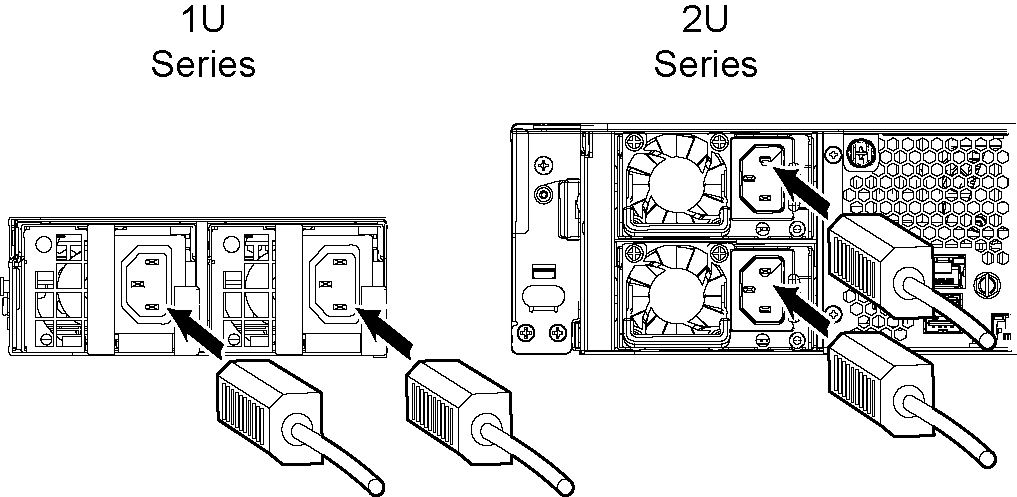
2. Plug the AC power cord into the SteelFusion Edge appliance.
Note: If your appliance has multiple power supplies, you must plug in all the power cords.
Figure: Connecting the AC power
3. Plug the AC power cord into an uninterrupted AC power source.