Using Discovery Agent
This chapter describes how to use the Discovery Agent, which is an alternate method for deploying SteelHead-v. It includes these sections:
Overview of the Discovery Agent
The Discovery Agent is a software package that you download from the Riverbed Support site and install on the client or server that is optimized.
In a server-side Discovery Agent deployment, when a client SteelHead connects to a server with Discovery Agent installed, the Discovery Agent redirects any autodiscovery probe to a configured SteelHead-v from its list. The client SteelHead then discovers and starts peering and optimizing with the server-side SteelHead-v. After the autodiscovery process completes, the connection is terminated locally between the Discovery Agent and server-side SteelHead without going over the WAN.
In a client-side Discovery Agent deployment, when a client with Discovery Agent installed connects to a server, the Discovery Agent redirects any TCP connection to a configured SteelHead-v from its list. The client-side SteelHead-v next sends an autodiscovery probe, discovers the remote SteelHead, and starts peering and optimizing with it.
The Discovery Agent provides these features:
• Optimization - Enables you to intercept (and optimize) inbound and outbound connections.
• Autodiscovery - Enables configured SteelHeads to automatically find one another. Autodiscovery relieves you of having to manually configure the SteelHeads with fixed target rules to find the remote SteelHead-v appliances and to optimize traffic through them.
• Transparency - Enables the application on the server to continue to send and receive data from the same client IP address (as if there was no SteelHead) so that logging, reporting, or any feature that uses the IP address continues to work the same as before you configured the SteelHead.
• Failure detection - Detects SteelHead-v failures and connectivity issues to the SteelHead-v so that traffic can be passed through instead of being redirected to the failed SteelHead-v.
• Load balancing - Redirects all traffic to the selected SteelHead. If there are multiple SteelHeads in the group, the Discovery Agent uses the round-robin or priority load-balancing method to select a SteelHead. When the primary SteelHead is unavailable or overloaded, it redirects all new connections to the next SteelHead on the list.
Note: In a Discovery Agent deployment, you cannot configure WAN transparency for the connection between SteelHeads.
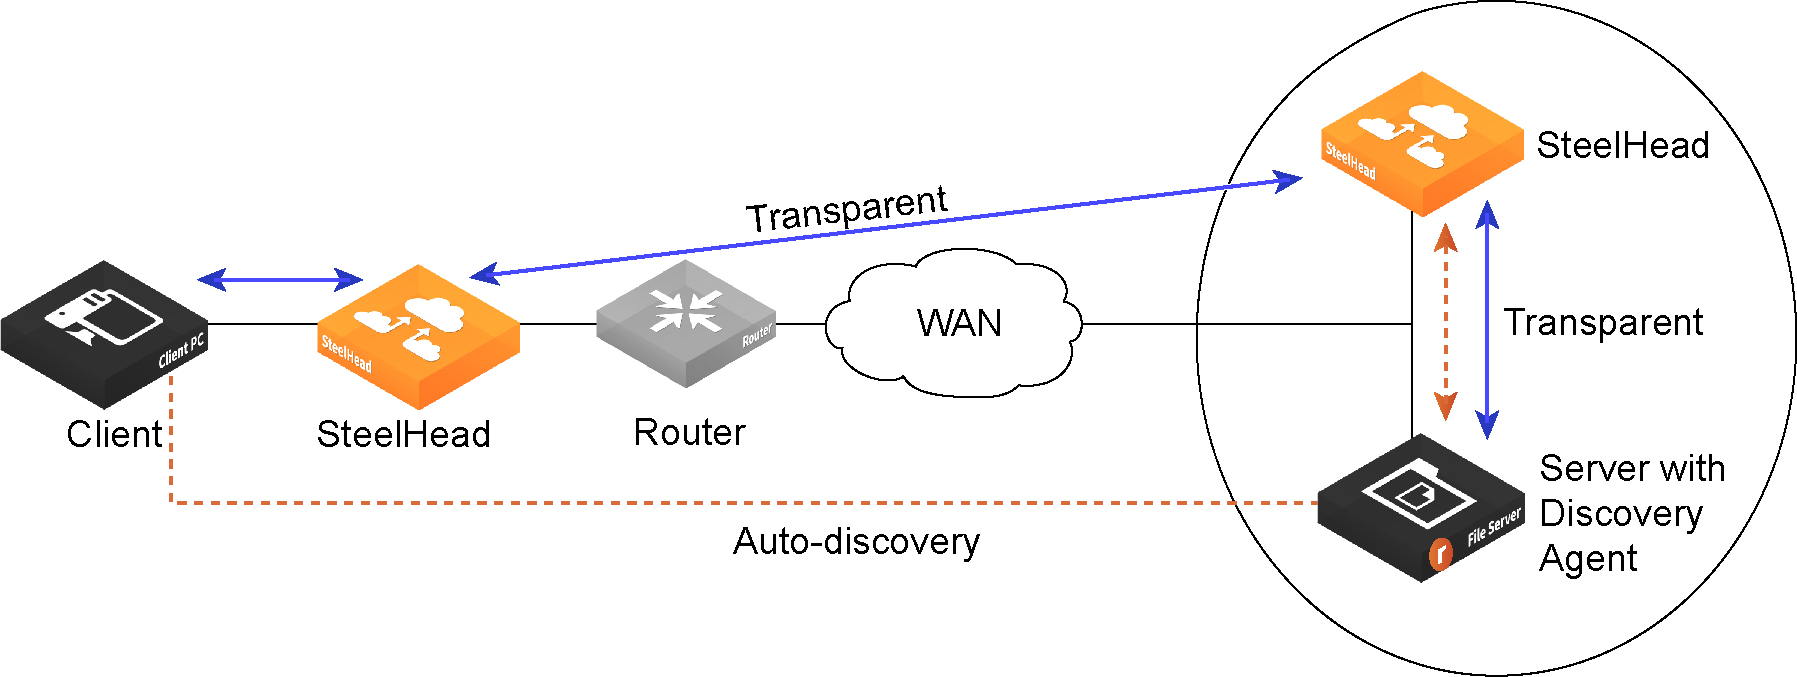
Figure: Discovery Agent server-side deployment shows a Discovery Agent deployment on the server side.
Figure: Discovery Agent server-side deployment
In
Figure: Discovery Agent server-side deployment, the Discovery Agent enables the client-side SteelHead and the server-side SteelHead to discover each other. When the client connects to the server, the client‑side SteelHead sends an autodiscovery probe to the server. The Discovery Agent redirects the autodiscovery probe to
the SteelHead-v. The SteelHead-v sends an autodiscovery probe response back to the Discovery Agent, which sends it to the client-side SteelHead. After the client-side SteelHead receives the probe response, it starts peering with the SteelHead-v to intercept and optimize the connection from the client to the server.
Discovery agent requirements
The Discovery Agent requires this hardware:
• Disk - At least 160 MB on Windows and 120 MB on Linux. This space is mainly used to store binary files, configuration files, and log files.
• RAM - At least 110 MB for 20,000 optimized connections (the current limit).
• CPU - Depends on the throughput. For example, the Discovery Agent uses 5 to 10 percent of a 2.66-GHz CPU to process 1 Gbps of optimized traffic.
Installing the Discovery Agent on a Windows server
To install the Discovery Agent on a Windows server, you first download the package from the Riverbed Support website.
The Discovery Agent supports these Windows servers:
• Windows Server 2012 R2 - 64 bit
• Windows Server 2008 R2 - 32 bit and 64 bit
• Windows Server 2008 - 32 bit and 64 bit
• Windows Server 2003 R2 - 32 bit and 64 bit
• Windows client Windows 7 - 32 bit and 64 bit
Note: Riverbed does not support the SteelHead Mobile Client and the Discovery Agent on the same Windows computer.
To install the Discovery Agent on a Windows server
1. From the Riverbed Support website, click Software & Documentation.
2. In the Search text box, enter Discovery Agent and click the arrow icon.
3. Click the link for the Discovery Agent package you want and save the file.
4. Log in to the Windows server and double-click the executable file to display the Discovery Agent Installation Wizard.
5. Click Next to display the Discovery Agent Installation Warning message.
When you install, uninstall, or upgrade the Discovery Agent on a Windows server, there is a temporary loss of network connectivity. You should save your work and close any Windows program that might be affected by the disruption before you continue.
6. Click Cancel to quit the program, or click Next to continue with the installation.
7. Read and accept the license agreement and click Next to display the Riverbed Discovery Agent Configuration page.
8. Select the Other cloud type from the drop-down list.
9. Select the target folder for the installation and click Install.
10. Click Finish to complete the install process.
The Discovery Agent starts automatically and the Riverbed icon appears on the system tray. If the icon appears gray, it signifies that the Discovery Agent service is just starting or has failed to start. If the Discovery Agent does not start, reboot the system and verify that the Discovery Agent starts.
Installing the Discovery Agent on a Linux server
To install the Discovery Agent on a Linux server, you first download the package.
The Discovery Agent supports the follows Linux servers:
• Centos 5.0, 5.2, 5.3, and 5.4 - 32 bit and 64 bit
• Linux Ubuntu 8.04, 10.04, and 12.0.4 - 32 bit and 64 bit
• Linux Fedora (Fedora core 8) - 32 bit and 64 bit
• RedHat Linux (RHEL) 7
To install the Discovery Agent on a Linux server
1. From the Riverbed Support website, click Software & Documentation.
2. In the Search text box, enter Discovery Agent and click the arrow icon.
3. Click the link for the Discovery Agent package you want and save the file.
4. Copy the downloaded tar file (Discovery Agent package) to the Linux server and log in to the server as the root user.
5. Uncompress the tar file and extract its contents by entering this command on the Linux command line:
# tar zxvf <filename>.tar.gz
6. Follow the steps in the README file to install and configure the Discovery Agent on the Linux server.
Configuring the Discovery Agent
The process for configuring the Discovery Agent differs depending on whether you are installing on Linux or Windows. In both cases, however, you deploy in manual mode.
Configuring the Discovery Agent on a Linux server
Follow the instructions in the Linux Discovery Agent README file, obtained during download and installation, to configure the Discovery Agent on a Linux server.
Configuring the Discovery Agent on Windows
This section describes how to perform a manual deployment on Windows.
To configure the Discovery Agent
1. Log in to your Windows server and double-click the Riverbed Discovery Agent icon in the system tray.
2. Select the Settings tab in the Discovery Agent to display the Settings page.
Figure: Discovery Agent settings page

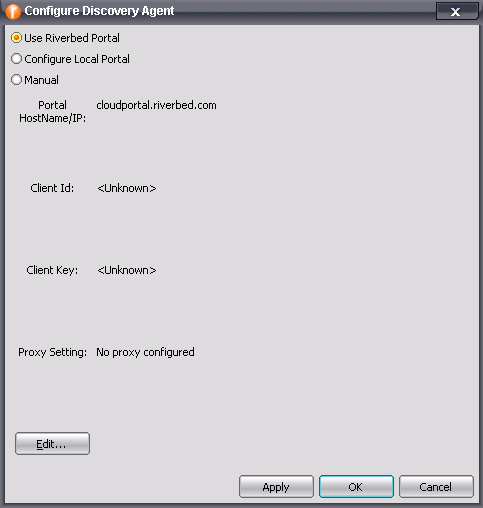
3. Click Configure to display the Configure Discovery Agent page.
Figure: Configure Discovery Agent - Use Riverbed Portal
4. Select Manual to display the Manual Configuration page.
Figure: Configure Discovery Agent - Manual
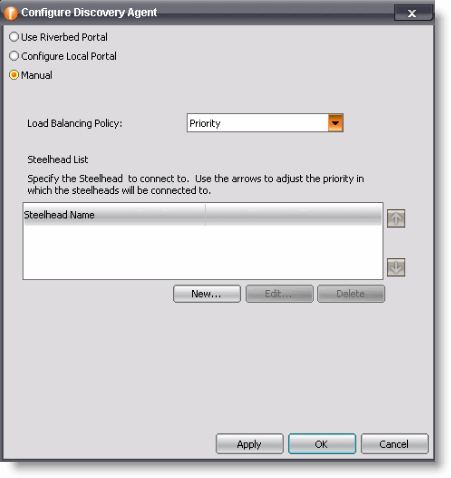
5. Select one of these load-balancing policies from the drop-down list:
– Priority - Selects a SteelHead-v for load balancing until its connection count exceeds the maximum and then moves on to the next available SteelHead-v. When the load of the first SteelHead-v decreases below the maximum, it is available again. This is the default mode.
– Round Robin - Selects a SteelHead-v and then another (using the round-robin method) for load balancing. Use the round robin mode only if the connection rate is high and you need more than one SteelHead-v to handle the load.
6. Click New to add a new SteelHead-v to connect to the Discovery Agent.
Figure: Add a new SteelHead
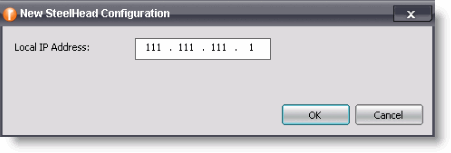
7. Enter the IP address of the SteelHead-v and click OK.
The SteelHead-v is added to the SteelHead List in the Configuration Dialog box.
Use the arrows to adjust the priority in which the Discovery Agent connects to the SteelHead-v.
Configuring transparency modes
You configure the Discovery Agent transparency modes on the SteelHead. You must use this CLI command:
# in-path agent-intercept server-nat-mode ?
For information, see the Riverbed Command-Line Interface Reference Manual.
The Discovery Agent provides three transparency modes for connections between the client/server and the corresponding SteelHead. You configure the selected transparency mode in the SteelHead-v and it is transmitted to the Discovery Agent.
The transparency mode selected does not affect packets of the connection on the network. Packets viewed on the network are still addressed between the client/server and SteelHead. However, the Discovery Agent performs NAT detection for these packets before sending them up the stack, so the transparency mode affects which IP address is visible to the application and client/server machine’s network stack.
The three modes are:
• Safe transparent - If the client is behind a NAT device, the client connection to the application server is nontransparent—the application server detects the connection as a connection from the server-side SteelHead and not the client IP address. All connections from a client that is not behind a NAT device are transparent, which means that the server sees the connections from the client IP address instead of the SteelHead-v IP address.
• Restricted transparent - All client connections are transparent with these restrictions:
– If the client connection is from a NAT network, the application server sees the private IP address of the client.
– You can use this mode only if there is no conflict between the private IP address ranges (there are no duplicate IP addresses) and ports.
This is the default mode.
• Non-transparent - All client connections are nontransparent—the application server detects the connections from the server-side SteelHead IP address and not the client IP address. We recommend that you use this mode only if you cannot use one of the other two modes.
Enabling optimization using the Discovery Agent
After you configure the Discovery Agent, connect to the SteelHead-v CLI and enter these commands to enable agent-intercept mode:
# enable
# configure terminal
# in-path agent-intercept enable
# in-path enable
Note: The optimized application server with Discovery Agent installed on it must connect to the primary interfaces on the SteelHead-v appliance.