Configuring a Riverbed NIC in ESX 4.1
The procedure for configuring bypass support for ESXi 5.0 and later is documented in the Network and Storage Card Installation Guide.
Configuring the bpvm0 interface (ESX/ESXi 4.1)
During the installation of your Riverbed NIC, you install an ESX driver of the file type .vib. Installation of the ESX driver is described in the Network and Storage Card Installation Guide. After you install the ESX driver, a network adapter device named bpvm0 appears in the vSphere client. If this device is not displayed after you install your ESX driver, reboot your machine. This device is not a real network adapter; it is used as a communication channel between the SteelHead-v guest and the ESX or ESXi host. The normal speed setting displayed for the bpvm0 adapter is 0 Half in the Network adapters tab.
To create virtual switches and port groups for the bpvm0 interface
1. In vSphere, connect to the ESX or ESXi host.
2. Select the ESX or ESXi host in the left Inventory pane.
3. Select the Configuration tab.
4. In the Hardware menu, select Network adapters.
5. In the Hardware menu, select Networking.
6. Select Add Networking in the upper right of the main pane.
7. Select the Connection Type Virtual Machine.
8. Click Next.
9. Select Create a virtual switch.
10. Select the box next to the bpvm0 network adapter.
11. Click Next.
12. Enter pg-bpvm for the name of the network label.
13. Click Next.
14. Verify that the diagram displayed in vSphere shows the pg-bpvm port group wired to the bpvm0 adapter.
15. Click Finish.
Configuring Riverbed NIC interfaces (ESX/ESXi 4.1)
Before you install SteelHead-v, you must create a separate virtual switch and port label for each interface on the Riverbed NIC.
To create virtual switches and port groups for Riverbed NICs
1. In vSphere, connect to the ESX or ESXi host.
2. Select the ESX or ESXi host in the left Inventory pane.
3. Select the Configuration tab.
4. In the Hardware menu, select Network Adapters.
In the vSphere client, the interfaces for the Riverbed NIC appear as two or four vmnic interfaces, under Intel Corporation 82575EB Gigabit Network Connection.
Figure: Interfaces in vSphere
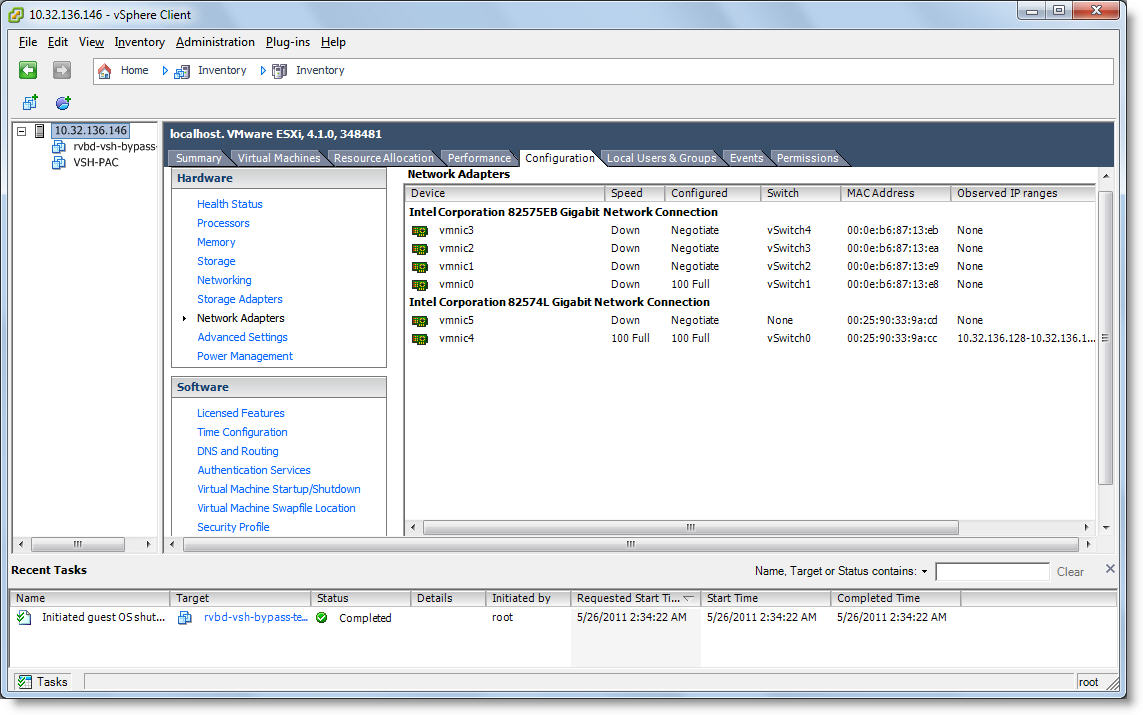
5. Under the heading “Intel Corporation 82575EB Gigabit Network Connection,” find and write down the names of the two or four vmnic adapters.
6. In the Hardware menu, select Networking.
7. Select Add Networking in the upper right of the main pane.
8. Select the Connection Type Virtual Machine.
9. Click Next.
10. Select Create a virtual switch.
11. Select the box next to the adapter with the lowest number.
Select only one of the adapters you noted in
Step 5.
12. Click Next.
13. Use this table to match your adapter to the correct network label and enter it.
ESX NIC Name | Network Label | Interface on SteelHead-v |
vmnic0 | pg-vmnic0 | wan1_0 |
vmnic1 | pg-vmnic1 | lan1_0 |
vmnic2 | pg-vmnic2 | wan0_0 |
vmnic3 | pg-vmnic3 | lan0_0 |
14. Click Next.
15. Verify that the diagram displayed in vSphere shows the correct port group wired to the adapter.
16. Click Finish.
17. On the virtual switch you just created, click Properties.
18. On the Ports tab in the Properties dialog box, select the interface.
19. Click Edit.
20. Select the Security tab.
21. In the Security tab, select Accept for Promiscuous Mode.
22. Click OK.
23. Repeat this procedure for each of the remaining three interfaces.
Note: Deploying Riverbed NICs requires some additional steps, noted in the standard installation procedure.