Setting Up and Using Accelerator for O365
This chapter describes the Riverbed Accelerator for O365 product and includes these sections:
Performing the initial setup
The initial setup is a one-time process. During this process, you set up an account on the Riverbed Cloud through Microsoft O365 and then specify your O365 region. See
About the initial setup.To perform the initial setup
1. In the Riverbed Cloud registration form, enter the email address that belongs to the administrator in your organization who will manage your Accelerator for O365.
2. Enter a domain name for your organization. This can be any arbitrary name.
3. Click Complete Signup.
Riverbed sends an email invitation to the specified address. The invitation contains a link to your Accelerator for O365.
After clicking the link, your Accelerator for O365 administrator may be prompted to create a Microsoft O365 account and grant sign-in and other permissions to Riverbed Cloud. See
About the initial setup.At first login, your administrator is prompted to specify the region that best matches your O365 location.
4. In Accelerator for O365, select Dashboard.
5. In the Initial configuration section, select your O365 region from the menu. Consult your O365 administrator if you do not know what region to select.
You cannot change the O365 region after you set it. The United States region in Accelerator for O365 covers all O365 regions within the United States, so if your organization changes your O365 region from one United States region to another, then that change will not affect your Accelerator for O365. However, if your organization changes regions from, for example, United States East to Europe, then you will need to contact Riverbed Support for help in adjusting your Accelerator for O365.
Figure 2‑1. Initial configuration
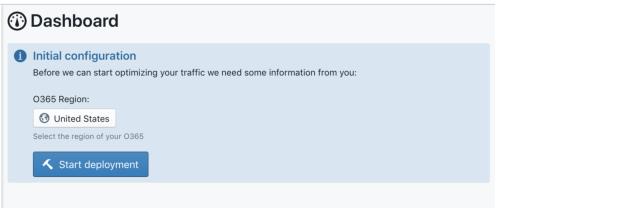
6. Click Start deployment.
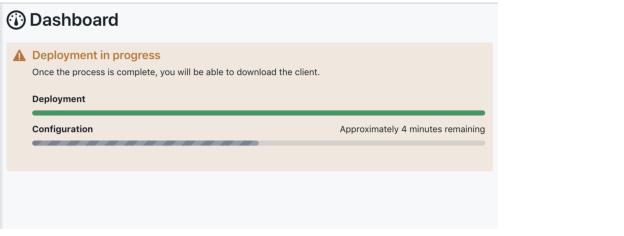
The system deploys all the resources, configuration settings, and policies required. Deployment can take several minutes.
Figure 2‑2. Deployment in progress
After the deployment is complete, you can download and distribute the client installation packages.
Distributing and installing client software on endpoint systems
Endpoint systems are your end-users’ devices such as laptops, tablets, and smart phones. Accelerator for O365 provides client software for these systems. See
About the client software for details such as endpoint system requirements, firewall settings, and compatible software.
After you complete the initial setup, you can download client installation packages.
The client installation software supports many Microsoft Windows Installer properties that you might find helpful in large, automated deployments. See Appendix: Windows Installer Properties, for details.
To download client packages
1. Log in to Accelerator for O365, and then select Client Download.
2. Click the link for the client package you want to download.
3. Use your preferred method to distribute and install the client software on your organization’s client devices.
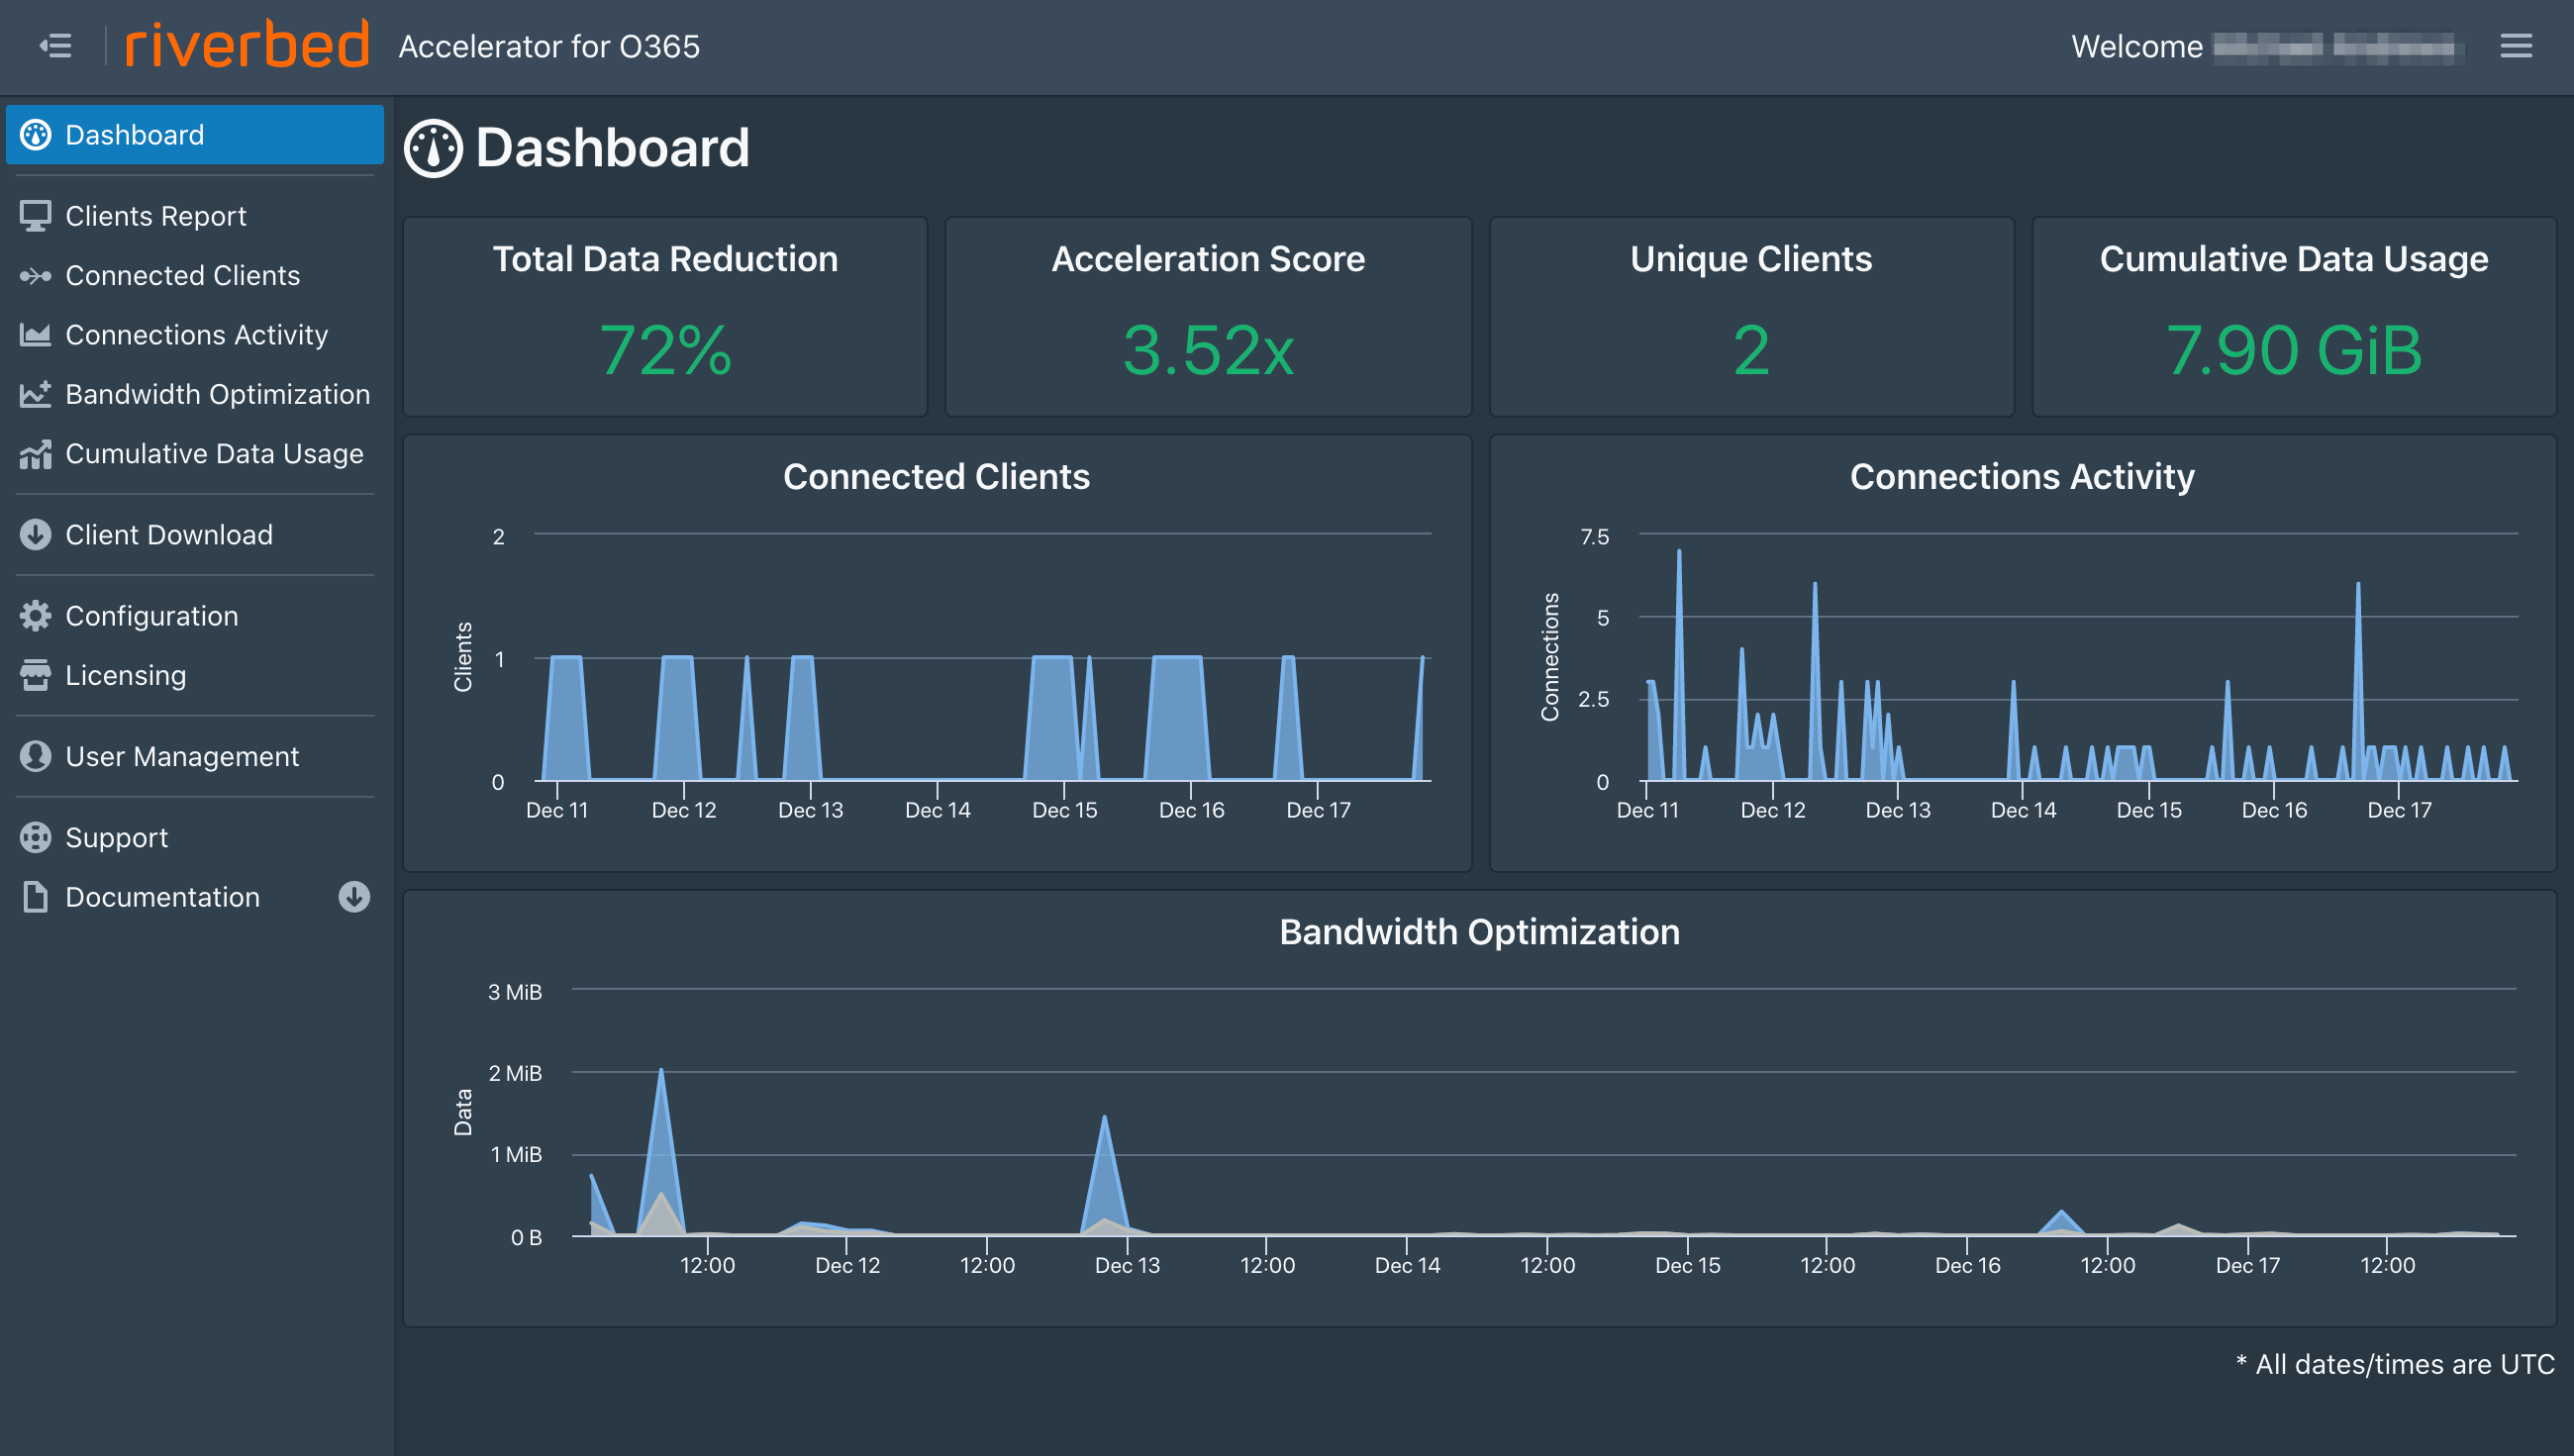
Using the dashboard
Your dashboard displays useful statistics on data usage and data reduction. From the dashboard you can also:
• view configuration details such as your O365 region, your Accelerator for O365 license, the number of seats your license provides, and the date by which you need to renew your Accelerator for O365 subscription.
• download client installation packages.
• find links to product documentation and Riverbed Support.
• change between light and dark color themes.
• collapse or expand the sidebar navigation.
• log out.
Using the toolbar
The toolbar at the top of the page contains items you can use to log out, change theme, display notifications, see your username, and show or hide the sidebar navigation.
To log out of Accelerator for O365
• Click the menu icon in the upper right corner, and then select Logout.
To change the theme color
• Click the menu icon in the upper right corner, and then select Light (or Dark) theme.
Figure 2‑3. Accelerator for O365 dashboard using the dark theme
To hide or show the sidebar
• Click the icon in the upper left corner.
Managing user accounts
If your account has full administrator privileges, you can add and edit user accounts. Each account can be assigned one of these roles:
• O365 Admin – Full access to the system. This role is the only role that can view and edit user accounts.
• O365 Write – Write access to the system. This role has the ability to edit configuration parameters, and has access to the First Time wizard.
• O365 Read – Read-only access to the system. This role has the ability to read reports and filter report data.
To access the User Management page
• Choose User Management from the navigation pane.
A list of user accounts appears. You can page through the list or adjust the number of items displayed per page by using the controls at the bottom of the page. You can also filter the list by entering a username, email address, or role in the search field at the top of the page.
Remember to click Apply to apply your filter to the list. Clear individual filters by clicking the X for the filter, or clear all filters by clicking the X to the right of the search field.
To invite a user to register their O365 account with the system
1. In the User Management page, click Invite User.
2. Enter the user’s email address, and then confirm the address.
3. Click Submit.
An invitation email is sent to the specified address. The user is added to the system after they accept the invitation.
To edit or remove a user account
In the User Management page:
• click Edit, and then select a role from the Select Role menu.
• click Remove, and then click Confirm.
Viewing reports
Your Accelerator for O365 reports provide information about your data usage, acceleration performance, and client activity. You can filter data for most reports.
Report dates and times are in Coordinated Universal Time (UTC).
To view reports
• Log in to your Accelerator for O365, and then select Dashboard or select a report from the navigation pane.
To filter report data
Select a report from the navigation pane, and then:
• click the pencil icon for the filter you want to change.
• click Add filter and select the filter you want add.
• click the X icon for the filter you want to remove.
You might need to delete a filter and then reselect it in order to change the filter’s values.
About the Total Data Reduction report
This report is displayed on the dashboard and shows the total data reduction provided by SaaS Accelerator since it was configured. Data reduction is a percentage based on LAN data compared to WAN data.
LAN data is the data transferred between the SaaS service cluster and the SaaS servers. The LAN data includes ingress and egress traffic on the SaaS LAN side.
WAN data is the data transferred between the SaaS service cluster and the client-side devices. The WAN data includes ingress and egress traffic on the WAN side.
About the Acceleration Score report
This report is displayed on the dashboard and presents a gauge chart that shows your acceleration performance as a multiple. That is, if your data is reduced by 50 percent, then this chart will show an acceleration score of 2x.
You can select the date range for this chart.
About the Unique Clients report
This report is displayed on the dashboard and shows the number of unique client endpoints registered in the system.
About the Cumulative Data Usage report
A summary report is displayed on the dashboard and enables you to quickly see the amount of data used since Accelerator for O365 was licensed. A more detailed report, accessed by selecting it in the navigation pane, displays a graph with data usage on the vertical axis and time on the horizontal axis. Mouse over the graph to see the total cumulative data used up to a specific date.
About the Clients report
Access this report by selecting it in the navigation pane. This report shows a list of clients. Report data can be filtered by date range, status, username, IP address, or subnet. For each client in the list, you can see client’s platform, status, IP address, data reduction, LAN data, WAN data, and when it last connected to the system.
About the Connected Clients report
A summary report is displayed on the dashboard and shows the number of clients connected to the system for each day in the selected date range. Mouse over the graph to display the number of connected clients, the date, and the time. If you want to see data from a different date range, select the report in the navigation pane. You can change the date range filter on this report page.
Changes to filters persist while you remain on the page, but those changes revert to the filters’ default values when you navigate away from the page. So, changing the date range here will not affect the data displayed in the dashboard’s Connected Clients summary report.
About the Connections Activity report
A summary report is displayed on the dashboard and shows the number of active connections for the selected date range. To view data for a specific date and time, mouse over that area of the graph. If you want to see data from a different date range, select the report in the navigation pane. You can change the date range filter on this report page.
About the Bandwidth Optimization report
A summary report is displayed on the dashboard and shows the amount of data on the LAN side that was optimized and reduced on the WAN side. The difference between the two is the effectiveness of the optimization. To view data for a specific date and time, mouse over that area of the graph. If you want to see data from a different date range, select the report in the navigation pane. You can change the date range filter on this report page.
Viewing configuration settings
The Configuration page has three tabs: Details, Advanced Access, and Upgrade Preferences. Select the Details tab to view these configuration settings:
• Region - Region where your O365 is located.
• Serial number - Serial number for your Accelerator for O365 instance.
• Controller host name - Host name of the Client Accelerator Controller used to manage Client Accelerator on endpoint devices.
• Service cluster IP - IP address of the service cluster dedicated to optimizing traffic. Client endpoints must be able to connect to this IP and port.
Select the Advanced Access tab for instructions on how to access additional read-only reports that are not currently available on Accelerator for O365.
Select the Upgrade Preferences tab to change your Client Accelerator upgrade options.
Viewing licensing information
The Licensing page has two tabs: Licensed Seats and Purchased Seats.
Select the Licensed Seats tab to view the number of users licensed to use your Accelerator for O365 instance.
Select the Purchased Seats tab to view a list of purchased seats. The list includes the purchase start date, expiration date, and number of seats. Use the controls at the bottom to page through the display and to adjust the number of items displayed on a page.
After expiration, optimization stops and traffic is passed through.
Getting support
If you need help troubleshooting an issue, want to ask a question, or want to access Knowledge Base articles, contact our Support team.
To contact Support
• Log in to Accelerator for O365, and then select Support.
Accessing documentation
To view Accelerator for O365 documentation, log in and select Documentation.