Managing SSL Settings
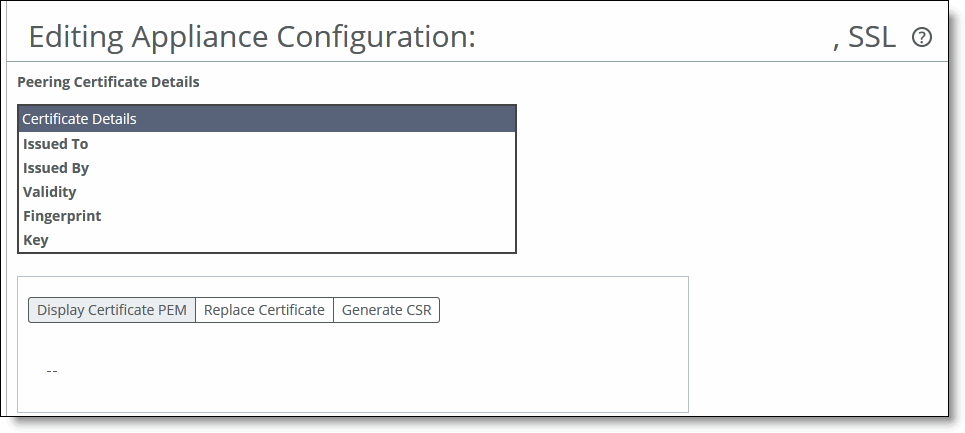
You configure SSL settings for a specific appliance in the Editing Appliance Configuration: <hostname>, SSL page.
SSL is a cryptographic protocol that provides secure communications between two parties over the Internet. Typically in a web-based application, it is the client that authenticates the server. To identify itself, an SSL certificate is installed on a web server and the client checks the credentials of the certificate to make sure it is valid and signed by a trusted third party. Trusted third parties that sign SSL certificates are called certificate authorities (CA).
This page applies to SteelHead and SteelHead EX.
For detailed information, see the SteelHead Management Console User’s Guide for SteelHead CX.
To display SSL tabs
1. Choose Manage > Topology: Appliances to display the Appliances page.
2. Select the name of the appliance you want to edit to expand the page and display the Appliance tabs.
3. Select the Appliance Pages tab to display the Appliance Configuration Pages list.
4. Under Appliance Configuration Pages, click SSL to display the Editing Appliance Configuration: <hostname>, SSL page.
Figure: Editing SSL Setting

s
5. To display certificates PLM, replace certificates, or generate CSR, click the tab to expand the page and display configuration settings.
Displaying the Certificate PEM
You can display the certificate PEM for the selected appliance in the Editing Appliance Configuration: <hostname>, SSL page.
To view peering certificate details
1. Choose Manage > Topology: Appliances to display the Appliances page.
2. Select the name of the appliance you want to edit to expand the page and display the Appliance tabs.
3. Select the Appliance Pages tab to display the Appliance Configuration Pages list.
4. Under Appliance Configuration Pages, click SSL to display the Editing Appliance Configuration: <hostname>, SSL page.
5. Select the Display Certificate PEM tab to display the certificate in PEM format.
Replacing the SSL Certificate
You can replace SSL certificates for the selected appliance in the Editing Appliance Configuration: <hostname>, SSL page.
To replace the SSL certificate
1. Choose Manage > Topology: Appliances to display the Appliances page.
2. Select the name of the appliance you want to edit to expand the page and display the Appliance tabs.
3. Select the Appliance Pages tab to display the Appliance Configuration Pages list.
4. Under Appliance Configuration Pages, click SSL to display the Editing Appliance Configuration: <hostname>, SSL page.
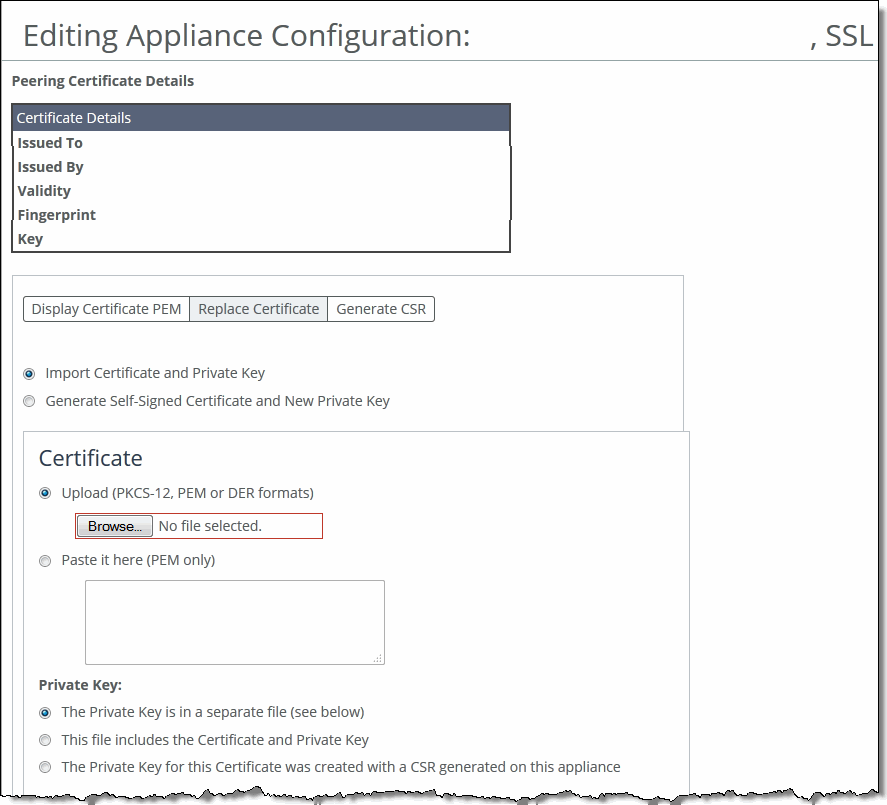
5. Select the Replace Certificate tab to expand the page.
Figure: Replacing a Certificate

6. Complete the configuration as described in this table.
Control | Description |
Import Certificate and Private Key | Imports the certificate and key. The page displays controls for browsing to and uploading the certificate and key files. Or, you can use the text box to copy and paste a PEM file. The private key is required regardless of whether you are adding or updating the certificate. |
Certificate | Upload - Browse to the local file in PKCS-12, PEM, or DER formats. |
Paste it here (PEM) - Copy and then paste the contents of a PEM file. |
Private Key | Select the private key origin. • The Private Key is in a separate file (see below) - You can either upload it or copy and paste it. • This file includes the Certificate and Private Key • The Private Key for this Certificate was created with a CSR generated on this appliance |
Separate Private Key | Upload (PEM or DER formats) - Browse to the local file in PEM or DER formats. |
Paste it here (PEM only) - Paste the contents of a PEM file. |
Decryption Password - Specify the decryption password, if necessary. Passwords are required for PKCS-12 files, optional for PEM files, and never needed for DER files. |
Import Certificate and Key | Imports the certificate and key. |
Generate Self-Signed Certificate and New Private Key | Select this option to generate a new private key and self-signed public certificate. The page displays controls to identify and generate the new certificate and key. |
Common Name - Specify the common name of a certificate. To facilitate configuration, you can use wildcards in the name: for example, *.example.com. If you have three origin servers using different certificates, such as webmail.example.com, internal.example.com, and marketingweb.example.com, on the server-side SteelHeads, all three server configurations can use the same certificate name *.example.com. |
Organization Name - Specify the organization name (for example, the company). |
Organization Unit Name - Specify the organization unit name (for example, the section or department). |
Locality - Specify the city. |
State (no abbreviations) - Specify the state. |
Country (2-letter code) - Specify the country (2-letter code only). |
Email Address - Specify the email address of the contact person. |
Validity Period (Days) - Specify how many days the certificate is valid. |
Private Key | Cipher Bits - Select the key length from the drop-down list. The default is 1024. |
Generate Certificate and Key | Generates certificate and key. |
Generating the Certificate Signing Request (CSR)
You can generate the CSR for the selected appliance in the Editing Appliance Configuration: <hostname>, SSL page.
To generate the CSR
1. Choose Manage > Topology: Appliances to display the Appliances page.
2. Select the name of the appliance you want to edit to expand the page and display the Appliance tabs.
3. Select the Appliance Pages tab to display the Appliance Configuration Pages list.
4. Under Appliance Configuration Pages, click SSL to display the Editing Appliance Configuration: <hostname>, SSL page.
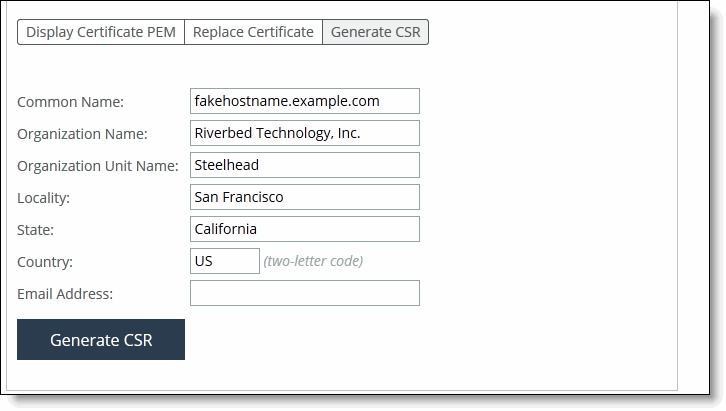
5. Select the Generate CSR tab to expand the page.
Figure: Generating the CSR

6. Complete the configuration as described in this table.
Control | Description |
Common Name (required) | Specify the common name (hostname) of the peer. |
Organization Name | Specify the organization name (for example, the company). |
Organization Unit Name | Specify the organization unit name (for example, the section or department). |
Locality | Specify the city. |
State | Specify the state. Do not abbreviate. |
Country (2-letter code) | Specify the country (2-letter code only). |
Email Address | Specify the email address of the contact person. |
Generate CSR | Generates the Certificate Signing Request. |
 s
s  s
s  s
s 
