Figure: Setting SNMP ACLs Secure Names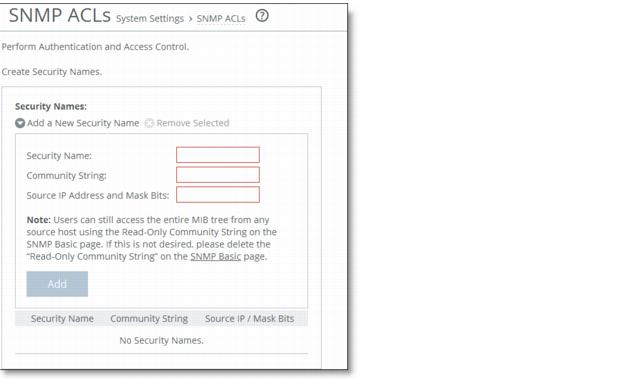
Control | Description |
Add a New Security Name | Displays the controls to add a security name. |
Security Name | Specify a name to identify a requester allowed to issue gets and sets (v1 and v2c only). The specified requester can make changes to the view-based access-control model (VACM) security name configuration. This control does not apply to SNMPv3 queries. To restrict v3 USM users from polling a particular subnet, use the RiOS Management ACL feature, located in the Administration > Security: Management ACL page. Traps for v1 and v2c are independent of the security name. |
Community String | Specify the password-like community string to control access. Use a combination of uppercase, lowercase, and numerical characters to reduce the chance of unauthorized access to the SteelHead. Community strings do not allow printable 7-bit ASCII characters, except for white spaces. Also, the community strings cannot begin with a pound sign (#) or a hyphen (-). If you specify a read-only community string (located in the SNMP Basic page under SNMP Server Settings), it takes precedence over this community name and allows users to access the entire MIB tree from any source host. If this is not desired, delete the read-only community string. To create multiple SNMP community strings on a SteelHead, leave the default public community string and then create a second read-only community string with a different security name. Or, you can delete the default public string and create two new SNMP ACLs with unique names. |
Source IP Address and Mask Bits | Specify the host IPv4 or IPv6 address and mask bits to which you permit access using the security name and community string. |
Add | Adds the security name. |
Remove Selected | Select the check box next to the name and click Remove Selected. |
Control | Description |
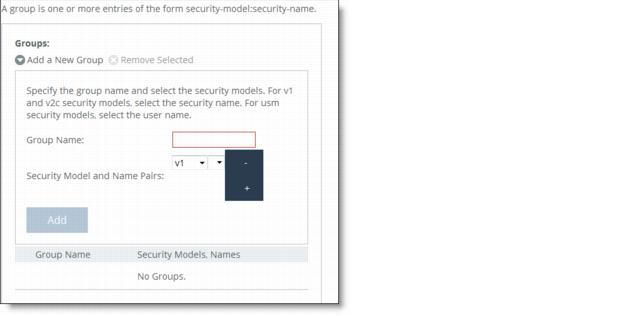
Add a New Group | Displays the controls to add a new group. |
Group Name | Specify a group name. |
Security Models and Name Pairs | Click the + and select a security model from the drop-down list: • v1 or v2c - Displays another drop-down list. Select a security name. • v3 (usm) - Displays another drop-down list. Select a user. To add another Security Model and Name pair, click the plus sign (+). |
Add | Adds the group name and security model and name pairs. |
Remove Selected | Select the check box next to the name and click Remove Selected. |
Control | Description |
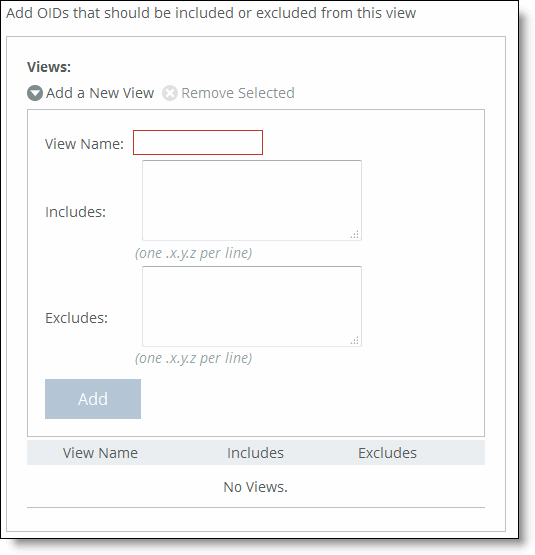
Add a New View | Displays the controls to add a new view. |
View Name | Specify a descriptive view name to facilitate administration. |
Includes | Specify the Object Identifiers (OIDs) to include in the view, separated by commas. For example, .1.3.6.1.4.1. By default, the view excludes all OIDs. You can specify .iso or any subtree or subtree branch. You can specify an OID number or use its string form. For example, .iso.org.dod.internet.private.enterprises.rbt.products.steelhead.system.model |
Excludes | Specify the OIDs to exclude in the view, separated by commas. By default, the view excludes all OIDs. |
Add | Adds the view. |
Remove Selected | Select the check box next to the name and click Remove Selected. |
Control | Description |
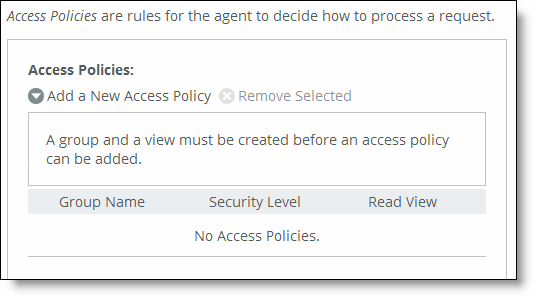
Add a New Access Policy | Displays the controls to add a new access policy. |
Group Name | Select a group name from the drop-down list. |
Security Level | Determines whether a single atomic message exchange is authenticated. Select one of these from the drop-down list: • No Auth - Does not authenticate packets and does not use privacy. This is the default setting. • Auth - Authenticates packets but does not use privacy. • AuthPriv - Authenticates packets using AES or DES to encrypt messages for privacy. A security level applies to a group, not to an individual user. |
Read View | Select a view from the drop-down list. |
Add | Adds the policy to the policy list. |
Remove Selected | Select the check box next to the name and click Remove Selected. |