Figure: Caching DNS Page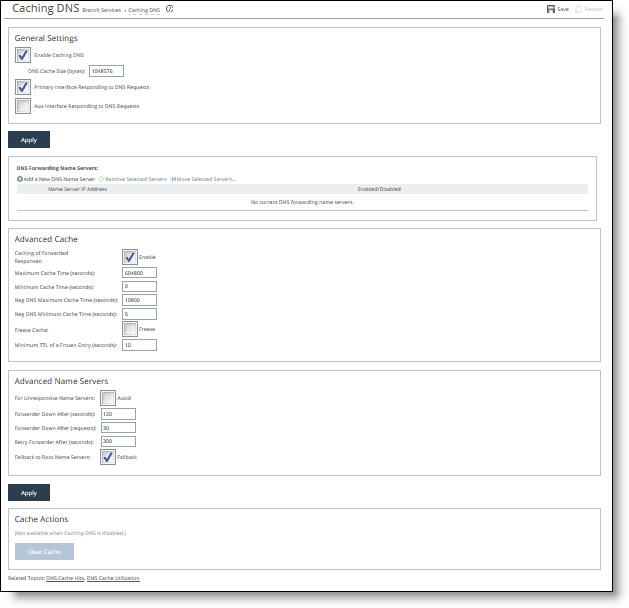
Control | Description |
Enable Caching DNS | Enabled - Forwards name resolution requests to a DNS name server, then stores the address information locally in the SteelHead. By default, the requests go to the root name server, unless you specify another name server. Disabled - Stops the SteelHead from acting as the DNS name server. |
DNS Cache Size (bytes) | Specifies the cache size, in bytes. The default value is 1048576. The range is from 524288 to 2097152. |
Primary Interface Responding to DNS Requests | Enabled - Enables the name server to listen for name resolution requests on the primary interface. Disabled - Stops the name server from using the primary interface. |
Aux Interface Responding to DNS Requests | Enabled - Enables the name server to listen for name resolution requests on the auxiliary interface. Disabled - Stops the name server from using the auxiliary interface. |
Control | Description |
Add a New DNS Name Server | Displays the controls to add a DNS name server to which the SteelHead forwards requests to cache responses. By default, the SteelHead only forwards requests to the Internet root name servers when you enable caching DNS without specifying any name servers to forward requests to. You can add multiple name servers to use; the SteelHead uses failover to these if one name server is not responding. |
Name Server IP Address | Specify an IP address for the name server. |
Position | Specify the order in which the name servers are queried (when using more than one). If the first name server, or forwarder, doesn’t respond, the SteelHead queries each remaining forwarder in sequence until it receives an answer or until it exhausts the list. |
Add | Adds the name server. |
Remove Selected | Select the check box next to the name and click Remove Selected Servers. |
Move Selected | Select the check box next to the name and click Move Selected Servers. |
Control | Description |
Caching of Forwarded Responses | Enables the cache that holds the resolved address entries. The cache is enabled by default; however, nothing is actually cached until you select the General Setting Enable Caching DNS. |
Maximum Cache Time (seconds) | Specify the maximum number of seconds the name server stores the address information. The default setting is one week (604,800 seconds). The minimum is 2 seconds and the maximum is 30 days (2,592,000 seconds). You can adjust this setting to reflect how long the cached addresses remain up-to-date and valid. Note: Changes to this setting affect new address information and don’t change responses already in the cache. |
Minimum Cache Time (seconds) | Specify the minimum number of seconds that the name server stores the address entries. The default value is 0. The maximum value is the current value of Maximum Cache Time. Typically there’s no need to adjust this setting. Note: Changes to this setting affect new responses and don’t change any responses already in the cache. |
Neg DNS Maximum Cache Time (seconds) | Specify the maximum number of seconds that an unresolved negative address is cached. The valid range is from two seconds to 30 days (2,592,000 seconds). The default value is 10,800 seconds. A negative entry occurs when a DNS request fails and the address remains unresolved. When a negative entry is in the cache, the appliance doesn’t request it again until the cache expires, the maximum cache time is reached, or the cache is cleared. |
Neg DNS Minimum Cache Time (seconds) | Specify the TTL for a negative entry, which is always this value or above, even if the server returns a smaller TTL value. For example, when this value is set to 300 seconds and the client queries aksdfjh.com, the DNS service returns a negative answer with a TTL of 100 seconds, but the DNS cache stores the entry as having a TTL of 300 seconds. The default value is 0, which specifies that the SteelHead still caches negative responses; it doesn’t place a lower bound on what the TTL value for the entry can be. |
Freeze Cache | Freezes the cache contents. When the cache is frozen, entries don’t automatically expire from the cache. They are still returned in response to DNS queries. This feature is useful to keep local services available when the WAN is disconnected. By default, this setting is disabled. Note: When the cache is frozen and full, entries can still be pushed out of the cache by newer entries. |
Minimum TTL of a Frozen Entry (seconds) | Specify the minimum TTL in seconds that a response from a frozen cache has when sent to a branch office client. The default value is 10. For example, suppose this value is set to 60 seconds. At the time the cache is frozen, the cache entry for riverbed.com has a TTL of 300 seconds. For subsequent client requests for riverbed.com, the service responds with a TTL of 300 seconds minus however much time has elapsed since the cache freeze. After 240 seconds have elapsed, the service responds to all subsequent requests with a TTL of 60 seconds regardless of how much time elapses, until the cache is unfrozen. |
Control | Description |
For Unresponsive Name Servers | Detects when one of the name servers is not responding and sends requests to a responsive name server instead. |
Forwarder Down After (seconds) | Specify how many seconds can pass without a response from a name server until the appliance considers it unresponsive. The default value is 120. When the name server receives a request but doesn’t respond within this time and doesn’t respond after the specified number of failed requests, the appliance determines that it’s down. It then queries each remaining forwarder in sequence until it receives an answer or it exhausts the list. When the list is exhausted and the request is still unresolved, you can specify that the SteelHead try the root name server. |
Forwarder Down After (requests) | Specify how many requests a name server can ignore before the appliance considers it unresponsive. The default value is 30. When the name server doesn’t respond to this many requests and doesn’t respond within the specified amount of time, the appliance determines that it’s down. It then queries each remaining forwarder in sequence until it receives an answer or it exhausts the list. When the list is exhausted and the request is still unresolved, you can specify that the SteelHead try the root name server. |
Retry Forwarder After (seconds) | Specify the time limit, in seconds, that the appliance forwards the name resolution requests to name servers that are responding instead of name servers that are down. The appliance also sends a single query to name servers that are down using this time period. If they respond, the appliance considers them back up again. The default value is 300. The single query occurs at intervals of this value if the value is set to 300. A request is allowed to go to a forwarder considered down about every 300 seconds until it responds to one. |
Fallback to Root Name Servers | Forwards the request to a root name server when all other name servers have not responded to a request. This is the default setting; either this option must be enabled or a server must be present. When the fallback to root name servers option is disabled, the SteelHead only forwards a request to the forwarding name servers listed above. If it exhausts these name servers and doesn’t get a response, it doesn’t forward the request to a root name server and returns a server failure. Note: If the name servers used by the SteelHead are internal name servers; that is, they can resolve hostnames that external name servers like the Internet DNS root servers can’t, you must disable this option. Otherwise, if the name servers all fail, the root name servers might inform the SteelHead that a host visible only to internal name servers doesn’t exist, might cache that response, and return it to clients until it expires. This control prolongs the period of time until service comes back up after name servers are down. |
Control | Description |
Clear Cache | Removes entries from the cache, even if it’s frozen. All cached data expires. Note: A small amount of data remains in the cache for internal use only. |